
Knitting is a timeless craft that allows people to unleash their creativity and create beautiful and functional items. One popular pattern that has gained a lot of attention recently is the Ranunculus knitting pattern. The Ranunculus is a stunning and elegant flower that is known for its delicate petals and vibrant colors. This knitting pattern takes inspiration from the Ranunculus flower and allows knitters to create their own wearable piece of art.
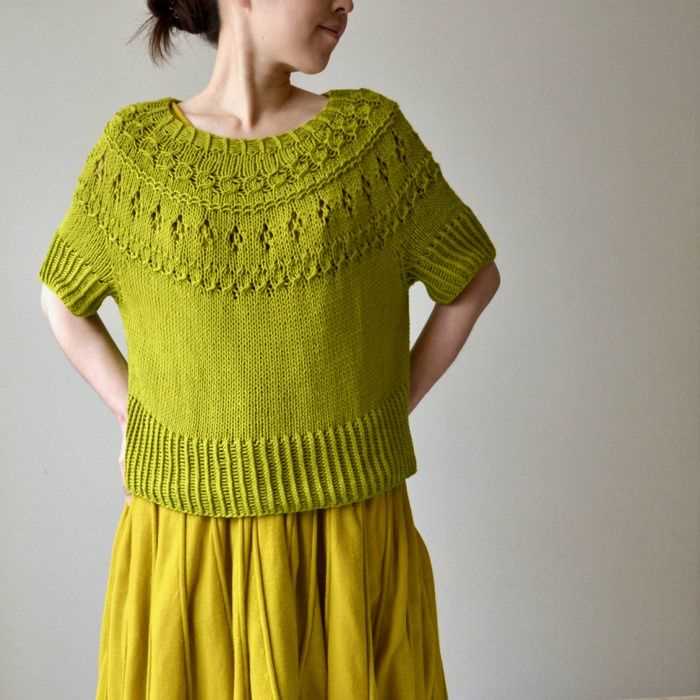
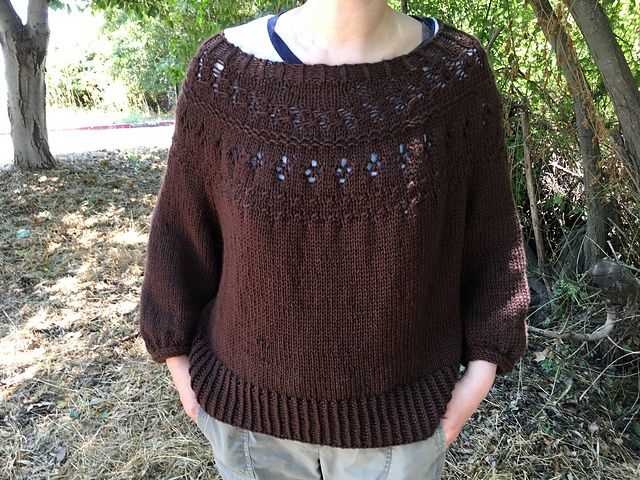
The Ranunculus knitting pattern is suitable for knitters of all levels. Whether you’re a beginner or an experienced knitter, you can easily follow this pattern and create a beautiful Ranunculus-inspired garment. The pattern typically includes instructions for knitting a top or a sweater, with options for different necklines, sleeves, and lengths. This allows knitters to customize their project and create a piece that suits their personal style and preferences.
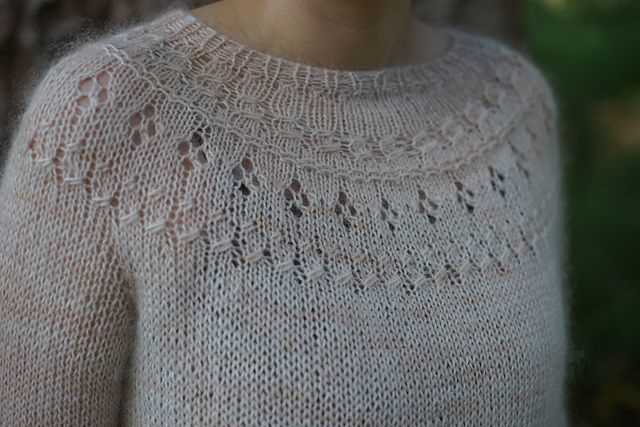
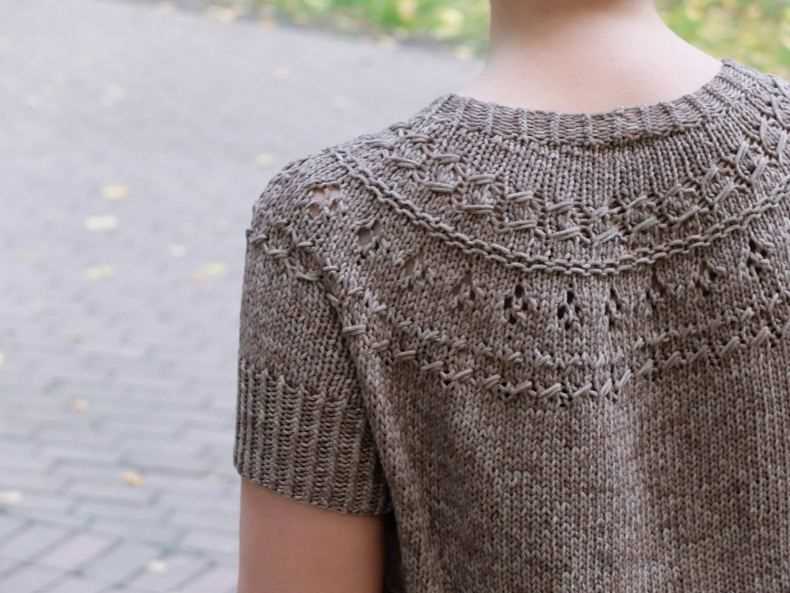
One of the features that makes the Ranunculus knitting pattern so special is the construction of the garment. Instead of knitting the piece in separate parts and then sewing them together, the Ranunculus pattern is worked seamlessly in the round. This means there are no seams to sew, resulting in a professional and polished finish. The pattern often uses a combination of basic knitting techniques, such as increases and decreases, to create the stunning shape and texture of the Ranunculus flower.
Whether you’re a seasoned knitter looking for a new project or a beginner eager to try something new, the Ranunculus knitting pattern is a fantastic choice. With its beautiful design and customizable options, this pattern allows you to create a truly unique and stylish piece that will be a joy to wear.
What is a ranunculus?
The ranunculus is a type of flower that belongs to the buttercup family, known as Ranunculaceae. It is a beautiful and vibrant flower that comes in various colors, including red, yellow, pink, and white. The ranunculus has delicate petals that are tightly packed together, giving it a unique and ruffled appearance.
This flower is native to Asia and Europe, and it is commonly found in gardens and floral arrangements around the world. It is highly regarded for its ornamental value and is often used in weddings, bouquets, and other special occasions. The ranunculus symbolizes charm, attractiveness, and radiance, making it a popular choice for gift-giving and decoration.
Characteristics of the ranunculus:
- The ranunculus has multiple layers of petals, giving it a full and voluminous look.
- It has a long and slender stem that allows for easy arrangement in flower bouquets.
- This flower blooms during the spring and early summer months.
- Ranunculus plants can grow to be up to 18 inches in height.
The ranunculus is a delicate and stunning flower that adds a touch of elegance to any floral arrangement or garden. Its vibrant colors and unique petals make it an eye-catching choice for those looking to add a pop of color to their surroundings. Whether used in weddings, home decor, or as a gift, the ranunculus is sure to bring joy and beauty to any occasion.
Types of Ranunculus Flowers
Ranunculus flowers are known for their vibrant colors and delicate petals. With over 600 species in the genus, there is a wide variety of ranunculus flowers to choose from. Each type has its own unique characteristics and beauty. Here are a few popular types of ranunculus flowers:
1. Persian Buttercup (Ranunculus asiaticus)
The Persian Buttercup is one of the most commonly cultivated varieties of ranunculus flowers. It is known for its large, showy blooms in a range of colors including red, pink, yellow, orange, and white. The petals are tightly arranged and have a slightly ruffled appearance, giving the flowers a lush and full look.
2. Clooney Ranunculus
Clooney Ranunculus is a newer variety of ranunculus flower that features large, double blooms with layers of frilly petals. The flowers come in a range of colors, including deep red, pink, white, and yellow. Clooney Ranunculus flowers are often used in floral arrangements and bridal bouquets due to their elegant and romantic appearance.
- Key features: Large, double blooms with frilly petals
- Colors: Deep red, pink, white, yellow
- Uses: Floral arrangements, bridal bouquets
3. Tecelote Ranunculus
Tecelote Ranunculus is a type of ranunculus flower that is known for its vibrant colors and large, semi-double blooms. The flowers have a unique cup-shaped appearance and come in a variety of shades, such as red, pink, orange, and yellow. Tecelote Ranunculus flowers are often used in garden borders and beds, adding a burst of color to any landscape.
- Key features: Cup-shaped blooms, vibrant colors
- Colors: Red, pink, orange, yellow
- Uses: Garden borders, beds
Whether you’re looking for a classic Persian Buttercup or a modern Clooney Ranunculus, there is a type of ranunculus flower that will suit your taste. Their vibrant colors and unique petal formations make them a popular choice for both flower arrangements and gardens.
Knitting a ranunculus: materials needed
When it comes to knitting a ranunculus flower, there are a few materials that you will need to have on hand. These materials will help you create a beautiful and realistic flower that can be used in a variety of projects.
To start, you will need a set of knitting needles. The size of the needles will depend on the desired size of your flower. Typically, a smaller needle size such as a US size 2 or 3 (2.75mm or 3.25mm) is used to create a delicate and realistic texture. However, you can experiment with different sizes to achieve the desired effect.
You will also need a skein or ball of yarn in the color of your choice. For a ranunculus flower, it is recommended to use a soft and lightweight yarn in a variety of shades to create depth and dimension. This will help mimic the natural colors and petals of a real ranunculus flower.
In addition to needles and yarn, you will need a few other tools such as scissors, a tapestry needle for sewing and weaving in ends, and stitch markers to keep track of your progress. These tools will make the knitting process easier and more efficient.
Overall, knitting a ranunculus flower requires some basic materials such as knitting needles, yarn, scissors, tapestry needles, and stitch markers. Having these materials prepared and ready will set you up for a successful and enjoyable knitting experience.
Choosing the right yarn for your ranunculus
When it comes to knitting your own ranunculus, selecting the right yarn is crucial for achieving the desired look and texture. The yarn you choose will greatly affect the drape, stitch definition, and overall appearance of your finished project.
Fiber content: The first thing to consider when selecting yarn for your ranunculus is the fiber content. Ranunculus knitting patterns often recommend using a lightweight and soft yarn with good drape. Natural fibers like merino wool, alpaca, cashmere, or silk blends are popular choices that provide a luxurious feel and beautiful drape. Synthetic fibers like acrylic can also be used, but they may not give the same level of softness and drape as natural fibers.
Weight: The weight of the yarn is another important factor to consider. Most ranunculus patterns call for a light or sport weight yarn, as this weight allows the stitches to create a delicate and airy fabric. Using a heavier yarn may result in a bulkier and less elegant finished product. However, if you prefer a more substantial and cozy ranunculus, you can experiment with a worsted or aran weight yarn, keeping in mind that it will alter the overall look of the pattern.
Color: Consider the color palette you want for your ranunculus. This will depend on your personal style and how you plan to wear or use the finished piece. Solid colors will emphasize the stitch pattern and texture, while variegated or self-striping yarns can add visual interest and dimension. Keep in mind that intricate stitch patterns may be less visible with highly variegated yarns, so choose your colorway accordingly.
Tension and gauge: To ensure a well-fitted and properly sized ranunculus, it is important to match the yarn’s tension and gauge with the pattern specifications. Check the yarn label for the recommended gauge, and make a swatch to check your tension. Adjust your needle size if necessary to achieve the correct gauge. This step is crucial for achieving a well-fitted and flattering finished garment.
With these considerations in mind, take your time to explore different yarn options and find the perfect one that suits your preferences and the desired outcome of your ranunculus knitting project. Remember that selecting the right yarn is an important part of the knitting process and can greatly contribute to the overall success and satisfaction with your finished piece.
How to choose the right knitting needles
When it comes to knitting, choosing the right needles is essential for a successful and enjoyable project. The size and material of the needles can greatly impact the outcome of your knitting, so it’s important to consider these factors before starting your next project.
Size: The first thing to consider when choosing knitting needles is the size. The size of the needles will determine the gauge or tension of your knitting, and it’s important to match the needle size with the pattern or desired outcome. Many patterns will specify a recommended needle size, but if you’re working on your own project, you can determine the appropriate needle size by making a gauge swatch.
Material: Knitting needles are available in a variety of materials, each with its own unique characteristics. The most common materials for knitting needles are metal, wood, and plastic. Metal needles are known for their smoothness and durability, while wooden needles provide a warm and natural feel. Plastic needles are often lighter and more affordable. Consider the type of yarn you will be using and your personal preference when choosing the needle material.
- Weight: Another important factor to consider is the weight of the knitting needles. Some knitters prefer lightweight needles, while others prefer heavier ones. The weight of the needles can affect your knitting speed and comfort, so it’s worth trying out different weights to see what works best for you.
- Length: The length of the needles can also impact your knitting experience. Longer needles are often used for larger projects or for knitting in the round, while shorter needles are ideal for smaller projects or for knitting flat. Consider the type of project you will be working on when choosing the length of your needles.
In conclusion, choosing the right knitting needles involves considering the size, material, weight, and length. By carefully selecting the appropriate needles for your project, you can ensure a successful knitting experience and achieve the desired outcome.
Creating the base of the ranunculus
The first step in creating a knitted ranunculus is to create the base. The base of the ranunculus is the foundation upon which all the petals will be attached. Start by casting on the required number of stitches, using the yarn and needle size specified in the knitting pattern. This will ensure that the base is the correct size and will provide a sturdy structure for the rest of the flower.
Once the stitches are cast on, work in a basic stitch pattern, such as stockinette or garter stitch, for a few rows. This will create a flat surface for the petals to be attached. It is important to keep the tension consistent throughout these rows to ensure an even and neat base. After completing the initial rows, check the measurements and adjust if necessary to match the dimensions specified in the pattern.
Next, it is time to shape the base. This can be done by increasing or decreasing stitches at specific points to create a rounded shape. The knitting pattern will provide instructions on where and how many stitches to increase or decrease. Take care to follow these instructions carefully to ensure the correct shape is achieved.
- Cast on the required number of stitches.
- Work a few rows in a basic stitch pattern.
- Check measurements and adjust if necessary.
- Shape the base by increasing or decreasing stitches.
- Follow the pattern instructions carefully.
Knitting the petals of the ranunculus
When it comes to knitting the ranunculus flower, the petals are arguably one of the most crucial elements to get right. The petals give the flower its distinctive shape and add depth and texture to the finished piece. Thankfully, with a little patience and attention to detail, knitting the petals can be a rewarding and enjoyable process.
One popular technique for knitting the petals is to use a combination of increases and decreases to create the desired shape. Starting from the center of the flower, each petal is worked individually, usually in garter stitch or a simple lace pattern. The number of stitches and rows may vary depending on the size and style of the flower, but the pattern typically provides clear instructions to follow.
To achieve a natural and realistic look, many knitters choose to shape the petals by blocking them after knitting. Blocking helps smooth out any unevenness in the stitches and allows the petals to lay flat or curve inward, mimicking the delicate curves of real ranunculus petals. The process involves wetting the knitted petals, shaping them as desired, and allowing them to dry completely before attaching them to the flower stem.
Assembling the knitted ranunculus
After completing all the necessary knitting steps for the Ranunculus pattern, it is time to assemble the finished pieces into a beautiful flower. The assembly process involves attaching the petals together and adding the necessary finishing touches to bring the flower to life.
Starting with the petals, carefully overlap the edges of each petal and stitch them together using a tapestry needle and the same yarn used for knitting. Make sure to align the edges of the petals perfectly to create a seamless appearance. Repeat this step for each petal until all are securely attached.
Attaching the leaves
- Once the petals are assembled, it is time to attach the leaves. Take the knitted leaves and position them at the base of the flower, where the petals meet.
- Using the tapestry needle and yarn, carefully stitch the leaves to the flower, ensuring they are securely fastened. Be mindful of the positioning and angle of the leaves to achieve a natural and realistic look.
- Continue attaching the remaining leaves, evenly spacing them around the flower. Adjust the leaves as necessary to create the desired shape and fullness of the ranunculus.
Finishing touches
- Once all the components of the ranunculus are attached, it’s time to add the finishing touches. This includes shaping the petals and leaves to create a more three-dimensional appearance.
- Gently manipulate the knitted pieces using your fingers, fluffing up the petals and shaping them to give the flower a fuller and more organic look. Pay attention to the natural curves and folds of the petals and leaves.
- Lastly, trim any excess yarn tails and weave in the ends to ensure a clean and polished finish. Take a step back and admire your beautiful knitted ranunculus, ready to be displayed or gifted!
With a little patience and attention to detail, the assembly process of the knitted ranunculus will result in a stunning flower that can be enjoyed for years to come. Whether used as a decoration or a thoughtful handmade gift, the knitted ranunculus is sure to bring joy and beauty to any setting.
Adding finishing touches to your knitted ranunculus
Now that you have completed knitting your beautiful ranunculus, it’s time to add the finishing touches to bring it to life. Here are a few steps to help you finish off your project and make it truly special.
1. Blocking
Before adding any embellishments or assembling the petals, it’s important to block your knitted ranunculus. Blocking helps to shape the petals and smooth out any uneven stitches. Gently soak your knitted piece in lukewarm water, then carefully squeeze out the excess water. Lay it flat on a towel and shape it into the desired size and form. Let it dry completely before moving on to the next step.
2. Embellishments
To make your ranunculus really stand out, consider adding some embellishments. You can pick small beads, sequins, or even tiny pearls to attach to the center of each petal. Simply thread a needle with matching thread and sew the embellishments onto the petals, making sure they are securely attached. This will add a touch of sparkle and sophistication to your knitted flower.
3. Assembling the petals
Now it’s time to put all the petals together and assemble your ranunculus. Arrange the petals in a circular pattern, slightly overlapping each other, and sew them together at the center. Make sure to hide the stitches as you go along, so they are not visible from the front. Once all the petals are securely attached, your knitted ranunculus will start to take shape.
4. Adding a stem
If you want your ranunculus to have a stem, you can attach one using wire or a floral stem. Insert the stem into the center of the flower and secure it with hot glue or by sewing it in place. This will give your knitted ranunculus a more realistic look and make it easier to display in a vase or flower arrangement.
With these finishing touches, your knitted ranunculus will be complete and ready to brighten up any space. Whether you choose to make a single flower or a bouquet, your hand-knitted creation is sure to be a stunning centerpiece or a thoughtful gift.
Tips and Tricks for Knitting a Perfect Ranunculus
The ranunculus flower is a beautiful and popular choice for knitting patterns. Its intricate shape and delicate petals make it a challenging but rewarding project. Here are some tips and tricks to help you create a perfect knitted ranunculus:
1. Choose the Right Yarn
When selecting yarn for your ranunculus, opt for a lightweight and soft yarn that will drape nicely. Consider using a yarn with a slight sheen to mimic the natural shine of real ranunculus petals. Wool or wool-blend yarns are also great choices for adding texture.
2. Use Appropriate Needles
The needle size you choose will depend on the yarn weight and the desired tightness of your stitches. For a more delicate ranunculus, use smaller needles to create tighter stitches and enhance the definition of the petals. Experiment with different needle sizes and swatch to achieve the desired gauge.
3. Pay Attention to Gauge

Gauge is crucial for ensuring the size and fit of your knitted ranunculus. Take the time to create a gauge swatch before beginning your project and adjust your needle size if necessary. Remember that smaller stitches will result in a smaller flower, while larger stitches will create a larger flower.
4. Follow the Pattern Carefully

When knitting a ranunculus, it’s important to carefully follow the pattern instructions. Pay attention to stitch counts, increases, and decreases to ensure that your petals come out correctly. Take the time to read through the entire pattern before starting to familiarize yourself with any techniques or special instructions.
5. Add Lifelike Details
To bring your knitted ranunculus to life, consider adding some lifelike details. You can use embroidery or duplicate stitch to create the center of the flower, adding a pop of color or texture. Adding some subtle shading to the petals with different colored yarns can also enhance the realism of your knitted ranunculus.
By following these tips and tricks, you’ll be able to knit a stunning and realistic ranunculus flower that will impress everyone who sees it. Happy knitting!
Ideas for using knitted ranunculus in your projects
Knitted ranunculus can be incorporated into a variety of projects, adding a touch of handmade charm and beauty. Here are some ideas to inspire you:
- Accessorize: Attach a knitted ranunculus to a hairband, hat, or headband for a unique and stylish accessory.
- Brooch: Sew a pin back onto the knitted ranunculus to create a beautiful brooch that can be worn on clothing or added as an embellishment to bags or scarves.
- Decorate home items: Attach knitted ranunculus to cushions, pillowcases, or blankets for a pop of color and texture.
- Create a bouquet: Knit multiple ranunculus flowers in different colors and sizes, then arrange them together to create a stunning bouquet that will never wilt.
- Embroidery: Sew knitted ranunculus onto fabric or embroidery hoops for a unique and dimensional element in your embroidery projects.
- Table centerpieces: Arrange knitted ranunculus in a vase or attach them to a wreath to create a beautiful and long-lasting centerpiece for your dining table or home decor.
- Gift toppers: Add a knitted ranunculus flower to the top of a wrapped gift for an extra special touch.
With so many ways to incorporate knitted ranunculus into your projects, you can let your creativity run wild. Whether you choose to adorn yourself or your home, these beautiful knitted flowers are sure to bring joy and warmth to any project.