
Knitting patterns can seem intimidating to beginners, with their seemingly endless rows of numbers, abbreviations, and symbols. However, once you understand how to read knitting patterns, you’ll unlock a whole new world of knitting possibilities. In this article, we’ll break down the different elements of a knitting pattern and provide tips on how to decipher them.
First, let’s start with the basics. Knitting patterns are like recipes for creating knitted items. They provide step-by-step instructions on how to create a specific design, including the type of stitches to use, the number of stitches and rows to knit, and any special techniques or details to incorporate. It’s important to remember that knitting patterns vary in complexity, so it’s always a good idea to start with a pattern that matches your skill level.
One of the first things to understand when reading a knitting pattern is the abbreviations. Knitting patterns use abbreviations to save space and make the instructions easier to read. For example, “k” is an abbreviation for knit, “p” is an abbreviation for purl, and “yo” is an abbreviation for yarn over. Familiarize yourself with the most common knitting abbreviations to make it easier to follow along with the pattern.
Understanding the basics
When it comes to knitting patterns, it’s important to understand the basics before diving into any project. Knowing how to read and interpret knitting patterns is essential for creating beautiful and well-fitted garments.
1. Abbreviations: Knitting patterns often use abbreviations to save space and make instructions more concise. It’s important to familiarize yourself with common knitting abbreviations such as knit (K), purl (P), yarn over (YO), and knit two together (K2tog). A quick reference guide or knitting abbreviation dictionary can be helpful when encountering unfamiliar abbreviations.
2. Stitch patterns: Knitting patterns will often include instructions for various stitch patterns. These patterns dictate the combination of knits, purls, and other techniques required to create different textures and designs. Take the time to read and understand the stitch pattern instructions before starting your project.
- 3. Sizing and gauge:
- 4. Materials and tools:
- 5. Reading the instructions:
Decoding Abbreviations and Symbols
When reading knitting patterns, it’s important to understand the various abbreviations and symbols that are commonly used. These abbreviations and symbols provide shortcuts for instructions and help save space in the pattern. By familiarizing yourself with these knitting terms, you’ll be able to easily follow any pattern and create beautiful knitted pieces.
1. Abbreviations:
Knitting patterns often use abbreviations to represent different stitches or techniques. Some common abbreviations include:
- CO – cast on
- K – knit
- P – purl
- YO – yarn over
- SSK – slip, slip, knit
- K2tog – knit two together
- P2tog – purl two together
These abbreviations are usually explained in the pattern’s key or glossary section. It’s important to refer to the key whenever you encounter an unfamiliar abbreviation.
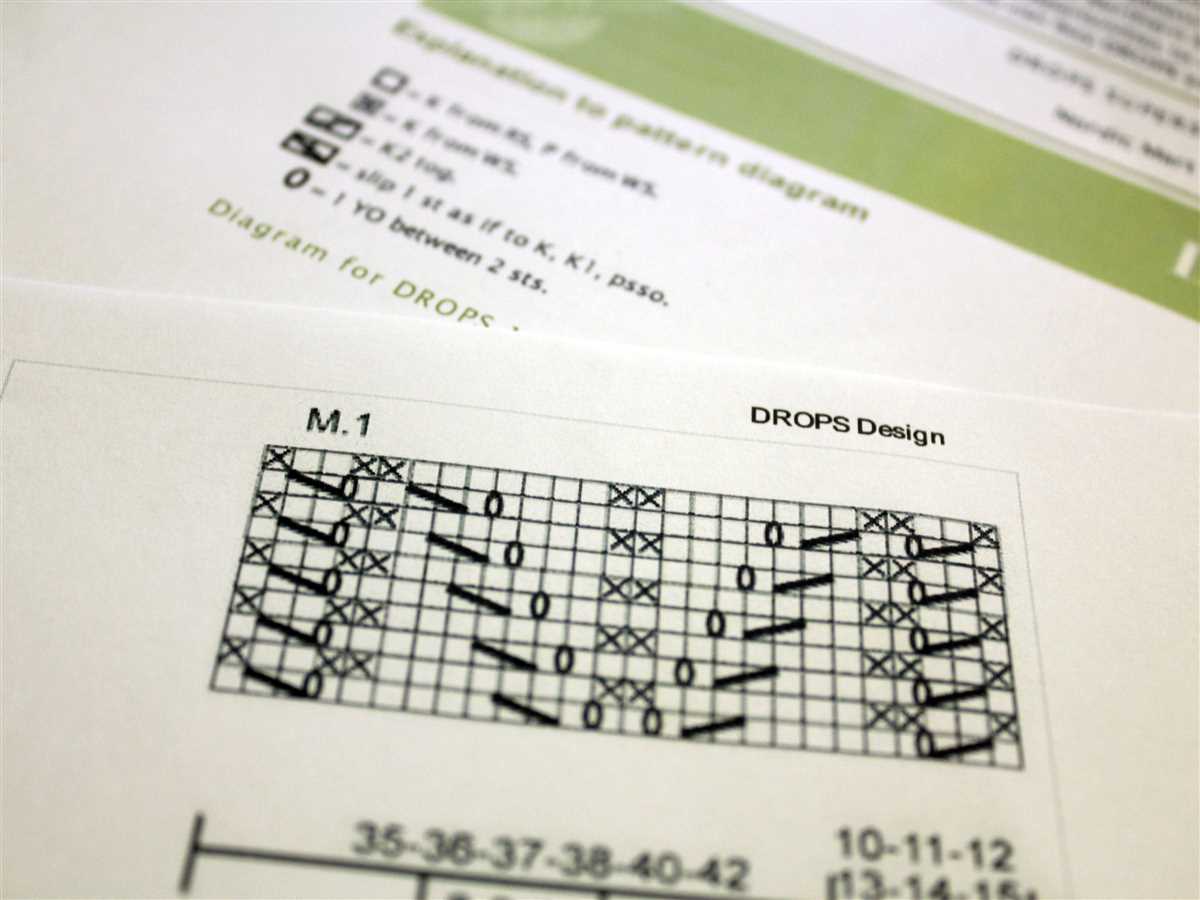
2. Symbols:
In addition to abbreviations, knitting patterns also use symbols to represent specific actions or stitches. These symbols are often placed in a chart or diagram to visually represent the pattern. Some common symbols include:
| Symbol | Meaning |
| O | Knit stitch |
| • | Purl stitch |
| ↞ | Slip stitch |
| ↺ | Yarn over |
Understanding these symbols is essential when working with knitting charts. It allows you to quickly visualize the pattern and follow the chart without relying solely on written instructions.
Interpreting stitch patterns
When reading a knitting pattern, one of the most important parts is understanding the stitch pattern. Stitch patterns are usually represented with abbreviations and symbols, and they provide instructions on what kind of stitches to work and in what order. To effectively interpret stitch patterns, it’s helpful to familiarize yourself with common knitting abbreviations and symbols.
Abbreviations and symbols
Knit and purl stitches are represented by letters in abbreviations. For example, “k” stands for knit and “p” stands for purl. These abbreviations are usually followed by a number that indicates how many stitches to work. Other common abbreviations include “yo” (yarn over), “ssk” (slip slip knit), and “k2tog” (knit two together).
Symbols are often used in stitch patterns to indicate the type of stitch. For example, a dot or a circle can represent a knit stitch, while a dash or a horizontal line can represent a purl stitch. Some stitch patterns may also include additional symbols to indicate decreases, increases, or other special stitches. It’s important to carefully read the key or legend provided in the pattern to understand what each symbol represents.
Following the pattern instructions
Once you have familiarized yourself with the abbreviations and symbols used in the stitch pattern, it’s time to follow the instructions. The pattern will typically specify how many stitches to cast on and provide row-by-row instructions for completing the stitch pattern. It’s important to read the instructions carefully and make sure to work the correct stitch in the correct order.
If the pattern includes repeats or multiple sections, pay attention to the instructions regarding how many times to repeat a specific set of stitches. Some patterns may also include special instructions for shaping or transitioning between different stitch patterns. Take your time to understand and visualize the pattern before you start knitting to avoid any mistakes or confusion.
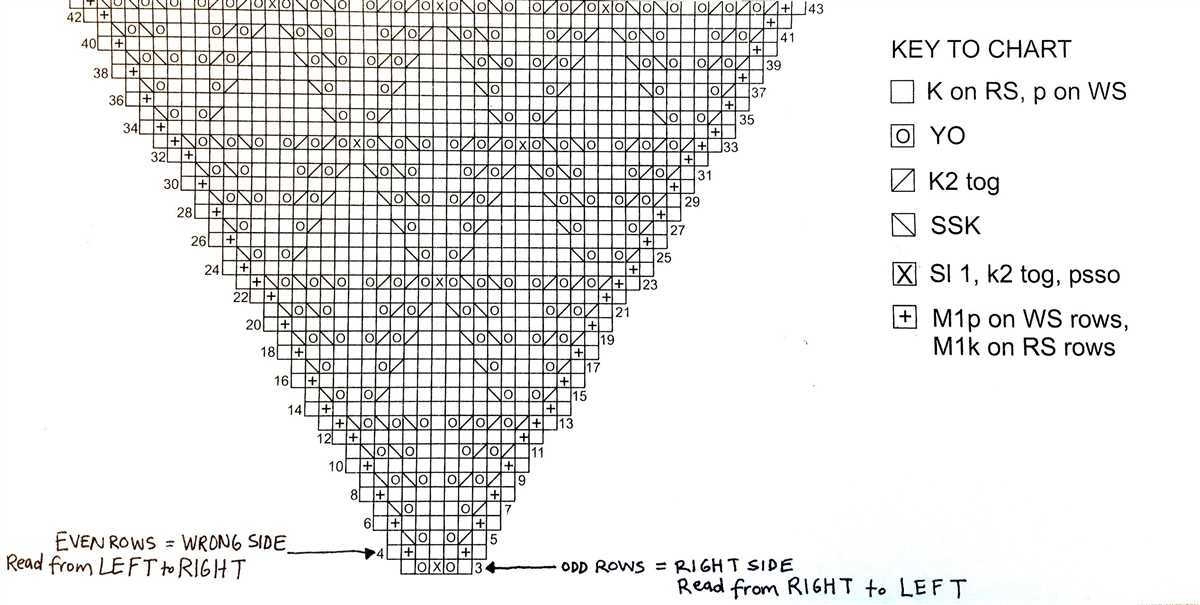
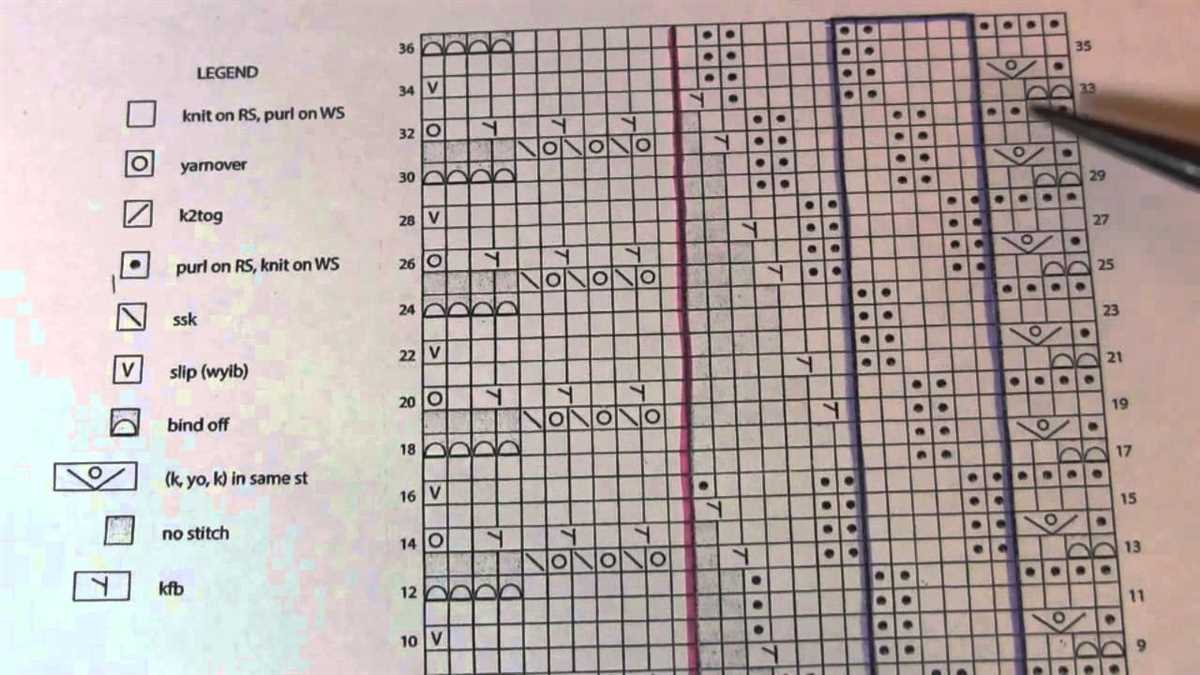
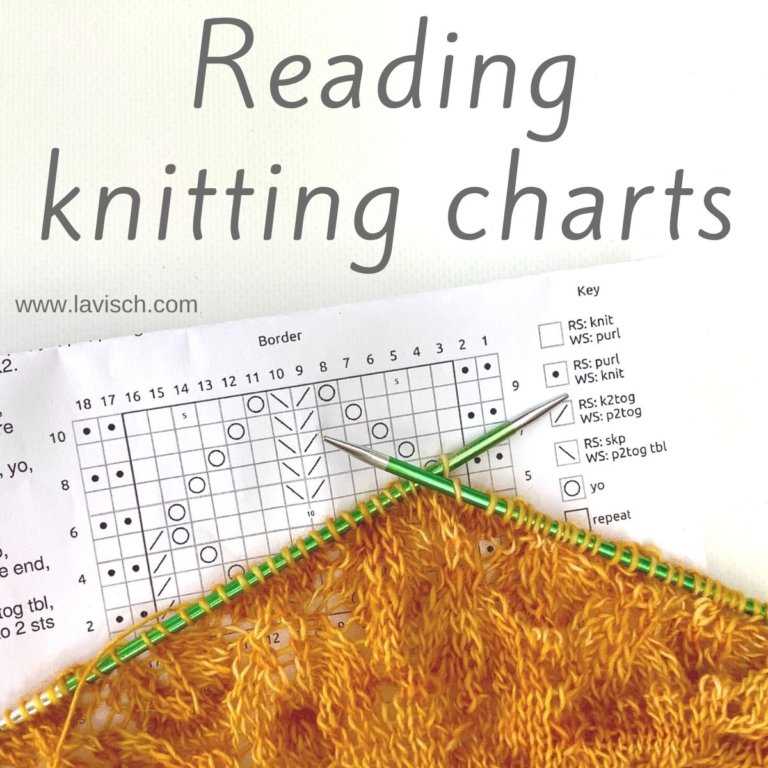
Reading charted patterns

Charts are visual representations of knitting patterns and can be a helpful tool for understanding complex stitch patterns. They are often used for lace, colorwork, and cable designs. Reading charted patterns requires some practice and understanding of the symbols and conventions used.
Understanding the symbols: Each symbol in a chart represents a specific stitch or action. Common symbols include squares for knit stitches, circles for purl stitches, and various lines or arrows to indicate decreases, increases, or other stitch manipulations. It is important to familiarize yourself with the key or legend provided with the chart to understand what each symbol means.
Following the chart:
- Read the chart from right to left: Charts are read from right to left on odd-numbered rows and from left to right on even-numbered rows. This is because most knitting is done from right to left on the right side and from left to right on the wrong side.
- Work row by row: Start at the first row of the chart and work each stitch or action as indicated by the symbols. Once you complete a row, move on to the next row and continue working in this manner until you reach the end of the chart.
- Pay attention to stitch count and repeats: Charts often indicate how many stitches should be present at the beginning and end of each row. It is important to count your stitches regularly to ensure accuracy. Additionally, some charts may have repetitive sections or motifs that are repeated across multiple rows. Pay attention to any instructions regarding stitch repeats to avoid mistakes.
Charts can be a valuable tool for visualizing complex knitting patterns. By familiarizing yourself with the symbols and conventions used in charted patterns, you can confidently follow these patterns and create beautiful knitted pieces.
Identifying pattern repeats
When reading a knitting pattern, it is important to be able to identify the pattern repeats. Pattern repeats are sections of stitches or rows that are repeated throughout the project. By understanding how to identify and follow the pattern repeats, you can easily navigate through the instructions and create a beautiful and consistent design.
1. Look for pattern repeat instructions: Some knitting patterns will explicitly state the number of stitches or rows in the pattern repeat. This information is typically found at the beginning of the pattern or in the pattern section instructions. Pay close attention to these instructions as they will guide you in understanding where the pattern repeat begins and ends.
2. Identify recurring stitch patterns: In some knitting patterns, there may not be specific instructions for the pattern repeat, but you can identify the repeat by recognizing the recurring stitch patterns. Look for sections of stitches that are repeated multiple times throughout the pattern. These sections often have a consistent number of stitches and rows, making it easier to spot the pattern repeat.
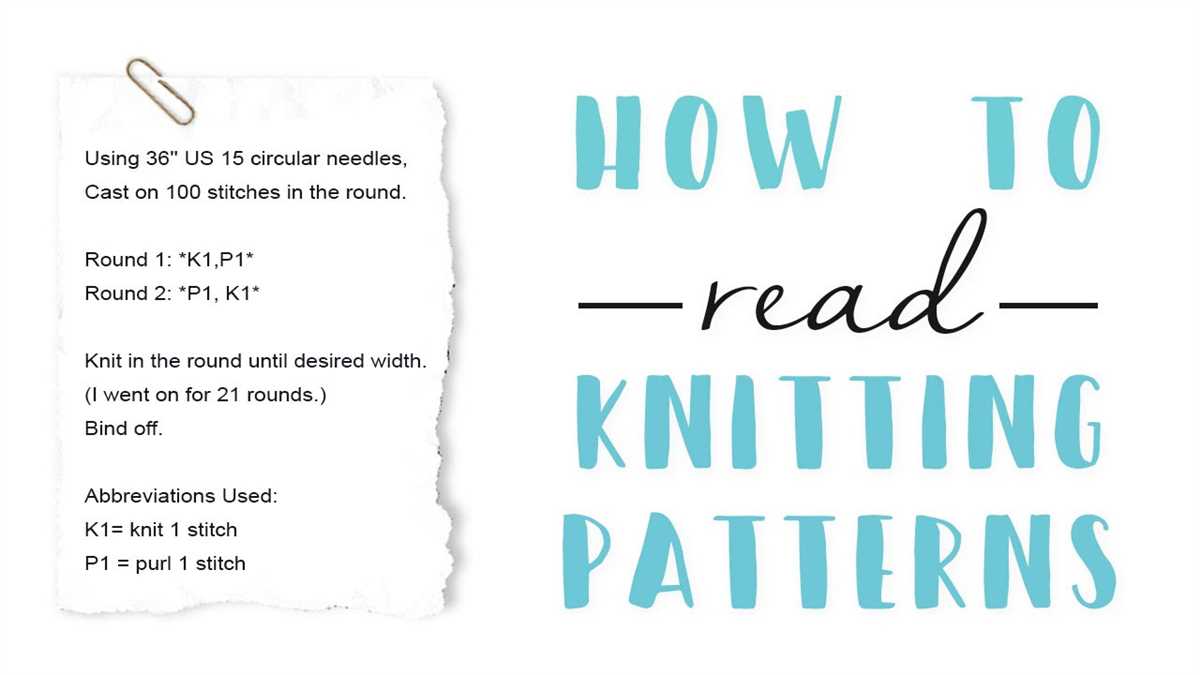
- Example: If you see a ribbing pattern that consists of knitting two stitches, purling two stitches and repeating this sequence, you have identified a pattern repeat. You can then simply continue repeating this sequence until instructed otherwise.
3. Check for symmetry: Many knitting patterns have a symmetrical design, where the stitches on one side of the work mirror the stitches on the other side. This can be helpful in identifying the pattern repeat, as you can look for a central point where the symmetry begins and ends.
- Example: If you have a lace pattern with a central motif, the pattern repeat may begin and end at the edges of the motif. This means that you can work the pattern repeat by repeating the instructions between the edges of the motif.
By carefully examining the knitting pattern and looking for these clues, you can easily identify the pattern repeats and confidently follow the instructions. This skill will enable you to create intricate and detailed designs with ease.
Following shaping instructions
When following a knitting pattern, one of the most important parts is understanding and following the shaping instructions. These instructions are typically found within the pattern and guide you on how to shape the different parts of your project, such as sleeves, necklines, or the body. It is crucial to carefully read and interpret these instructions to ensure your finished project turns out as intended.
1. Pay attention to the abbreviations: Shaping instructions often use abbreviations to indicate certain actions or stitches. It is important to familiarize yourself with these abbreviations before starting the pattern. Common shaping abbreviations include “k2tog” for knit two stitches together, “ssk” for slip, slip, knit, and “inc” for increase. By understanding these abbreviations, you will have a clearer understanding of the shaping instructions.
2. Take note of the stitch count: Shaping instructions often mention the number of stitches you should have at various points in the pattern. It is important to keep track of your stitch count to ensure you are shaping your project correctly. You can use stitch markers to mark crucial points or count your stitches regularly to make sure you haven’t accidentally missed or added any stitches.
3. Read through the instructions before starting: Before you begin shaping your project, take the time to carefully read through the shaping instructions. This will give you an overview of what needs to be done and allow you to plan and visualize the shaping process. Understanding the steps involved will also help you anticipate any potential challenges or difficulties that may arise.
4. Follow the instructions step by step: When shaping your project, it is crucial to follow the shaping instructions step by step. Each instruction builds upon the previous one, and skipping or altering steps can result in an incorrectly shaped project. Take your time and ensure you understand each step before moving on to the next.
5. Keep track of your progress: As you work through the shaping instructions, it can be helpful to keep track of your progress. You can do this by ticking off completed rows or using a row counter. This will help you stay organized and prevent any confusion or mistakes that may occur if you lose track of where you are in the shaping process.
In conclusion, following shaping instructions is an essential part of working with knitting patterns. By understanding the abbreviations, paying attention to stitch counts, reading through the instructions, following each step, and keeping track of your progress, you can successfully shape your knitting project and achieve the desired outcome.
Understanding Gauge and Tension
When it comes to knitting patterns, understanding gauge and tension is essential. Gauge refers to the number of stitches and rows that can be achieved in a specific measurement, usually calculated over a 4×4 inch square. Tension, on the other hand, refers to how tightly or loosely a knitter works. Both gauge and tension can greatly impact the final size and fit of a knitting project.
Gauge swatch: Before starting any knitting project, it is crucial to create a gauge swatch. This involves casting on a number of stitches and knitting several rows using the recommended needle size and yarn. The swatch is then measured to determine if the gauge matches that of the pattern. If the gauge is off, the needle size may need to be adjusted to achieve the correct tension.
Pattern instructions: Knitting patterns will often specify a gauge and tension requirement. This is usually expressed as a number of stitches and rows per inch or centimeter. It is important to pay attention to these instructions and ensure that your gauge swatch matches the specified gauge. Failure to do so can result in a finished project that is too small or too large.
For example, a pattern may state that the gauge should be 20 stitches and 24 rows per 4 inches. If your gauge swatch measures 22 stitches and 26 rows, your tension is too tight. To achieve the correct gauge, you may need to switch to larger needles. On the other hand, if your gauge swatch measures 18 stitches and 22 rows, your tension is too loose. In this case, switching to smaller needles may be necessary.
Keep in mind that everyone’s tension may vary slightly despite using the same needle size and yarn. This is why creating a gauge swatch is so important. It allows you to adjust your tension and achieve the correct gauge, ensuring that your project will fit as intended.
Adjusting for gauge: If your gauge swatch does not match the pattern’s specified gauge, it is crucial to adjust accordingly. This may involve changing the needle size, yarn weight, or even modifying the pattern itself. For example, if your tension is too tight, you can try using larger needles or switching to a bulkier yarn. Conversely, if your tension is too loose, you can try using smaller needles or a finer yarn.
- Remember to always check your gauge before starting a knitting project.
- Keep in mind that different stitch patterns may require different tensions.
- Experimenting with different needle sizes and yarns can help you achieve the desired gauge.
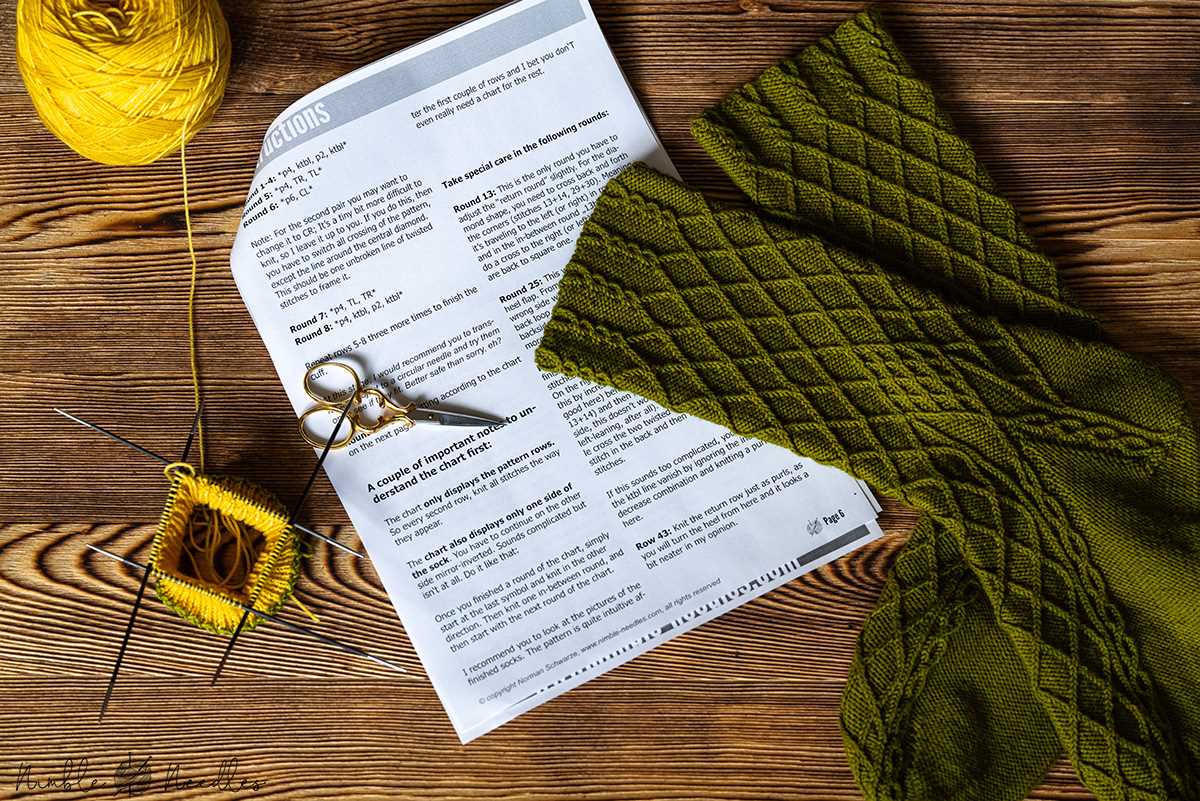
Reading pattern notes and explanations
When learning how to read knitting patterns, it is essential to understand the pattern notes and explanations. These sections provide important details about the pattern and any special instructions or techniques that may be used. It is important to carefully read and comprehend these notes before starting the project.
Pattern notes: The pattern notes section typically appears at the beginning of a knitting pattern. It provides general information about the pattern, including the materials needed, gauge, and any special abbreviations used. Pay close attention to this section, as it sets the foundation for understanding the rest of the pattern.
Instructions and techniques: Following the pattern notes, the instructions and techniques section provides step-by-step guidance on how to create the desired project. It may include specific stitches, stitch counts, shaping instructions, or special techniques such as cables or colorwork. Take the time to carefully read through these instructions and make sure you understand each step before proceeding.
Abbreviations and symbols: Knitting patterns often use abbreviations and symbols to convey information more efficiently. The pattern notes or a separate key section will generally explain these abbreviations and symbols. It is crucial to familiarize yourself with these before starting the pattern, as they will be used throughout.
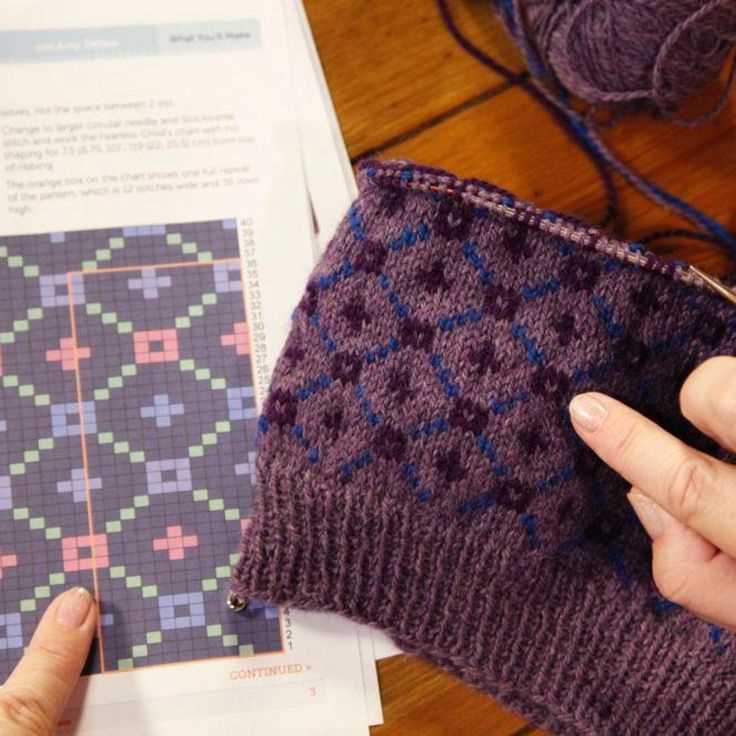
Charts and diagrams: Some knitting patterns include charts or diagrams to represent stitches, colorwork, or pattern repeats. These visual representations can be helpful, especially for complex patterns. Take the time to study and understand these charts before starting the project to ensure accurate execution of the pattern.
Overall, reading pattern notes and explanations is an important part of understanding and successfully completing a knitting project. By carefully reviewing these sections and familiarizing yourself with the instructions, techniques, abbreviations, and charts, you will be well-prepared to tackle any knitting pattern with confidence.
Using markers and counters
When it comes to reading knitting patterns, markers and counters are essential tools that can help you keep track of your progress and make the process smoother. A marker is a small ring or clip that you can attach to your knitting needle to mark a specific stitch or section in your pattern. Markers are particularly useful when working on complex patterns with several stitch repeats or when shaping a garment.
Counters, on the other hand, are small devices that you can use to keep track of the number of rows or stitches you have completed. They come in various forms, including digital counters, row counters that slide onto the knitting needle, or even simple pen and paper. Counters can be especially handy when working on patterns that require you to repeat a certain number of rows or stitches multiple times.
By using markers and counters in combination, you can easily keep track of your progress and avoid mistakes. For example, you can use a marker to indicate the beginning of a round or a specific stitch pattern, then use a counter to keep track of the number of repeats you have completed. This way, you can easily see where you are in the pattern and quickly spot any errors or discrepancies.
When using markers and counters, it’s important to remember to move them as you work. For instance, if you have a marker indicating the beginning of a round, you will need to move it up each time you complete a round. Similarly, if you are using a row counter, make sure to advance it after completing each row. By keeping your markers and counters up to date, you will ensure that you stay on track and avoid confusion.
- Use markers to indicate specific stitches or sections in your pattern.
- Counters can help you keep track of the number of rows or stitches completed.
- Use markers and counters in combination for better tracking.
- Remember to move your markers and advance your counters as you progress.
Keeping track of rows and repeats
When reading a knitting pattern, it’s crucial to keep track of your rows and repeats to ensure the accuracy of your work. This will help you stay organized and avoid any mistakes or confusion along the way. Here are some tips to help you keep track of rows and repeats:
Use a row counter:
A row counter is a handy tool that can be attached to your knitting needles or kept nearby. With each completed row, you can simply press a button or move a dial to keep track of your progress. This eliminates the need to manually count rows and reduces the chances of losing your place in the pattern.
Mark key points:
In some patterns, there may be certain key points or milestones that you need to keep track of. This could include increases, decreases, or changes in stitch patterns. Using stitch markers or placing removable stitch holders can help you easily spot these points in your work and prevent any mistakes.
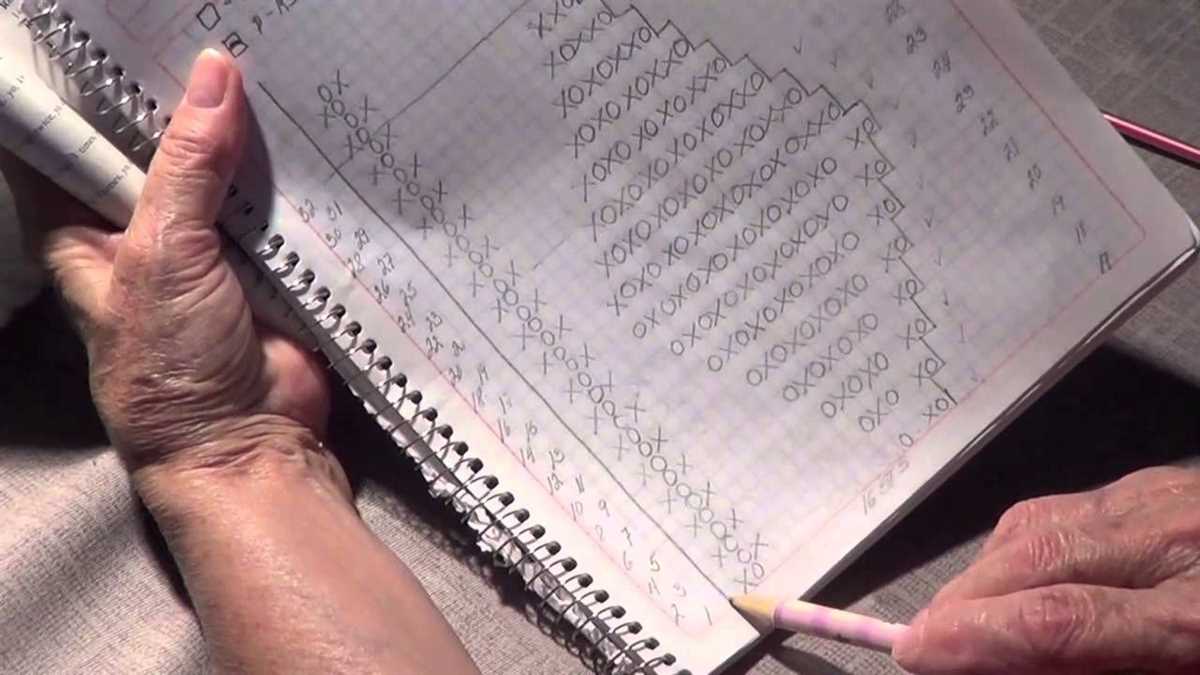
Create a chart or table:
For complex patterns or those with multiple repeats, creating a chart or table can be extremely helpful. This allows you to visually track your progress and identify any patterns or repeats that need to be followed. You can use symbols or abbreviations to represent each stitch or row, making it easier to understand and follow the pattern.
Maintain clear notes:
Throughout your knitting project, it’s important to keep clear and detailed notes. This includes jotting down the number of rows completed, any modifications or adjustments made, and any issues or challenges encountered. These notes can serve as a reference for future projects or if you need to make any adjustments during the knitting process.
By implementing these strategies, you can effectively keep track of your rows and repeats while reading knitting patterns. This will enhance your knitting experience and result in beautifully finished projects.
Troubleshooting common pattern issues
While knitting patterns can be a great source of inspiration and guidance, they can also sometimes be confusing or contain mistakes. Here are some common issues that you may face when reading knitting patterns and how to troubleshoot them:
1. Confusing instructions

Some patterns may have instructions that are not clearly written or are difficult to understand. If you come across confusing instructions, try reading them multiple times to see if they make sense. You can also refer to knitting glossaries or online tutorials for clarification on specific terms or techniques. If the pattern is still confusing, reach out to the designer or a knitting community for help.
2. Mistakes in the pattern
It’s not uncommon for patterns to have mistakes in them. If you suspect that there is an error in the pattern, check for any errata or corrections provided by the designer or publisher. These can usually be found on their website or through an online search. If there are no available corrections, you may need to improvise or make your best judgment based on your knitting experience.
3. Gauge issues
Gauge is an important factor in knitting patterns as it determines the size and fit of the finished project. If your gauge doesn’t match the gauge specified in the pattern, your project may turn out too big or too small. To troubleshoot gauge issues, make sure you are using the recommended yarn and needle size. If needed, you can try changing your needle size to achieve the correct gauge. It’s also a good idea to make a gauge swatch before starting your project to ensure accuracy.
4. Difficulty with complex stitches or techniques
Some patterns may include complex stitches or techniques that are challenging for beginner knitters. If you find yourself struggling with a particular stitch or technique, don’t hesitate to seek guidance. You can consult tutorial videos, knitting books, or ask for help from experienced knitters. With practice and patience, you can gradually improve your skills and tackle more advanced patterns.
5. Unclear or missing finishing instructions
Finishing instructions are the final steps of a knitting pattern and include details on how to assemble, sew, and finish off your project. However, some patterns may provide incomplete or unclear finishing instructions. In these cases, you can refer to general sewing and finishing techniques to complete your project. Online tutorials or instructional books can be useful resources for learning these skills.
Remember, knitting patterns are meant to be a guide, and sometimes you may need to make adjustments or modifications to suit your preferences or correct any discrepancies. Don’t be afraid to experiment and adapt the pattern as needed to ensure a successful knitting project.
Summary:
- Confusing instructions? Read multiple times and seek clarification from knitting resources or communities.
- Pattern mistakes? Check for errata or make improvisations based on your experience.
- Gauge issues? Use recommended yarn and needle size, adjust needle size if needed, and make a gauge swatch.
- Difficulty with complex stitches or techniques? Seek guidance from tutorials, books, or experienced knitters.
- Unclear or missing finishing instructions? Refer to general sewing and finishing techniques for guidance.
Remember to have fun while knitting and don’t be discouraged by pattern issues. Learning from challenges and seeking help when needed will only improve your knitting skills over time.
Q&A:
What is a knitting pattern?
A knitting pattern is a set of instructions that guide you on how to create a specific knitted item, such as a sweater or a hat. It includes details on the stitches to use, the size and measurements, and any specific techniques or stitches required.
How do I read a knitting pattern?
To read a knitting pattern, start by familiarizing yourself with the abbreviations and terminology used. Then, carefully read through the pattern instructions, paying attention to any special notes or instructions. Use the provided stitch count and measurements to ensure you are on track, and refer to any charts or diagrams included if necessary. It can be helpful to highlight or mark your progress as you go to keep track of where you are in the pattern.
What are knitting pattern abbreviations?
Knitting patterns often use abbreviations as a way to make the instructions more concise. Common knitting abbreviations include “k” for knit, “p” for purl, “st” for stitch, “yo” for yarn over, and “k2tog” for knit two stitches together. It is important to refer to the pattern’s provided list of abbreviations for any specific terms used.
What should I do if I don’t understand a knitting pattern?
If you come across something in a knitting pattern that you don’t understand, don’t panic. Try re-reading the section or instruction, as sometimes it can make more sense upon a second read. If you’re still unsure, consider looking up tutorials or joining knitting communities online where you can ask for help. It can also be helpful to practice with simpler patterns before tackling more complex ones.
Can I make changes to a knitting pattern?
Yes, you can make changes to a knitting pattern if you wish. However, it is important to keep in mind that altering a pattern can affect the final outcome of your project. If you want to make changes, consider consulting with more experienced knitters or pattern designers to ensure that the modifications will work well with the overall design. Additionally, keep in mind that making changes to gauge or stitch counts may also require adjustments to the size or fit of the item.
What are knitting patterns?
Knitting patterns are instructions that guide you in creating a specific knitted item, such as a sweater, hat, or scarf. They include details on the type of yarn to use, the size of knitting needles, and the stitches and techniques you need to follow to complete the project.