
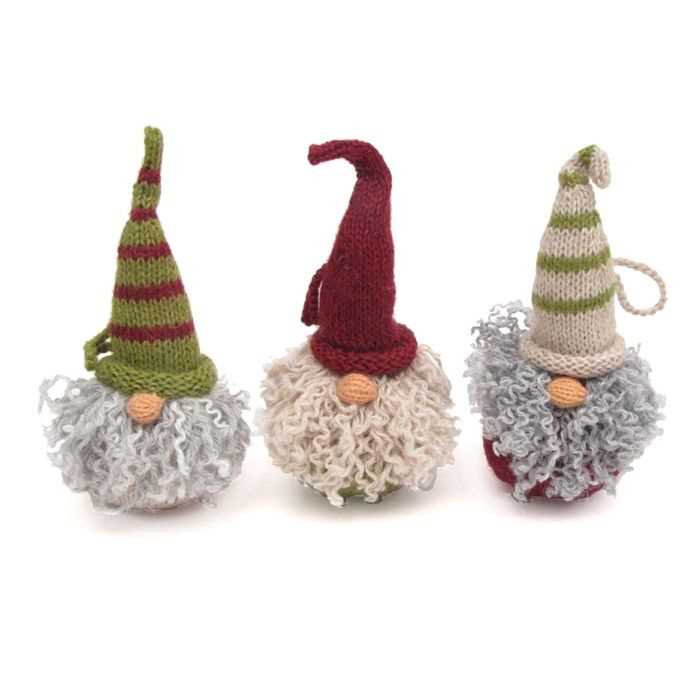
If you love knitting and want to create something fun and unique, then a knitted gnome hat is the perfect project for you. Gnome hats are cute, quirky, and make a statement. Plus, they are surprisingly easy to knit, making them a great project for beginners and experienced knitters alike.
This article will provide you with a free pattern for knitting your very own gnome hat. Whether you want to make one for yourself or as a gift for a loved one, this pattern will guide you step by step. All you need is some yarn, knitting needles, and a little bit of time.
The great thing about this gnome hat pattern is that it can be easily customized to suit your style. You can choose from a variety of colors, yarn types, and even add embellishments like pom-poms or tassels. The possibilities are endless, and the end result will be a hat that is truly one-of-a-kind.
Knitted Gnome Hat Pattern: A Free Guide
Are you looking for a cozy and adorable winter accessory to add to your wardrobe? Look no further than the knitted gnome hat! With its whimsical design and warm construction, this hat is sure to keep you both fashionable and comfortable during the colder months.
Making your own knitted gnome hat is easier than you might think, and with this free guide, you’ll be able to create your very own in no time. Whether you’re a knitting beginner or an experienced crafter, this pattern offers step-by-step instructions and helpful tips to ensure your hat turns out just right.
To get started, gather your materials: size 9 double-pointed knitting needles, worsted weight yarn in your color choice, a yarn needle, and a stitch marker. Once you have everything ready, cast on the required number of stitches and begin knitting in the round. The pattern includes a simple ribbing section, followed by the body of the hat, which features a fun gnome-inspired pointy top.
Here’s a breakdown of the steps:
- Create the ribbing section by knitting in a K2, P2 rib pattern for a few inches.
- Transition to stockinette stitch and continue knitting in the round until the hat reaches the desired length.
- Decrease evenly around the hat to create the gnomish pointy top.
- Bind off and weave in any loose ends.
Once you’ve completed these steps, you’ll have your very own knitted gnome hat! Feel free to experiment with different colors and yarn types to personalize your hat even further. Whether you’re wearing it for a winter stroll or a festive gathering, this hat is sure to bring a touch of whimsy to your outfit.
So why wait? Grab your knitting needles and get started on your very own knitted gnome hat today. With this free guide, you’ll be able to create a unique and cozy accessory that will keep you warm and stylish all season long.
Creating a Whimsical Accessory for Winter

In the cold, dreary months of winter, it’s important to stay warm and cozy. One way to add some whimsy and fun to your winter wardrobe is by creating a knitted gnome hat. This unique and playful accessory is sure to turn heads and bring a smile to your face.
Knitting a gnome hat is a fun and rewarding project. With a free pattern available online, you can easily create your own gnome hat and customize it to your liking. Whether you prefer bright, bold colors or soft, neutral tones, the choice is yours. The pattern provides detailed instructions, making it suitable for knitters of all skill levels.
Materials Needed:
- Knitting needles (size may vary depending on yarn weight)
- Yarn (choose your favorite colors and textures)
- Stitch markers
- Tapestry needle
To begin, cast on the required number of stitches and follow the pattern instructions for the ribbing. This will create a snug and comfortable fit around the head. As you continue knitting, you’ll notice the hat taking shape, with the pointed gnome top becoming more defined.
Once you’ve completed the main body of the hat, it’s time to add the finishing touches. This includes shaping the gnome top, attaching a pom-pom or tassel, and adding any other decorative elements you desire. The possibilities are endless, allowing you to make your gnome hat truly one-of-a-kind.
Once your gnome hat is complete, you can proudly wear it throughout the winter season. Not only will it keep you warm, but it will also add a touch of whimsy and playfulness to any outfit. Whether you’re heading out for a winter stroll, playing in the snow, or simply cozying up by the fire, your gnome hat will be the perfect accessory.
Supplies needed for knitting a gnome hat
Knitting a gnome hat is a fun and creative project that requires a few essential supplies. While the specific materials may vary depending on the pattern and personal preferences, here are some common supplies you will need:
Yarn:
The most important supply for knitting a gnome hat is yarn. Choose a soft and warm yarn of your choice in the color or colors you prefer for your hat. Acrylic and wool blend yarns are popular choices for their durability and warmth.
Knitting needles:
You will need a pair of knitting needles in the appropriate size for your yarn. The needle size will depend on the gauge specified in the pattern or your personal knitting style. Circular or double-pointed needles may be used depending on the hat design.
Scissors:

Don’t forget to have a pair of sharp scissors on hand for cutting yarn and trimming any loose ends. A good pair of scissors will make it easier to finish your knitted gnome hat neatly.
Tapestry needle:
A tapestry needle with a large eye is essential for weaving in loose ends and seaming parts of the gnome hat. This needle will help you achieve a professional finish by hiding any yarn tails securely.
Stitch markers:
Stitch markers can be helpful for keeping track of your stitches, especially when working on rounds or complex patterns. These small rings or clips can be easily placed on your needles to mark specific stitches or sections.
Pom-pom maker (optional):
If you want to add a pom-pom to your gnome hat, a pom-pom maker tool can be useful. It simplifies the process of creating fluffy and evenly shaped pom-poms in various sizes. However, you can also make pom-poms by hand if you prefer.
These are the basic supplies you will need to knit a gnome hat. Remember to check the specific pattern you are following for any additional materials or tools required. Get creative and have fun exploring different yarns and color combinations for your unique gnome hat!
Gathering the necessary materials
Before you begin knitting your gnome hat, it’s important to gather all the necessary materials. This will ensure that you have everything you need to complete the project without any interruptions. Here is a list of the materials you will need:
- Yarn: Choose a soft and warm yarn suitable for winter accessories. It’s best to use a bulky or super bulky weight yarn to create a thick and cozy hat.
- Knitting needles: Use a set of size US 10 (6 mm) circular needles with a 16-inch (40 cm) cable. This length is ideal for knitting in the round and will allow you to easily work the hat’s brim.
- Stitch markers: These are helpful for marking the beginning of rounds and any special stitches or sections in the pattern.
- Tapestry needle: This needle is used for weaving in yarn ends and sewing the hat’s brim together.
- Scissors: A pair of sharp scissors will come in handy for cutting the yarn.
- Measuring tape: Use this tool to measure your head circumference and ensure that the hat will fit properly.
Once you have all the necessary materials, you’ll be ready to start knitting your gnome hat. Make sure you have a comfortable and well-lit workspace where you can easily access your materials. It’s also a good idea to have a pattern or instructions on hand, as well as any additional tools or accessories you may need for the specific gnome hat design you’re following. Now you can get started and enjoy the process of creating your own cozy and whimsical hat!
Choosing the right yarn for your gnome hat
When it comes to knitting a gnome hat, choosing the right yarn is essential to achieve the desired look and feel. The texture, thickness, and color of the yarn can greatly impact the final result of your hat. Here are some factors to consider when selecting the perfect yarn for your gnome hat.
1. Texture:
The texture of the yarn will determine the overall appearance and feel of your gnome hat. If you want a hat with a smooth and sleek finish, opt for a yarn with a tight twist and minimal fuzziness. For a more rustic and cozy look, consider using a yarn with a looser twist and a slightly fuzzy texture.
2. Thickness:
The thickness of the yarn will determine the size and warmth of your gnome hat. If you want a hat that is lightweight and breathable, choose a thinner yarn with a lighter weight. On the other hand, if you’re looking for a cozy and warm hat, go for a thicker yarn with a heavier weight.
3. Color:

The color of the yarn can greatly impact the overall appearance of your gnome hat. Consider the look you want to achieve and choose a color that complements your style and preferences. You can go for traditional earthy tones like brown, gray, or green for a classic gnome look, or experiment with vibrant colors to add a playful and whimsical touch to your hat.
By taking into account the texture, thickness, and color of the yarn, you can ensure that your gnome hat turns out just the way you envision it. Experiment with different yarns to create unique and personalized hats that will be both fun to knit and enjoyable to wear.
Exploring different options for the perfect look
When it comes to knitting a gnome hat, there are so many options to consider. From the type of yarn to the size and shape of the hat, every detail plays a role in creating the perfect look. One option to consider is the choice of color. While traditional gnome hats are often red, experimenting with different colors can add a unique twist to the design. Think about using vibrant hues like purple, green, or even neon pink to make a bold statement.
The texture of the hat is another factor to explore. Knitting patterns that incorporate different stitches, such as cables or lace, can add depth and interest to the finished product. For a more classic look, a simple and smooth texture may be preferred. It’s all about finding the right balance between a cozy and comfortable hat and a visually appealing design.
Material is also an important consideration. Some knitters prefer natural fibers like wool for its warmth and durability, while others might opt for synthetic blends for easier care. It’s worth exploring different yarn options to see which one works best for the desired look and function of the hat. Additionally, considering the weight of the yarn is important, as it can affect the overall drape and shape of the hat.
Finally, don’t forget about the finishing touches. Adding a pom-pom or a knitted tassel to the top of the hat can give it a playful and whimsical touch. Embellishments like buttons or ribbons can also be used to personalize the hat and make it truly unique. By exploring different options in terms of color, texture, material, and finishing touches, you can create a gnome hat that perfectly suits your style and personality.
Selecting the ideal knitting needles
When it comes to knitting, selecting the right needles is essential for a successful and enjoyable project. The type and size of the needles can make a big difference in the final outcome of your knitted item. Here are some factors to consider when choosing knitting needles:
Type of needles:
- Straight needles: Straight knitting needles are the most common type of needles. They are straight with a point at one end and a knob at the other end to prevent stitches from falling off.
- Circular needles: Circular knitting needles consist of two straight needles connected by a flexible cable. They are great for knitting in the round or for larger projects that require more stitches.
- Double-pointed needles: Double-pointed needles are shorter than straight needles and come in sets of four or five. They are used for knitting smaller items in the round, such as socks or hats.
Material:
Knitting needles can be made from various materials, each with their own pros and cons. Here are some common materials to consider:
- Wood: Wooden needles are popular for their warmth and smoothness. They provide good grip and are great for beginners.
- Metal: Metal needles are durable and slick, making them ideal for working with slippery yarns. They are also lighter and provide faster knitting speed.
- Plastic: Plastic needles are lightweight and affordable. They are great for beginners and for working with delicate yarns.
Size:

Needles come in different sizes, indicated by numbers or letters. The size of the needles determines the size of the stitches and the overall tension of the knitted fabric. The size you choose will depend on the specific project and the desired outcome.
Overall, finding the ideal knitting needles is a personal preference. It’s important to consider the type of needles, the material, and the size that will work best for your knitting style and project. Experimenting with different types of needles can also help you discover your favorite knitting tools.
Considering size and material for optimal results
If you are planning to knit a gnome hat, it is important to consider the size and material of the hat for optimal results. The size of the hat will determine how well it fits the wearer, and the material will affect the overall look and feel of the hat.
When it comes to size, it is important to take accurate measurements before starting the project. This will ensure that the hat fits well and is comfortable to wear. Measure the circumference of the head and the length from the crown to the bottom of the ear. This will help you determine the appropriate size for the hat.
Material
The material you choose for the gnome hat will play a big role in its overall look and feel. Knitting with soft and warm yarns, such as wool or alpaca, will create a cozy hat that will keep the wearer warm during the colder months. Alternatively, you can use acrylic yarn for a more budget-friendly option.
Consider the color and texture of the yarn as well. Bright and bold colors can add a fun and whimsical touch to the gnome hat, while earthy tones can create a more natural and rustic look. You can also experiment with different textures, such as using fuzzy or chunky yarn, to add an interesting element to the hat.
By carefully considering the size and material of the gnome hat, you can create a beautiful and comfortable accessory that is perfect for both children and adults. Whether you choose a soft and warm yarn or opt for a bold and textured look, your gnome hat is sure to be a hit.
Understanding the basic stitches

In order to successfully knit a gnome hat, it is important to have a good understanding of the basic stitches. These stitches form the foundation of any knitting project and are essential for creating the desired pattern and texture. By mastering these stitches, you will be able to confidently tackle any knitting project, including the gnome hat pattern.
1. Knit stitch: The knit stitch is the most basic stitch in knitting. It is created by inserting the right-hand needle into the first stitch on the left-hand needle, wrapping the yarn around the right-hand needle, and pulling it through the stitch to create a new loop. This stitch is typically used to create a smooth, flat fabric and is denoted by the letter “K” in knitting patterns.
2. Purl stitch: The purl stitch is the reverse of the knit stitch. It is created by inserting the right-hand needle from right to left into the first stitch on the left-hand needle, wrapping the yarn around the right-hand needle, and pulling it through the stitch to create a new loop. This stitch creates a bumpy texture on the fabric and is denoted by the letter “P” in knitting patterns.
Once you have a clear understanding of these two basic stitches, you can start practicing different stitch combinations and patterns to add variety to your knitting projects. By experimenting with different stitch patterns, you can create intricate designs and textures in your gnome hat, making it truly unique. Remember to take your time and practice these basic stitches until you feel comfortable and confident in your knitting skills. Happy knitting!
A Step-by-Step Tutorial for Beginners

If you’re new to knitting and would like to try your hand at making a knitted gnome hat, this step-by-step tutorial is perfect for you. With clear instructions and helpful tips, you’ll be able to create your own cozy and adorable gnome hat in no time.
Materials Needed:
- Worsted weight yarn
- Knitting needles (size 8 or 9)
- Tape measure
- Darning needle
- Scissors
Step 1: Cast On
To start, cast on 80 stitches using your preferred method. This will be the brim of the hat.
Step 2: Knit the Brim
Row 1: *K2, P2* – repeat this pattern across the row
Row 2: *P2, K2* – repeat this pattern across the row
Continue knitting in this rib stitch pattern for the desired length of the brim, usually about 2 inches.
Step 3: Start the Body
Switch to knitting in stockinette stitch (knit one row, purl one row) for the body of the hat. Knit in stockinette stitch until the desired length for the hat is reached, usually about 6-7 inches.
Step 4: Decrease
Decrease the number of stitches gradually in each row by knitting two stitches together (k2tog). Continue decreasing until you have a small number of stitches left on your needles.
Step 5: Finishing
Cut the yarn, leaving a long tail. Thread the tail through the darning needle and slip the needle through the remaining stitches, removing them from the knitting needles. Pull the tail tight to close up the top of the hat. Use the darning needle to weave in any loose ends.
Congratulations! You’ve completed your knitted gnome hat. Now you can proudly wear or gift your cozy creation.
Knitting the body of the gnome hat

Once you have finished knitting the brim of the gnome hat, it’s time to move on to the body. The body of the hat will determine its size and shape, so it’s important to follow the pattern closely.
To begin knitting the body, you will need to continue working in the round. Start by joining a new ball of yarn at the end of the brim and knit several rounds in the main stitch pattern. This could be a simple stockinette stitch, or you could incorporate more complex stitch patterns for added interest.
As you work on the body, make sure to periodically check your gauge to ensure that the hat is coming out the correct size. You can do this by comparing your knitting to the measurements provided in the pattern. If your gauge is off, you may need to adjust your needle size or tension to achieve the desired results.
Continue knitting the body until it reaches the desired length, as specified in the pattern. This could be a short and slouchy hat or a longer, more pointed gnome hat. Once you have reached the desired length, you will need to shape the crown of the hat by decreasing stitches. The pattern will provide instructions on how many stitches to decrease and at what intervals. Follow these instructions carefully to achieve the correct shape for your gnome hat.
Once you have finished knitting the body and shaping the crown, you can bind off your stitches and weave in any loose ends. Your gnome hat is now complete and ready to be worn or gifted to someone special!
A detailed guide to creating the main part of the hat
In order to create the main part of the gnome hat, you will need to have a basic understanding of knitting techniques. The hat is worked in the round from the brim up to the crown. You will need to cast on the required number of stitches and join them in a circle. This can be done using either double-pointed needles, a circular needle, or the magic loop method.
Once you have your stitches joined in a circle, you will begin working the ribbing for the brim. This is typically done in a rib stitch pattern, such as k2, p2 or k1, p1. The ribbing should be worked for a few inches to create a snug fit around the head. The number of rows will depend on the gauge of your knitting and the desired length of the brim.
After completing the ribbing, you will transition to knitting the main body of the hat. This is typically done in a combination of knit and purl stitches to create a textured or patterned effect. You can choose from a variety of stitch patterns, such as seed stitch, moss stitch, or simple stockinette stitch.
Continue knitting the main body of the hat until you reach the desired length. This will depend on the size of the hat and the desired fit. It’s a good idea to periodically try on the hat as you knit to ensure it is the right length.
Once you have reached the desired length, you can start decreasing stitches to shape the crown of the hat. This is typically done by knitting two stitches together at regular intervals. The exact method and frequency of decreases will depend on the specific pattern you are using.
Finally, when you have decreased all of the necessary stitches, you will need to fasten off any remaining yarn and weave in the loose ends. This will ensure a clean and professional finish to your hat. With the main part of the hat complete, you can now move on to adding any additional embellishments or accessories, such as a pom-pom or braided ties.
Adding the gnome hat’s signature point

After you have finished knitting the body of the gnome hat, it’s time to add the signature point. This point gives the hat its characteristic gnome-like shape and adds a whimsical touch to the design.
To make the point, you will need to decrease stitches gradually in each row. Start by knitting two stitches together at the beginning of each row. Continue this decrease pattern until you have only a few stitches left. Then, cut the yarn leaving a long tail, thread the tail through the remaining stitches, and pull it tight to close the top of the hat.
By following this pattern, you will have created a cute and cozy gnome hat that will keep you warm throughout the winter season. This hat is not only functional but also makes a great fashionable accessory. You can customize it by using different colors or adding embellishments like pom-poms or tassels.
Get creative and have fun with your knitting project!
Summary:
- Knit the body of the hat.
- Decrease stitches gradually to create the gnome hat’s point.
- Close the top of the hat by pulling the yarn through the remaining stitches.
- Customize the hat with colors, pom-poms, or tassels.