
Knitting is a popular hobby that allows you to create beautiful and unique items out of yarn. While traditional knitting requires the use of knitting needles, many people prefer to use a knitting loom instead. Loom knitting is a great alternative for those who struggle with traditional knitting techniques or simply prefer the ease and simplicity of using a loom.
However, if you have a knitting pattern that you would like to use with a loom, you will need to convert it to fit the loom’s dimensions and stitch pattern. Converting a knitting pattern to a loom pattern may seem intimidating at first, but with a bit of practice and patience, you can easily adapt any knitting pattern to work with a loom.
In this article, we will guide you through the process of converting a knitting pattern to a loom pattern. We will discuss how to determine the appropriate loom size, how to adjust stitch counts and patterns, and provide helpful tips and tricks for successful loom knitting.
Converting a Knitting Pattern to a Loom: A Step-by-Step Guide
Converting a knitting pattern to a loom can open up a whole new world of possibilities for loom knitters. With a few simple steps, you can transform your favorite knitting patterns into designs that can be easily created on a loom. Follow this step-by-step guide to learn how to convert a knitting pattern to a loom.
1. Choose the Right Loom
The first step in converting a knitting pattern to a loom is to choose the right loom for your project. Consider the gauge of the loom and the size of the project you want to create. Make sure the loom you select has enough pegs to accommodate the number of stitches in your pattern.
2. Understand the Stitch Count
Next, carefully read through the knitting pattern to understand the stitch count and any special stitches or techniques used. You’ll need to translate these instructions to the loom, so it’s important to have a clear understanding of the pattern before you begin.
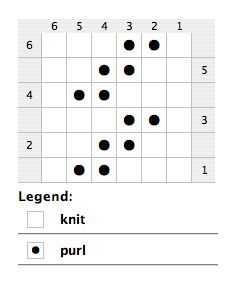
3. Create a Loom Chart
Create a chart that shows the layout of your loom, with each peg represented by a symbol or number. Use this chart to map out the stitches in your knitting pattern. Pay close attention to any increases, decreases, or other stitch variations, and make notes on your chart to reference as you work.
4. Adapt the Stitch Instructions
Now it’s time to adapt the stitch instructions from the knitting pattern to the loom. Use your chart as a guide, following the stitch count and any special stitches or techniques specified in the pattern. You may need to adjust the instructions slightly to accommodate the differences between knitting needles and a loom.
5. Begin Loom Knitting
With your loom chart and adapted stitch instructions in hand, you’re ready to start loom knitting! Follow the instructions on your chart, working one row at a time and using the appropriate loom techniques for each stitch. Take your time and refer back to your chart as needed to ensure accuracy.
By following these steps, you can easily convert a knitting pattern to a loom and create beautiful projects with your loom knitting skills. With practice, you’ll become more comfortable with the conversion process and be able to tackle more complex patterns. So grab your loom and get ready to take your knitting to the next level!
Understanding the Basics of Loom Knitting
Loom knitting is a popular alternative to traditional knitting that uses a loom instead of needles. It’s a great way for beginners to get started with knitting, as it’s easier to learn and offers a quicker way to create garments and accessories. When converting a knitting pattern to loom knitting, it’s important to have a basic understanding of the loom knitting process.
The Loom
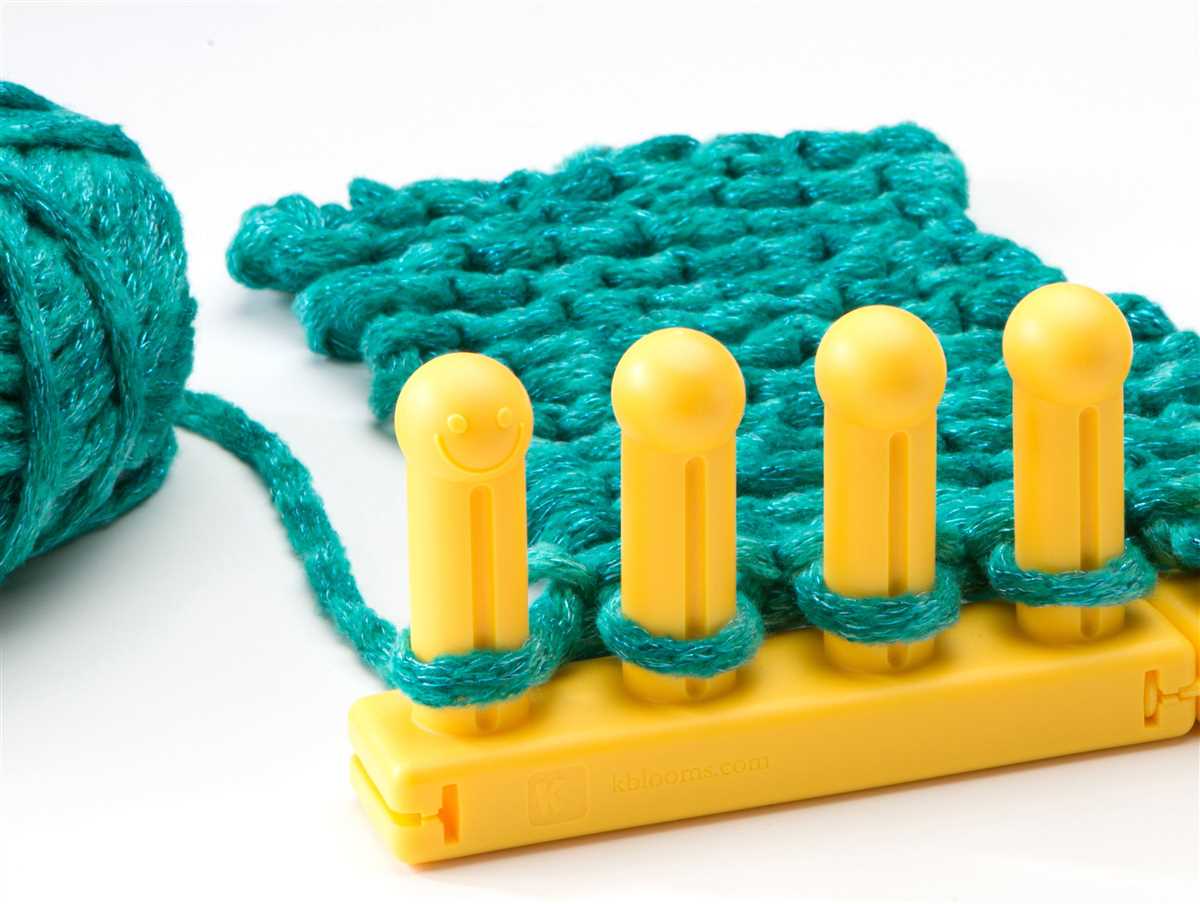
The main tool used in loom knitting is the loom itself. Looms come in different shapes and sizes, but they all consist of a series of pegs or hooks that hold the yarn in place. The size of the loom determines the size of the finished project, so it’s important to choose the right loom for your project.
The Yarn
Choosing the right yarn is another important factor in loom knitting. Depending on the design and desired outcome, different types of yarn can be used. Thicker yarns will create a bulkier and warmer fabric, while thinner yarns will result in a lighter and more delicate fabric. It’s important to check the recommended yarn weight for the knitting pattern before starting.
The Stitches
In loom knitting, there are different types of stitches that can be made. The basic stitch is the knit stitch, which involves wrapping the yarn around the peg and lifting the bottom loop over the top loop. Other common stitches include the purl stitch, which creates a different texture, and the e-wrap stitch, which is used for creating ribbing or cables. Understanding how to make these stitches is key to successfully converting a knitting pattern to loom knitting.
By understanding the basics of loom knitting, such as choosing the right loom, yarn, and stitches, beginners can easily convert knitting patterns to loom knitting and create beautiful garments and accessories using this technique.
Choosing the Right Loom for Your Project
When converting a knitting pattern to a loom, one of the most important considerations is choosing the right loom for your project. The loom you choose will depend on the size and complexity of the pattern, as well as your personal preferences.
1. Determine the Size: Before selecting a loom, consider the finished size of your project. If you are knitting a small accessory like a hat or a pair of socks, a small round loom or a loom with fewer pegs may be sufficient. For larger projects like blankets or shawls, a rectangular loom with more pegs would be more suitable.
2. Consider the Gauge: Gauge refers to the number of stitches and rows per inch. It is important to match the gauge specified in the knitting pattern to ensure the correct size of the finished project. Different looms have different gauges, so choose a loom that will allow you to achieve the required gauge for your pattern.
3. Evaluate the Pattern Complexity: Some knitting patterns may require special stitches or techniques that can only be achieved on certain types of looms. If your pattern includes complex stitch patterns or cables, choose a loom that has the necessary features to accommodate these techniques.
4. Take Your Skill Level into Account: If you are a beginner, it may be best to start with a basic loom that is easy to use and understand. As you gain more experience and confidence, you can then progress to more advanced looms that offer a wider range of possibilities.
5. Consider Your Personal Preference: Lastly, consider your personal preferences when choosing a loom. Some people may prefer the feel of wood or bamboo looms, while others may prefer the lightweight and portable nature of plastic looms. Think about what features or materials will work best for you and make your knitting experience more enjoyable.
Taking the time to choose the right loom for your project will greatly enhance your knitting experience and help you achieve the desired results. Whether you are a beginner or an experienced knitter, there is a loom out there that will meet your needs and allow you to create beautiful, knitted projects.
Gathering the Necessary Materials
Before converting a knitting pattern to a loom, it’s important to gather all the necessary materials. Here is a list of essentials:
- Loom: A knitting loom is the main tool you’ll need for the project. There are various types of looms available, such as round looms, long looms, and sock looms. Choose the loom that best suits the pattern and your preferences.
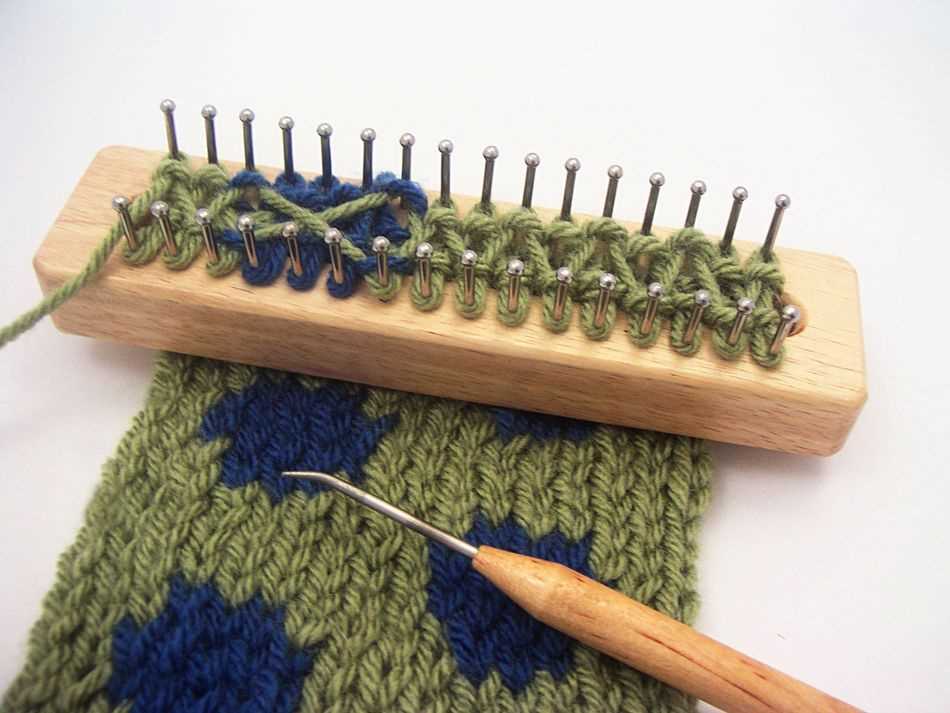
- Knitting Tool: This tool is used to help lift the loops over the pegs on the loom. It can be a simple crochet hook or a specialized knitting tool designed for loom knitting.
- Yarn: Choose a yarn that matches the gauge and weight specified in the knitting pattern. The yarn should be compatible with the loom size and peg configuration.
- Tape Measure: This is essential for measuring the gauge and ensuring the finished piece’s dimensions align with the pattern.
- Scissors: A good pair of scissors is essential for cutting the yarn and weaving in any loose ends.
- Stitch Markers: These are handy for marking specific stitch patterns or sections of the project, helping you keep track of your progress.
- Pattern: Have the original knitting pattern on hand to reference and follow along while converting it to a loom.
By gathering these essential materials, you’ll be well-prepared for converting a knitting pattern to a loom. This ensures a smooth and successful transition from traditional knitting to loom knitting.
Reading and Analyzing the Knitting Pattern
When converting a knitting pattern to a loom, it is important to first carefully read and analyze the original pattern. This will help you understand the stitches, techniques, and construction used in the pattern, and how they can be translated to the loom knitting process.
1. Understanding the Stitch Patterns: Start by identifying the different stitch patterns used in the knitting pattern. Look for instructions on how to knit or purl, as well as any special stitches or techniques like cables or lace. Make notes of the stitch abbreviations and symbols used in the pattern, as you will need to translate these to the loom’s terminology.
2. Noting the Gauge and Measurements: Pay attention to the recommended gauge and the measurements of the finished piece in the knitting pattern. This will help you determine the appropriate loom size to use and ensure that the finished item will have the correct dimensions. Adjustments may need to be made depending on the loom’s gauge and the desired size of the finished project.
3. Identifying the Construction and Shaping: Examine how the knitted piece is constructed and shaped in the original pattern. Note any shaping techniques such as increases, decreases, or short rows, as these will need to be adapted to the loom. Understanding the construction will guide you in planning the order of stitches and rows on the loom.
4. Adapting Instructions for the Loom: Once you have analyzed the stitch patterns, gauge, measurements, and construction of the original knitting pattern, you can begin adapting the instructions to the loom. This may involve translating stitch abbreviations to loom knitting terms, adjusting the number of stitches or rows, and finding alternative techniques to achieve the desired shaping or texture.
In conclusion, reading and analyzing the knitting pattern is the first important step in converting it to a loom. By understanding the stitch patterns, gauge, measurements, and construction of the original pattern, you can effectively adapt the instructions for loom knitting and create beautiful projects.
Converting Stitches from Needles to Loom
When converting a knitting pattern from needles to a loom, it’s important to understand how to translate stitches and techniques to the different tool. While the overall concept of knitting remains the same, there are a few key differences to keep in mind when making the switch.
1. Stitch Conversion: One of the first things to consider is how to convert the individual stitches from needles to loom. Generally, each knit stitch will be translated to a peg on the loom, and each purl stitch will be translated to a space between the pegs. It’s important to pay attention to the stitch pattern and chart provided in the pattern, as it will help guide the conversion process.
2. Gauge Adjustment: Another important factor to consider when converting a knitting pattern to a loom is the gauge. Loom knitting typically results in a looser tension compared to needles, so you may need to adjust the number of pegs used or the size of the loom to achieve the desired gauge. Swatching and measuring your gauge before starting the project can help ensure that your finished piece comes out the correct size.
3. Technique Modifications: Certain techniques or stitch patterns may need to be modified when converting from needles to loom. For example, complex cable patterns may need to be simplified or adapted to work with the limited number of pegs on a loom. Additionally, techniques that rely on sliding stitches across the needle, such as sliding decreases, may need to be adjusted to accommodate the fixed pegs on a loom.
By keeping these factors in mind and taking the time to understand the differences between needles and loom knitting, you can successfully convert a pattern from one to the other. Remember to always read the pattern instructions carefully and make any necessary adjustments to ensure a beautiful finished project.
Adjusting the Gauge for Loom Knitting
When converting a knitting pattern to loom knitting, it is crucial to adjust the gauge to match the loom you are using. Gauge refers to the number of stitches and rows per inch in a knitted fabric. Since loom knitting uses a different technique and often different yarn weight than traditional knitting, the gauge will typically be different as well.
To adjust the gauge for loom knitting, you will need to determine the number of stitches per inch on your loom. This can be done by creating a small swatch using the loom and yarn you plan to use for your project. Measure the width of the swatch and count the number of stitches. If the number of stitches is greater or lesser than the knitting pattern’s gauge, you will need to make some adjustments.
Increase or decrease the gauge by using a loom with a different number of pegs or adjusting the tension of your stitches. If your swatch has fewer stitches per inch than the pattern’s gauge, use a loom with fewer pegs to increase the number of stitches. If you have more stitches per inch, use a loom with more pegs to decrease the number of stitches.
It is important to note that adjusting the gauge may also affect the size of your finished project. If you are working on a project that requires a precise fit, such as a garment, make sure to create a larger swatch and test the gauge before starting the project. This will help ensure that your final result matches the intended size and fit of the pattern.
Once you have adjusted the gauge to match your loom, you can confidently begin converting the knitting pattern to loom knitting. Follow the instructions provided in the knitting pattern, but substitute knitting stitches with appropriate loom knitting techniques. With practice and experimentation, you will become more comfortable converting knitting patterns to loom knitting and creating beautiful projects on your loom.
Calculating the Number of Stitches and Rows
Converting a knitting pattern to a loom requires careful calculation to determine the number of stitches and rows needed for the desired size. This process involves converting the gauge of the knitting pattern to the gauge of the loom, as well as making adjustments for any stitches or techniques that may not be possible on a loom. Here are some steps to help you calculate the number of stitches and rows:
Step 1: Determine the Loom Gauge
The first step in calculating the number of stitches and rows is to determine the gauge of your loom. This is done by knitting a sample swatch using the yarn and loom you plan to use for your project. Measure the number of stitches and rows per inch in your swatch to determine the loom gauge.
Step 2: Convert the Knitting Pattern Gauge
Next, you’ll need to convert the gauge of the knitting pattern to match the gauge of your loom. To do this, divide the number of stitches and rows per inch in the knitting pattern by the number of stitches and rows per inch in your loom gauge. This will give you a conversion factor that you can use to adjust the stitch and row counts in the pattern.
Step 3: Adjust for Loom-Specific Techniques
Some knitting stitches and techniques may not be possible to replicate on a loom. For example, cables or intricate lace patterns may not be achievable. In these cases, you’ll need to make adjustments to the stitch and row counts to simplify the pattern or find alternative stitches that can be done on a loom.
By following these steps and carefully calculating the number of stitches and rows, you’ll be able to convert a knitting pattern to a loom and create beautiful projects using your loom knitting skills.
Adapting Knitting Techniques for Loom Knitting
When it comes to converting knitting patterns to loom knitting, there are a few key techniques to keep in mind. Loom knitting is a versatile and accessible alternative to traditional needle knitting, but it does require some adjustments to accommodate for the different tools and methods involved.
1. Understanding the Loom
The first step in adapting knitting techniques for loom knitting is to familiarize yourself with the loom itself. Looms come in various shapes and sizes, and each one has its own unique set of capabilities. Understanding the different parts of the loom and how they work together is crucial for successfully converting knitting patterns.
2. Adapting Stitch Patterns
One of the most important aspects of converting knitting patterns to loom knitting is adapting the stitch patterns. While many stitch patterns can be easily translated to the loom, others may require some modifications. For example, if a pattern calls for complex stitch combinations or intricate cable patterns, you may need to simplify or find alternative stitch patterns that can be easily recreated on the loom.
3. Adjusting Gauge
Gauge is another key consideration when converting knitting patterns to loom knitting. Loom knitting typically produces a looser gauge compared to needle knitting, so adjustments may need to be made to accommodate for this. It’s important to swatch and test your gauge on the loom before starting a project to ensure the final measurements match the pattern.
4. Modifying Construction Techniques
In addition to stitch patterns and gauge, it’s important to consider the construction techniques used in the knitting pattern. Some techniques, such as seaming or picking up stitches, may not be easily replicated on the loom. In these cases, you may need to modify or find alternative techniques that can be used with the loom.
5. Utilizing Loom-Specific Techniques
Finally, loom knitting has its own unique techniques that can be utilized to create different effects and textures. These include techniques such as e-wrap, flat stitch, and purl stitch, which can be used to create ribbing, lace, and various other stitch patterns. Learning these loom-specific techniques can greatly expand your options for converting and creating knitting patterns on the loom.
By understanding and adapting these techniques, you can successfully convert knitting patterns to loom knitting and create beautiful projects on your loom.
Managing Increases and Decreases on a Loom
The process of converting a knitting pattern to a loom can be challenging, especially when it comes to managing increases and decreases. On traditional knitting needles, increases and decreases are achieved by manipulating the stitches with a series of knit and purl stitches. However, on a loom, a different approach is required.
Increase and decrease stitches on a loom can be achieved by using a variety of techniques. One common method is the use of the e-wrap stitch. To increase, simply wrap the working yarn around the next peg in a clockwise direction, creating an additional loop. To decrease, wrap the working yarn around two pegs and then lift the bottom loop over the top loop, effectively combining the two loops into one.
Another technique to manage increases and decreases on a loom is the use of short rows. Short rows involve knitting only a portion of the stitches in a row, leaving some stitches unworked. This can create interesting shaping effects, especially when combined with other stitch patterns.
When converting a knitting pattern to a loom, it is important to carefully read the pattern instructions and identify any increases or decreases. Once identified, you can then determine the best method for achieving these changes on a loom. It may require some experimentation and practice to get the desired results, but with patience and perseverance, it is possible to successfully manage increases and decreases on a loom.
Working with Different Stitch Patterns on a Loom
When using a loom for knitting, one of the most important aspects is working with different stitch patterns. Stitch patterns help create texture and design in your knitted projects, making them more visually appealing and unique. However, converting stitch patterns from traditional knitting needles to a loom can be a bit challenging.
It is essential to understand the basic stitches and techniques used in traditional knitting to successfully convert them to a loom. Knowing how to work with knit and purl stitches, cables, lace, and colorwork on knitting needles will make it easier to translate them onto a loom.
Knit and Purl Stitches
The knit and purl stitches are the foundation of knitting and can be easily replicated on a loom. When converting a knitting pattern to a loom, you will need to familiarize yourself with the different loom stitches that mimic the knit and purl stitches correctly. For example, the e-wrap stitch can be used to replace the knit stitch, while the purl stitch can be replicated using the u-stitch or purl stitch on a loom.
Cables and Lace

Creating cables and lace patterns on a loom is also possible, although it requires a bit of adaptation. Instead of working with a cable needle or using yarn overs for lace, you will need to modify the technique to suit the loom. One way to create cables on a loom is by using a cable stitch, which involves knitting or purling stitches out of sequence. For lace patterns, you can use a combination of different stitch techniques, such as decreasing, increasing, and yarn overs, to achieve the desired lace effect.
Colorwork
Colorwork, such as fair isle or intarsia, can also be done on a loom, but the process may vary compared to traditional knitting. Instead of carrying multiple yarns along the back of the work, you can use different techniques like duplicate stitching or color changing within a row to achieve colorwork on a loom. It may require experimentation and practice to find the best technique that works for you when it comes to colorwork on a loom.
Overall, working with different stitch patterns on a loom can be an exciting challenge for knitters. By understanding the basics of traditional knitting stitches and adapting them to the loom, you can create beautiful and intricate designs in your knitted projects.
Troubleshooting Common Issues in Loom Knitting
Tangled Yarn: Tangled yarn can be frustrating, but it’s a common problem in any type of knitting. To prevent tangled yarn, make sure to keep it organized and untangled as you work. You can use a yarn bowl or a yarn holder to help keep your yarn in place.
Uneven Stitches: If you notice that your stitches are uneven, it could be due to inconsistent tension. Try to keep an even tension as you knit, and avoid pulling too tightly or too loosely. Practice can help improve your tension control.
Dropped Stitches: Dropped stitches happen when a stitch falls off the loom accidentally. To fix a dropped stitch, use a crochet hook or a knitting needle to pick up the dropped stitch and put it back on the loom in the correct order.
Holes in the Fabric: Holes in your fabric can occur when there are dropped stitches or when you accidentally skip a stitch. Carefully examine your knitting and make sure to fix any dropped stitches or missed stitches to avoid creating holes.
Wrong Size or Measurements: If your finished project doesn’t match the desired size or measurements, it could be due to different tension or using a different loom gauge than what is specified in the pattern. Adjust your tension or switch to a different loom gauge to achieve the desired size.
Yarn Breakage: Yarn breakage can occur if your yarn is weak or if you’re pulling too tightly. Choose a sturdier yarn or adjust your tension to prevent yarn breakage.
Conclusion: Troubleshooting common issues in loom knitting is an essential skill for every loom knitter. By understanding the common problems and their solutions, you can easily overcome any challenges you may encounter. Remember, practice makes perfect – the more you knit, the more you’ll improve your skills and become a confident loom knitter.