
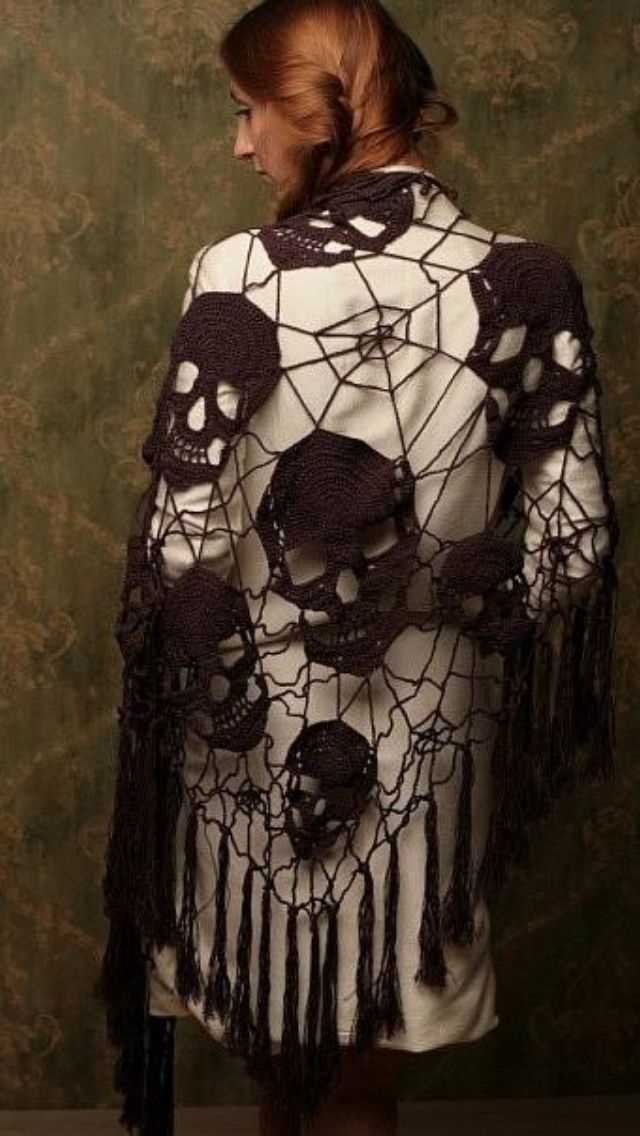
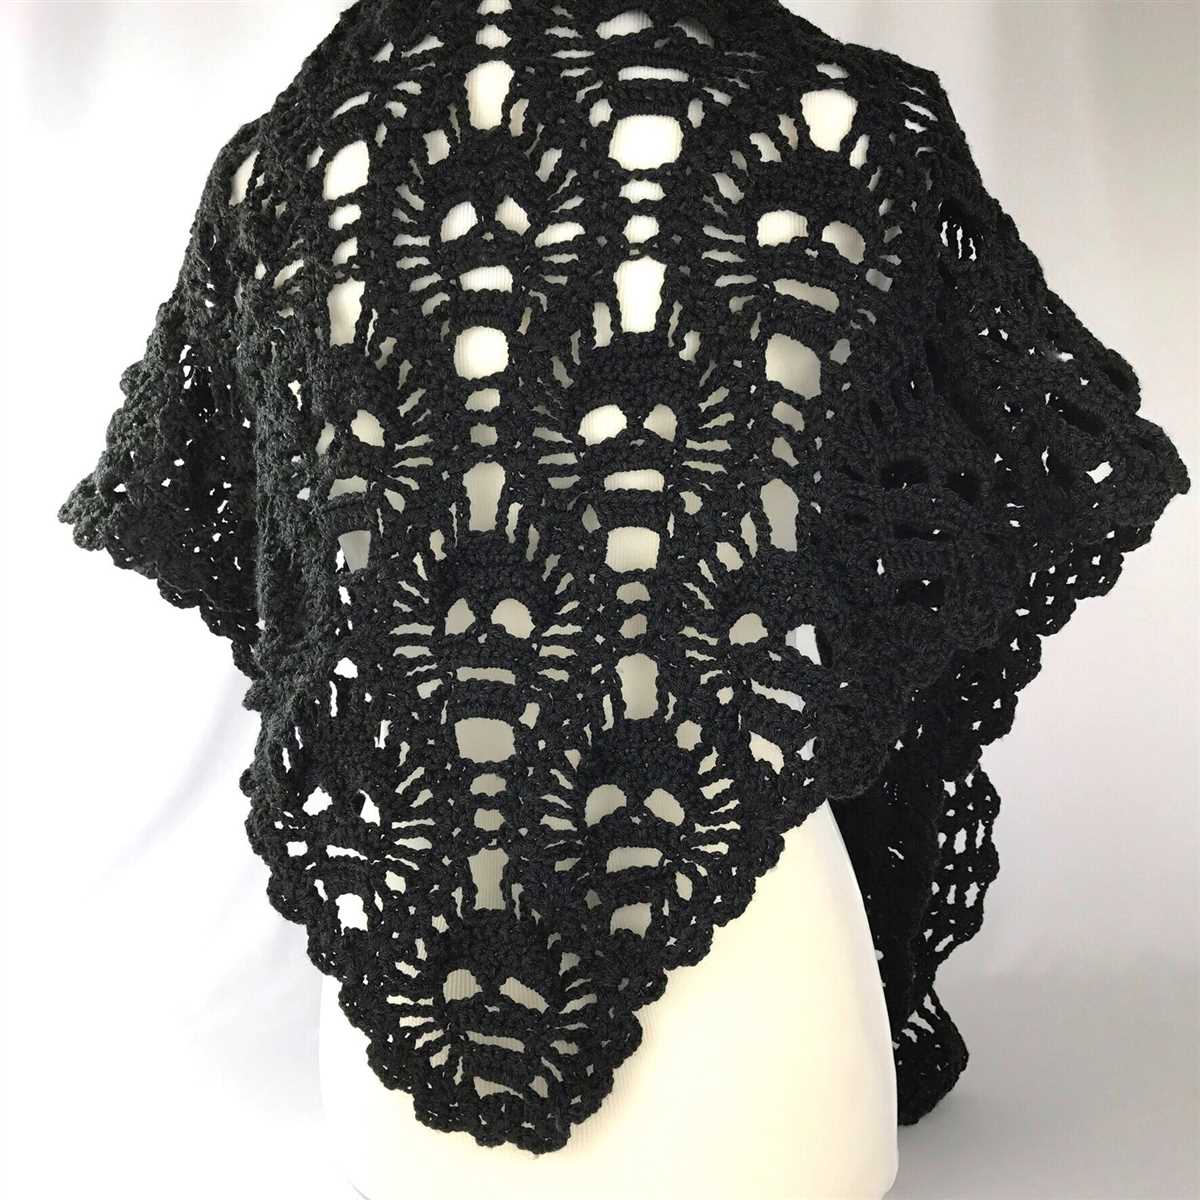
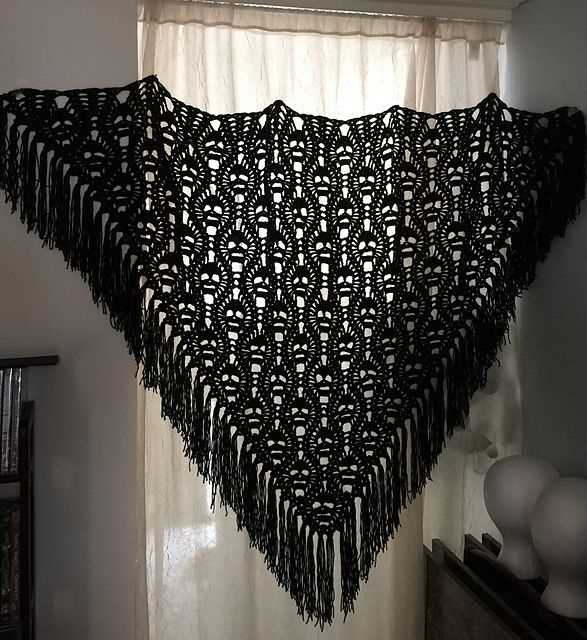
Are you looking for a unique and edgy accessory to add to your wardrobe? Look no further than the skull shawl knitting pattern. This pattern combines the beauty of lace knitting with the iconic skull motif, creating a stunning and eye-catching piece.
Knitting a skull shawl may seem intimidating at first, but with a little practice and the right instructions, you can create a beautiful and intricate design. The pattern typically uses lace weight yarn, which adds a delicate and ethereal quality to the finished shawl. Whether you’re an experienced knitter or just starting out, this pattern is a great way to challenge yourself and expand your skills.
Not only does the skull shawl knitting pattern create a one-of-a-kind accessory, but it also allows you to express your individual style. The skull motif is a bold and powerful symbol that has long been associated with rebellion and counter culture. By knitting and wearing this shawl, you can embrace your love for all things unconventional and make a statement.
How to Knit a Skull Shawl: A Step-by-Step Guide

Knitting a skull shawl can be a fun and rewarding project for those who enjoy both knitting and a bit of gothic style. This step-by-step guide will walk you through the process of creating your own skull shawl, from choosing the right yarn to adding the finishing touches.
Materials Needed:
- Yarn – Choose a medium-weight yarn in a color of your choice.
- Knitting needles – Opt for a pair of needles that match the recommended size for your chosen yarn.
- Tapestry needle – This will be used for weaving in the loose ends of your project.
- Stitch markers – These can help you keep track of your progress and mark important points in the pattern.
- Skull chart – Find or create a skull chart that you will use to create the skull design on your shawl.
Step 1: Choose Your Pattern
Before you begin knitting, you’ll need to choose a skull shawl pattern that you like. There are many freely available patterns online, or you can create your own. Make sure to consider your skill level and the time you have available for the project when selecting a pattern.
Step 2: Gather Your Materials
Once you have chosen your pattern, gather all the materials you will need for the project. This includes your yarn, knitting needles, tapestry needle, stitch markers, and skull chart. Having everything ready at hand will make the knitting process smoother.
Step 3: Start Knitting
With your materials ready, it’s time to start knitting! Begin by casting on the required number of stitches as specified in your pattern. As you work through the pattern, follow the instructions carefully and use stitch markers to mark any important points.
Step 4: Add the Skull Design
Once you have reached the section of your shawl where the skull design should be added, refer to your skull chart. Follow the chart row by row, knitting the appropriate stitches to create the design. Pay attention to any color changes or special stitches indicated in the chart.
Step 5: Finish and Block
After completing the skull design, continue knitting according to your pattern until you reach the desired size for your shawl. Once your knitting is done, weave in any loose ends with a tapestry needle. To give your shawl a polished look, block it by gently wetting it, shaping it, and allowing it to dry flat.
With these steps, you can confidently knit your own skull shawl and showcase your knitting skills with a touch of gothic flair. Whether you wear it as a statement accessory or give it as a unique gift, your skull shawl is sure to stand out in any crowd.
Choosing the Right Yarn for Your Skull Shawl
When it comes to knitting a skull shawl, choosing the right yarn is crucial for achieving the desired look and feel. The yarn you select will determine the drape, texture, and warmth of your shawl, so it’s important to consider a few factors before making your decision.
1. Weight and Thickness: The weight and thickness of the yarn will affect the overall appearance and feel of your skull shawl. If you want a light and delicate shawl, opt for a lace weight or fingering weight yarn. On the other hand, if you prefer a more substantial shawl with a cozy feel, consider using a worsted weight or even a bulky weight yarn.
2. Fiber Content: Different fibers have different characteristics, so you’ll need to think about the look and performance you want from your skull shawl. If you want a shawl that is soft and drapes beautifully, a yarn with silk or cashmere content might be a good choice. For a more rustic and textured shawl, consider using a wool or alpaca blend.
3. Color and Pattern: The color and pattern of the yarn can greatly impact the overall design and look of your skull shawl. Consider whether you want a solid color shawl or if you prefer variegated or self-striping yarns. Also, think about how the colors will interact with the skull motif and any additional stitch patterns you plan to incorporate.
4. Budget and Availability: Finally, consider your budget and the availability of the yarn you choose. Some specialty or luxury yarns can be quite expensive, so make sure to factor in the cost of the yarn when planning your project. Additionally, check the availability of the yarn in the quantities and colors you need, as you don’t want to run out of yarn in the middle of your project.
By considering these factors and taking your personal preferences into account, you’ll be able to choose the right yarn to create the perfect skull shawl. Remember to swatch and test your yarn before starting your project to ensure the desired gauge and appearance. Happy knitting!
Understanding the Skull Shawl Knitting Pattern
The Skull Shawl knitting pattern is a unique and striking design that incorporates skull motifs into a traditional shawl. This pattern is perfect for knitters looking to create a statement piece that combines both style and edginess. Understanding the pattern is key to successfully knitting this eye-catching accessory.
Materials
To begin knitting the skull shawl, gathering the necessary materials is essential. The pattern typically calls for a specific weight of yarn and corresponding needle size. It is important to choose a yarn that will highlight the skull motif, such as a solid color or a variegated yarn with contrasting colors. Additionally, circular knitting needles are recommended to accommodate the large number of stitches required for the shawl.
Pattern Instructions
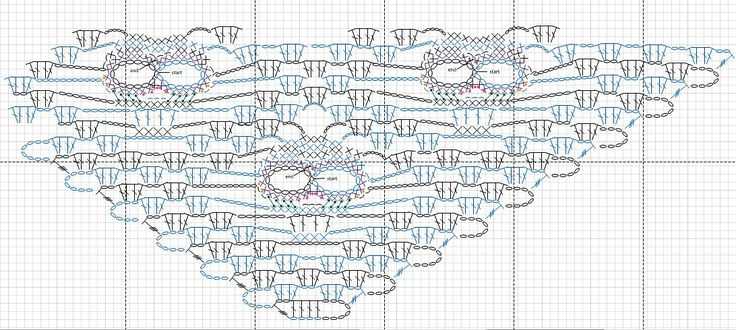
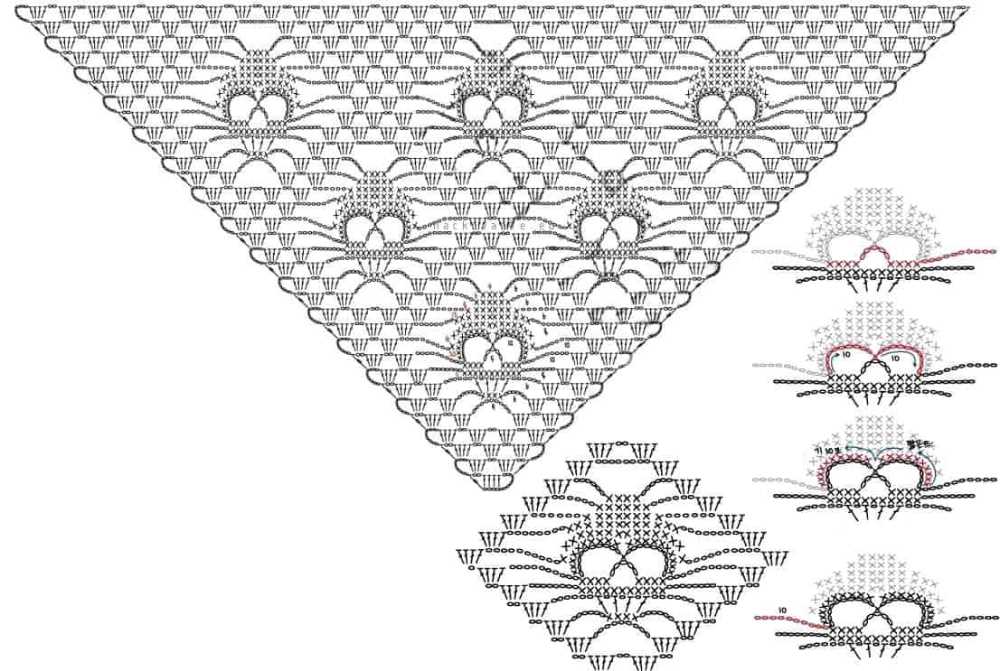
The Skull Shawl pattern usually consists of a combination of stitches, including knit, purl, yarn over, and various decreases to create the skull motifs. Following the pattern instructions step by step is crucial to achieving the desired result. Some patterns may include charts to visually represent the motifs, while others provide written instructions. Knitters should be comfortable reading both charted and written instructions to successfully complete the shawl.
It is important to pay attention to any special instructions or notes provided in the pattern. This could include information on gauge, stitch count, or specific techniques required to complete certain sections. Taking the time to understand and familiarize yourself with the pattern before starting will help avoid any confusion or mistakes during the knitting process.
Finishing Touches
Once the main body of the Skull Shawl is completed, there may be additional steps involved in finishing the shawl. This could include blocking the shawl to enhance its drape and shape, as well as weaving in any loose ends to give the shawl a clean and polished appearance.
Knitting the Skull Shawl pattern offers a unique and creative opportunity for knitters to showcase their skills. By understanding the pattern instructions, selecting the right materials, and paying attention to finishing touches, knitters can create a stunning and personalized accessory that is sure to turn heads.
Gathering the Necessary Knitting Tools
When embarking on a knitting project, it is important to have all the necessary tools at hand. Whether you are an experienced knitter or just starting out, having the right equipment will make your knitting experience more efficient and enjoyable. Here are some essential tools you will need for knitting a skull shawl:
1. Knitting Needles
The most obvious tool you will need for knitting is a pair of knitting needles. For knitting a skull shawl, you will need a set of circular knitting needles in the appropriate size for your chosen yarn. Circular needles are preferred for larger projects as they can hold more stitches and distribute the weight of your work more evenly. Choose needles with a smooth surface and a comfortable grip to make your knitting experience more enjoyable.
2. Yarn
Another crucial tool for knitting is the yarn. When knitting a skull shawl, you can choose any type of yarn that you prefer, as long as it is suitable for the project. Consider the weight and texture of the yarn to achieve the desired drape and appearance of the shawl. It is also important to have enough yarn to complete the project, so make sure to check the yardage requirements specified in the knitting pattern.
3. Stitch Markers
Stitch markers are small, usually plastic or metal rings, which can be placed on the knitting needles to mark specific stitches or sections of your work. They serve as a helpful guide and can be especially useful when knitting complex patterns or in cases where you need to keep track of increases or decreases. Having a set of stitch markers in different sizes will ensure that you have the right ones to fit your knitting needles and project needs.
4. Tapestry Needle
A tapestry needle is a blunt-tipped needle with a large eye, used for weaving in yarn ends and sewing pieces together. When knitting a skull shawl, you may need to weave in loose ends or join different sections of the shawl together. Having a tapestry needle at hand will make this process much easier and neater.
These are just a few of the essential tools you will need for knitting a skull shawl. It is also helpful to have a pair of scissors, a row counter, and a measuring tape handy. With the right tools and a knitting pattern in hand, you are ready to embark on your knitting journey and create a beautiful skull shawl.
Casting On and Starting Your Skull Shawl
One of the key steps in starting your skull shawl knitting project is casting on. This is how you create the foundation row of stitches that will be the base of your shawl. The number of stitches you cast on will depend on the size and desired width of your shawl, as well as the yarn and needle size you are using.
To cast on, you can use any method that you are comfortable with. Some common methods include the long-tail cast on, the knitted cast on, and the cable cast on. Choose the method that works best for you and cast on the required number of stitches.
Once you have cast on your stitches, you are ready to start knitting your skull shawl. Begin by working the first row according to the pattern instructions. This may involve knitting or purling various stitches, depending on the design of the shawl. Pay close attention to any stitch patterns or repeats mentioned in the pattern, as these will be important for creating the skull motif.
If the pattern includes a chart, make sure to follow it carefully. The chart will show you the pattern stitches for each row and will help you create the skull design. It’s essential to keep track of your progress and mark each row as you complete it to avoid any mistakes.
As you work on your skull shawl, remember to take your time and enjoy the process. Knitting should be a relaxing and enjoyable activity, so don’t rush through it. Take breaks when needed, and don’t hesitate to ask for help or clarification if you’re unsure about any part of the pattern. With practice and patience, you will soon have a beautiful skull shawl to wear or gift to someone special.
Knitting the Skull Motifs
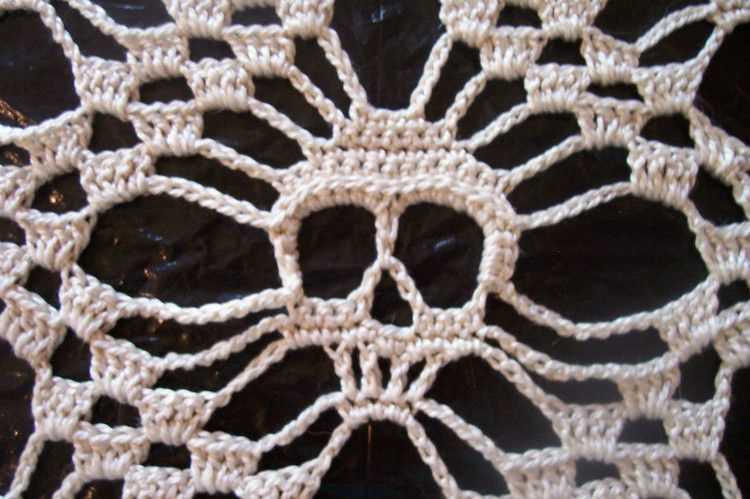
When knitting the skull shawl pattern, one of the key elements to focus on is the skull motifs themselves. These motifs add a unique and edgy touch to the shawl, making it stand out from other traditional knitting projects.
The skull motifs are typically knitted using intarsia technique, where different colored yarns are used to create the distinct skull design. This technique allows for precise color changes and helps to create a clear and defined image of the skull. It is important to follow the provided knitting chart or pattern instructions to ensure that the skull motifs are knitted correctly.
To begin knitting the skull motifs, one should start with the background color of the shawl and then add in the contrasting colors for the skull design. This can be done by knitting with two strands of yarn at a time, one for the background color and one for the skull color. It is important to keep the tension consistent throughout the knitting process to avoid any unevenness in the finished motif.
The skull motifs can be customized by experimenting with different color combinations or adding additional embellishments. For example, one could use metallic yarn or beads to add a touch of sparkle to the eyes or to outline the skull shape. This allows for a personal touch and gives knitters the opportunity to make the shawl truly their own.
Overall, knitting the skull motifs in the shawl pattern requires attention to detail and patience. However, the end result is a unique and eye-catching accessory that is sure to impress. So grab your knitting needles and yarn, and get ready to create a stunning skull shawl that is both stylish and distinctive!
Adding the Shaping to Your Skull Shawl
When it comes to knitting a skull shawl, adding shaping is an important step to consider. The shaping helps achieve the skull-like design and gives the shawl a more realistic and three-dimensional look. There are a few different techniques you can use to add the shaping, depending on the specific pattern you are following.
Decreases: One common way to add shaping to the skull shawl is by using decreases. This involves knitting two stitches together or slipping a stitch and passing it over to reduce the total number of stitches. By strategically placing these decreases, you can create the shape of the skull. For example, you may want to decrease at the center top of the shawl to create the rounded shape of the skull’s crown.
Short Rows: Another technique that can be used to add shaping is short rows. Short rows involve knitting or purling a certain number of stitches and then turning the work before reaching the end of the row. This creates extra fabric in specific areas and helps shape the shawl. You can use short rows to create the dip in the back of the skull or to shape the eye sockets and nose area.
Charts and Instructions: It’s important to carefully follow the charts and instructions provided in your knitting pattern for the skull shawl. These charts will show you when and where to add the shaping techniques, such as decreases and short rows. Pay attention to any special symbols or abbreviations used in the charts and follow the instructions step by step to ensure accurate shaping.
Experimenting and Customization: While there are general guidelines for adding shaping to a skull shawl, don’t be afraid to get creative and customize your design. You can experiment with different techniques, vary the placement of the shaping, or even incorporate additional elements like beads or embroidery to enhance the skull-like appearance. Remember to have fun and make the shawl uniquely yours.
By carefully adding the shaping to your skull shawl, you can create a stunning and realistic design that is sure to impress. Take your time and follow the instructions provided in your pattern, and don’t be afraid to add your own personal touch to make the shawl truly one-of-a-kind.
Creating the Eyelets and Lace Patterns
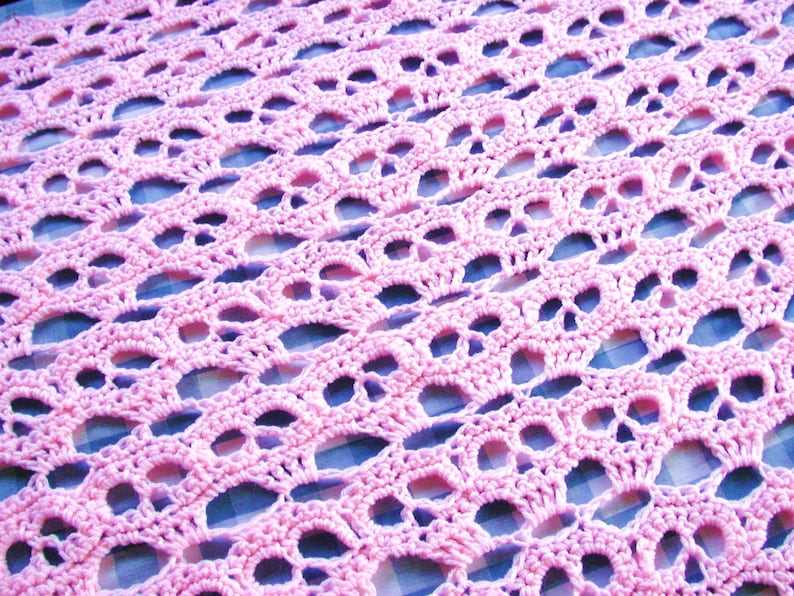
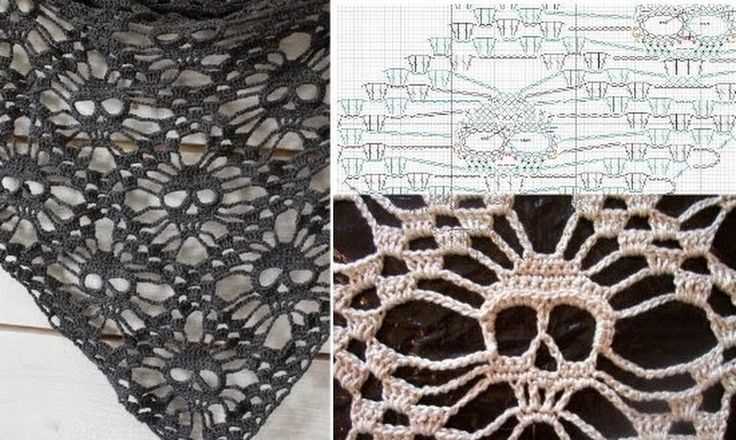
When knitting a skull shawl, one of the key design elements is the eyelets and lace patterns that give the shawl its unique look. These patterns are created by strategically placing yarn overs and decreases throughout the knitting process. By alternating between these two techniques, you can achieve intricate and delicate lace designs that resemble skulls.
To start, you will need to follow the knitting chart or written instructions specific to the skull shawl pattern you are using. These instructions will indicate where to place yarn overs and which decreases to use to create the desired lace pattern. Before you begin, make sure you have a good understanding of how to execute these techniques, as they will be used frequently throughout the project.
Yarn overs are the first element used to create the eyelets and lace patterns. To make a yarn over, simply bring the yarn over the right-hand needle from back to front, creating a new loop. This new loop will count as a stitch and create an eyelet in the knitted fabric. The exact placement of yarn overs will vary depending on the pattern, so always refer to the instructions for guidance.
Decreases are the second element used. There are several types of decreases commonly used in lace knitting, such as the knit two together (k2tog), slip, slip, knit (ssk), and slip, knit, pass (skp) decreases. These decreases help create the intricate skull shapes by decreasing the number of stitches and pulling the fabric inwards. As with yarn overs, the specific decrease to use will be indicated in the pattern instructions.
To create the lace patterns and eyelets, you will alternate between making yarn overs and decreases according to the design chart or written instructions. As you work through the pattern, you will see the intricate lace patterns slowly take shape, forming the distinctive skull motifs. It is essential to carefully follow the instructions and read the chart or written pattern to ensure you are creating the eyelets and lace patterns correctly.
By mastering the techniques of yarn overs and decreases, you can create stunning skull shawls with intricate lace patterns. Whether you are a beginner or an experienced knitter, this unique knitting project will challenge your skills and produce a beautiful and fashionable accessory.
Incorporating the Skull Border
The skull border is an eye-catching addition to any shawl and can bring a touch of edginess to your knitting project. To incorporate the skull border into your shawl, follow these step-by-step instructions.
1. Start with a Solid Base
Before adding the skull border, ensure that your shawl has a solid base. This can be achieved by knitting a pattern of your choice or simply using a stockinette stitch. The solid base will provide a clean canvas for the skull motif to stand out.
2. Choose the Skull Chart
There are various skull chart patterns available online that you can use for the border. Look for a chart that suits the size and shape of your shawl. Once you have chosen the chart, print it out or have it easily accessible on your computer screen.
3. Follow the Chart
When you reach the desired point in your shawl where you want to incorporate the skull border, begin following the chart. Each stitch on the chart represents a specific knitting pattern. Pay close attention to the symbols and instructions on the chart to ensure accuracy.
4. Be Mindful of Gauge and Tension
It is crucial to maintain consistent gauge and tension throughout the skull border section of your shawl. This will help to ensure that the pattern is evenly spaced and the skulls are clearly defined. Take your time and adjust your knitting technique if necessary.
5. Finishing Touches
Once you have completed the skull border section, finish your shawl as desired, whether it’s adding a decorative edging or simply binding off. Block your finished shawl to help the skull border lay flat and show off its intricate details.
By incorporating the skull border into your shawl, you can create a unique and statement-making piece that is sure to turn heads. Whether you’re knitting for yourself or as a gift, the skull motif adds an edgy flair to any project.
Adjusting the Size of Your Skull Shawl
When knitting a skull shawl, it’s important to ensure the size fits your desired specifications. Luckily, adjusting the size of your shawl is a straightforward process that can be accomplished by modifying the number of stitches and rows in the pattern. Here are some tips to help you customize the size of your skull shawl.
1. Changing the Number of Stitches:
To make your skull shawl larger or smaller, you can adjust the number of stitches used in each row. If you want to increase the size, you can add more stitches to each repeat or increase the number of repeats. Conversely, if you want to decrease the size, you can remove stitches from each repeat or reduce the number of repeats. Just make sure to maintain the pattern’s symmetry and follow any stitch counts specified in the pattern instructions.
2. Modifying the Number of Rows:
In addition to changing the number of stitches, you can also adjust the size of your skull shawl by modifying the number of rows. If you want a larger shawl, you can add more rows to each section or increase the overall number of sections. Conversely, if you want a smaller shawl, you can decrease the number of rows in each section or reduce the total number of sections. Keep in mind that altering the number of rows may affect the overall shape and drape of the shawl, so it’s important to consider these factors before making any adjustments.
3. Gauge and Yarn Choice:
Another factor that can affect the size of your skull shawl is your gauge and yarn choice. If you want a larger shawl, you can opt for a bulkier yarn or adjust your gauge to create larger stitches. Conversely, if you want a smaller shawl, you can choose a finer yarn or adjust your gauge to create smaller stitches. Remember to check the pattern’s gauge requirements and always make a gauge swatch before starting your project to ensure that your adjustments will result in the desired size.
By following these tips, you can easily adjust the size of your skull shawl and create a finished piece that fits your preferences. Whether you want a larger or smaller shawl, the flexibility of knitting allows you to customize your project to achieve the perfect size and fit.
Blocking Your Finished Skull Shawl
Blocking is an essential step in finishing your skull shawl, as it helps to enhance the shape and drape of the shawl, as well as open up the lace pattern. Here are some steps to follow when blocking your finished skull shawl:
1. Soak the Shawl
Fill a basin or sink with lukewarm water and a mild wool wash or detergent. Gently place the skull shawl into the water, making sure it is fully submerged. Allow the shawl to soak for about 15-20 minutes, or until it is completely saturated.
2. Remove Excess Water
After soaking, carefully remove the shawl from the water and gently squeeze out any excess water. Avoid wringing or twisting the shawl, as this can damage the delicate fibers. Instead, press the shawl between towels to absorb the water.
3. Lay Out the Shawl
Find a clean, flat surface where you can lay out the skull shawl. You can use a blocking mat, towels, or a clean bedsheet. Gently arrange the shawl, making sure the skull motifs are properly aligned. Smooth out any wrinkles or folds, ensuring the lace pattern is fully visible.
4. Pin the Shawl
Using rustproof T-pins or blocking wires, pin the edges of the skull shawl to the blocking surface. Start by pinning the center of each edge, and then work your way outwards, making sure the shawl maintains its shape. Use additional pins or wires to shape the points of the shawl and define the skull motifs.
5. Let it Dry
Once the shawl is pinned, leave it to air dry in a well-ventilated area, away from direct sunlight or heat sources. Depending on the humidity and the thickness of the yarn, drying can take anywhere from 24 to 48 hours. Avoid disturbing the shawl while it is drying to maintain its shape.
By following these steps, you can ensure that your finished skull shawl looks its best and showcases the intricate lace pattern and skull motifs. Blocking not only helps to enhance the overall appearance of the shawl but also helps the yarn fibers to relax and settle into their intended shape. So take the time to block your skull shawl properly, and enjoy the finished result!
Adding Finishing Touches to Your Skull Shawl
Completing your skull shawl can be a satisfying and rewarding process. After completing the main knitting sections, it’s time to add those final touches that will truly make your shawl stand out.
To start, consider adding embellishments such as beads or sequins to your shawl. These can be sewn onto the points of the skull motif or scattered throughout the shawl for added sparkle. Choose beads or sequins that complement the colors of your shawl for a cohesive look.
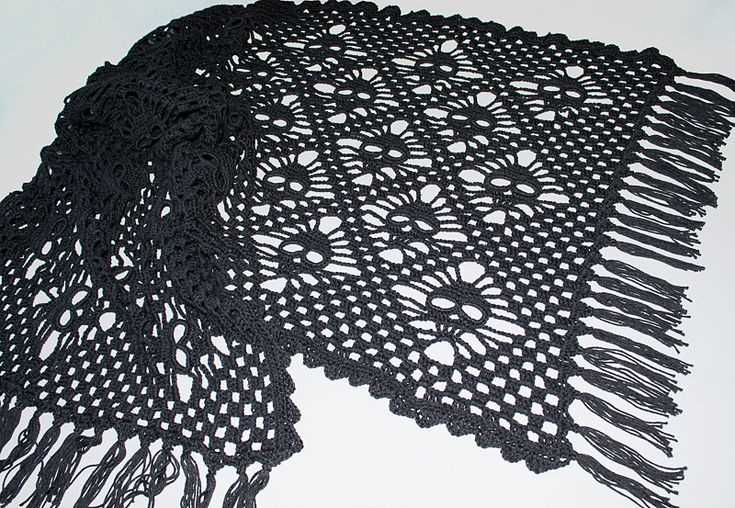
Another option for adding finishing touches is to incorporate fringe into your design. This can be done by attaching fringe to the edge of your shawl using a crochet hook. Choose fringe that matches the color or style of your shawl to create a cohesive and polished look.
If you prefer a more understated finish, consider blocking your shawl to give it a professional appearance. Blocking helps to even out the stitches and shape the shawl, making it lay flat and drape beautifully. Follow the instructions provided with your yarn to block your shawl properly.
Finally, don’t forget to weave in any loose ends or threads from the knitting process. This will give your shawl a clean and polished look. Use a tapestry needle to carefully weave the ends into the surrounding stitches, ensuring they are secure and hidden from view.
In conclusion, adding finishing touches to your skull shawl can elevate its overall appearance. Whether you choose to incorporate embellishments, fringe, block the shawl, or simply weave in loose ends, these final details will help create a finished product that you can be proud of and enjoy for years to come.
Tips and Tricks for Knitting a Perfect Skull Shawl
Knitting a skull shawl can be a fun and rewarding project, but it can also be a bit challenging. Here are some tips and tricks to help you knit a perfect skull shawl:
1. Choose the Right Yarn:
When knitting a skull shawl, it’s important to choose the right yarn. Opt for a lightweight yarn with good drape, such as a fingering or lace weight yarn. This will ensure that the shawl has a beautiful flow and drapes nicely when worn.
2. Use Lifelines:
To avoid any major mistakes or mishaps, it’s a good idea to use lifelines when knitting your skull shawl. A lifeline is a thin piece of contrasting yarn that you thread through your stitches. If you make a mistake, you can easily rip back to the lifeline and start again without losing too much progress.
3. Block Your Shawl:
Blocking is an essential step in knitting any shawl, including a skull shawl. It helps to even out your stitches, open up lacework, and give your shawl its final shape and size. Take the time to carefully block your skull shawl to achieve the best results.
4. Pay Attention to Chart Symbols:
When following a knitting pattern for a skull shawl, it’s important to pay attention to the chart symbols. Each symbol represents a specific stitch or action, such as knit, purl, yarn over, or decrease. Make sure to familiarize yourself with the symbols before you start knitting, and refer to the chart as you work to keep track of your stitches.
5. Take Breaks:

Knitting a skull shawl can be a time-consuming project, so it’s important to take breaks to rest your hands and avoid strain. Stretching or doing hand exercises can also help prevent hand and wrist fatigue. Be sure to listen to your body and take regular breaks as needed.
By following these tips and tricks, you’ll be on your way to knitting a perfect skull shawl. Remember, practice makes perfect, so don’t be discouraged if it takes a few tries to get it just right. Enjoy the process and have fun creating a unique and stylish accessory!