
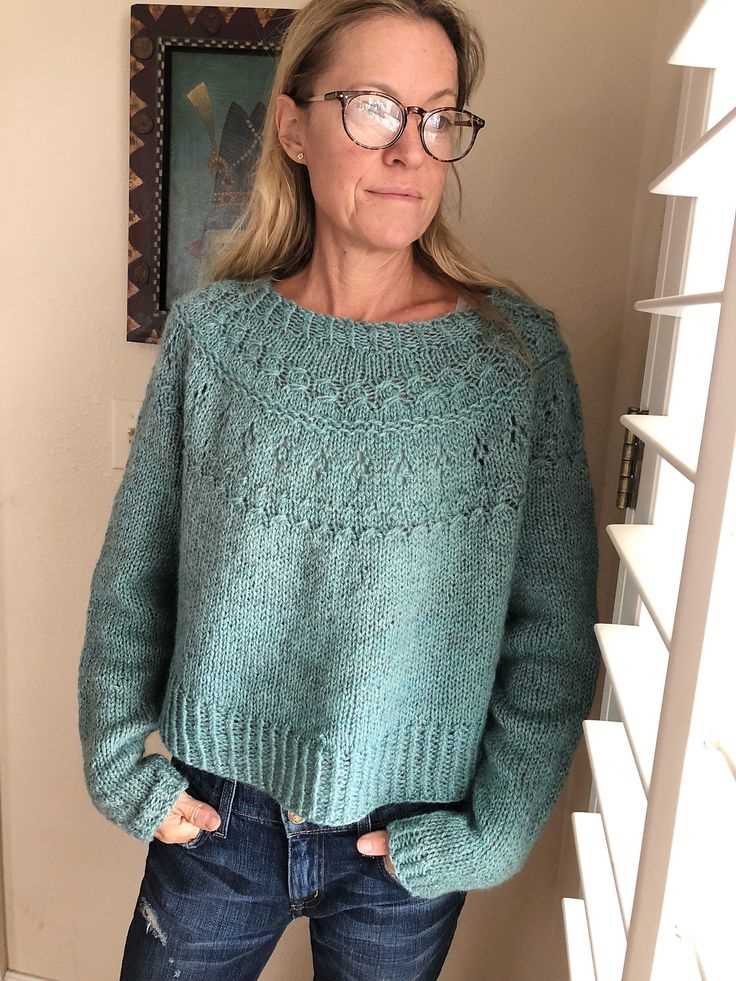
Are you looking for a cozy yet stylish sweater to keep you warm during those chilly days? Look no further than the Ranunculus Sweater knitting pattern! This beautiful pattern features a relaxed fit and a unique textured stitch, making it a perfect addition to your winter wardrobe. Whether you’re an experienced knitter or a beginner looking to tackle a new project, this pattern is sure to become a favorite.
The Ranunculus Sweater is designed to be both comfortable and fashionable. The loose fit allows for easy layering, while the textured stitch adds a touch of elegance. With its wide sleeves and slightly cropped length, this sweater is versatile enough to be dressed up or down, making it perfect for both casual and formal occasions. Plus, the pattern is available in a range of sizes, ensuring a flattering fit for everyone.
What sets the Ranunculus Sweater apart from other knitting patterns is the unique stitch used throughout. The twisted rib stitch creates a beautiful texture that is both interesting to knit and visually appealing. The pattern also includes detailed instructions and helpful tips, making it accessible even for beginners. And with the option to customize the length and sleeve width, you can truly make this sweater your own.
Ranunculus Sweater Knitting Pattern
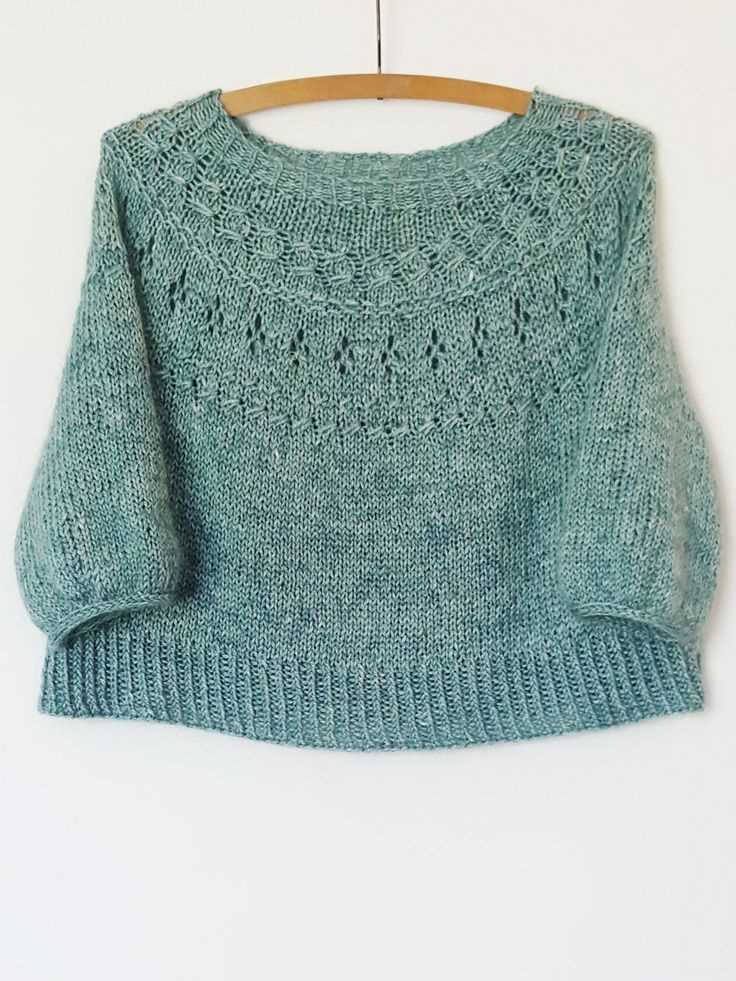
The Ranunculus Sweater is a beautifully designed and versatile knitting pattern that is sure to become a favorite in your wardrobe. This pattern features a loose and oversized fit, with large balloon sleeves that create a unique and stylish silhouette. The sweater can be knit in a range of sizes, making it suitable for all body types. Whether you prefer a cropped or longer length, the pattern can be easily customized to suit your personal style.
The Ranunculus Sweater pattern is suitable for knitters of all skill levels, including beginners. The pattern includes detailed instructions and helpful tips to guide you through each step of the knitting process. The sweater is knit using a top-down construction method, which means you can try it on as you go to ensure the perfect fit. The pattern also includes options for adjusting the neckline and sleeve length, allowing you to create a sweater that is uniquely yours.
To knit the Ranunculus Sweater, you will need a chunky weight yarn and a set of circular knitting needles. The pattern suggests using a yarn with a high percentage of wool for its warmth and softness. The sweater is knit primarily in stockinette stitch, with ribbing at the cuffs and hem for added structure. The oversized sleeves are created using increases and decreases to achieve the distinctive balloon shape.
Once you have completed the knitting, you will need to block and finish the sweater. Blocking is an important step in the knitting process that helps to even out the stitches and give the garment its final shape. The pattern provides instructions on how to block the sweater to achieve the desired fit and drape. Once blocked, you can add any desired finishing touches, such as sewing on buttons or adding a decorative trim.
The Ranunculus Sweater is not only a cozy and stylish addition to your wardrobe, but it is also a fun and rewarding knitting project. With its versatile design and customizable options, this sweater is sure to become a staple in your knitting repertoire. Whether you are a beginner or an experienced knitter, the Ranunculus Sweater pattern is a must-have for your collection.
Overview
The Ranunculus sweater knitting pattern is a beautiful and versatile design that is perfect for both beginner and experienced knitters. This pattern features a unique lace stitch pattern that creates a textured and delicate look, making it a stylish addition to any wardrobe.
With its loose and flowy fit, the Ranunculus sweater is not only fashionable, but also incredibly comfortable to wear. The pattern provides instructions for multiple sizes, so you can easily customize it to fit your body shape and preferences.
The pattern calls for bulky weight yarn, which makes this sweater a quick and satisfying project to knit. The recommended yarns are soft and cozy, ensuring that the finished sweater will be warm and snuggly. The pattern also includes information on yarn substitutions, so you can choose the perfect yarn for your desired look and feel.
Whether you choose to knit this sweater for yourself or as a thoughtful gift for a loved one, the Ranunculus pattern is sure to impress. Its beautiful lace pattern and relaxed fit make it a go-to sweater for any occasion. So grab your needles and get ready to create your own stylish and cozy Ranunculus sweater!
Materials

The Ranunculus sweater knitting pattern requires the following materials:
- Yarn: You will need approximately 800-1200 yards of fingering weight yarn. It is recommended to use a high-quality wool or wool blend yarn for best results. The pattern is designed to be versatile and can be knit with different yarn weights, just make sure to adjust your needle size accordingly.
- Needles: You will need both circular and double-pointed needles. The pattern recommends size US 4 (3.5mm) for the body and size US 2 (2.75mm) for the ribbing, but make sure to swatch and adjust needle size if needed to achieve the correct gauge.
- Stitch markers: These will be used to mark the beginning of rounds and any other important stitch placements.
- Tapestry needle: This will be used for weaving in ends and seaming.
- Scissors: You will need a good pair of scissors for cutting yarn.
Optional materials that may be helpful during the knitting process include stitch holders or scrap yarn for holding stitches, a row counter to keep track of your progress, and blocking tools such as blocking mats and blocking wires to help shape and size your finished sweater.
Gauge and Measurements
Before you start knitting the Ranunculus sweater, it is important to check your gauge. Gauge refers to the number of stitches and rows per inch in a knitted fabric. To achieve the correct fit and size of the sweater, it is crucial to match the gauge specified in the pattern.
Gauge:
- 8 stitches = 4 inches in stockinette stitch
- 12 rows = 4 inches in stockinette stitch
To check your gauge, you can knit a swatch using the recommended needle size. Start by casting on a few more stitches than specified in the pattern, and knit a few rows in stockinette stitch. Measure the stitches and rows within a 4-inch square using a ruler or a gauge measuring tool. If your gauge matches the pattern’s gauge, then you are ready to begin knitting the sweater. If not, you may need to adjust your needle size to obtain the correct gauge.
When it comes to measurements, the Ranunculus sweater is available in multiple sizes ranging from XS to XXL. The finished bust circumference for each size is as follows:
| Size | Finished Bust Circumference |
|---|---|
| XS | 35 inches |
| S | 38 inches |
| M | 41 inches |
| L | 44 inches |
| XL | 47 inches |
| XXL | 50 inches |
It is important to choose the size that matches your bust circumference or the desired ease. The pattern provides instructions for customizing the length of the sweater as well.
Cast-On and Ribbing
The Cast-On and Ribbing section is an essential part of knitting the Ranunculus sweater. It sets the foundation for the sweater and creates a stretchy and decorative edge. To begin, you will need to choose the appropriate cast-on method for your project. The pattern recommends using the long-tail cast-on, as it provides a neat edge and enough elasticity for the ribbing.
To execute the long-tail cast-on, measure a length of yarn approximately three times the width of your intended ribbing. This will give you enough yarn for the cast-on stitches, as well as a tail to weave in later. Hold the tail in your right hand, and create a slipknot at the end of the yarn. Place the slipknot on one of the needles and hold it in your left hand.
Once you have completed the cast-on, you can begin working the ribbing pattern. The Ranunculus sweater pattern suggests using a 1×1 ribbing, which alternates between one knit stitch and one purl stitch. The ribbing creates a textured effect and helps the sweater retain its shape. With the long-tail cast-on stitches on your needle, start by knitting the first stitch. Then, bring the yarn to the front of the work and purl the next stitch. Continue alternating between knit and purl stitches until you reach the desired length for your ribbing.
Body and Sleeve Construction
The Ranunculus sweater is constructed from the top down, using the raglan sleeve method. This means that the body and sleeves are worked downward from the neckline, with raglan shaping to create the distinctive sloping lines at the shoulders.
To begin, you will cast on stitches for the neckline and work in ribbing for a few rows to create a comfortable and stretchy collar. Then, the raglan shaping begins by increasing stitches at regular intervals along the raglan lines. This creates the gentle slope of the shoulders and gives the sweater its relaxed and cozy fit.
The body of the sweater is worked in the round, with the raglan increases continuing as you work down. You’ll continue knitting until you reach the desired length for the body, which can be customized to your preference. To finish, you will work a few more rows of ribbing at the bottom to match the collar, creating a cohesive look.
The sleeves of the Ranunculus sweater are also worked using the raglan method. They are picked up and worked directly from the body, with the raglan increases continuing along the sleeve lines. This allows for a seamless construction and ensures that the sleeve length and fit can be easily adjusted as needed. Once the desired length is reached, you’ll finish the sleeves with a few rows of ribbing to match the collar and bottom hem.
The overall construction of the Ranunculus sweater allows for a comfortable and customizable fit, while the raglan shaping adds visual interest and enhances the relaxed silhouette. Whether you’re a beginner or an experienced knitter, this pattern offers an enjoyable and satisfying knitting experience.
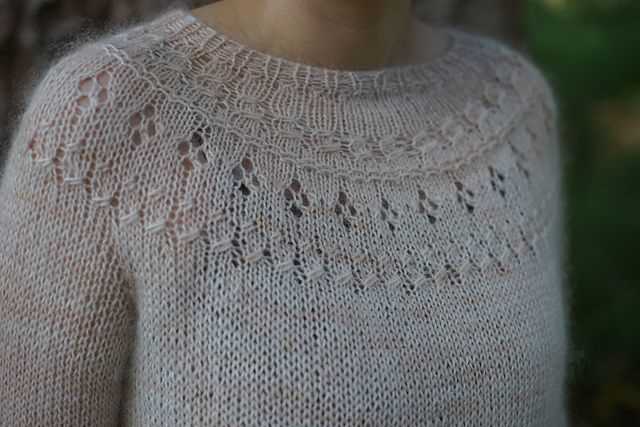
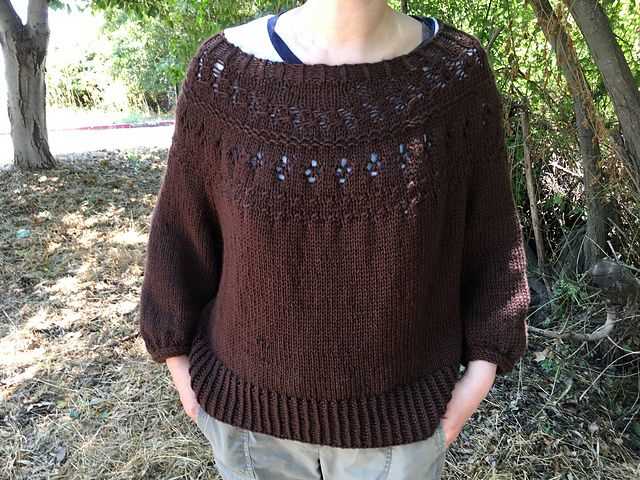
Lace Pattern
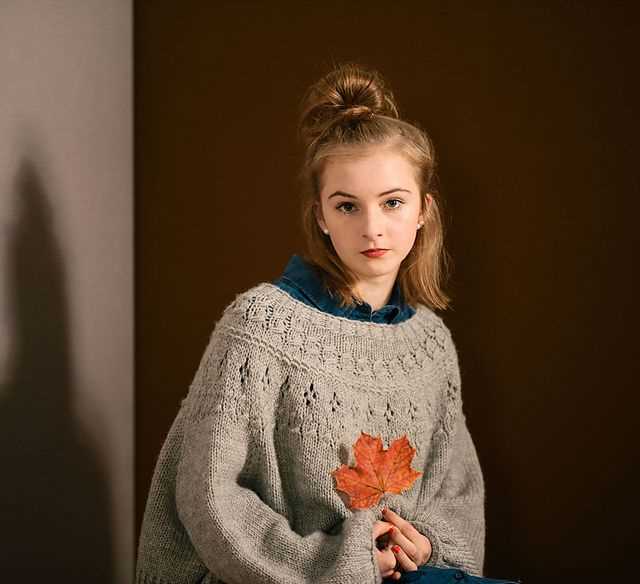
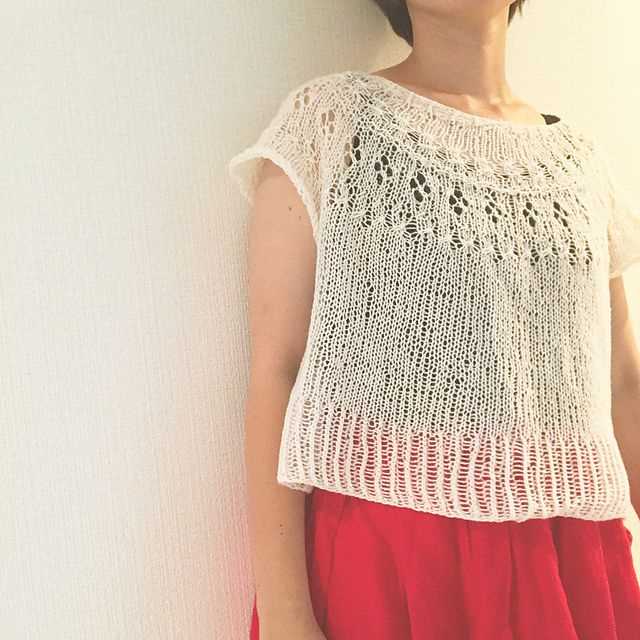
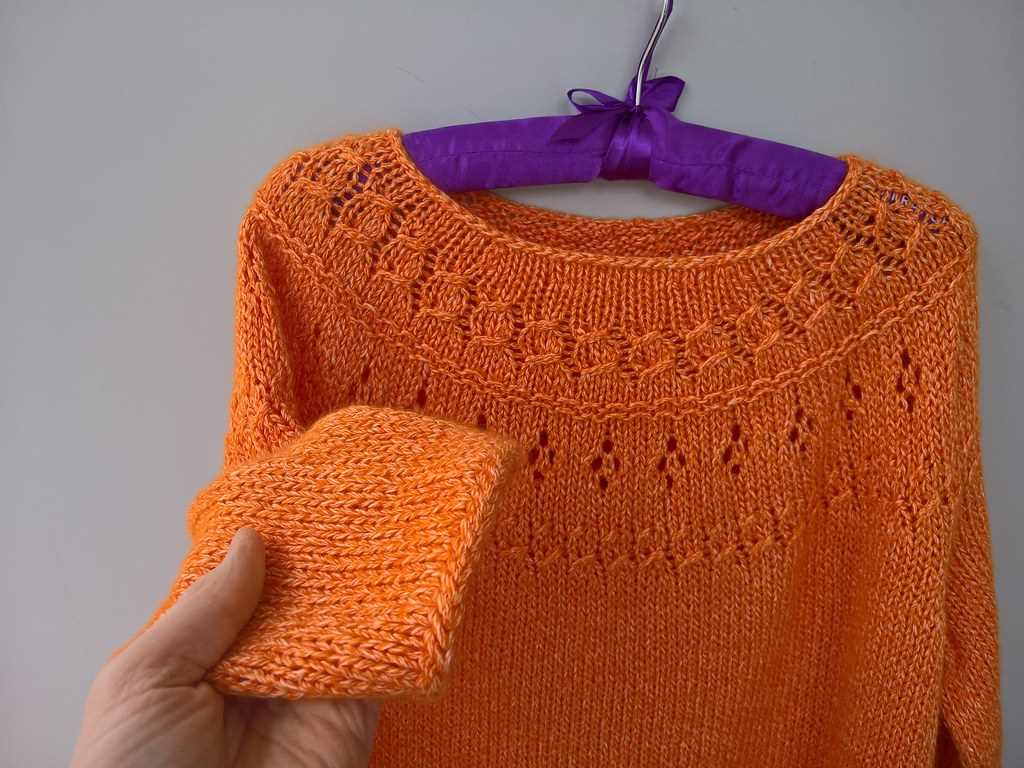
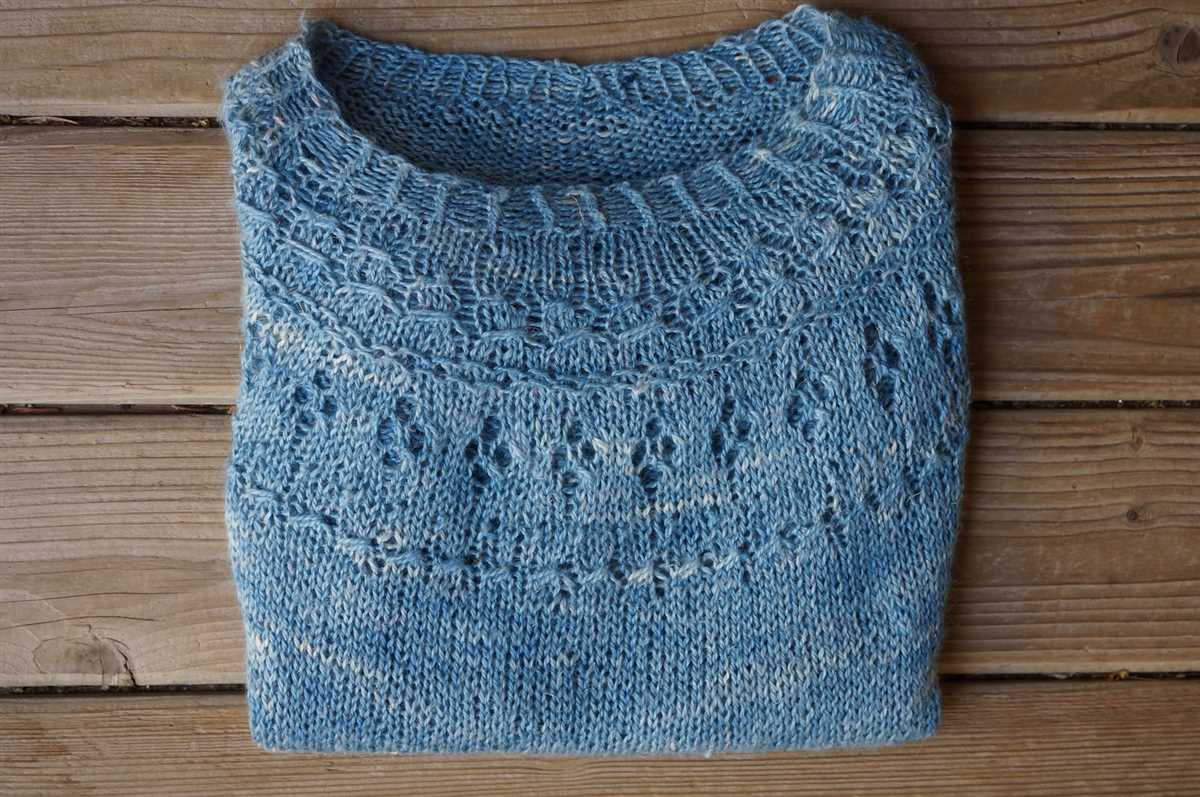
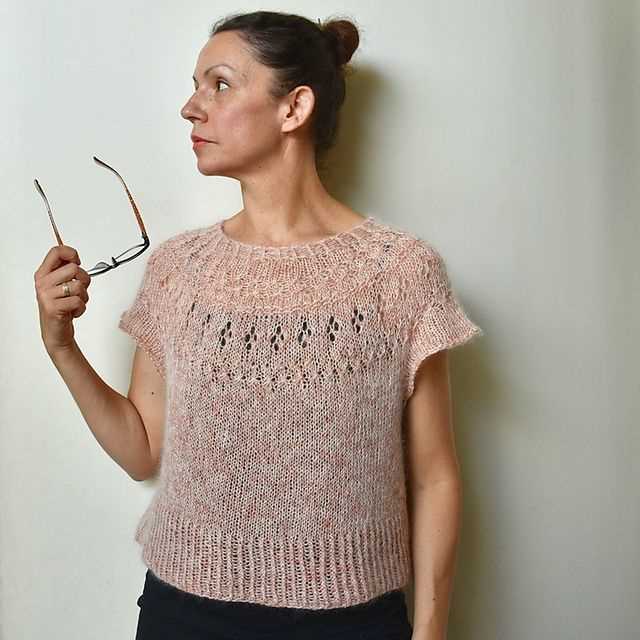
The Ranunculus sweater features a beautiful lace pattern that adds a delicate and feminine touch to the design. The lace pattern creates an intricate design of leaves and flowers, giving the sweater a romantic and elegant look. The pattern is worked in a repeating motif, with each motif forming a leaf or a flower. Knitted in a fine yarn, the lace pattern allows for a lightweight and airy fabric, perfect for spring or summer.
The lace pattern is worked over a multiple of stitches, making it easy to adjust the size of the sweater to your preference. The pattern includes both written instructions and charts, allowing you to choose the method that you prefer. The lace motifs are worked on both the front and the back of the sweater, creating a symmetrical design.
To create the lace pattern, you will need to have a good understanding of basic knitting techniques, such as yarn overs, decreases, and increases. The pattern includes detailed instructions for each stitch, making it suitable for intermediate to advanced knitters. With practice, you will be able to create the intricate lace pattern with ease and confidence.
The lace pattern is the highlight of the Ranunculus sweater, adding charm and elegance to the overall design. Whether you choose to knit the sweater in a soft pastel shade or a vibrant color, the lace pattern will create a stunning effect. Wear it with a skirt or jeans for a stylish and versatile look. The Ranunculus sweater is a timeless piece that you will cherish for years to come.
The yoke shaping is an important part of the Ranunculus sweater knitting pattern. It determines the fit and overall look of the sweater. The yoke is the portion of the sweater that sits on the shoulders and covers the upper part of the body. In this pattern, the yoke is worked in a combination of ribbing and stockinette stitches, creating a visually appealing texture.
To begin the yoke shaping, the pattern instructs to divide the stitches onto multiple double-pointed needles or use the magic loop method. This is done to accommodate the increasing number of stitches as the yoke is worked. The pattern provides detailed instructions on how to increase stitches evenly to shape the yoke. These increases may be done through different methods such as yarn overs or knit front and back (kfb) stitches. The number and frequency of the increases will vary depending on the size being knit.
Yoke Shaping Techniques
One common yoke shaping technique used in this pattern is the raglan shaping method. Raglan shaping creates diagonal lines that extend from the underarm to the neckline, resulting in a comfortable fit and overall flattering shape. This is achieved by decreasing stitches at the raglan seams in a consistent pattern.
Another yoke shaping technique used in this pattern is the short-row shaping. Short rows are worked across a portion of the yoke to create a gentle curve at the back of the neck. This helps the sweater lay flat and prevents any bunching or discomfort at the neck. The pattern provides specific instructions on how to work the short rows.
Overall, the yoke shaping of the Ranunculus sweater knitting pattern is carefully designed to create a comfortable and stylish fit. The combination of ribbing, stockinette, increases, and decreases creates a visually appealing texture and shape. Following the pattern’s instructions for yoke shaping is crucial to achieve the desired fit and look of the finished sweater.
Neckline Finishing
The neckline finishing on the Ranunculus sweater is an important step to complete the garment. It not only adds a professional touch to the overall design, but also ensures a comfortable fit around the neck.
To finish the neckline, you will start by picking up stitches around the neck opening using your preferred method. This can be done using a circular needle or double-pointed needles, depending on your preference and the size of the neckline. Make sure to evenly distribute the stitches around the entire neckline.
Once you have picked up the stitches, you can begin the edging. One option is to work a simple ribbed edging using a combination of knit and purl stitches. This creates a stretchy and clean finish. Alternatively, you can choose to add a decorative edging such as a picot or eyelet pattern for added detail.
After completing the desired edging, you will need to bind off the stitches. It is important to use a loose bind-off method to ensure that the neckline remains comfortable and flexible. You can choose a stretchy bind-off technique such as the tubular bind-off or the Jeny’s Surprisingly Stretchy Bind-Off.
Once the neckline is bound off, you can weave in any loose ends and block the sweater to give it its final shape. Blocking will help smooth out any uneven stitches and allow the neckline to lay flat.
Sleeve Cuff

The sleeve cuffs are an important part of the Ranunculus sweater knitting pattern. They add a finishing touch to the sleeves and help to keep them in place. The cuff is worked in ribbing stitch, which creates a stretchy and snug fit.
To knit the sleeve cuff, you will need to pick up stitches along the edge of the sleeve. Start by folding the cuff in half and marking the halfway point. Using a knitting needle, pick up stitches along the edge of the sleeve, starting at the marker and working towards the cuff edge. Make sure to pick up an even number of stitches so that the ribbing pattern can be worked evenly.
Once you have picked up the stitches, you will work in ribbing stitch for the cuff. This can be a traditional 1×1 rib or a 2×2 rib, depending on your preference. Ribbing stitch is created by alternating knit and purl stitches in a specific pattern. For a 1×1 rib, you will knit one stitch, then purl one stitch, repeating this pattern across the row. For a 2×2 rib, you will knit two stitches, then purl two stitches, repeating this pattern across the row. The ribbing stitch creates a stretchy fabric that helps to keep the cuff in place.
Continue working in ribbing stitch for the desired length of the cuff. You can try the cuff on as you go to ensure a comfortable fit. When you are finished with the cuff, bind off the stitches in pattern, maintaining the ribbing pattern. Cut the yarn, leaving a tail for weaving in later.
Hemline
A hemline is the edge of a fabric that is folded over and stitched to create a finished edge. It is an important element in garment construction as it helps to give structure and shape to the garment. The hemline can vary in length and style depending on the design of the garment.
In the context of the Ranunculus sweater knitting pattern, the hemline refers to the bottom edge of the sweater. The pattern suggests using a folded hem to create a clean and polished finish. To achieve this, you would typically fold the fabric up and then stitch it in place.
The hemline of the Ranunculus sweater can be customized to suit your desired length. The pattern provides instructions on how to adjust the length of the body and sleeves, allowing you to create a sweater that fits your preferences. Whether you prefer a cropped or longer length, you have the flexibility to adjust the hemline accordingly.
When working on the hemline of the Ranunculus sweater, it is important to pay attention to the tension of your stitches. Ensuring an even tension will help to create a professional-looking finish. You may also consider using a contrasting color for the hemline to add an extra pop of color and visual interest to your sweater.
Overall, the hemline is an essential component of the Ranunculus sweater knitting pattern. It allows you to add a polished and customized finish to your sweater, ensuring that it fits well and looks stylish. Whether you choose to follow the suggested folded hem technique or experiment with different styles, the hemline is a detail that can truly elevate your knitting project.
Blocking and Finishing
To achieve a professional finish and ensure the best fit for your Ranunculus sweater, blocking is an essential step in the knitting process. Blocking helps to shape the garment, even out stitches, and improve the drape of the fabric. It involves wetting the knitted piece and then carefully shaping and pinning it to the desired measurements.
Before blocking, it is important to read the specific instructions provided in the Ranunculus sweater knitting pattern. The pattern may recommend a specific blocking method and offer guidance on the measurements and shape to aim for. Make sure to follow these instructions to achieve the intended design and fit of the sweater.
To begin the blocking process, gently fill a sink or basin with lukewarm water and add a mild wool detergent. Submerge the knitted piece in the water, making sure it is fully saturated. Avoid agitating or wringing the fabric, as this can cause stretching or distortion. Leave the sweater to soak for about 15-20 minutes, allowing the fibers to absorb the moisture.
Next, carefully remove the sweater from the water and gently squeeze out the excess moisture. Lay the sweater flat on a clean towel and roll it up, pressing down to extract more water. Once the sweater is damp, it is ready to be blocked.
Lay the sweater on a blocking board or a clean, flat surface, making sure it is in the desired shape and measurements. Use rust-proof T-pins to secure the edges and corners of the sweater, shaping it to the desired fit. Take care to measure and check the dimensions to ensure symmetry and accuracy.
Allow the sweater to dry completely before unpinning. This can take anywhere from a few hours to a day, depending on the humidity and air circulation in your environment. Once dry, gently remove the pins and admire your beautifully finished Ranunculus sweater. It is now ready to be worn and enjoyed!
Tips and Variations
When knitting the Ranunculus sweater, here are a few tips to keep in mind:
- Use stitch markers to easily mark the beginning of rounds and any increases or decreases.
- Measure your gauge before starting the project to ensure the sweater will fit properly.
- If you prefer a longer or shorter sweater, you can easily adjust the length by adding or subtracting rounds in the body and sleeves.
- If desired, you can customize the neckline by adding a ribbed collar or a different type of edging.
- Consider experimenting with different yarn weights and fibers to create a unique look for your sweater.
Here are some variations you can try:
- Stripes: Instead of knitting the sweater in a solid color, you can incorporate stripes by alternating between two or more colors.
- Lace or cable panels: Add visual interest to the sweater by including lace or cable panels in the body or sleeves.
- Color block: Divide the sweater into sections of different colors for a bold, modern look.
- Cropped version: For a shorter, more cropped sweater, you can reduce the number of rounds in the body section.
With these tips and variations in mind, you can create a beautiful and personalized Ranunculus sweater that is perfect for you.