
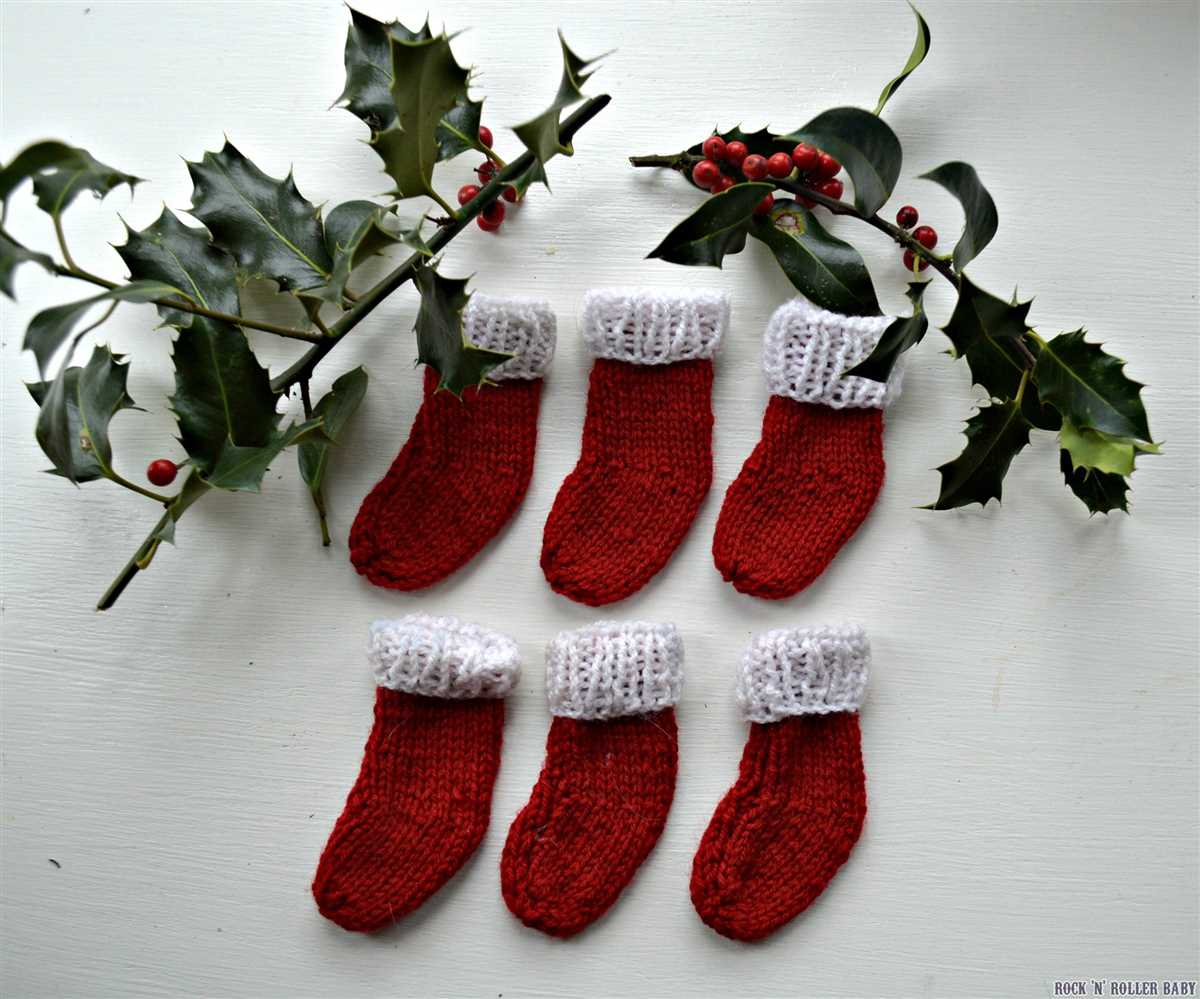
Christmas stockings are an essential part of holiday decorations. They are often hung by the fireplace or on a mantel, ready to be filled with gifts and goodies from Santa Claus. Knitting a Christmas stocking is a fun and rewarding project that allows you to customize the design and colors to match your holiday decor. Whether you are a beginner or an experienced knitter, this pattern will guide you through the process of creating a beautiful and festive stocking.
Materials:
- Worsted weight yarn in various colors
- Circular knitting needles, size 8 (5mm)
- Set of double-pointed knitting needles, size 8 (5mm)
- Tapestry needle
- Stitch markers
Instructions:
1. Cast on 60 stitches onto your circular knitting needles.
2. Join the round and place a stitch marker to mark the beginning of the round.
3. Knit in a rib stitch pattern (knit 2, purl 2) for 12 rounds to create the cuff of the stocking.
4. Switch to your desired color for the body of the stocking. Continue knitting in the round until the length of the stocking measures approximately 12 inches.
5. Decrease stitches evenly around the round until you have 20 stitches remaining.
6. Cut the yarn, leaving a long tail. Thread the tail through a tapestry needle and slip the needle through the remaining stitches, pulling tight to close the top of the stocking.
7. Weave in any loose ends and your Christmas stocking is ready to be hung and filled with holiday treats!
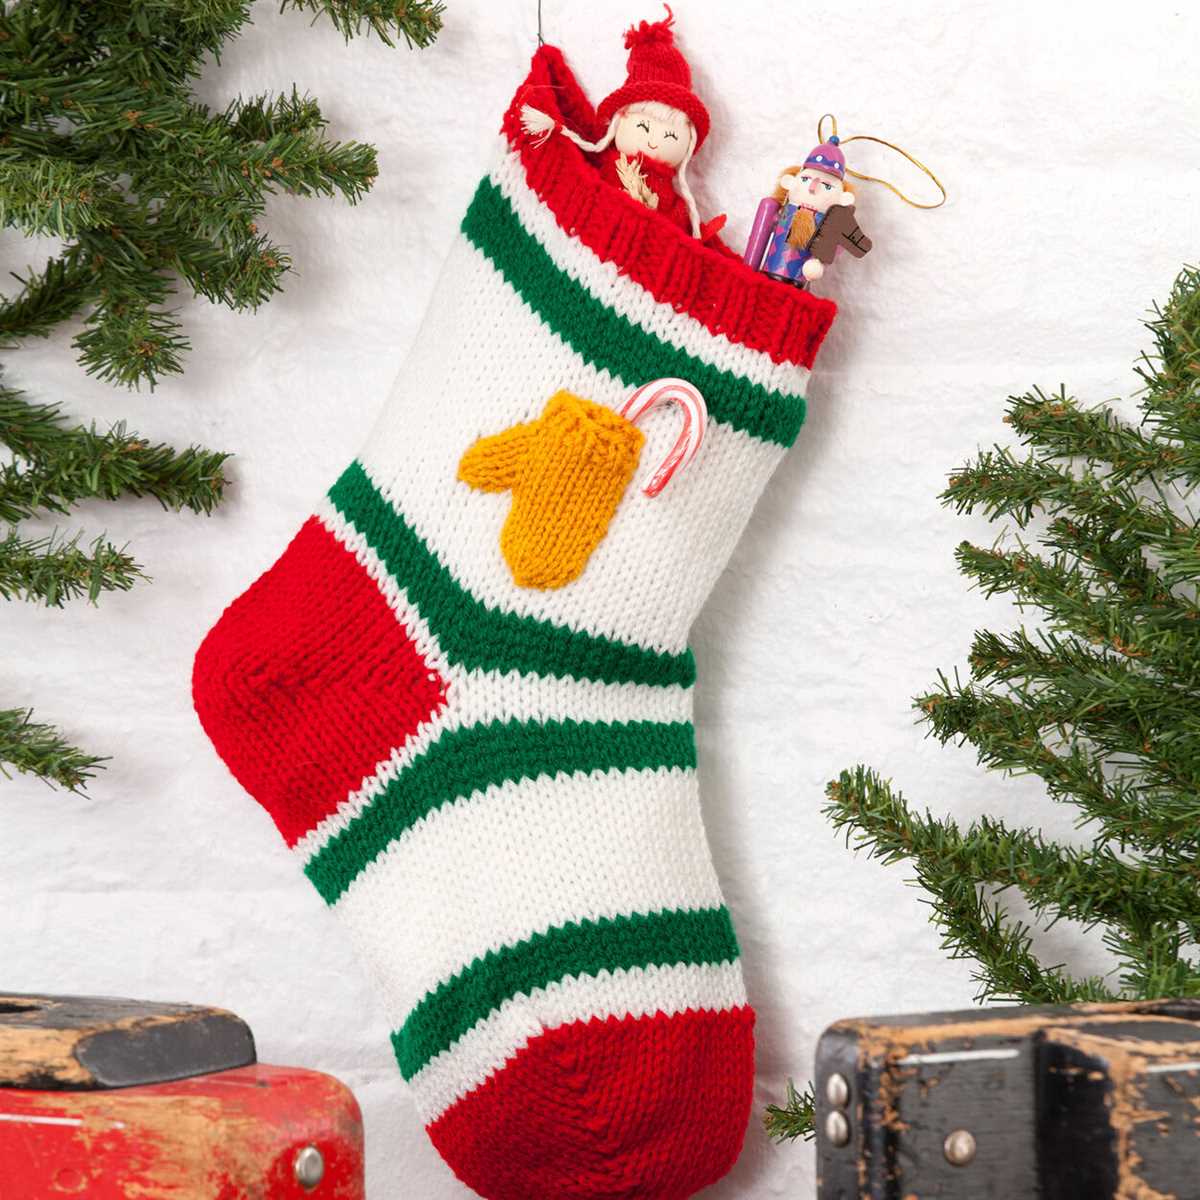
This pattern is a basic guide, and you can customize it by adding stripes, snowflake motifs, or other embellishments. Get creative and have fun knitting your own unique Christmas stocking!
Pattern for Knit Christmas Stocking
A knit Christmas stocking is a classic and charming addition to any holiday decor. Whether you want to create a personalized stocking for a loved one or simply enjoy the process of knitting one yourself, this pattern is a great place to start.
To begin, gather your materials: a set of knitting needles, yarn in your desired colors, and a tapestry needle for finishing touches. This pattern uses a basic stocking shape with a ribbed cuff, a striped body, and a contrasting heel and toe.
Materials:
- Size 8 knitting needles
- Worsted weight yarn in 3 colors: main color, contrasting color 1, and contrasting color 2
- Tapestry needle
Instructions:
- Cast on 60 stitches using the main color.
- Work in a K2, P2 rib stitch for 2 inches to create the cuff.
- Switch to contrasting color 1 and knit 2 rows.
- Switch back to the main color and knit 4 rows.
- Repeat steps 3 and 4, alternating between the contrasting color and main color, until the stocking measures 16 inches in total length.
- Switch to contrasting color 2 and knit 2 rows.
- Switch back to the main color and work in a K2, P2 rib stitch for 2 inches to create the toe.
- Bind off all stitches and weave in any loose ends.
Once you have finished knitting the stocking, you can add personal touches such as embroidered initials or decorative buttons. Hang it with care and enjoy the festive spirit it brings to your home during the holiday season!
Knit Stocking Patterns: Tips and Tricks
Knitting Christmas stockings can be a fun and rewarding project for the holiday season. Whether you’re a beginner or an experienced knitter, there are a few tips and tricks you can use to make your stocking patterns even more beautiful and unique.
Choose the Right Yarn
When selecting yarn for your knit stockings, it’s important to choose a material that’s both soft and durable. Wool or wool-blend yarns are a popular choice, as they provide warmth and can withstand the test of time. You can also experiment with different textures and colors to add interest to your stockings.
Use the Right Needles
The size of your knitting needles can make a big difference in the final look and feel of your stocking. For a tight-knit stocking, choose smaller needles. If you want a looser, more relaxed look, opt for larger needles. Circular needles can also be useful for knitting in the round, especially if you’re making stockings with a striped or patterned design.
Follow a Pattern
While it’s possible to create your own stocking pattern, using a pre-designed pattern can save you time and ensure a well-constructed stocking. Look for patterns that include clear instructions and diagrams to help guide you through the knitting process. You can find a variety of stocking patterns online or in knitting books and magazines.
Personalize Your Stockings
One of the best parts about knitting your own stockings is the ability to personalize them. Consider adding initials, names, or other decorative elements to make each stocking unique. You can use duplicate stitch, embroidery, or even knit-in motifs to add that special touch.
With these tips and tricks in mind, you’ll be well-equipped to create beautiful knit stockings that will be treasured for years to come. Happy knitting!
Choosing the Perfect Yarn for Your Knit Stocking
When it comes to knitting Christmas stockings, choosing the right yarn is essential to achieve the desired look and feel. The yarn you select will determine the durability, softness, and overall appearance of your stocking. Additionally, different types of yarn will affect the difficulty level of the pattern and how the finished stocking hangs.
Type of Yarn: There are numerous options when it comes to selecting yarn for your knit stocking. Factors to consider include the fiber content, weight, and texture of the yarn. For a traditional stocking, wool or wool blend yarns are a popular choice due to their warmth and durability. Acrylic yarns are also commonly used for their affordability and wide range of colors available. Alternatively, you can opt for luxury yarns such as cashmere or alpaca for a more luxurious stocking.
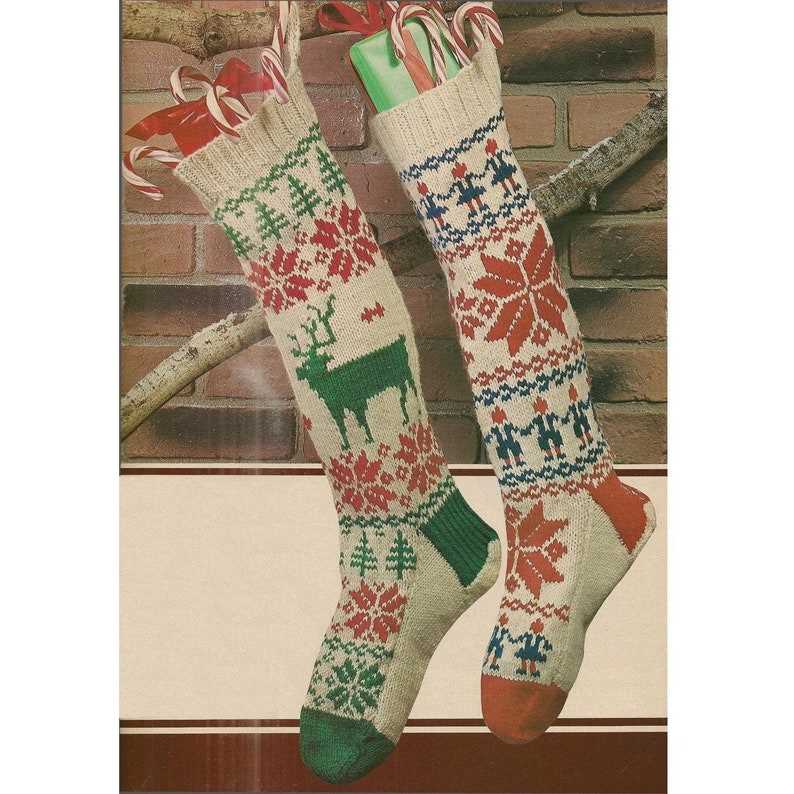
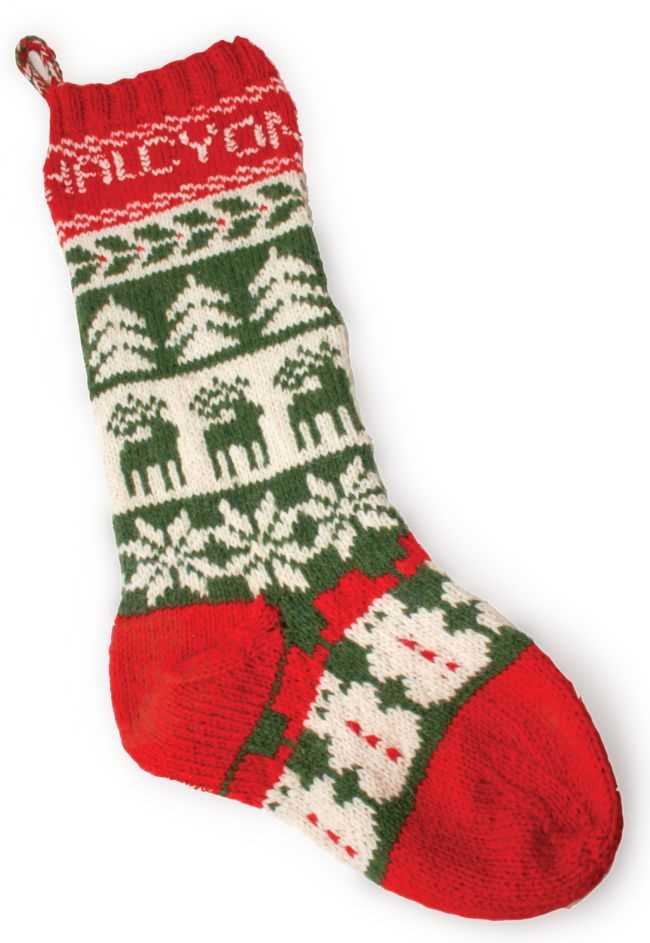
Color: The color of yarn you choose can greatly impact the overall appearance of your stocking. Traditional Christmas stockings often feature vibrant holiday colors, such as red, green, and white. However, there are no hard and fast rules when it comes to color selection – you can choose to match your existing holiday decor or go for a more unique and personalized look. Consider using multiple colors and creating stripes or Fair Isle patterns for added visual interest.
Texture: The texture of the yarn will affect how the stocking looks and feels. Some yarns have a smooth and even texture, while others have a more textured or fluffy appearance. Consider the pattern you will be using and how the yarn’s texture will complement it. For example, if you are knitting a cable or lace pattern, a yarn with good stitch definition will help showcase the intricate design.
Gauge: Before you start knitting your stocking, it’s important to check the gauge of your chosen yarn. The recommended gauge for your pattern will determine how many stitches and rows you need to achieve the correct size. Make sure to knit a gauge swatch and adjust your needle size if necessary to ensure your stocking turns out the right size.
Conclusion: Choosing the perfect yarn for your knit stocking is an important decision that can greatly impact the final result. Consider the type of yarn, color, texture, and gauge to ensure the stocking meets your desired style and functionality. With the right choice of yarn, you can create a beautiful and cherished Christmas stocking that will be treasured for years to come.
Getting Started: How to Cast On for Your Knit Stocking
When beginning your project of knitting a Christmas stocking, one of the first steps is to cast on your stitches. Casting on is the process of creating the foundation row of stitches onto your knitting needles, which will set the width of your stocking.
1. Choose your preferred casting on method: There are several different methods to choose from when casting on, including the long-tail cast on, the cable cast on, and the provisional cast on. Each method has its own unique advantages and characteristics, so it’s important to select the one that best suits your needs and preferences.
2. Gather your tools and materials: Before you begin casting on, make sure you have all the necessary tools and materials at hand. This includes your knitting needles, yarn, and any additional notions or accessories you may need. Having everything prepared and within reach will help ensure a smooth and uninterrupted casting on process.
3. Follow the casting on instructions: Once you have chosen your casting on method and gathered your supplies, carefully read and follow the instructions for that specific method. Each method will have its own set of steps and techniques, so it’s important to pay attention to the details and ensure accuracy.
4. Double-check your stitch count: After completing your cast on, it’s a good idea to double-check your stitch count to ensure you have the correct number of stitches. This is particularly important if your pattern specifies a certain stitch count or if you want to make sure your stocking turns out the desired size.
5. Begin knitting: Once you have successfully cast on your stitches, you’re ready to start knitting your Christmas stocking! Follow your pattern instructions and enjoy the process of creating a beautiful and personalized stocking for the holiday season.
Knitting Techniques: Essential Stitches for Your Stocking
When it comes to knitting a Christmas stocking, there are several essential stitches that you need to know. These stitches will help you create beautiful patterns and textures for your stocking, making it a standout piece for your holiday decor.
1. Stockinette Stitch: The stockinette stitch is one of the most basic and versatile stitches in knitting. It creates a smooth and even fabric, perfect for the body of your stocking. To achieve this stitch, knit one row and purl the next row.
2. Ribbing: Ribbing is a common stitch pattern used for cuffs and edges of garments, and it works great for the top of your stocking. Ribbing is created by alternating knit and purl stitches in a specific pattern, such as knit 2, purl 2 or knit 1, purl 1. This stitch creates a stretchy and snug edge for your stocking.
3. Cables: Cables are an advanced knitting technique that can add a beautiful and intricate design to your stocking. They create the illusion of twisted ropes or braids on your fabric. To create cables, stitches are crossed over each other using a cable needle or a double-pointed needle.
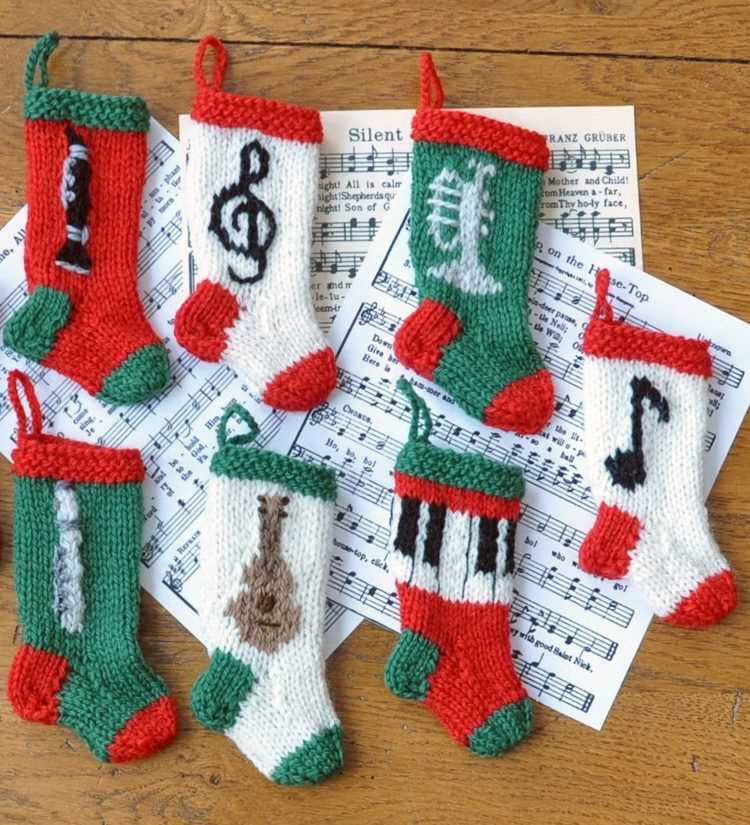
4. Fair Isle: Fair Isle is a colorwork technique that involves working with two or more colors in the same row. It is perfect for adding festive patterns and motifs to your stocking. To create Fair Isle, you will carry the unused color behind the work and alternate between colors as you knit.
5. Eyelet Lace: Eyelet lace is a delicate stitch pattern that adds a feminine touch to your stocking. It creates small holes or eyelets in the fabric, perfect for incorporating a decorative ribbon or hanging loop on your stocking. To achieve this stitch, you will need to yarn over and knit two stitches together in a specific pattern.
6. Duplicate Stitch: Duplicate stitch is a method of adding additional colors to a finished piece of knitting. It is great for adding small details or personalization to your stocking. With duplicate stitch, you embroider over the existing stitches with a contrasting color using a tapestry needle.
By mastering these essential knitting stitches, you will be able to create a beautiful and personalized stocking that is unique to you. Whether you choose a classic design or experiment with different patterns, these techniques will help you achieve the perfect Christmas stocking for your holiday celebrations.
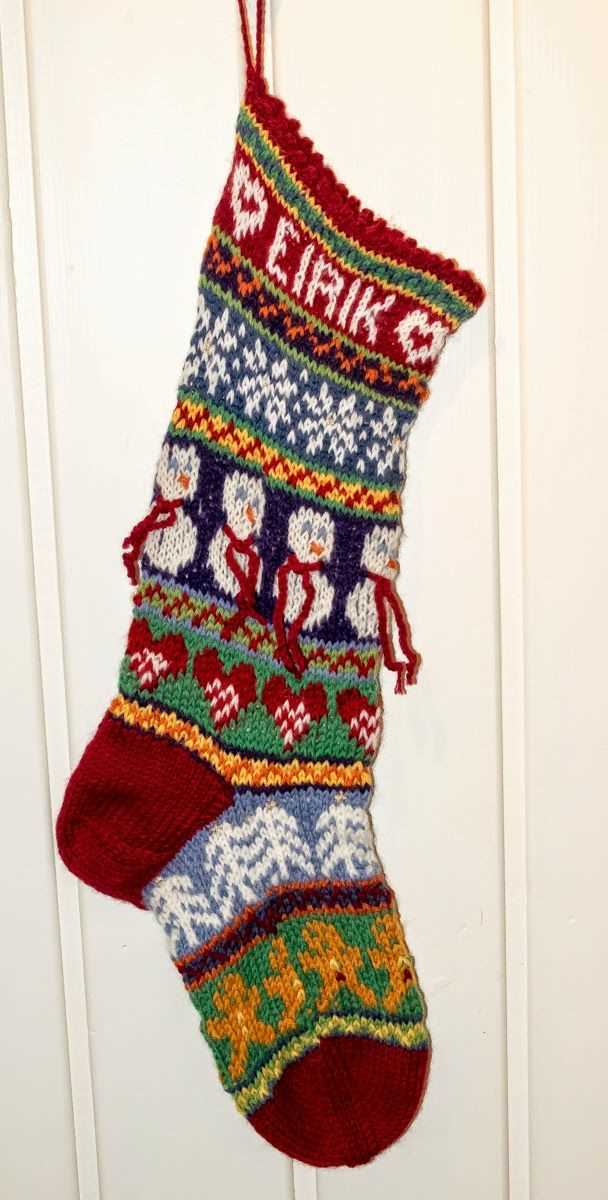
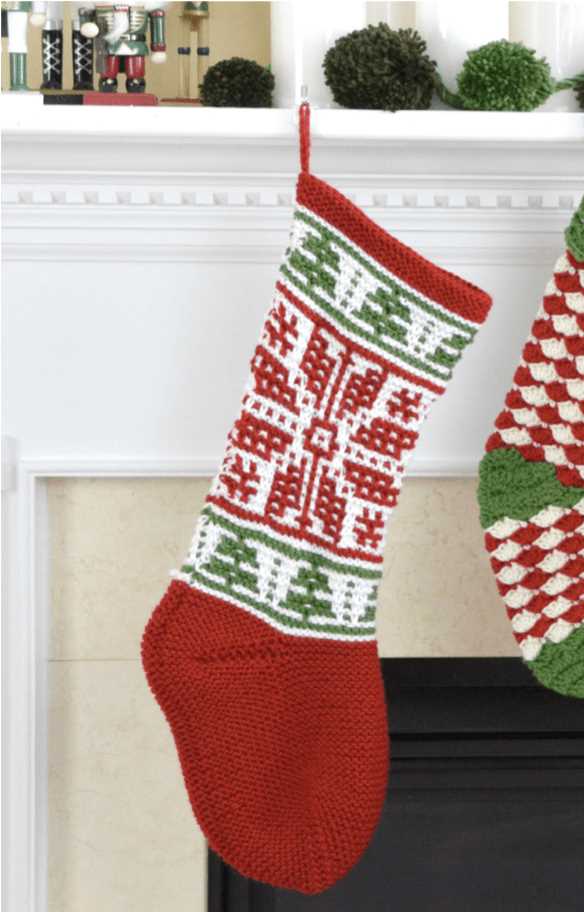
Creating Patterns: Fair Isle and Cable Knitting for Stockings
The holiday season is the perfect time to indulge in knitting projects, and one of the most popular items to create is a festive Christmas stocking. Knitting stockings allows you to express your creativity while also producing a practical and decorative item for your home. If you’re looking to add some extra flair to your stocking, consider incorporating Fair Isle and cable knitting techniques into your pattern.
Fair Isle knitting is a traditional technique that originated in the Fair Isle region of Scotland. It involves working with multiple colors in a single row, creating intricate patterns and motifs. By incorporating Fair Isle knitting into your stocking pattern, you can add beautiful snowflake designs, reindeer motifs, or any other festive imagery. The key to successful Fair Isle knitting is to keep your tension consistent and to carry the unused yarn along the back of your work, creating a neat and sturdy fabric.
Cable knitting, on the other hand, involves creating twisted stitches that form raised, textured patterns. This technique adds depth and interest to your stocking design. You can incorporate simple cables for a classic look or experiment with more complex cable patterns for a unique and eye-catching stocking. Cable knitting requires the use of a cable needle or small double-pointed needle to temporarily hold stitches while you cross them over each other, creating the twisted effect.
When combining Fair Isle and cable knitting in your stocking pattern, it’s important to consider the design elements you want to include. You can incorporate cables into the cuff or create a Fair Isle pattern on the body of the stocking with cable accents. Experiment with different color combinations and motifs to create a stocking that reflects your personal style and holiday aesthetic. With these techniques, you can create a one-of-a-kind stocking that will be cherished for years to come.
- Key phrases:
- Fair Isle knitting
- cable knitting
- festive Christmas stocking
- incorporating
- intricate patterns
- tension consistent
- unused yarn
- raised, textured patterns
- cable needle
- twisted effect
- design elements
- color combinations
- personal style
- holiday aesthetic
- one-of-a-kind stocking
Adding Personal Touches: Embellishments for Your Stocking
Adding embellishments to your knit Christmas stocking is a great way to make it truly unique and special. There are countless options for adding personal touches, from simple accents to more intricate designs. By incorporating these embellishments, you can create a stocking that truly reflects your own style and personality.
Ribbon and Bows: One of the easiest ways to add visual interest to your stocking is by attaching ribbon or bows. Choose a ribbon that complements the colors of your stocking, and tie it in a bow at the top or along the sides. You can also add small bows to the cuff or heel for an extra festive touch.
Embroidery: Embroidering your name or initials onto your stocking is a classic way to personalize it. You can use a contrasting thread color to make the embroidery stand out, or match it to the yarn you used for the stocking. Consider adding other small embroidered designs, such as snowflakes or holly leaves, for added flair.
Sequins and Beads: For a bit of sparkle, consider adding sequins or beads to your stocking. You can sew them on individually to create a pattern, or use them to create larger motifs such as stars or Christmas trees. Be sure to choose sequins and beads that are securely attached so they don’t fall off when the stocking is hung or filled.
Pom-poms and Tassels: Pom-poms and tassels are fun and playful embellishments that can add a touch of whimsy to your stocking. Attach them to the ends of the stocking’s toe or heel, or use them to create a decorative trim along the cuff. Choose colors that coordinate with the rest of your stocking for a cohesive look.
Buttons and Charms: Sewing buttons or attaching charms can add an extra dimension to your stocking. Use buttons in different sizes and colors to create a unique pattern, or attach them in a specific shape or design. Charms can be hung from the cuff or sewn onto the body of the stocking for a personalized touch.
Remember, the key to successful embellishment is to keep it balanced and not overwhelm the overall design of your stocking. Choose a few embellishments that complement each other and the overall theme of your stocking, and have fun adding your own personal touches.
Shaping Your Stocking: Decreases and Increases
When knitting a Christmas stocking, shaping is an important technique to create a tapered shape that mimics the traditional stocking silhouette. This shaping is achieved through the use of decreases and increases in your knitting.
Decreases: Decreases are used to narrow the width of the knitting. There are several different types of decreases you can use, such as knit two stitches together (k2tog) or slip, slip, knit (ssk). These decreases are typically placed at the sides of the stocking to create a straight line that tapers towards the top.
Increases: Increases, on the other hand, are used to widen the width of the knitting. You can use techniques such as yarn over (yo) or make one (m1) to create these increases. They are typically placed towards the bottom of the stocking to accommodate for the increasing width as you move up towards the leg of the stocking.
It’s important to follow the pattern instructions carefully to ensure that your decreases and increases are placed in the correct positions. This will help you achieve the desired shape for your stocking and ensure that it fits snugly around your fireplace or mantle.
Remember, shaping your stocking is a key step in creating a professional-looking finished product. Take your time, practice the different decreases and increases, and soon you’ll be able to knit beautiful and festive Christmas stockings.
Finishing Touches: Binding Off and Weaving in Ends
After completing the final row of your knit Christmas stocking, it’s time to finish off your work with a clean edge. To do this, you’ll need to bind off your stitches, securing them so they don’t unravel.
To bind off, knit the first two stitches of the row as usual. Then, insert the left needle into the first stitch on the right needle and lift it over the second stitch and off the needle. Repeat this process, knitting one stitch and lifting the previous stitch over, until you have one stitch remaining on the right needle. Cut the yarn, leaving a long tail, and thread it through the last stitch to secure it.
Once you have bound off all your stitches, you may still have several loose ends of yarn hanging from your work. These ends need to be woven in to ensure that your stocking looks neat and tidy. Take a tapestry needle and thread one of the loose ends onto it. Begin weaving the yarn through the stitches on the wrong side of your work, going back and forth to create a secure and invisible finish.
Be sure to weave in all loose ends of yarn, including any from color changes or joining new skeins. Once all the ends are securely woven in, trim any excess yarn, being careful not to cut too close to your work. This will give your knit Christmas stocking a professional look and prevent any loose ends from unraveling over time.
Finishing Details: Sewing or Crocheting the Stocking Together
Once you have finished knitting all the pieces of your Christmas stocking, it’s time to sew or crochet them together to create the final product. This step is crucial for giving your stocking its shape and ensuring that it will hold up to the weight of all the goodies you plan to stuff inside it.
If you prefer sewing, start by laying out the knitted pieces of the stocking, making sure that the edges line up correctly. Use a yarn needle and the same yarn that you used for knitting to sew the pieces together. Begin sewing from the top of the stocking down, using a whip stitch or mattress stitch to join the edges. Take care to make your stitches neat and even, so that they are not visible from the outside of the stocking. Once you have sewn the sides together, turn the stocking inside out to hide the seams.
If crochet is your preferred method, you can use a slip stitch or single crochet to join the knitted pieces of the stocking. Start by aligning the edges of the pieces and hold them together as you work. Insert your hook through both layers of fabric and pull a loop of yarn through. Then, yarn over and pull through both loops on the hook to complete the slip stitch or single crochet. Repeat this process along the entire edge of the stocking, making sure to keep your tension consistent for an even result. Once you have crocheted the sides together, fasten off and weave in any loose ends.
Whichever method you choose, be sure to take your time and pay attention to detail as you sew or crochet the stocking together. This will ensure that your finished product looks polished and professional. Once you have completed this step, your Christmas stocking will be ready to hang and fill with festive treats and gifts for the holiday season.
Blocking Your Knit Stocking for the Perfect Fit

A knit Christmas stocking is a beautiful and festive addition to any holiday decor. However, to achieve the perfect fit and shape, it’s important to block your stocking after knitting. Blocking involves shaping and stretching the knit fabric to give it the desired measurements and appearance.
To begin the blocking process, you will need a few materials, including a blocking board or mat, rustproof pins, and a spray bottle filled with water. Start by laying out your knit stocking on the blocking board, making sure it is flat and smooth. You can use rustproof pins to secure the edges and corners of the stocking to the board, ensuring it stays in place throughout the blocking process.
Next, gently spritz the stocking with water using the spray bottle. Be careful not to oversaturate the fabric, as this can lead to stretching or distortion. The water will help relax the fibers and make them more pliable for shaping. Once the stocking is damp, you can start reshaping it to the desired size and form.
To achieve the perfect fit, you can use measurements as a guide. Pay attention to the length and width of the stocking, as well as the shape of the toe and heel. You can use a tape measure to ensure the stocking is symmetrical and proportionate. Adjust the fabric as needed, pulling gently on the edges and pinning them in place.
Once you are satisfied with the shape and fit of the stocking, let it dry completely. This can take anywhere from a few hours to a day, depending on the thickness of the knit and the humidity level in your area. Avoid moving or touching the stocking while it is drying, as this can disrupt the shaping process.
After the stocking is fully dry, carefully remove the pins and admire your handiwork. The blocked stocking should now have a perfect fit and shape, ready to be hung with care. Remember to store your knit stockings in a cool, dry place to maintain their shape and prevent any potential damage.
Extra Tips and Tricks for a Professional-Looking Stocking
Creating a professional-looking stocking requires attention to detail and careful execution. Here are some additional tips and tricks to help you achieve a polished and well-crafted result:
- Select high-quality yarn: The choice of yarn can greatly impact the overall look of your stocking. Opt for a soft and durable yarn, such as wool or acrylic blend, to ensure that your stocking retains its shape and withstands the test of time.
- Use a tension gauge: To maintain consistency in your knitting, it’s important to check your tension periodically. Use a tension gauge to ensure that you’re knitting at the correct gauge specified in the pattern. This will help prevent any unwanted variations in size or shape.
- Block your stocking: Once you’ve completed the knitting, consider blocking your stocking to give it a polished finish. Blocking involves wetting the stocking and gently stretching and shaping it to its intended size. This can help even out any uneven stitches and give your stocking a professional look.
- Pay attention to finishing details: Finishing details, such as the toe and heel shaping, can make a big difference in the final appearance of your stocking. Take the time to carefully shape these areas and sew them neatly for a clean and professional finish.
- Embroider or add embellishments: To elevate the look of your stocking, consider adding embroidery or embellishments. Personalize it with the recipient’s name or add decorative elements such as beads or sequins. Just make sure to align them properly and sew them securely.
By following these extra tips and tricks, you can take your knit Christmas stocking to the next level and create a professional-looking piece that will be cherished for years to come.
Show off Your Stocking: Display and Care Tips
Once you have finished knitting your beautiful Christmas stocking, it’s time to show it off and take care of it to ensure its longevity. Here are some tips for displaying and caring for your stocking:
Display Tips:
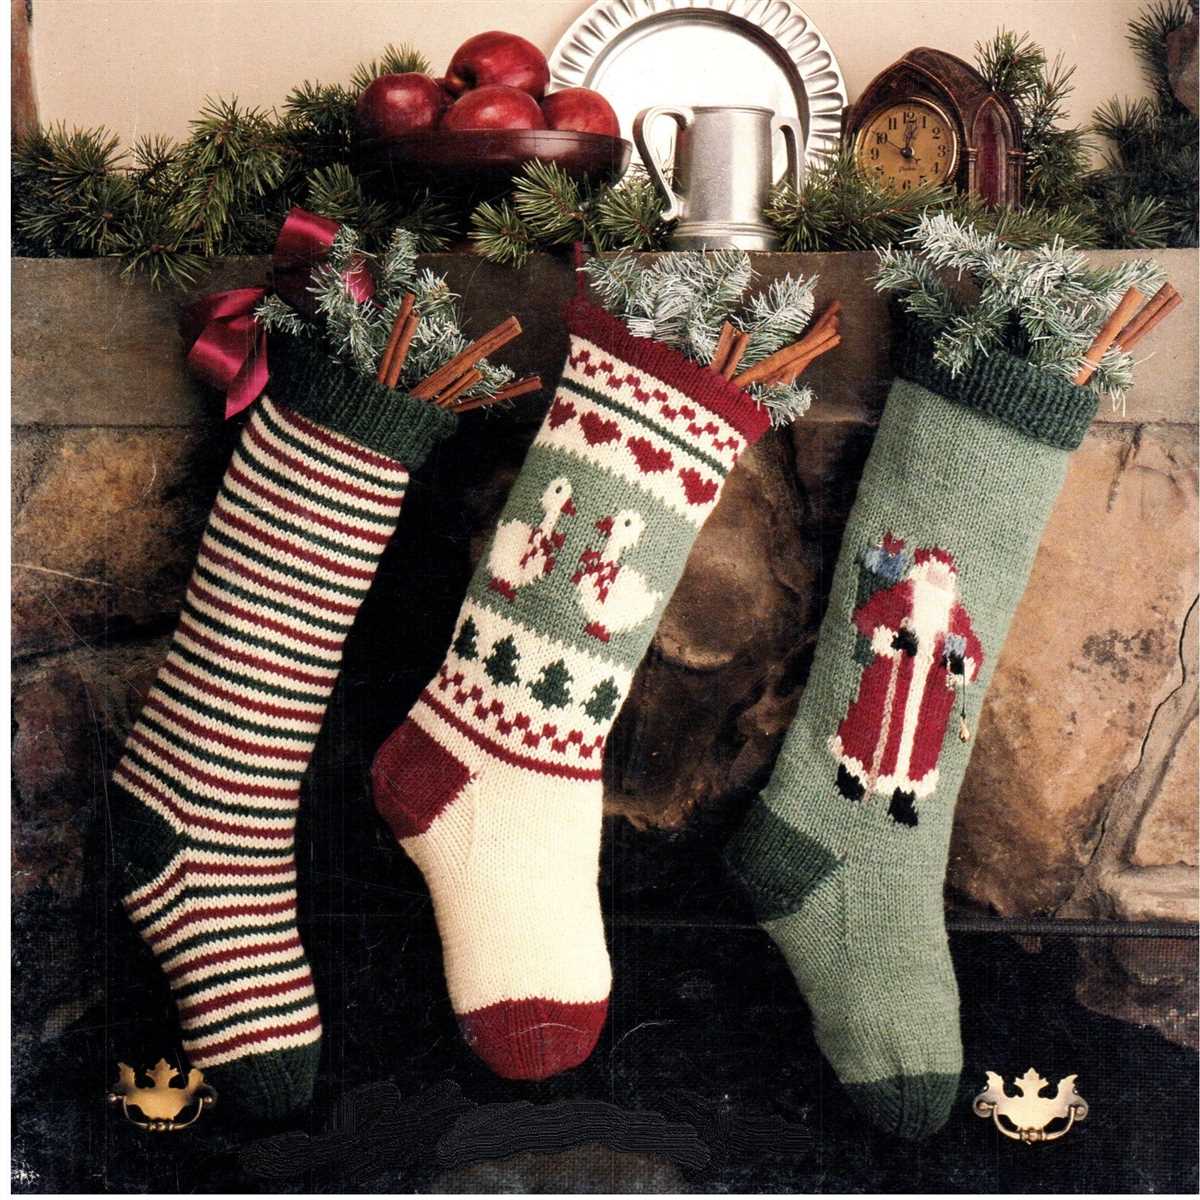
- Showcase your Christmas stocking by hanging it on the mantel. It will not only add a festive touch to your home decor, but also allow you to easily reach for it to fill it with goodies during the holiday season.
- If you don’t have a mantel, consider hanging your stocking on a staircase railing or a wall. You can use decorative hooks or adhesive hooks to safely display it without causing any damage.
- For a more creative display, you can hang multiple stockings in a row, spell out initials with them, or even create a stocking garland to drape across a wall or fireplace.
- Consider placing your stocking near other Christmas decorations, such as a Christmas tree or holiday wreath, to create a cohesive and festive display.
Care Tips:
- Handle your knitting stocking with clean hands to prevent any dirt or oils from transferring onto the fabric. If necessary, gently spot clean any stains using a mild detergent and a soft cloth.
- Avoid exposing your stocking to direct sunlight for extended periods of time, as this can cause the colors to fade over time. Instead, display it in an area that receives indirect sunlight or in a shaded spot.
- To maintain the shape and structure of your stocking, avoid hanging heavy items or overfilling it. This will help prevent stretching and maintain the integrity of the knitted stitches.
- When packing away your stocking after the holiday season, make sure it is completely dry to prevent any mildew or mold growth. Store it in a cool, dry place to protect it from dust and humidity.
With these tips, you can proudly display your knit Christmas stocking and ensure it lasts for many holiday seasons to come. Happy knitting and happy holidays!