
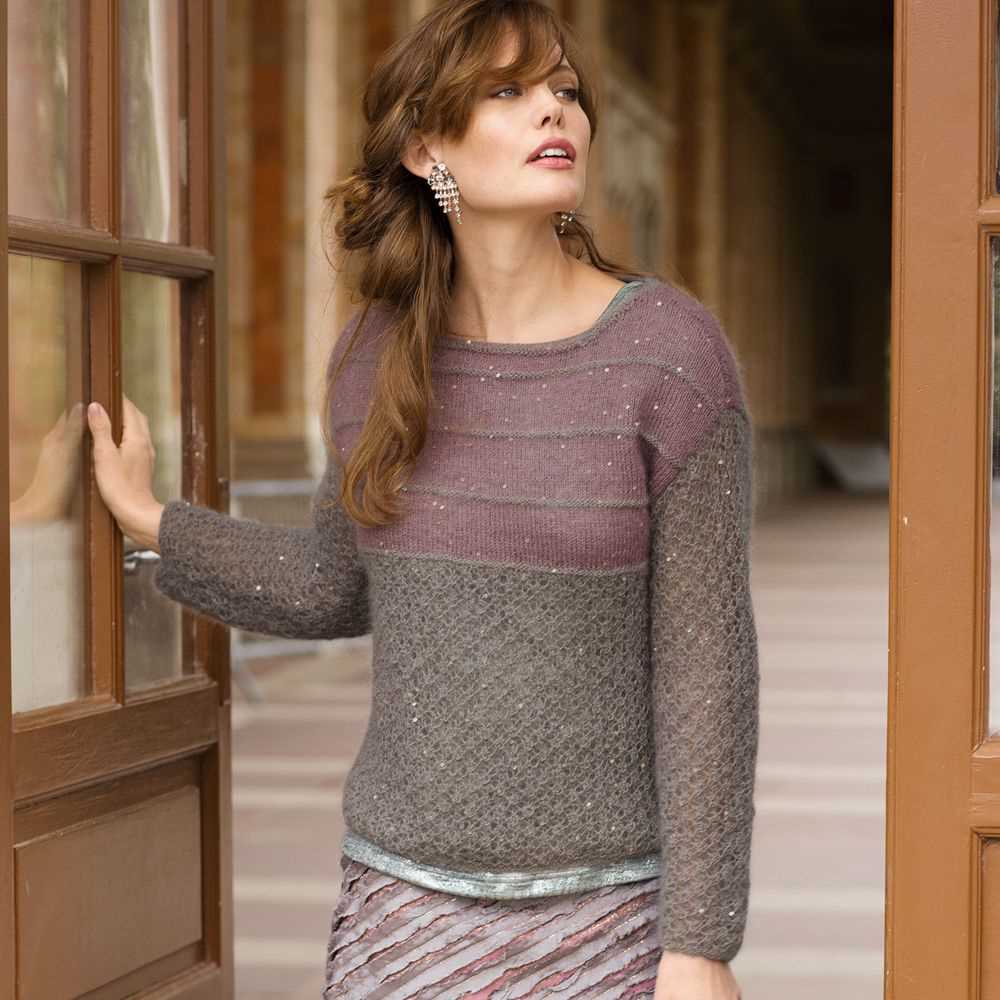
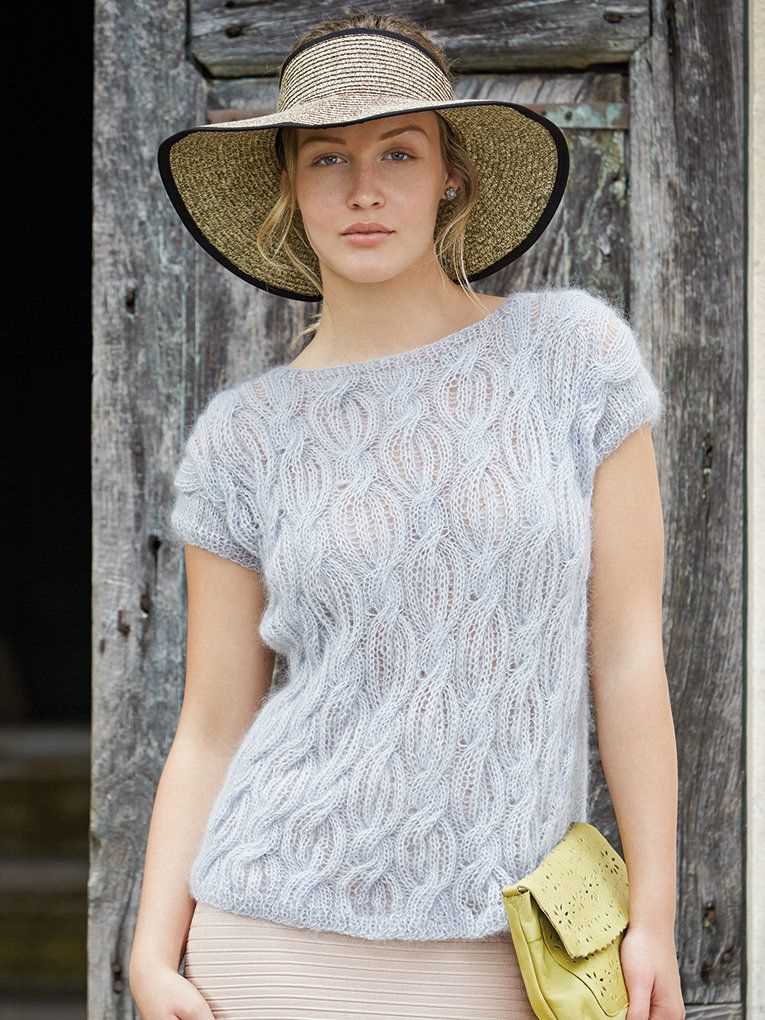
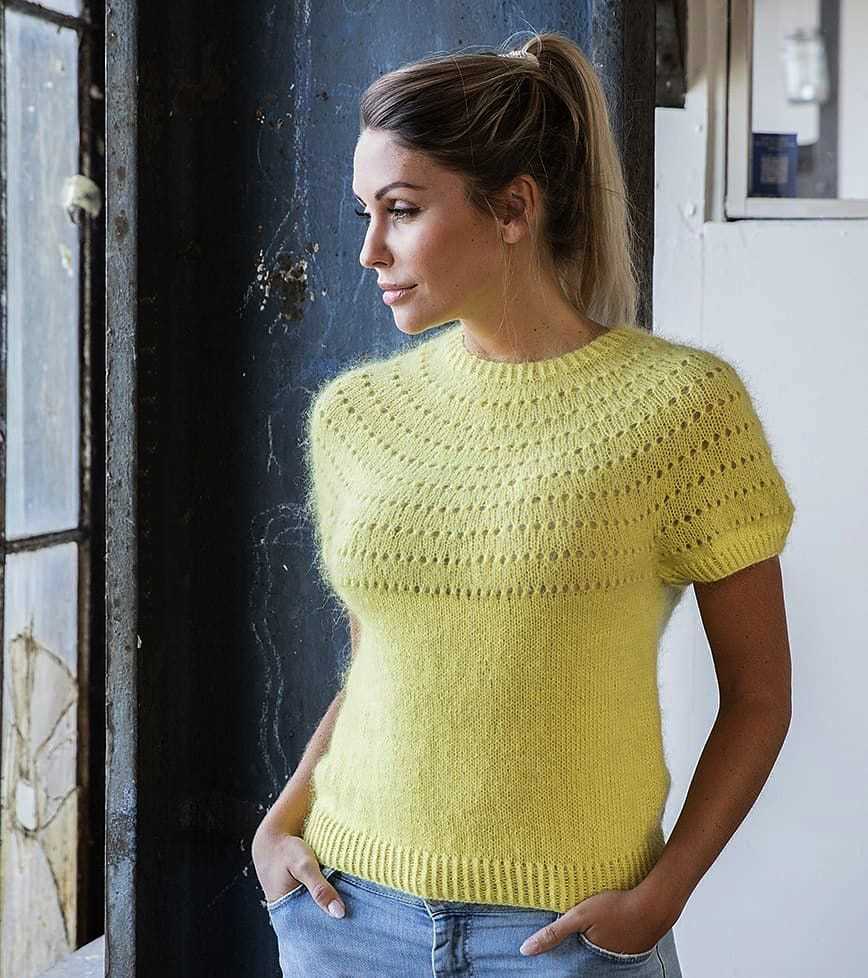
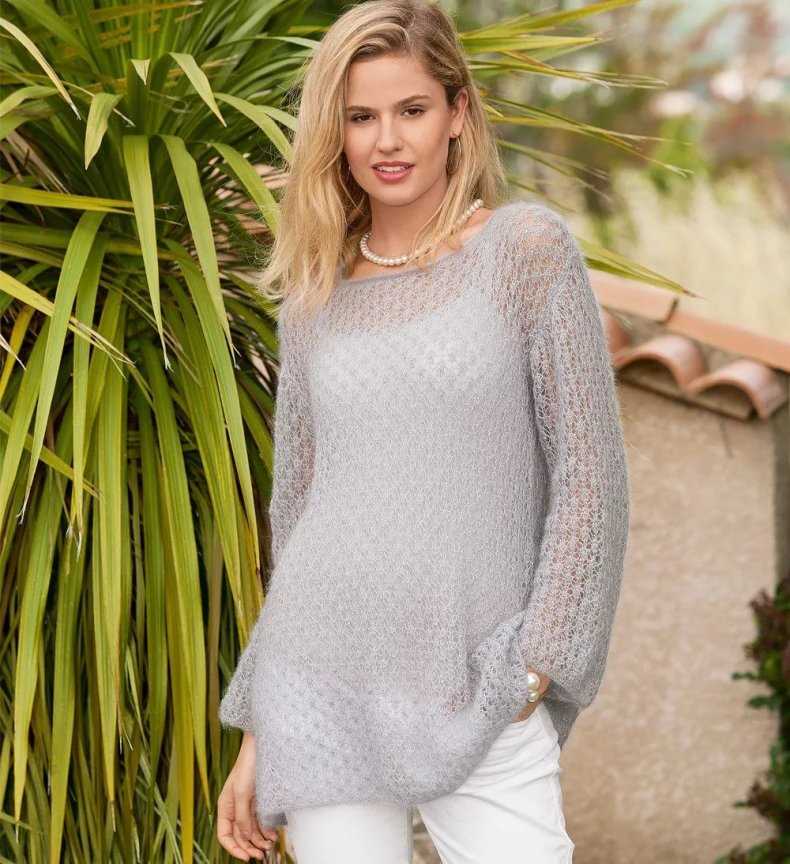
If you love the softness and the luxurious feel of mohair, then this tank top knitting pattern is perfect for you. Mohair is a type of yarn that is made from the hair of the Angora goat. It is known for its fluffy texture and its ability to provide warmth without adding bulk. This tank top pattern is a great way to showcase the beauty of mohair and create a stylish and comfortable summer garment.
This pattern is suitable for intermediate knitters who have some experience with lace knitting and working with mohair yarn. It features a delicate lace panel down the center front and back, adding a touch of femininity to the design. The tank top is knitted in the round from the bottom up, and the pattern includes instructions for customizing the fit and length to suit your preferences.
For this project, you will need a set of circular knitting needles, a stitch holder, and approximately 500-700 meters of mohair yarn. The pattern is written for sizes XS to XL, so you can easily choose the size that fits you best. Whether you wear it on its own or layer it with a cardigan or jacket, this mohair tank top will be a cozy and stylish addition to your wardrobe.
Mohair Tank Top Knitting Pattern
If you’re looking for a lightweight and stylish garment to add to your wardrobe, look no further than the Mohair Tank Top. With its airy texture and soft, fuzzy feel, this tank top is perfect for summer days or layering in cooler weather.
The Mohair Tank Top is a versatile piece that can be dressed up or down. Whether you pair it with jeans for a casual look or wear it with a skirt for a more elegant ensemble, this tank top is sure to make a statement. Its loose fit and comfortable drape make it flattering for all body types.
Materials
- Mohair yarn (2 skeins)
- Knitting needles (size US 7 / 4.5mm)
- Tapestry needle
Instructions
- Cast on 80 stitches.
- Row 1: Knit 2, purl 2, repeat until end of row.
- Row 2: Purl 2, knit 2, repeat until end of row.
- Repeat rows 1 and 2 until the piece measures 10 inches.
- Next row: Knit 2 together, purl 2 together, repeat until end of row.
- Next row: Purl 2 together, knit 2 together, repeat until end of row.
- Repeat the last 2 rows until you have 10 stitches remaining.
- Bind off all stitches.
- Repeat the same steps to create the back piece of the tank top.
- Join the front and back pieces together by sewing the shoulders and sides.
- Weave in any loose ends with a tapestry needle.
- Your Mohair Tank Top is now ready to wear!
Materials Needed for the Mohair Tank Top
Knitting a mohair tank top requires a few essential materials to ensure the creation of a high-quality, comfortable garment. Here is a list of the materials you will need:
1. Mohair Yarn:
Choose a high-quality mohair yarn for your tank top project. Mohair yarn is known for its softness, warmth, and lustrous appearance. Look for a yarn that is specifically labeled as mohair and select a color that complements your personal style.
2. Knitting Needles:
Invest in a pair of knitting needles suitable for working with the mohair yarn. The size of the needles will depend on the pattern you are following, so make sure to check the recommended needle size provided in the pattern instructions.
3. Stitch Markers:
Stitch markers are small circular clips or rings that are used to mark specific sections or stitches in your knitting. They can be especially helpful when knitting the tank top’s armholes or neck shaping. Make sure to have enough stitch markers on hand for your specific pattern.
4. Tapestry Needle:
A tapestry needle is necessary for weaving in loose ends and finishing touches once your knitting is complete. This needle has a large eye and a blunt tip, making it easy to thread and navigate through the stitches of your garment.
5. Scissors:
A pair of sharp scissors is essential for cutting yarn and trimming any excess material. Choose a pair of scissors that are comfortable to hold and have a precise cutting edge.
By gathering these essential materials before starting your mohair tank top knitting project, you will be well-equipped to create a beautiful and cozy garment that you can enjoy wearing for years to come.
Gauge and Sizing
When knitting the Mohair tank top, it is important to achieve the correct gauge in order to ensure that the finished garment fits properly. The gauge refers to the number of stitches and rows per inch that are achieved with a specific needle size and yarn. To check your gauge, it is recommended to knit a swatch using the recommended needle size and yarn, and measure the resulting stitches and rows over a 4×4 inch area.
The gauge for the Mohair tank top pattern is as follows: 20 stitches and 24 rows = 4 inches in stockinette stitch. If your gauge is too loose and you have more stitches or rows per inch, you may need to use a smaller needle size. Conversely, if your gauge is too tight and you have fewer stitches or rows per inch, you may need to use a larger needle size. It is important to achieve the correct gauge in order to ensure the finished garment will have the correct measurements.
Sizing:
- Small: Bust – 32-34 inches, Waist – 25-27 inches
- Medium: Bust – 36-38 inches, Waist – 28-30 inches
- Large: Bust – 40-42 inches, Waist – 32-34 inches
It is important to choose the correct size for the Mohair tank top pattern based on your bust and waist measurements. The pattern provides instructions for each size, so make sure to follow the appropriate instructions for the size you are knitting. By achieving the correct gauge and selecting the appropriate size, you can ensure that the finished Mohair tank top will fit you as desired.
Casting on and Ribbing
Before you begin knitting the mohair tank top, you need to cast on the required number of stitches. To do this, you can use the long-tail cast on method, which creates a sturdy and flexible edge. Measure out a long tail, about three times the width of the desired ribbing, and make a slipknot at the end. Insert the needle through the slipknot, positioning it in your dominant hand, and hold the tail of the yarn in your non-dominant hand. With the needle, scoop up the working yarn from the back to the front, creating a loop around the needle. Pull the loop through the slipknot, forming a new stitch. Repeat this process until you have cast on the required number of stitches.
Once you have cast on the stitches, it’s time to work the ribbing. The ribbing gives the tank top a stretchy and snug fit around the edges. To create a ribbed pattern, you will alternate between knit and purl stitches. The most common ribbing pattern is the 1×1 rib, which consists of alternating knit and purl stitches across each row. Start the first row by knitting one stitch, then purl one stitch, and continue this pattern until the end of the row. On the next row, you will purl the knit stitches and knit the purl stitches to create the ribbing effect. Repeat these rows until the desired length of ribbing is achieved.
It is important to maintain an even tension while knitting the ribbing to ensure that it matches the rest of the tank top. You can use a stitch marker to mark the beginning of each row and keep track of your progress. Additionally, if you prefer a different ribbing pattern, such as a 2×2 rib or a twisted rib, you can adjust the pattern accordingly. Remember to consult the instructions for the specific tank top pattern you are using to determine the recommended ribbing length and pattern.
Mohair Tank Top Knitting Pattern: Body of the Tank Top
Once you have completed the ribbing for the neckline and armholes, it’s time to move on to the body of the tank top. The body of the tank top is worked in stockinette stitch, which means knitting all stitches on the right side and purling all stitches on the wrong side.
To begin, you will need to determine the appropriate length for your tank top. Measure from the bottom edge of the ribbing to the desired length, and make a note of this measurement.
Using the stitch marker from the previous section as a reference, place a new stitch marker on either side of the work to designate the side seams. This will help guide your increases and decreases as you work the body of the tank top.
Continue working in stockinette stitch until the body of the tank top measures the desired length. Remember to keep track of your stitch count and make any necessary increases or decreases to maintain the desired shape.
If you prefer a more fitted look, you can add waist shaping by decreasing a few stitches at the sides of the tank top. Alternatively, if you want a looser fit, you can increase stitches at the sides.
Once the body of the tank top is complete, you can bind off all stitches and weave in any loose ends. Try on your tank top to ensure it fits correctly and make any final adjustments if needed.
Shaping the Armholes
Once you have completed the required number of rows for the body of the tank top, it’s time to start shaping the armholes. The armholes are created by decreasing stitches on both sides of the work, allowing for a comfortable fit and ease of movement.
In order to shape the armholes, you will need to follow the pattern’s instructions for the specific number and placement of decrease rows. Usually, these decrease rows are worked on the right side of the work and involve decreasing a certain number of stitches at the beginning and end of the row.
One common method for decreasing stitches is to work a decrease stitch, such as a knit two together (k2tog) or a slip slip knit (ssk), at the beginning and end of the row. This helps to create a smooth and gradual decrease, ensuring that the armhole shape looks symmetrical and professional.
It’s important to carefully follow the pattern’s instructions for the armhole decrease rows, as this will determine the final shape and size of the armholes. Make sure to keep track of your stitch count and ensure that you are decreasing the correct number of stitches in each row.
Once you have completed the armhole decrease rows, you may continue working the remaining rows of the pattern as instructed. Remember to check your stitch count regularly to ensure that you are maintaining the correct number of stitches for the rest of the tank top.
Neckline and Shoulder Shaping
When knitting the neckline and shoulder shaping for your mohair tank top, it is important to follow the pattern instructions carefully to ensure a perfect fit and drape. The neckline is an important feature of any top, and the shaping of the shoulders can greatly affect the overall look and comfort of the garment.
To start the neckline shaping, you will typically begin with a certain number of stitches and then decrease evenly across a row or rows to create the desired neckline shape. This may involve decreasing on both sides of the work or only on one side, depending on the design. The pattern will specify the number of stitches to be decreased and the row or rows on which these decreases should be made.
Key phrases: neckline shaping, pattern instructions, perfect fit, drape, decrease evenly, desired neckline shape
Next, you will move on to the shoulder shaping. This involves gradually decreasing the number of stitches on each shoulder to create a smooth and sloping shape. The pattern will specify the number of stitches to decrease and the row or rows on which these decreases should be made.
It is important to pay close attention to the pattern instructions for the shoulder shaping, as it can greatly affect the fit and comfort of the tank top. Too many or too few decreases can result in an ill-fitting garment or shoulders that are too wide or too narrow. Take your time and follow the instructions carefully to ensure the best result.
Key phrases: shoulder shaping, gradually decreasing, smooth and sloping shape, fit and comfort, ill-fitting garment, wide or narrow shoulders
Adding Straps
Once you have completed the body of the tank top, it’s time to add the straps. The straps will provide the necessary support and stability to the garment, ensuring that it stays in place when worn.
To add the straps, you will need to pick up stitches along the top edge of the tank top. Start by folding the tank top in half vertically to find the center point. Use this center point as a reference to evenly distribute the straps on both sides.
To pick up stitches, insert your knitting needle into the first stitch along the top edge. Wrap the working yarn around the needle and pull through to create a new stitch. Repeat this process along the entire top edge, picking up the desired number of stitches for each strap.
Once you have picked up the stitches, you can begin knitting the straps. You can choose to knit the straps in the same stitch pattern as the body of the tank top, or you can switch to a different stitch pattern for a contrasting look. Knit the straps to your desired length, making sure to leave enough yarn to bind off the stitches.
To bind off the stitches, knit the first two stitches as normal. Then, insert the left needle into the first stitch on the right needle and lift it up and over the second stitch and off the needle. Repeat this process until all stitches have been bound off. Cut the yarn, leaving a long tail, and pull it through the last stitch to secure.
Repeat the process on the other side of the tank top to add the second strap. Once both straps have been added, weave in any loose ends and block the tank top to help it retain its shape. And there you have it – your mohair tank top with perfectly added straps!
Finishing Touches: Blocking and Weaving in Ends
Once you have completed knitting your mohair tank top using the provided pattern, there are a few finishing touches that will give your garment a polished look. Blocking and weaving in ends are two important steps that will help enhance the overall appearance and durability of your project.
Blocking
Blocking is the process of shaping and setting your knitted piece into its final form. It involves stretching the fabric gently and evenly, then allowing it to dry in that stretched position. Mohair can be delicate, so it’s essential to handle it with care during blocking to avoid stretching or damaging the fibers.
To block your mohair tank top, fill a basin with lukewarm water and add a mild wool wash or shampoo. Immerse your knitted piece in the water, gently pressing it down to ensure it is fully saturated. Let it soak for 15-20 minutes. After soaking, carefully remove the garment, supporting it with your hands to avoid stretching.
Lay a clean towel on a flat surface and place your damp tank top on it. Gently shape the garment to your desired dimensions, smoothing out any wrinkles or uneven areas. Pin the edges of the tank top to the towel using rustproof T-pins to keep it in place. Allow the garment to air dry completely, which may take a couple of days depending on the climate and humidity level.
Weaving in Ends
After blocking, it’s time to weave in any loose ends or yarn tails from joining new colors or attaching yarn. Weaving in ends is crucial for both the appearance and durability of your mohair tank top, as it secures the yarn in place and prevents it from unraveling.
To weave in ends, thread a tapestry needle with the yarn tail, and starting from the back of your work, carefully insert the needle under several stitches to secure it. Then, weave the needle in a zigzag pattern, going back and forth across the fabric for a few inches. Be sure to avoid pulling too tightly, as this can distort the fabric. Once you have woven in the end for a sufficient length, trim any excess yarn with scissors, leaving a small tail.
Continue this process for any remaining loose ends, ensuring that each one is securely woven in. Once all ends are woven in and trimmed, your mohair tank top is ready to be worn or gifted, with a polished finish that showcases your knitting skills.
Styling Tips for Wearing the Mohair Tank Top
If you’re looking to create a stylish and fashionable outfit with a mohair tank top, here are some tips to help you make the most of this versatile piece.
1. Layer It Up
Add depth and dimension to your look by layering the mohair tank top with other garments. Pair it with a denim jacket or a lightweight cardigan for a casual and effortless vibe. You can also experiment with layering it over a long-sleeved shirt or a turtleneck for a more sophisticated and cozy outfit.
2. Play with Textures
Mohair is a fabric known for its fuzzy and fluffy texture, so why not have some fun with it? Contrast the softness of the mohair tank top by pairing it with leather or denim bottoms. This will create an interesting contrast that adds visual interest to your overall look.
3. Dress It Up or Down
The versatility of the mohair tank top allows you to dress it up or down depending on the occasion. For a casual daytime look, style it with high-waisted jeans and sneakers. If you’re heading for a more formal event, pair it with a tailored skirt or trousers and heels to elevate your outfit.
4. Accessorize Wisely
When it comes to accessorizing your mohair tank top, less is often more. The tank top itself can be a statement piece, so opt for minimal accessories to keep the focus on the texture and design. A simple pendant necklace or delicate earrings can add a touch of elegance without overpowering the outfit.
5. Experiment with Colors
While mohair tank tops are often associated with neutral tones, don’t be afraid to experiment with colors. A vibrant, jewel-toned mohair tank top can add a pop of color to an otherwise monochromatic outfit. Alternatively, you can also opt for a pastel-colored mohair tank top for a softer and more feminine look.
Overall, the mohair tank top is a versatile and stylish garment that can be incorporated into various outfits. With these styling tips in mind, you can create unique and fashionable looks that showcase your personal style.
Additional Resources for Mohair Knitting Patterns
Looking for more mohair knitting patterns to try? Here are some additional resources that can help you explore this versatile and luxurious yarn:
If you prefer online platforms, websites like Ravelry, LoveCrafts, and Knitting Patterns Central offer a wide range of mohair knitting patterns. These websites allow you to filter patterns based on garment type, difficulty level, and even specific mohair yarn brands. You can easily find tank top patterns, along with many other mohair projects, to suit your knitting skills and preferences.
For those who enjoy physical copies of knitting patterns, consider checking out your local library or bookstore. Many knitting magazines and books include mohair patterns, especially those focused on women’s fashion and summer knitting. Browse through the knitting section or ask for recommendations from the staff.
Additionally, joining knitting communities and forums can provide you with a wealth of mohair knitting resources. Fellow knitters are often willing to share their favorite patterns and experiences. You can also find tips and tricks for working with mohair from experienced knitters who have already completed similar projects.
In summary, mohair knitting patterns are widely available both online and in print. Whether you prefer digital resources or physical copies, there are many options for finding tank top patterns and other mohair projects. Explore websites, visit your local library or bookstore, and join knitting communities to expand your mohair knitting repertoire and create beautiful garments with this luxurious yarn.