
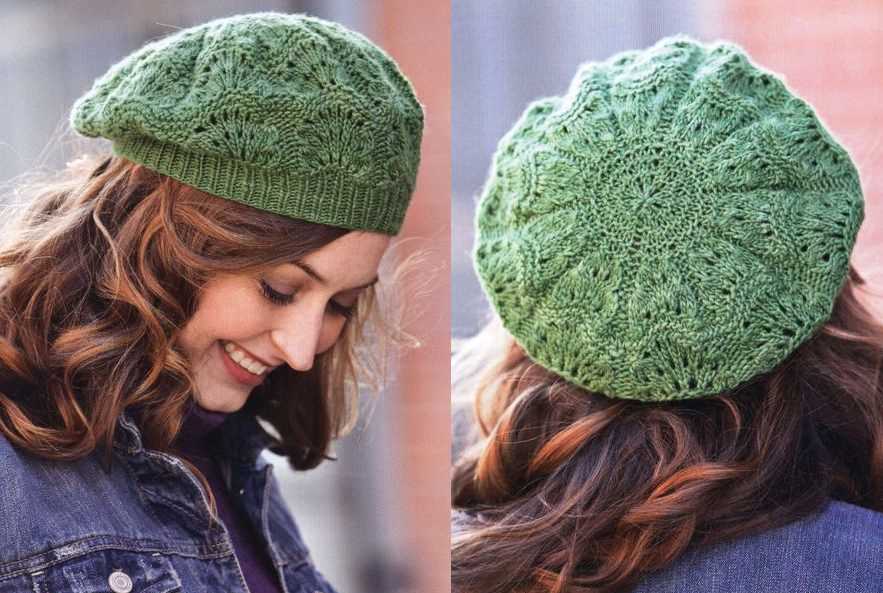
Knitting a lace knit hat is a beautiful and intricate project that allows you to showcase your skills and create a stunning accessory. Whether you’re a beginner or an experienced knitter, this lace hat pattern is a great way to challenge yourself and create a unique piece.
What sets lace knitting apart from other knitting techniques is the use of yarn overs and decreases to create holes and intricate patterns. This lace hat pattern incorporates various lace stitches, such as the diamond lace stitch and the leaf lace stitch, to create a delicate and airy design.
The lace knit hat pattern is versatile and can be customized to fit your personal style and preferences. You can choose from a variety of yarns, from cozy wool to light and airy cotton, to achieve different looks and textures. Additionally, you can experiment with different colors to create a one-of-a-kind hat that reflects your individuality.
Whether you’re knitting this lace hat pattern for yourself or as a gift for a loved one, the end result will be a stunning accessory that adds elegance and sophistication to any outfit. So grab your knitting needles, choose your favorite yarn, and get ready to create a lace knit hat that is sure to impress!
Lace Knit Hat Pattern
The lace knit hat pattern is a beautiful and feminine design that adds a touch of elegance to any outfit. With its delicate lacework, this hat is perfect for special occasions or for adding a stylish twist to your everyday wardrobe.
To create the lace knit hat, you will need a set of knitting needles and a skein of lace-weight yarn. The pattern is fairly simple and suitable for intermediate knitters. It involves working a combination of basic knitting stitches and lacework techniques to create the intricate pattern.
To begin, cast on the desired number of stitches onto your needles. The number of stitches will depend on the size of the hat you want to make. It is recommended to cast on a multiple of 8 stitches to easily follow the lace pattern.
Once you have cast on your stitches, you will begin working the lace pattern. This usually involves a combination of knitting, purling, yarn overs, and knitting stitches together. The pattern will typically repeat over a certain number of rows, creating the lace design.
Continue working the lace pattern until the hat reaches your desired length. Then, you will begin shaping the crown of the hat. This is usually done by gradually decreasing the number of stitches in each row. You can use various techniques for decreasing, such as knitting two stitches together or using slip, slip, knit stitches.
Once you have finished shaping the crown, simply bind off your stitches and weave in any loose ends. Feel free to add any desired embellishments, such as a pom-pom or a decorative button, to personalize your lace knit hat.
The lace knit hat pattern allows you to experiment with different yarn colors and textures to create unique and stunning designs. You can also customize the pattern by adjusting the size of the needles or the number of stitches cast on. With a little practice, you will soon be able to create beautiful lace knit hats to keep yourself cozy and stylish during the colder months.
Choosing the Right Yarn and Needles
When it comes to knitting a lace hat, selecting the appropriate yarn and needles is crucial to producing the desired result. The choice of materials can greatly affect the overall look and feel of the finished product.
Yarn: When choosing yarn for a lace hat, it is important to consider both the weight and fiber content. Lace patterns typically require a lightweight yarn to create the delicate and intricate stitches. A fingering or lace weight yarn is ideal for achieving the desired effect. Additionally, natural fibers such as wool, cotton, or bamboo are often preferred for lace knitting as they provide excellent stitch definition and drape.
Needles: The right set of needles can greatly enhance your lace knitting experience. Circular needles are typically recommended for knitting hats as they allow for more flexibility and ease of use. For lace knitting, it is essential to choose needles with a sharp tip to help with intricate stitchwork. Additionally, selecting the correct needle size is important. The pattern you are using will often specify the recommended needle size, ensuring that your stitches are neither too tight nor too loose.
By carefully selecting the right yarn and needles, you can ensure that your lace knit hat turns out beautifully. Experimenting with different combinations of materials can also add unique touches to your knitted creations.
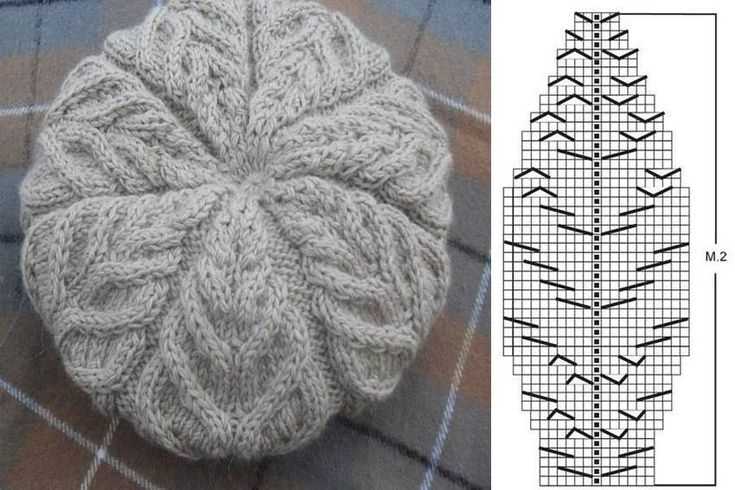
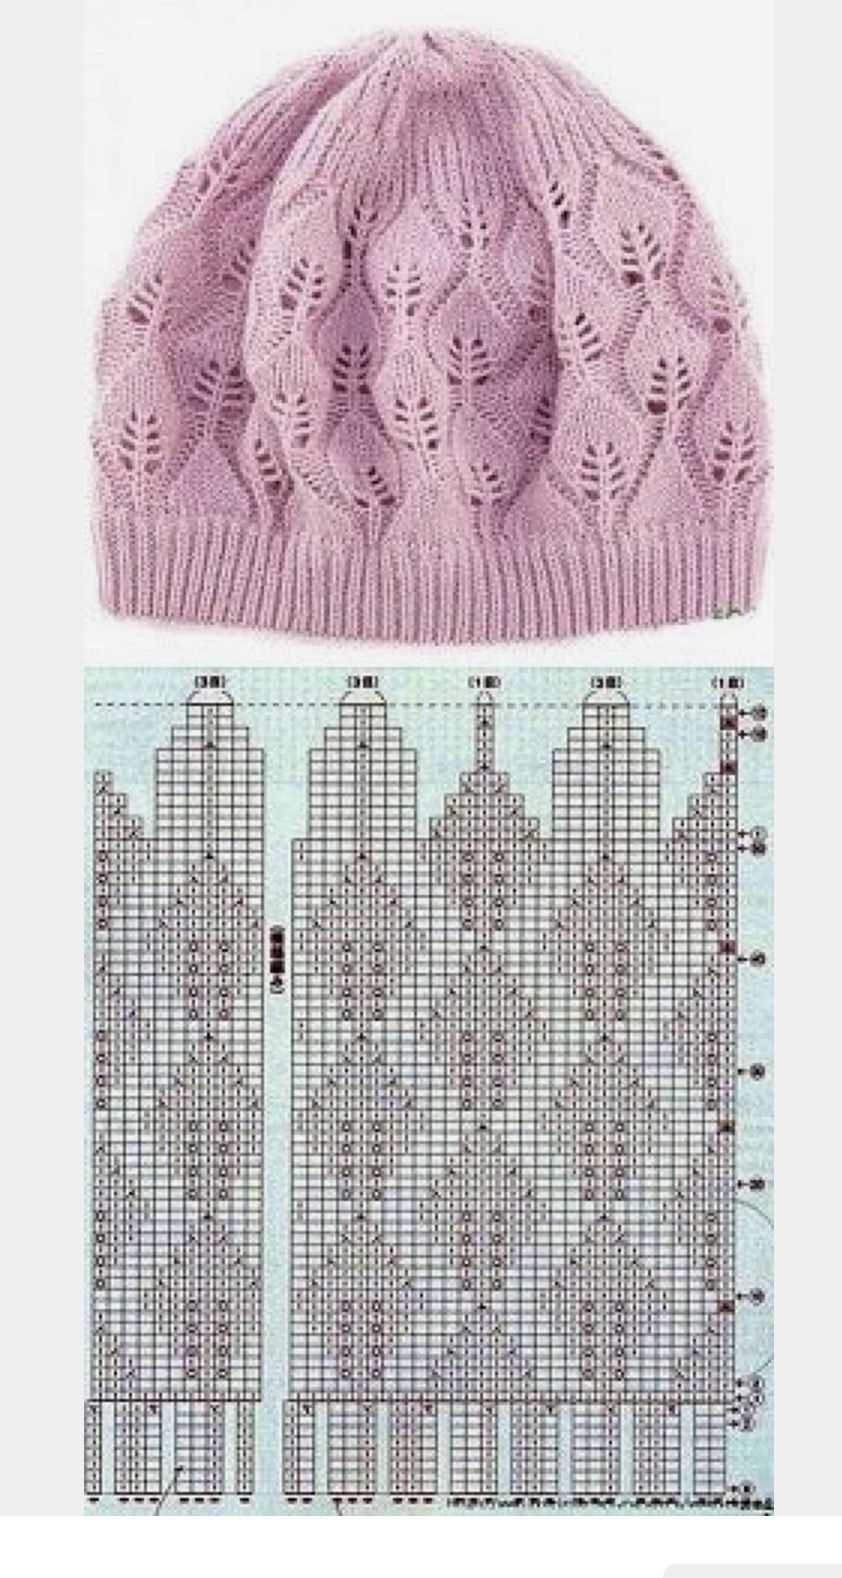
Understanding Lace Knitting Charts
When it comes to lace knitting, charts are an essential tool for understanding and following the intricate stitch patterns. Lace knitting charts provide a visual representation of each row and stitch, making it easier to keep track of the pattern.
Typically, a lace knitting chart is displayed as a grid with symbols representing different stitches. Each symbol corresponds to a specific stitch pattern, and it is important to familiarize yourself with these symbols before starting a lace knitting project. Common symbols include yarn overs, knit stitches, purl stitches, and decreases.
Reading a lace knitting chart:
1. Start from the bottom right corner of the chart, which represents the first row of your knitting project.
2. Read each symbol from right to left for right-side rows and from left to right for wrong-side rows.
It is important to note that not all lace knitting charts are created equal, and different designers and publications may use slightly different symbols or conventions. Therefore, it is always important to carefully read the chart’s accompanying instructions and key to ensure you are interpreting the symbols correctly.
To help keep track of your progress, it can be helpful to use a highlighter or pen to mark off each completed row on the chart. This can prevent mistakes and make it easier to spot any errors in your knitting.
In conclusion, understanding lace knitting charts is essential for successfully working on lace knitting projects. By familiarizing yourself with the symbols and conventions used in the charts, you can confidently tackle even the most intricate lace patterns.
How to Read a Lace Knit Hat Pattern
Reading a lace knit hat pattern can be intimidating for beginners, but with a little practice and understanding of the key elements, you’ll be able to tackle any lace knitting project with confidence. Here’s a step-by-step guide on how to read a lace knit hat pattern.
1. Familiarize yourself with the pattern key:
The pattern key will provide you with the symbols or abbreviations used in the pattern and their corresponding stitches. This includes common lace knitting stitches such as yarn overs, SSK (slip, slip, knit), and K2tog (knit two together). Make sure to read and understand the key before you start knitting.
2. Study the stitch repeat section:
Lace knitting patterns often have a stitch repeat section, which indicates the sequence of stitches that you will repeat throughout the pattern. It’s important to understand and memorize this section, as it will make knitting the lace pattern much easier.
3. Take note of special instructions:
Some lace knit hat patterns may have special instructions or techniques that you need to be aware of. These can include things like shaping the crown of the hat or using a specific stitch pattern for a certain section. Pay close attention to these instructions to ensure your hat turns out as intended.
4. Keep track of your progress:
As you work through the lace knit hat pattern, it’s helpful to keep track of your progress. This can be done by using stitch markers to mark different sections or by placing a marker after every repeat of the stitch pattern. This will make it easier to spot any mistakes and keep track of where you are in the pattern.
5. Read the pattern notes and gauge:
Before you start knitting, make sure to read the pattern notes and check the recommended gauge. The notes may provide additional tips or clarification on certain sections of the pattern, while the gauge will help ensure that your finished hat will fit correctly. Adjust your needle size if necessary to match the gauge.
With these steps in mind, you’ll be well-equipped to read and knit any lace knit hat pattern. Remember to take your time, have patience, and don’t be afraid to seek help or clarification if needed. Happy knitting!
Getting Started: Casting on and Joining in the Round
Before starting the lace knit hat pattern, it is important to first cast on and join in the round. This technique is used to create a seamless and continuous circle, allowing you to knit in a continuous spiral without any visible seams. Here are the steps to get started:
Casting On
1. Begin by making a slipknot and placing it on one of the double-pointed needles.
2. Hold the needle with the slipknot in your right hand, and use your left hand to hold the working yarn.
3. Insert the right-hand needle into the slipknot from left to right, catching the working yarn with the needle.
4. Bring the tip of the right-hand needle back through the slipknot, pulling the working yarn with it to create a new loop.
5. Slip this new loop onto the right-hand needle and tighten it gently.
6. Repeat steps 3-5 until you have cast on the desired number of stitches for your lace knit hat pattern.
Joining in the Round
1. Once you have cast on all the stitches, make sure the stitches are not twisted around the needle.
2. With the right side of the work facing you, insert the right-hand needle into the first stitch on the left-hand needle.
3. Bring the working yarn behind the right-hand needle and use it to knit the first stitch, pulling the yarn through the stitch and onto the right-hand needle.
4. Continue knitting each stitch in the round, working in a continuous spiral.
5. To keep track of the beginning of the round, you can place a stitch marker on the right-hand needle after the first stitch.
By following these steps, you will be able to cast on and join in the round, creating a seamless foundation for your lace knit hat pattern. Once you have completed this step, you can continue knitting the lace pattern to create a beautiful and intricate design.
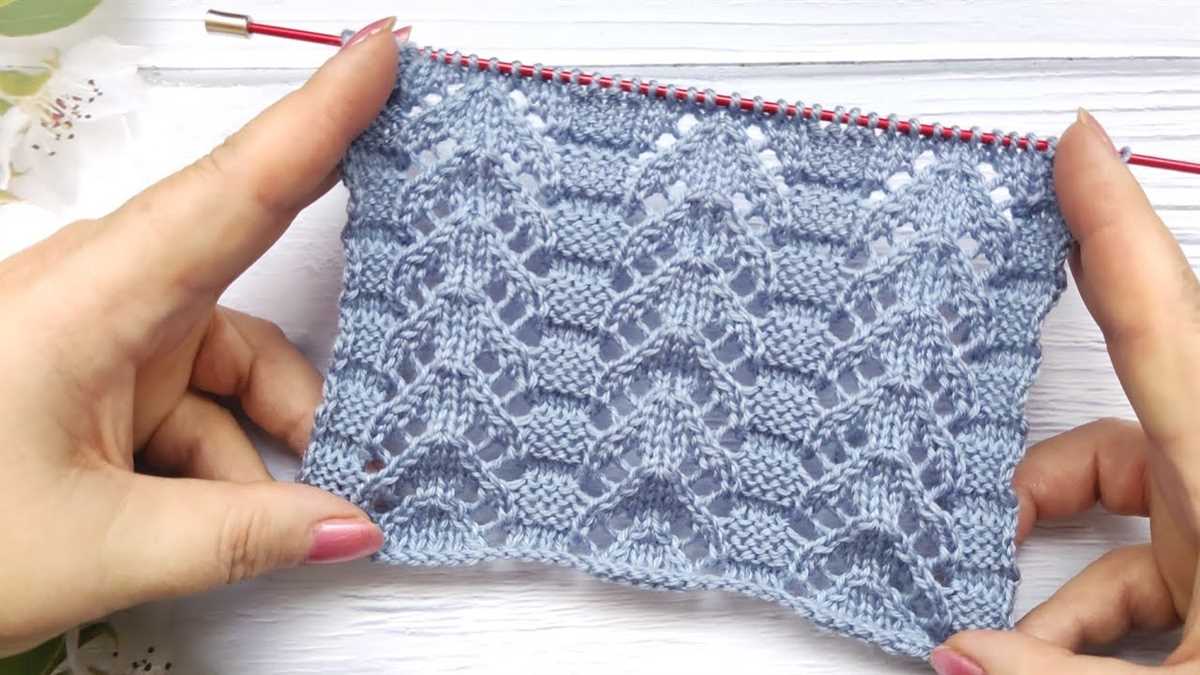
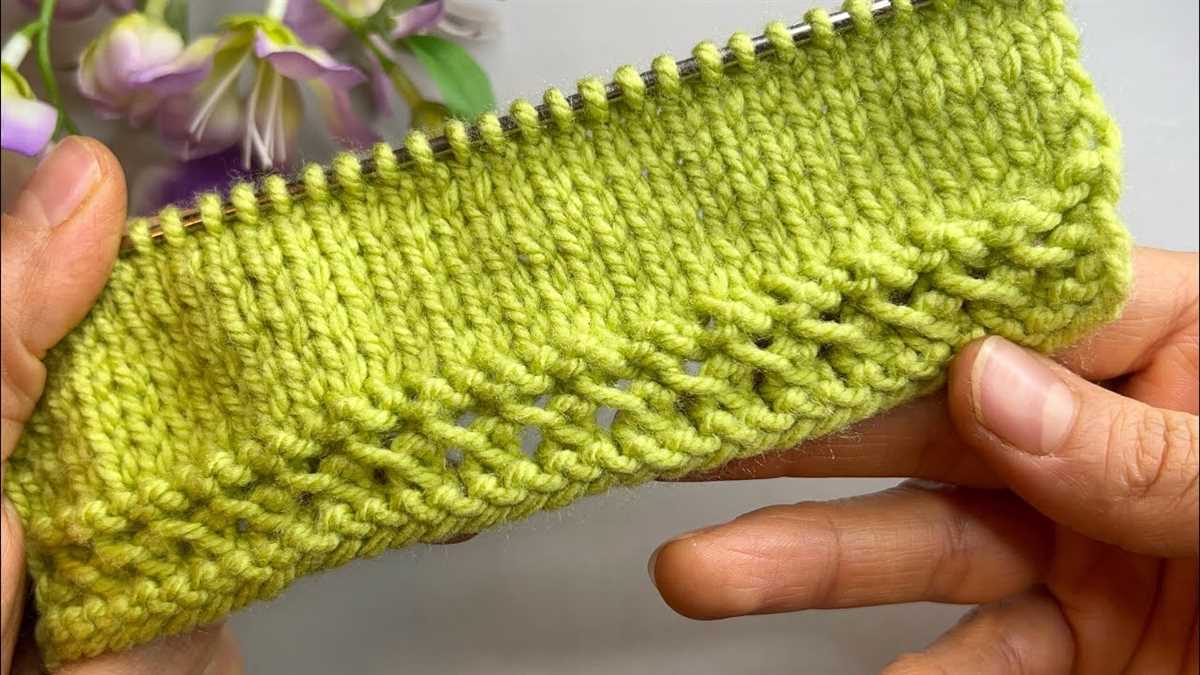
Knitting the Lace Stitch Pattern
Knitting the lace stitch pattern can be a fun and rewarding project for knitters of all skill levels. Whether you are an experienced knitter or just starting out, lace knitting offers a unique and beautiful way to create intricate and delicate designs in your projects. The lace stitch pattern involves creating a series of decorative holes or eyelets in your knitting, which can be arranged in various patterns to create different effects.
To begin knitting the lace stitch pattern, you will need to choose the appropriate yarn and needles for your project. Lace knitting typically requires finer yarn and smaller needles to achieve the delicate look and feel of the finished piece. Once you have your materials ready, you can start by casting on the desired number of stitches.
One popular lace stitch pattern is the yarn over (YO) technique. This involves wrapping the yarn around the needle to create an extra stitch, which then creates an eyelet in the knitting. The YO technique is often used in combination with other stitches, such as knit stitches and purl stitches, to create intricate lace designs. By following a lace stitch pattern chart or written instructions, you can easily create beautiful lace designs in your knitting.
- Start by knitting a few rows or rounds in your chosen lace stitch pattern to establish the design.
- Continue knitting in the lace stitch pattern until you have reached the desired length or completed the designated number of pattern repeats.
- Once you have finished knitting the lace stitch pattern, you can bind off your stitches to secure the edges of your project.
- Blocking your finished lace project is an important step to accentuate the lace stitches and achieve a professional-looking result. This involves wetting the knitted piece and then pinning it to a blocking board or flat surface to shape and stretch the lace stitches.
- After blocking, allow your project to dry completely before removing the pins. This will help set the lace stitches and give your finished piece a polished appearance.
Overall, knitting the lace stitch pattern can be a rewarding experience that allows you to create intricate and delicate designs in your knitting projects. Whether you are working on a lace hat, scarf, or shawl, the lace stitch pattern adds a touch of elegance and sophistication to your finished piece.
Shaping the Crown of the Hat
Once you have completed knitting the body of the hat, it’s time to shape the crown. This is the part of the hat that sits on top of the head and gives it its rounded shape. There are a few different ways to shape the crown of a hat, but one common method is to decrease stitches gradually until you reach the desired size.
To begin shaping the crown, you will need to divide the remaining stitches on your needles into equal sections. This can be done by counting the stitches and dividing by the number of sections you want to create. For example, if you have 80 stitches and want to divide them into 8 sections, you would have 10 stitches per section.
Once you have divided the stitches, you can start decreasing. This is typically done by knitting two stitches together, or by using other common decrease stitches such as slip slip knit (ssk) or knit two together through the back loop (k2tog tbl). The exact decrease method will depend on the specific pattern you are following.
Continue decreasing stitches in each section every few rows until you have decreased enough to reach the desired size for the crown. This may involve decreasing in every row, or every other row, depending on how quickly you want the crown to taper. As you decrease, you may need to switch to double-pointed needles or a circular needle to accommodate the smaller number of stitches.
Once you have finished decreasing, you can bind off the remaining stitches and finish off the hat. If desired, you can also add a pom pom or other embellishments to the top of the crown for added style.
Adding Ribbing for a Perfect Fit
When knitting a lace hat, adding ribbing to the brim can help ensure a snug and comfortable fit. Ribbing is a stretchy and flexible knitting technique that creates alternating columns of knit and purl stitches. By incorporating ribbing into the hat’s brim, you can prevent the hat from being too tight or too loose, making it fit perfectly on the wearer’s head.
To add ribbing to your lace hat pattern, you can start by determining the number of stitches needed for the ribbing section. This can be based on the desired width of the brim or the gauge of your knitting. For example, you may choose to have a ribbing section that is 2 inches wide, which requires casting on a certain number of stitches.
Once you have calculated the number of stitches, you can begin knitting the ribbing section. This typically involves working in a 1×1 or 2×2 rib pattern, where you alternate between knitting and purling stitches in a repeated sequence. The ribbing section can be as short or as long as you prefer, depending on the desired look and fit of the hat.
When transitioning from the ribbing section to the lace pattern of the hat, it is important to maintain the stitch count to ensure the overall shape and fit of the hat. This can be achieved by increasing or decreasing stitches as needed to match the pattern’s stitch count. Pay attention to any stitch markers or pattern instructions to ensure accuracy during the transition.
By incorporating ribbing into your lace knit hat pattern, you can achieve a perfect fit that is both comfortable and stylish. The ribbing adds elasticity to the brim, allowing it to stretch and conform to the wearer’s head shape. Whether you choose a simple 1×1 rib or a more complex rib pattern, the added stretch and flexibility will enhance the overall fit and wearability of the hat.
Blocking and Finishing the Hat
After you have completed knitting the lace hat, the next step is to block and finish it. This process is important as it helps to shape the hat and give it a professional and polished look. To block the hat, you will need a blocking board or a foam mat, rust-resistant pins, and a spray bottle filled with water.
To begin, lay the lace hat flat on the blocking board or foam mat. Gently stretch the hat to its desired shape, making sure to maintain the integrity of the lace pattern. Pin the edges of the hat in place, placing the pins about an inch apart. This will help the hat retain its shape while drying.
Once the hat is pinned, lightly spritz it with water using the spray bottle. Be careful not to saturate the hat, as too much water can cause the fibers to stretch or lose their shape. Allow the hat to dry completely before removing the pins. This may take a few hours to overnight, depending on the humidity levels in your area.
Once the hat is dry, carefully remove the pins and admire your finished lace hat. If desired, you can add any finishing touches, such as sewing in an optional lining or attaching a decorative embellishment. Now, your lace knit hat is ready to be worn and enjoyed!
Finishing Touches: Adding a Pom Pom or Tassel
Once you have finished knitting your lace hat, it’s time to add some finishing touches to give it that extra touch of style. One popular option is to add a pom pom to the top of the hat. A pom pom can add a playful and whimsical element to your hat, and it’s a fun way to personalize your creation.
Adding a pom pom is quite easy. You can use pre-made pom poms or make your own using yarn. To attach the pom pom, thread a piece of yarn through a darning needle, then insert the needle through the center of the pom pom and pull the yarn through. Tie a knot at the top of the pom pom and then use the remaining yarn to securely attach it to the top of the hat. You can also sew the pom pom onto a small piece of fabric or cardboard and then attach it to the hat.
If you’re not a fan of pom poms, you can opt for a tassel instead. Tassels can give your lace hat a more elegant and sophisticated look. To make a tassel, simply cut a length of yarn (about 6-8 inches) and set it aside. Then, wrap the yarn around a piece of cardboard or your fingers several times to create a loop. Carefully slide the loop off the cardboard or your fingers and tie the 6-8 inch length of yarn around the top, about 1-2 inches down from the looped end. Trim the ends of the looped yarn and shape it into a tassel. Attach the tassel to the top of the hat using the same method as the pom pom.
Whether you choose to add a pom pom or a tassel, these finishing touches can take your lace knit hat to the next level. Play around with different colors and sizes to find the perfect accent for your hat. Have fun experimenting and creating a hat that is uniquely yours!
Tips for Customizing Your Lace Knit Hat
Lace knit hats are a stylish and versatile accessory that can add a touch of elegance and sophistication to any outfit. One of the great things about knitting your own lace hat is that you have the freedom to customize it to suit your personal style and preferences. Here are some tips to help you create a lace knit hat that is truly unique.
1. Choose the right yarn
The choice of yarn can greatly affect the final look and feel of your lace knit hat. For a delicate and feminine hat, opt for a lightweight yarn with a high silk or cotton content. If you prefer a more cozy and warm hat, go for a yarn with a higher wool or alpaca content. Experiment with different fibers and textures to find the perfect yarn for your project.
2. Select the lace pattern
The lace pattern you choose will determine the overall design of your hat. There are countless lace patterns to choose from, ranging from simple eyelet stitches to intricate floral motifs. Consider the level of difficulty and the desired lace density when selecting a pattern. Remember that lace patterns tend to stretch, so choose a pattern that will look good even when stretched.
3. Customize the size
To ensure a perfect fit, it’s important to customize the size of your lace knit hat. Start by measuring the circumference of your head and determine your gauge. Based on your measurements, adjust the number of stitches and rounds in the pattern to achieve the desired size. Remember to check your gauge regularly throughout the project to ensure accurate sizing.
4. Embellish with beads or sequins
If you want to add an extra touch of glamour to your lace knit hat, consider embellishing it with beads or sequins. You can strategically sew them onto the lace pattern to create a stunning effect. Choose beads or sequins that complement the color of your yarn and enhance the overall design of the hat. Just be sure to secure them tightly to prevent them from falling off.
5. Experiment with different finishing touches
The finishing touches can make a big difference in the overall appearance of your lace knit hat. Consider different options for the brim, such as a folded hem, a rolled edge, or a ribbed band. You can also add a pom-pom, a bow, or a decorative button to the top of the hat for added charm. Play around with different finishing techniques to find the one that suits your style best.
With these tips, you can turn a basic lace knit hat pattern into a personalized and unique accessory that reflects your individual style. Whether you choose to add embellishments, experiment with different yarns, or customize the size, the possibilities are endless. Have fun exploring your creativity and enjoy the process of creating a one-of-a-kind lace knit hat.
Inspiring Lace Knit Hat Patterns to Try
When it comes to lace knit hat patterns, there are endless options to choose from. Whether you’re a beginner looking for a simple lace pattern or an advanced knitter seeking a more intricate design, there is a lace knit hat pattern out there for you.
For those just starting out, the Lace Rib Hat is a great option. This pattern utilizes basic lace stitches that are perfect for beginners to practice and master. It creates a delicate and textured hat that is both stylish and functional.
1. Lace Rib Hat Pattern
This lace rib hat pattern is a great choice for beginners. It features a simple yet elegant lace rib stitch that adds texture and visual interest to the hat. The pattern includes instructions for different sizes, making it suitable for knitters of all ages.
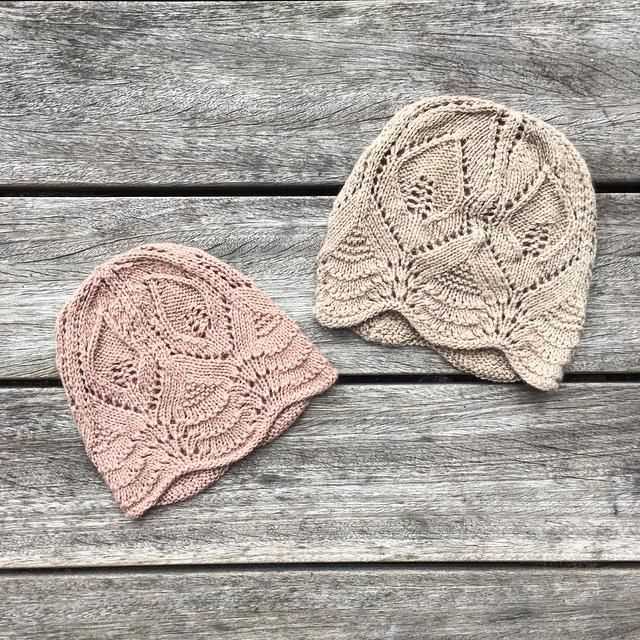
2. Floral Lace Hat Pattern
If you’re looking for a more feminine lace knit hat pattern, the floral lace hat is a great option. This pattern incorporates delicate lace motifs that resemble flowers, adding a romantic touch to any outfit. It’s a fun and challenging project for advanced knitters looking to expand their lace knitting skills.
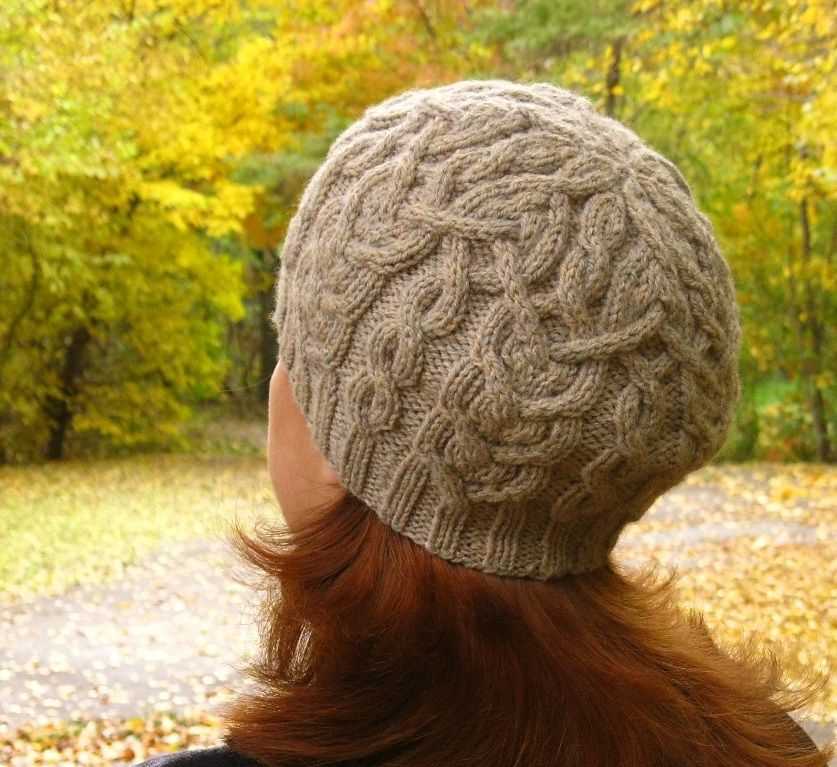
3. Cable and Lace Hat Pattern
For those who want to combine two stunning knitting techniques, the cable and lace hat pattern is the perfect choice. This pattern combines the intricate beauty of lace knitting with the classic charm of cable knitting. The result is a unique and visually striking hat that is sure to turn heads.
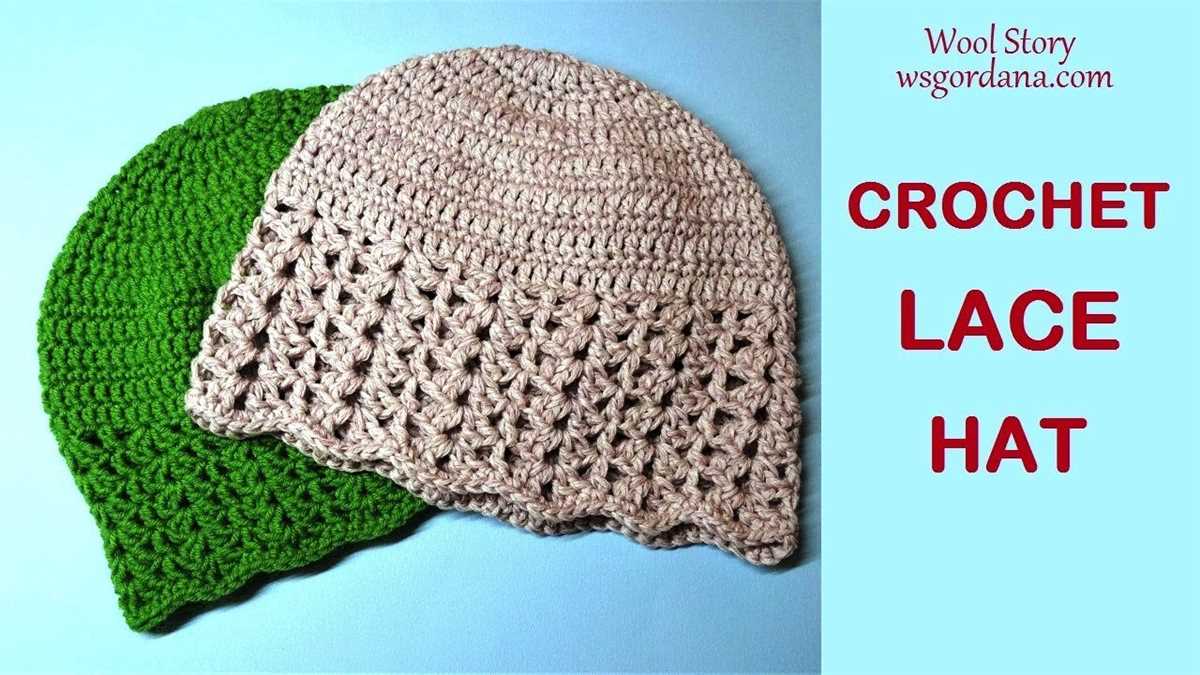
4. Lace Slouchy Hat Pattern
If you prefer a more relaxed and casual look, the lace slouchy hat pattern is a great option. This pattern features a loose and airy lace stitch that creates a slouchy and comfortable hat. It’s perfect for those days when you want to stay warm and stylish without sacrificing comfort.
In conclusion, lace knit hat patterns offer a wide range of options for knitters of all skill levels. Whether you’re a beginner or an experienced knitter, there is a lace hat pattern that will inspire and challenge you. So grab your knitting needles and get ready to create beautiful and intricate lace hats.