
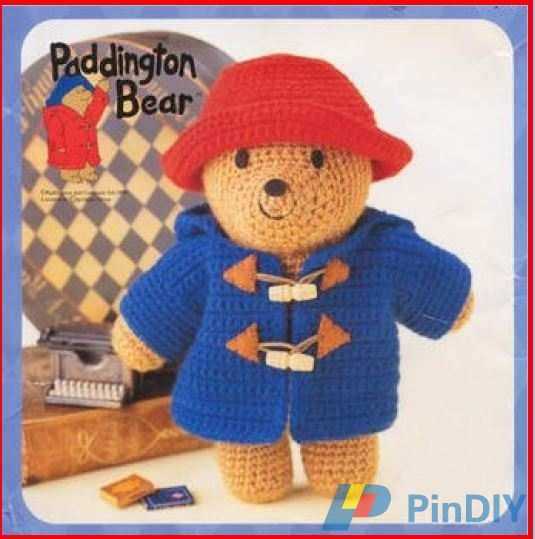
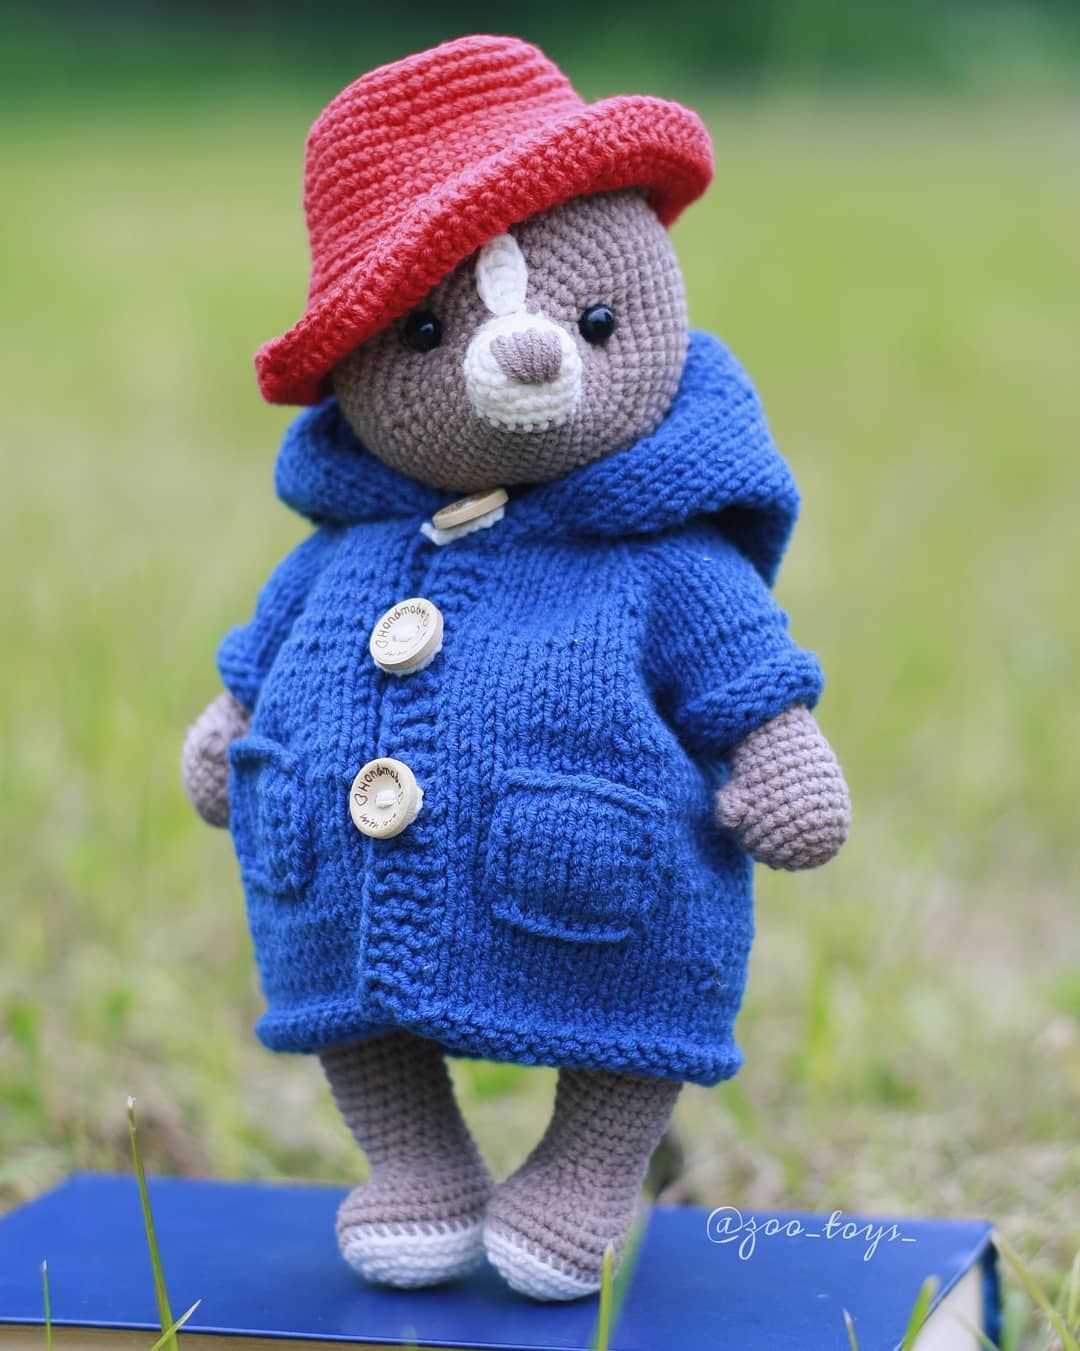
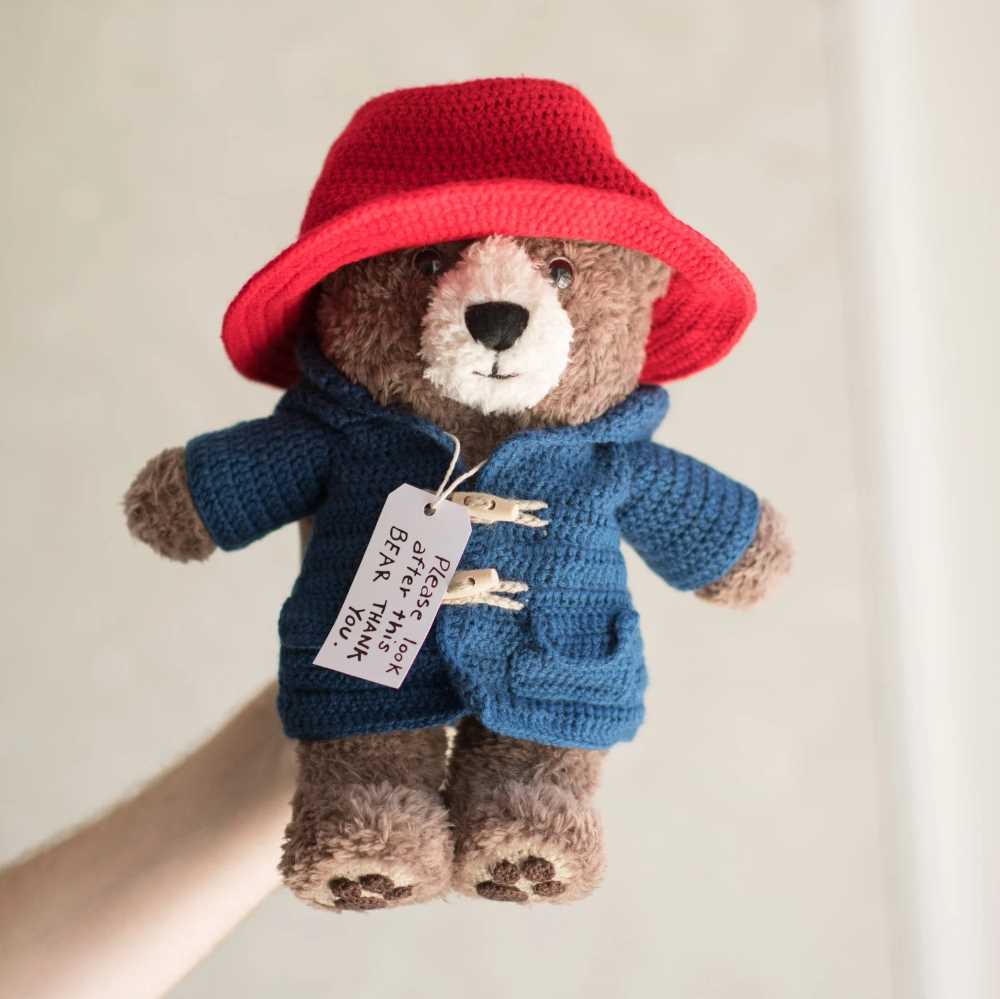
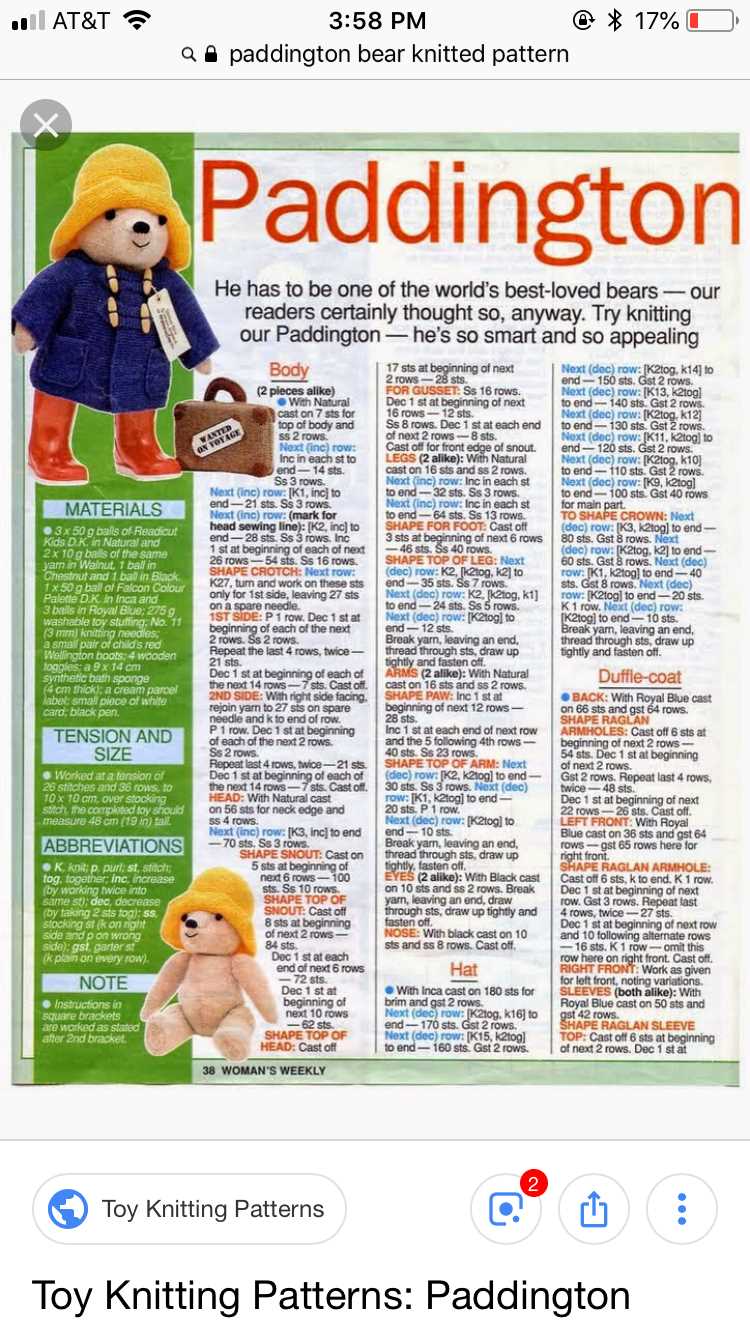
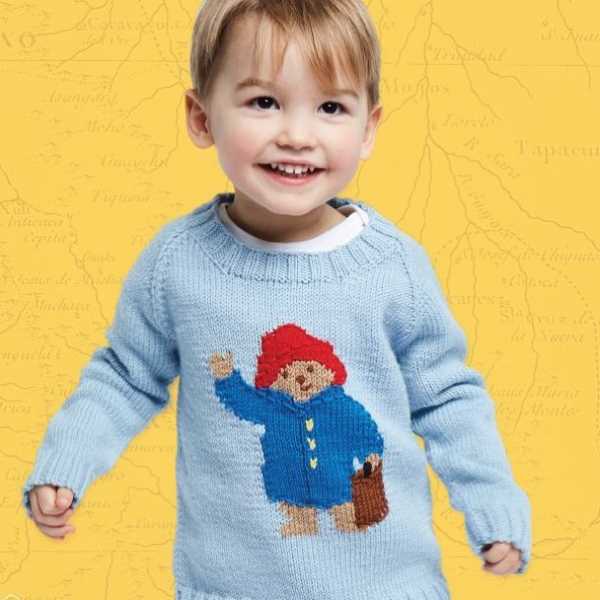
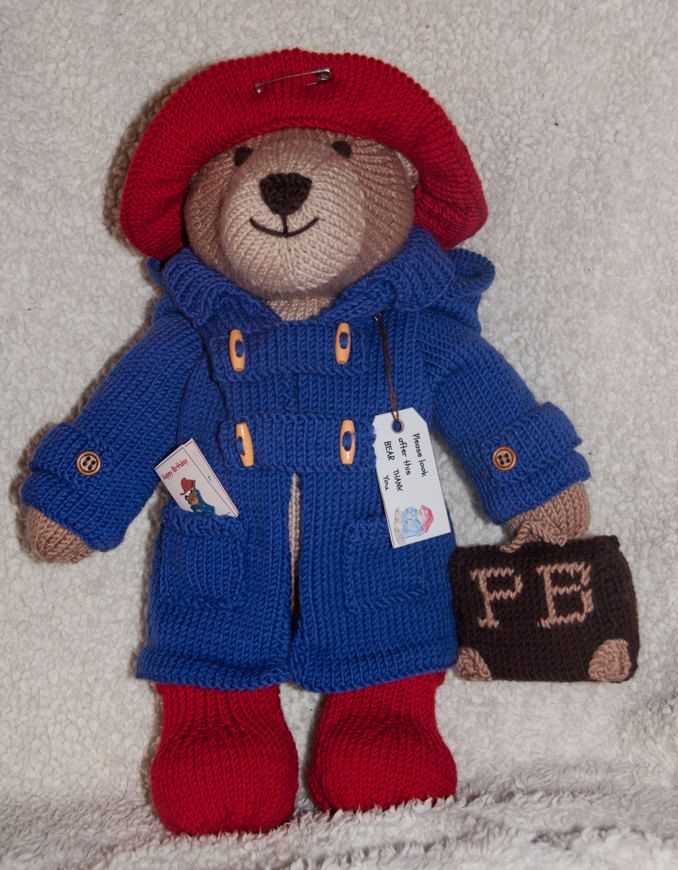
Paddington Bear is a beloved character in children’s literature, and his iconic blue coat and red hat have become instantly recognizable. If you are a fan of knitting and would like to create your own Paddington Bear, you’re in luck! There are many knitting patterns available that allow you to bring this charming bear to life.
Knitting a Paddington Bear can be a fun and rewarding project for both experienced and beginner knitters. The patterns typically include step-by-step instructions, including the materials and yarn needed, as well as the techniques required to complete the project. Whether you are knitting for a child or as a nostalgic gift for a Paddington Bear fan, this project is sure to bring a smile to any face.
One of the great things about knitting your own Paddington Bear is that you can customize the design to your liking. You can choose different yarn colors and textures to create a unique bear that matches your vision. Additionally, some patterns offer options for different sizes or poses, allowing you to create a whole family of Paddington Bears!
Whether you are a knitting enthusiast or simply a fan of Paddington Bear, knitting your own bear can be a fun and creative way to bring this beloved character to life. With a wide range of patterns available, you are sure to find one that fits your skill level and desired final product. So grab your knitting needles and get ready to embark on a fun and magical knitting adventure!
History of Paddington Bear
Paddington Bear is a beloved character in British children’s literature. The bear has been featured in numerous books, films, and television series, capturing the hearts of generations of readers. Created by Michael Bond, Paddington Bear was first introduced to the world in the book “A Bear Called Paddington,” published in 1958.
The story of Paddington Bear begins when he is found at Paddington Station in London by the Brown family. They take him home and name him Paddington after the station where he was discovered. The bear, wearing his iconic blue coat and red hat, quickly becomes a part of the Brown family’s everyday life, often finding himself in amusing and entertaining situations.
Since his debut, Paddington Bear has become an iconic symbol of British literature and culture. The character’s popularity led to numerous sequels, spin-off books, and adaptations, including animated television shows and movies. In 2014, a live-action movie titled “Paddington” was released, further cementing Paddington Bear’s status as a beloved children’s character.
The image of Paddington Bear has become instantly recognizable, with his distinctive outfit and marmalade sandwich always close at hand. His adventures, often filled with humor and mischief, continue to captivate children and adults around the world, making him one of the most beloved and enduring characters in children’s literature.
Importance of Knitting Patterns
Knitting patterns play a crucial role in the world of knitting enthusiasts. They serve as guides and instructions that help knitters create beautiful and intricate designs. Whether you are a beginner or an experienced knitter, having access to well-written knitting patterns is essential.
Guidance and Direction: Knitting patterns provide step-by-step instructions, guiding knitters through the process of creating a particular design. They outline the necessary stitches, techniques, and materials needed, ensuring that knitters have all the information they need to complete their project successfully.
For example, if you are interested in knitting a Paddington Bear, a knitting pattern for Paddington Bear would provide you with the specific stitches and techniques needed to create this iconic character.
Consistency and Accuracy: Knitting patterns help ensure consistency and accuracy in the finished products. They provide detailed measurements, gauge information, and stitch counts so that knitters can create items that fit properly. Following a knitting pattern helps eliminate guesswork and increases the chances of achieving the desired result.
Sharing and Replicating: Knitting patterns also enable knitters to share and replicate designs. They allow for the recreation of beloved items and the sharing of ideas and techniques within the knitting community. By following a knitting pattern, knitters can recreate popular designs, such as sweaters, hats, shawls, and more, and add their personal touch.
Exploration and Creativity: Finally, knitting patterns serve as a starting point for knitters’ exploration and creativity. They provide a foundation from which knitters can modify and adapt designs to suit their preferences. Knitters can experiment with different colors, yarns, and stitch patterns, adding their personal flair to the original design.
In conclusion, knitting patterns are essential tools for knitters. They provide guidance, ensure accuracy, facilitate sharing, and foster exploration and creativity. Whether you are knitting a Paddington Bear or any other design, having access to well-written knitting patterns is crucial to achieving successful and satisfying knitting projects.
Materials Needed for Knitting
Knitting is a popular craft that requires a few essential materials to get started. Whether you are a beginner or an experienced knitter, having the right materials is key to creating beautiful and functional knitted items. Here are some of the essential materials needed for knitting:
Yarn:
Yarn is the primary material used in knitting. It comes in a variety of weights, colors, and fibers. When choosing yarn for your project, consider the pattern instructions and the intended use of the finished item. Different yarns have different properties, such as warmth, durability, and softness.
Knitting Needles:

Knitting needles come in various sizes and styles. They are typically made of metal, wood, or plastic. The size of the knitting needles will depend on the weight of yarn you are using and the desired gauge of your project. The length of the needles can also vary depending on the technique you are using.
Stitch Markers:
Stitch markers are small rings or clips that are placed on the knitting needles to mark specific stitches or sections in your pattern. They help you keep track of where you are in the pattern and make it easier to count stitches and rows.
Tape Measure:
A tape measure is an essential tool for measuring your gauge and ensuring that your finished project will have the correct dimensions. It is also useful for measuring the length of your knitting needles or the width of your project.
Scissors:
A pair of sharp scissors is necessary for cutting yarn and weaving in ends. It’s important to have a dedicated pair of scissors for your knitting projects to ensure clean cuts without damaging the yarn.
Row Counter:
A row counter is a handy tool for keeping track of the number of rows you have knitted. It eliminates the need to count rows manually and makes it easier to follow complex patterns.
Darning Needles:
Darning needles, also known as yarn needles or tapestry needles, are used for weaving in loose ends and sewing pieces together. They have large eyes that can accommodate yarn, making it easy to hide and secure loose ends within your knitted fabric.
Pattern:
A knitting pattern is a set of instructions that guides you through the construction of a specific project. It includes information on yarn weight, needle size, stitch patterns, and shaping. Having a well-written pattern is crucial for achieving the desired outcome.
In addition to these materials, you might also need stitch holders, cable needles, and other specialized tools depending on the intricacy of your project. Remember to choose high-quality materials that suit your individual knitting style and preferences.
Difficulty Level of the Pattern
When it comes to knitting patterns, the difficulty level can vary greatly. The same goes for the famous Paddington Bear pattern. Beginners may find this pattern a bit challenging, as it involves working with various stitches and techniques. However, with some patience and practice, even novice knitters can successfully create their very own Paddington Bear.
Intermediate Knitting Skills Required
To tackle the Paddington Bear knitting pattern, intermediate knitting skills are required. The pattern involves techniques such as knit, purl, increasing, decreasing, and seaming. Additionally, there may be more advanced techniques involved, such as colorwork or cables, depending on the specific pattern you choose. It is recommended to have prior experience working with these techniques before attempting the pattern.
For those who have already mastered the basics of knitting and are comfortable following patterns, the Paddington Bear pattern can be a fun and rewarding project. The pattern may include detailed instructions and diagrams to help guide you through the process. Additionally, there are online resources and tutorials available that can provide further assistance if needed.
Attention to Detail and Patience
While the Paddington Bear pattern may not be suitable for absolute beginners, it can be a great challenge for those who are looking to expand their knitting skills. Attention to detail and patience are key when working on this pattern, as it may involve intricate shaping and finishing touches to achieve the adorable Paddington Bear look. Taking your time and carefully following the instructions will greatly contribute to the success of your project.
Overall, the difficulty level of the Paddington Bear knitting pattern falls into the intermediate category. With some dedication and perseverance, knitters of intermediate skill level can create a charming Paddington Bear that will bring joy to both children and adults alike.
Size and Gauge Requirements

In order to ensure that your knitted Paddington Bear turns out the correct size, it is important to pay attention to the gauge requirements of the knitting pattern. The pattern will specify the gauge, which is the number of stitches and rows that should be achieved over a certain measurement.
Before starting your project, it is recommended to make a gauge swatch to check your tension. This involves knitting a small square using the recommended yarn and needle size, then measuring the number of stitches and rows. If your gauge matches the pattern’s gauge, you can proceed with confidence that your finished bear will be the correct size.
Materials
- Yarn: The pattern will specify the type of yarn to use. It is important to choose a yarn that matches the recommended weight and fiber content for best results.
- Needles: The pattern will specify the size of needles to use. It is important to use the correct size to achieve the gauge.
- Other supplies: Depending on the pattern, you may also need additional supplies such as stuffing, safety eyes, and a yarn needle for finishing.
Gauge
The gauge is typically given as a measurement over 4 inches or 10 centimeters. For example, the pattern may specify a gauge of 20 stitches and 28 rows over 4 inches. This means that if you knit a 4-inch square, it should contain 20 stitches and 28 rows.
If your gauge is larger than the specified gauge, your finished bear may turn out larger than intended. If your gauge is smaller, your bear may be smaller. It is important to adjust your needle size accordingly to achieve the correct gauge.
Adjusting the Size
If you find that your gauge does not match the pattern’s gauge, you can adjust the size of your bear by changing the needle size. If your gauge is larger than specified, try using a smaller needle size. If your gauge is smaller, try using a larger needle size. Remember to make a new gauge swatch with the adjusted needle size to ensure accuracy.
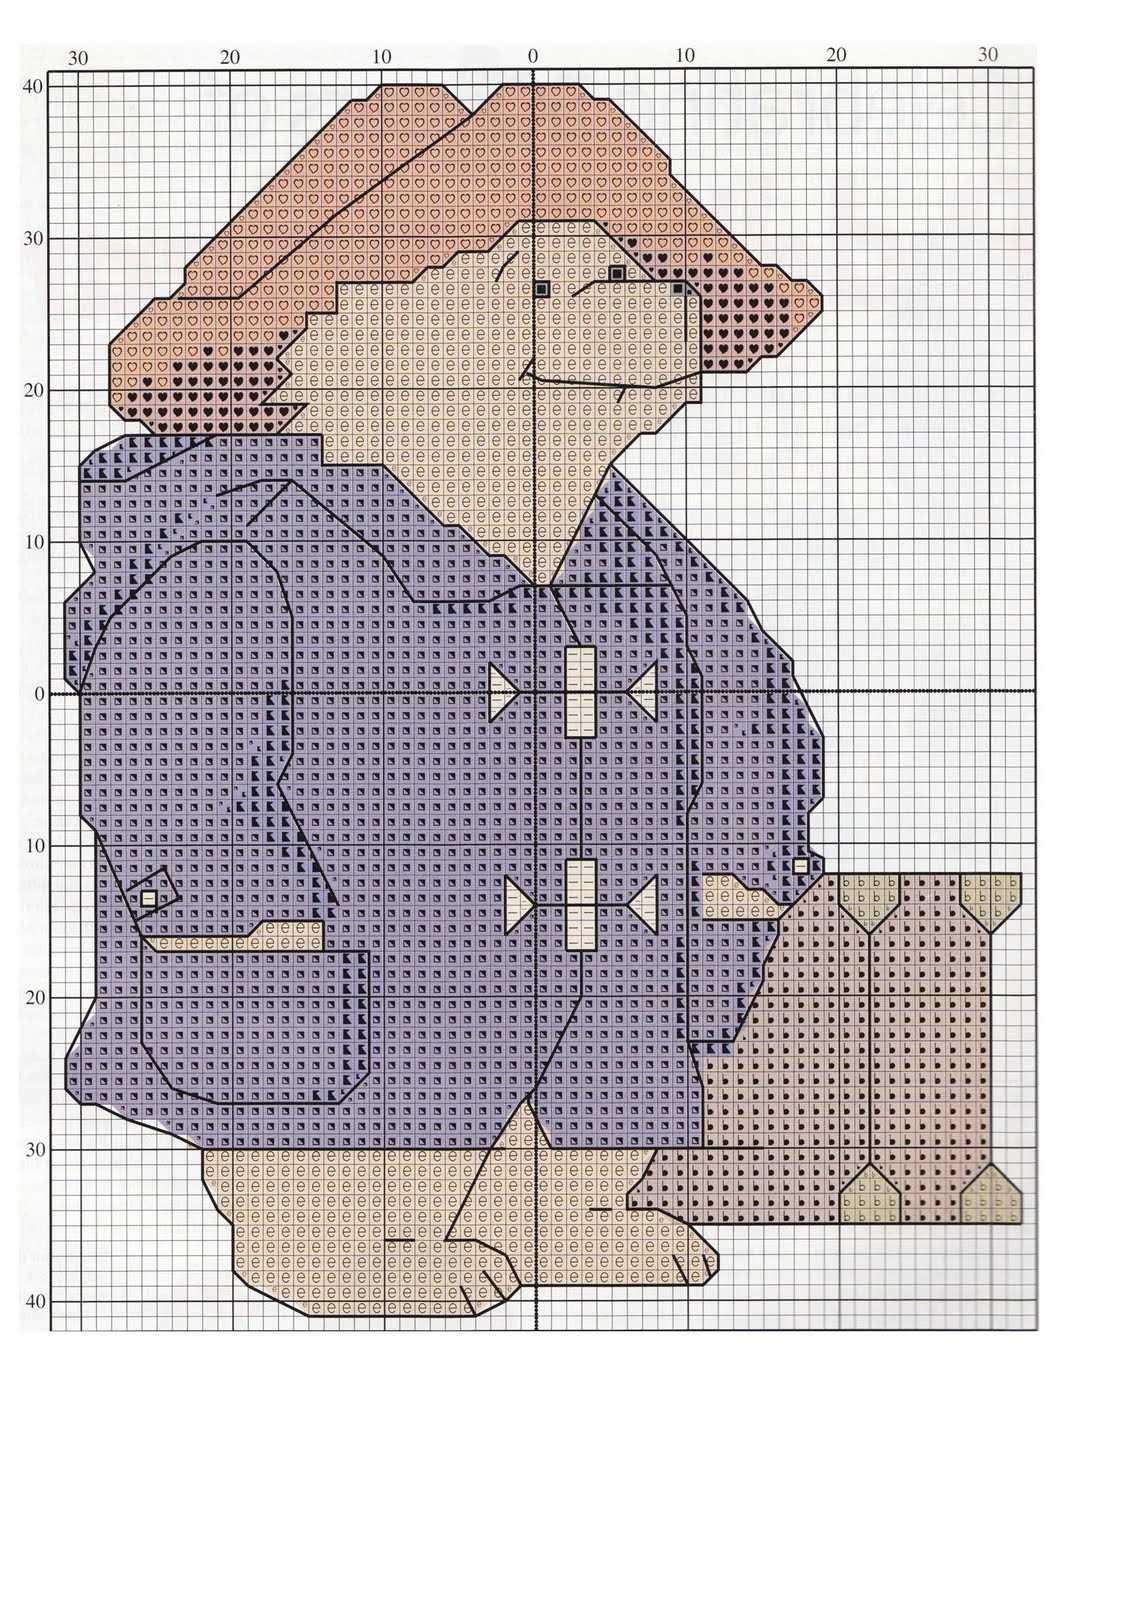
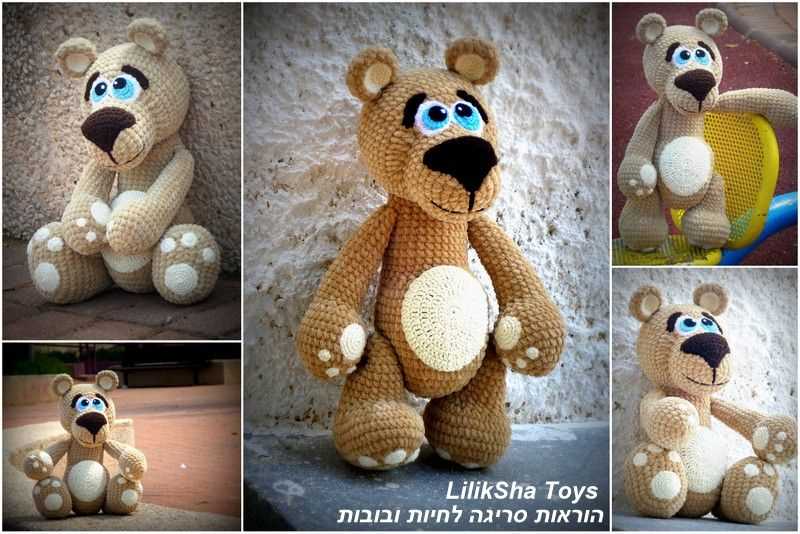
Step-by-step Instructions for Knitting Paddington Bear
Paddington Bear, the beloved character from the children’s books, is a delightful project to knit. With these step-by-step instructions, you’ll be able to create your own adorable Paddington Bear toy.
Materials:
- Worsted weight yarn in brown, red, and cream
- Knitting needles (size US 8)
- Stuffing
- Yarn needle
- Black thread or embroidery floss
- Two small black buttons
Instructions:
1. Head and Body: Start by casting on 40 stitches using brown yarn. Knit in stockinette stitch for 12 inches to form the body. Then, switch to cream yarn and knit in stockinette stitch for 4 inches to create the head.
2. Arms: Using brown yarn, cast on 16 stitches. Knit in stockinette stitch for 8 inches. Repeat to make a second arm.
3. Legs: Using brown yarn, cast on 20 stitches. Knit in stockinette stitch for 10 inches. Repeat to make a second leg.
4. Ears: Using brown yarn, cast on 12 stitches. Knit in garter stitch for 4 rows. Decrease 1 stitch at the beginning of each row until there are 6 stitches left. Knit 2 more rows. Repeat to make a second ear.
5. Assembly: Sew the head and body pieces together using a yarn needle. Attach the arms and legs to the body. Attach the ears to the top of the head. Leave an opening at the bottom of the body for stuffing.
6. Face: Embroider Paddington Bear’s eyes and nose using black thread or embroidery floss. Sew on two small black buttons for his eyes.
7. Stuffing: Fill the body with stuffing, making sure to evenly distribute it. Sew the opening closed.
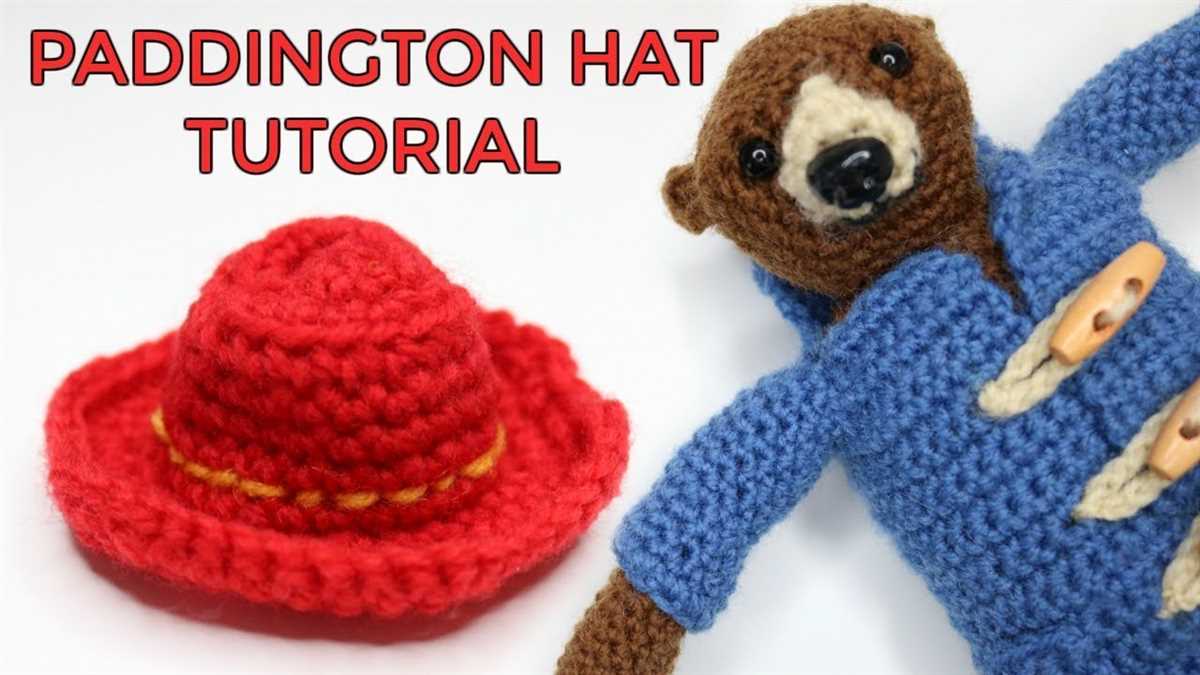
8. Accessories: To complete the look, you can knit a red hat and a red coat for Paddington Bear using red yarn. You can follow a separate knitting pattern for these accessories.
With these step-by-step instructions, you’ll have a charming Paddington Bear toy to cherish or gift to a loved one. Happy knitting!
Casting On Stitches
When starting a knitting project, one of the first steps is to cast on stitches. This is the process of creating the first row of stitches on the knitting needle. There are several methods of casting on, but the most common method is the long-tail cast on.
To begin the long-tail cast on, you will need a long tail of yarn – about three times the width of the finished project. Hold the working yarn in your right hand and loop the tail around your thumb and index finger of your left hand. Insert the needle under the loop on your thumb, then bring the needle over the loop on your index finger.
Next, slip the newly created stitch onto the needle and tighten the yarn tail. This process is repeated for each stitch, with the needle moving under the loop on the thumb and over the loop on the index finger. It may take some practice to get the tension and size of the stitches right, but with time and patience, you will be able to master this casting on technique.
The long-tail cast on creates a neat and elastic edge, making it a popular choice for many knitting projects, including the Paddington Bear knitting pattern. Once you have cast on the required number of stitches, you are ready to begin knitting the first row of your project.
Remember, casting on is an essential step in knitting as it forms the foundation of your project. Take your time and ensure each stitch is secure and even. With the right technique, you will have a strong start to your knitting project and be on your way to creating your very own Paddington Bear.
Knitting Techniques Used
In knitting the Paddington Bear pattern, several knitting techniques are utilized to create the iconic bear character. These techniques include:
- Stockinette Stitch: The majority of the bear is knit using the stockinette stitch, which creates a smooth fabric with a “V” pattern on the right side and a purl pattern on the wrong side.
- Garter Stitch: The ears, hat, and scarf of Paddington Bear are knit using the garter stitch, which is created by knitting every row. This stitch creates a ridged texture and is often used for borders and edgings.
- Decreases: Decreases are used to shape the bear’s head, body, and limbs. Common decrease techniques include knit two stitches together (k2tog) and slip, slip, knit (ssk).
- Increases: Increases are used to shape the bear’s head, body, and limbs. Common increase techniques include yarn over (yo) and knit front and back (kfb).
- Seaming: After knitting the individual pieces of the bear, they are sewn together using a mattress stitch or a whip stitch. This creates the final stuffed bear with all its features.
- Embroidery: Embroidery techniques are used to add details to the bear, such as the eyes, nose, and mouth. This can be done using a tapestry needle and yarn or embroidery floss.
By employing these knitting techniques, you can create your own adorable Paddington Bear with all the charm of the beloved character.
Shaping the Body and Limbs
When knitting a Paddington Bear, shaping the body and limbs is an important step in creating a realistic and adorable finished product. By using specific knitting techniques and carefully following the pattern, you can bring Paddington Bear to life.
Body: To shape the body, the pattern will usually instruct you to increase or decrease stitches at certain points. This helps create the curves and contours of Paddington Bear’s body. For example, you may be instructed to increase stitches to create a rounder shape for the torso, or to decrease stitches to create a taper towards the neck.
Limbs: Paddington Bear’s limbs, including his arms and legs, can also be shaped using similar techniques. Depending on the pattern, you may need to increase or decrease stitches to give the limbs a more natural look. For instance, you may be instructed to increase stitches when knitting the top of the arm to create a fuller shape, or to decrease stitches towards the wrists for a slimmer appearance.
It’s important to carefully read and follow the pattern instructions to ensure you shape the body and limbs correctly. Pay attention to any specific measurements or stitch counts provided in the pattern, as these will help you achieve the desired shape and proportions. By taking your time and using the appropriate techniques, you’ll be able to create a beautifully shaped Paddington Bear that captures his iconic silhouette.
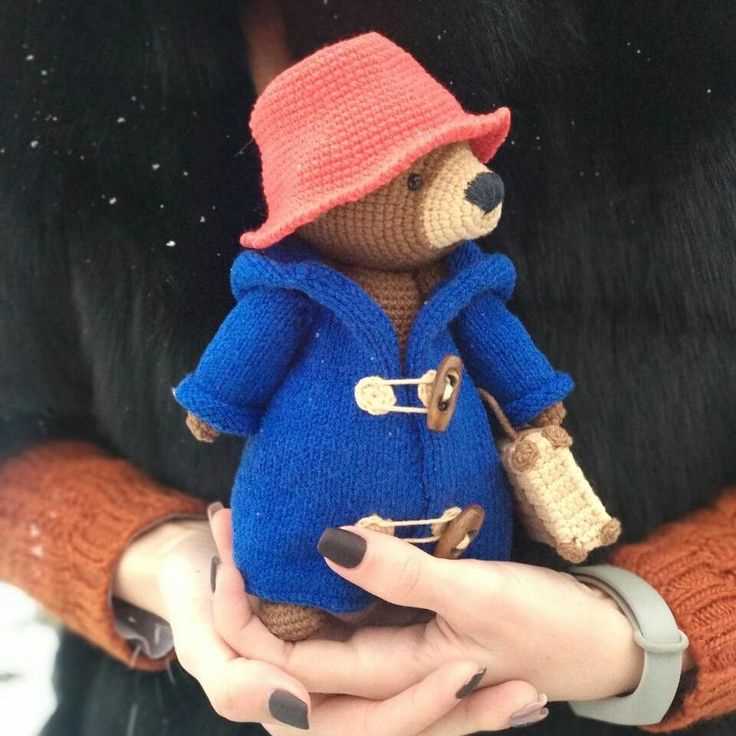
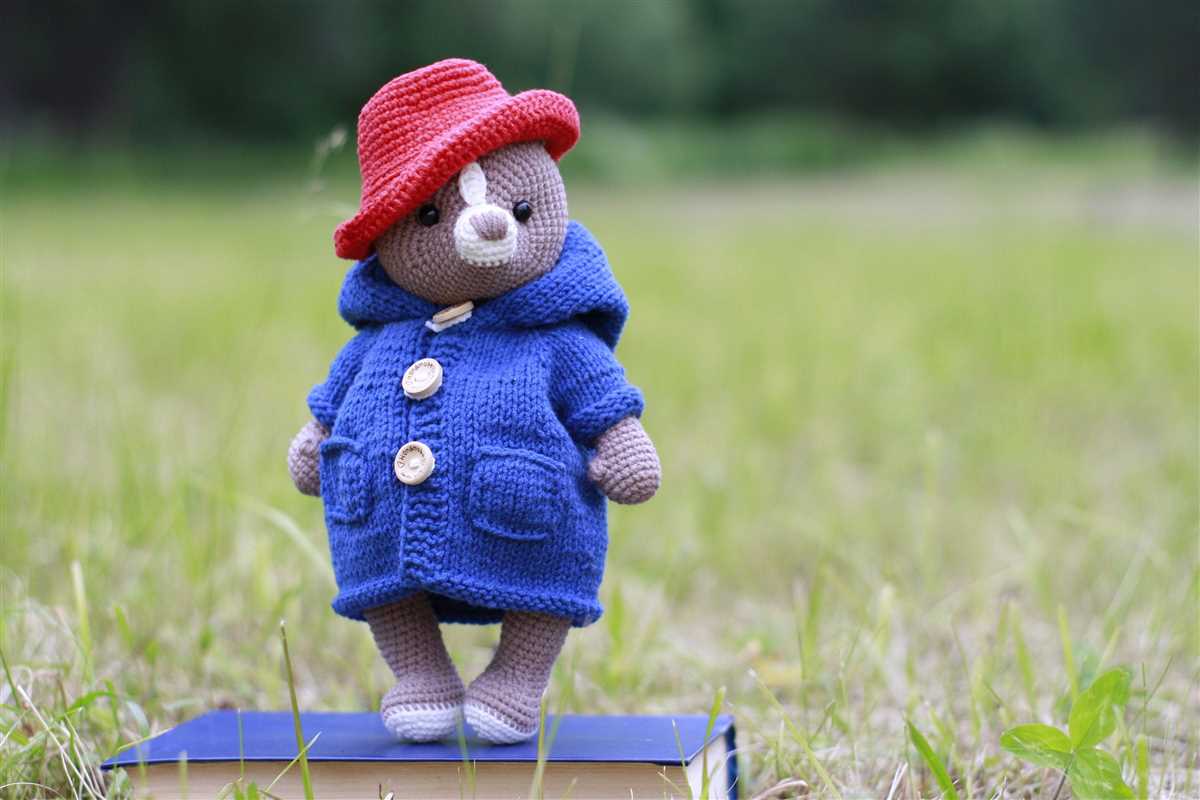
Adding Details to the Bear
When knitting a Paddington Bear, adding details is an important step to bring the character to life. It’s the small touches that make the bear recognizable and unique. Here are some tips on how to add those special details!
1. Embroidering Features
Embroidering the bear’s features is a great way to add personality and expression. Start by using black yarn or embroidery floss to create the eyes. Place them evenly on the face and secure them tightly. Next, embroider a simple nose using a triangle shape. Finally, use a light-colored yarn to create a small smile or frown. This step gives the bear a cute and lovable expression.
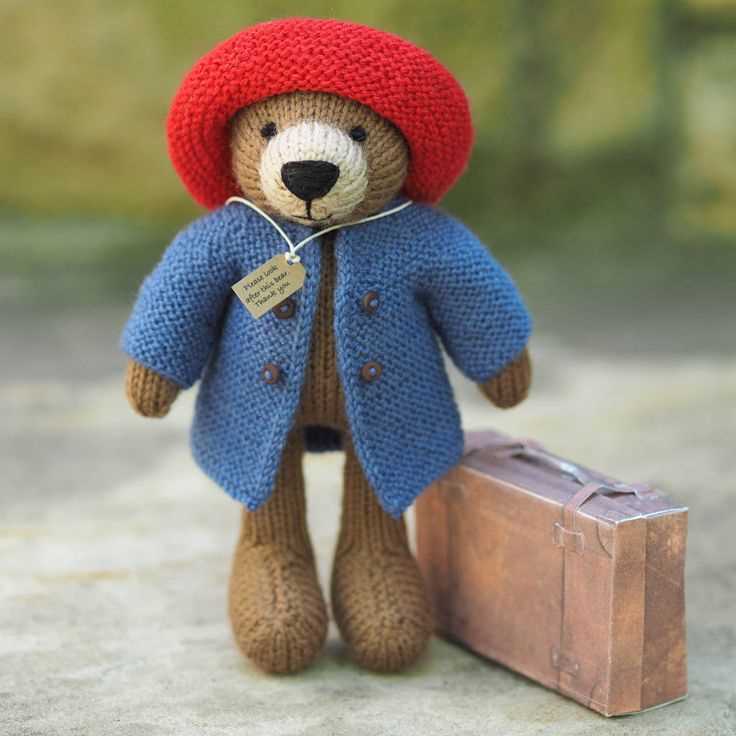
2. Adding Clothing Accessories

To truly represent Paddington Bear, be sure to include his iconic clothing accessories. Knit a small red hat using a separate pattern and securely attach it to the bear’s head. The hat should have a small brim that sits just above his eyes. Additionally, you can knit a small blue coat or attach a fabric coat to complete the look. These added touches make the bear instantly recognizable as Paddington.
3. Attach Arms and Legs
To attach the bear’s arms and legs, carefully sew them onto the body using a yarn needle and matching yarn. It’s important to place the limbs in the correct position to give the bear a natural and realistic stance. Take care to secure the yarn tightly to ensure that the limbs stay in place. This step brings the bear to life and makes it look even more cuddly.
- Remember to stuff the bear with fiberfill before attaching the limbs to give it a soft and huggable feel.
- Consider adding small buttons or patches to the bear’s clothing for added detail.
- As you add the details, pause and step back to see if the bear resembles Paddington. Make adjustments as needed to achieve the desired look.
Tips and Tricks for a Perfect Finish
When it comes to knitting projects, the finishing touches can make a huge difference in the final outcome. Here are some tips and tricks to help you achieve a perfect finish on your Paddington Bear knitting pattern:
1. Blocking
Blocking your finished knitting project can help even out stitches, open up lace patterns, and bring out the true shape and size of the piece. Follow the instructions on the yarn label for the appropriate blocking method, whether it’s steam blocking, wet blocking, or pinning the project to shape.
2. Weaving in Ends
To ensure a clean and professional-looking finish, take the time to weave in all loose ends securely. Use a tapestry needle to thread the ends through the back of the stitches, making sure they are hidden and won’t come loose with wear or washing.
3. Seaming
When it comes to seaming pieces together, take your time and use the appropriate method for the project. Whether it’s mattress stitch, whip stitch, or any other technique, make sure your seams are neat and tidy to give your Paddington Bear that polished look.
4. Embroidery and Details
Adding the final touches to your Paddington Bear, such as embroidering the face and attaching any additional details, can really bring the character to life. Use embroidery floss or yarn in complementary colors to create the desired features, and secure any additional details in place with small stitches or fabric glue.
5. Finishing Touches
Lastly, don’t forget to give your finished Paddington Bear a final inspection. Check for any loose threads, uneven stuffing, or areas that may need reinforcement. Making these small adjustments before declaring your project complete can make all the difference in achieving a perfect finish.
By following these tips and tricks, you’ll be able to create a Paddington Bear that looks just as adorable and charming as the original character. Enjoy the process and have fun bringing this beloved bear to life with your own knitting skills!