
Knitting has long been cherished as both a traditional craft and a creative outlet for many people. The art of knitting can produce beautiful and practical items, from cozy scarves and socks to intricate sweaters and hats. But did you know that you can also knit a coffee cup sleeve?
A coffee cup sleeve, also known as a coffee cozy or cup cozy, is a small knit sleeve that fits around a coffee cup to insulate the hot drink and protect your hands from the heat. It is not only a functional accessory but also a way to add a personal touch to your daily coffee routine. Plus, knitting a coffee cup sleeve can be a quick and satisfying project for knitters of all levels.
There are numerous knitting patterns available for coffee cup sleeves, allowing you to choose the style and design that suits your taste. Whether you prefer a simple and classic ribbed design or a more intricate lace pattern, there is a knitting pattern out there for you. You can experiment with different yarns and colors to create a sleeve that reflects your personal style and matches your favorite coffee shop vibes.
In this article, we will explore various knitting patterns for coffee cup sleeves, from beginner-friendly options to more advanced designs. We will also provide step-by-step instructions for a basic coffee cup sleeve pattern, so you can get started on your own cozy creation. So grab your knitting needles and a cup of your favorite brew, and let’s get knitting!
How to Make a Knitting Pattern Coffee Cup Sleeve
Knitting is a popular craft that allows you to create beautiful and functional items. One of the projects you can try is making a coffee cup sleeve. This sleeve not only adds a personal touch to your daily cup of joe but also serves as an eco-friendly alternative to disposable coffee cup sleeves. With a knitting pattern, you can easily make your own coffee cup sleeve using your favorite yarn and knitting needles.
Materials Needed:
- Yarn in your preferred color
- Knitting needles (size will depend on the yarn weight)
- Tapestry needle
- Scissors
- Measuring tape
Instructions:
- Choose the yarn and knitting needles that you want to use for your coffee cup sleeve. Thicker yarn will create a cozier and more insulated sleeve, while thinner yarn will result in a lighter and less bulky sleeve. Determine the appropriate needle size by checking the yarn label or doing a gauge swatch.
- Measure the circumference of your coffee cup. Use a measuring tape to measure the widest part of the cup, usually around the middle. This measurement will help you determine how many stitches to cast on.
- Calculate the number of stitches to cast on. If you want a snug fit, cast on the same number of stitches as the circumference of your coffee cup. If you prefer a looser fit, add a few extra stitches.
- Cast on the calculated number of stitches using the long-tail cast on method or any other cast on method you prefer.
- Start knitting in the desired stitch pattern. You can choose to knit the entire sleeve in stockinette stitch, ribbing, textured patterns, or any other stitch pattern you like.
- Continue knitting until the sleeve reaches your desired length. You can measure the sleeve against the coffee cup to ensure the perfect fit.
- Once you reach the desired length, bind off all stitches. Cut the yarn, leaving a long tail for sewing.
- Use a tapestry needle to sew the two ends of the sleeve together using the mattress stitch or any other preferred seaming method. Make sure the seam is sturdy and secure.
- Weave in any loose ends using the tapestry needle.
- Your knitting pattern coffee cup sleeve is now complete! Slip it onto your coffee cup and enjoy your favorite hot beverage in style while keeping your hands protected from the heat.
Materials Needed for Knitting Pattern Coffee Cup Sleeve
When it comes to knitting a coffee cup sleeve, you’ll need a few key materials to get started. These materials are essential for creating a cozy and functional sleeve that will keep your hands cool and your drink hot. Here’s a list of the materials you’ll need:
- Yarn: Choose a soft, durable yarn in a color and texture of your choice. You’ll need about 50-75 yards, depending on the size of your cup sleeve.
- Knitting Needles: Select the appropriate knitting needles for your chosen yarn. The size will depend on the gauge you want to achieve and the thickness of the yarn.
- Tapestry Needle: A tapestry needle will come in handy for weaving in ends and finishing your sleeve.
- Scissors: A pair of sharp scissors is essential for cutting the yarn and trimming any excess.
- Measuring Tape: You’ll need a measuring tape to ensure the correct fit of your coffee cup sleeve.
- Stitch Markers: Stitch markers can be useful for keeping track of your stitches and marking any important sections in the pattern.
With these materials in hand, you’ll be well-equipped to start knitting a cozy coffee cup sleeve that’s perfect for enjoying your favorite hot beverage. Gather your supplies, find a cozy spot, and get ready to create your own unique sleeve.
Choosing the Right Yarn for Your Knitting Pattern Coffee Cup Sleeve
Knitting pattern coffee cup sleeves are a great way to add a touch of personal style to your morning coffee routine. When choosing the right yarn for your sleeve, there are a few important factors to consider.
Fiber Content: The first thing to consider is the fiber content of the yarn. Different fibers have different characteristics, so it’s important to choose one that will meet your specific needs. Common options for coffee cup sleeves include wool, cotton, acrylic, and blends.
Insulation: One key factor to consider is insulation. Coffee cup sleeves are designed to provide some level of insulation to keep your hands from getting too hot or cold when holding your cup. Wool is a great option for insulation, as it has natural insulating properties. However, other fibers like acrylic can also provide insulation.
Comfort: Another factor to consider is the comfort of the yarn against your skin. If you plan to use the sleeve without a handle, it’s important to choose a yarn that feels soft and comfortable against your hand. Natural fibers like cotton can be a good choice for comfort, as they tend to be softer and less itchy than synthetic fibers.
Washing Instructions: Finally, it’s important to consider the washing instructions for the yarn. Coffee cup sleeves can get dirty over time, so it’s important to choose a yarn that can be easily cleaned. Some yarns may be machine washable, while others may require hand washing. Be sure to choose a yarn that fits your lifestyle and cleaning preferences.
By considering these factors and choosing the right yarn for your knitting pattern coffee cup sleeve, you can create a stylish and functional accessory for your morning coffee routine.
Tools Required for Knitting Pattern Coffee Cup Sleeve
If you are planning to knit your own coffee cup sleeve, there are several tools that you will need to have on hand. These tools are essential for creating a beautiful and functional sleeve that will keep your hands safe from the heat of your drink.
- Knitting Needles: You will need a pair of knitting needles in the appropriate size for your chosen pattern. The size of the needles will depend on the thickness of the yarn you are using.
- Yarn: Choose a soft and durable yarn in the color of your choice. Make sure to select a yarn that is suitable for the size of needles you are using.
- Tapestry Needle: A tapestry needle is essential for weaving in loose ends and finishing off your sleeve. It is also useful for any additional finishing touches you may want to add.
- Scissors: A pair of sharp scissors will be needed for cutting the yarn and trimming any excess.
- Measuring Tape: A measuring tape will come in handy for checking your gauge and ensuring that your sleeve is the correct size.
These are the basic tools that you will need to get started on your knitting pattern coffee cup sleeve. Once you have gathered all of these items, you will be ready to begin your project and create a cozy accessory for your favorite hot beverages.
Knitting Pattern Coffee Cup Sleeve Size and Gauge
When knitting a coffee cup sleeve, it’s important to consider the size and gauge of your project. The size of the sleeve will determine how snugly it fits on your cup, while the gauge will determine the overall thickness and durability of the sleeve.
Before starting your project, it’s a good idea to measure the circumference of your coffee cup or mug. This will give you an idea of how big or small to make your sleeve. You can use a measuring tape or a flexible ruler to measure the circumference at the widest point of the cup. Keep in mind that you want the sleeve to fit snugly, but not too tight that it becomes difficult to slide on or off.
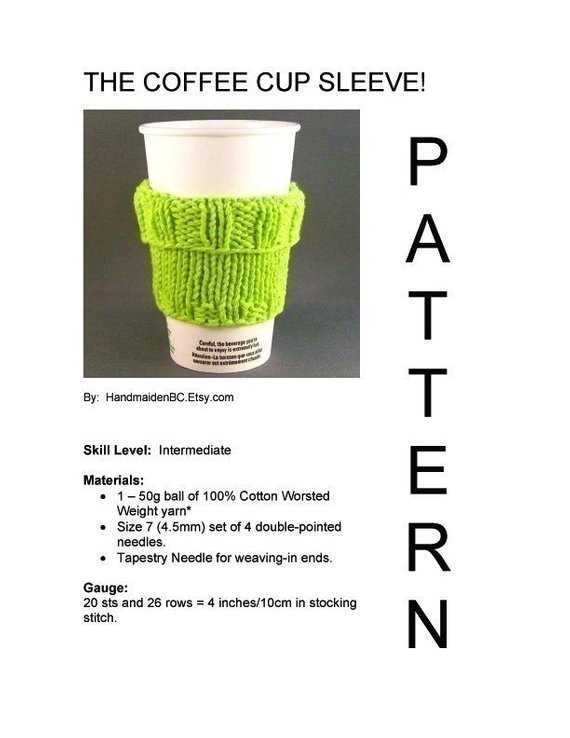
Gauge
The gauge is an important factor to consider when knitting a coffee cup sleeve. It refers to the number of stitches and rows that fit within a given measurement. For example, a gauge of 20 stitches and 24 rows might result in a 4×4-inch swatch. The gauge will determine the overall size and thickness of the sleeve.
To determine your gauge, you can create a small swatch using the desired yarn and needle size. Follow the pattern instructions or cast on a few stitches and work in the desired stitch pattern for a few inches. Measure the width and height of the swatch and compare it to the recommended gauge in the pattern. If your gauge is larger, try using a smaller needle size. If your gauge is smaller, try using a larger needle size.
Remember that everyone knits with slightly different tension, so it’s always a good idea to create a gauge swatch before starting your project. This will ensure that your coffee cup sleeve turns out the correct size and fits your cup perfectly.
Understanding the Knitting Pattern Coffee Cup Sleeve Pattern
Knitting patterns can be both challenging and rewarding, and the coffee cup sleeve pattern is no exception. This pattern is specifically designed to create a cozy and functional sleeve for your favorite hot beverage. Whether you’re a beginner or an experienced knitter, understanding the pattern is essential for successfully knitting the coffee cup sleeve.
- Materials: Before you begin knitting, gather all the necessary materials. The coffee cup sleeve pattern typically requires a specific type and amount of yarn, as well as the appropriate knitting needles. Make sure to check the pattern for the recommended materials before starting.
- Pattern Instructions: The knitting pattern for the coffee cup sleeve will provide you with step-by-step instructions on how to create the sleeve. It will include details such as the type of stitches to use, the number of stitches to cast on, and the specific knitting techniques required. It’s essential to read and understand each instruction before proceeding to the next step.
- Gauge: Achieving the correct gauge is crucial in creating a coffee cup sleeve that fits snugly around your cup. The gauge refers to the number of stitches and rows per inch in the knitted fabric. Follow the pattern’s gauge instructions, and make a gauge swatch before starting the actual sleeve to ensure your measurements are accurate.
- Special Techniques: Some knitting patterns may include special techniques or stitches that you may not be familiar with. Take the time to study and practice these techniques before attempting them in the actual pattern. This will help you feel more confident and ensure that your coffee cup sleeve turns out as expected.
- Finishing the Sleeve: After completing all the required stitches and rows, the pattern will guide you on how to finish the coffee cup sleeve. This may involve binding off stitches, sewing seams, or adding any additional embellishments or closures. Follow the instructions carefully to achieve a professional and polished final product.
Step-by-Step Instructions for Knitting Pattern Coffee Cup Sleeve
If you love knitting and enjoy drinking a hot beverage on the go, then this knitting pattern coffee cup sleeve is the perfect project for you. With just a few simple steps, you can create a reusable and stylish sleeve for your favorite coffee or tea cup. Whether you’re a beginner or an experienced knitter, this project is suitable for all skill levels.
Materials:
- Worsted weight yarn in your choice of color
- Size 8 knitting needles
- Tapestry needle
- Scissors
Instructions:
- Cast on 36 stitches using the long-tail cast on method.
- Knit 2 rows in garter stitch (knit every stitch).
- Switch to your desired stitch pattern. You can choose from basic ribbing, seed stitch, or any other pattern you prefer.
- Continue knitting in your chosen stitch pattern until the sleeve measures approximately 4 inches in length.
- Knit 2 rows in garter stitch to create a border.
- Bind off all stitches using the standard bind off method.
- Weave in any loose ends using a tapestry needle.
- Slide the finished sleeve onto your coffee or tea cup and enjoy your hot beverage in style while keeping your hands protected from the heat.
With these simple step-by-step instructions, you can easily create a knitting pattern coffee cup sleeve that is both functional and fashionable. Experiment with different stitch patterns and colors to make your sleeve unique to your personal style. This project also makes for a great gift idea for friends and family who enjoy a hot drink on the go. Happy knitting!
Customizing Your Knitting Pattern Coffee Cup Sleeve
When it comes to knitting pattern coffee cup sleeves, there are endless options for customization. Whether you’re a beginner knitter or an experienced one, you can easily personalize your sleeve to make it unique and reflect your style. Here are some ideas and techniques to help you customize your knitting pattern coffee cup sleeve.
1. Color
One of the simplest ways to customize your knitting pattern coffee cup sleeve is by choosing the right colors. You can select a single color that matches your favorite outfit or go for a vibrant multicolor design. Consider using yarns with different textures or gradients to create an eye-catching effect. Experiment with different color combinations to find the perfect one that suits your taste.
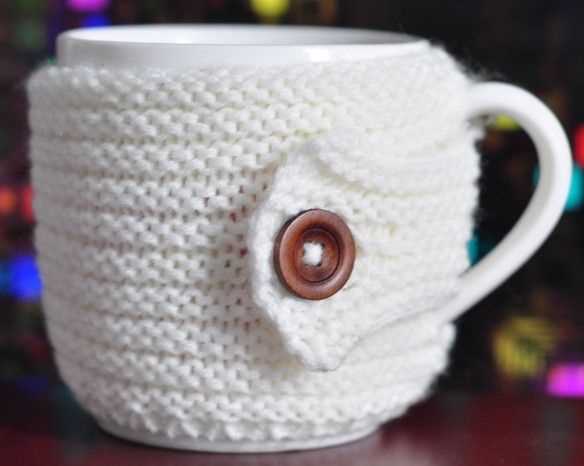
2. Embellishments

Add some flair to your knitting pattern coffee cup sleeve by incorporating embellishments. You can use buttons, beads, or sequins to create a decorative element. Sew them onto the sleeve in a pattern or randomly for an eclectic look. Alternatively, you can add a small crochet flower or pom-poms for a playful touch. The possibilities are endless, so let your creativity run wild!
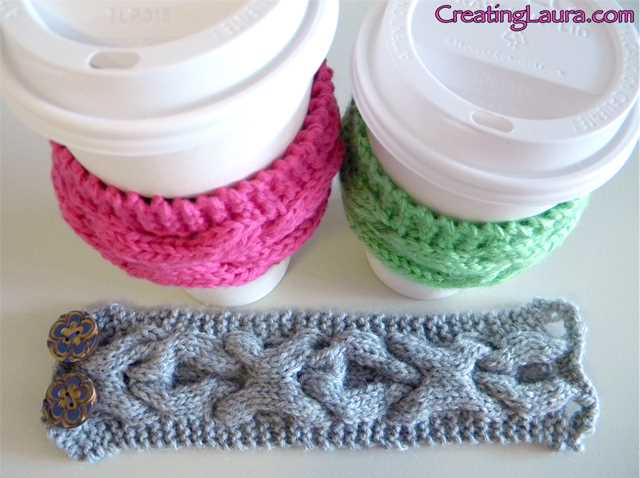
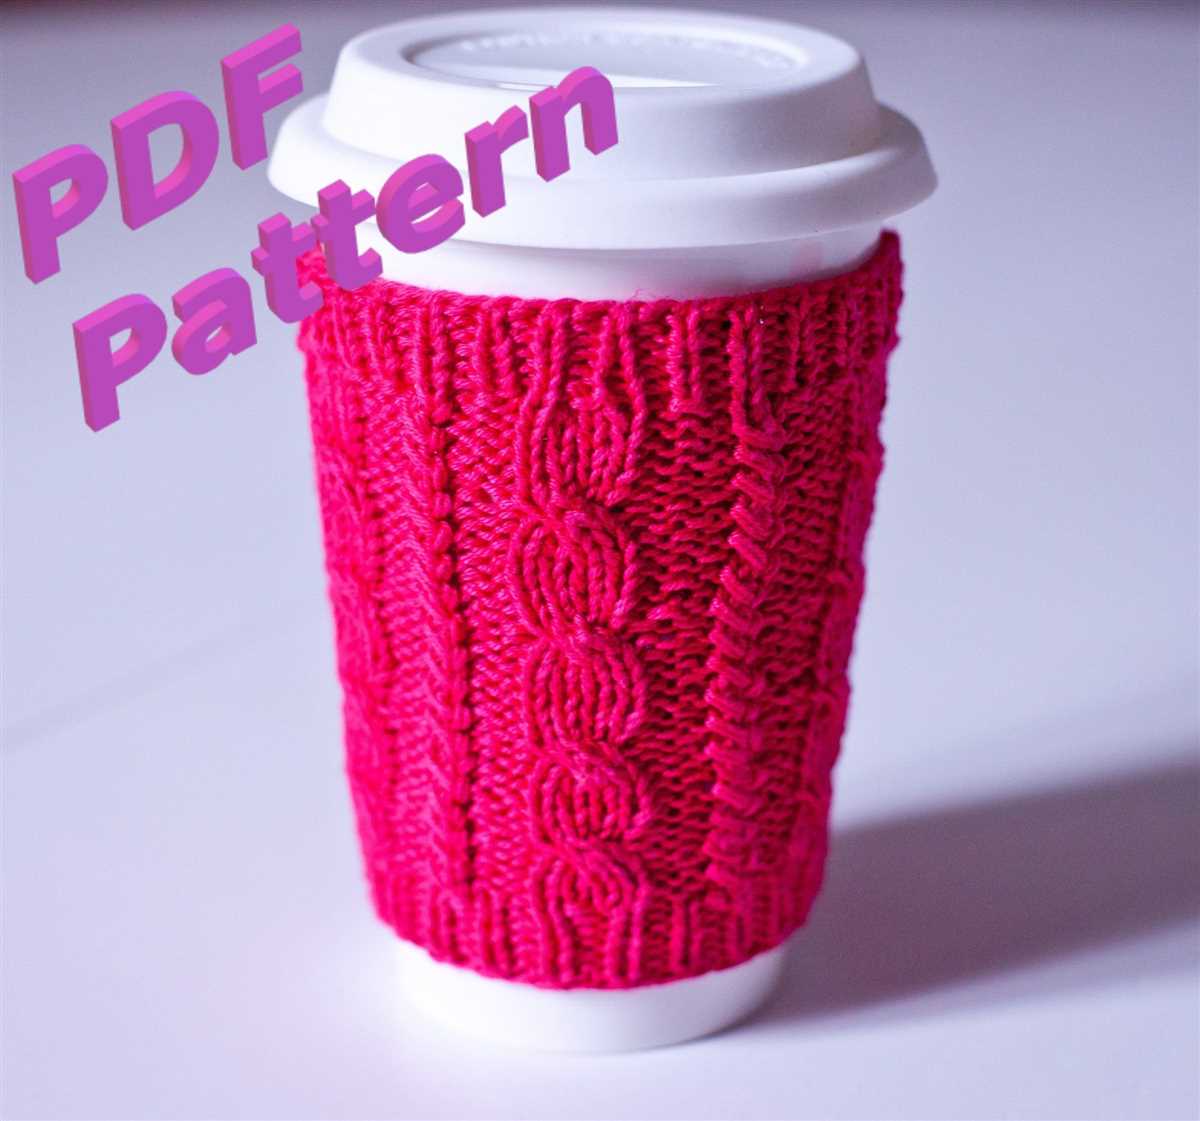
3. Stitch Patterns
Another way to customize your knitting pattern coffee cup sleeve is by choosing different stitch patterns. Experiment with various knitting techniques, such as cables, lace, or texture patterns, to create unique designs. You can also play with different stitch sizes or combine multiple stitch patterns for a more intricate look. The choice of stitch pattern will greatly impact the overall appearance of your coffee cup sleeve.
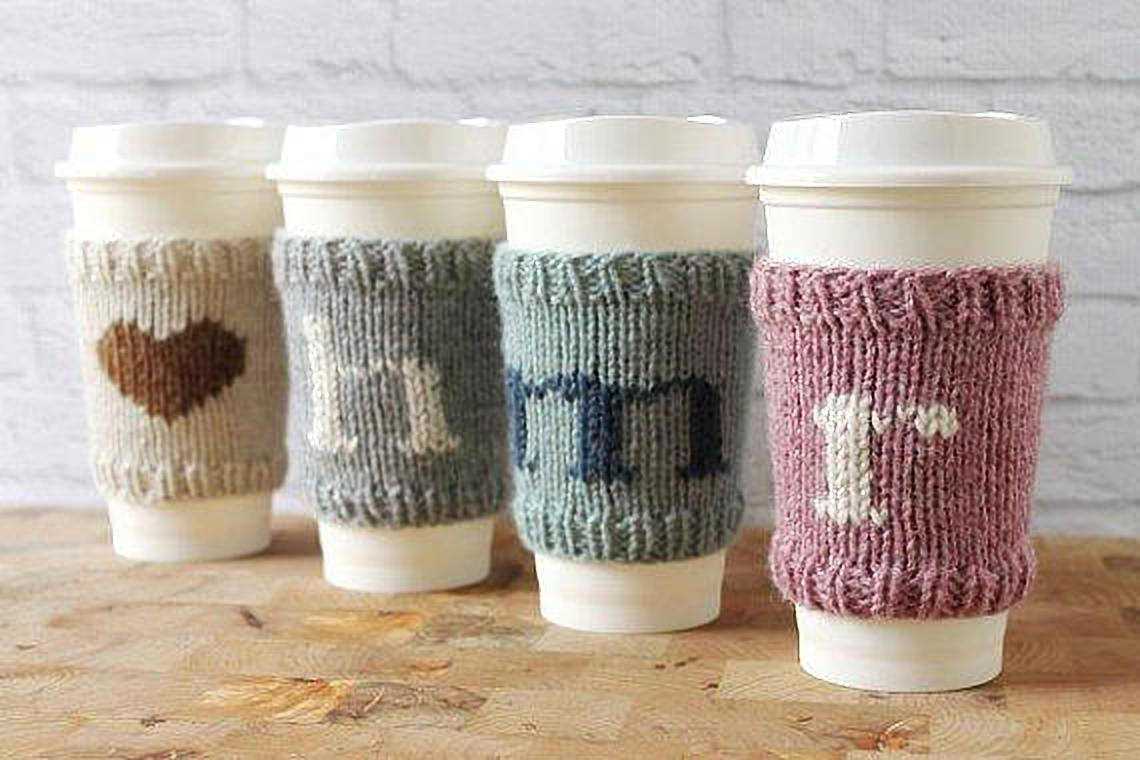
4. Personalization
Make your knitting pattern coffee cup sleeve truly your own by adding personalization. Consider incorporating initials or a monogram using duplicate stitch or intarsia technique. You can also knit in a special symbol or design that holds meaning to you. This adds a special touch and makes your coffee cup sleeve one of a kind.
In conclusion, customizing your knitting pattern coffee cup sleeve allows you to showcase your creativity and personal style. Consider experimenting with different colors, embellishments, stitch patterns, and personalization techniques to make your sleeve truly unique. Enjoy the process of customizing and make your coffee cup sleeve a reflection of yourself.
Adding Embellishments to Your Knitting Pattern Coffee Cup Sleeve
If you’re looking to take your knitting pattern coffee cup sleeve to the next level, consider adding embellishments. There are various ways to embellish your sleeve, allowing you to personalize it and make it truly unique. Whether you want to add a pop of color, texture, or even a touch of sparkle, there are endless possibilities for embellishing your knitting pattern coffee cup sleeve.
Here are some ideas for adding embellishments to your coffee cup sleeve:
- Embroidery: Embroidery is a fantastic way to add intricate designs and patterns to your coffee cup sleeve. You can use different colors of thread to create beautiful motifs, such as flowers, leaves, or even abstract designs. Consider using embroidery stitches like satin stitch, chain stitch, or French knots to add texture and interest to your sleeve.
- Buttons: Buttons are an easy and versatile embellishment that can instantly elevate the look of your coffee cup sleeve. You can sew on buttons in various sizes, colors, and shapes to add visual interest and dimension. Consider using buttons in contrasting colors or coordinating ones to match the yarn you used.
- Ribbons: Ribbons can add a touch of elegance and femininity to your coffee cup sleeve. You can attach ribbons in different widths and colors to create bows, knots, or even a crisscross pattern. Choose ribbons made from materials like satin or velvet for a luxurious look.
- Beads: Beads can add a bit of sparkle and glamour to your coffee cup sleeve. You can sew on beads individually or create patterns and designs by stringing them together. Consider using beads in different sizes and colors to create a unique and eye-catching sleeve.
- Pom-poms: Pom-poms are a fun and playful embellishment option for your coffee cup sleeve. You can make pom-poms using yarn in coordinating or contrasting colors and attach them to the sleeve using a needle and thread. Pom-poms add a touch of whimsy and can make your sleeve stand out.
With these ideas for adding embellishments, you can transform your knitting pattern coffee cup sleeve into a one-of-a-kind accessory. Don’t be afraid to experiment and let your creativity shine.
Tips and Tricks for Knitting a Perfect Coffee Cup Sleeve
Knitting a coffee cup sleeve can be a fun and rewarding project for any knitter. Whether you’re a beginner or an experienced knitter, there are some tips and tricks that can help you create the perfect coffee cup sleeve. This article will provide you with some valuable advice to ensure your knitting project turns out just right.
1. Choose the Right Yarn and Needles
When selecting yarn for your coffee cup sleeve, it’s important to choose a material that is both durable and insulating. Wool or acrylic blends are great options as they provide warmth and can withstand frequent use. Additionally, consider using needles that are appropriate for the yarn weight you’ve chosen. This will help ensure your stitches are even and the fabric has the desired thickness.
2. Perfect Your Gauge Swatch
Before you begin your coffee cup sleeve, take the time to create a gauge swatch. This swatch will help you determine the number of stitches and rows needed to achieve the desired measurements for your sleeve. It’s important to match the specified gauge in the knitting pattern to ensure your finished sleeve fits snugly around the coffee cup.
3. Follow the Pattern Instructions Carefully
When knitting a coffee cup sleeve, it’s crucial to carefully follow the pattern instructions. Pay attention to any specific stitch patterns, stitch counts, and shaping techniques that are outlined in the pattern. By following the instructions closely, you’ll be able to create a sleeve that matches the intended design and size.
4. Add Personal Touches
While knitting a coffee cup sleeve, don’t be afraid to add your personal touches to the design. Consider incorporating different stitch patterns, color changes, or even decorative buttons. These additions can make your coffee cup sleeve unique and reflect your personal style.
5. Finishing Tips
When completing your coffee cup sleeve, make sure to finish the edges neatly. You can use techniques such as binding off or adding ribbed or garter stitch borders. Additionally, blocking your finished sleeve can help even out any inconsistencies and give it a polished look.
With these tips and tricks in mind, you’re ready to start knitting a perfect coffee cup sleeve. Enjoy the process and showcase your knitting skills with a stylish accessory for your favorite hot beverage.
Finishing Your Knitting Pattern Coffee Cup Sleeve
Once you have completed knitting your coffee cup sleeve following the pattern instructions, it’s time to finish it off to ensure a polished and professional-looking result. There are a few key steps you can take to achieve this.
Weaving in Ends:
Firstly, you should weave in any loose ends that may be left from changing colors or joining new yarn. This involves using a yarn needle to thread the ends through the stitches on the wrong side of the sleeve, making sure to secure them tightly. By doing this, you will prevent any loose ends from unraveling and give your sleeve a neat and tidy appearance.
Blocking:
To give your coffee cup sleeve a more finished look and to help it retain its shape, blocking is highly recommended. Blocking involves wetting your sleeve with water and gently stretching it to the desired dimensions, using pins or a blocking board to hold it in place. Allow it to dry completely before removing the pins, and you will find that your sleeve has a more even and professional appearance.
Caring for Your Knitted Coffee Cup Sleeve
Proper care and maintenance are important to keep your knitted coffee cup sleeve in great condition. Follow these tips to ensure that it lasts for a long time:
- Hand Wash Only: Knitted items are delicate, so it’s best to hand wash your coffee cup sleeve. Fill a sink or basin with lukewarm water and a mild detergent. Gently agitate the sleeve in the water, then rinse thoroughly. Avoid twisting or wringing out the sleeve, as this can cause it to lose its shape.
- Dry Flat: After washing, reshape your coffee cup sleeve and lay it flat on a clean towel to dry. Avoid hanging it up to dry, as this can cause it to stretch out of shape.
- Avoid Excessive Heat: Knitted items can become damaged when exposed to high temperatures. Avoid placing your coffee cup sleeve near radiators, fireplaces, or other sources of heat.
- Store Properly: When you’re not using your coffee cup sleeve, it’s important to store it properly to prevent it from getting tangled or damaged. Roll it up and secure it with a rubber band or place it in a small bag or container.
- Spot Clean: If you notice any stains or spills on your coffee cup sleeve, gently spot clean the affected area using a mild detergent and a soft cloth.
- Avoid Sharp Objects: Knitted items can snag easily, so be careful when using your coffee cup sleeve around sharp objects or rough surfaces.
In conclusion, taking proper care of your knitted coffee cup sleeve will help it stay in excellent condition and prolong its lifespan. By following these care instructions, you can enjoy your cozy and stylish sleeve for many cups of coffee to come.