
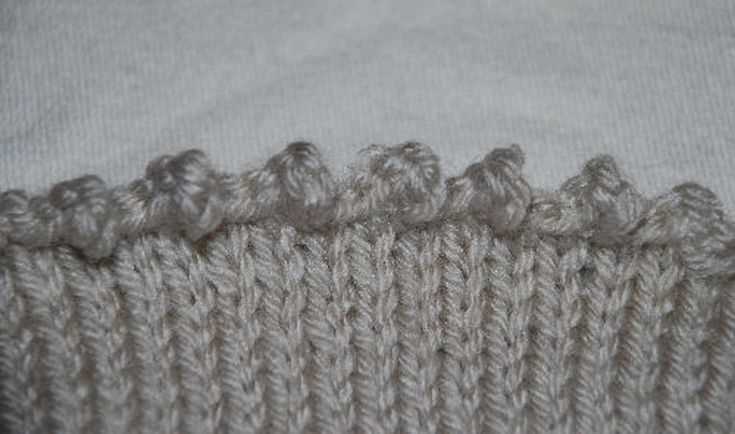
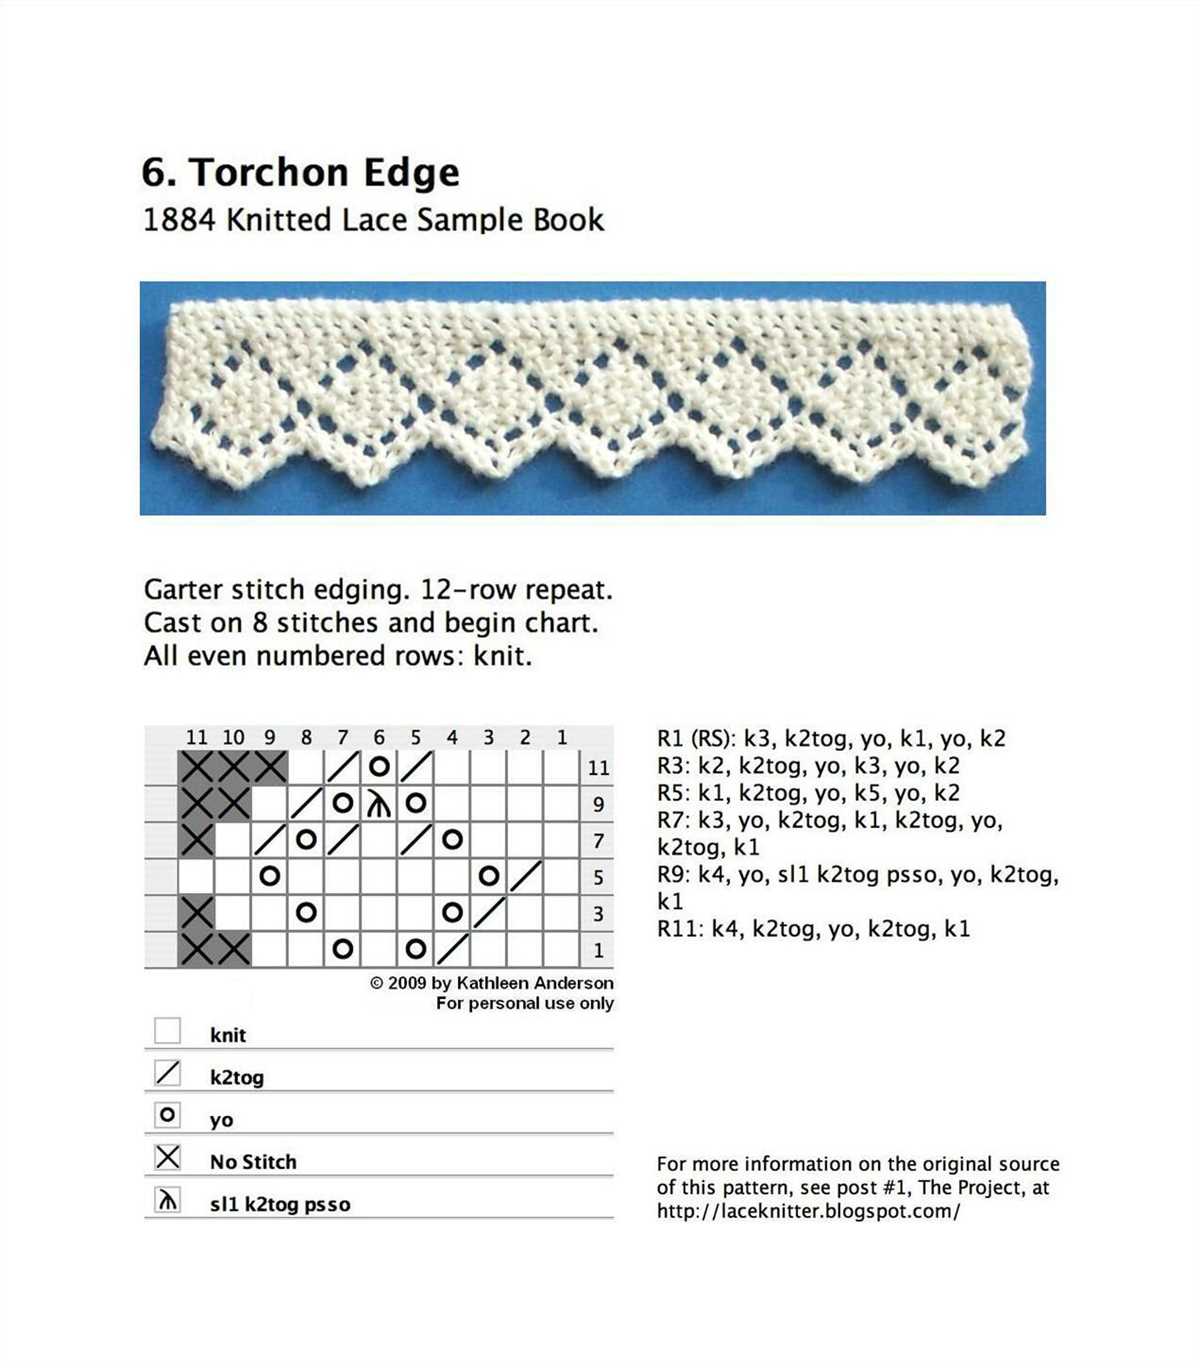
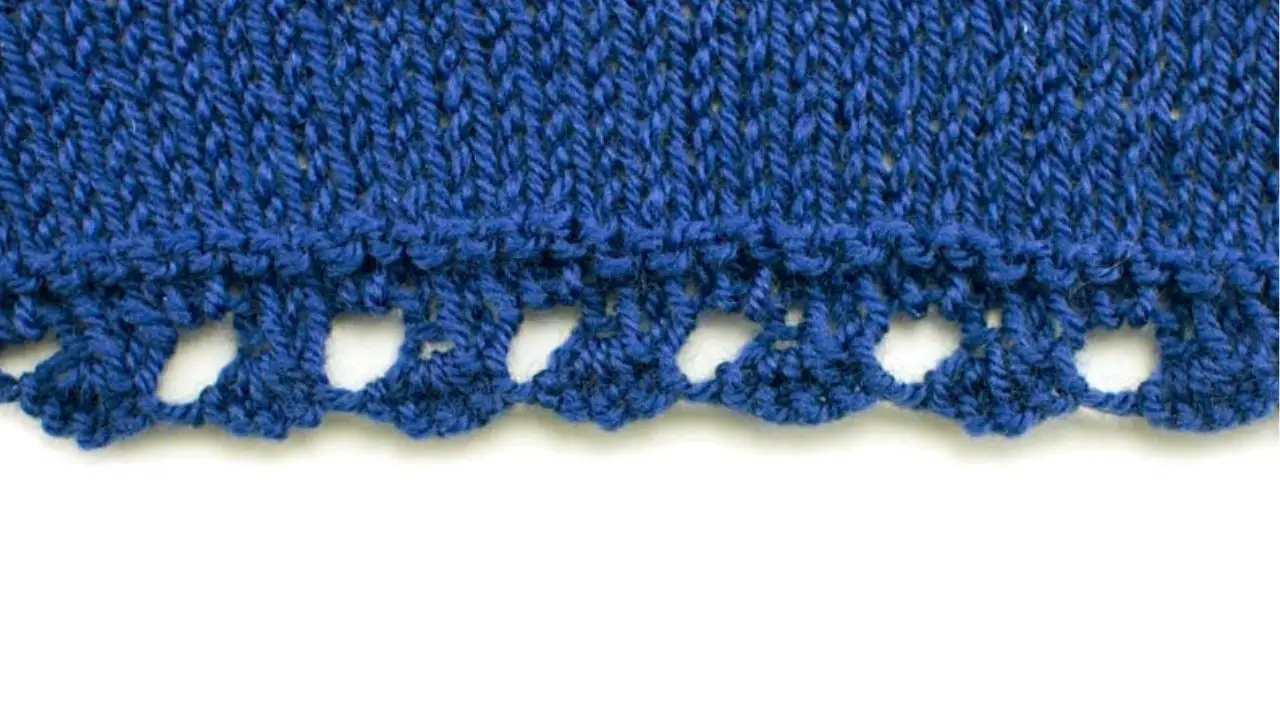
Knitted picot edge is a beautiful decorative pattern that adds a delicate touch to any project. It is commonly used to finish off the edges of a garment, such as a scarf, shawl, or baby blanket. The picot edging creates a row of small loops, giving the project a feminine and elegant look.
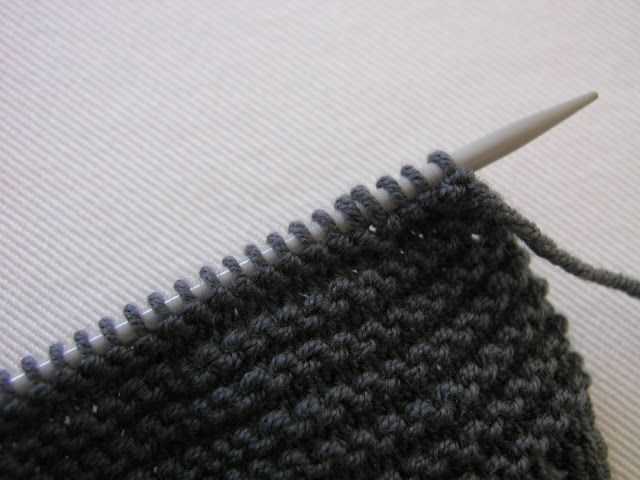
The knitted picot edge pattern is created by working a series of cast-on and bind-off stitches in a specific sequence. It involves knitting a small number of stitches, then creating a loop by slipping the first stitch over the second stitch. This loop forms the picot, which is then secured by binding off the stitches.
One of the advantages of the knitted picot edge pattern is that it is relatively easy to learn and execute. It can be worked on any size of knitting needles, and it can be adjusted to create a picot edge of any desired height. The picot edging can be added to any stitch pattern, making it a versatile technique that can be used to enhance a wide variety of projects.
Knitted Picot Edge Pattern
A picot edge is a decorative element that can be added to the edge of a knitted item. It is created by casting on a small number of extra stitches, knitting a few rows, and then binding off those stitches. The result is a row of small loops which can be used for various purposes, such as attaching buttons or adding a decorative touch to a garment.
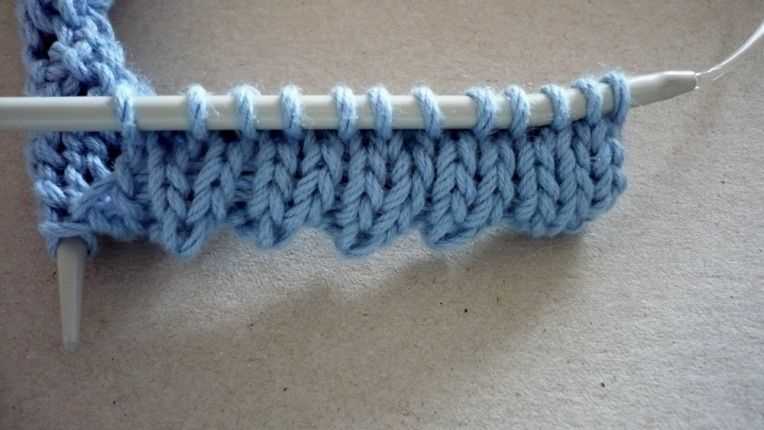
To create a knitted picot edge, start by casting on the desired number of stitches for your project. Once you have completed the main portion of your knitting, it’s time to add the picot edge. Begin by knitting a few rows. The number of rows will depend on the desired size of the picots. For a small picot, you may only need to knit 2 or 3 rows. For larger picots, you may want to knit 4 or 5 rows.
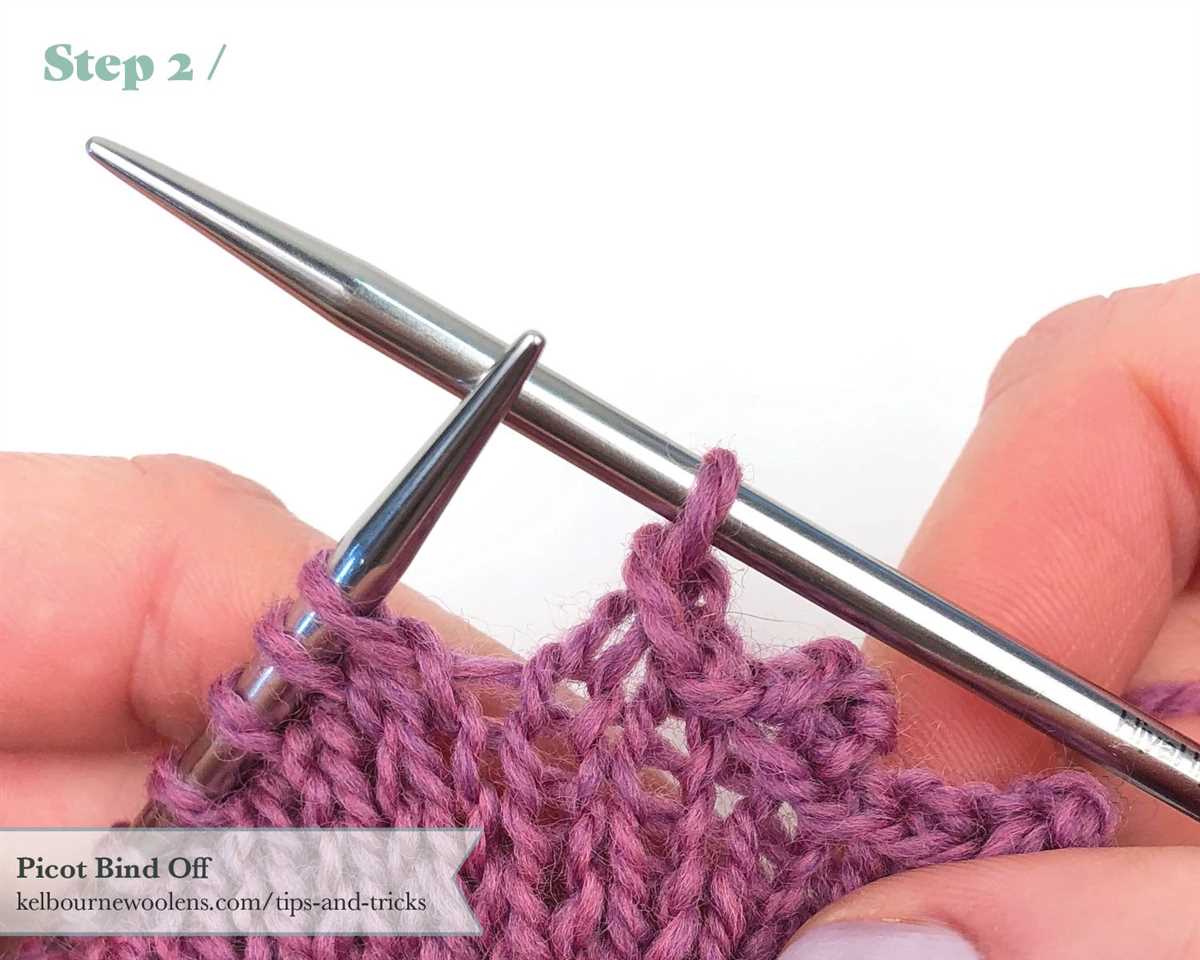
Steps to create the knitted picot edge:
- Knit the desired number of rows for the picot.
- On the next row, knit the first stitch.
- Then, bind off the next stitch by passing the first stitch over the second stitch. Repeat this process until all the picot stitches have been bound off.
- Continue knitting the remaining stitches in the row as normal.
After binding off the picot stitches, you can either continue knitting the remaining rows or bind off all the stitches to complete your project. The picot edge will create a decorative finish to your knitting, adding a delicate touch to any item.
Experiment with different yarns and colors to create unique picot edgings for your projects. Try using a contrasting color or a sparkly yarn to make your picots stand out. You can also vary the size of the picots by knitting more or fewer rows or casting on more or fewer stitches for the picot edge. Have fun exploring different possibilities and adding a special touch to your knitted items!
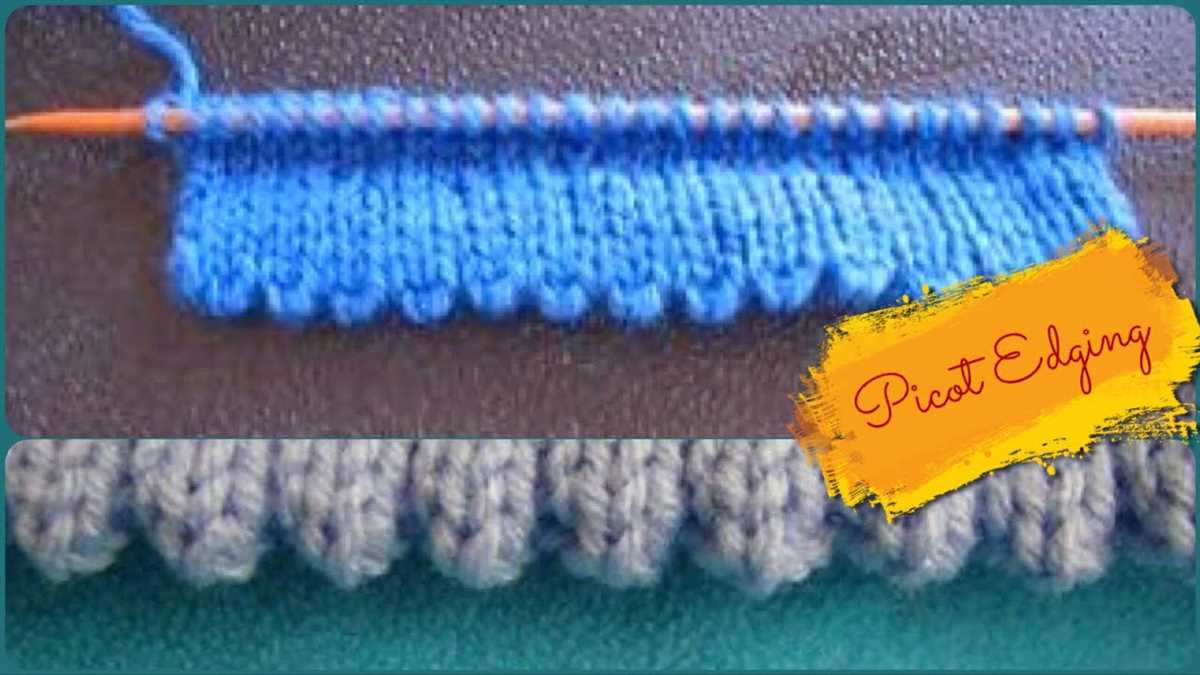
What is a Picot Edge?
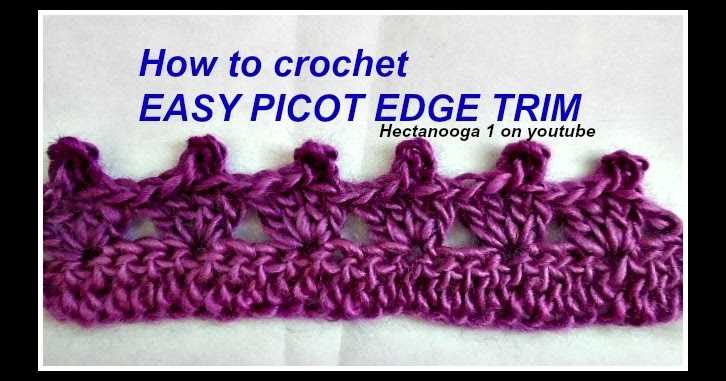
A picot edge is a decorative crochet or knitting technique that creates a small looped edge, resembling the petals of a flowers or the teeth of a picot. It is often used to add a delicate and feminine finishing touch to various projects, such as blankets, shawls, scarves, and clothing.
The picot edge is created by working a series of chain stitches, followed by a slip stitch or a single crochet stitch to secure the loop. This creates a decorative and sturdy border that can be used to finish off an item, or serve as a foundation for further embellishment.
To create a picot edge, you will need to have a basic understanding of crochet or knitting techniques. The size and spacing of the picots can be adjusted to suit your preference and the desired effect. You can also experiment with different yarns and colors to create unique and personalized picot edges.
A picot edge can add a touch of elegance and charm to your projects, and it is a versatile technique that can be used in a variety of ways. Whether you are a beginner or an experienced crafter, incorporating a picot edge into your knitting or crochet repertoire can take your creations to the next level.
How to Knit a Picot Edge
A picot edge is a decorative edge that can be added to any knitting project to give it a delicate and feminine touch. It is especially popular for finishing the edges of blankets, scarves, and baby garments. Knitting a picot edge is relatively simple and can be achieved by following a few easy steps.
Step 1: Cast on
To begin knitting a picot edge, cast on the desired number of stitches. For a picot edge, you will need to cast on an additional number of stitches that is divisible by three. This will ensure that you have an equal number of stitches for each picot.
Step 2: Knit stitches
Once you have cast on the required number of stitches, knit a few rows in your desired stitch pattern. This will serve as the base for your picot edge.
Step 3: Create picots
To create the picots, you will need to bind off a set number of stitches, typically three. Knit the designated number of stitches and then bind off the first two stitches using a standard bind-off method.
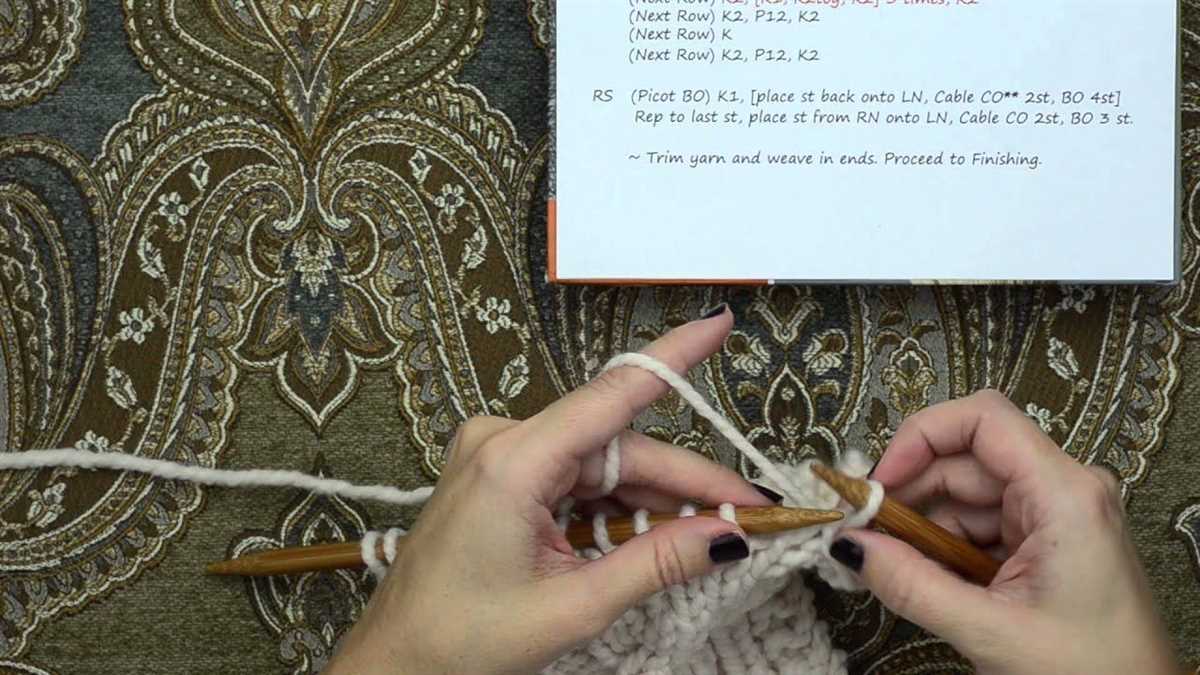
Step 4: Join picots
To join the picots together, slip the last stitch of the bind-off row back onto the left-hand needle. Then, using the cable cast-on method, cast on the same number of stitches that you bound off. This will create a loop that connects the two picots.
Step 5: Continue knitting
After joining the picots, continue knitting the remaining stitches in the row. Repeat steps 3 and 4 for each set of picots that you want to create along the edge.
By following these steps, you can easily knit a picot edge to add a beautiful finishing touch to your knitting projects. Whether you’re working on a blanket, a scarf, or a baby garment, the picot edge is sure to elevate the overall look and feel of your project.
Choosing the Right Yarn and Needles
When it comes to knitting a picot edge pattern, choosing the right yarn and needles is essential for achieving the desired result. The yarn you choose will determine the weight and texture of your finished project, while the needles will affect the size and drape of the fabric.
Yarn: The first thing to consider when selecting yarn for a picot edge pattern is its weight. Thinner yarns, such as lace or fingering weight, will create delicate and dainty picot edges, while heavier yarns, such as worsted or bulky weight, will result in more substantial and pronounced edges. Additionally, consider the fiber content of the yarn. Natural fibers like wool or cotton will provide structure and warmth, while synthetic fibers like acrylic or nylon can give the edges a softer and more flexible feel.
Needles: The size of your needles will determine the gauge of your knitting and the final size of your picot edges. Smaller needles will create tighter stitches and smaller picot edges, while larger needles will produce looser stitches and larger edges. Additionally, consider the type of needles you prefer to work with. Straight needles are ideal for flat knitting, while circular needles are suitable for both back-and-forth and circular knitting. Choose needles that feel comfortable in your hands and allow you to work with ease.
By carefully selecting the right yarn and needles for your picot edge pattern, you can ensure that your finished project has the desired weight, texture, size, and drape. Experiment with different combinations to achieve the look and feel that best suits your knitting style and the intended use of the finished piece.
Basic Knitting Stitches for the Picot Edge
When it comes to creating a picot edge in knitting, there are a few basic stitches that you will need to know. These stitches will help you achieve the decorative and delicate look of the picot edge. Here are some of the essential stitches to master when knitting a picot edge.
1. Cast On Stitch
The first stitch you will need to know is the cast on stitch. This stitch is used to create the foundation row for your project. To create a picot edge, you will need to cast on an additional number of stitches, depending on the desired size of the picot. This will allow you to form the loops that give the edge its picot appearance.
2. Knit Stitch
The knit stitch is one of the most basic and essential stitches in knitting. It is used to create the fabric of your project and is also used to create the rows that form the picot edge. To create a picot edge using the knit stitch, you will need to knit a certain number of rows before starting the picot edge pattern. This will give your project the necessary height for the picot loops.
3. Purl Stitch
The purl stitch is another fundamental stitch in knitting. It is the reverse of the knit stitch and creates a different texture on the fabric. When knitting a picot edge, the purl stitch is used to create a row of bumps that serve as the base for the picot loops. By alternating knit and purl stitches, you can achieve the desired picot edge pattern.
4. Bind Off Stitch
The bind off stitch, also known as the cast off stitch, is used to finish your knitting project. It creates a secure edge and prevents the stitches from unraveling. When creating a picot edge, the bind off stitch is used to complete the picot loops. The picot loops are formed by binding off a certain number of stitches and then casting on the same number of stitches in the next row.
Mastering these basic knitting stitches will give you the foundation you need to create beautiful and intricate picot edges in your knitting projects. By combining these stitches and experimenting with different patterns and techniques, you can create unique and stunning picot edges that will add a touch of elegance to any project.
Step-by-Step Instructions for Knitting a Picot Edge
If you’re looking to add a delicate and decorative touch to your knitting project, a picot edge is a great option. This simple yet elegant edging adds a decorative border to your work and gives it a lovely finished look. Here are step-by-step instructions on how to knit a picot edge.
Materials Needed:
- Yarn of your choice
- Knitting needles in the appropriate size for your yarn
- Tapestry needle
Instructions:
- Start by casting on the desired number of stitches for your project.
- Knit the first row of your project as usual.
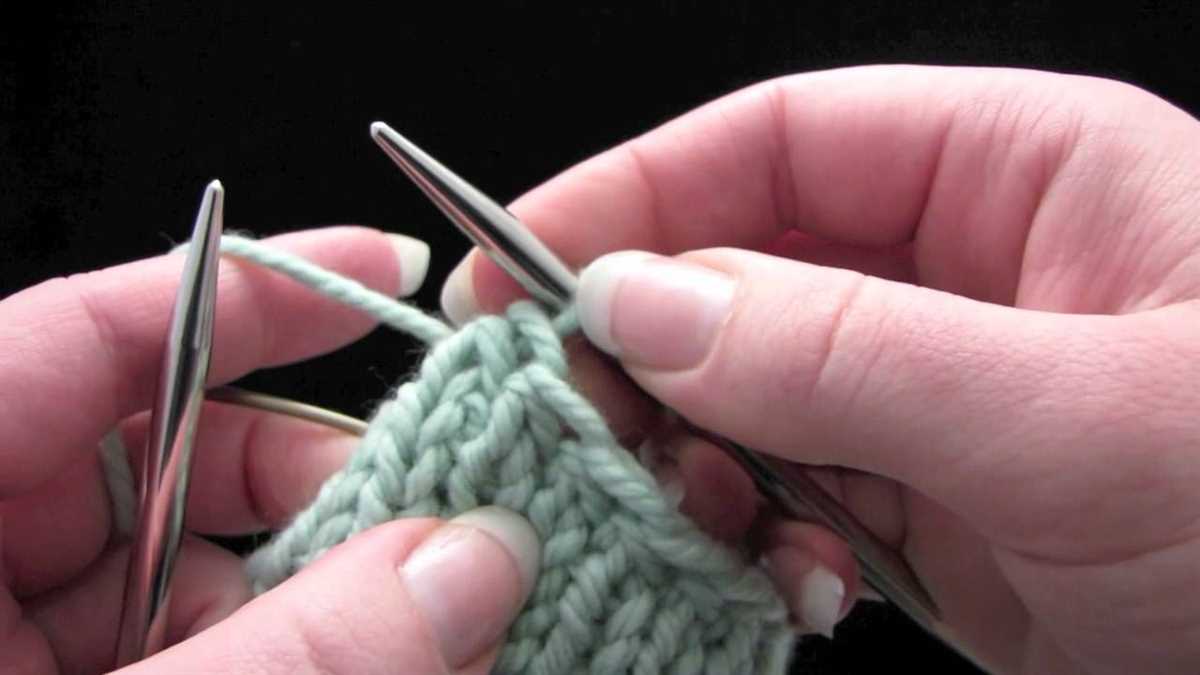
- On the second row, knit the first stitch as normal.
- Next, slip the next stitch purl-wise from the left-hand needle to the right-hand needle.
- Take the first stitch that you slipped and pass it over the second stitch and off the needle. This creates a picot loop.
- Knit the next stitch as usual.
- Repeat steps 4-6 until you have completed the row.
- Continue knitting your project in your desired stitch pattern.
- When you’re ready to bind off, simply bind off the stitches as normal, treating the picot loops as regular stitches.
- Weave in any loose ends and give your project a gentle blocking if needed.
By following these step-by-step instructions, you can easily add a beautiful picot edge to your knitting project. Whether you’re knitting a blanket, scarf, or garment, the picot edge is sure to add a touch of elegance and sophistication.
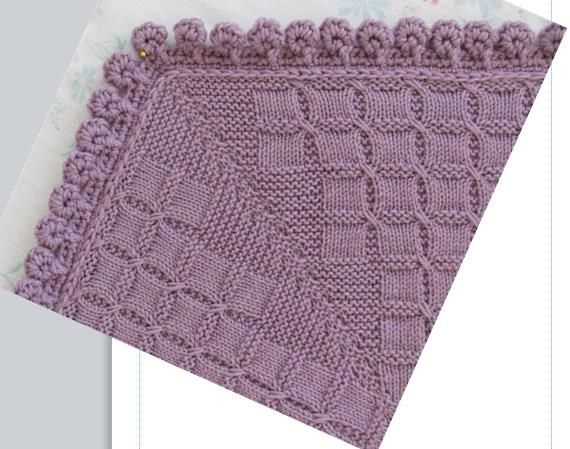
Adding Picot Edges to Different Knitted Items
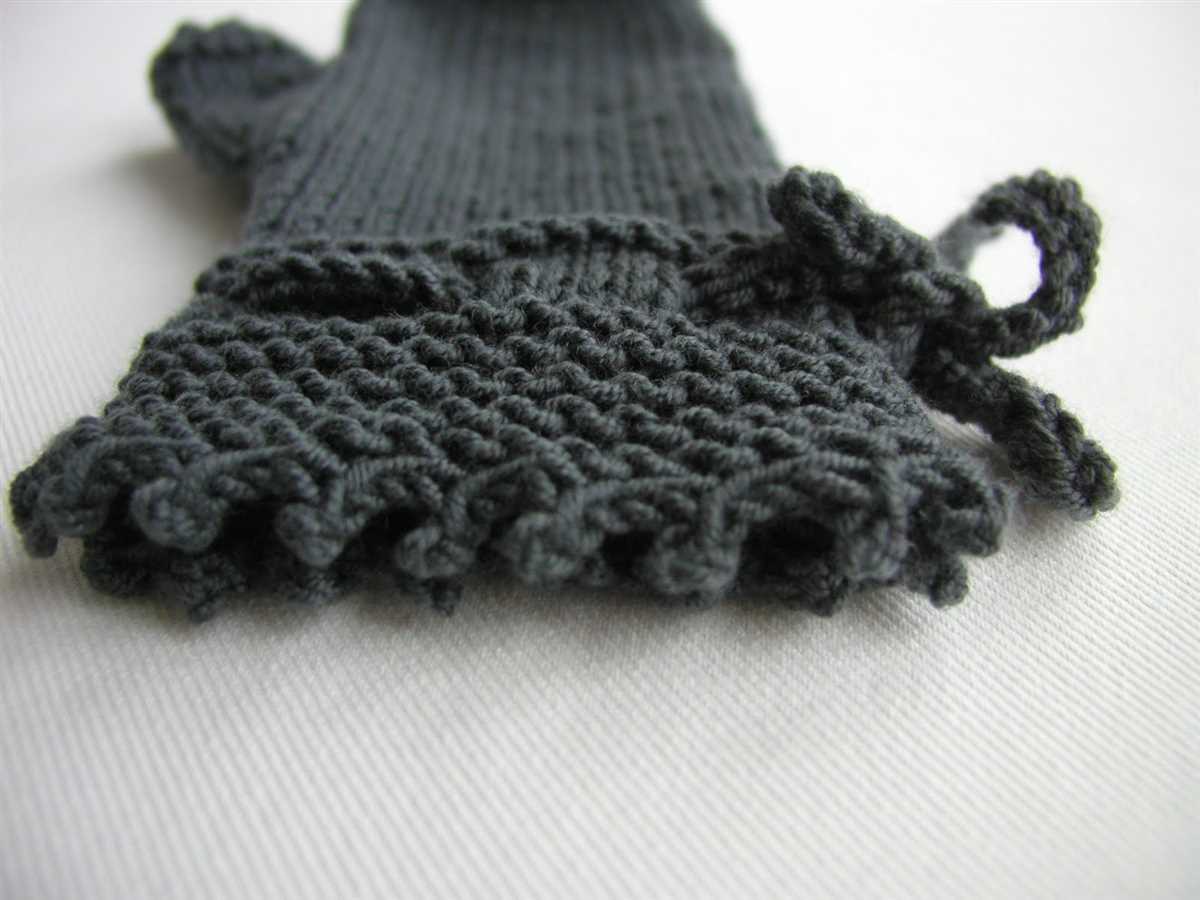
Knitting is a versatile craft that allows you to create a wide range of beautiful and practical items, from sweaters and scarves to hats and blankets. One way to add a decorative touch to your knitted items is by incorporating a picot edge. A picot edge is a series of small loops or points that create a delicate and feminine detail.
There are many different techniques and patterns you can use to create a picot edge, depending on the item you’re knitting and the look you want to achieve. One popular method involves casting on a certain number of stitches, then binding them off in a way that creates a small loop. This loop is then joined to the main fabric of the knitting, creating the picot edge.
Here are some examples of how you can add picot edges to different knitted items:
- Sweaters: To add a picot edge to the cuffs or hem of a sweater, you can pick up stitches along the edge and then work the picot bind-off. This will create a pretty and feminine detail that adds interest to your garment.
- Scarves: Adding a picot edge to a scarf can give it a delicate and finished look. You can work the picot bind-off along one or both edges of the scarf, depending on the desired effect.
- Hats: Picot edges can be added to the brim of a knitted hat to create a playful and stylish detail. You can work the picot bind-off directly on the edge of the brim or pick up stitches along the edge and then work the bind-off.
- Blankets: A picot edge can be a beautiful finishing touch for a knitted blanket. You can work the picot bind-off along the edges of the blanket or just on the corners to create a subtle and elegant detail.
Experimenting with different picot edge patterns and techniques can help you add a unique and personal touch to your knitted items. Whether you’re creating a baby blanket or a cozy sweater, adding a picot edge can elevate your project and make it stand out.
Tips and Tricks for Perfect Picot Edges
When knitting a picot edge, it’s important to pay attention to the details to achieve a flawless result. Here are some tips and tricks to help you create the perfect picot edge.
1. Choose the right yarn and needle size
For a well-defined picot edge, it’s best to use a smooth yarn with good stitch definition. This will help the picot stitches stand out and create a clean edge. Additionally, using a slightly smaller needle size than recommended for the yarn will also help achieve a neater picot edge.
2. Don’t skimp on blocking
Blocking is an essential step to give your picot edge a polished look. Once your project is complete, wet blocking the picot edge will help even out the stitches and make the picots more pronounced. Be sure to pin the picot edge in place and allow it to fully dry before removing the pins.
3. Pay attention to tension
Tension plays a crucial role in creating a crisp picot edge. Make sure to maintain an even tension throughout the knitting process, especially when working the picot stitches. Loose stitches can result in messy picots, while tight stitches may make it difficult to create the desired picot effect.
4. Practice the picot cast on
The cast on for a picot edge can be a bit tricky at first, but with practice, you’ll master it. Take the time to practice the picot cast on technique before starting your project to ensure you’re comfortable with the process. You can also try knitting a small swatch with a picot edge to perfect your technique before tackling a larger project.
5. Use stitch markers
When working a picot edge, it can be helpful to place stitch markers at regular intervals. This will help you keep track of the number of stitches and ensure that your picots are evenly spaced. You can remove the stitch markers once you’re comfortable with the pattern and no longer need them as a guide.
By following these tips and tricks, you’ll be well on your way to creating flawless picot edges in your knitted projects. With a little practice and attention to detail, your picot edges will add a beautiful finishing touch to your knitting.
Adding Variation to the Picot Edge Pattern
Knitted picot edges are a beautiful way to finish off a project, adding a delicate and decorative touch. While the basic picot edge pattern is lovely on its own, there are several ways to add variation and make it even more unique and eye-catching.
1. Varying the Size:
One way to add variation to the picot edge pattern is by varying the size of the picots. Instead of using the same number of stitches for each picot, you can alternate between smaller and larger picots. This creates an interesting and dynamic look, with some picots standing out more than others. It can also add texture and dimension to your knitted piece.
2. Using Different Colors:
Another way to add variation to the picot edge pattern is by using different colors for the picots. This works especially well if you are working on a multicolored project or if you want to create a striking contrast. You can choose colors that complement or contrast with the main color of your project, creating a visually interesting and unique effect. It’s a great way to personalize your knitting and make it truly one-of-a-kind.
3. Experimenting with Stitch Patterns:
Why stick to a basic picot edge pattern when there are so many other stitch patterns to choose from? You can add variation to your picot edge by experimenting with different stitch patterns. For example, instead of using a simple knit stitch for the picots, you can try a lace stitch or a cable stitch. This gives your picot edge a different look and adds complexity to your knitting. It’s a fun way to challenge yourself and create something truly unique.
4. Incorporating Beads or Buttons:
If you want to take your picot edge pattern to the next level, consider incorporating beads or buttons into your knitting. You can string beads onto the picot stitches or attach buttons to the edge. This adds a touch of glamour and elegance to your knitting, making it stand out even more. It’s a great way to add some extra sparkle and make your project truly special.
Adding variation to the picot edge pattern allows you to personalize your knitting and create something truly unique. Whether you choose to vary the size of the picots, use different colors, experiment with stitch patterns, or incorporate beads or buttons, the possibilities are endless. Get creative and have fun with your picot edge pattern to make your knitting truly stand out.
Common Mistakes to Avoid When Knitting a Picot Edge
Knitting a picot edge can add a beautiful finishing touch to your projects, but it’s important to be aware of common mistakes that can easily be made. By avoiding these mistakes, you can ensure you achieve a clean, professional look.
1. Incorrect stitch count:
One of the most common mistakes when knitting a picot edge is ending up with the wrong number of stitches. It’s crucial to carefully follow the pattern instructions and maintain the correct stitch count throughout. Adding or missing stitches can lead to an uneven or distorted edge.
2. Not using the right needle size:
Using the wrong needle size can also impact the appearance of your picot edge. Typically, a smaller needle size than what is used for the main body of the project is recommended. This helps to create a more defined and tight edge. Be sure to check the pattern or gauge recommendations to ensure you are using the correct needle size for the picot edge.
3. Inconsistent tension:
Uneven tension while knitting the picot edge can result in an unattractive finish. It’s essential to maintain a consistent tension throughout the entire edge. Pay attention to how tight or loose your stitches are and adjust accordingly to ensure a uniform and professional look.
4. Skipping the blocking process:
Skipping the blocking process can significantly impact the appearance of your knitted picot edge. Blocking helps to even out stitches and give the edge a clean, polished look. It’s important to follow the blocking instructions provided with the pattern to achieve the best results.
5. Ignoring the direction of the picots:
When knitting a picot edge, it’s crucial to pay attention to the direction of the picots. Picots should be pointing in the same direction and evenly spaced. Neglecting to arrange the picots correctly can result in an uneven and messy edge.
Avoiding these common mistakes will help you achieve a beautiful and professional-looking picot edge. Take your time, follow the pattern instructions accurately, and maintain consistent tension throughout the knitting process. By paying attention to these details, you can create a stunning finished project with a lovely picot edge.
Top Knitting Patterns Using the Picot Edge
The picot edge is a beautiful and versatile knitting technique that can add a delicate and feminine touch to any project. Whether you’re knitting a hat, a scarf, or a sweater, incorporating a picot edge can elevate your design and make it stand out.
One popular knitting pattern that uses the picot edge is the “Picot Edge Baby Blanket.” This pattern features a sweet and dainty picot edge border, perfect for creating a cozy and stylish blanket for a little one. The picot edge adds an extra touch of charm to an already adorable project.
Another stunning knitting pattern that showcases the picot edge is the “Picot Edge Shawl.” This pattern is perfect for those looking to create an elegant and intricate accessory. The picot edge adds a delicate and decorative finish to the shawl, making it a beautiful addition to any outfit.
If you’re in need of a fun and quick knitting project, you might want to try the “Picot Edge Hat” pattern. This pattern is perfect for beginners who want to practice their picot edge skills. The picot edge adds a playful and whimsical touch to the hat, making it a trendy and fashionable accessory.
For those who love knitting socks, the “Picot Edge Socks” pattern is a must-try. The picot edge gives the socks a feminine and delicate look, making them perfect for wearing with skirts or dresses. This pattern is a great way to showcase your knitting skills and create a unique pair of socks.
Overall, the picot edge is a versatile and beautiful knitting technique that can be incorporated into a wide range of patterns. Whether you’re knitting for a baby, creating an elegant shawl, or making a fashionable hat or socks, adding a picot edge can take your project to the next level. So why not give it a try and see the magic of the picot edge for yourself?
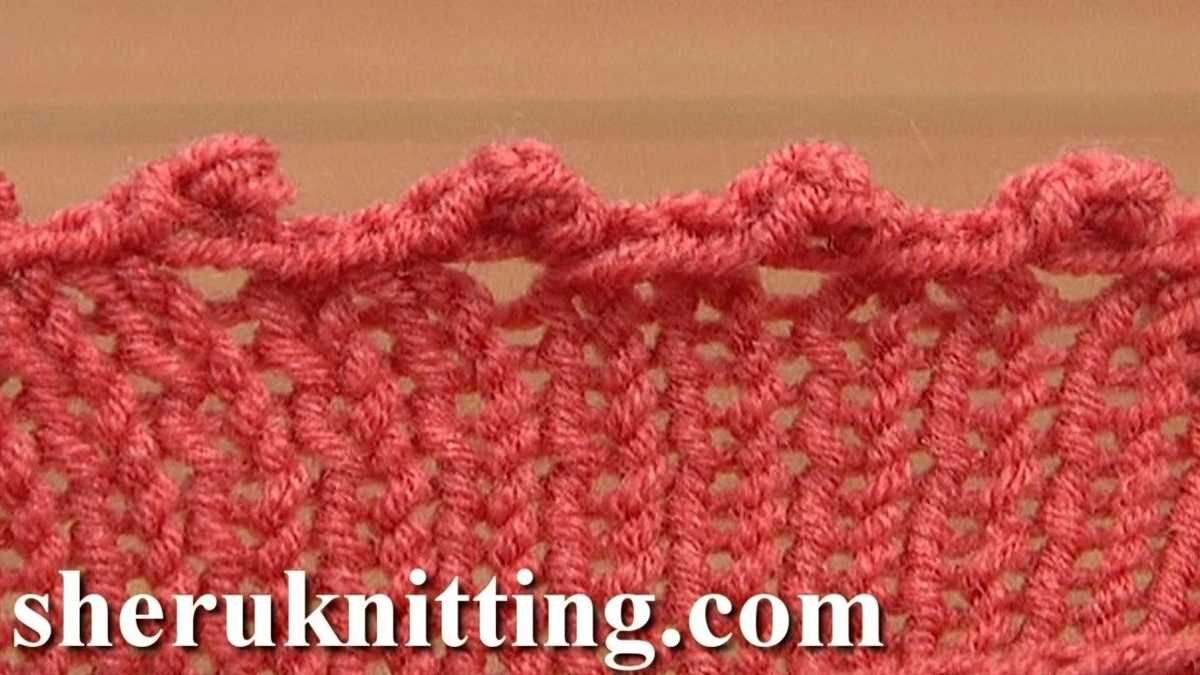
Exploring Different Types of Picot Edging
When it comes to adding a picot edging to your knitted project, there are various options to choose from. Each type of picot edging adds a unique touch to your finished piece. Let’s explore some of the different types of picot edging patterns you can try.
1. Simple Picot Edging
The simple picot edging is the most basic and commonly used type of picot edging. It involves creating a small loop at regular intervals along the edge of your knitting. This creates a delicate and decorative look.
2. Lace Picot Edging
For a more intricate and elegant look, lace picot edging is a great option. This type of edging incorporates lace stitches into the picot loops, adding a lacy and delicate touch to your project.
3. Ribbed Picot Edging
Ribbed picot edging is a popular choice for adding a textural element to your knitting. This type of edging involves alternating knit and purl stitches in the picot loops, creating a ribbed effect. It adds depth and interest to your finished piece.
4. Garter Stitch Picot Edging

For a simple and classic look, garter stitch picot edging is a great choice. This type of edging involves knitting every stitch in the picot loops, creating a textured and bumpy edge. It works well with both solid colors and variegated yarns.
5. Scallop Picot Edging
Scallop picot edging adds a whimsical and playful touch to your knitting. This type of edging involves creating elongated picot loops that resemble scallops. It adds a unique and decorative element to your finished piece.
In conclusion, adding a picot edging to your knitting can enhance the overall look and style of your project. Whether you choose a simple picot edging or opt for a more intricate design, picot edging patterns offer a versatile and creative way to finish off your knitting projects.