
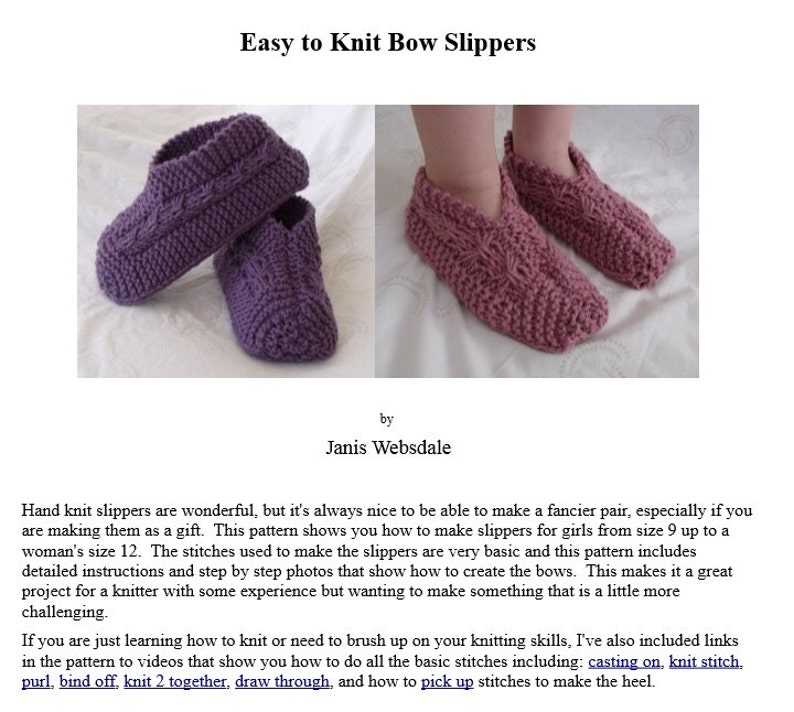
Knitted bows are a cute and versatile accessory that can add a touch of charm to any outfit or home decor. Whether you’re a beginner or an experienced knitter, creating a knitted bow is a fun and satisfying project that can be completed relatively quickly.
There are countless patterns available for knitted bows, ranging from simple and classic designs to more intricate and decorative styles. The great thing about knitting bows is that you can customize them to match your personal style or the occasion you’re dressing up for. You can play with different yarn colors and textures, as well as experiment with various stitch patterns to create unique and eye-catching bows.
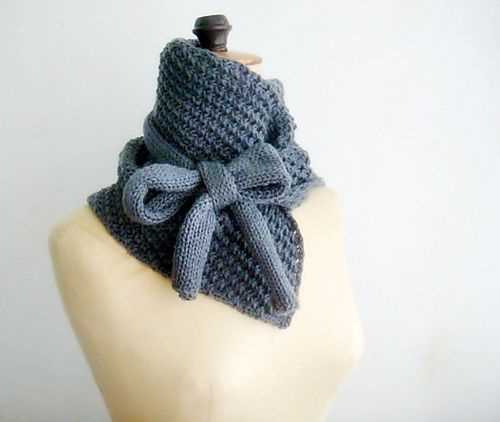
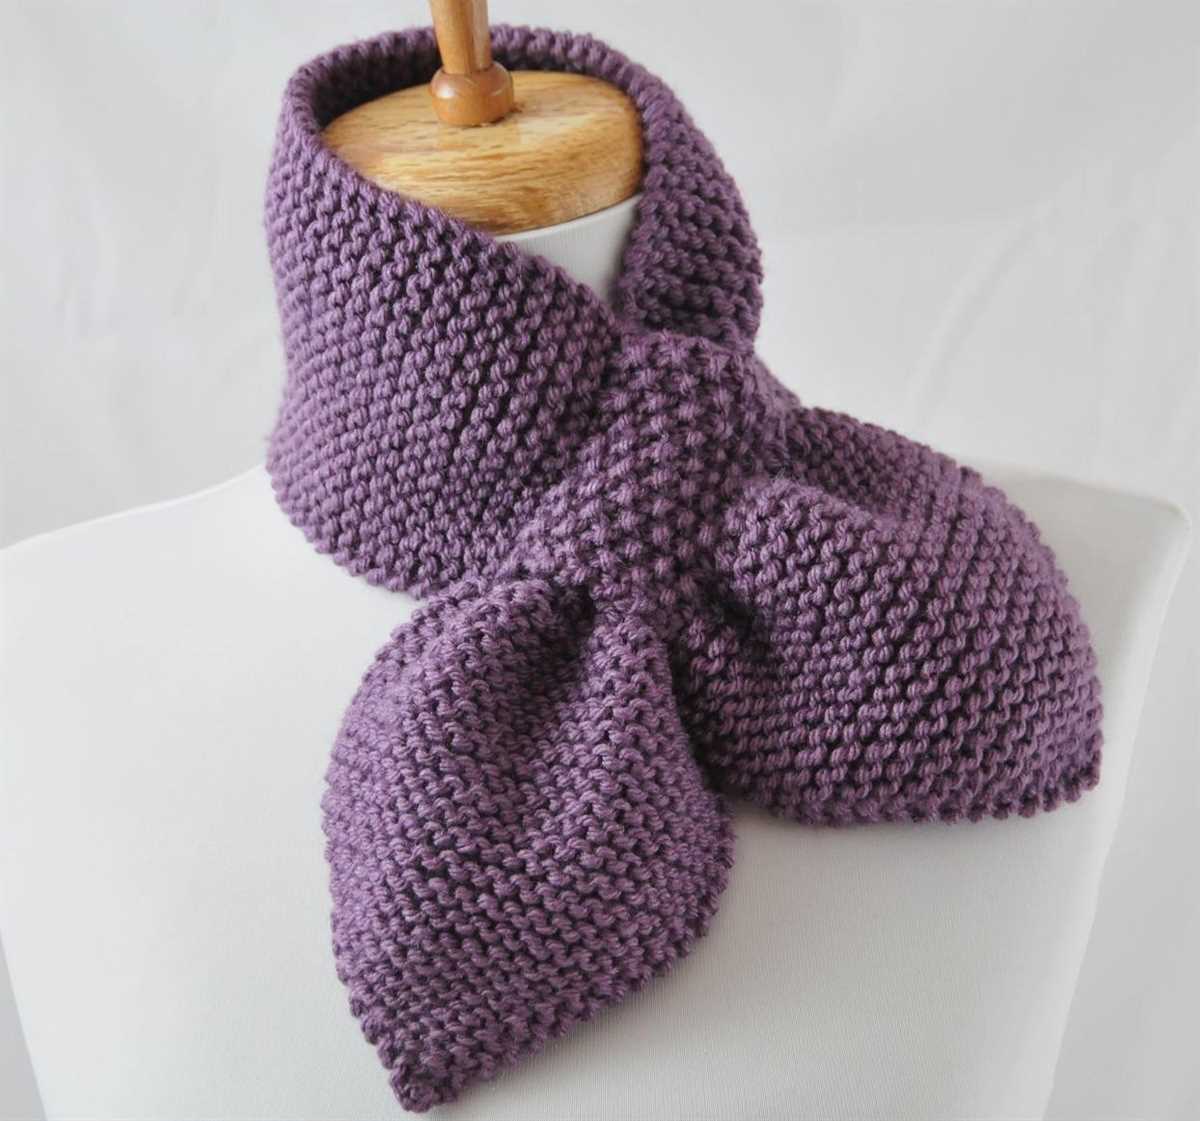
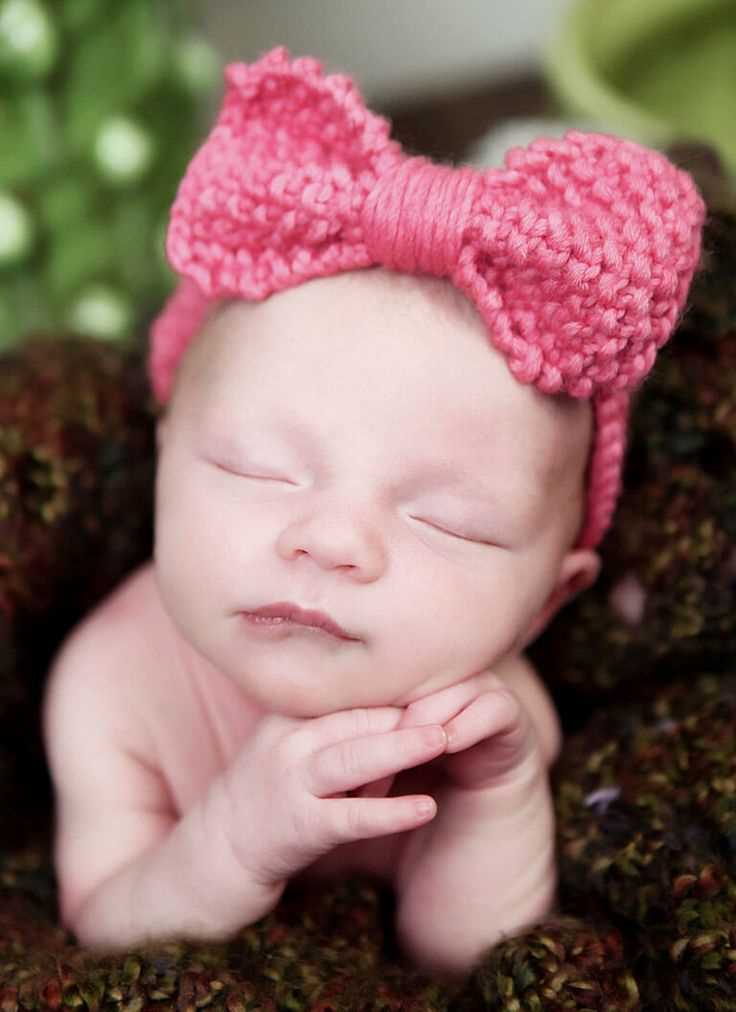
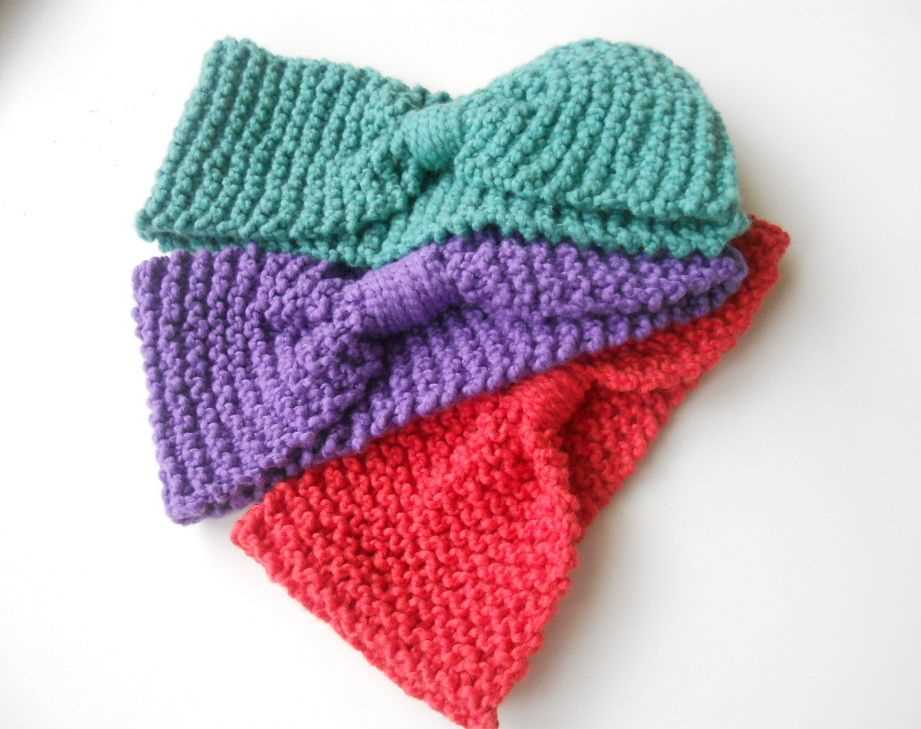
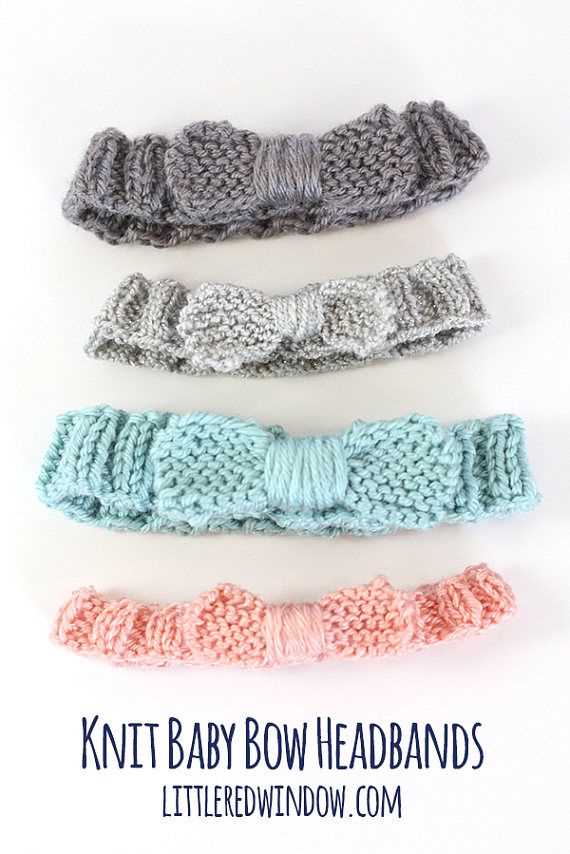
Knitted bows can be used in a variety of ways. They can be attached to headbands, hair clips, or pins to create adorable hair accessories. They can also be sewn onto hats, scarves, or sweaters to add a touch of whimsy and sophistication. Additionally, knitted bows can be used to embellish home decor items such as pillows, blankets, or even curtains. The possibilities are endless!
If you’re new to knitting, don’t worry! Knitting a bow is a great beginners’ project that allows you to practice essential knitting techniques such as casting on, knitting, purling, and casting off. By mastering these basic stitches, you’ll gain confidence and skills that you can apply to more complex projects in the future.
Step-by-Step Guide to Knitting a Bow Pattern
Knitting a bow pattern can be a fun and stylish way to add some flair to your accessories or garments. Whether you want to embellish a hat, a bag, or a headband, following this step-by-step guide will help you create a beautiful knitted bow.
Materials:
- Yarn of your choice in the color you desire
- Knitting needles appropriate for your chosen yarn
- Tapestry needle
- Scissors
Step 1: Cast on stitches
Begin by casting on the desired number of stitches, which will depend on the size of the bow you want to create. A good starting point is around 20 stitches, but you can adjust the number based on your preference. Make sure the stitches are not too tight to allow for easy knitting.
Step 2: Knit the first row
With the stitches casted on, start knitting the first row in the knit stitch. This will create a smooth and even base for your bow. Continue knitting in the knit stitch until you reach the desired length for your bow. You can experiment with different lengths to find the perfect size.
Step 3: Bind off
Once you have reached the desired length, it’s time to bind off your stitches. You can do a regular bind off by knitting two stitches, then passing the first stitch over the second stitch. Repeat this process until you have only one stitch left, then cut the yarn leaving a tail to weave in later.
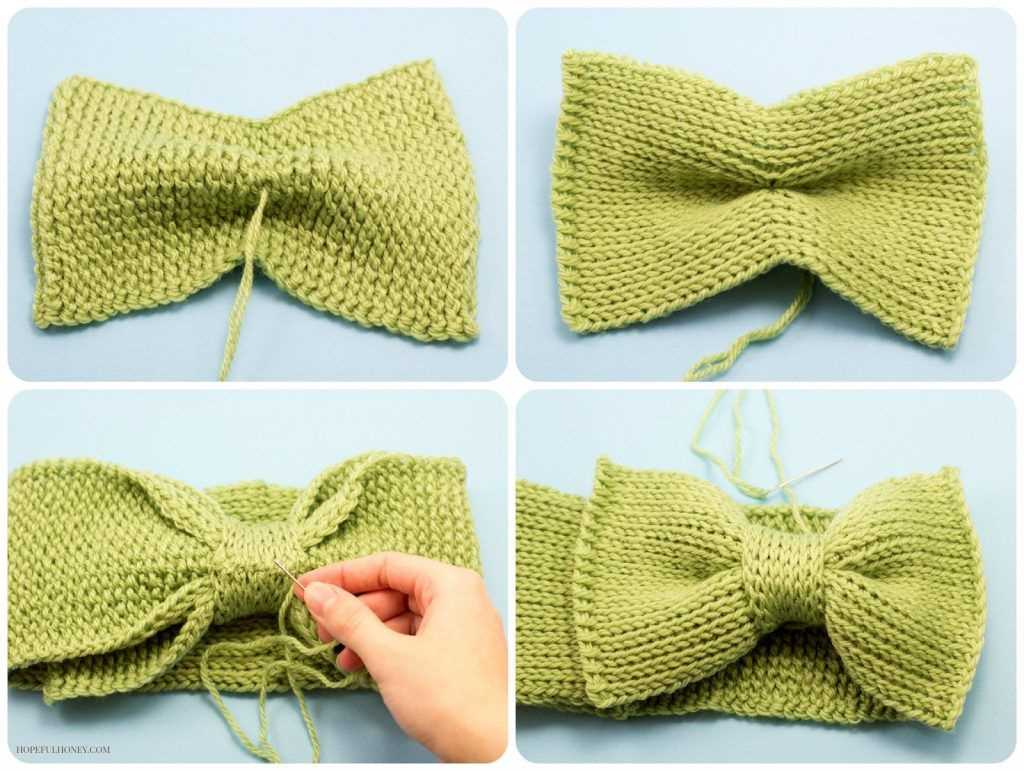
Step 4: Shaping the bow
To create the bow shape, fold the knitted rectangle in half, with the bound-off edge in the middle. Using the tail left from the bind off, sew the two ends of the rectangle together, creating a loop. Make sure to secure your stitches firmly.
Step 5: Finishing touches
Finally, use the remaining yarn tail to wrap around the center of the bow, securing it tightly. You can also use a tapestry needle to weave in any loose ends to give your bow a polished and professional look.
Congratulations! You have successfully knitted a bow pattern. Now you can attach it to any accessory or garment of your choice to add a touch of style and uniqueness.
Materials Needed for Knitting a Bow Pattern
In order to knit a bow pattern, you will need a few key materials. These materials will help you create the perfect bow accessory to add a feminine touch to any outfit or accessory.
1. Yarn:

The first essential material you will need is yarn. Choose a soft and durable yarn in the color of your choice. You can opt for a solid color that matches your outfit or go for a fun and vibrant color to make a statement.
2. Knitting Needles:
To knit the bow pattern, you will need a pair of knitting needles. The size of the needles will depend on the thickness of the yarn you choose. Make sure to check the recommended needle size for the yarn you are using.
3. Scissors:
Having a good pair of scissors is essential for any knitting project, including knitting a bow pattern. You will need them to cut the yarn and trim any excess threads.
4. Tapestry Needle:
A tapestry needle, also known as a yarn needle, is necessary for weaving in loose ends and sewing the different parts of the bow together. Look for a needle with a large eye that can accommodate the yarn you are using.
5. Stitch Markers:
Stitch markers are helpful for keeping track of stitches and marking certain sections of the bow pattern. They can be small rings or clips that can be easily attached and removed from the knitting needles.
6. Pattern Instructions:
Lastly, make sure to have a copy of the bow pattern instructions. You can either find a pattern online or purchase a knitting pattern book that includes various bow designs. Follow the instructions carefully to ensure your bow turns out as intended.
Choosing the Right Yarn for Your Knitted Bow
When it comes to knitting a bow, choosing the right yarn is crucial to ensure that your finished piece looks beautiful and holds its shape. Here are some factors to consider when selecting the yarn for your knitted bow.
Type of Yarn:
The type of yarn you choose will greatly impact the final look and feel of your knitted bow. For a more structured and defined bow, it is best to opt for a yarn with some stiffness, such as a cotton or linen blend. These types of yarns will hold their shape well and create crisp edges. If you prefer a softer and more relaxed bow, then a wool or acrylic blend may be a better choice, as they offer more drape and flexibility.
Weight and Thickness:
The weight and thickness of the yarn will determine the overall size and bulkiness of your bow. If you want a small and delicate bow, go for a fingering or lace-weight yarn. For a larger and more substantial bow, choose a worsted or bulky-weight yarn. Keep in mind that the weight of the yarn also affects the knitting gauge, so make sure to adjust your needle size accordingly to achieve the desired tension and thickness.
Color and Texture:
The color and texture of the yarn can make a significant difference in the visual appeal of your knitted bow. Consider the overall look and purpose of your bow. If you want it to be a bold statement piece, go for vibrant and eye-catching colors. If you prefer a more subtle and sophisticated look, choose neutral or pastel tones. Additionally, textured yarns, such as tweed or boucle, can add dimension and interest to your bow.
Remember, knitting a bow is an opportunity to let your creativity shine and experiment with different yarns. Don’t be afraid to mix and match materials and colors to achieve the desired effect. Take your time in selecting the perfect yarn and enjoy the process of creating a unique and personalized knitted bow.
Getting Started: Casting On Stitches
Before you can start knitting your bow, you need to cast on stitches. Casting on is the process of creating the foundation row of stitches that will form the base of your knitted piece.
There are several methods for casting on stitches, but one of the most common methods is the long tail cast on. To do this, you’ll need a long tail of yarn, approximately three times the width of your finished bow.
First, make a slipknot at one end of the yarn and slide it onto your knitting needle. Hold the needle in your dominant hand and the tail end of the yarn in your non-dominant hand.
Next, using your thumb and index finger, create an “X” shape with the yarn, making sure the tail end is on the bottom and the working end is on top.
Insert the knitting needle from left to right through the loop of the “X” shape. Hold the needle in place with your thumb and index finger, and use your non-dominant hand to pull the working end of the yarn through the loop.
Slide this new stitch onto the needle, and repeat the process until you have cast on the desired number of stitches for your bow. Make sure to keep the stitches snug but not too tight to ensure an even and flexible foundation row.
Once you have cast on all the stitches, you are ready to start knitting the body of your bow. The casting on process is an essential first step in any knitting project and sets the stage for the rest of your work.
Knitting the Bow Body
Once you have completed knitting the bow loops, it’s time to move on to the body of the bow. The body gives shape to the bow and holds all the loops together.
To start knitting the body, you will need to cast on a certain number of stitches, depending on the size of the bow you want to create. You can use a basic cast-on method, such as the long-tail cast-on, or any other method you prefer.
After casting on, you will begin working in rows to create the body of the bow. You can use any stitch pattern you like, but keep in mind that a simple stockinette stitch or garter stitch will work well to achieve a smooth and even finish.
As you knit each row, make sure to maintain the same number of stitches and continue until the body reaches your desired length. It’s a good idea to periodically check the length of the body against the size of the loops to ensure everything is proportionate.
Once you have finished knitting the body, you can bind off your stitches to secure the edges. You can use a basic bind-off method or experiment with different bind-off techniques to add a decorative touch.
With the body complete, you can now move on to assembling the bow. Carefully arrange the loops on top of the body, making sure they are evenly spaced and centered. Use a tapestry needle and some yarn to sew the loops securely onto the body.
At this point, you can also choose to add any additional embellishments, such as buttons, beads, or ribbons, to further personalize your bow. Once you are satisfied with the placement and look of your bow, trim any excess yarn and weave in the loose ends for a neat and finished appearance.
Shaping the Bow Ends
When knitting a bow, one of the key elements is shaping the ends to create the classic bow shape. There are several techniques you can use to achieve this, depending on the style of bow you want to create and the stitch pattern you are using.
One common method is to create pointed ends by decreasing stitches gradually. To do this, you can work a series of decreases at the beginning and end of each row, either at set intervals or gradually decreasing the number of stitches as you go. This will create a triangular shape at the ends of the bow.
Another option is to create rounded ends by increasing stitches gradually. In this case, you would work a series of increases at the beginning and end of each row, either at set intervals or gradually increasing the number of stitches as you go. This will create a curved shape at the ends of the bow.
For a more intricate bow pattern, you can also incorporate different stitch patterns or cables to add texture and dimension to the bow ends. This could include lace stitches, ribbing, or even a cable design that creates an interesting shape at the ends of the bow.
Experiment with different shaping techniques and stitch patterns to create the perfect bow ends for your knitted project. Remember to keep track of your stitches and rows to ensure that both ends of the bow are shaped symmetrically. This will help create a polished and professional-looking finished bow.
Adding Details: Purl Stitches and Ribbing
In the world of knitting, adding details to your project can take it from simple to stunning. One way to add visual interest and texture is by incorporating purl stitches into your pattern. Purl stitches create a bumpy texture on the front of the work, while the back remains smooth. This contrast can make your knitted piece more visually appealing and add depth to the overall design.
Using purl stitches strategically can enhance specific elements of your project, such as creating ribbing. Ribbing is a technique commonly used on cuffs, waistbands, and collars to give them elasticity and structure. By alternating knit and purl stitches in a specific pattern, you can achieve a stretchy fabric that molds to the body and ensures a comfortable fit.
Knitting ribbing with purl stitches:
- To create a ribbed effect, start by knitting a few rows in a knit stitch. This will serve as the base for your ribbing.
- Next, switch to purl stitches for a set number of rows, depending on how deep you want your ribbing to be.
- After completing the purl rows, switch back to knitting for the same number of rows as the initial knit stitches.
- Repeat this alternating pattern of knit and purl rows until you’ve reached the desired length of your ribbing.
When incorporating purl stitches and ribbing into your knitting project, it’s important to pay attention to your tension. Purl stitches can sometimes be tighter than knit stitches, so make sure to keep an even tension throughout your work. Additionally, experimenting with different yarn weights and needle sizes can also yield different results in terms of the appearance and texture of your ribbing.
Overall, adding details like purl stitches and ribbing to your knitting projects can elevate the final result. Whether you’re creating a cozy sweater, a stylish hat, or a beautiful scarf, incorporating these techniques can make your knitted pieces stand out with their unique texture and professional finish.
Finishing Touches: Bind Off Stitches
When it comes to knitting, the finishing touches can really make a difference in the final look of your project. One important finishing technique is binding off, which is used to secure the stitches and create a clean edge. By binding off your stitches, you prevent them from unraveling and give your knitted piece a polished appearance.
To bind off stitches, you will need a knitting needle and scissors. Start by knitting two stitches. Then, use the left needle to lift the first stitch over the second stitch and off the right needle. Repeat this process by knitting one stitch and lifting the previous stitch over until you have reached the end of your row. Finally, cut the yarn, leaving a tail long enough to weave in later.
There are also variations of the basic bind off technique that you can use to add decorative elements to your knitted piece. For example, the picot bind off creates a decorative edge with small loops. To achieve this, bind off a few stitches normally, then cast on the same number of stitches using the backwards loop method. Continue binding off a few stitches and casting on the same number of stitches until you have reached the end of your row. This will create a picot edge that adds a delicate touch to your project.
Whether you are binding off stitches for a simple edge or adding a decorative touch, the bind off technique is an essential skill to learn in knitting. It gives your projects a professional finish and ensures that your hard work does not unravel. So, the next time you finish a knitted piece, don’t forget the bind off stitches to complete the look.
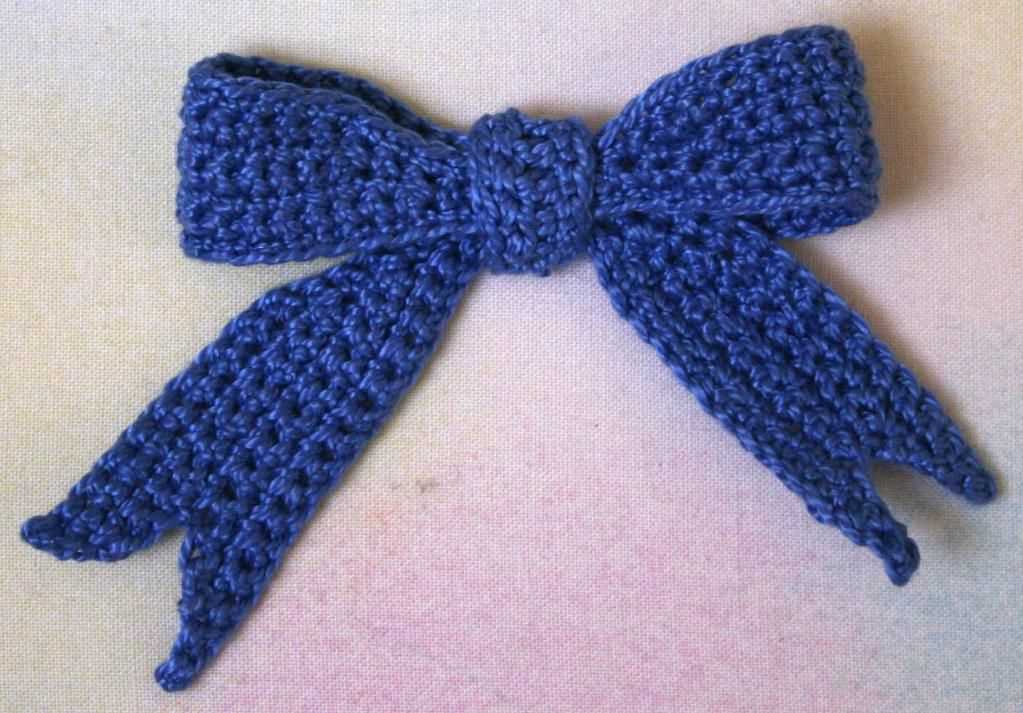
Assembling the Bow
Once you have completed knitting all the pieces for your bow, it is time to assemble them together to create the final product. Follow these steps to ensure a professional and polished look for your knitted bow:
Step 1: Sewing the Center Knot
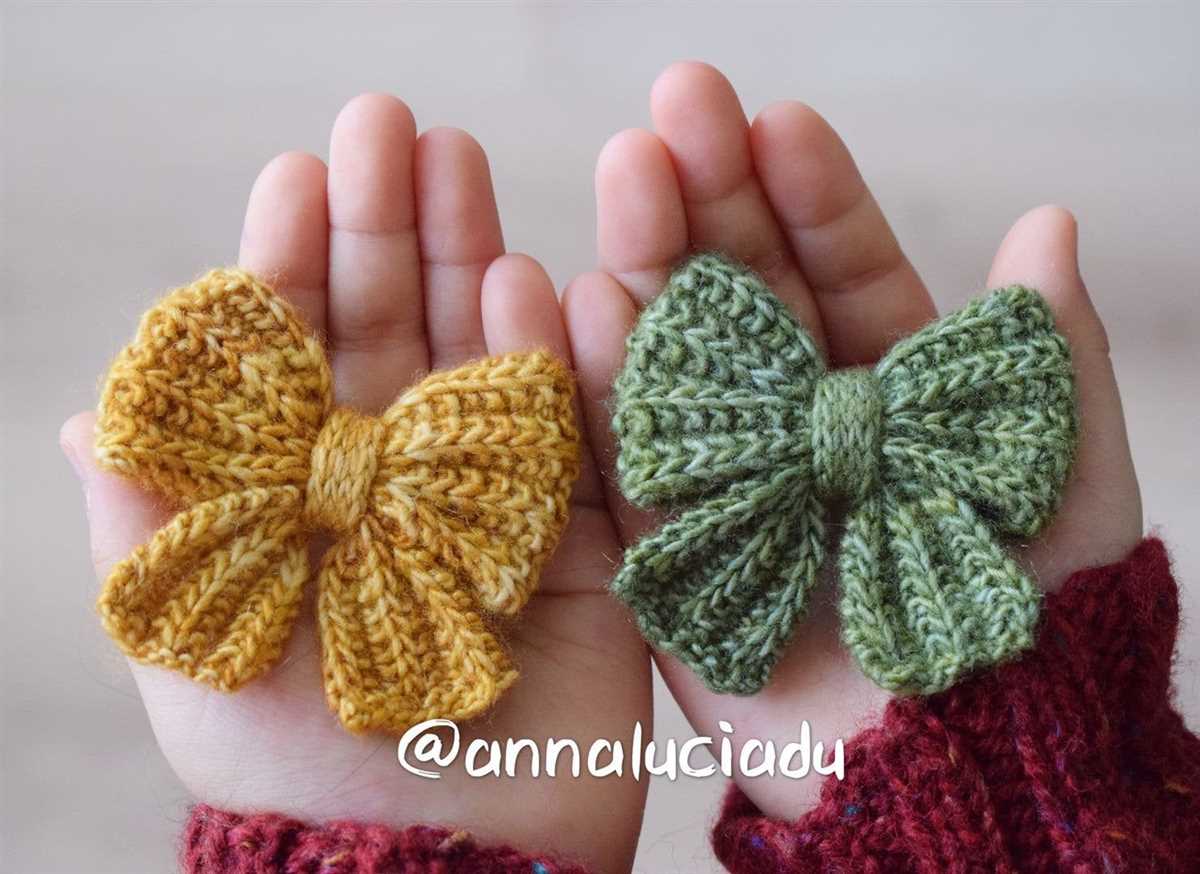
Start by sewing the center knot of the bow. Fold the rectangular piece in half lengthwise and use a tapestry needle to stitch the two ends together. Make sure to secure the stitches tightly to prevent any unraveling.
Step 2: Attaching the Center Knot to the Bow Loops

Take the bow loops, which should be two knitted pieces in the shape of mini rectangles, and lay them flat. Position the center knot on top of the loops, aligning the stitched seam of the center knot with the center of the loops. Use a tapestry needle and matching yarn to sew the center knot in place, attaching it securely to the loops.
Step 3: Shaping the Bow
To give your bow a full and dimensional shape, take each loop and bring the ends towards the center, overlapping them slightly. Use a tapestry needle and matching yarn to stitch the ends together, securing the shape of the bow. Repeat this step with the other loop to achieve symmetrical bow ends.
Once you have assembled all the components together, adjust the shape and position of the bow as desired. Trim any excess yarn or threads and weave in the loose ends to finish off your knitted bow. Now you have a beautiful accessory that can be attached to hats, headbands, or even used as a decorative accent for garments or home decor items.
Note: You can customize your bow by using different yarn colors, adding embellishments such as buttons or beads, or adjusting the size of the bow loops to create larger or smaller bows. Have fun experimenting and creating unique designs!
Creating a Bow Center
When knitting a bow, the center is an important component that holds the bow together and gives it structure. Creating a bow center can be done in various ways, depending on the desired look and style of the bow.
Option 1: Knitted Center
One option for creating a bow center is by knitting it. To do this, you will need to cast on a certain number of stitches, depending on the size of the bow center you want. Knit a few rows in a rib stitch pattern, such as K2, P2, to create a stretchy and textured center. To finish, bind off your stitches and sew the center onto the bow.
Option 2: Fabric Center
Another option is to create a fabric center for your bow. This can be done by cutting a strip of fabric in the desired length and width, and folding it in half lengthwise. Sew the edges together, leaving a small opening to turn it right side out. After turning it right side out, hand stitch the opening closed. This fabric center can then be attached to the bow.
Option 3: Ribbon Center
A third option is to use ribbon as the bow center. Cut a piece of ribbon in the desired length and width. Fold the ribbon in half lengthwise, with the wrong sides facing each other, and machine stitch the edges together. This ribbon center can then be attached to the bow.
Customizing the Center
To further customize the bow center, you can add embellishments such as buttons, beads, or fabric flowers. These can be sewn or glued onto the center to add visual interest and enhance the overall look of the bow.
In conclusion, creating a bow center can be a fun and creative process. Whether you choose to knit a center, sew a fabric center, or use ribbon, the center plays a crucial role in ensuring the bow maintains its shape and adds a decorative touch to your knitting project.
Customizing Your Knitted Bow
When it comes to knitting, customization is key to making your project truly unique. The same goes for knitted bows! Whether you’re knitting a bow as an accessory for your hair, clothing, or gift wrapping, here are a few ways you can customize your knitted bow to make it your own:
1. Yarn selection: Choose a yarn that matches the style and purpose of your bow. Opt for a soft and delicate yarn for a dainty hair bow, or a chunky and textured yarn for a statement bow on a gift wrap.
2. Color: The color of your bow can greatly impact the overall look and feel. Select a color that complements your outfit, matches the occasion, or represents your personal style. You can even experiment with color combinations for a more vibrant and playful look.
3. Embellishments: Add some extra flair to your knitted bow by incorporating embellishments such as buttons, beads, or embroidery. These small details can elevate your bow and make it stand out even more.
4. Size: Adjust the size of your bow depending on your preferences and the intended use. A smaller bow can be perfect for hair accessories or smaller gift boxes, while a larger bow can make a bold statement on larger gift packages or as a fashion accessory.
5. Stitch pattern: Experiment with different stitch patterns to create unique textures and designs. From simple garter stitch to more intricate lace patterns, there are endless possibilities to explore.
By customizing your knitted bow, you can create a one-of-a-kind accessory or gift embellishment that reflects your personal style and creativity. Let your imagination run wild and enjoy the process of making something truly special!