
Knitting patterns can be a bit intimidating, especially for beginners. With all the abbreviations, symbols, and instructions, it can feel like trying to decipher a secret code. One common element of knitting patterns that can cause confusion is the use of brackets and parentheses. These symbols are used to group instructions together and indicate repeats, but they can be tricky to understand if you’re not familiar with the terminology.
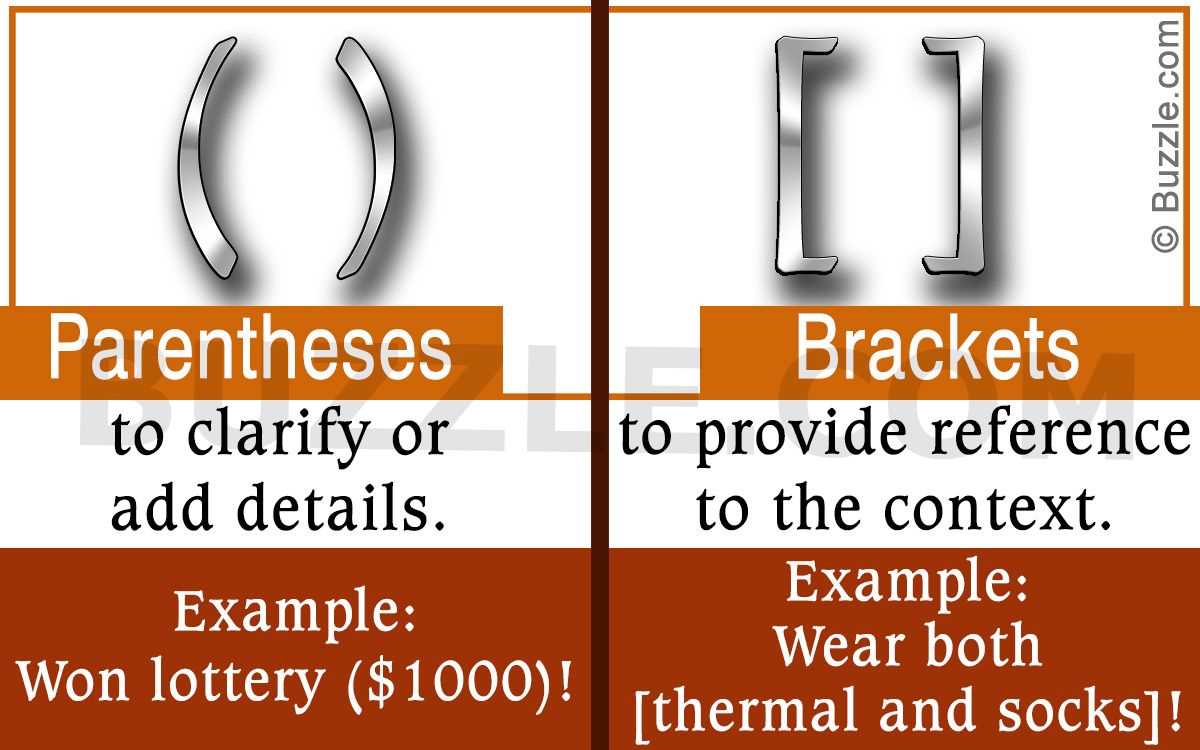
Brackets [] are typically used to enclose a set of instructions that need to be repeated a certain number of times. For example, if you see [K2, P2] 6 times, it means you should knit 2 stitches, purl 2 stitches, and then repeat that sequence a total of 6 times. The number before the brackets indicates how many times the whole sequence should be repeated. This repetition is often used for stitch patterns or shaping elements, such as sleeves or necklines.
Parentheses () are used to enclose optional instructions or to indicate a different size or version of the pattern. Anything inside the parentheses should be read as an alternative or variation of the main instructions. For example, if you see (K2, P2) twice, it means you can choose to either knit 2 stitches and purl 2 stitches, or repeat the entire sequence twice. These parentheses can be especially useful when you want to customize a pattern to fit your specific needs or preferences.
Once you understand how to interpret the brackets and parentheses in a knitting pattern, it becomes much easier to follow along and execute the instructions correctly. Take the time to familiarize yourself with the common abbreviations and symbols used in patterns, and don’t be afraid to ask for help or clarification if something isn’t clear. With practice and patience, you’ll soon become a pro at reading knitting patterns and creating beautiful projects!
How to Read a Knitting Pattern with Brackets and Parentheses
Knitting patterns can sometimes be confusing, especially when they include brackets and parentheses. These symbols are used to indicate specific instructions or repetitions within a pattern. By understanding how to read these symbols, you can easily follow a knitting pattern and create beautiful projects.
Brackets []: Brackets in a knitting pattern are often used to indicate repeats. The instructions within the brackets are meant to be repeated a certain number of times. For example, if the pattern says “Knit [K2, P2] 5 times,” it means you should knit the sequence K2, P2, and then repeat it four more times for a total of five repetitions. Brackets can also be used to group instructions together, such as in lace patterns where there are multiple decreases or yarn overs within a single row.
Parentheses (): Parentheses in a knitting pattern are typically used to provide additional instructions or clarification. The instructions within the parentheses are usually optional or alternative steps. For example, if the pattern says “Knit 10 (12, 14) stitches,” it means you should knit 10 stitches if you are making the smallest size, 12 stitches if you are making the medium size, and 14 stitches if you are making the largest size. Parentheses can also be used to indicate that a certain set of instructions should be repeated within a specified range, such as in a ribbing pattern where the instructions may vary depending on the desired length.
When reading a knitting pattern with brackets and parentheses, it is important to pay attention to the specific instructions and repetitions indicated. Take your time to carefully read and understand the pattern before starting your project. If you are unsure about any part of the pattern, refer to the pattern key or seek clarification from other knitters or the pattern designer. With practice and familiarity, you will become more comfortable reading knitting patterns and creating beautiful knitted items.
Understanding the Basics
If you’re new to knitting or have recently started using knitting patterns, it’s important to understand the basics of how to read them. Knitting patterns are like instructions for a specific project, providing you with the necessary information to create the desired item.
1. Yarn and Needle Requirements: The first thing to look for in a knitting pattern is the yarn and needle requirements. This information is typically found at the beginning of the pattern and tells you what type of yarn to use and what size of knitting needles are recommended.
2. Gauge: Gauge refers to the number of stitches and rows per inch of knitted fabric. It’s important to check the gauge of your knitting to ensure that it matches the gauge specified in the pattern. Adjustments may need to be made to your needle size or tension if your gauge is off.
3. Abbreviations: Knitting patterns often use abbreviations to condense instructions and make them easier to read. It’s essential to familiarize yourself with common knitting abbreviations, such as K (knit), P (purl), and YO (yarn over), as they will be used throughout the pattern.
4. Stitch Patterns: Many knitting patterns include specific stitch patterns or textures that make up the design of the item. These stitch patterns may be presented in the form of charts or written instructions. Take the time to understand each stitch pattern before starting your project.
5. Parentheses and Brackets: Parentheses () and brackets [] are often used in knitting patterns to indicate repeats or grouping of stitches. Pay attention to these symbols as they can affect the number of stitches and rows you need to work.
6. Finishing Instructions: At the end of the pattern, you will usually find finishing instructions, such as how to bind off, sew seams, or add any necessary embellishments. These instructions are crucial to completing your project and achieving the desired finished look.
7. Take It Slow: Reading a knitting pattern can be overwhelming at first, but with practice, it will become more natural. Take your time, read the pattern thoroughly before starting, and don’t be afraid to reference tutorials or ask for help if you’re unsure about any part of the instructions.
Decoding Abbreviations and Symbols
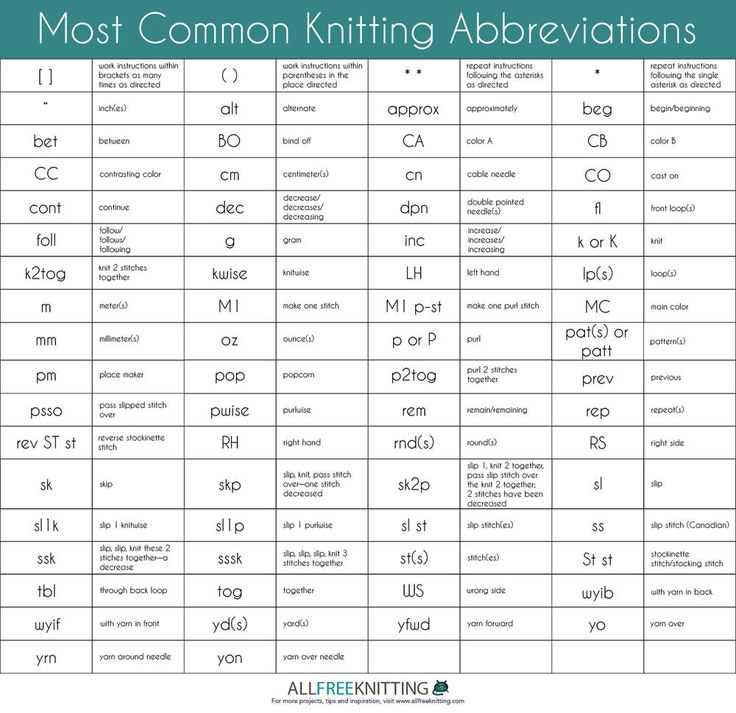
In order to read and understand a knitting pattern, it is important to familiarize yourself with the common abbreviations and symbols used. These abbreviations and symbols are used to condense instructions and make the pattern easier to read. Here are some key abbreviations and symbols you may come across:
Abbreviations:
- K: knit
- P: purl
- YO: yarn over
- K2tog: knit two stitches together
- P2tog: purl two stitches together
- RS: right side
- WS: wrong side
- St: stitch
- Rpt: repeat
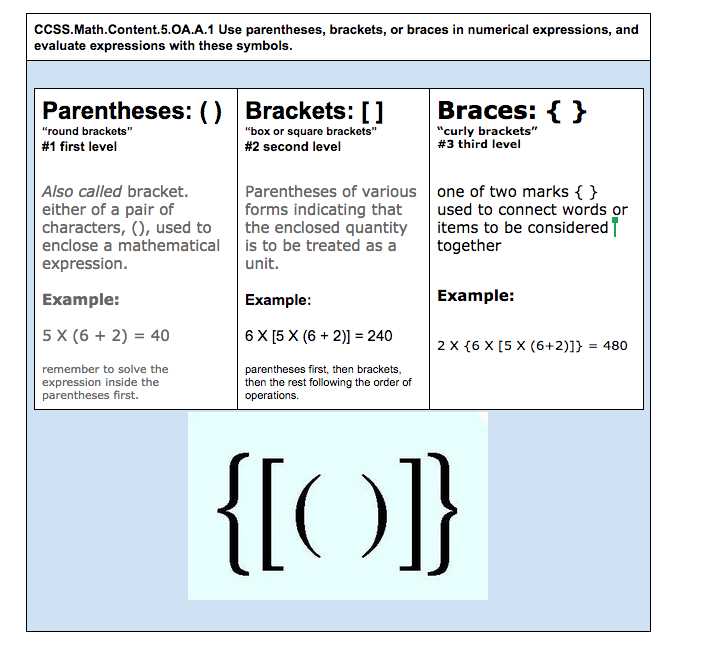
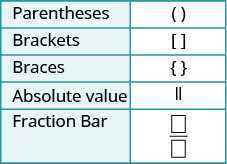
Symbols:
| Symbol | Meaning |
|---|---|
| * | repeat the instructions following the asterisk |
| [ ] | work the instructions inside the brackets as many times as indicated |
| ( ) | work the instructions inside the parentheses in the same row or round |
| { } | indicates a set of instructions that should be repeated a specific number of times |
| – | indicates a range, such as “work rows 1-5” |
| = | separates different sizes or sections of a pattern |
Understanding these abbreviations and symbols will help you decipher a knitting pattern and ensure you are following the instructions correctly. It may take some practice to become familiar with them, but with time, reading knitting patterns will become easier and more intuitive.
Interpreting Bracket Notations
When reading a knitting pattern, it is important to understand how to interpret the bracket notations that are often used. These brackets are used to indicate repeats or groupings of stitches, and understanding their meaning can greatly simplify the pattern reading process.
Repeats: One common use of brackets in knitting patterns is to indicate when a series of stitches should be repeated multiple times. For example, if you see a pattern instruction like “k2, (p1, k1) 3 times,” this means that you should knit two stitches, then repeat the sequence of purling one stitch and knitting one stitch three times in total.
Groupings: Brackets can also be used to group stitches together in a pattern. This is often done to indicate that a specific set of stitches should be worked in a particular way. For example, if you see a pattern instruction like “(k2tog, yo) 6 times,” this means that you should knit two stitches together, then yarn over, and repeat this sequence a total of six times.
It is important to carefully read the instructions surrounding the brackets to fully understand how to work the stitches within them. Pay close attention to any additional information or explanations provided in the pattern, as this can help clarify the intended meaning of the bracket notations.
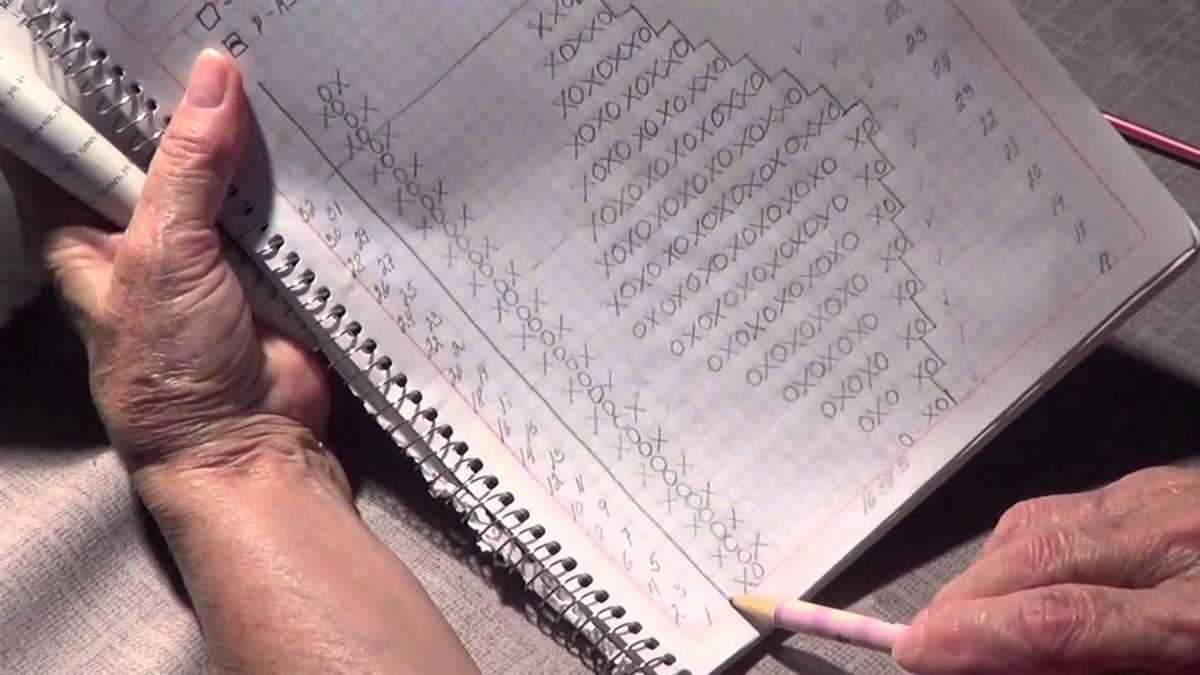
Additionally, it can be helpful to visually track your progress as you work through a pattern with bracket notations. You can use a row counter or highlighter tape to mark off each repeat or set of stitches as you complete them. This can help you stay organized and ensure that you are following the pattern correctly.
Cracking the Code of Parentheses
When it comes to reading knitting patterns, understanding the symbols and abbreviations can sometimes feel like deciphering a secret code. One particular set of symbols that often leaves knitters puzzled is parentheses. These curved brackets can appear next to numbers, stitches, or instructions, and they play a crucial role in understanding the pattern.
Understanding Repeated Instructions:
In knitting patterns, parentheses are often used to indicate that a set of instructions or stitches should be repeated a certain number of times. For example, you may see a line of instructions like “(K2, P2) x 5,” where the parentheses indicate that the stitches within should be repeated a total of five times. This means that you would knit two stitches, purl two stitches, and then repeat that sequence five times in total.
Grouping Stitches:
In addition to indicating repetition, parentheses are also used to group stitches or instructions together. This helps to clarify the order of operations and ensure that the correct stitches are worked in the correct places. For instance, you might come across a line that says “K3, (P2, K2), P3,” which means you would knit three stitches, followed by a set of purl two stitches, knit two stitches, and then continue with purling three stitches.
Clarifying Size or Pattern Options:
Parentheses can also be used in knitting patterns to indicate different sizing options or pattern variations. For example, you might see a line that reads “Cast on 40 (44, 48) stitches,” where the numbers within the parentheses correspond to different sizes. This helps knitters choose the correct number of stitches based on their desired size or fit.
Summary:
Cracking the code of parentheses in knitting patterns opens up a whole new world of understanding. By recognizing the different ways parentheses are used, knitters can confidently follow patterns, repeat instructions, and create beautiful knitted pieces.
Identifying Repeat Instructions
When reading a knitting pattern, it is important to be able to identify repeat instructions. These instructions are often indicated by brackets [] or parentheses (). By understanding how to recognize and interpret them, you can navigate a pattern more easily and follow the repeating sections accurately.
Bracket Repeat Instructions
Bracket repeat instructions are commonly used to indicate a set of stitches that need to be repeated multiple times. The number inside the brackets tells you how many times to repeat the instructions within. For example, if you see [K2, P2] 6 times, it means you need to knit 2 stitches, purl 2 stitches, and then repeat that sequence 6 times in total.
It is important to pay attention to any additional instructions that may be included within the bracket repeat. For instance, [K2, P2, K1, P1] 4 times means you need to knit 2 stitches, purl 2 stitches, knit 1 stitch, purl 1 stitch, and then repeat that entire sequence 4 times.
Parentheses Repeat Instructions
Parentheses repeat instructions are typically used to indicate a section of stitches that need to be repeated within a larger set of instructions. The number inside the parentheses tells you how many times to repeat the enclosed section. For example, if you see (K2, P2) 6 times, it means you need to knit 2 stitches, purl 2 stitches, and then repeat that entire sequence 6 times in total.
Similar to bracket repeat instructions, it is important to pay attention to any additional instructions that may be included within the parentheses. For instance, (K2, P2, K1, P1) 4 times means you need to knit 2 stitches, purl 2 stitches, knit 1 stitch, purl 1 stitch, and then repeat that entire sequence 4 times within the larger set of instructions.
Following Shaping Instructions
When reading a knitting pattern with brackets and parentheses, it is important to pay attention to the shaping instructions. These instructions will guide you on how to shape your knitted piece to achieve the desired fit and design. Shaping instructions are usually indicated within brackets or parentheses and may include decreases or increases, as well as specific measurements or stitch counts.
To follow shaping instructions, it is helpful to have a good understanding of basic knitting techniques and abbreviations. It is also important to carefully read and understand the entire pattern before starting to knit. Pay close attention to any special notes or explanations provided by the designer, as they may clarify the shaping instructions.
Decreases: Shaping instructions may include decreases, which are used to create curves or reduce the number of stitches. Common decrease abbreviations include k2tog (knit two stitches together), ssk (slip, slip, knit), and p2tog (purl two stitches together). These decreases are usually indicated within brackets or parentheses and are often accompanied by specific stitch counts or measurements.
Increases: Shaping instructions may also include increases, which are used to add stitches and create curves or shape. Common increase abbreviations include kfb (knit in the front and back of the same stitch), m1 (make one stitch), and yo (yarn over). These increases are usually indicated within brackets or parentheses and may also be accompanied by specific stitch counts or measurements.
By carefully following the shaping instructions in a knitting pattern and using the appropriate decreases or increases, you can ensure that your knitted piece takes on the desired shape and fit. Remember to always check your gauge before starting a new pattern to ensure that your finished piece will match the measurements specified in the pattern.
Understanding Pattern Stitch Repeats
When reading a knitting pattern, understanding the stitch repeats is crucial to successfully complete the project. Stitch repeats are often denoted by brackets or parentheses in the pattern, indicating a series of stitches that are repeated multiple times. By understanding how to read and interpret these stitch repeats, knitters can easily follow the pattern and create beautiful and intricate designs.
The use of brackets or parentheses in a knitting pattern typically indicates a specific set of stitches that are to be repeated. These repeats can be as simple as repeating a single stitch or as complex as repeating a series of stitches and patterns. In the pattern, the stitches within the brackets or parentheses are to be repeated the number of times specified in the pattern instructions.
For example, a pattern may include the instruction (K2tog, yo) three times. This means that the knitter should knit two stitches together, followed by a yarn over, and then repeat this sequence two more times for a total of three sets of (K2tog, yo). The brackets or parentheses provide a clear visual indication of the stitch repeat and help to organize the pattern instructions.
It is important to carefully read and understand the pattern before beginning, as the stitch repeats can vary and may require different techniques or stitch combinations. In some cases, the stitch repeats may span multiple rows, and the pattern will indicate how many rows the repeat should be worked.
By being familiar with stitch repeats and understanding how to read and interpret them, knitters can confidently navigate through knitting patterns and create beautiful and intricate designs. With practice, deciphering stitch repeats becomes second nature, and knitters can explore a wide range of patterns and projects with ease.
Mastering Pattern Stitches with Multiple Options

Knitting patterns can often seem confusing and overwhelming, especially when they include a mix of brackets and parentheses. However, by understanding the different options and variations within pattern stitches, you can easily navigate and master any knitting pattern.
Identifying the Purpose of Brackets and Parentheses:
- Brackets [ ] are typically used to indicate a repeat within the pattern. For example, [K2, P2] could mean to knit 2 stitches, purl 2 stitches, and then repeat that sequence for the desired number of times specified in the pattern.
- Parentheses ( ) are often used to enclose additional instructions or options within the pattern. For example, (K2, P2, K2) could indicate that you have the option to choose between knitting 2 stitches, purling 2 stitches, or knitting 2 stitches, depending on your preference or the effect you want to achieve in your project.
Experimenting with Different Options:
One of the advantages of patterns with brackets and parentheses is that they allow for flexibility and customization. By experimenting with different options, you can create unique textures and designs in your knitting project.
For example, let’s say you have the pattern stitch (K2, P2) [K4, P4] (K2, P2). You could choose to knit 2 stitches and purl 2 stitches for the first section, then knit 4 stitches and purl 4 stitches for the repeat section, and finally knit 2 stitches and purl 2 stitches again for the last section. This would create an interesting ribbed pattern with alternating sections of different textures.
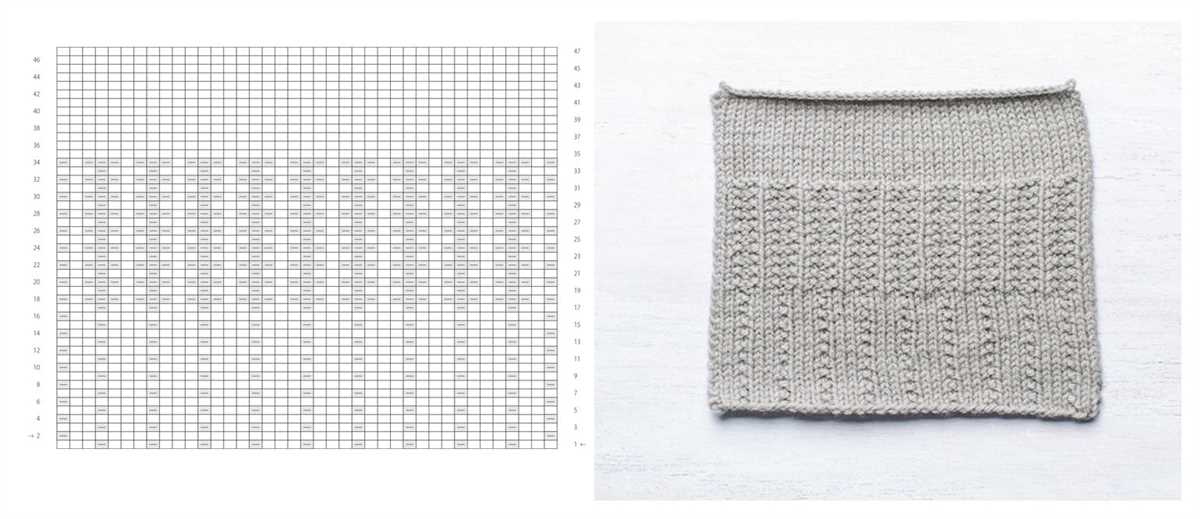
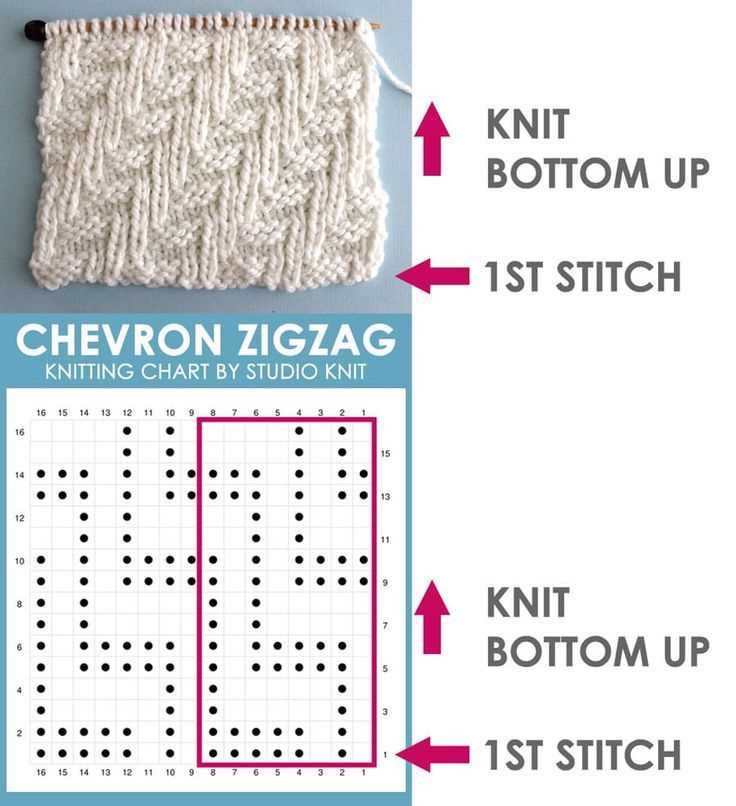
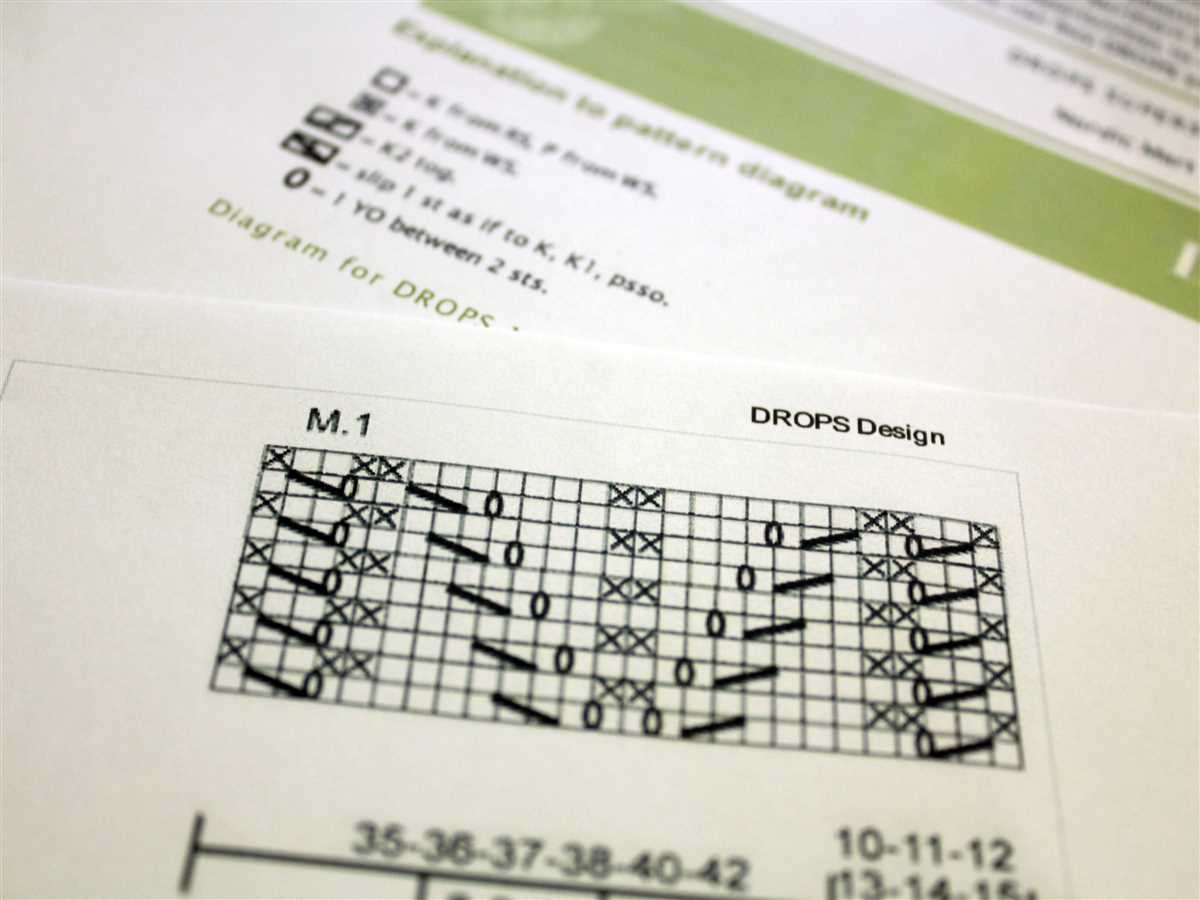
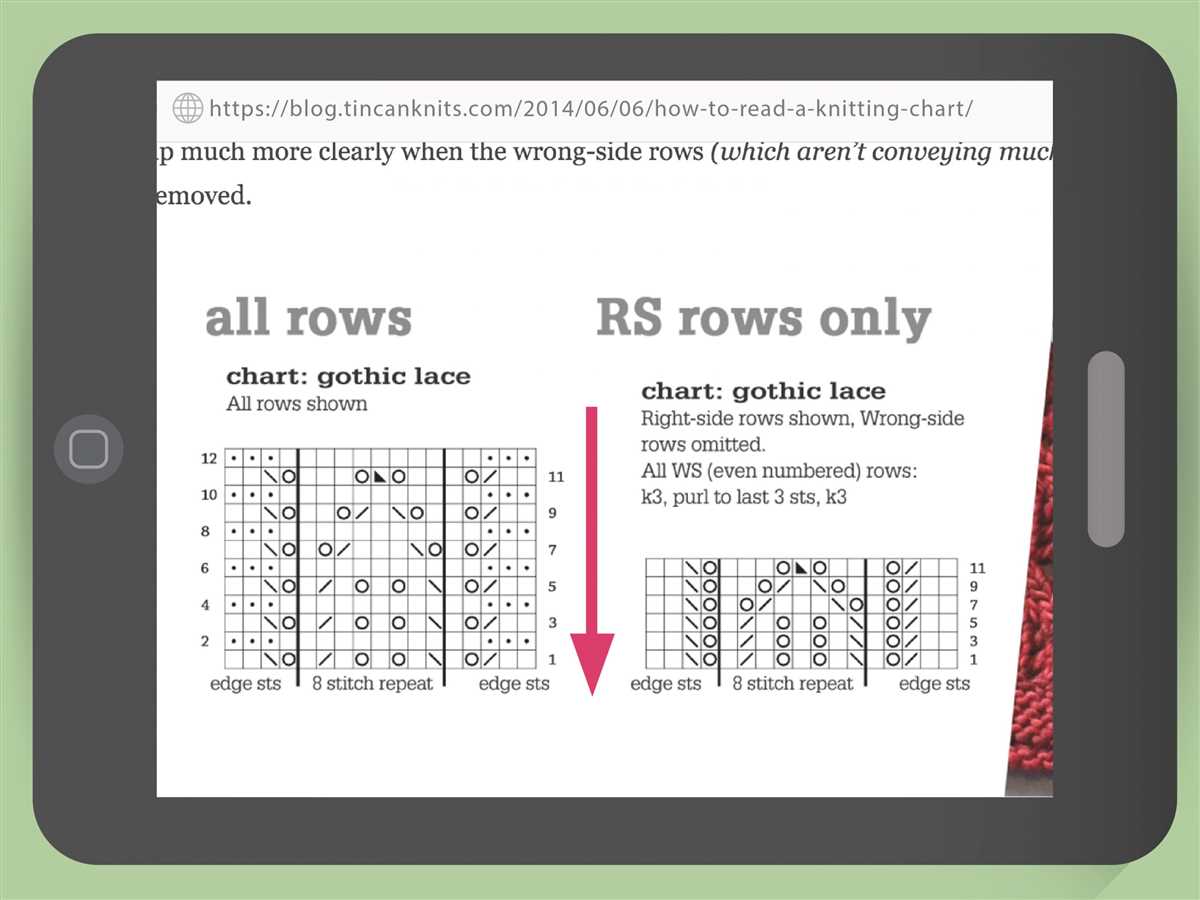
Understanding Pattern Charts:
In addition to the brackets and parentheses, some knitting patterns also include pattern charts, which provide a visual representation of the stitches and their placement. These charts can be especially helpful when working with complex stitch patterns or when you prefer a visual reference rather than written instructions.
For example, a chart may use symbols or colors to represent specific stitches or pattern repeats. By following the chart, you can easily see how the stitches are arranged and repeated throughout the pattern.
Conclusion:
Reading a knitting pattern with brackets and parentheses may initially seem daunting, but with practice and understanding, you can become proficient at interpreting and executing any pattern. By experimenting with different options and utilizing pattern charts, you can unleash your creativity and create beautiful and unique knitting projects.
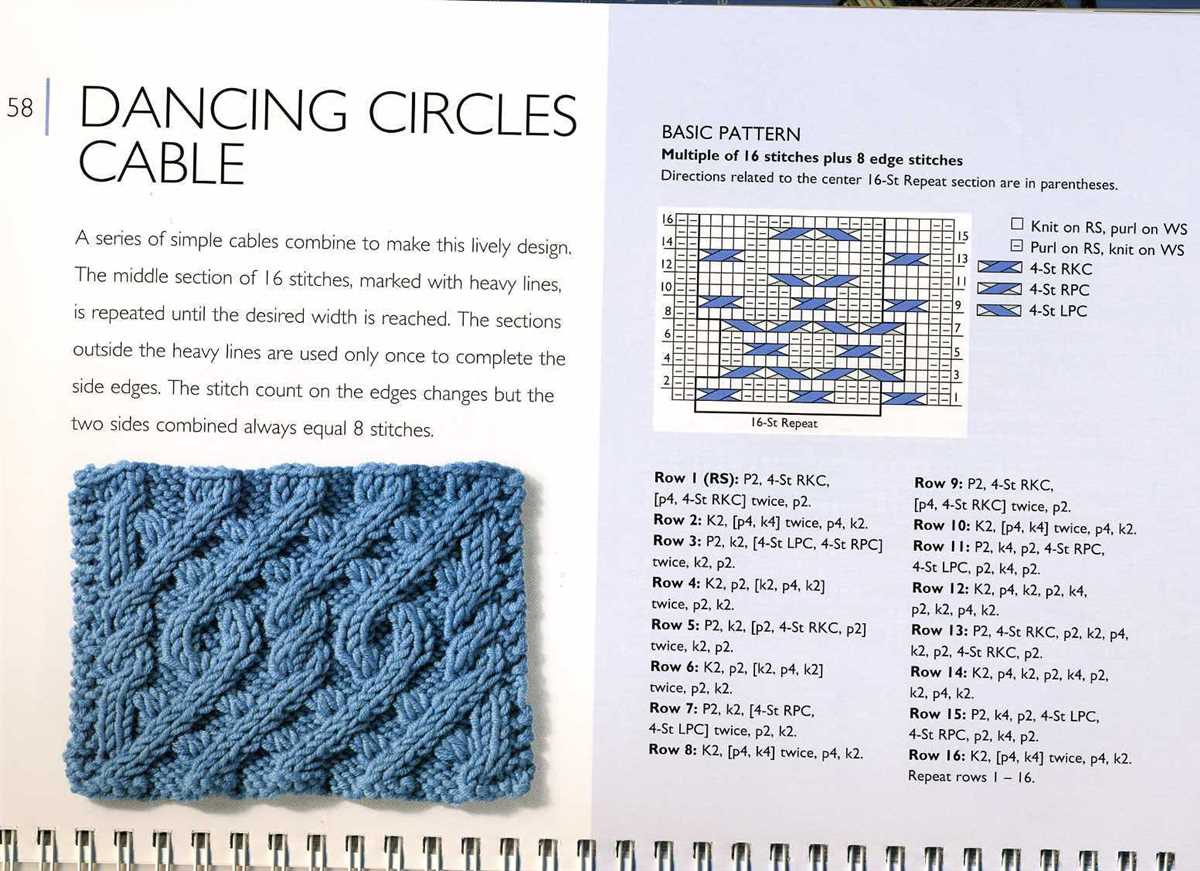
Tackling Lace and Cable Patterns
Knitting lace and cable patterns can be both challenging and rewarding. These intricate designs can add a touch of elegance and sophistication to any project. However, deciphering lace and cable patterns can be intimidating for beginners. Understanding the abbreviations, symbols, and instructions can make a world of difference in successfully tackling these patterns.
When working with lace patterns, it is important to pay attention to the chart symbols and written instructions. Lace patterns often include yarn overs (YO), which create the decorative holes in the fabric, as well as decreases such as knit two together (K2tog) or slip, slip, knit (SSK), which shape the lace. The chart symbols represent these stitches, and understanding how they interact with each other is key to following the pattern correctly.
Cable patterns, on the other hand, involve crossing stitches over each other to create intricate twists and braids. The cable pattern is usually represented on a chart or in written instructions. The chart will display symbols for each cable, indicating how the stitches should be crossed. The written instructions will guide you through the steps of crossing the stitches, usually using abbreviations like C6F (cable six stitches to the front) or C6B (cable six stitches to the back).
To tackle lace and cable patterns with ease, it is important to familiarize yourself with the pattern key or legend. This key will provide explanations for the different abbreviations, symbols, and techniques used in the pattern. Take the time to read through the key before starting the project to ensure you understand all the elements of the pattern.
Additionally, it can be helpful to practice these techniques on a smaller scale before diving into a full lace or cable project. Knitting swatches or small samples can familiarize you with the stitches and allow you to practice any new techniques without the pressure of completing a full project. It is also a good idea to use stitch markers to help keep track of pattern repeats and to highlight any special instructions.
With patience and practice, tackling lace and cable patterns can become a rewarding experience. Take your time to understand the instructions, practice the techniques, and enjoy the process of creating beautiful and intricate designs with your knitting needles.
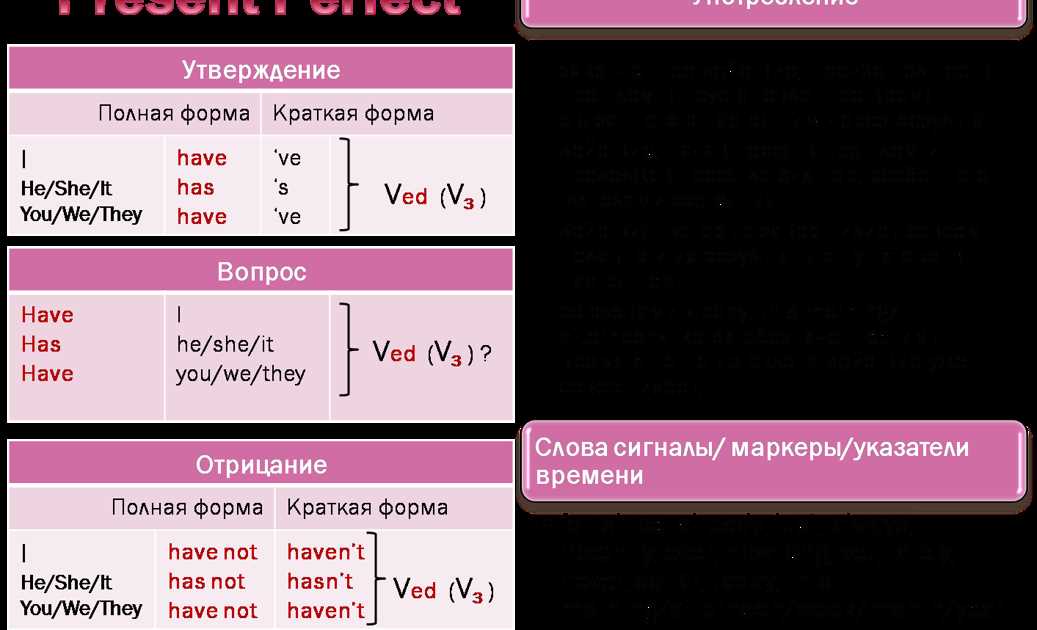
Navigating Pattern Instructions in Different Languages
Reading knitting patterns can be challenging enough in your native language, but it can become even more daunting when trying to navigate instructions in different languages. However, with a few key tips and tricks, you can overcome the language barrier and successfully follow any knitting pattern.
1. Familiarize Yourself with Standard Knitting Terms
Before attempting to read a knitting pattern in a different language, it’s important to have a solid understanding of standard knitting terms. This will allow you to recognize common abbreviations and symbols, even if the language is unfamiliar to you.
2. Utilize Translations and Charts
If you come across a knitting pattern in a language you don’t understand, try finding a translation or a chart that matches the instructions. Many knitting websites and forums offer translations and charts for popular patterns, which can make it much easier to follow along.
3. Pay Attention to Formatting
When reading a knitting pattern in a different language, take note of the formatting and layout. Look for familiar sections such as cast-on, increases, decreases, and bind-off. This can help you understand the structure of the pattern and make it easier to interpret the instructions.
4. Seek Help from Knitting Communities
If you’re struggling to understand a knitting pattern in a different language, don’t hesitate to reach out to knitting communities for assistance. Online forums, social media groups, and local knitting clubs are filled with experienced knitters who can provide guidance and clarify any confusing instructions.
5. Practice Patience
Reading knitting patterns in different languages may require extra time and effort, so it’s important to be patient with yourself. Take your time to carefully analyze each instruction, refer back to knitting resources, and practice the techniques. With persistence, you’ll become more comfortable with understanding patterns in different languages.
With these strategies, you can confidently tackle knitting patterns in any language and broaden your knitting horizons. Don’t let the language barrier hold you back from exploring new designs and techniques!
Troubleshooting Common Mistakes

Knitting patterns can sometimes be confusing, especially when they include brackets and parentheses. However, with a few troubleshooting tips, you can navigate through any common mistakes you may encounter.
Mistake: Missing or Extra Stitches
One common mistake is accidentally adding or dropping stitches while knitting. This can throw off the entire pattern and result in a misshapen or uneven project. To fix this, carefully count your stitches after completing each row. If you have extra stitches, carefully unravel the last row and correct the mistake. If you’re missing stitches, you can use a crochet hook to pick up the dropped stitch and knit it back into the fabric.
Mistake: Misunderstanding Parentheses and Brackets
The use of parentheses and brackets in knitting patterns can be confusing, especially if you’re not familiar with their specific meanings. Parentheses usually indicate repeats, while brackets are used to group instructions or indicate sizes. Take the time to carefully read and understand the pattern instructions. If you’re unsure about the use of parentheses or brackets, consult a knitting reference book or seek help from an experienced knitter.
Mistake: Incorrectly Counting Rows
Counting rows accurately is crucial to achieving the correct size and shape for your project. However, it can be easy to lose track, especially for larger or more complex patterns. To avoid this mistake, use stitch markers or a row counter to keep track of your rows. Additionally, regularly check your work against the pattern to ensure you’re on the right track.
Mistake: Tension Issues
Tension refers to the tightness or looseness of your knitting stitches. Inconsistent tension can lead to uneven fabric and an ill-fitting project. Pay attention to the suggested tension stated in the pattern, and practice maintaining a consistent gauge. If your tension is too tight or too loose, adjust your needles or yarn size accordingly. Regularly checking your tension as you knit can help you catch and correct any issues before they become too significant.
- In conclusion, troubleshooting common mistakes in knitting patterns with brackets and parentheses can be done with patience and attention to detail.
- Always take the time to carefully read and understand the pattern instructions and consult resources or seek help if needed.
- Regularly checking your work, counting stitches and rows, and maintaining consistent tension can help you avoid and fix common mistakes.
- Remember that knitting is a skill that improves with practice, so don’t be discouraged if you encounter mistakes along the way.
Expanding Your Knitting Skills with Advanced Patterns
Once you have mastered reading and understanding basic knitting patterns with brackets and parentheses, you may want to challenge yourself with more advanced patterns. These patterns can help you further develop your skills and create intricate and unique knitting projects. Here are a few tips to help you tackle advanced knitting patterns:
- Start small: When attempting an advanced pattern, it is best to start with a small project such as a scarf or a hat. This will allow you to practice the new techniques required in the pattern without feeling overwhelmed.
- Read the pattern carefully: Advanced patterns can often be more complex and detailed. Take the time to read through the entire pattern before you begin knitting. Make sure you understand each section and any special instructions that may be included.
- Use stitch markers: Stitch markers can be helpful in keeping track of your progress and ensuring that you don’t make mistakes. Place them at the beginning and end of each pattern repeat or section, as well as any specific points indicated in the pattern.
- Take it one step at a time: Advanced patterns may require you to learn new techniques or stitches. Break down the pattern into smaller sections and focus on mastering each one before moving on to the next. This will help you avoid feeling overwhelmed and ensure that you are able to complete the project successfully.
Remember, knitting is a skill that takes time and practice to master. Don’t be discouraged if you find an advanced pattern challenging at first. Keep practicing and building your skills, and soon you will be able to tackle even the most complex knitting patterns with confidence!