
When it comes to knitting, choosing the right size is essential in order to create a garment that fits well and looks flattering. Whether you are a beginner or an experienced knitter, understanding how to choose the right size in a knitting pattern is crucial. Here are some tips and guidelines to help you make the right decision.
1. Read the Pattern Carefully: Before you start casting on and knitting, it’s important to thoroughly read through the pattern. Look for any specific instructions or notes on sizing. The pattern designer may provide measurements or guidelines to help you choose the right size for your body.
2. Take Your Measurements: Before you can select a size, you need to know your own measurements. Use a measuring tape to measure your bust, waist, and hips. Write down these measurements and compare them to the size chart provided in the pattern. This will help you determine which size is the closest match to your own measurements.
3. Consider Ease: Ease refers to the amount of extra space in a garment beyond your actual body measurements. It can affect the fit and drape of the finished garment. Some patterns will provide information on the intended ease, such as slim, standard, or loose. Consider your personal preference and the style of the garment when choosing the size.
4. Compare to Your Favorite Garments: If you have a well-fitting garment that is similar in style to the one you are planning to knit, lay it flat and measure it. Compare these measurements to the finished measurements provided in the knitting pattern. This can give you an idea of the fit and size you should choose.
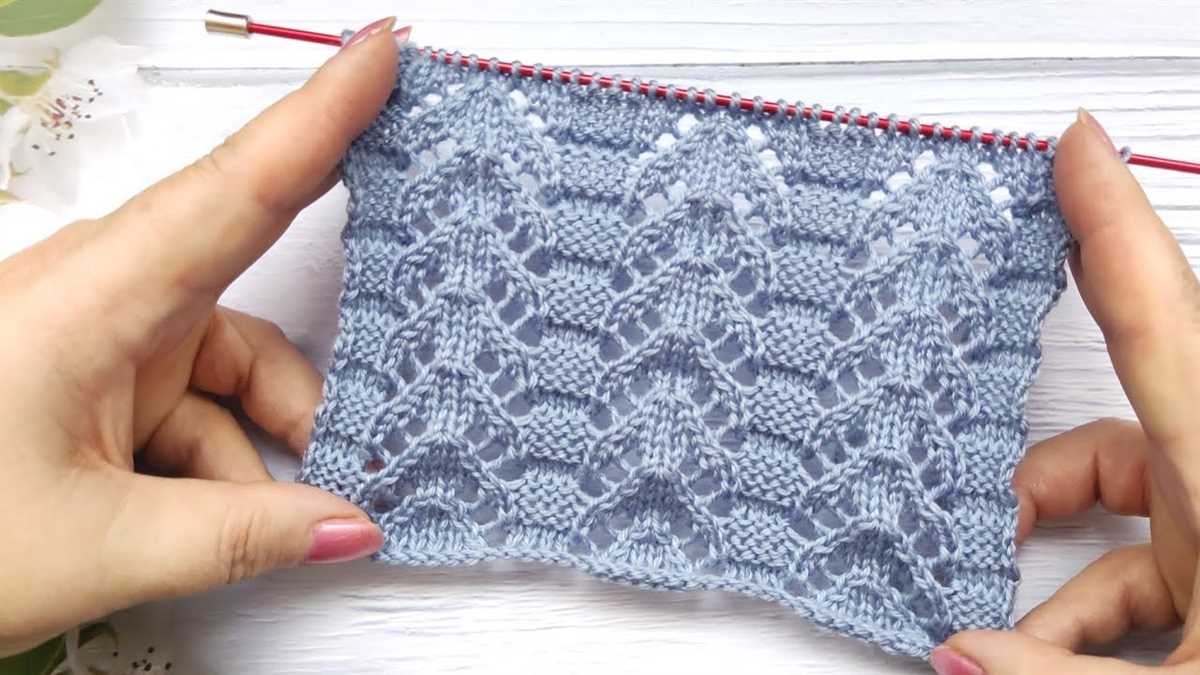
5. Make a Gauge Swatch: Even if you are using the recommended yarn and needle size, it’s important to knit a gauge swatch before starting your project. The pattern will provide a recommended gauge, which is the number of stitches and rows per inch. By knitting a swatch and measuring it, you can ensure that your tension matches the pattern and make any necessary adjustments to the needle size or your knitting style.
By following these tips, you can confidently choose the right size in a knitting pattern and create a garment that fits you perfectly. Remember to take accurate measurements, consider ease, and make a gauge swatch before you begin. Happy knitting!
How to Choose Size in Knitting Pattern
Choosing the right size in a knitting pattern is crucial to ensure that the finished garment fits you perfectly. It can be daunting to navigate through all the different size options, but with a few simple steps, you can find the size that works best for you.
1. Take accurate measurements: Before you begin, take precise measurements of your bust, waist, hips, and any other relevant body parts. Use a flexible measuring tape and ensure that it is not too tight or too loose. This will give you the most accurate measurements to compare with the pattern’s size chart.
2. Consult the pattern’s size chart:
Most knitting patterns include a size chart that lists the measurements for each available size. Compare your measurements with the chart to determine which size aligns closest with your body measurements.
For example, if your bust measurement falls between the numbers for two sizes, choose the larger size for a looser fit or the smaller size for a more fitted look.
3. Consider ease:
Ease refers to the difference between your body measurements and the finished measurements of the garment. Some patterns have a recommended ease, which is the amount of positive ease (extra room) or negative ease (tight fit) designed into the pattern. Consider how you want the finished garment to fit and choose a size accordingly.
4. Make a gauge swatch: It’s essential to make a gauge swatch before starting your project. Follow the recommended needle size and stitch pattern to create a 4-inch by 4-inch square. Measure the number of stitches and rows within that square, and compare it to the pattern’s gauge. Adjust your needle size if necessary to match the pattern’s gauge, as this will ensure that your finished garment will have the correct dimensions.
5. Adjustments:
If your measurements fall between the available sizes or if you are in between sizes, you may need to make adjustments to the pattern. This can be done by adding or subtracting stitches or rows at specific points in the pattern. Make sure to consult the pattern’s instructions or seek guidance from more experienced knitters if needed.
By following these steps, you can confidently choose the right size in a knitting pattern and create a beautiful garment that fits you perfectly.
Understanding the Importance of Choosing the Right Size
When it comes to knitting, choosing the right size is crucial for the overall success and fit of your project. Whether you are knitting a sweater, a hat, or any other garment, selecting the appropriate size can make a significant difference in how the finished piece looks and feels on your body.
Accurate measurements: The first step in choosing the right size is to take accurate body measurements. This includes measuring the bust, waist, hips, and other relevant areas that will determine the size of the finished garment. By measuring yourself or the person you are knitting for, you can ensure a more customized and comfortable fit.
Pattern specifications: Knitting patterns often provide a range of sizes for each design. It is important to carefully read the pattern specifications and compare them to your measurements. This will help you identify the size that corresponds closest to your body measurements, allowing for ease and movement in the finished garment.
Ease and fit: Ease refers to the amount of extra space in a garment beyond the actual body measurements. It plays a crucial role in determining the fit and comfort of the finished piece. Different styles and designs may call for different amounts of ease, so it is important to consider this when choosing your size. For a closer fit, you may opt for negative ease, where the garment measurements are slightly smaller than your body measurements. For a looser fit, you might choose a size with positive ease, which allows for more room.
Adjustments and modifications: If you find that your body measurements do not easily match up with the available sizes in a knitting pattern, you may need to make adjustments or modifications. This can involve adding or subtracting stitches or rows, altering the length or width of certain sections, or even combining sizes to achieve the desired fit. It is helpful to have a basic understanding of knitting techniques and construction to make these adjustments successfully.
Trying on and swatching: It is always a good idea to try on your knitted project as you go or make a swatch to ensure that it will fit properly before investing time and effort into the entire garment. This can help you catch any sizing issues early on and make any necessary adjustments before it’s too late.
In conclusion, choosing the right size in a knitting pattern is essential for achieving a well-fitting and flattering garment. By taking accurate measurements, considering ease and fit, and making any necessary adjustments, you can create a knitted piece that not only looks great but also feels comfortable to wear.
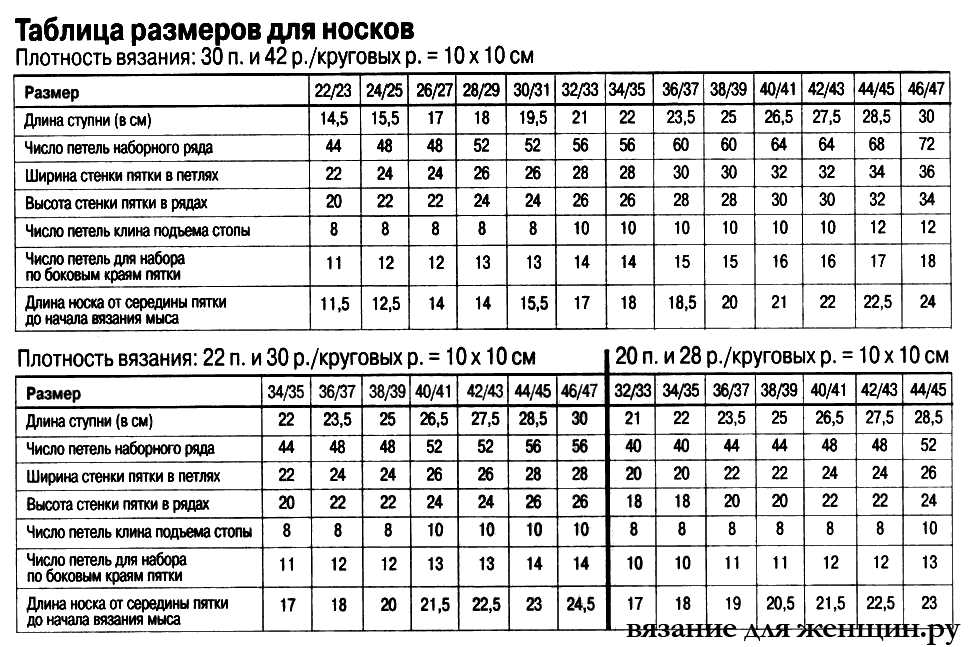
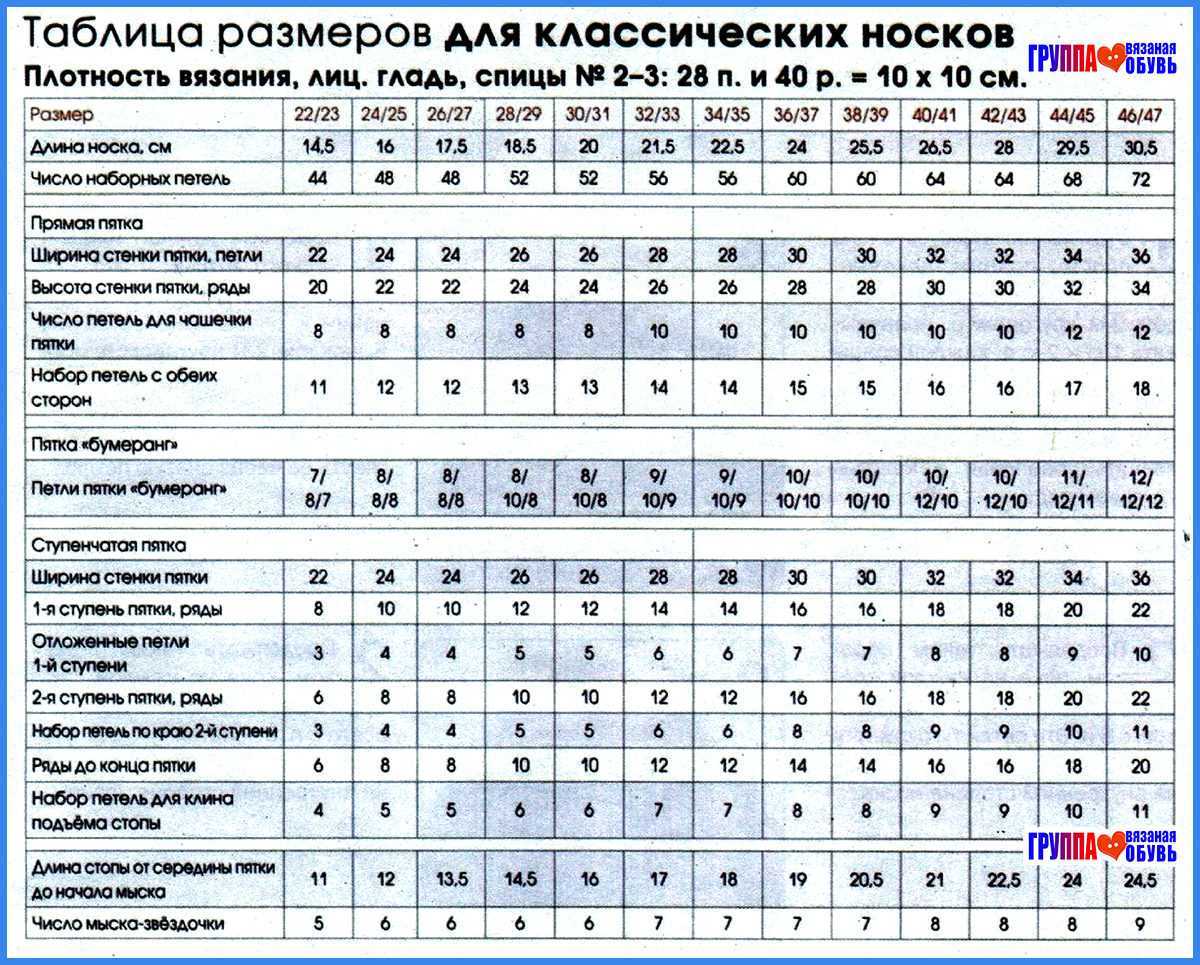
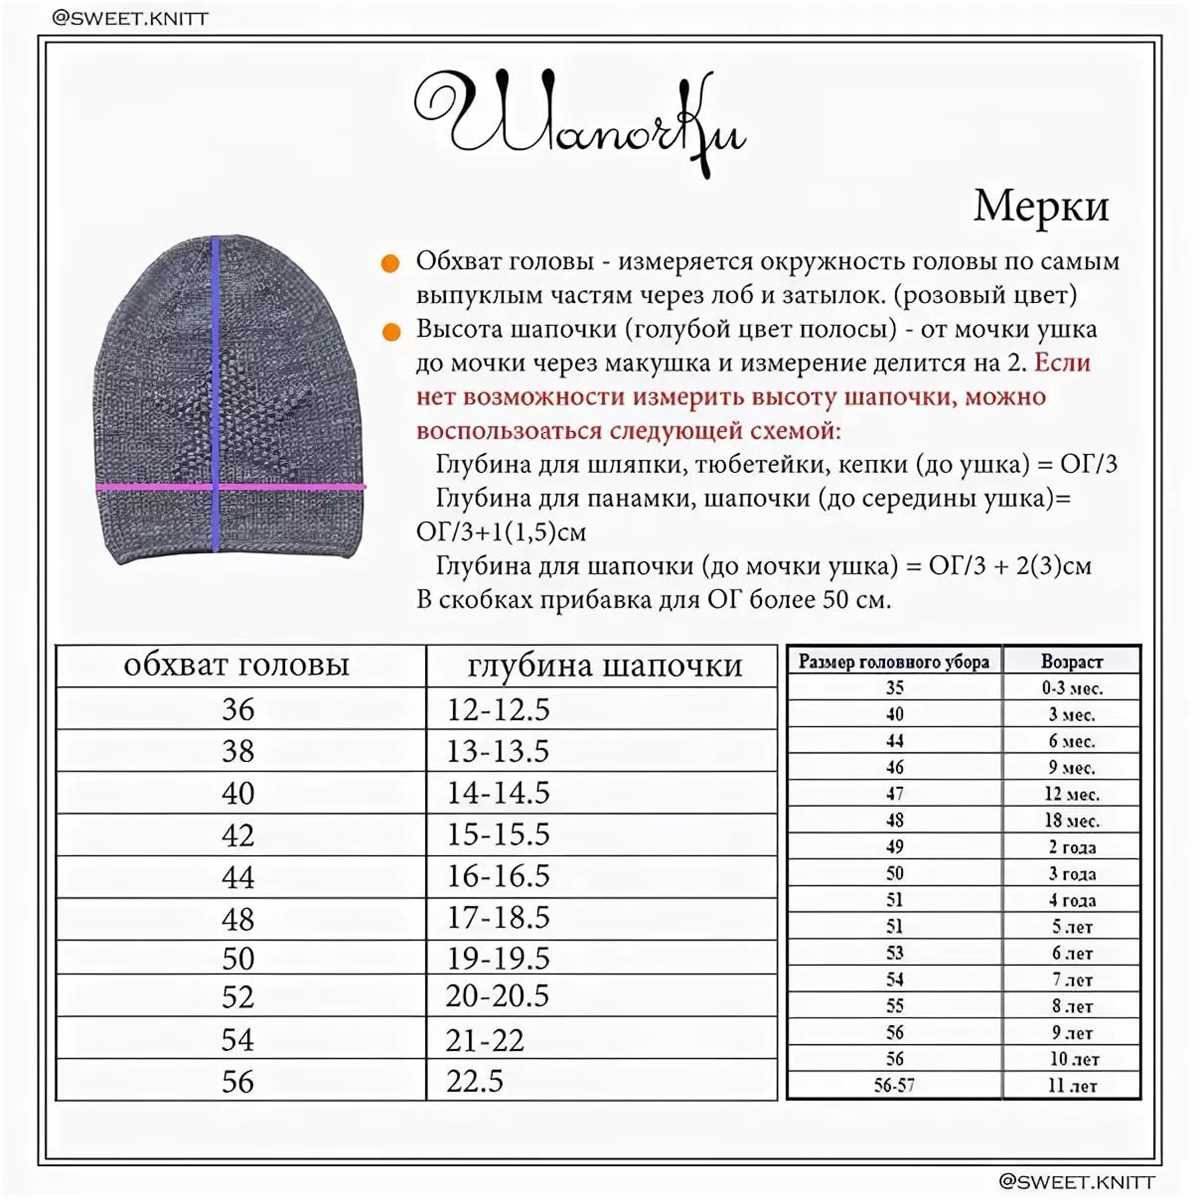
Measurements required for selecting the size
When choosing a size in a knitting pattern, it is important to have accurate measurements of the intended wearer. This will ensure that the finished garment fits properly and is comfortable to wear. The following measurements are typically required:
- Bust: Measure around the fullest part of the bust, keeping the tape measure parallel to the floor.
- Waist: Measure around the natural waistline, which is usually the narrowest part of the waist.
- Hips: Measure around the fullest part of the hips, keeping the tape measure parallel to the floor.
- Arm length: Measure from the shoulder down to the wrist, with the arm slightly bent.
- Shoulder width: Measure from the outer edge of one shoulder to the outer edge of the other shoulder.
- Back width: Measure across the back, from one armpit to the other.
- Body length: Measure from the base of the neck down to the desired length of the garment.
Having these measurements on hand will allow you to compare them to the size chart provided in the knitting pattern. It is important to note that different patterns may have different sizing conventions, so always refer to the specific pattern’s size chart for accurate sizing information. If your measurements fall between sizes, it is often recommended to choose the larger size for a more comfortable fit. Remember to also take into account the desired ease of the garment, as some patterns may include instructions for a close-fitting or relaxed fit.
Analyzing the schematic diagram
When choosing the right size in a knitting pattern, it is important to carefully analyze the schematic diagram provided. This diagram gives an overview of the garment’s dimensions, including measurements for the bust, waist, hip, sleeve length, and overall length. By comparing these measurements to your own body measurements, you can determine which size will fit you best.
Step 1: Start by measuring your own body. Use a tape measure to measure the circumference of your bust, waist, and hips. Measure from the base of your neck to your desired length for the sweater. These measurements will serve as a reference point when analyzing the schematic diagram.
Step 2: Take a close look at the schematic diagram provided in the knitting pattern. The diagram will usually include vertical lines that represent the front and back of the garment, as well as horizontal lines that indicate the different measurements. Pay attention to any shaping or design elements indicated on the diagram, such as decreases, increases, or stitch patterns.
Step 3: Compare the measurements on the schematic diagram to your own body measurements. Look for the size that corresponds most closely to your own measurements. Keep in mind that knitting patterns typically include ease, which is the additional room or space added to the garment for a comfortable fit. Consider how much ease you prefer and take this into account when selecting your size.
Step 4: If you fall between sizes or are unsure about which size to choose, consider adjusting the pattern to better fit your measurements. This can be done by adding or subtracting stitches or rows, or by making modifications to the shaping elements of the pattern.
Step 5: Once you have analyzed the schematic diagram and chosen the right size, it is important to make a gauge swatch. This will help ensure that your knitting matches the pattern’s specified gauge, which will ultimately affect the final fit of the garment. Adjust your needle size as needed to match the gauge, and then proceed with knitting the pattern in your chosen size.
Considerations for ease and fit
The key to choosing the right size in a knitting pattern is understanding how ease and fit play a role in the finished garment. Ease refers to the extra room or space in a garment beyond the body measurements, while fit refers to how closely the garment conforms to the body.
- Positive ease: When a garment has positive ease, it means that it is designed to be larger than the actual body measurements. This can create a loose and relaxed fit, making it comfortable and easy to move in. Positive ease is often used in casual or oversized designs.
- Negative ease: On the other hand, negative ease means that the garment is designed to be smaller than the actual body measurements. This creates a snug and form-fitting fit, which can be flattering and emphasize the body’s curves. Negative ease is often used in fitted or stretchy designs.
When choosing a size based on ease, it is important to consider the intended fit of the garment. Some patterns may provide specific guidance on the amount of ease that is built into the design. It can be helpful to measure a similar garment that fits well and compare it to the pattern’s finished measurements to determine the desired amount of ease.
In addition to ease, other factors such as the yarn used and the stitch pattern can also affect the fit of a garment. For example, a bulky yarn may create a thicker fabric with less drape, while a lace stitch pattern may result in a more open and stretchy fabric. It is important to take these factors into account when choosing a size and making any necessary adjustments to ensure the desired fit.
Choosing the size based on the pattern guidelines
When knitting a garment, following the pattern guidelines for choosing the correct size is important to ensure a good fit. The pattern will typically provide a range of sizes, and it is essential to select the appropriate one based on your body measurements and desired fit.
Step 1: Take accurate body measurements. Use a tape measure to measure your bust, waist, and hips. Compare these measurements to the size chart provided in the pattern. This will help you determine which size to choose.
Step 2: Consider the ease. Ease refers to the additional room or snugness in a garment beyond your actual body measurements. The pattern will usually indicate whether it has negative ease (snug fit) or positive ease (loose fit). Take your personal preference into account when selecting the size.
Step 3: Look for any specific instructions or recommendations in the pattern. Some patterns may include notes about modifications or adjustments that need to be made for a better fit. It is important to read and understand these instructions before choosing your size.
Step 4: Consider your knitting tension. If your tension is significantly different from what is recommended in the pattern, it may affect the finished size of the garment. Take this into account when choosing the size and consider making adjustments if necessary.
Step 5: Keep in mind that knitting patterns can vary in their sizing conventions. Some patterns may use standard clothing sizes, while others may use specific measurements. Always refer to the pattern’s size chart and compare it to your own measurements for the best fit.
Adjusting for personal preferences
When following a knitting pattern, it’s important to remember that sizes are not one size fits all. Everyone’s body is different, and what may fit one person perfectly may not be the right fit for someone else. That’s why it’s essential to adjust the pattern to match your personal preferences and measurements.
Step 1: Take accurate measurements
Before starting the knitting project, take your body measurements. This includes bust, waist, hips, and arm length. Compare your measurements to the pattern’s size chart to determine which size to follow. If your measurements fall between two sizes, you can adjust accordingly to achieve the desired fit.
Step 2: Calculate gauge
Gauge is the number of stitches and rows per inch in your knitting. It’s crucial to match the gauge specified in the pattern, as it ensures the finished garment will have the correct dimensions. If your gauge doesn’t match, you’ll need to adjust your needle size to achieve the desired gauge.
Step 3: Make adjustments
Once you have determined your size and have the correct gauge, you can make further adjustments to personalize the fit. For example, if you prefer a longer or shorter length, you can add or subtract rows accordingly. You can also adjust the width by adding or removing stitches, or by changing the stitch pattern.
Step 4: Test your adjustments
When making adjustments, it’s a good idea to create a swatch or small sample of the stitch pattern to see how it looks and fits. This allows you to test and adjust your changes before committing to the entire project. Make any necessary modifications based on your swatch and continue with confidence.
Step 5: Consider the yarn type
Keep in mind that different yarns may behave differently when knitted up. A bulky yarn will produce a thicker and warmer fabric, while a lightweight yarn will create a more delicate and airy fabric. Consider the drape and texture you want for your finished garment and choose a yarn that complements your desired fit.
Step 6: Embrace trial and error
Knitting is a craft that often requires trial and error to achieve the perfect fit. Don’t be afraid to make adjustments and try different techniques to customize the pattern to your personal preferences. Enjoy the process and embrace the satisfaction of creating a garment that fits you just right.
Factors to consider for different parts of the garment
When choosing the size for a knitting pattern, it is important to consider the specific measurements for different parts of the garment. Here are some factors to keep in mind:
- Bust size: The bust measurement is crucial for determining the overall size of a sweater or top. Measure around the fullest part of your bust and choose a size that is closest to this measurement. The fit around the bust will greatly influence the overall fit of the garment.
- Shoulder width: The shoulder width measurement is important for ensuring that the shoulder seams of the garment sit correctly on your shoulders. Measure from the edge of one shoulder to the edge of the other, across the back. If the shoulder seams are too wide or too narrow, the garment may not hang or drape properly.
- Arm length: Taking accurate arm length measurements is crucial for achieving the correct fit for sleeves. Measure from the top of your shoulder down to your wrist, and compare this measurement to the pattern’s recommended sleeve length. Adjustments may need to be made to ensure the sleeves are the desired length.
- Waist and hip measurements: For garments that are fitted around the waist and hips, it is important to measure these areas accurately. The waist measurement is taken at the narrowest part of the waist, and the hip measurement is taken at the fullest part of the hips. Choosing the correct size based on these measurements will ensure a comfortable and flattering fit.
It is important to note that different patterns may have different size charts and recommendations. Always refer to the specific pattern’s instructions and measurements for the most accurate sizing information. Taking detailed measurements of your own body and comparing them to the pattern’s size chart will help you make an informed decision and choose the size that will best suit your body shape and preferences.
Tips for choosing the right size for different body types
When choosing the right size for a knitting pattern, it is important to consider the different body types and how they may affect the fit of the finished garment. Here are some tips to help you choose the right size for different body types:
1. Hourglass figure
For those with an hourglass figure, it is important to choose a size that accentuates the waist. Look for patterns that have shaping or waist-defining details, such as a fitted bodice or a cinched waist. Pay attention to the finished garment measurements and choose a size that will accommodate your bust, waist, and hips.
2. Pear-shaped figure
If you have a pear-shaped figure, where your hips are wider than your bust, consider patterns that have a more generous hip measurement. Look for A-line or flared silhouettes that will help balance out your proportions. It’s also important to pay attention to the length of the garment, as you may need to make adjustments to accommodate your hip measurements.
3. Apple-shaped figure
For those with an apple-shaped figure, where your midsection is wider than your hips and bust, consider patterns that have a looser fit around the waist. Look for patterns with a relaxed or oversized silhouette that will skim over your midsection. Pay attention to the finished garment measurements and choose a size that will accommodate your midsection while still fitting comfortably in the bust and hips.
4. Rectangular figure
If you have a rectangular figure, where your bust, waist, and hips are similar in measurements, consider patterns that have shaping or details that create the illusion of curves. Look for patterns that have waist-defining details, such as belts or darts, as well as patterns with A-line or fitted silhouettes that will add shape to your figure.
Remember, these are general tips and it’s important to take your own measurements and compare them to the pattern’s sizing chart to choose the best size for you. Don’t be afraid to make size adjustments, such as adding or subtracting stitches, to ensure a better fit for your body type.
Common mistakes to avoid when selecting the size
When choosing the size for a knitting pattern, it’s important to avoid some common mistakes that can lead to an ill-fitting garment. A poorly fitting knitted item can be uncomfortable to wear and not have the desired aesthetic appeal. Here are some mistakes to watch out for:
- Not taking accurate measurements: One of the most common mistakes is not taking accurate measurements of the body. To ensure the chosen size fits properly, it’s crucial to measure the bust, waist, and hips accurately.
- Ignoring the finished measurements: Another mistake is ignoring the finished measurements provided in the knitting pattern. These measurements indicate the size of the garment after it has been knitted and blocked, and they can help in choosing the appropriate size.
- Not considering ease: Ease refers to the amount of extra room in a garment. Some patterns mention the desired ease, whether it’s a close fit, relaxed fit, or oversized fit. Neglecting to consider ease can result in a garment that is either too tight or too loose.
- Not accounting for gauge: Gauge is the number of stitches and rows per inch in a knitted fabric. It’s crucial to match the gauge mentioned in the pattern to ensure the correct size. Failure to match the gauge can lead to a significantly different finished size.
- Overlooking body shape: Each knitting pattern is designed with a specific body shape in mind, whether it’s hourglass, pear, or apple. Ignoring the recommended body shape can result in a garment that doesn’t flatter the wearer.
Avoiding these common mistakes can help make the process of selecting the right size for a knitting pattern much easier and ensure a well-fitting and visually pleasing final product.
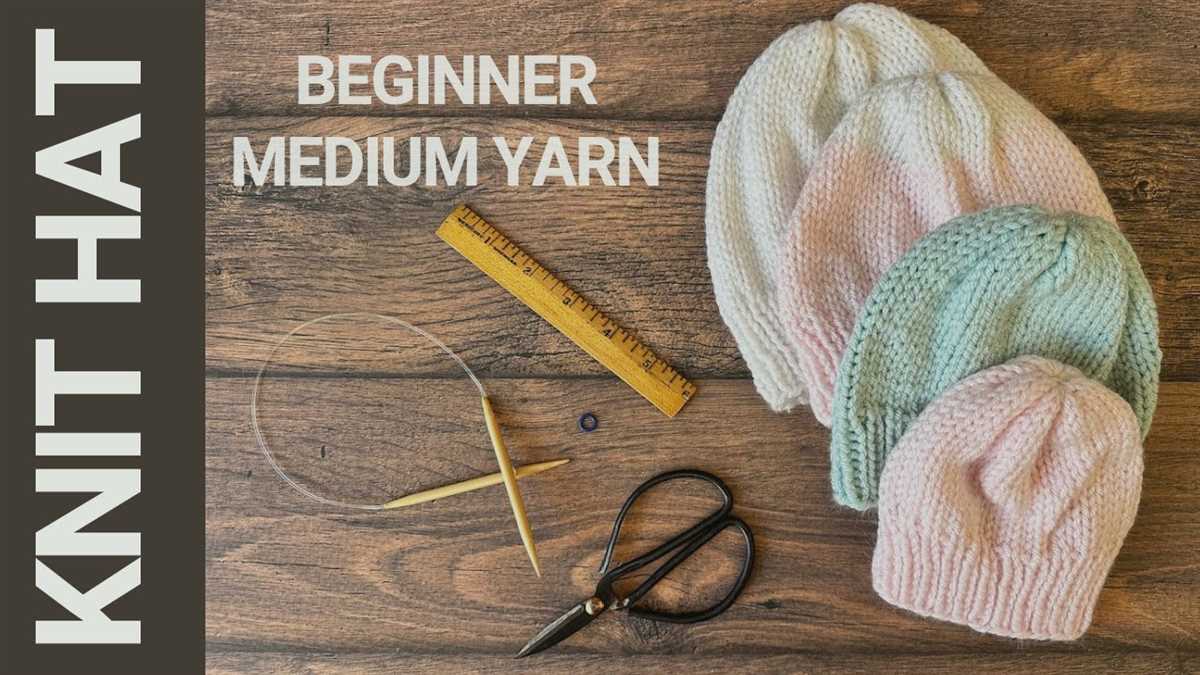
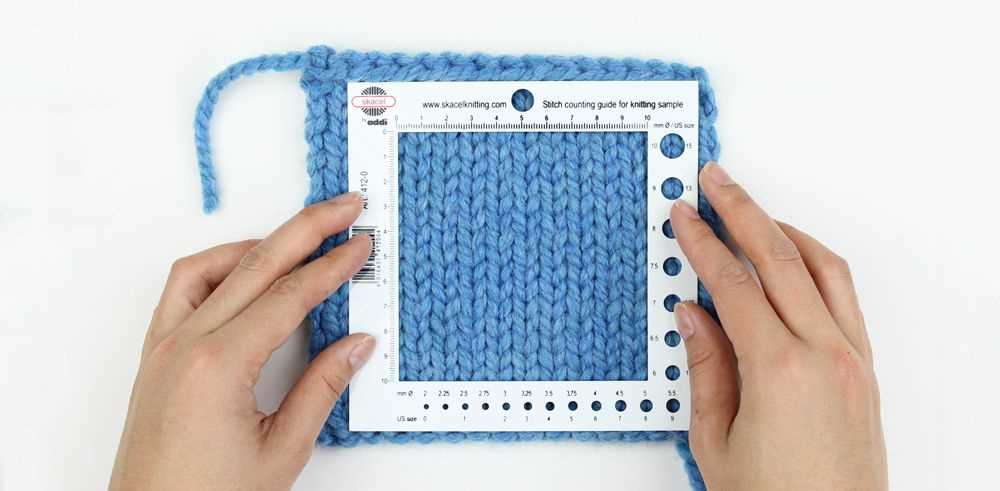
The Importance of Making a Gauge Swatch
When starting a knitting project, one of the most important steps is making a gauge swatch. A gauge swatch is a small sample of knitting worked in the pattern and stitch that you will be using for your project. This swatch allows you to determine the correct gauge or tension for the pattern, which is essential for ensuring that your finished product will fit properly.
Making a gauge swatch is crucial because it allows you to check your knitting tension and determine if you need to make any adjustments. Each knitter has a unique way of holding the needles and yarn, which can affect the final gauge. Therefore, it is important to match the gauge specified in the pattern to ensure that the finished project will have the correct measurements.
To make a gauge swatch, follow these steps:
- Choose the yarn and needles that will be used for the project.
- Cast on enough stitches to create a square swatch, typically about 4 inches (10 cm) wide.
- Work in the pattern and stitch specified in the pattern for a few inches.
- Measure the gauge by counting the number of stitches and rows within a 4-inch (10 cm) square.
- If the gauge matches the pattern, you can proceed with confidence. If not, you may need to change your needle size and try again.
Making a gauge swatch may seem like an extra step that takes time and effort, but it is well worth it in the long run. By taking the time to make a gauge swatch and adjust your needle size if necessary, you can ensure that your final knitting project will fit perfectly and look as intended.
Finalizing the size selection and starting the project
After going through the steps to choose the right size in a knitting pattern, you should now have a clear understanding of your measurements and the size that will best fit you. Remember to take into account any ease and adjust accordingly if necessary.
Once you have finalized the size selection, you can confidently begin your knitting project. Make sure to double-check the gauge, as it will directly influence the size and fit of your finished piece. Adjust your needle size or tension if needed to match the recommended gauge in the pattern.
To start the project, gather all the necessary materials, such as yarn, needles, stitch markers, and any additional tools required. Read through the entire knitting pattern before beginning to ensure you understand all the instructions and techniques involved.
Take the time to swatch and measure your gauge before diving into the main project. This will prevent any unpleasant surprises and ensure that your final piece turns out the right size. Make adjustments to your needle size or tension if the gauge is not matching the pattern’s recommendations.
As you work through the project, be mindful of any shaping and adjustments that may need to be made for your chosen size. Refer back to the pattern instructions and consult resources such as knitting guides or online tutorials for guidance.
Remember to properly measure your progress along the way to ensure that you are on track and producing the correct size. Try on the garment periodically to check the fit, especially if you are making any customization or modifications.
Knitting is a fun and creative craft that allows you to make your own unique garments and accessories. By carefully choosing the right size in a knitting pattern and paying attention to detail throughout the project, you can create beautiful and well-fitting pieces that you will be proud to wear or gift to others.