
Knitting is a craft that allows you to create beautiful, unique garments and accessories. Whether you are an experienced knitter or just starting out, understanding how to calculate knitting patterns is essential. Knowing how to calculate the number of stitches and rows needed for a project can help you customize patterns to fit your measurements or adjust the size to your liking.
One of the key elements in knitting patterns is gauge. Gauge refers to the number of stitches and rows per inch achieved with a specific yarn and needle size. By matching the gauge stated in the pattern, you can ensure that your finished project will have the correct dimensions. Calculating gauge involves knitting a sample swatch and measuring it to determine how many stitches and rows you are knitting per inch.
Once you have determined your gauge, you can use it to calculate the number of stitches and rows needed for your project. Patterns typically provide a stitch count and row count for a specific size. To adjust the pattern for a different size, you can apply simple proportional calculations. For example, if the pattern calls for 20 stitches and 30 rows for a 4-inch square and you want to knit a larger size that measures 6 inches, you would calculate 20/4 = 5 stitches per inch and 30/4 = 7.5 rows per inch. Then, multiply these numbers by the desired measurements to find the total number of stitches and rows needed.
How to Calculate Knitting Patterns
When it comes to knitting, calculating patterns is an essential skill that every knitter should possess. Whether you are creating your own design or following a published pattern, understanding how to calculate various aspects of the project is crucial for achieving the desired result.
One of the first calculations you will need to make is determining the number of stitches needed. This will depend on the gauge, or the number of stitches and rows per inch, specified in the pattern. By measuring your gauge swatch and comparing it to the pattern’s gauge, you can calculate the number of stitches needed to achieve the desired width.
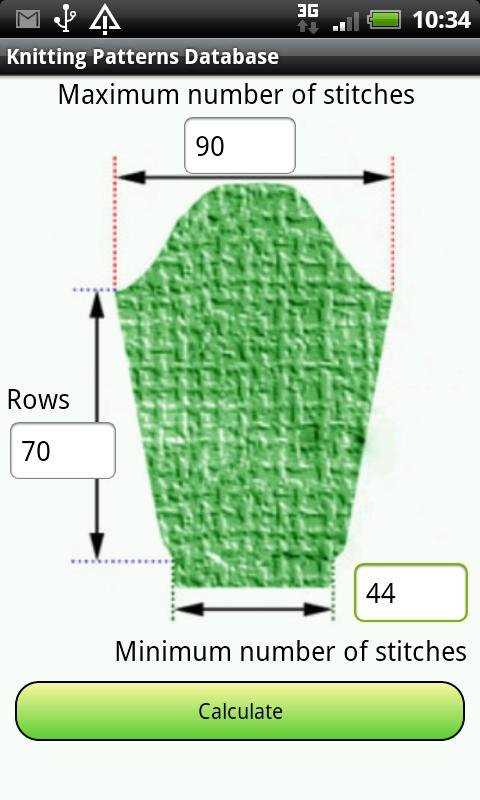
Calculating Shaping
Shaping is another important aspect of knitting patterns that requires calculations. Whether adding or decreasing stitches for sleeves, necklines, or other design elements, it is crucial to determine the correct placement and number of shaping rows. By dividing the total number of stitches by the desired decrease rate, you can calculate how many rows it will take to complete the shaping.
Another calculation that frequently comes into play is determining the amount of yarn needed for a project. This involves calculating the total yardage required based on the pattern’s recommended yarn weight and the desired size of the finished garment. By multiplying the yardage per skein listed on the yarn label by the number of skeins needed, you can calculate the total yardage required.
Checking and Adjusting
Once you have made all the necessary calculations, it is essential to double-check your figures before starting the project. This will help ensure that your calculations are accurate and will result in a well-fitted garment. If necessary, make adjustments to your calculations to accommodate any variations in gauge or desired fit.
- Carefully reading and understanding the pattern instructions
- Accurately calculating the number of stitches needed
- Determining the placement and number of shaping rows
- Calculating the amount of yarn needed
- Double-checking and adjusting calculations as necessary
By mastering the art of calculating knitting patterns, you will be able to confidently tackle any project and create beautifully crafted garments.
Understanding Knitting Gauge
Knitting gauge is a fundamental concept in knitting that determines the size and fit of a knitted project. It refers to the number of stitches and rows per inch in a knitted swatch or sample. By measuring the gauge, knitters can adjust their needle size and yarn weight to achieve the desired measurements and ensure that the finished project matches the pattern’s instructions.
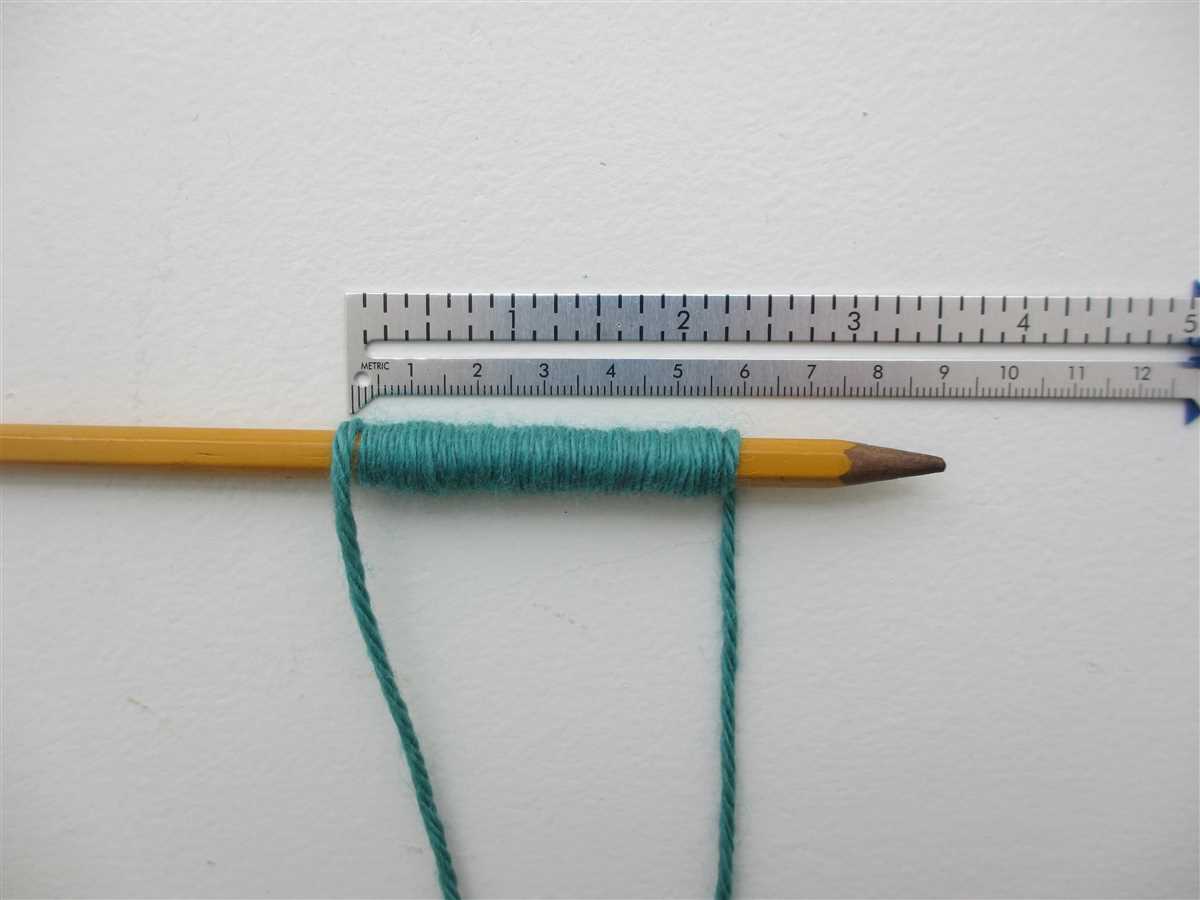
How to measure gauge?
Measuring gauge involves creating a small swatch of fabric using the specified yarn and needle size stated in the pattern. The swatch should be large enough to accurately measure the gauge but not too large that it becomes time-consuming.
Once the swatch is complete, it should be blocked or washed according to the yarn’s specifications. Blocking allows the stitches to relax and settle into their natural shape, providing a more accurate gauge measurement.
Why is gauge important?
The gauge is essential because it ensures that the final measurements of the knitted project align with the pattern’s instructions. If the gauge is too loose, the finished item will be larger than intended. On the other hand, if the gauge is too tight, the item will be smaller.
Additionally, gauge can vary between knitters due to differences in knitting tension and style. What might be a gauge of 4 stitches per inch for one knitter could be 5 stitches per inch for another. Therefore, it is crucial for each knitter to create their own swatch to determine their unique gauge.
How to adjust gauge?
If the gauge of the swatch does not match the pattern’s required gauge, adjustments can be made by changing the needle size or using a different yarn weight. A larger needle size will result in fewer stitches per inch, making the fabric looser, while a smaller needle size will increase the number of stitches per inch, creating a tighter fabric.
Alternatively, switching to a lighter yarn weight will generally decrease the number of stitches per inch, while using a thicker yarn will increase the stitch count.
It is important to note that changing the needle size or yarn weight will also impact the drape and texture of the fabric, so it is essential to consider these factors when making adjustments.
Measuring Instructions
When it comes to knitting patterns, accurate measurements are key to creating a garment that fits well. Taking proper measurements ensures that your finished project will have the desired fit and look. Here are some tips to help you measure correctly:
1. Use a flexible measuring tape: A flexible measuring tape is ideal for taking body measurements as it can easily wrap around curves and contours.
2. Wear thin clothing: When measuring yourself or someone else, make sure to wear thin, form-fitting clothing, or even just undergarments. Bulky clothing can add extra inches and lead to inaccurate measurements.
3. Stand up straight: Maintain good posture while taking measurements to ensure accurate results. Slouching or standing in an unnatural position can affect your measurements.
- Bust: Measure around the fullest part of your bust, usually across the nipple line.
- Waist: Measure around the narrowest part of your waist, usually just above the belly button.
- Hips: Measure around the fullest part of your hips, usually around the widest point of your buttocks.
- Arm length: Measure from the top of your shoulder down to your wrist bone. Bend your elbow slightly for a more accurate measurement.
- Back width: Measure across the back from the widest point of one shoulder to the widest point of the other shoulder.
- Body length: Measure from the base of your neck down to the desired length of the garment.
Once you have your measurements, refer to the knitting pattern’s size chart to determine the appropriate size to knit. Keep in mind that knitting tension and yarn weight can also affect the final size of your project.
By following these measuring instructions, you can ensure that your knitting patterns will result in well-fitting garments that you can be proud of!
Q&A:
How do I calculate the number of stitches in a knitting pattern?
To calculate the number of stitches in a knitting pattern, you need to consider the gauge specified in the pattern, the desired finished dimensions, and the stitch pattern being used. Divide the gauge by the desired finished dimensions in order to determine the number of stitches per inch. Then, multiply that number by the width of the desired finished project in order to get the total number of stitches needed.
How do I calculate the number of rows in a knitting pattern?
To calculate the number of rows in a knitting pattern, you need to consider the gauge specified in the pattern, the desired finished dimensions, and the row gauge of the stitch pattern being used. Divide the row gauge by the desired finished dimensions in order to determine the number of rows per inch. Then, multiply that number by the height of the desired finished project in order to get the total number of rows needed.
What is a stitch gauge in knitting?
A stitch gauge in knitting refers to the number of stitches that can fit into a specified measurement, usually one inch. It is often measured horizontally across the fabric. The stitch gauge is an important factor in calculating the number of stitches needed for a knitting pattern, as it helps to determine the width and size of the finished project.
What is a row gauge in knitting?
A row gauge in knitting refers to the number of rows that can fit into a specified measurement, usually one inch. It is often measured vertically along the fabric. The row gauge is an important factor in calculating the number of rows needed for a knitting pattern, as it helps to determine the height and size of the finished project.
Can I adjust the stitch and row gauge in a knitting pattern?
Yes, it is possible to adjust the stitch and row gauge in a knitting pattern. However, it is important to note that changing the gauge will affect the overall size and fit of the finished project. If you wish to adjust the gauge, you may need to make changes to the number of stitches and rows specified in the pattern in order to achieve the desired dimensions.
How can I calculate a knitting pattern?
To calculate a knitting pattern, you will need to determine your gauge and take measurements. First, knit a gauge swatch using the recommended yarn and needle size. Measure the number of stitches and rows per inch in your swatch. Then, measure the parts of your body that the garment will cover, such as the bust, waist, and hips. Use your gauge to determine the number of stitches needed to achieve the desired measurements, and follow the instructions provided in the pattern to shape and construct your garment.