
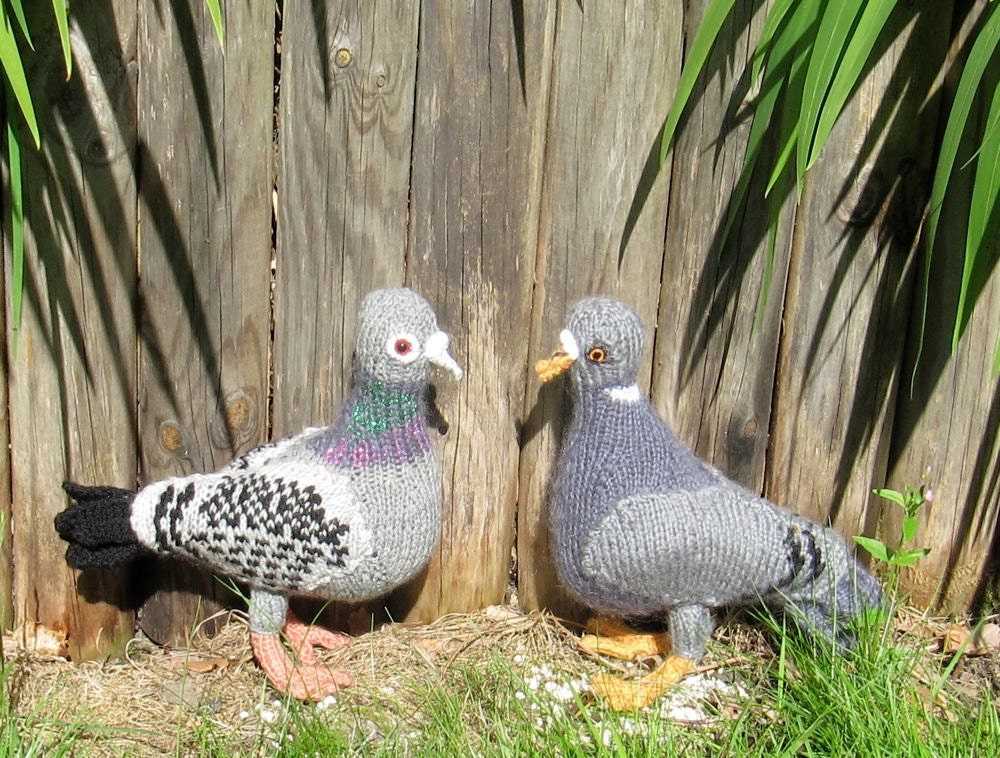
If you enjoy knitting and love birds, then this free pigeon knitting pattern is perfect for you! This adorable pattern allows you to create your very own knitted pigeon, complete with all the details that make these birds so charming. Whether you’re an experienced knitter or just starting out, this pattern is simple enough for knitters of all skill levels to follow along and create a delightful knitted pigeon.
The pattern provides step-by-step instructions, including a list of materials needed and detailed explanations of each knitting technique used. You’ll learn how to create the body, wings, beak, and legs, as well as how to add the finishing touches that bring the pigeon to life. The pattern also includes helpful tips and tricks to ensure your knitted pigeon turns out just right.
Once you’ve completed your knitted pigeon, you can use it as a cute decoration or a lovely gift for a bird lover in your life. It’s also a great project to work on with children, teaching them the art of knitting and sparking their creativity. So grab your knitting needles and start stitching, and soon you’ll have a charming knitted pigeon to add to your collection!
Free Pigeon Knitting Pattern
If you are a fan of knitting and looking for a unique and fun project, why not try out a free pigeon knitting pattern? Knitting toys and animals is a popular trend among crafters, and pigeons can be a cute and quirky addition to your collection. With this free pattern, you can create your own knitting pigeon complete with details like wings, beak, and feet.
The free pigeon knitting pattern is suitable for intermediate knitters who have experience working with double-pointed needles and are familiar with basic knitting techniques. The pattern provides detailed instructions and a list of materials needed, including yarn, knitting needles, and stuffing. It also offers guidance on gauge and sizing to help you create a pigeon that meets your desired specifications.
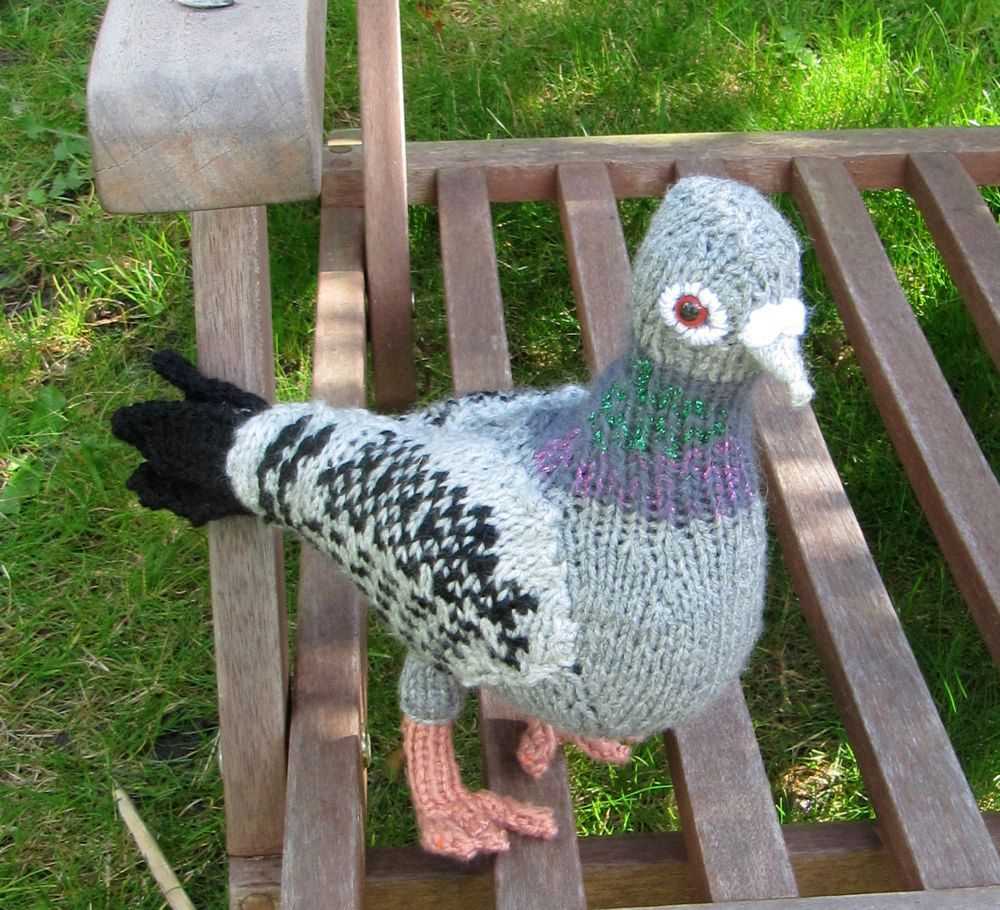
This pigeon knitting pattern allows you to customize your bird’s appearance by choosing different colors for the body, wings, and beak. You can experiment with different yarn textures and patterns to add unique touches to your pigeon. Whether you prefer a realistic or fantastical approach, this pattern offers flexibility for you to unleash your creativity and make a pigeon that reflects your personal style.
Instructions:
- Start by casting on the required number of stitches and working the pigeon’s body in the round.
- Follow the instructions for shaping the head, wings, and tail, and continue knitting until you reach the desired length.
- Once the basic body is complete, you can add details such as the beak, feet, and eyes using embroidery techniques.
- Finish off your pigeon by stuffing it firmly and securely sewing up any openings.
- Feel free to embellish your pigeon with additional features like feathers or accessories.
With this free pigeon knitting pattern, you can create a cute and charming knitted pigeon that will surely be a conversation starter and a delightful addition to your knitting collection. So gather your materials, pick up your knitting needles, and get started on this fun and rewarding project!
Materials Needed
In order to knit your own pigeon, you will need the following materials:
1. Yarn:
- One skein of grey yarn for the body
- Small amounts of black, white, and pink yarn for the details
2. Knitting Needles:
- A pair of size 4 (3.5mm) straight knitting needles
3. Stitch Markers:
- At least 4 stitch markers
4. Scissors:
- A pair of scissors for cutting the yarn
5. Stuffing:
- A small amount of stuffing for filling the pigeon
6. Yarn Needle:
- A yarn needle for sewing up the seams and attaching the details
7. Safety Eyes:
- A pair of safety eyes for the pigeon’s face (optional)
Gauge and Needle Size
When knitting the free pigeon pattern, it is important to achieve the correct gauge to ensure your finished project turns out the right size. The gauge refers to the number of stitches and rows that can be knit within a specific measurement. This measurement is usually given as a 4-inch (10 cm) square.
To check your gauge, you will need to use the recommended yarn and needle size stated in the pattern. If your gauge does not match the gauge stated in the pattern, you may need to adjust your needle size. If your stitches are too loose and your gauge is too big, try using a smaller needle size. Conversely, if your stitches are too tight and your gauge is too small, try using a larger needle size.
It is also helpful to knit a gauge swatch before starting your project. This involves casting on a small number of stitches, knitting in the specified stitch pattern, and measuring your gauge. This will give you an indication of how your stitches will look and how the finished item will turn out.
Remember, achieving the correct gauge is crucial in ensuring your finished pigeon knitted toy turns out the right size and proportions. Take the time to check your gauge and make any necessary adjustments before starting your project. This will help you avoid disappointment and ensure a successful knitting experience.
- Recommended needle size: 3.25mm (US size 3)
- Recommended yarn: DK weight
Pigeon Body
The pigeon body is an essential part of knitting a pigeon. It is the main structure that gives the pigeon its shape and form. When knitting a pigeon body, it is important to pay attention to the size and proportionality, as well as the texture and color of the yarn used.
For the pigeon body, you can start by casting on the required number of stitches using the chosen yarn and needle size. It is recommended to use a smooth yarn with a suitable gauge for the desired size of the pigeon. The body can be knitted in the round or flat, depending on your preferred knitting technique.
Materials:
- Yarn in chosen color(s)
- Knitting needles in appropriate size
- Yarn needle
- Stuffing material
- Scissors
Instructions:
- Begin by casting on the required number of stitches for the body.
- Continue knitting in the chosen stitch pattern until the body reaches the desired length.
- Once the body is the desired length, bind off all stitches.
- Using the yarn needle, weave in any loose ends.
- Stuff the body with the chosen stuffing material, ensuring it is evenly distributed.
- Using the yarn needle, sew the opening closed.
The pigeon body serves as a foundation for the rest of the pigeon’s features, such as the wings, head, and tail. It is important to stuff the body firmly but not excessively, to maintain the desired shape. Once the body is complete, you can move on to knitting the other parts of the pigeon to bring it to life.
Remember to customize your pigeon body by choosing different yarn colors, adding stripes, or incorporating other design elements. Have fun and get creative with your knitting!
Pigeon Wings
Pigeons are known for their unique flying abilities, especially their wings. Pigeon wings are designed for agility and speed, allowing these birds to maneuver through even the tightest spaces with ease.
The wings of a pigeon are made up of multiple feathers that are tightly packed together. These feathers form a smooth and streamlined surface, reducing air resistance and enabling pigeons to reach impressive speeds during flight.
Shape and Structure:
The shape of pigeon wings is reminiscent of an airplane wing, with a tapered end and a broad base. This shape helps in generating lift and stability, allowing pigeons to stay airborne for long periods of time.
Underneath the feathers, the wings are supported by a strong framework of bones. The primary flight feathers, located at the tip of the wings, are the longest and provide the most lift. The secondary flight feathers, found towards the middle of the wings, contribute to stability and control during flight.
Flight Capability:
Pigeon wings have an incredible range of motion, thanks to their flexible joints. This allows pigeons to perform precise maneuvers and navigate through even the most complex environments. Additionally, the muscles in their wings are well-developed, providing the power necessary for sustained flight.
Pigeons are also able to adjust the position and angle of their wings to fine-tune their flight, whether it’s gliding, soaring, or performing quick turns and dives.
Mating Rituals:
Pigeons also utilize their wings in elaborate courtship displays. Males will often spread their wings and puff out their feathers to demonstrate their fitness and attract a mate. They may also perform aerial acrobatics, such as spiraling dives or impressive displays of flight speed, to impress potential partners.
Overall, the wings of pigeons are a marvel of nature, allowing these birds to navigate the skies with grace and agility.
Pigeon Tail
The tail of a pigeon is an important feature that helps these birds with their flight and communication. It is composed of several feathers that are arranged in a fan-like shape and attached to the bird’s rump.
Function: The primary function of the pigeon’s tail is to assist in flight. The tail feathers provide stability and control by acting as a rudder, helping the bird maintain balance and change direction during flight. The feathers are flexible, allowing for adjustments in flight maneuvers.
Coloration: Pigeon tails can come in various colors and patterns, depending on the species. Some pigeons have solid-colored tails, while others have striped or speckled patterns. These colorations can help with species identification and mate selection.
Display: Pigeons also use their tails for communication and display purposes. During courtship rituals, male pigeons will puff up their chest and fan out their tails to attract females. This display showcases the bird’s health and vigor, making it an important aspect of mate selection.
Molting: Pigeons undergo molting, where old feathers are shed and replaced with new ones. This process also affects the tail feathers, and pigeons may appear with shorter or uneven tails during molting periods.
Protective Tool: Additionally, the tail feathers of pigeons can act as a protective tool. When threatened or attacked, pigeons can quickly raise and lower their tails, creating a distraction or potentially intimidating their predator.
Conclusion: The pigeon tail serves multiple functions, from flight control to communication and protection. Its design and coloration contribute to the beauty and uniqueness of these birds, making them fascinating creatures to observe and appreciate.
Pigeon Head
The pigeon head plays a crucial role in the overall appearance of the bird. It is characterized by its rounded shape, small beak, and beady eyes. The head is covered in feathers that can vary in color and pattern depending on the pigeon’s breed.
The beak of a pigeon is designed for picking up small seeds and grains, allowing them to feed easily in urban environments where food is often scattered on the ground. The beady eyes are located on either side of the head and provide excellent vision, allowing pigeons to spot predators and navigate their surroundings.
In addition to their functional aspects, the pigeon head also contributes to their overall beauty. Pigeons with unique feather patterns on their head, such as fantails or crests, are highly sought after among pigeon enthusiasts. These distinct features can be seen as a result of selective breeding and have become defining characteristics of certain pigeon breeds.
When knitting a pigeon, attention to detail in creating the head is essential to capturing the essence of these birds. From the rounded shape to the beak and eyes, every aspect of the head should be carefully crafted to create a realistic and charming pigeon. By following a free pigeon knitting pattern, you can easily create your own adorable pigeon head and bring a touch of nature to your knitted creations.
Pigeon Beak
A pigeon’s beak is a remarkable adaptation that enables these birds to perform a variety of functions essential to their survival. The beak of a pigeon is composed of two strong, curved mandibles that are perfectly designed for pecking, grasping, and manipulating objects. It is an integral part of their anatomy and an important tool for their everyday activities.
The primary function of a pigeon’s beak is feeding. Pigeons are omnivorous creatures, and their beak allows them to pick up and consume a wide range of food items, including seeds, grains, fruits, and small insects. The shape and size of their beak are well-suited for efficiently cracking open seeds and breaking down larger food items into manageable pieces.
Another important role of a pigeon’s beak is communication. Pigeons use their beaks to produce distinct vocalizations, such as cooing sounds, to attract mates or establish territory. They also use their beaks to touch and interact with other pigeons during courtship rituals and social interactions.
Additionally, a pigeon’s beak plays a role in grooming and maintaining its feathers. Pigeons use their beak to preen and clean their feathers, removing dirt, debris, and parasites. They can reach almost every part of their body with their beak, ensuring that their feathers remain in optimal condition.
In summary, a pigeon’s beak is a versatile and essential tool that enables these birds to feed, communicate, and groom themselves effectively. Its unique structure and functionality contribute to the pigeon’s ability to adapt and thrive in various environments.
Assembly
Once you have finished knitting all the pieces for your pigeon, it’s time to assemble them together to create your adorable bird. Follow these steps to put your pigeon together:
1. Attach the wings: Take the two wing pieces and sew them onto the sides of the body, near the top. Make sure they are symmetrical and secure them tightly.
2. Add the tail feathers: Take the tail feather pieces and sew them onto the back of the body. Arrange them in a fan shape and sew them firmly in place.
3. Sew the head: Take the head piece and sew it to the top of the body, near the front. Make sure the beak is facing forward and stitch around the edges to secure it.
4. Attach the legs: Take the two leg pieces and sew them onto the bottom of the body. Position them slightly apart and sew them securely to give your pigeon stability.
5. Embroider the eyes: Use black or dark-colored yarn to embroider the eyes onto the head. You can use small French knots or simple straight stitches to create the eyes.
6. Finish with beak details: Use a small piece of orange or yellow yarn to create a beak. Attach it to the front of the head, between the eyes, using small stitches.
Your pigeon is now complete! Take a step back and admire your handiwork. This cute and cuddly knitted pigeon will make a perfect addition to your collection or a lovely gift for a bird enthusiast.
Finishing Touches
Once you have completed knitting your pigeon, it’s time to add some finishing touches to make it come to life. These small details can really make a difference and give your knitted pigeon a unique and realistic look.
1. Embroider the eyes: Use black embroidery thread to sew two small stitches for the eyes. You can use a French knot stitch or a simple straight stitch, depending on the look you want to achieve. Be sure to evenly space the eyes on the face and make them symmetrical.
2. Add a beak: Cut a small triangular shape from orange felt or fabric and position it in the center of the pigeon’s face, just below the eyes. Secure it in place with a few stitches or fabric glue.
3. Attach wings: Knitted pigeon patterns usually include instructions on how to knit the wings. Once you have finished knitting them, sew them onto the sides of the pigeon’s body. Make sure they are positioned symmetrically and securely attached.
4. Stuff and shape: Before closing up the pigeon, stuff it with polyester fiberfill or other stuffing material. This will give your pigeon a nice plump shape. Pay attention to shaping the body and wings to create a natural-looking silhouette.
5. Add details: Use a contrasting color yarn to embroider any additional details you want, such as feathers or markings on the pigeon’s body. This will add texture and depth to your knitted creation.
6. Finish with a bow: For an extra touch, you can tie a small bow around the pigeon’s neck using a thin ribbon or yarn. This can add a playful or decorative element to your knitted pigeon.
By following these finishing touches, you can take your knitted pigeon from a simple project to a beautifully crafted piece of art. Don’t be afraid to get creative and add your own personal touch to make your pigeon unique.
Tips and Tricks
Knitting a pigeon can be a fun and rewarding project, but it can also be challenging, especially if you are new to knitting or working with intricate patterns. Here are some tips and tricks to help you along the way:
- Choose the right yarn: When knitting a pigeon, it’s important to choose a yarn that is soft and lightweight, as you want your pigeon to be cuddly and comfortable.
- Use stitch markers: Pigeon knitting patterns often involve intricate stitch patterns and shaping. To keep track of your stitches and ensure accuracy, use stitch markers to mark important points in your work.
- Read the pattern carefully: Before you begin knitting, make sure to thoroughly read the pattern and understand each step. This will help you avoid mistakes and ensure that your finished pigeon looks as intended.
- Count your stitches: Counting stitches at regular intervals will help you catch any mistakes early on and ensure that your work stays on track.
- Use lifelines: If you’re feeling unsure or want to protect your progress, consider using lifelines. A lifeline is a piece of contrasting color yarn that is threaded through your stitches at a particular row. If you make a mistake, you can easily rip back to the lifeline without losing your entire project.
- Take breaks: Knitting can be repetitive, so don’t be afraid to take breaks and give your hands and eyes a rest. This will also give you a chance to step back and admire your progress.
Remember, practice makes perfect! Don’t get discouraged if your first pigeon doesn’t turn out exactly as you hoped. Keep trying, experimenting with different techniques, and soon you’ll be creating beautiful and adorable pigeons with ease.