
Knitting is a wonderful hobby that allows you to create beautiful and unique pieces of clothing and accessories. If you’re looking for a new knitting challenge, the Fox Paws pattern is a great project to try. This intricate pattern creates a stunning geometric design that resembles the paws of a fox. In this tutorial, we will guide you through the steps of knitting the Fox Paws pattern, so you can create your own one-of-a-kind piece.
Before you begin knitting the Fox Paws pattern, it’s important to gather all the necessary materials. You will need a set of knitting needles, yarn in your desired color, stitch markers, and a tapestry needle. Choose a yarn that is suitable for the project, such as a fingering weight yarn that allows for fine detail and stitch definition.
The Fox Paws pattern consists of a series of increases and decreases, which create the intricate paw-like design. It is recommended that you have some experience with basic knitting techniques, such as knitting, purling, and yarn overs, before attempting this pattern. However, if you’re a confident beginner, this tutorial will walk you through each step and provide clear instructions to help you along the way.
Fox Paws Knitting Pattern Tutorial
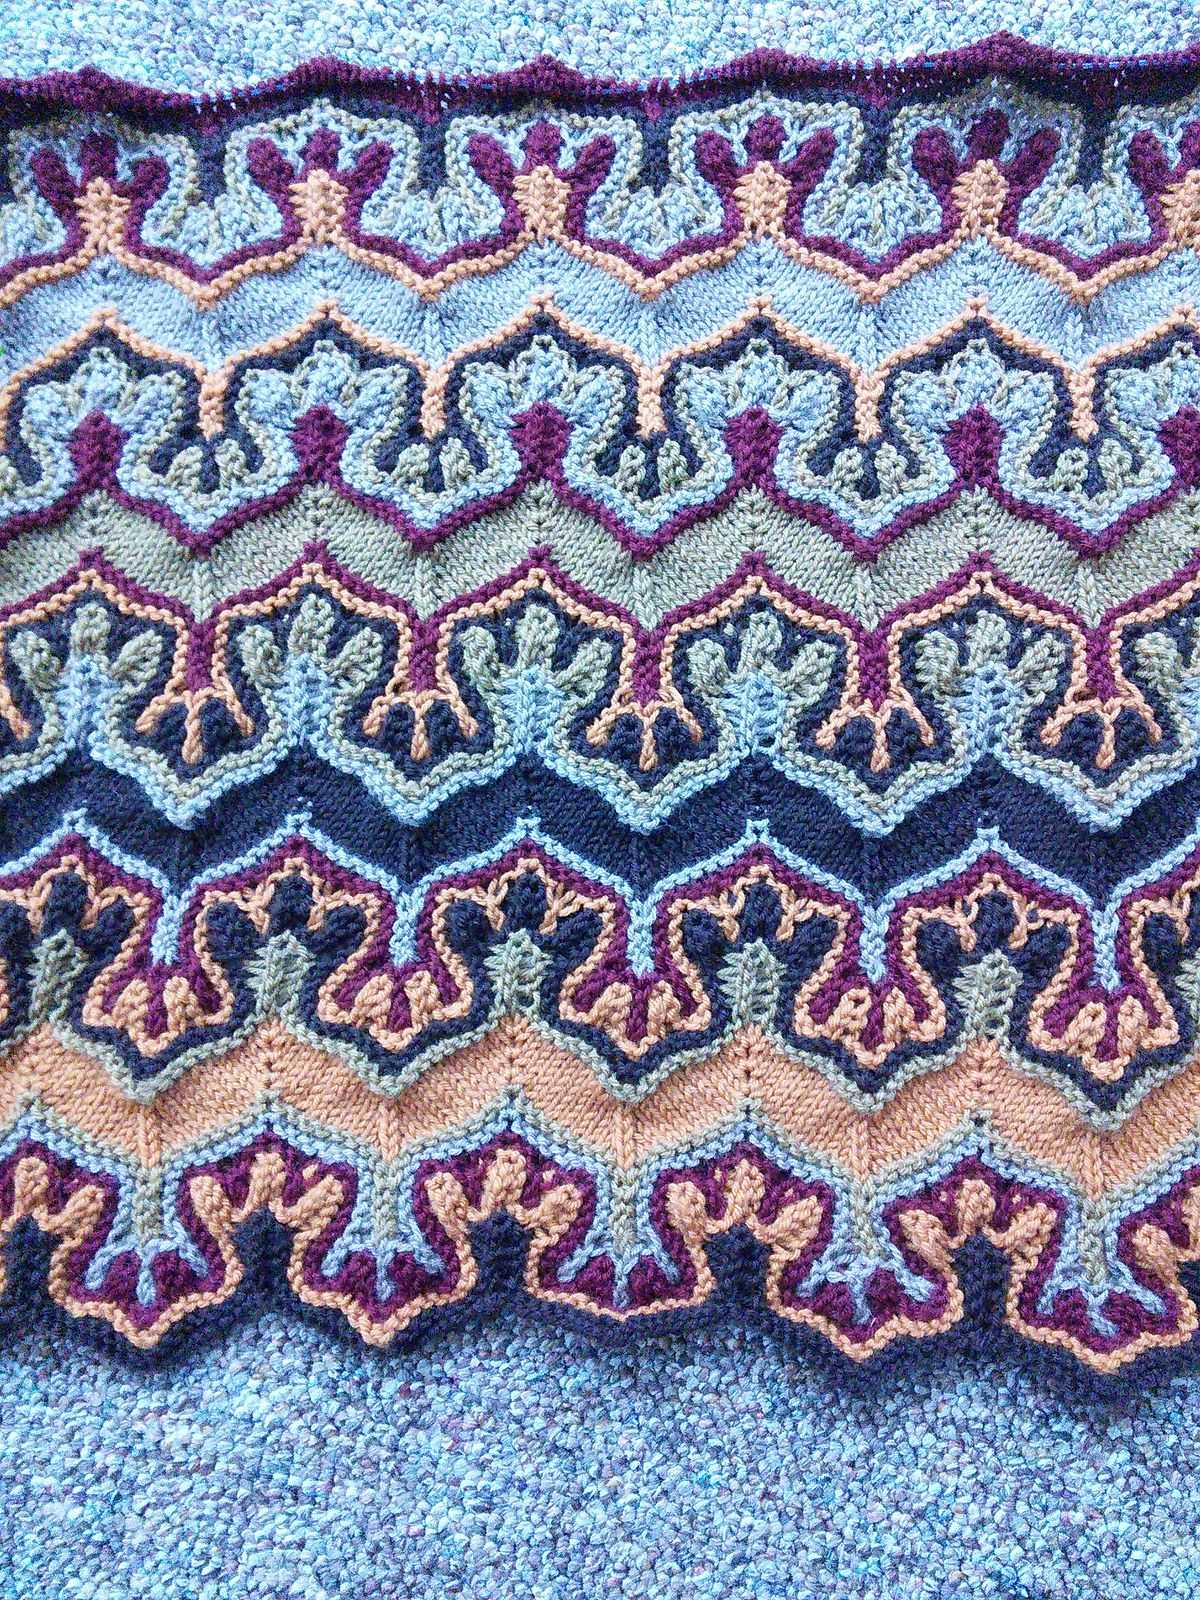
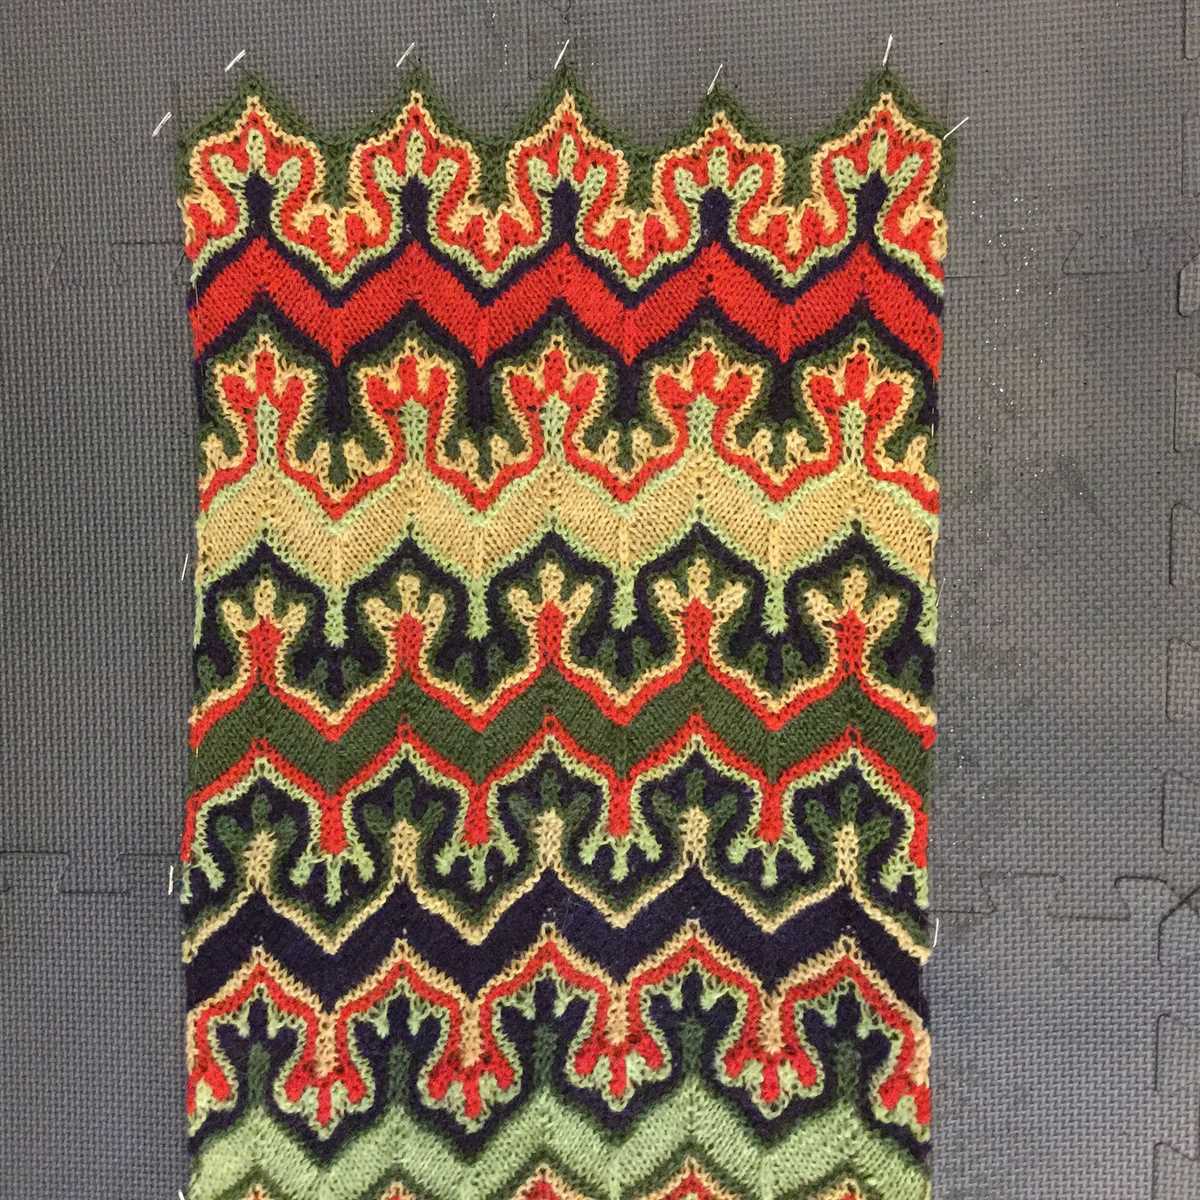
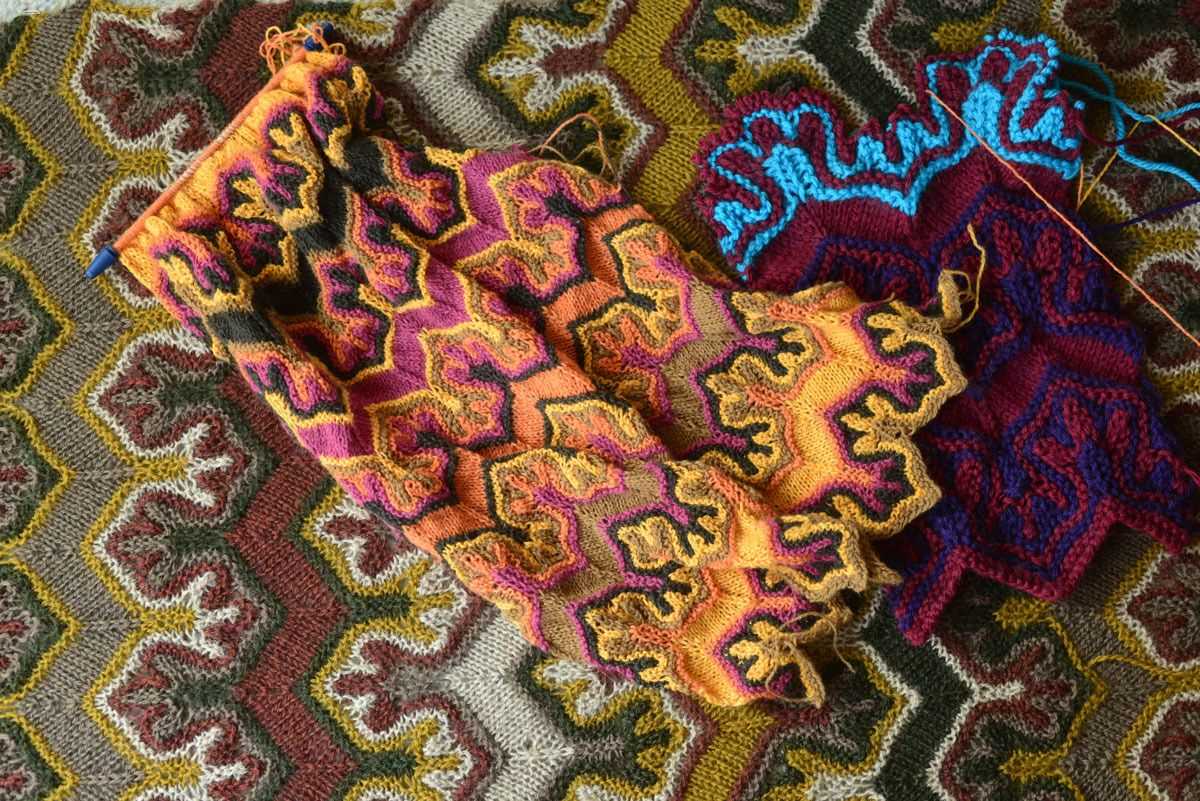
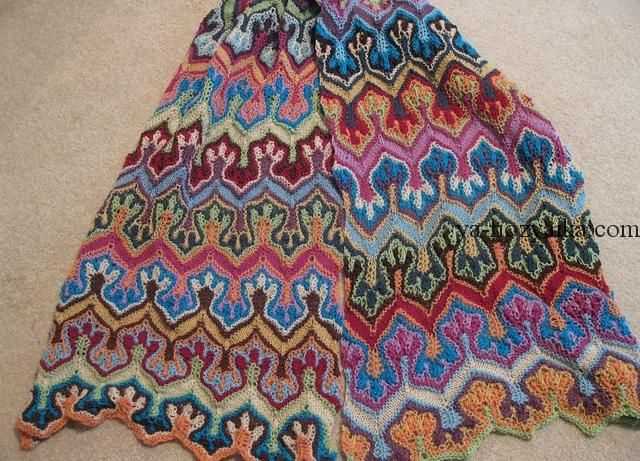
The Fox Paws knitting pattern is a popular choice for those looking to create a unique and eye-catching design. This intricate pattern features rows of v-shaped colorwork that resemble the paw prints of a fox, creating a visually stunning effect. If you’re an experienced knitter looking to challenge yourself with a complex pattern, the Fox Paws design may be just what you’re looking for.
To begin the Fox Paws pattern, you’ll need to gather your materials. You’ll need several colors of yarn, preferably a lightweight yarn that will allow the pattern to shine. You’ll also need a set of knitting needles in the appropriate size for your chosen yarn. Once you have your materials ready, you can begin casting on and getting started on the pattern.
Step 1: Cast On
Start by casting on the required number of stitches for the pattern. The number of stitches may vary depending on the size and width of the project you’re working on. Make sure to keep track of your stitches as accuracy is crucial for this pattern.
Step 2: Begin the Pattern
Once you have your stitches cast on, it’s time to start the Fox Paws pattern. The pattern consists of a series of rows and repeats, which create the distinctive paw print design. Each row will require different combinations of knit stitches, purl stitches, and color changes to create the unique pattern. Make sure to carefully follow the pattern instructions and pay close attention to any stitch markers or color change indicators.
Step 3: Repeat and Finishing

As you work through the pattern, you’ll need to repeat certain rows or sections to create the full Fox Paws design. This repetition will help build the paw print motif and give the pattern its distinctive look. Once you’ve completed the required number of repeats and rows, it’s time to finish off the pattern. You may need to bind off stitches or complete any additional finishing touches based on the pattern instructions.
The Fox Paws knitting pattern can be challenging, but with patience and practice, you’ll be able to create a stunning, intricate design. Take your time and enjoy the process of creating this unique pattern. Whether you’re making a scarf, blanket, or any other project, the Fox Paws design is sure to impress with its intricate detail and beautiful colorwork.
What is the Fox Paws Knitting Pattern?
The Fox Paws knitting pattern is a popular and intricate knitting design that creates a stunning geometric effect resembling fox paws. It is often used to make blankets, scarves, and other accessories.
This pattern typically involves using multiple colors and stitch combinations to create the illusion of interlocking triangles and diamonds. The result is a visually striking and textured piece of knitting that is sure to impress.
How to Knit the Fox Paws Pattern:
To knit the Fox Paws pattern, you will need to be comfortable with advanced knitting techniques such as increases, decreases, and slipped stitches. The pattern is usually worked in rows, with each row building upon the previous one to create the intricate design.
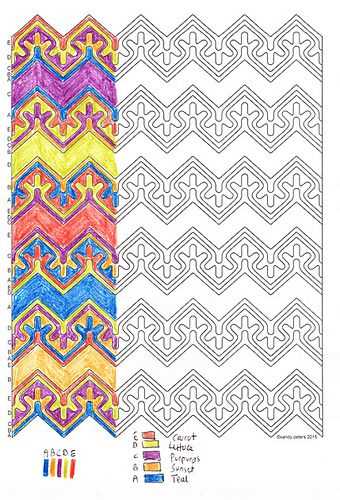
It is important to carefully follow the instructions and stitch charts provided in the pattern, as they will guide you on which stitches to make and when. The pattern will also specify the color changes and combinations to achieve the desired effect.
Tips for Knitting the Fox Paws Pattern:
- Use high contrast colors to make the geometric design of the Fox Paws pattern stand out.
- Take your time and pay attention to the pattern instructions to ensure accuracy.
- Count your stitches regularly to make sure you are on track and catching any mistakes early.
- Consider using stitch markers to help keep track of different sections of the pattern.
- Practice patience, as the Fox Paws pattern can be challenging but rewarding to complete.
Overall, the Fox Paws knitting pattern is a beautiful and intricate design that requires skill and attention to detail. It is a great project for experienced knitters looking for a challenge and the opportunity to create a stunning piece of knitted art.
Tools and Materials
Knitting Needles: For this pattern, you will need a set of circular knitting needles. The size will depend on your personal preference and the thickness of the yarn you are using. Typically, the recommended size is between US size 4-8 (3.5mm-5mm).
Yarn: Choose a yarn that is appropriate for the needle size you are using. A medium weight or worsted weight yarn is commonly used for this pattern. You will need multiple colors of yarn to create the fox paws design. The color choices are up to you, but it is recommended to use contrasting colors to make the design stand out.
Tapestry Needle: A tapestry needle will be used for weaving in the loose ends of yarn and for any necessary sewing or finishing touches.
Scissors: A pair of scissors will be necessary to cut the yarn.
Stitch Markers: Stitch markers can be helpful for keeping track of your stitches and marking any important points in the pattern.
Row Counter: A row counter can be useful for keeping track of your rows, especially if you are working with multiple colors or have many repeats in the pattern.
Blocking Tools (optional): Blocking tools such as blocking mats, pins, and a steam iron can be useful for shaping and finishing the project, but they are not necessary.
Getting Started with the Fox Paws Knitting Pattern
Before you begin knitting the Fox Paws pattern, you’ll need to gather your materials. You’ll need a set of knitting needles suitable for the yarn you’re using, as well as the yarn itself. Make sure to choose a yarn color that will highlight the intricate design of the pattern.
One of the key features of the Fox Paws pattern is the use of increases and decreases to create the fox-like motif. To make things easier, it’s important to be comfortable with basic knitting techniques such as knit stitches, purl stitches, and yarn overs. If you’re not familiar with these techniques, it may be helpful to practice them before starting the Fox Paws pattern.
When you’re ready to start the pattern, carefully read through the instructions and become familiar with the stitch chart. The stitch chart will provide a visual representation of the pattern and show you where to place your increases and decreases. Take your time to understand the chart before you begin knitting.
As you work on the pattern, it’s also important to keep track of your progress. Using stitch markers can help you keep track of where to place your increases and decreases, and may prevent mistakes. Additionally, using a row counter or marking your rows with a piece of paper can help you stay organized and ensure that you’re following the pattern correctly.
Remember, don’t be discouraged if it takes a few tries to get the hang of the Fox Paws pattern. Knitting is a skill that improves with practice, and as you become more familiar with the pattern, you’ll be able to create stunning projects that showcase your knitting skills.
Casting On
Before you can start knitting the Fox Paws pattern, you will need to cast on. Casting on is the process of creating the foundation row of stitches on your knitting needle. There are several different methods for casting on, but for this pattern we will be using the long-tail cast on method.
To begin, you will need to estimate how much yarn you will need for the long tail cast on. This can be done by measuring out a length of yarn that is approximately three times the width of your finished work. Once you have determined the appropriate length, make a slipknot at the end of the yarn and place it on your knitting needle.
Next, hold the knitting needle in your right hand and the tail end of the yarn in your left hand. Use your thumb and index finger to grasp the working end of the yarn. With your right hand, insert the knitting needle between the slipknot and the working end of the yarn, from left to right.
Keeping the needle in place, use your left hand to bring the tail end of the yarn over the top of the needle to the back, forming a loop. Then, insert the knitting needle into the loop from right to left, going under the strand of yarn that is coming from the slipknot. Your needle should now be in a position to create the first stitch.
Repeat this process, inserting the needle between the slipknot and the working end of the yarn, and then bringing the tail end of the yarn over the top of the needle and through the loop, until you have cast on the desired number of stitches. Make sure to keep the stitches snug on the needle, but not too tight.
Once you have cast on all the stitches for your project, you are ready to begin knitting the Fox Paws pattern. Happy knitting!
Knitting the First Rows
When starting the Fox Paws knitting pattern, it is important to get the first few rows right in order to set the foundation for the rest of the pattern. These initial rows will determine the overall shape and structure of the project, so it is crucial to pay attention to detail and follow the instructions carefully.
To begin, cast on the required number of stitches as specified in the pattern. This can usually be found in the instructions or the materials list. Make sure to use a suitable cast-on method that will provide a strong and flexible edge. The cast-on should be tight enough to hold the stitches in place, but not too tight that it becomes difficult to work with.
Once the stitches are cast on, it is time to start working the first row. The pattern may specify a specific stitch or technique to use for the first row, such as a knit stitch or a combination of knit and purl stitches. Again, it is important to carefully read the instructions and understand the techniques required.
As you knit the first row, pay close attention to the tension of your stitches. It is important to maintain an even tension throughout the row to ensure that the fabric lies flat and does not pucker or bunch up. If you find that your tension is too loose or too tight, you may need to adjust your needle size or knitting style to achieve the desired tension.
Continue to work the subsequent rows as instructed in the pattern, taking care to follow any stitch increases or decreases that may be required. This may involve knitting or purling multiple stitches together, or working yarn overs to create new stitches.
Overall, the first few rows of the Fox Paws knitting pattern are essential for establishing the foundation of the project. By casting on correctly and following the pattern instructions carefully, you will be on your way to creating a beautiful and intricate Fox Paws design.
Understanding the Stitch Patterns
When it comes to knitting the Fox Paws pattern, understanding the stitch patterns is essential. The pattern uses a combination of slipped stitches, increases, and decreases to create the intricate fox paw motif. By familiarizing yourself with these stitch patterns, you’ll be able to follow the pattern more easily and achieve the desired result.
The Fox Paws pattern consists of several stitch patterns that are repeated throughout the project. One of the main stitch patterns used is the slip stitch pattern. This stitch pattern involves slipping stitches onto a separate needle or stitch holder, which creates elongated stitches. These elongated stitches are then worked in later rows to create the distinctive fox paw shape.
The pattern also includes various increase and decrease stitches to create the dramatic angles and curves of the fox paws. These stitches are strategically placed to sculpt the shape of the motif and add depth and dimension to the overall design. Paying close attention to the stitch counts and placement of these increases and decreases is crucial to maintaining the integrity of the pattern.
To help you keep track of the stitch patterns and ensure accuracy, it can be helpful to use a stitch marker or highlighter tape to mark the sections of the pattern as you work through it. This will prevent any confusion or mistakes and allow you to focus on the intricate stitch work.
By understanding and practicing the stitch patterns used in the Fox Paws pattern, you’ll be able to confidently create this stunning design. Take the time to study and familiarize yourself with the individual stitches and their placement, and you’ll be on your way to knitting your very own pair of beautiful fox paws.
Garter Stitch
Garter stitch is one of the basic knitting stitches that is commonly used in many knitting patterns. It is created by knitting every row, resulting in a fabric that has a bumpy texture on both sides. This stitch is often favored by beginners as it is easy to learn and creates a sturdy and reversible fabric.
To create garter stitch, simply knit every stitch on every row. It is as simple as that! No purling or any other complicated stitches are required. This makes garter stitch a great stitch for beginners who are just starting to learn knitting.
Garter stitch can be used to create various projects such as scarves, blankets, and even garments. The textured fabric created by garter stitch adds interest and depth to any piece. Additionally, the reversible nature of garter stitch makes it perfect for projects where both sides of the fabric will be visible.
When using garter stitch, it is important to keep in mind that it tends to create a fabric that is more dense and less stretchy than other stitch patterns. Therefore, it is recommended to use larger needles or a looser tension when knitting garter stitch to achieve a soft and drapey fabric.
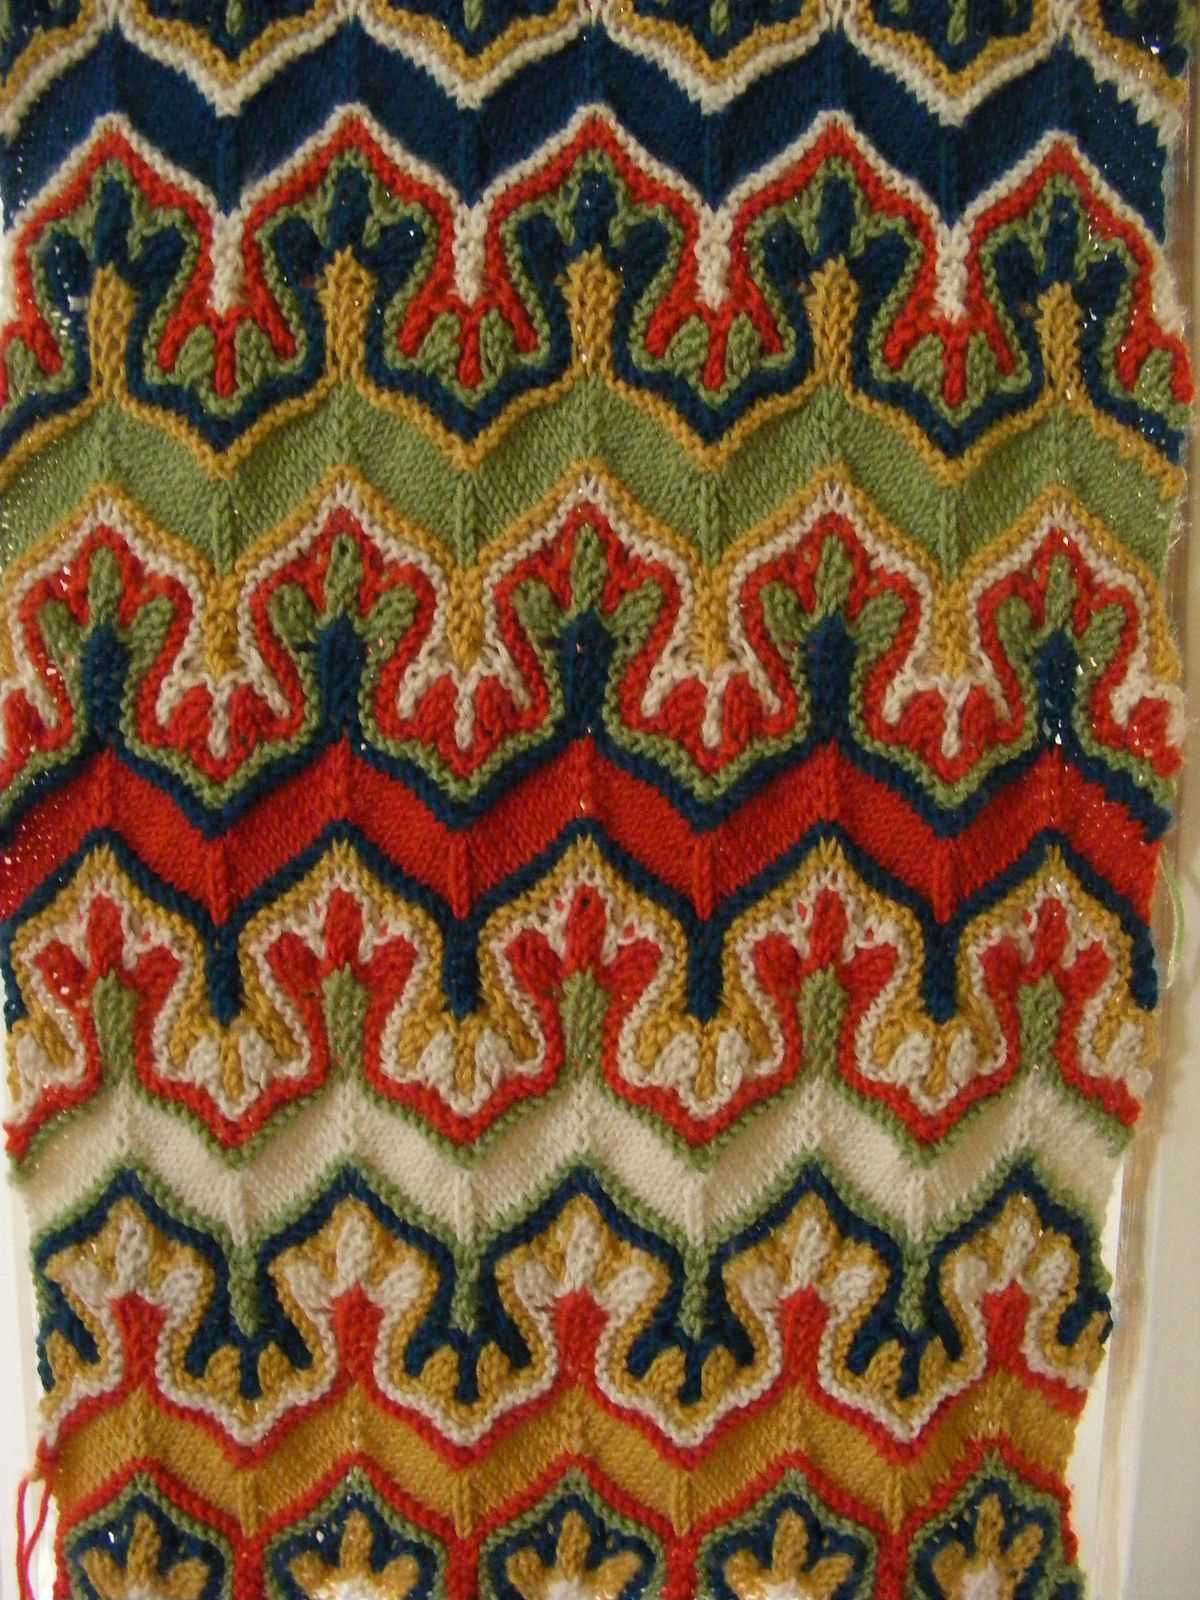
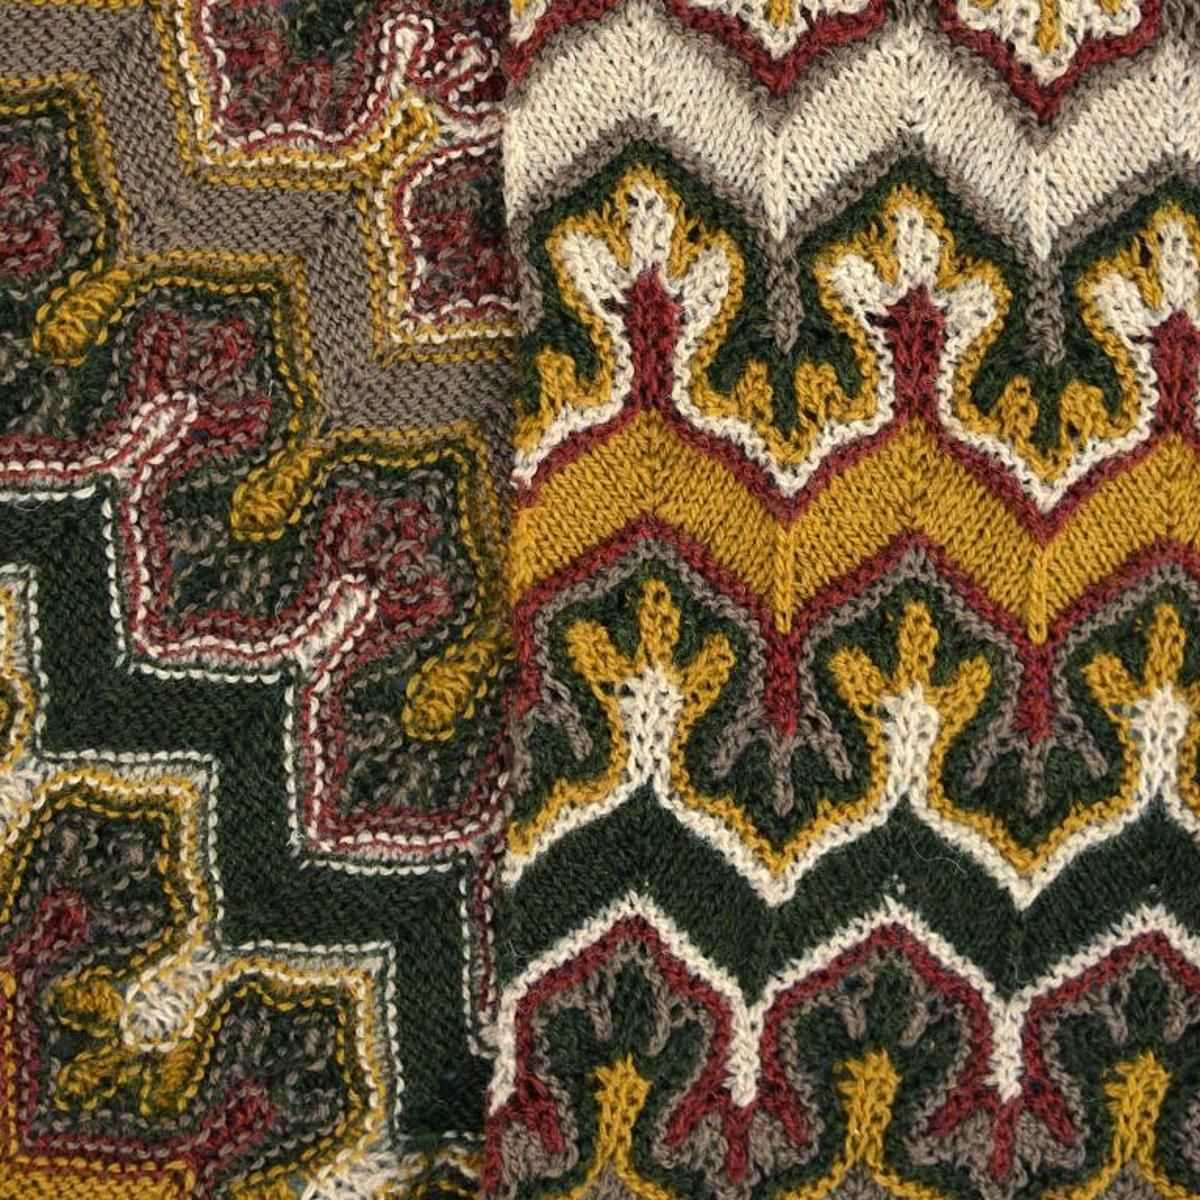
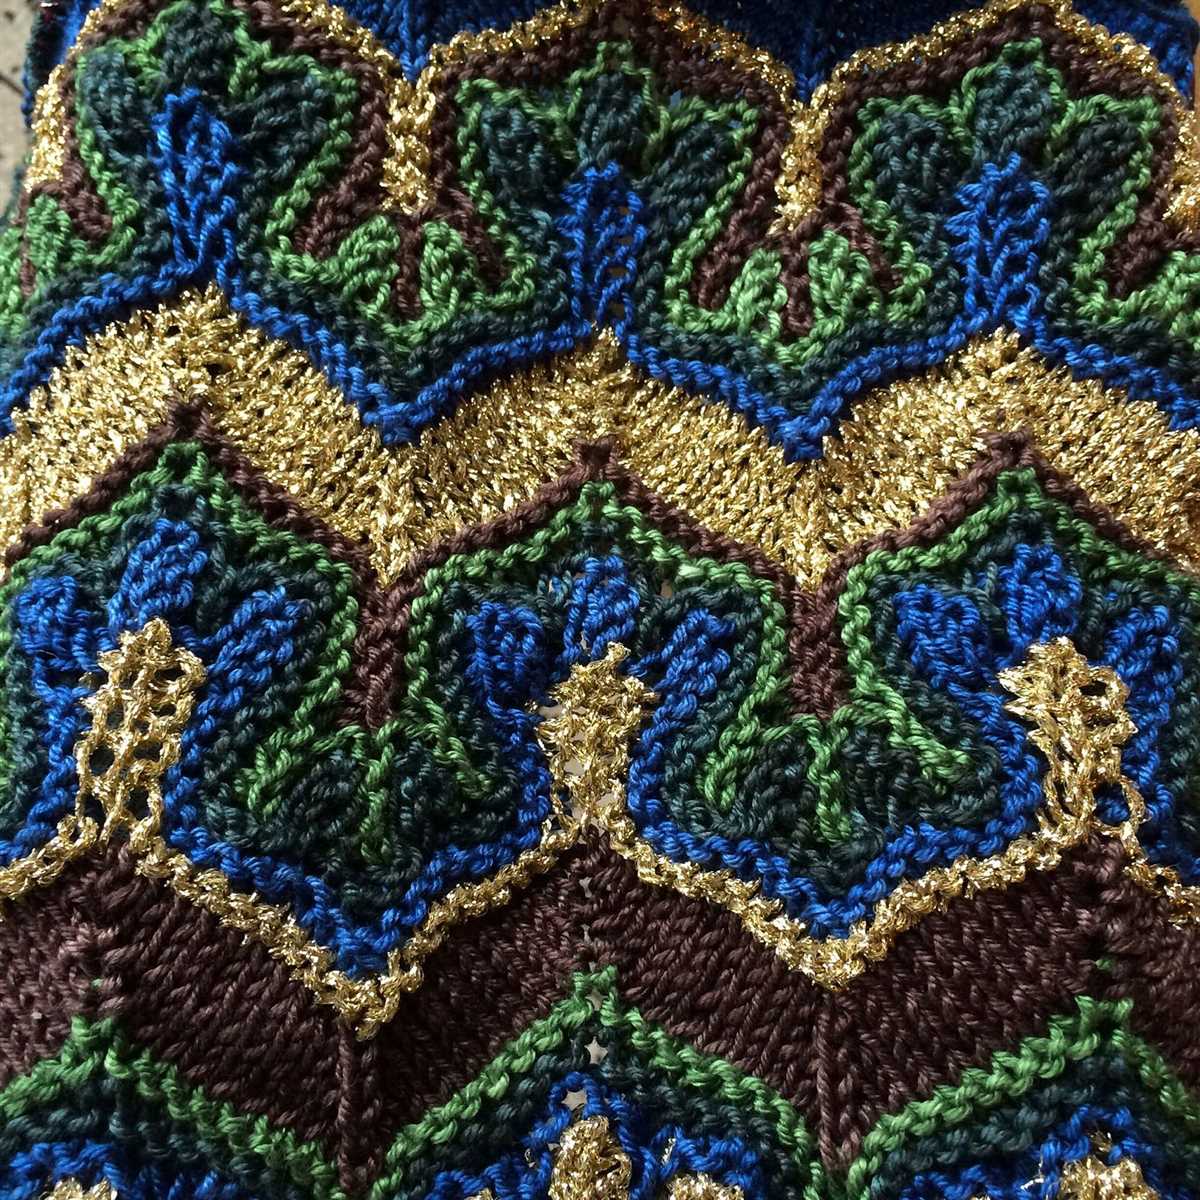
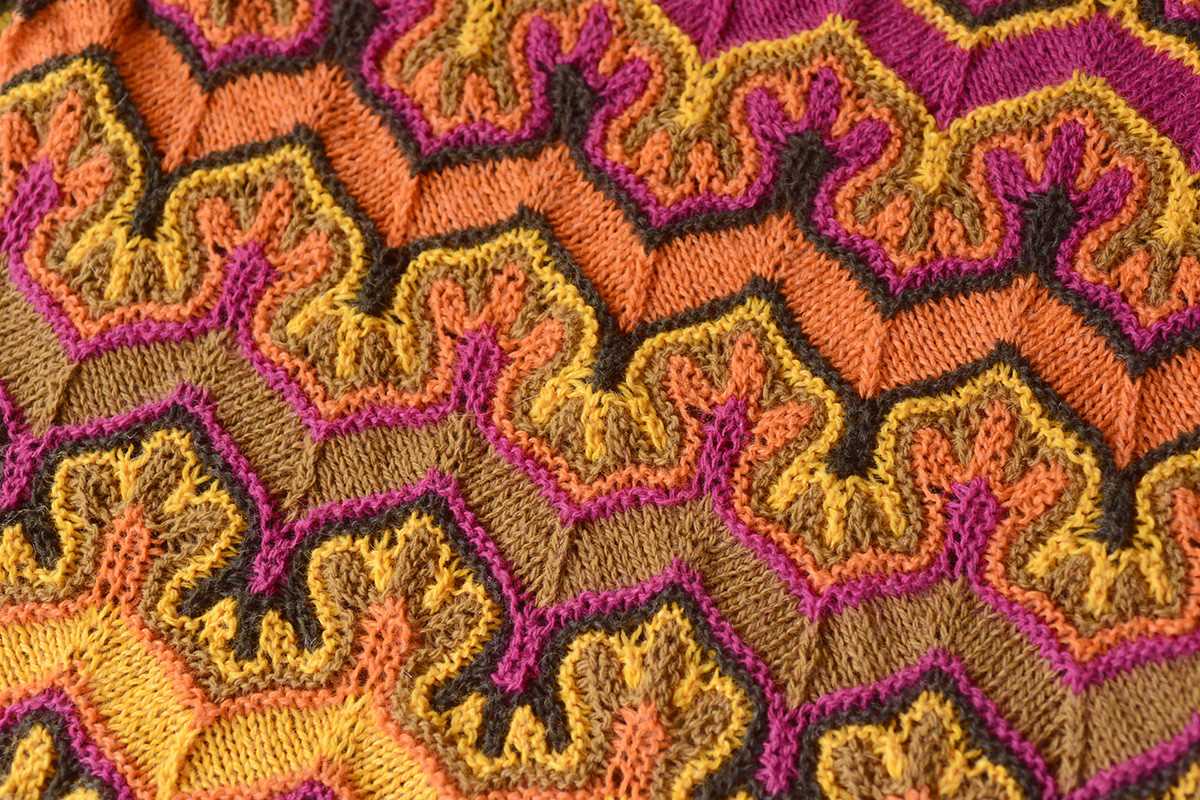
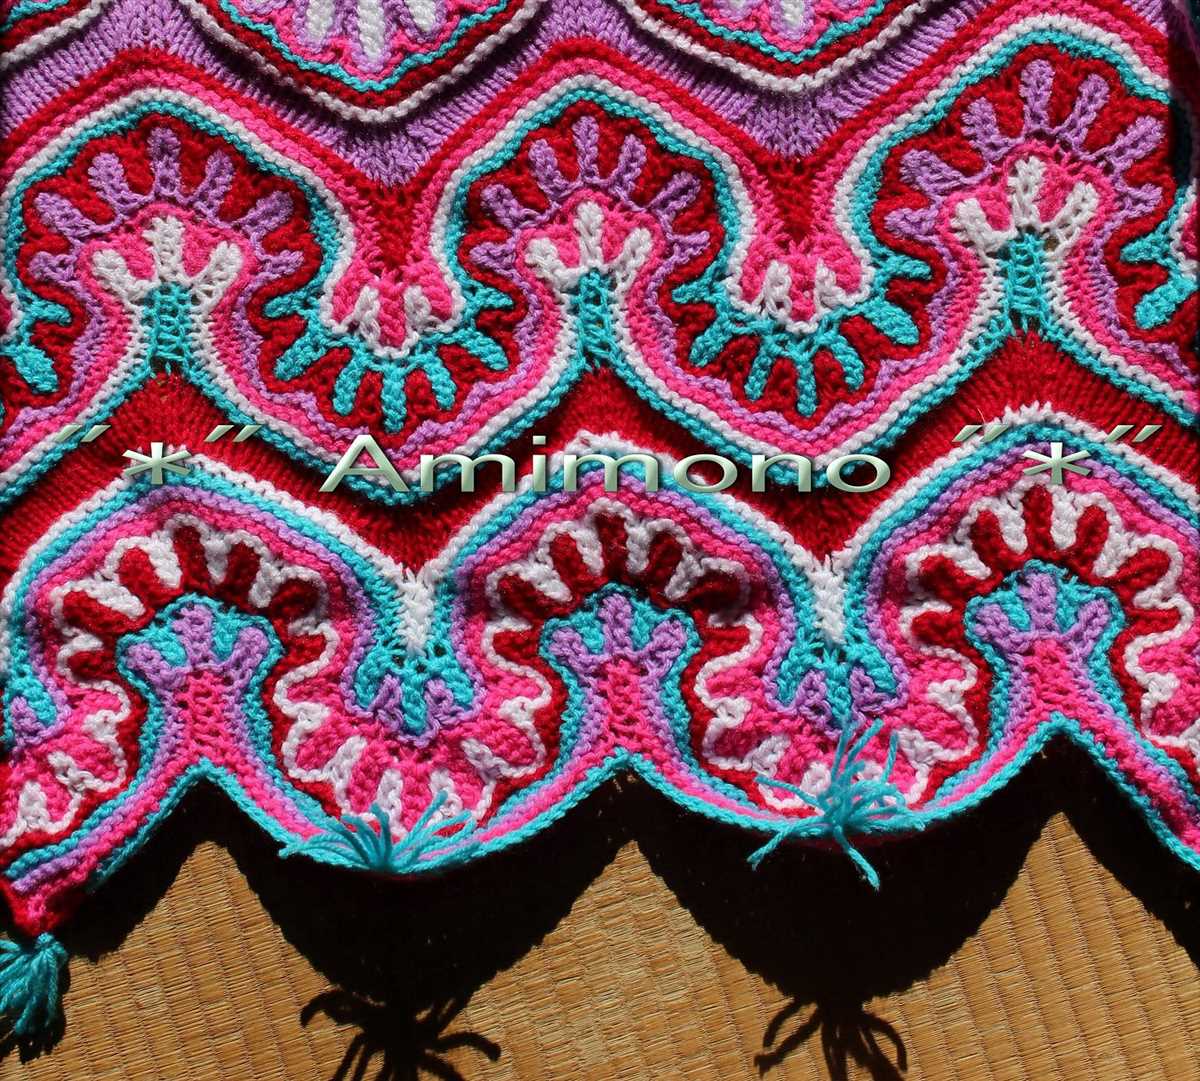
Fox Paws Stitch
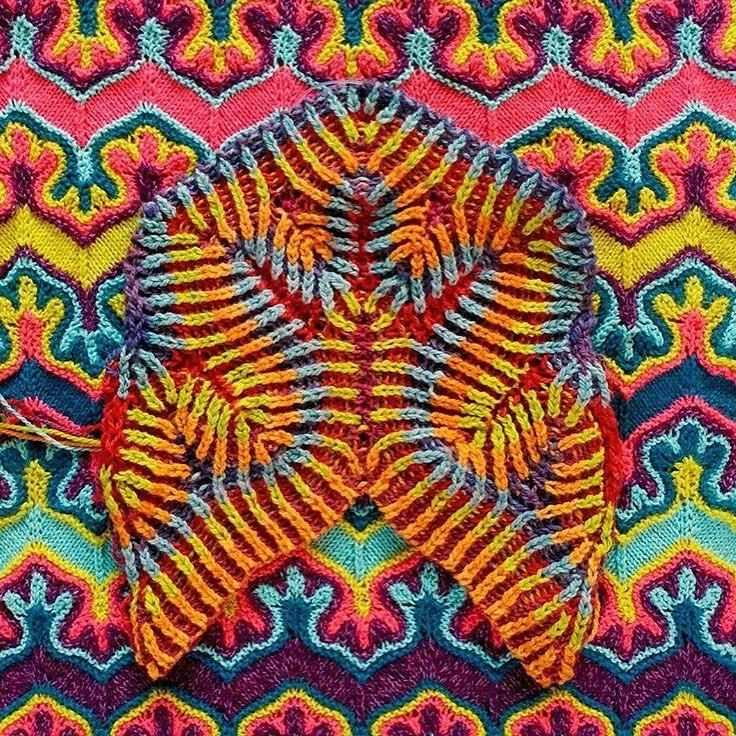
The Fox Paws stitch is a unique and intricate knitting pattern that creates a beautiful fox-inspired design. It is often used in projects such as blankets, scarves, and sweaters, adding a touch of whimsy and elegance. This stitch pattern combines various knitting techniques, such as slip stitches, yarn overs, and decreases, to create the illusion of fox paws running across the fabric.
To knit the Fox Paws stitch, you will need a basic understanding of knitting stitches, including knit and purl stitches, as well as some intermediate techniques, such as slipping stitches and working yarn overs. The pattern is created by repeating a specific set of rows, which alternate between the fox paw motif and plain stockinette stitch sections. The result is a textured fabric with raised fox paw shapes that appear to be interwoven with one another.
To get started with the Fox Paws stitch, you will need a set of knitting needles and your choice of yarn. It is recommended to use a smooth yarn in a solid or semi-solid color to showcase the intricate stitch pattern. The number of stitches and rows required will depend on the size of your project, so make sure to check the pattern instructions for specific details.
The Fox Paws stitch is a challenging but rewarding pattern to knit. It requires focus and attention to detail, but the end result is a stunning and unique piece of knitted fabric that is sure to impress. Whether you choose to knit a blanket, scarf, or sweater using this stitch, the Fox Paws design will add a touch of sophistication and charm to your knitting project.
Lace Stitch
In knitting, lace stitch is a technique that creates an intricate and delicate pattern. It is often used to add elegance and femininity to various projects, including shawls, scarves, and garments. Lace stitches are characterized by their openwork and intricate designs, which are created by incorporating yarn overs (YO) and decreases.
One popular lace stitch pattern is the Fox Paws stitch, which creates a beautiful geometric design resembling the pawprints of a fox. This stitch pattern uses a combination of yarn overs, knit stitches, and slip stitches to create the intricate pattern. The Fox Paws knitting pattern tutorial provides detailed instructions on how to create this stunning lace stitch.
Key Features of Lace Stitch
- Yarn overs: Lace stitches often incorporate yarn overs, where the yarn is wrapped around the needle to create an extra stitch. These yarn overs create the holes and open spaces characteristic of lace knitting.
- Decreases: Lace stitches also make use of various types of decreases, such as knit two together (K2tog) and slip, slip, knit (SSK), to create shaping and intricate patterns.
- Repeats: Lace stitch patterns are often composed of a series of repeated stitches and rows, creating a rhythm and flow to the design.
- Charts: Lace stitch patterns are often represented using charts, which provide a visual representation of the stitches and their placement. These charts make it easier to follow the pattern and keep track of the intricate stitch work.
When working with lace stitch patterns, it is important to pay attention to the yarn and needle size. Fine or laceweight yarns are often used to create the delicate and lightweight fabric associated with lace knitting. Additionally, using larger needles can create a looser fabric, allowing the lace stitches to open up and show their intricate details.
Overall, lace stitch patterns can add a touch of elegance and sophistication to any knitting project. Whether you’re a beginner or an experienced knitter, exploring different lace stitch patterns can open up a world of possibilities for creating beautiful and intricate designs.
Cable Stitch

The cable stitch is a classic knitting technique that adds texture and visual interest to any project. It involves crossing stitches over each other to create a twisted rope-like pattern. Cable stitches can be simple or complex, depending on the number of stitches and the order in which they are crossed.
One of the most common cable stitches is the 4-stitch cable, which involves crossing two stitches over two, either to the left or to the right. This is achieved by slipping two stitches onto a cable needle, holding it in front or in back of the work, knitting the next two stitches, and then knitting the stitches from the cable needle.
The cable stitch can be used to create various designs, such as braids, diamonds, and intricate patterns. It is often used in sweater designs, scarves, and hats to add a touch of elegance and sophistication. The cable stitch can be worked on any type of knitting needles and can be incorporated into any knitting project.
To master the cable stitch, it is important to understand the basics of knitting, such as how to knit, purl, and work basic decreases and increases. Once these skills are mastered, learning the cable stitch is relatively easy and can open up a whole new world of knitting possibilities.
Working the Fox Paws Motif
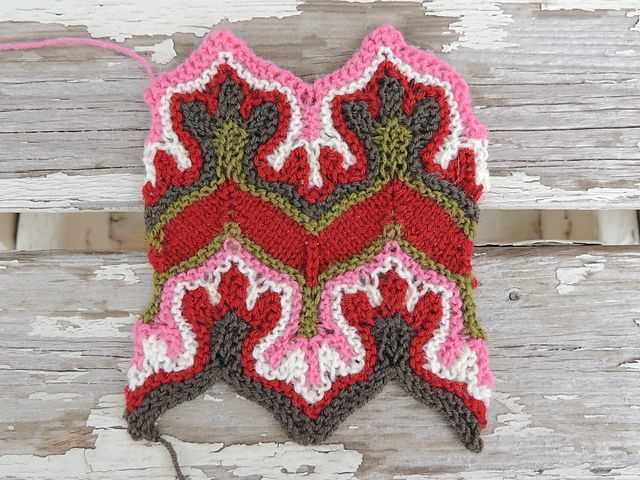
When knitting the Fox Paws pattern, it’s important to understand how the motif is created. The Fox Paws motif consists of a combination of slipped stitches, increases, and decreases to create the illusion of interlocking paws. Below, we’ll break down the steps to working this intricate motif.
1. Slip Stitches
Slipping stitches is a key element in creating the Fox Paws motif. This technique involves transferring the stitch from the left-hand needle to the right-hand needle without knitting or purling it. By slipping stitches, you create a visually interesting texture and allow for the interlocking effect.
2. Increases
In order to create the shape of the paws, you’ll need to incorporate increases in the pattern. This can be done through various methods such as yarn overs or make-one increases. The specific increase method will depend on the pattern you’re following, so be sure to carefully read the instructions to ensure you’re executing the increases correctly.
3. Decreases
Similar to increases, decreases are an important part of shaping the Fox Paws motif. Whether it’s knit two together (K2tog) or slip, slip, knit (ssk) decreases, these techniques help to create the curves and angles necessary for the paw design.
4. Pattern Repeats
The Fox Paws pattern is typically comprised of multiple repeats of the motif to create a larger fabric or project. It’s important to pay attention to the number of stitches and rows required for each repeat, as well as any additional instructions for transitioning between repeats. This will ensure that your motif is consistent throughout the entire piece.
By understanding and executing these techniques, you’ll be able to knit the Fox Paws motif with confidence. Remember to always read and follow the pattern instructions carefully to achieve the desired results.
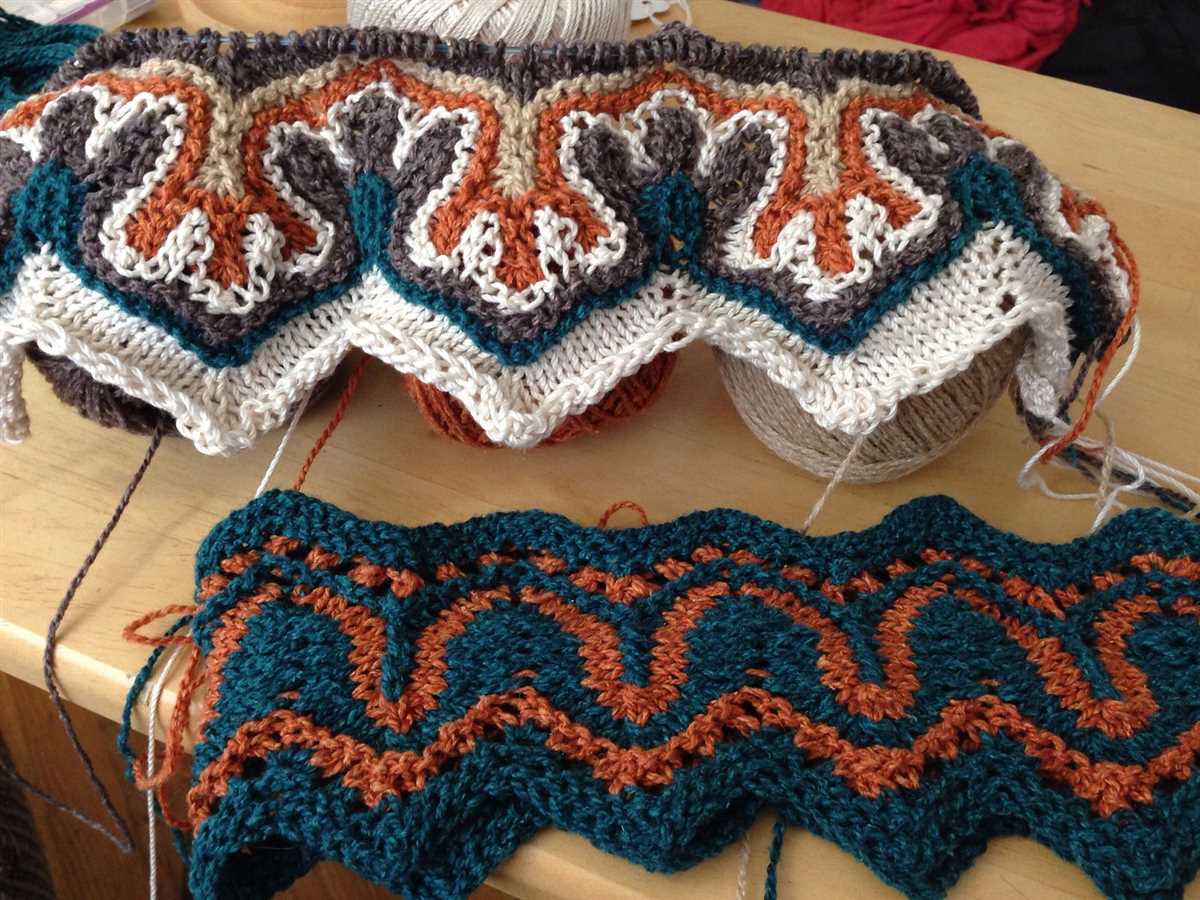
Adding Color to the Fox Paws Knitting Pattern
In addition to the intricate stitch pattern, the Fox Paws Knitting pattern also offers the opportunity to incorporate color into your project. By using multiple colors of yarn, you can create stunning visual effects and customize the pattern to your liking.
There are several ways you can add color to the Fox Paws Knitting pattern. Here are a few techniques you can try:
- Stripes: One of the simplest ways to add color is to introduce stripes into the pattern. You can alternate between different colors every few rows or create thicker stripes by knitting several rows with the same color before switching.
- Fades: Another popular option is to create a gradient or fade effect by using yarns in similar shades that transition gradually from light to dark or vice versa. This technique adds depth and dimension to the pattern.
- Color Blocks: If you prefer a bolder look, you can also incorporate color blocks by knitting specific sections of the pattern with one color and then switch to another color for the next section. This creates a bold contrast and can be a great way to highlight certain parts of the pattern.
When adding color to the Fox Paws Knitting pattern, it’s important to consider the color combinations and ensure they complement each other well. You can experiment with different yarns and swatch before committing to a specific color scheme.
Adding color to the Fox Paws Knitting pattern allows you to unleash your creativity and make each project unique. Whether you choose to add subtle accents or bold contrasts, the possibilities are endless. Have fun exploring different color options and making the pattern truly your own!
Q&A:
What is a Fox paws knitting pattern?
Fox paws knitting pattern is a complex and unique knitting pattern that creates a textured design resembling fox paws. It involves a combination of twisted stitches, cabling, and slipped stitches to create the intricate design.
Is the Fox paws knitting pattern suitable for beginners?
The Fox paws knitting pattern is not recommended for beginners. It is a more advanced knitting pattern that requires some experience with various knitting techniques such as cabling and working with twisted stitches. It is best suited for intermediate to advanced knitters.
Where can I find a tutorial for the Fox paws knitting pattern?
There are several tutorials available online for the Fox paws knitting pattern. You can search for video tutorials on knitting websites or platforms like YouTube. Additionally, there are also written patterns with detailed instructions that can be found on knitting blogs or in knitting pattern books.
What materials do I need to knit the Fox paws pattern?
To knit the Fox paws pattern, you will need yarn in your chosen colors and the appropriate needle size for your yarn. The specific materials and quantities will depend on the size of the project you wish to knit. It is recommended to use a smooth-textured yarn to better highlight the texture of the pattern.