
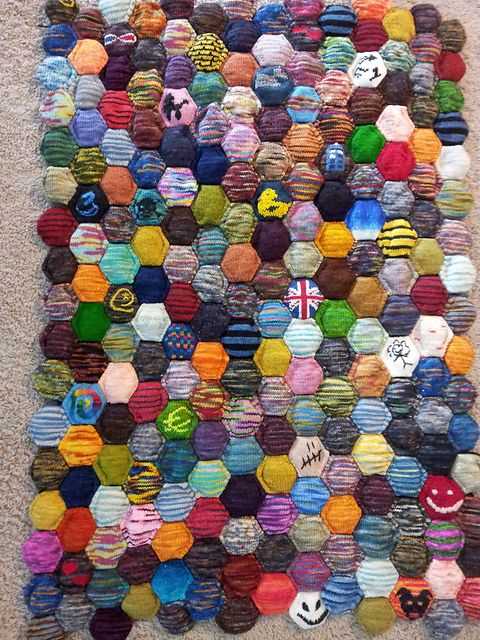
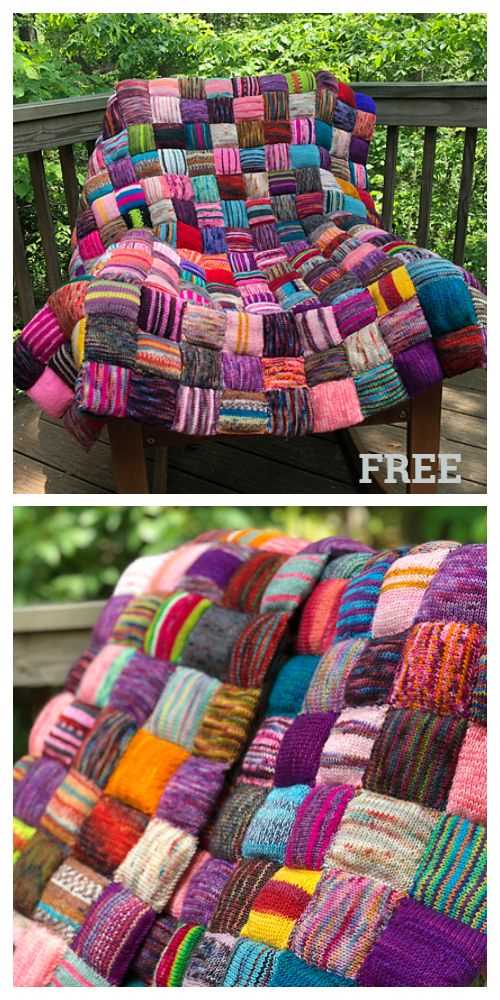
The Beekeeper’s Quilt is a popular knitting pattern that has gained a lot of attention in the knitting community. It is a unique and versatile project that allows knitters to create small, stuffed hexagon-shaped puffs that can be sewn together to create a beautiful and cozy quilt. The pattern was designed by Stephanie Dosen and it has become a favorite among both experienced and beginner knitters.
The Beekeeper’s Quilt pattern is known for its simplicity and creativity. It is a great way to use up leftover yarn from other projects, as each hexagon puff requires only a small amount of yarn. The pattern also allows for endless customization, as knitters can choose their own color combinations and embellishments. With its honeycomb-like shape, the completed quilt has a beautiful and intricate look that is sure to impress.
Knitting the Beekeeper’s Quilt can be a relaxing and enjoyable process. The repetitive nature of knitting the hexagon puffs is meditative and calming, making it a perfect project for those looking to unwind. Additionally, the small size of each puff means that they can be easily taken on the go, making it an ideal project for travel or knitting on-the-go. Whether you’re a seasoned knitter or just starting out, the Beekeeper’s Quilt is a pattern that you’re sure to love.
Beekeeper’s Quilt Knit Pattern: Your Ultimate Guide
Are you ready to embark on a knitting adventure? Look no further than the Beekeeper’s Quilt knit pattern. This unique and captivating pattern has taken the knitting community by storm, and for good reason. With its intricate hexagon shapes and endless customizable possibilities, the Beekeeper’s Quilt is a project that will keep you engaged and inspired from start to finish.
The beauty of the Beekeeper’s Quilt lies in its simplicity. Each hexagon is worked individually, allowing you to practice your knitting skills and experiment with different colors and patterns. Whether you prefer vibrant hues or muted tones, there is no limit to the creative combinations you can create with this pattern. And once you have completed a handful of hexagons, you can sew them together to create a cozy and beautiful quilt that can be treasured for years to come.
Getting Started:
To begin your Beekeeper’s Quilt journey, you will need basic knitting skills, including how to cast on, knit, and purl. The pattern is suitable for knitters of all experience levels, so don’t be afraid to give it a try, even if you’re a beginner. You will also need a set of double-pointed needles or circular needles, depending on your preference.
Next, choose your yarn. The Beekeeper’s Quilt is a great opportunity to use up your leftover sock yarn or experiment with different types of yarn. The choice is yours! Just make sure to select a yarn that is suitable for the needle size you will be using, and consider using a slightly smaller needle than recommended to achieve a tighter gauge.
Knitting the Hexagons:
Once you have your materials ready, it’s time to cast on and start knitting the hexagons. The pattern provides detailed instructions for each hexagon, including stitch counts and pattern variations. You can follow the pattern exactly or get creative and modify it to suit your preferences. Think of each hexagon as a mini project within the larger quilt, and enjoy the process of knitting each one.
As you progress, you can keep your completed hexagons organized by using stitch markers or separating them into different bags. This will make assembling the quilt much easier when the time comes.
Assembling the Quilt:
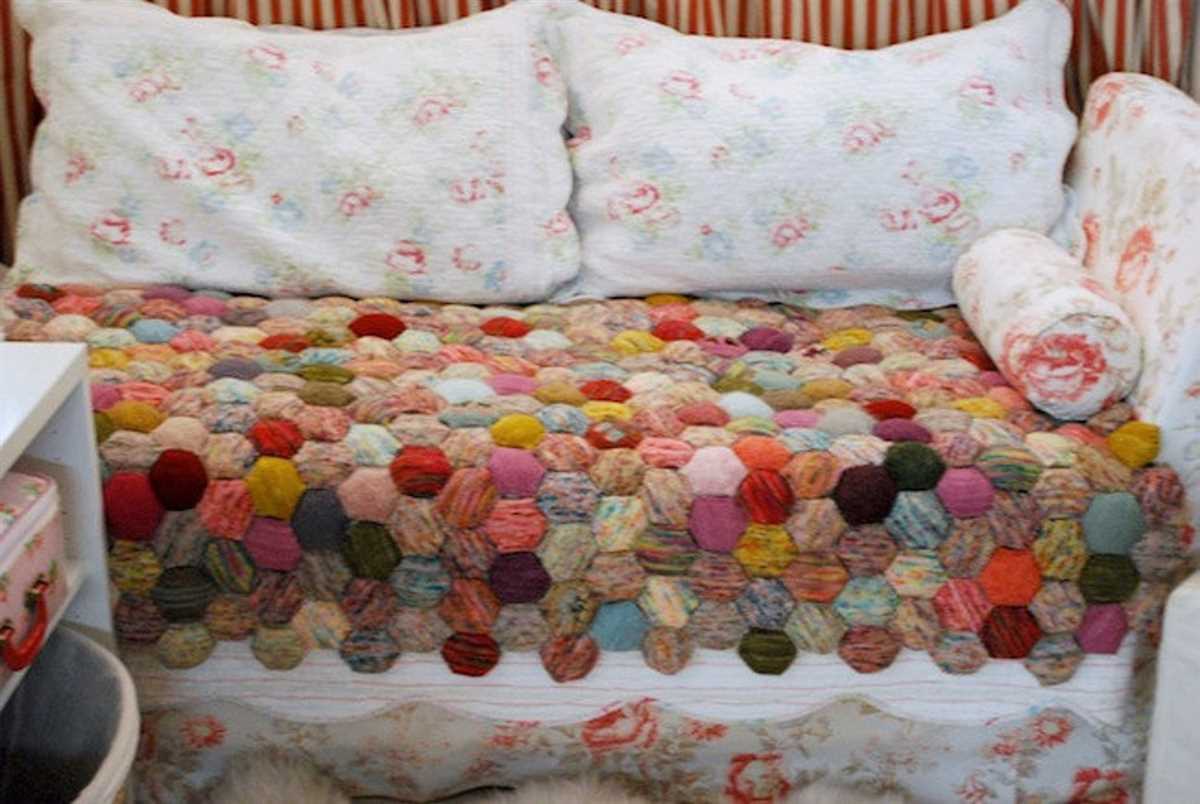
Once you have completed enough hexagons to your liking, it’s time to assemble them into a quilt. Lay out your hexagons in a pattern that you find visually pleasing, and then use a whipstitch or mattress stitch to sew them together. Take your time with this step, as the assembly process can be a bit time-consuming. But trust us, the final result will be well worth the effort.
Now that you have your Beekeeper’s Quilt complete, it’s time to snuggle up and enjoy the fruits of your labor. Whether you use it as a cozy lap blanket or a decorative piece for your home, this unique and beautiful quilt is sure to be a cherished keepsake that brings you joy for years to come.
What is the Beekeeper’s Quilt Knit Pattern?
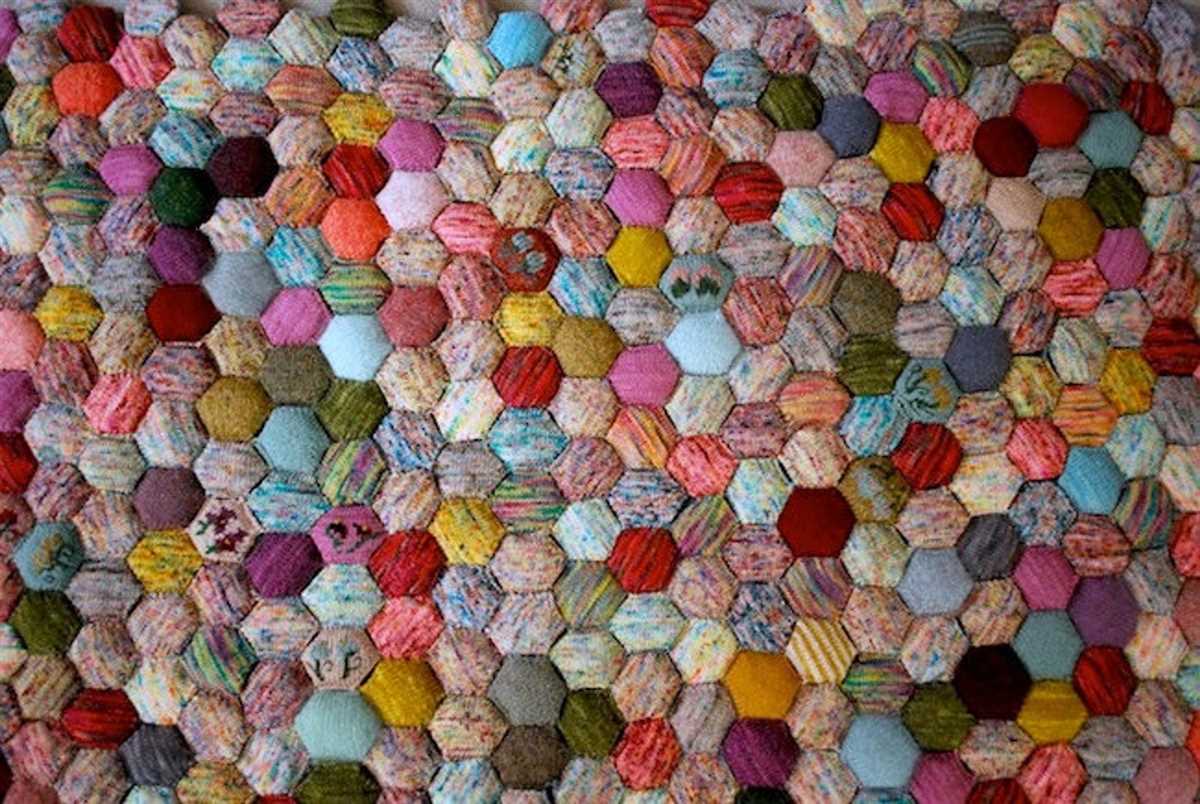
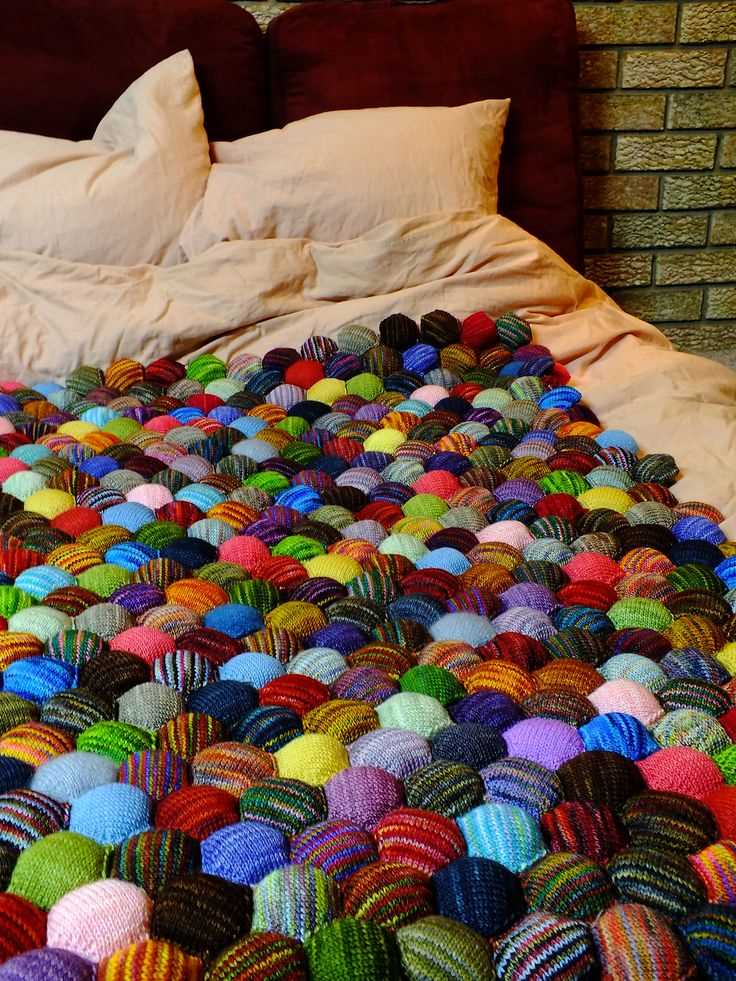
The Beekeeper’s Quilt Knit Pattern is a unique and popular knitting project that creates small, hexagonal puffs or “honeycomb” shapes. These individual puffs are then stitched together to form a beautiful and cozy quilt. The pattern was created by Stephanie Dosen and gained popularity through her blog, Tiny Owl Knits.
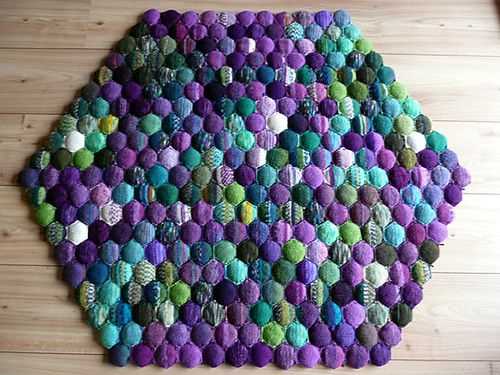
The pattern is known for its versatility and creativity, allowing knitters to customize their quilts by using different colors, yarns, and stitch patterns. Each hexagonal puff is knit separately, making it a great portable project that can be worked on in small sections. The finished quilt can be made in any size, from a small lap blanket to a large bedspread, depending on the number of puffs knitted.
To create the honeycomb puffs, knitters typically use a technique called “munching” or “short-row knitting.” This involves working partial rows to create wedges or triangles, which are then joined together to form the hexagonal shape. The pattern provides detailed instructions on this technique, making it accessible for knitters of all skill levels.
The Beekeeper’s Quilt Knit Pattern has gained a strong following among knitting enthusiasts, who enjoy the meditative and portable nature of the project. The quilts can be personalized with different color combinations, allowing knitters to create unique and individual pieces. The honeycomb puffs are not only visually pleasing but also provide warmth and comfort, making the Beekeeper’s Quilt a perfect addition to any home or as a cherished gift.
Materials Needed for the Beekeeper’s Quilt Knit Pattern
To create the Beekeeper’s Quilt knit pattern, you will need the following materials:
- Yarn: This pattern requires small amounts of yarn in various colors and textures. You can use leftover yarn from previous projects or purchase mini skeins specifically for this quilt.
- Knitting Needles: You will need a set of double-pointed needles in a size appropriate for the yarn you are using. The pattern recommends using a size that allows you to achieve a tight gauge.
- Tapestry Needle: This needle will be used for weaving in ends and sewing the quilted pieces together.
- Stuffing Material: You will need some type of stuffing, such as polyester fiberfill or wool, to fill the quilted pieces and give them shape and volume.
- Scissors: You will need a pair of scissors for cutting yarn and trimming excess fabric.
- Optional Accessories: While not necessary, some knitters like to use stitch markers and a row counter to help keep track of their progress.
It’s important to note that the Beekeeper’s Quilt knit pattern is a great way to use up leftover yarn since each quilted piece only requires a small amount. However, if you don’t have enough yarn in your stash, you can purchase mini skeins or use this project as an opportunity to explore new yarns and colors. Whether you choose to stick to a specific color palette or go wild with a mix of vibrant hues, the materials for this pattern can easily be customized to reflect your personal style and creativity.
Getting Started: Basic Knitting Techniques
Before diving into the Beekeeper’s quilt knit pattern, it’s important to familiarize yourself with some basic knitting techniques. These techniques will serve as the foundation for creating the quilt squares and help you achieve the desired texture and structure of the quilt.
Casting on: The first step in any knitting project is to cast on, which is the process of creating the first row (stitches) on your knitting needle. There are different methods of casting on, such as the long-tail cast on or the knitted cast on. Choose the method that you find most comfortable and allows for an even tension.
Knit stitch: The knit stitch, also known as the plain stitch, is the most basic stitch in knitting. It involves inserting the right-hand needle into the first stitch on the left-hand needle, wrapping the yarn around the right-hand needle, and pulling the yarn through the stitch to create a new stitch. The knit stitch creates a smooth, V-shaped pattern on the fabric.
Purl stitch: The purl stitch is the reverse of the knit stitch and creates a textured pattern on the fabric. It involves bringing the yarn to the front of the work, inserting the right-hand needle from right to left into the first stitch on the left-hand needle, wrapping the yarn around the right-hand needle, and pulling the yarn through the stitch to create a new stitch.
Increasing and decreasing: To shape your knitting project, you will often need to increase or decrease the number of stitches. There are different methods of increasing and decreasing, such as the knit front and back (kfb) increase or the knit two together (k2tog) decrease. These techniques create additional stitches or reduce the number of stitches without leaving a visible seam.
Binding off: When you reach the final row of your knitting project, you will need to bind off or cast off to secure the stitches and create a finished edge. The most common method of binding off is to knit two stitches, then pass the first stitch over the second stitch and off the needle. Repeat this process until you have one stitch left, then cut the yarn and pull it through the final stitch to secure it.
With these basic knitting techniques in your repertoire, you are ready to start working on the Beekeeper’s quilt knit pattern. Remember to take your time, practice your tension, and enjoy the process of creating each unique quilt square.
Choosing Yarn for the Beekeeper’s Quilt
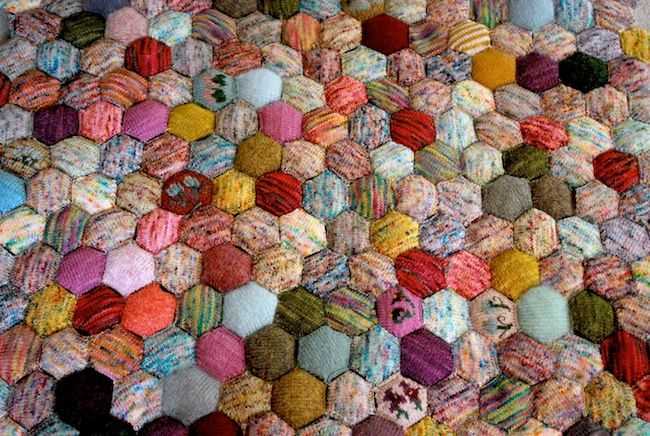
When it comes to knitting the Beekeeper’s Quilt, choosing the right yarn is crucial. The pattern calls for small hexagonal pieces, known as “hexipuffs,” that are later joined together to create the quilt. Each hexipuff requires a relatively small amount of yarn, making this project a great opportunity to use up leftover yarn from other projects.
Types of Yarn: The Beekeeper’s Quilt can be made using any type of yarn, as long as it is a suitable weight for the pattern. Popular options include wool, acrylic, cotton, and blends of natural and synthetic fibers. Some knitters prefer using natural fibers for their softness and breathability, while others opt for synthetic fibers for their durability and ease of care.
Weight and Gauge: It is important to choose a yarn that matches the gauge specified in the pattern, as this will ensure that the hexipuffs will be the correct size and fit together properly. The pattern typically recommends using a fingering or sock weight yarn, which produces small and lightweight hexipuffs. However, you can experiment with different weights of yarn to create hexipuffs of varying sizes, as long as they all have the same gauge.
Color and Texture: The Beekeeper’s Quilt offers endless possibilities for color and texture combinations. You can choose a single color for all your hexipuffs, or mix and match different colors to create a more vibrant and playful quilt. Additionally, you can incorporate yarns with different textures, such as mohair or boucle, to add visual interest to your hexipuffs.
Stash Busting: One of the great advantages of the Beekeeper’s Quilt is that it allows you to use up small amounts of leftover yarn from previous projects. If you have a collection of yarn scraps, this is the perfect project to put them to good use. You can create a truly unique quilt by combining various colors and textures, giving new life to yarn that might otherwise go to waste.
Choosing yarn for the Beekeeper’s Quilt should be a fun and creative process. Consider your personal preferences for fiber type, weight, color, and texture, and let your imagination run wild. With the right yarn, you can create a beautiful and cozy quilt that is not only practical but also a reflection of your personal style.
Creating the Hexagon Pattern
In order to create the Hexagon pattern for the Beekeeper’s quilt, you will need to have a basic understanding of knitting and be familiar with basic knitting techniques such as casting on, knitting, purling, and decreasing stitches. The pattern consists of knitting small hexagon-shaped motifs that will later be stitched together to form the quilt.
Materials: To start the project, you will need yarn in various colors, knitting needles in the recommended size, and a yarn needle for sewing the hexagons together.
Step 1: Casting on
Begin by casting on the required number of stitches for your chosen hexagon size. The pattern typically suggests casting on a multiple of six stitches to create a hexagon shape.
Step 2: Knitting the hexagon
Once you have cast on the stitches, follow the pattern instructions to knit the hexagon. This may involve knitting in multiple colors to create the desired design. Pay close attention to any increases or decreases in stitches to create the angular shape of the hexagon.
Step 3: Binding off
Once you have completed knitting the hexagon, bind off the stitches to secure the edges. This will prevent the stitches from unraveling. Cut the yarn, leaving a tail for sewing.
Step 4: Sewing the hexagons together
After knitting multiple hexagons, you can start sewing them together to form the quilt. Use the yarn needle to stitch the edges of the hexagons together, making sure to align the corners and edges to create a seamless pattern. This process may require some careful stitching and adjusting to ensure the hexagons fit together smoothly.
Step 5: Finishing touches
After all the hexagons are sewn together, weave in any loose ends to give the quilt a polished look. You can also add any additional decorative elements or embellishments to personalize your Beekeeper’s quilt.
By following these steps and repeating the process, you can create a beautiful Beekeeper’s quilt with the hexagon pattern. The size of the quilt will depend on how many hexagons you choose to make. Get creative with colors and designs to make your quilt one-of-a-kind!
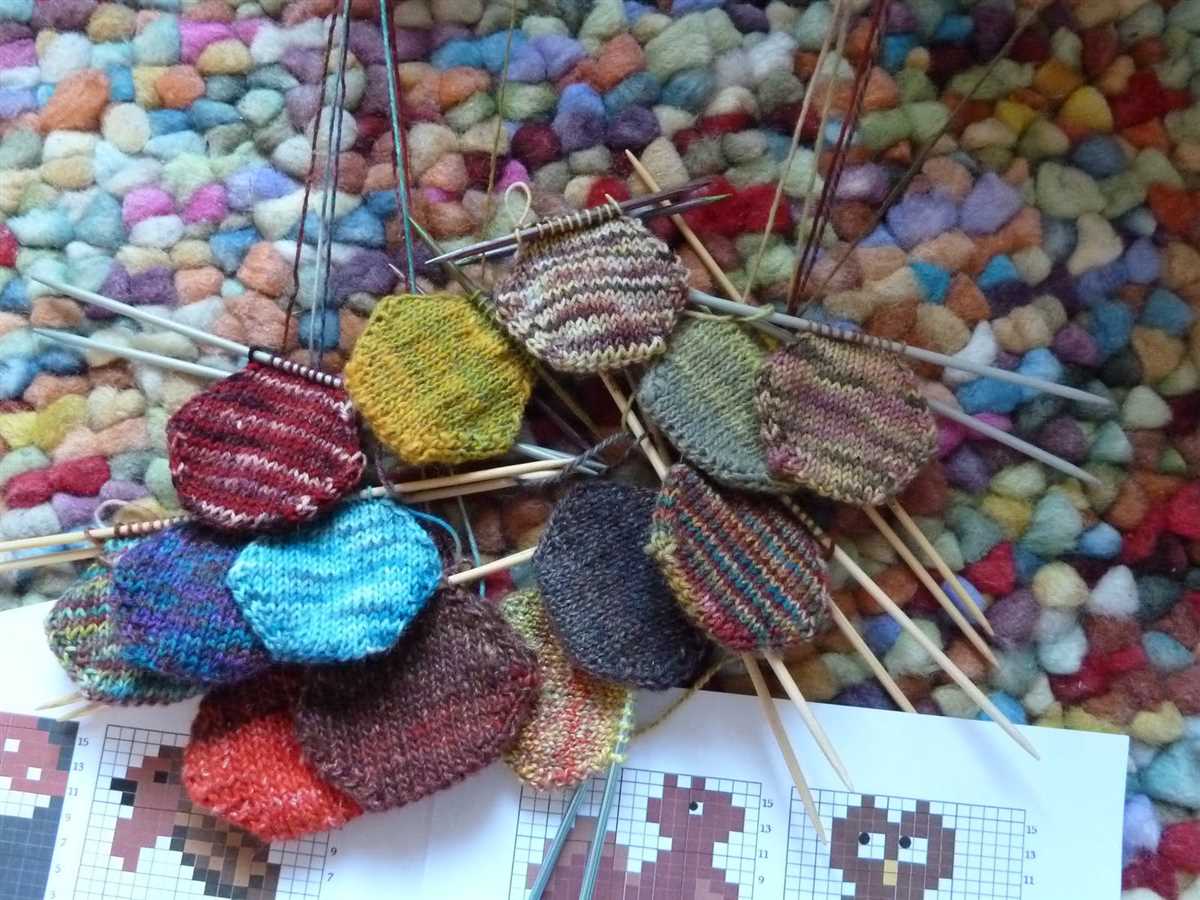
Knitting the Hexagon Puffs
Knitting the hexagon puffs is an essential step in creating the Beekeeper’s quilt. These puffs serve as individual units that will eventually be stitched together to form a cozy blanket. To begin knitting the hexagon puffs, you will need a set of double-pointed needles and your choice of yarn.
To start, cast on 19 stitches using the long-tail cast on method. This will create the center of your hexagon puff. Next, you will begin to work in the round. Knit the first stitch, then place a stitch marker to mark the beginning of the round. It’s important to keep track of your stitches as you go.
Next, you will start the increase rounds. Knit 3 stitches, then make a yarn over, knit 4 stitches, make another yarn over, and knit 4 stitches. Continue this pattern until you reach the stitch marker. On the next round, knit all the stitches.
Once you have completed the increase rounds, you will move on to the decrease rounds. This will shape your hexagon puff. Knit 2 stitches together, knit 2 stitches, then make a yarn over. Knit 2 stitches together, knit 3 stitches, make another yarn over, and knit 2 stitches together. Continue this pattern until you reach the stitch marker.
After completing the decrease rounds, you will have a total of 52 stitches. You can now bind off the stitches by knitting 2 stitches together and passing the previous stitch over until you have one stitch remaining. Cut the yarn and pull it through the last stitch to secure it.
Repeat the process to knit multiple hexagon puffs for your Beekeeper’s quilt. Once you have a sufficient number of puffs, you can start joining them together using a mattress stitch or your preferred seaming method. Your finished quilt will be a beautiful and cozy masterpiece that showcases your knitting skills!
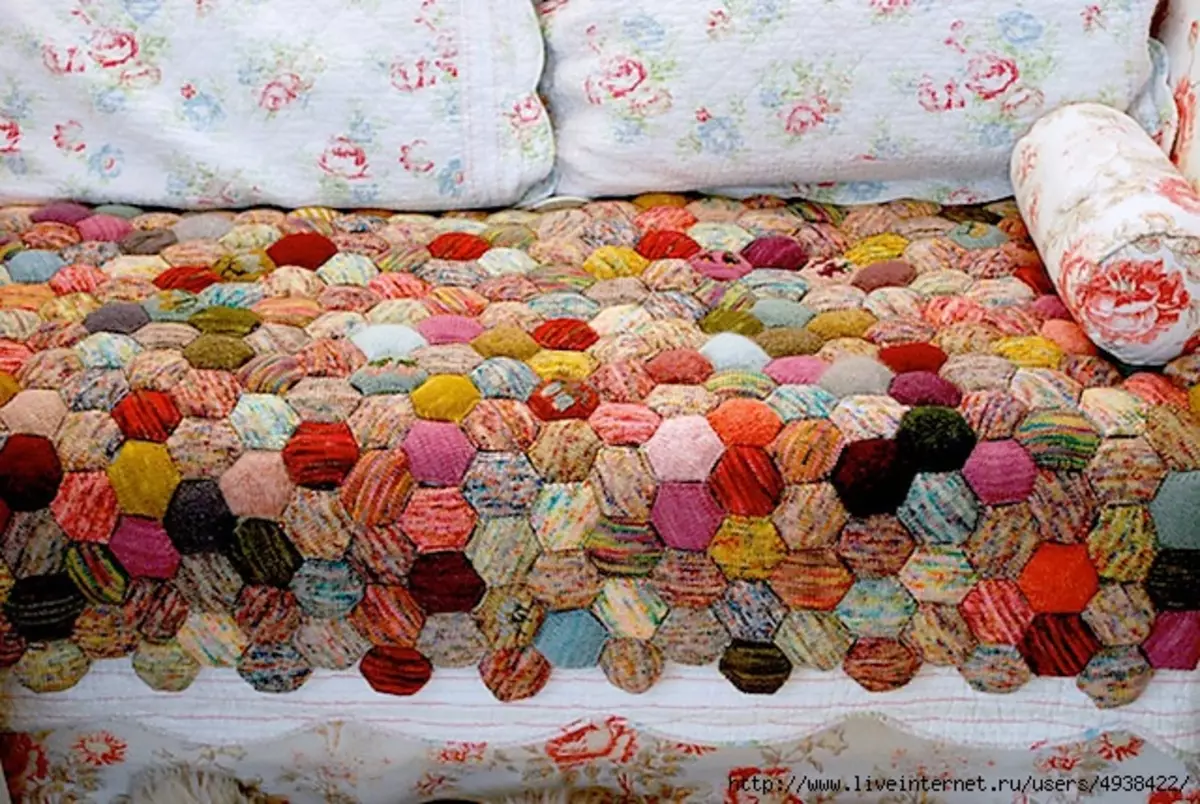
Assembly: Joining the Hexagons Together
Once you have knitted all your hexagons for the Beekeeper’s quilt, it’s time to assemble them together. Follow these steps to join the hexagons and create the final quilt:
1. Lay out the hexagons
Start by laying out all your hexagons in the desired pattern. This will give you an idea of how the final quilt will look. You can arrange them in a random pattern or create a specific design.
2. Seam the hexagons
To join the hexagons, you will use the mattress stitch. This stitch creates an invisible seam, making the joins look seamless. Start by placing two hexagons side by side, with the edges you want to join facing each other.
- Insert the needle into the corner stitch of the first hexagon and bring it out at the corner stitch of the second hexagon.
- Continue stitching along the edge, inserting the needle through the corresponding stitches on each hexagon.
- Make sure to pull the yarn gently to create a tight seam that blends in with the surrounding stitches.
- Repeat this process for all the edges you want to join.
3. Weave in the ends
After joining the hexagons, you will have some loose yarn ends. Take the time to weave in these ends using a tapestry needle. This will give your quilt a neat and finished look.
Once all the hexagons are seamed together and the ends are woven in, your Beekeeper’s quilt is complete! Enjoy your cozy and unique creation!
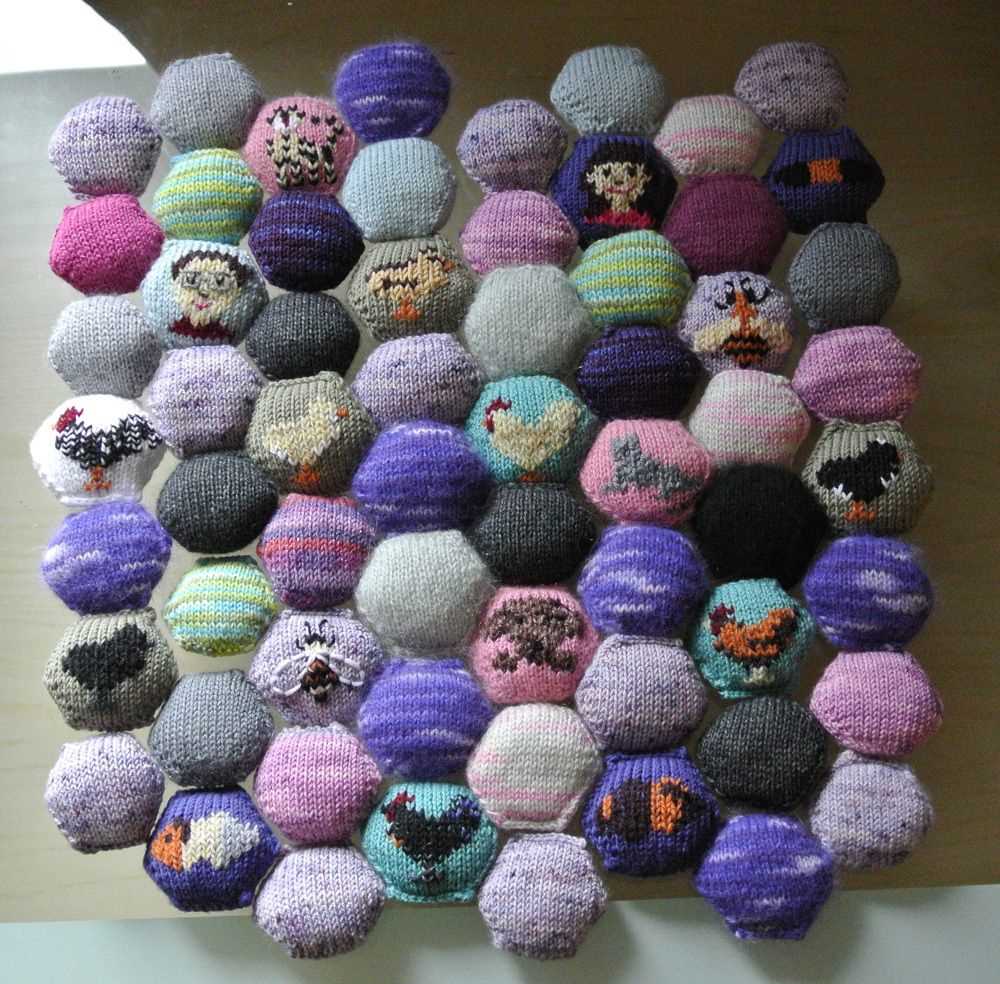
Adding Optional Embellishments
If you want to add some extra flair to your Beekeeper’s Quilt, there are a few optional embellishments you can incorporate into the pattern. These embellishments can add texture, color, and visual interest to your quilt, making it truly unique.
1. Beads: One popular way to embellish the quilt is by adding small beads to some of the hexagon motifs. You can choose beads in coordinating or contrasting colors to create different effects. Sew the beads onto the knitted hexagons using a small needle and thread, making sure the beads are secure.
2. Embroidery: Another option is to add embroidery stitches to the hexagons. You can use embroidery floss in different colors to create intricate patterns or simple designs. Stitching can be done on the individual hexagons or across multiple hexagons to create a cohesive look.
3. Appliques: If you’re feeling extra crafty, consider adding appliques to your quilt. You can knit or crochet small motifs, such as flowers or animals, and sew them onto the hexagons. This can give your quilt a whimsical touch and showcase your creativity.
4. Buttons: Adding buttons to some of the hexagons can also be a fun way to embellish your quilt. You can choose buttons in different sizes, shapes, and colors to create visual interest. Sew the buttons onto the knitted hexagons securely, making sure they are firmly attached.
5. Patchwork: If you have leftover yarns from other projects or scraps of fabric, you can incorporate them into your quilt by creating patchwork hexagons. These patchwork hexagons can add a unique and eclectic look to your quilt, showcasing your resourcefulness and adding a personal touch.
With these optional embellishments, you can make your Beekeeper’s Quilt truly one-of-a-kind. Get creative and have fun experimenting with different techniques to customize your quilt to your own style and preferences.
Tips and Tricks for a Successful Beekeeper’s Quilt
Beekeeper’s quilt is a popular knitting project, known for its unique honeycomb pattern and cozy texture. Whether you’re a beginner or an experienced knitter, here are some tips and tricks to help you create a successful Beekeeper’s quilt:
1. Choose High-Quality Yarn:
To achieve the best results, it’s important to choose high-quality yarn for your Beekeeper’s quilt. Look for yarn that is soft, durable, and easy to work with. Opt for natural fibers like wool or cotton that will provide warmth and comfort.
2. Use Stitch Markers:
Using stitch markers is essential when knitting the honeycomb pattern of the Beekeeper’s quilt. Place a stitch marker at the beginning of each repeat to help you keep track of your stitches and prevent mistakes.
3. Block Your Squares:
Blocking your squares is crucial to ensure a polished and even finish for your Beekeeper’s quilt. After completing each square, wet block them by gently washing and shaping the squares to the desired dimensions. This will help the squares maintain their shape and size.
4. Seam Carefully:

Seaming the squares together can be challenging, but taking the time to seam carefully will give your Beekeeper’s quilt a professional look. Use a tapestry needle and a whip stitch or mattress stitch to join the squares, ensuring that each seam is neat and secure.
5. Add Personal Touches:
Don’t be afraid to add personal touches to your Beekeeper’s quilt. You can incorporate different colors or yarn weights to create unique variations of the honeycomb pattern. You can also experiment with different border designs or add embroidered motifs for a personalized touch.
With these tips and tricks in mind, you’ll be well on your way to creating a beautiful and cozy Beekeeper’s quilt. Enjoy the process and embrace your creativity as you knit this delightful project!
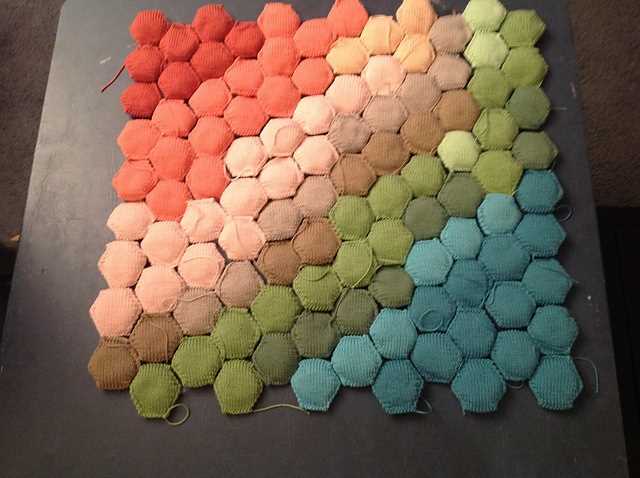
Inspiration: Color and Design Ideas
The Beekeeper’s quilt knit pattern offers endless possibilities for color and design. With its unique hexagonal shape, each individual patch can be a canvas for creativity and personal expression. Whether you prefer bold and vibrant colors or subtle and muted tones, there are countless combinations to suit your style.
Color Inspiration:
- Monochromatic: Explore different shades and tones of a single color to create a harmonious and cohesive appearance. This can range from a gradient effect, blending from light to dark, or using variations of the same color for a textured look.
- Contrasting Colors: For a striking and eye-catching design, choose colors that are opposite each other on the color wheel. This can create a bold and dynamic effect, with each patch standing out against the others.
- Analogous Colors: Select colors that are next to each other on the color wheel for a harmonious and balanced look. This can create a soothing and visually pleasing quilt, with the different patches seamlessly blending together.
- Complementary Colors: Combine colors that are opposite each other on the color wheel to create a vibrant and energetic quilt. This can result in a high contrast design, with each patch enhancing the others.
Design Inspiration:
- Geometric Patterns: Explore different shapes and patterns, such as stripes, chevrons, or diamonds, to add visual interest to your quilt. This can create a modern and graphic look, with each patch fitting together like a puzzle.
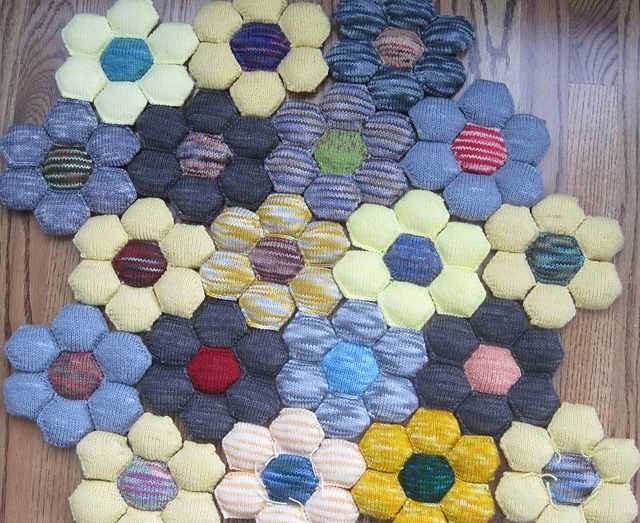
- Nature-Inspired: Draw inspiration from nature and incorporate elements like flowers, leaves, or animals into your quilt. This can create a whimsical and organic design, bringing a touch of the outdoors to your home.
- Textured Stitches: Experiment with different stitch patterns, such as cables or lace, to add texture and dimension to your quilt. This can create a tactile and luxurious feel, with each patch showcasing a different technique.
- Personalization: Add special touches to your quilt to make it truly unique and meaningful. This can be achieved through embroidery, appliqué, or incorporating symbols or initials that hold significance to you.
By combining different colors and designs, you can create a Beekeeper’s quilt that is as individual as you are. Whether you follow a specific theme or simply let your imagination run wild, the possibilities are endless with this versatile and timeless pattern.
Project Ideas for Beekeeper’s Quilt
If you’re a knitter who loves the beekeeper’s quilt pattern, there are so many fun project ideas you can create! From blankets to pillows, and even stuffed animals, the possibilities are endless. Whether you’re a beginner or an experienced knitter, these ideas will inspire you to get creative with this unique pattern.
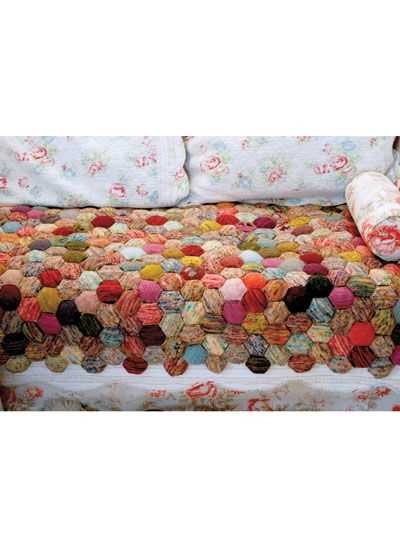
1. Beekeeper’s Quilt Blanket: One of the most popular projects using the beekeeper’s quilt pattern is to create a cozy and beautiful blanket. You can knit hexagon-shaped patches in various colors to create a vibrant and eye-catching design. Join the hexagons together to form a large blanket that is perfect for snuggling up on chilly evenings.
2. Beekeeper’s Quilt Pillow: Another great project idea is to knit smaller hexagons and sew them together to make adorable pillows. You can mix and match colors to create unique patterns and designs. These pillows will add a touch of charm to your home decor while providing extra comfort for lounging or napping.
3. Beekeeper’s Quilt Stuffed Animals: Take your knitting skills to the next level by creating cute stuffed animals using the beekeeper’s quilt pattern. Knit hexagons in various colors and stuff them to create the body parts of your chosen animal. Then, sew the hexagons together to bring your stuffed animal to life. This project is perfect for gift-giving or as a unique addition to your own collection.
4. Beekeeper’s Quilt Coasters: If you’re looking for a smaller project, consider knitting hexagons and using them as coasters. These mini hexagons can be made in any color combination you desire, making them a fun and customizable addition to your home. Not only will they protect your surfaces from drink rings, but they will also add a touch of handcrafted beauty to your space.
5. Beekeeper’s Quilt Baby Blanket: Knitting a baby blanket using the beekeeper’s quilt pattern is a wonderful way to welcome a new little one into the world. Use soft and gentle yarn to create a cozy and comforting blanket that will be cherished for years to come. The hexagons can be made in pastel colors and joined together to create a beautiful gift for a baby shower or newborn.
- 6. Beekeeper’s Quilt Christmas Ornaments: Get into the holiday spirit by knitting mini hexagons and turning them into Christmas ornaments. Add some festive embellishments like beads, sequins, or small bows to make them extra special. Hang these adorable ornaments on your tree or give them as thoughtful handmade gifts to family and friends.
- 7. Beekeeper’s Quilt Table Runner: Add a touch of elegance to your dining table by knitting hexagons and sewing them together to create a unique table runner. Choose colors that match your dining room decor and enjoy the compliments from your guests. This project is also a great way to use up leftover yarn from your other beekeeper’s quilt projects.
Sharing Your Beekeeper’s Quilt with the Knitting Community
Once you have completed your Beekeeper’s Quilt, you may want to share your creation with the knitting community. There are several ways you can do this, allowing you to showcase your skills, inspire others, and connect with fellow knitters who share your love for this unique pattern.
Firstly, consider sharing photos of your finished quilt on social media platforms such as Instagram, Facebook, or Pinterest. Use relevant hashtags such as #beekeepersquilt or #knittingcommunity to reach a wider audience. By posting your photos, you can receive feedback, admiration, and even helpful tips from other knitters who have also tackled this pattern. It’s a wonderful way to engage with the knitting community and gain recognition for your hard work.
If you prefer a more personal touch, you can join knitting forums or online communities dedicated to the Beekeeper’s Quilt pattern. There, you can share your progress, ask for advice, and see what others have created. These communities often have dedicated threads or sections where you can showcase your finished quilt to a like-minded audience. The feedback and support you receive can be invaluable, especially if you’re planning to make another Beekeeper’s Quilt or explore other intricate knitting patterns.
Lastly, consider participating in knitting events or workshops where you can showcase your Beekeeper’s Quilt. Local yarn shops or knitting groups may organize events where knitters can gather, exchange ideas, and display their projects. You could bring your quilt and share your journey with others, potentially inspiring new knitters and creating meaningful connections within the community.
Sharing your Beekeeper’s Quilt with the knitting community not only allows you to celebrate your achievement but also encourages others to try this pattern and explore their creativity. It’s a way to connect with like-minded individuals who appreciate the art of knitting and can offer support and inspiration along the way. So don’t be shy – show off your beautiful quilt and become an active member of the knitting community!