
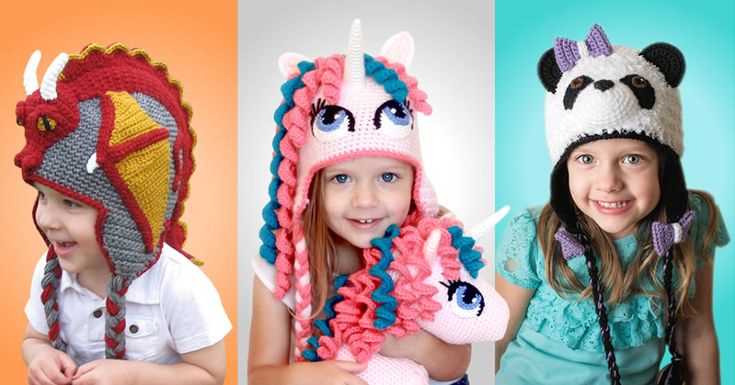
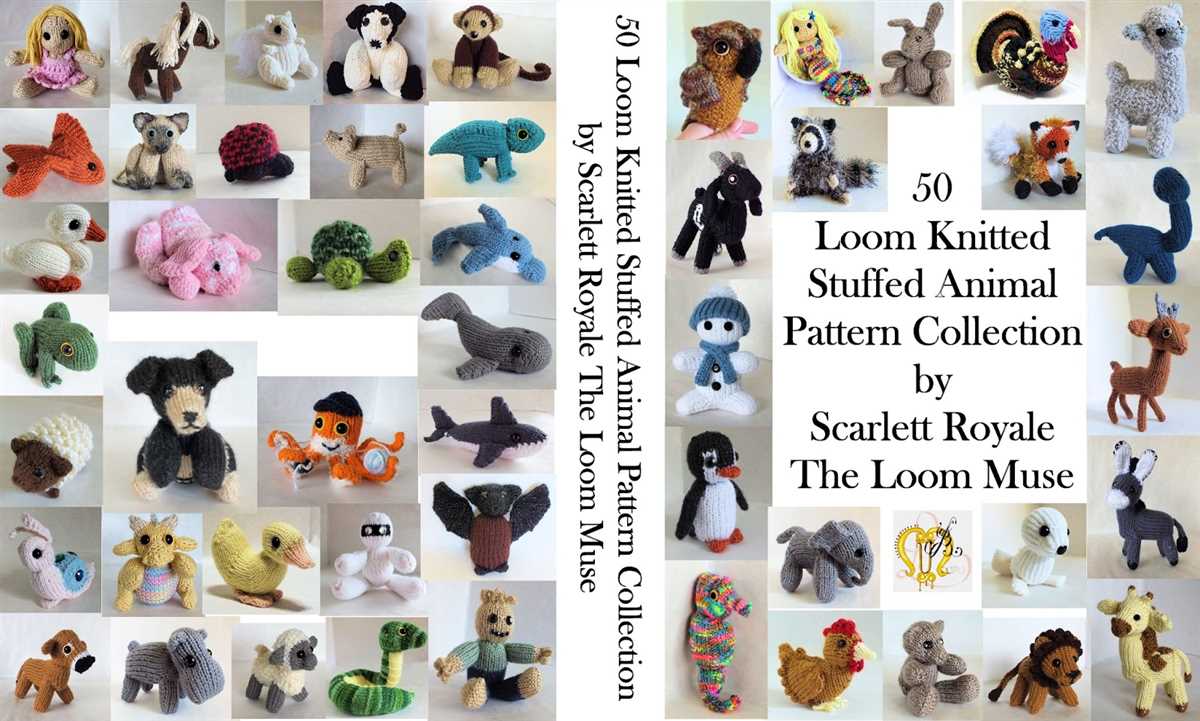
Animal hats are a fun and whimsical way to add some character to your wardrobe. Whether you are looking for a cute hat for a child or a quirky accessory for yourself, knitting your own animal hat allows you to express your creativity and showcase your knitting skills. With a wide range of patterns available, there is sure to be an animal hat that suits your style and personality.
In this article, we will explore 15 different animal hat patterns that you can knit and show off. From adorable bunny hats and fierce lion hats to playful fox hats and cozy bear hats, there is something for everyone. Each pattern comes with detailed instructions and helpful tips to ensure that your knitting project is a success.
Knitting animal hats not only allows you to create a unique and personalized accessory, but it also provides an opportunity to learn and practice new knitting techniques. Whether you are a beginner knitter or an experienced pro, these animal hat patterns will help you expand your knitting skills and create beautiful and functional pieces.
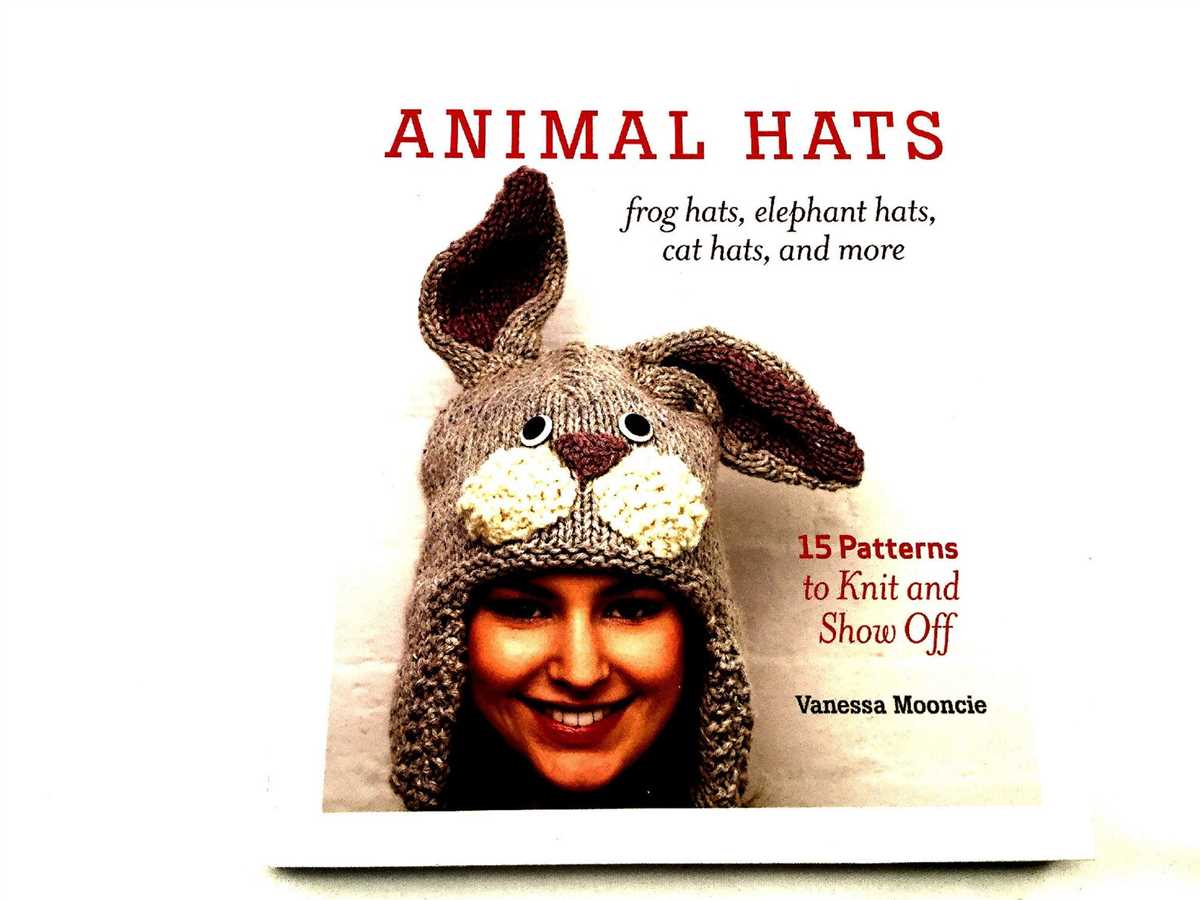
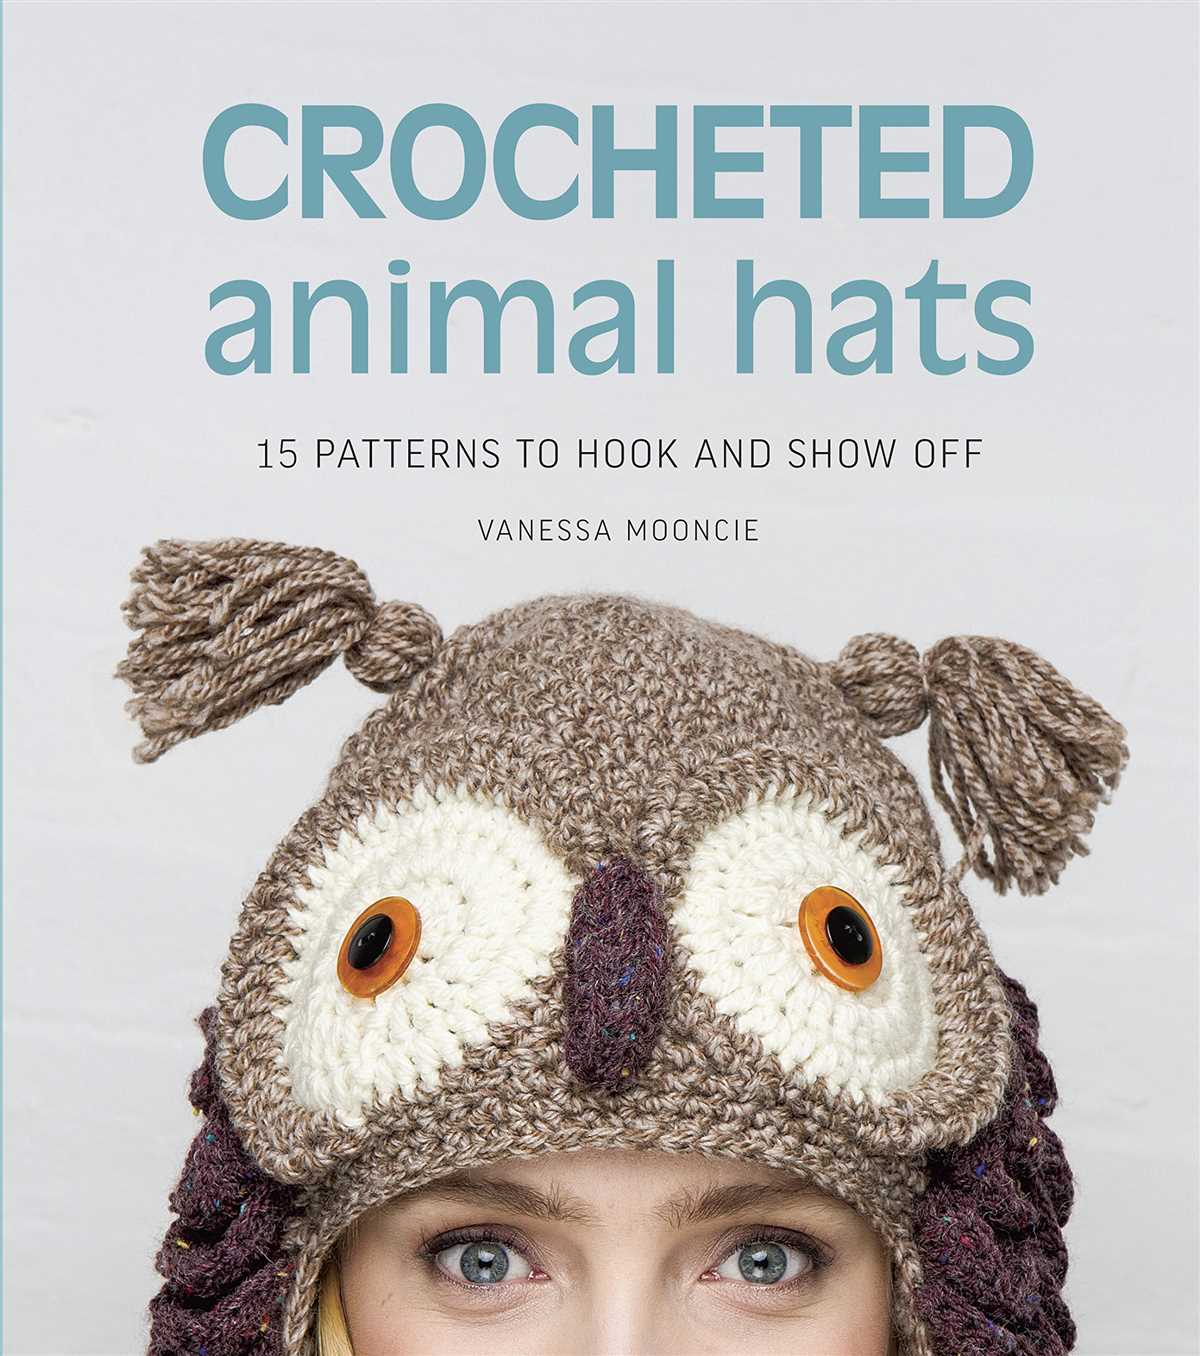
Animal Hats: 15 Patterns to Knit and Show Off
If you love animals and knitting, then “Animal Hats: 15 Patterns to Knit and Show Off” is the perfect book for you. This book features a collection of 15 adorable animal-themed hat patterns that will bring joy to both young and old.
Each pattern in this book is carefully designed to capture the charm and characteristics of different animals. Whether you want to knit a hat that resembles a cute kitten, a playful panda, or a majestic lion, this book has it all. The patterns are easy to follow and include step-by-step instructions, making it suitable for both beginner and experienced knitters.
The book not only provides patterns but also includes tips and techniques to enhance your knitting skills. From choosing the right yarn and needles to creating realistic animal features, this book offers valuable advice to help you create hats that are not only cute but also comfortable to wear.
What makes “Animal Hats: 15 Patterns to Knit and Show Off” unique is its focus on showcasing the finished products. Each pattern is accompanied by beautiful photographs that bring the hats to life. The hats are modeled by children and adults, making it easy to see how the hats fit and look.
Whether you knit these hats for yourself, your children, or as gifts for loved ones, they are sure to bring smiles and warmth. Pick up your knitting needles and start creating these adorable animal hats today!
Table of Contents:
- Introduction
- Materials and Tools
- Basic Knitting Techniques
- Kitten Hat
- Panda Hat
- Lion Hat
- Bunny Hat
- Owl Hat
- Elephant Hat
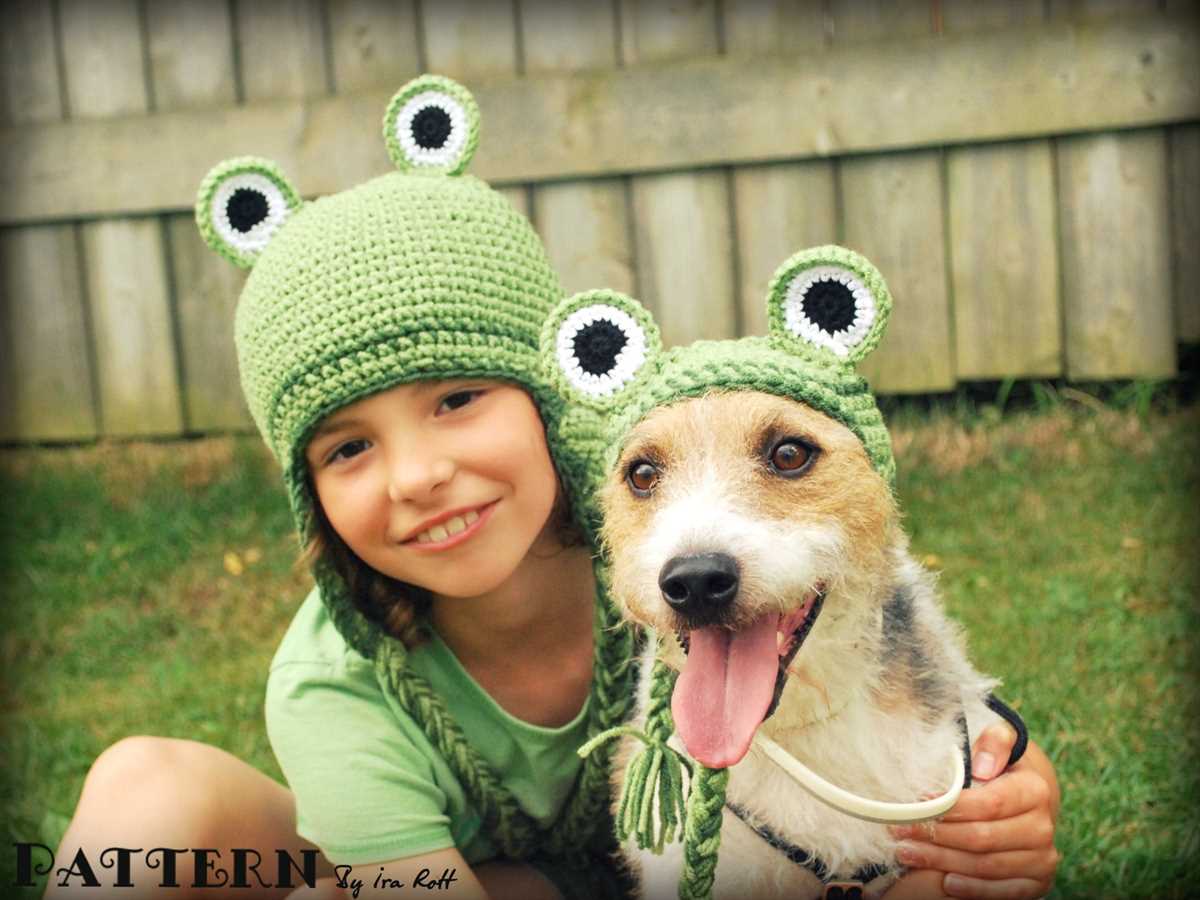
- Frog Hat
- Monkey Hat
- Tiger Hat
- Giraffe Hat
- Bear Hat
- Penguin Hat
- Zebra Hat
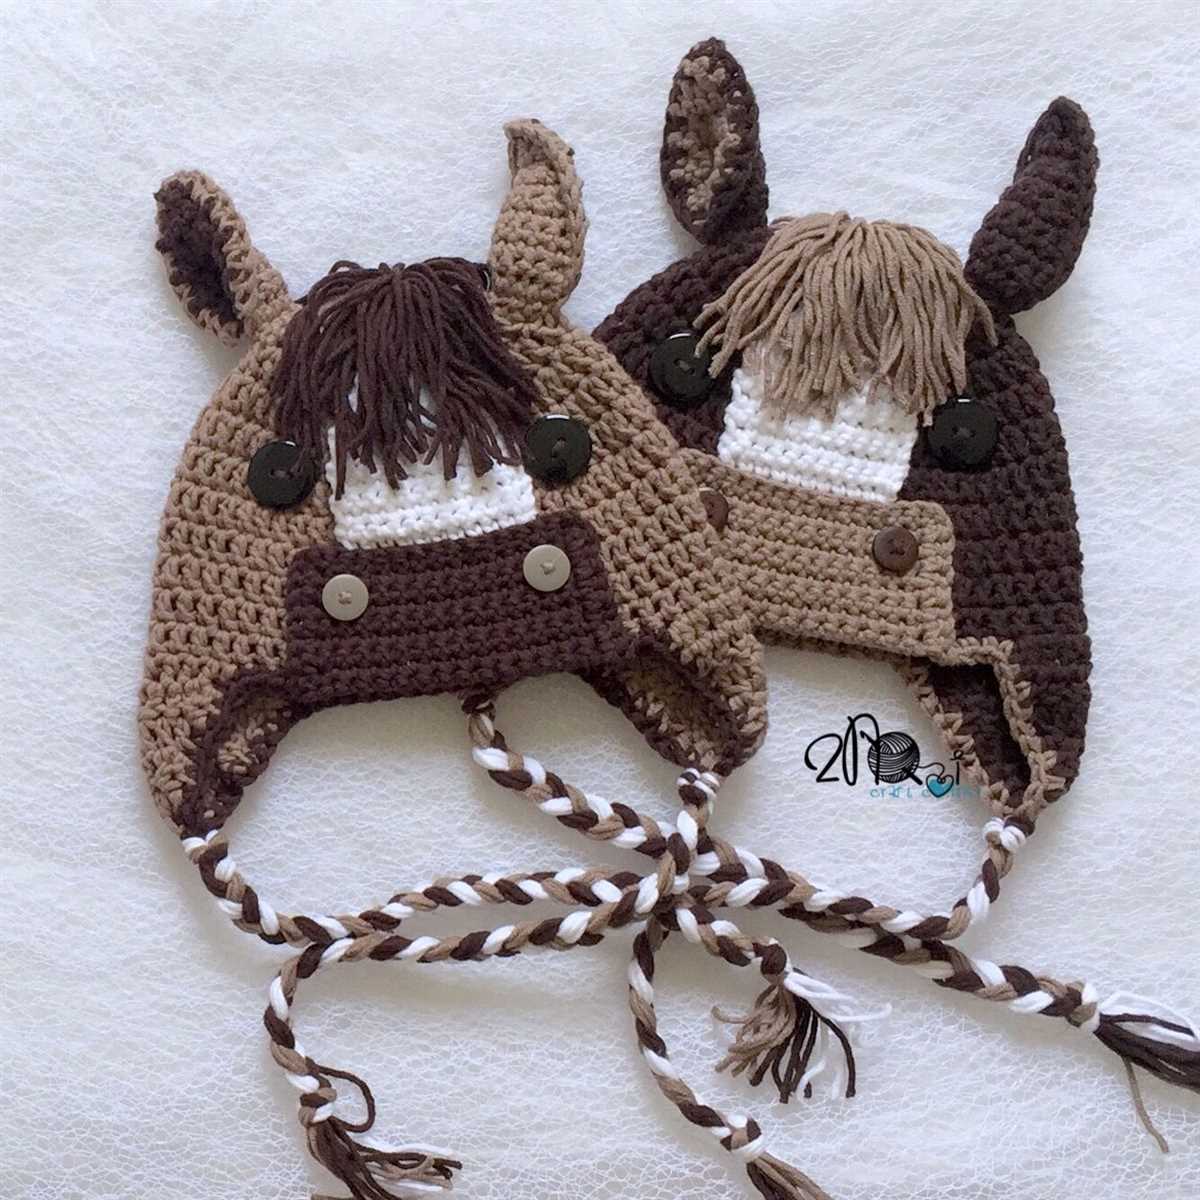
- Horse Hat
- Conclusion
Benefits of Knitting Animal Hats
Knitting animal hats can be a fun and rewarding hobby that comes with a variety of benefits. Whether you’re a beginner or an experienced knitter, creating these adorable accessories can bring joy and satisfaction to your life.
Creative Outlet
Knitting animal hats allows you to express your creativity and showcase your unique style. With a wide range of patterns available, you can choose from different animal designs, colors, and embellishments to create hats that reflect your personal taste. It’s a great way to add a touch of whimsy to your wardrobe or make one-of-a-kind gifts for friends and family.
Relaxation and Stress Relief

Knitting has been known to have a calming effect on the mind and body. The repetitive motions involved in knitting can help reduce stress and anxiety, allowing you to relax and unwind after a long day. It’s a therapeutic activity that can help improve your overall well-being and provide a sense of accomplishment as you see your project come together.
Practical and Functional
Aside from being adorable fashion accessories, animal hats serve a practical purpose as well. Knitted hats are perfect for keeping you warm during colder months, providing insulation and protection against the elements. They can also be a fun way to dress up for costume parties or children’s events, allowing you to showcase your creativity while staying cozy.
Community and Social Connection
Knitting animal hats can also be a great way to connect with others who share the same interest. Joining knitting groups or online communities can provide you with a sense of belonging and camaraderie. You can share ideas, tips, and patterns with fellow knitters, and even participate in charity knitting projects to help those in need.
In conclusion, knitting animal hats offers a range of benefits, from unleashing your creativity to providing relaxation and stress relief. The practical and functional aspect of these hats makes them versatile accessories, while the social connection and community aspect can add an extra element of fulfillment to your knitting journey.
Getting Started: Materials and Tools
Before you start knitting your animal hats, it’s important to gather all the necessary materials and tools. Here’s a list of what you’ll need:
- Yarn: Choose a soft, high-quality yarn in the colors you want for your animal hats. Make sure the yarn is suitable for the size of the needles you’ll be using.
- Knitting Needles: You’ll need a pair of knitting needles in the appropriate size for your yarn. Check the pattern for the recommended needle size.
- Tapestry Needle: This needle will be used for weaving in ends and sewing up any seams.
- Stitch Markers: These little plastic rings or clips will help you keep track of your stitches and pattern repeats.
- Scissors: A good pair of sharp scissors will be necessary for cutting yarn and trimming loose ends.
- Measuring Tape: This will come in handy for checking your gauge and measuring the size of your finished hat.
- Stuffing: If your hat pattern includes animal ears or other 3D features, you may need some stuffing material like polyester fiberfill.
Once you have all your materials ready, it’s time to start knitting! Make sure to read through the entire pattern before beginning, so you have a clear understanding of the steps involved. Gather your materials, find a comfortable spot, and get ready to create adorable animal hats!
Basic Knitting Techniques for Animal Hats
Knitting animal hats can be a fun and rewarding project for knitters of all skill levels. Whether you’re a beginner or an experienced knitter, there are some basic techniques that will help you create adorable and eye-catching animal hats.
Casting On: Before you can start knitting your animal hat, you’ll need to cast on. This is the process of creating the first row of stitches on your knitting needle. There are different methods to cast on, such as the long-tail cast on or the knitted cast on. Choose the method that you’re most comfortable with and that suits the design of your animal hat.
Knit and Purl Stitches: The most basic stitches in knitting are the knit stitch and the purl stitch. The knit stitch creates a “V” shape on the right side of your work, while the purl stitch creates a bumpy texture on the right side. By combining these two stitches, you can create a wide variety of patterns and textures for your animal hat.
Increasing and Decreasing: To shape your animal hat, you will need to know how to increase and decrease stitches. Increasing is when you add stitches to your work, while decreasing is when you remove stitches. There are different methods for increasing and decreasing, such as knitting into the front and back of a stitch or knitting two stitches together. These techniques allow you to create the unique shapes of animal ears, snouts, and other features.
Colorwork: Many animal hats feature colorwork, where you use different colors of yarn to create patterns or designs. This can be done through intarsia, fair isle, or slip stitch techniques. Intarsia involves working with separate sections of color and requires careful attention to where the color changes occur. Fair isle involves carrying different colors of yarn across the back of your work and knitting with one color at a time. Slip stitch colorwork involves slipping stitches to create a pattern with contrasting colors.
Finishing Techniques: Once you’ve finished knitting your animal hat, you’ll need to think about finishing touches. This may include weaving in loose ends, sewing on buttons or other embellishments, or blocking your hat to shape it. Take the time to carefully finish your animal hat to ensure that it looks its best when worn.
By mastering these basic knitting techniques, you’ll be well-equipped to tackle the patterns in “Animal Hats: 15 Patterns to Knit and Show Off.” Whether you’re knitting a cute bunny hat, a fierce lion hat, or a playful panda hat, these techniques will help you bring your animal hats to life!
Choosing the Perfect Animal Hat Pattern
When it comes to knitting an animal hat, there are so many adorable options to choose from. Whether you want to create a hat that resembles a lovable forest creature or a cute farm animal, there is a pattern out there that will suit your style and skill level.
1. Consider the recipient: Before selecting an animal hat pattern, think about who will be wearing it. Are you making it for a child, an adult, or maybe even yourself? This will help you narrow down the options and choose a pattern that is the right size and style.
2. Take a look at the difficulty level: If you’re a beginner knitter, it’s best to start with a pattern that is labeled as “easy” or “beginner-friendly.” These patterns typically have simple instructions and basic stitches. On the other hand, if you’re an experienced knitter looking for a challenge, you can opt for a more complex pattern with intricate details.
3. Think about the animal: Consider the animal that you want to recreate in hat form. Do you have a favorite animal? Maybe you’re looking for a hat that represents an animal with specific characteristics, such as a long neck or floppy ears. Take a look at different patterns available and choose one that captures the essence of the animal you have in mind.
4. Look for unique features: Some animal hat patterns come with additional features like ears, horns, or even tails. These extra details can really make your hat stand out and add a fun element to your knitting project. If you’re looking for something extra special, keep an eye out for patterns that include these unique features.
5. Check for reviews and recommendations: Before starting your knitting project, it’s always a good idea to check for reviews and recommendations from other knitters who have tried the pattern. Look for patterns that have positive feedback and detailed explanations to ensure that you have a smooth and enjoyable knitting experience.
In conclusion, choosing the perfect animal hat pattern is all about considering the recipient, the difficulty level, the desired animal, any unique features, and checking for reviews. By taking these factors into account, you can select a pattern that will result in a cute and cozy animal hat that you will be proud to show off.
Cat Hat Pattern: Step-by-Step Instructions
Knitting a cat hat can be a fun and adorable project for any cat lover. With these step-by-step instructions, you’ll be able to create a cute and cozy hat for yourself or your furry friend.
Here’s what you’ll need:
- Knitting needles
- Yarn in your desired color
- A tapestry needle
- Scissors
- A cat-sized measuring tape or string
To begin, measure the circumference of your cat’s head using the measuring tape or string. This will give you an idea of how many stitches to cast on. Once you have the measurement, cast on the appropriate number of stitches on your knitting needles.
Next, start knitting in the round using your chosen stitch pattern. You can use a simple knit stitch or get creative with more intricate patterns. Continue knitting until the hat reaches your desired length. Remember to occasionally check the fit on your cat’s head to ensure it’s neither too tight nor too loose.
Once you reach the desired length, it’s time to decrease the stitches to create the top of the hat. Follow the pattern’s instructions for decreasing, which may involve knitting two stitches together or other techniques. Continue decreasing until you have a small enough number of stitches left to gather together.
Using your tapestry needle, thread the yarn through the remaining stitches to create a drawstring effect. Pull tight to gather the stitches and secure the end of the yarn. Trim any excess yarn with scissors.
Your cat hat is now complete! Feel free to add any decorative elements, such as ears or whiskers, if desired. Your furry friend will be the talk of the town with their fashionable new accessory.
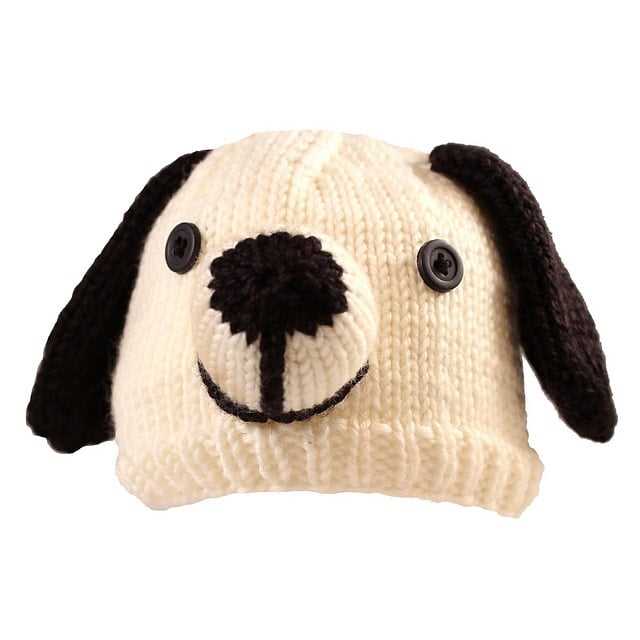
Dog Hat Pattern: Step-by-Step Instructions
If you’re looking to knit a cute and adorable hat for your furry friend, look no further than this dog hat pattern. With step-by-step instructions, you’ll be able to create a fun and fashionable accessory that your dog will love.
Materials:
- Knitting needles, size 8
- Worsted weight yarn in your desired color
- Tapestry needle
- Scissors
Instructions:
- Begin by casting on 36 stitches using your knitting needles.
- Row 1: Knit all stitches.
- Row 2: Purl all stitches.
- Repeat rows 1 and 2 until your work measures 5 inches.
- Next, decrease 4 stitches evenly across each row until you have 20 stitches remaining.
- Continue knitting in stockinette stitch until the piece measures 7 inches.
- Next, begin shaping the top of the hat. This can be done by knitting 2 stitches together every 2 stitches across each row until you have 4 stitches remaining.
- Bind off the remaining 4 stitches and cut the yarn, leaving a long tail.
- Using a tapestry needle, sew the sides of the hat together, leaving a small opening for your dog’s ears.
- Weave in any loose ends and trim excess yarn.
And there you have it, a dog hat that is sure to make your furry friend the talk of the town. Follow these step-by-step instructions and soon your dog will be strutting their stuff in style.
Bear Hat Pattern: Step-by-Step Instructions
If you’re looking for a fun and adorable project to knit, then the Bear Hat pattern is perfect for you! This pattern provides step-by-step instructions on how to create a cute bear-themed hat that is sure to be a hit with kids and adults alike.
To get started, you will need the following materials:
- Size 8 (5mm) knitting needles
- Medium weight yarn in brown (about 200 yards)
- A set of double-pointed knitting needles (size 8)
- A yarn needle for sewing
- A pair of scissors
The first step in creating your bear hat is to cast on 88 stitches using the brown yarn. This will form the brim of the hat. You can use the long-tail cast on method for this.
Once you have cast on your stitches, you will need to join them in the round. Place a marker to indicate the beginning of the round, and then knit every stitch in the round for about 2 inches.
Next, it’s time to start working on the bear ears. Divide the stitches onto four double-pointed knitting needles, with 22 stitches on each needle. Leave the rest of the stitches on the circular needle.
Proceed to create the bear ears by knitting in the round, decreasing two stitches at the beginning and end of each double-pointed needle every other row. Continue until you have 12 stitches remaining on each needle.
Once the bear ears are complete, you can continue knitting the remaining stitches in the round for about 5 inches, or until the hat reaches your desired length. Then, it’s time to bind off the stitches and cut the yarn, leaving a tail for sewing.
To assemble the hat, fold the brim in half and sew the edges together using the yarn needle. Then, sew the bear ears to the top corners of the hat by using the tail left from binding off.
With just a few simple steps, you have created a charming bear hat that will keep you warm and stylish during the colder months. Enjoy showing off your handmade creation!
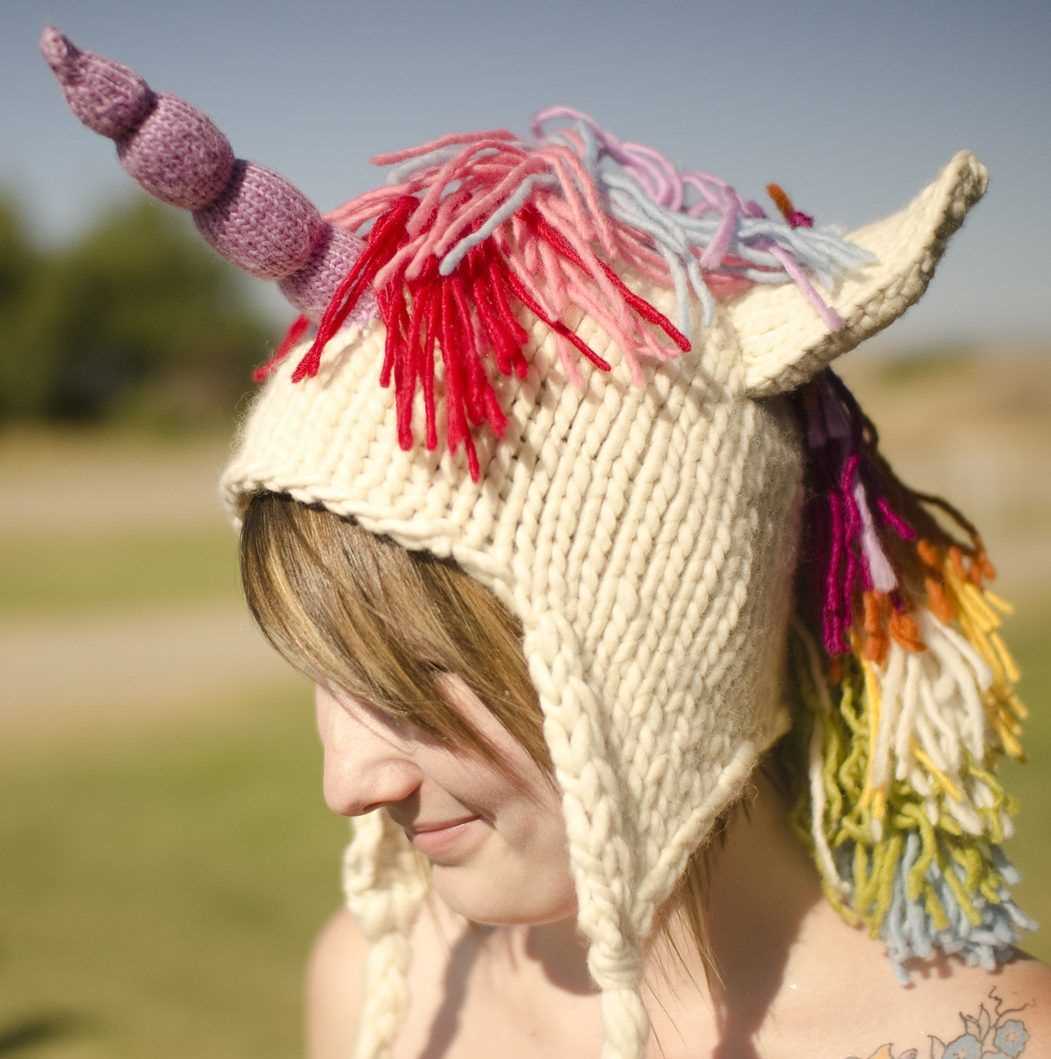
Rabbit Hat Pattern: Step-by-Step Instructions
Whether for a children’s costume or just for fun, knitting a rabbit hat can be a charming and playful project. With this step-by-step pattern, you’ll be able to create an adorable hat that will bring out the inner rabbit in anyone. Follow these instructions carefully to ensure a successful knitting experience.
Gather Your Materials
Before you start knitting, make sure you have all the necessary materials. You will need:
- Size 8 (5 mm) knitting needles
- Worsted weight yarn in the main hat color (approx. 200 yards)
- Contrasting color yarn for the rabbit ears and facial features
- Tapestry needle for finishing
- Stitch markers
- Scissors
Begin Knitting the Hat
1. Cast on 88 stitches using the main hat color yarn.
2. Join in a round, being careful not to twist the stitches, and place a stitch marker at the beginning of the round.
3. Knit in a 1×1 rib pattern (knit 1, purl 1) for 1 inch.
4. Switch to stockinette stitch (knit every round) and continue knitting until the hat measures approximately 6 inches from the cast on edge.
5. Begin decreasing rounds as follows: *K6, k2tog* repeat around (77 stitches).
6. Continue decreasing every round by knitting 1 stitch less between each k2tog until there are 11 stitches remaining.
7. Cut the yarn, leaving a long tail. Thread the tail through a tapestry needle, and slide the needle through the remaining stitches to secure them.
Add the Rabbit Ears and Facial Features
1. Using the contrasting color yarn, cast on 12 stitches per ear. Work flat in stockinette stitch, knitting every row, for 4 inches.
2. Decrease 1 stitch at the beginning and end of each row until 4 stitches remain. Bind off.
3. Sew the ears to the top of the hat, using the photo as a guide.
4. Using the contrasting color yarn, embroider the rabbit’s facial features onto the front of the hat. Use duplicate stitch or embroidery techniques to create the eyes, nose, and mouth.
With these step-by-step instructions, you can knit an adorable rabbit hat that will make anyone hop with joy. Whether for a costume or just for everyday wear, this hat is sure to delight. Gather your materials, follow the pattern carefully, and enjoy the process of bringing this charming rabbit to life.
Tips and Tricks for Perfect Animal Hat Finishing
Finishing an animal hat can be a challenging task, but with the right tips and tricks, you can achieve a perfect result. Here are some helpful suggestions to ensure your animal hat looks great:
1. Blocking
Before you start the finishing process, it’s important to block your hat. Blocking helps to shape the hat and even out any stitches. You can use a blocking mat or simply dampen the hat and place it on a towel to dry in the desired shape. This will ensure that the hat looks polished and professional.
2. Seam Placement

When sewing the seams of your animal hat, it’s crucial to place them in inconspicuous areas. Try to position the seams at the back of the hat or underneath any decorative elements, such as ears or horns. This will create a more seamless and seamless look and prevent the seams from being too noticeable.
3. Embroidery Techniques
Adding details to your animal hat, such as eyes, noses, or mouths, can really bring it to life. To achieve the best results, consider using different embroidery techniques. For example, you can use backstitch for more precise lines or satin stitch for a smoother finish. Experiment with different techniques to find the one that works best for your design.
4. Secure Loose Ends
Make sure to secure any loose ends of yarn or thread to prevent them from unraveling. You can use a yarn needle to weave the ends into the back of the stitches or tie them in a knot and trim them close to the fabric. This will give your animal hat a neater and more professional appearance.
5. Steam and Press
Before wearing or gifting your animal hat, it’s a good idea to give it a final touch-up with steam and pressing. Use a steamer or an iron on a low heat setting to gently smooth out any wrinkles or creases. Be careful not to apply too much heat or pressure, as this can damage the yarn or fabric.
By following these tips and tricks, you can achieve a perfect finish for your animal hat. Enjoy showing off your adorable and well-finished creation!
Showcasing Your Animal Hats: Styling and Photography Tips
Once you have finished knitting your animal hats, it’s time to show them off! Good styling and photography can enhance the appeal of your creations and help you attract attention and potential customers. Here are some tips to help you showcase your animal hats in the best possible way:
1. Choose an Appropriate Setting
When photographing your animal hats, select a setting that complements their whimsical and playful nature. Consider outdoor locations such as parks, gardens, or urban streets with colorful backgrounds. Alternatively, you can create a cozy indoor setting with props like a basket filled with leaves or a child’s plush toy. The setting should help evoke the characteristics of the animal the hat represents.
2. Model and Pose
Use models to showcase your animal hats. They can be adults, children, or even pets, depending on your target audience. Ensure that the model’s attire doesn’t clash with the hat and allows the hat to be the focus of attention. Encourage the model to interact with the hat: wearing it in different ways, playing with it, or posing in a way that reflects the animal’s behavior.
3. Lighting and Composition
Lighting plays a crucial role in photography. Natural light is usually the best option, as it brings out the colors and details of the hat. Avoid harsh midday sun, and instead opt for soft morning or late afternoon light. Experiment with different angles and compositions to find the most flattering and visually appealing result.
4. Details Matter
Pay attention to the details of your animal hat and capture them in your photographs. Highlight the intricate stitching, unique features, and any additional accessories like ears or paws. Close-up shots can help potential customers appreciate the craftsmanship and quality of your work.
5. Consider Props
Props can add interest and context to your photographs. For example, include seasonal props like fallen leaves or blooming flowers for a touch of realism. Alternatively, you can use props that complement the animal theme, such as a toy mouse for a cat hat or a stuffed tree branch for an owl hat. Be creative, but ensure that the props don’t overshadow the main focus of the photo – your animal hat.
6. Edit and Highlight
After taking your photographs, take some time to edit them if necessary. Adjust the brightness, contrast, and saturation to enhance the colors and details. Crop the images to remove any distractions and focus the viewer’s attention on the hat. Use photo editing software or apps to add filters or adjust the overall mood of the image, if desired. Make sure the final images capture the essence of your animal hats.
By following these styling and photography tips, you can effectively showcase your animal hats and attract attention to your knitting creations. Remember to experiment, be creative, and have fun with the process. With stunning photographs of your unique animal hats, you’ll certainly be able to stand out and gain appreciation for your knitting skills.