
Knitting is a popular craft that allows you to create beautiful garments and accessories using just a pair of needles and some yarn. However, for those new to knitting, reading a knitting pattern can be confusing and overwhelming. With its abbreviations, symbols, and jargon, knitting patterns can seem like a foreign language. But fear not, because in this article, we’ll break down the elements of a knitting pattern and show you how to decode it like a pro.
Before we dive into the details, it’s important to understand that knitting patterns are like road maps for your project. They contain all the instructions you need to create a specific item, from the type of yarn and needles to use, to the stitch pattern and finishing techniques. By learning how to read a knitting pattern, you’ll gain the confidence to tackle any project, from a simple scarf to a complex sweater.
One of the first things you’ll notice when looking at a knitting pattern are the abbreviations. Knitting patterns use abbreviations to make the instructions more concise. So instead of spelling out “knit” and “purl” each time, you’ll see “k” and “p” instead. Don’t worry if you’re not familiar with all the abbreviations – most knitting patterns include a key or glossary that explains what each abbreviation means. It’s a good idea to familiarize yourself with these abbreviations before you start knitting.
Understanding the abbreviations
When reading a knitting pattern, you may come across various abbreviations that can look confusing at first. However, understanding these abbreviations is key to successfully following the pattern and creating the desired knitted item. Here are some commonly used abbreviations and their meanings:
- K – Knit stitch: This is the most basic and common stitch in knitting. It involves inserting the right-hand needle into the front of the stitch on the left-hand needle and pulling the yarn through to create a new stitch.
- P – Purl stitch: This is another basic stitch in knitting and is often used in combination with the knit stitch to create various patterns. It involves inserting the right-hand needle into the front of the stitch on the left-hand needle, but instead of pulling the yarn through, the yarn is brought to the front and the stitch is slipped off the left-hand needle.
- YO – Yarn over: This abbreviation indicates that you should bring the yarn to the front or back of the work (depending on the pattern) and then continue with the next stitch. This creates an extra loop of yarn, which adds an eyelet or decorative hole in the fabric.
- SSK – Slip, slip, knit: This abbreviation is used to describe a decrease stitch. It involves slipping two stitches one at a time from the left-hand needle to the right-hand needle, then inserting the left-hand needle into the front of both slipped stitches and knitting them together.
- K2tog – Knit two together: This abbreviation is also used to describe a decrease stitch. It involves inserting the right-hand needle into the front of two stitches on the left-hand needle, then knitting them together as if they were one stitch.
These are just a few examples of the abbreviations you may encounter when reading a knitting pattern. It’s important to refer to the pattern’s key or glossary for a full list of abbreviations and their meanings specific to the pattern you are working on. By understanding and familiarizing yourself with these abbreviations, you’ll be able to confidently read and follow any knitting pattern.
Decoding the symbols
When you first look at a knitting pattern, you may be overwhelmed by the various symbols and abbreviations used. However, with some practice and understanding, you can easily decode these symbols and follow along with the pattern.
Stitch Symbols: Knitting patterns often use symbols to represent different types of stitches. For example, a dot (.) may indicate a knit stitch, while a dash (-) may indicate a purl stitch. Understanding these symbols and being able to recognize them will help you follow the pattern correctly.
Repeat Symbols: Knitting patterns often have sections that need to be repeated, whether it’s a specific stitch pattern or an entire set of instructions. To indicate this repetition, patterns use symbols such as asterisks (*) or brackets ([]). These symbols help you understand where the section begins and ends, and how many times it should be repeated.
Measurement Symbols: Knitting patterns often include measurements for different parts of the garment, such as the bust, waist, or length. These measurements are usually indicated with abbreviations such as “in” for inches or “cm” for centimeters. It’s important to understand these symbols to ensure that you are knitting the correct size and achieving the desired fit.
Special Symbols: Some knitting patterns may include special symbols or abbreviations that are specific to that particular pattern. These symbols may indicate unique stitches or techniques that are used in the pattern. It’s important to carefully read the pattern instructions and any accompanying key or glossary to understand these special symbols.
To help keep track of these symbols and abbreviations, it can be helpful to create a key or legend where you write down the meaning of each symbol. This way, you can easily refer to your key as you work through the pattern and ensure that you are interpreting the symbols correctly.
Knowing your yarn and needle size
When it comes to knitting, understanding the type of yarn you are working with and the appropriate needle size is crucial for achieving the desired outcome of your project. Yarn and needle size directly impact the gauge and tension of your knitting, which in turn affects the size and appearance of your final piece.
Yarn weight is one of the first things to consider when choosing a yarn for your knitting project. Yarns are categorized into different weights, ranging from super fine to super bulky. The weight of the yarn determines the thickness and density of the fibers, which in turn affects the drape and warmth of the knitted fabric. It’s important to match the recommended yarn weight specified in the knitting pattern to ensure that your project turns out as intended.
Needle size
Needle size is another important factor to consider. Needles come in various sizes, and the size you choose will depend on the thickness of your yarn and the desired tension of your knitting. The needle size indicated in the knitting pattern is a recommendation to achieve the specified gauge. You may need to use a smaller or larger needle size to achieve the same gauge, so it’s a good idea to make a gauge swatch before starting your project.
When choosing a needle size, pay attention to the type of needle as well. Straight needles are commonly used for flat knitting, while circular needles are preferred for knitting in the round or for larger projects that require more stitches. Additionally, the material of the needle can affect your knitting experience. Metal needles are smooth and slick, making them suitable for fast knitters, while wooden or bamboo needles provide more grip and control.
- Understanding yarn weight and matching it with the recommended weight in the pattern is important for achieving the desired outcome of your project.
- Choosing the right needle size will determine the tension and gauge of your knitting.
- Consider the type and material of the needle for optimal knitting experience.
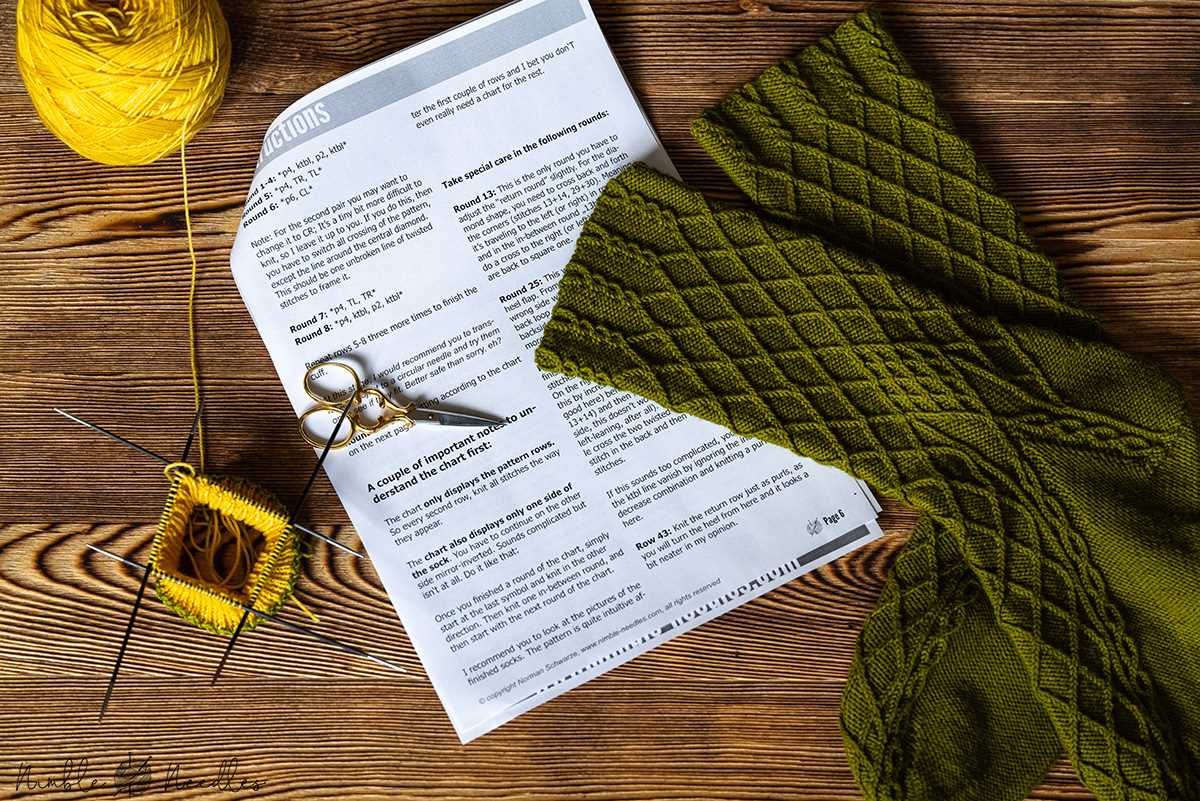
Identifying the stitch repeat
When reading a knitting pattern, one of the important things to identify is the stitch repeat. The stitch repeat is a group of stitches that are repeated throughout the pattern. It is usually indicated by a set of instructions enclosed within brackets or asterisks. By identifying the stitch repeat, you can easily follow the pattern and understand the structure of the design.
To identify the stitch repeat, look for a section in the pattern where the same set of instructions is repeated multiple times. It could be a series of knit and purl stitches, or a combination of different stitches. The repeat could be a single row of stitches, or it could span multiple rows. Once you have identified the repeat, you can focus on understanding and memorizing those specific instructions.
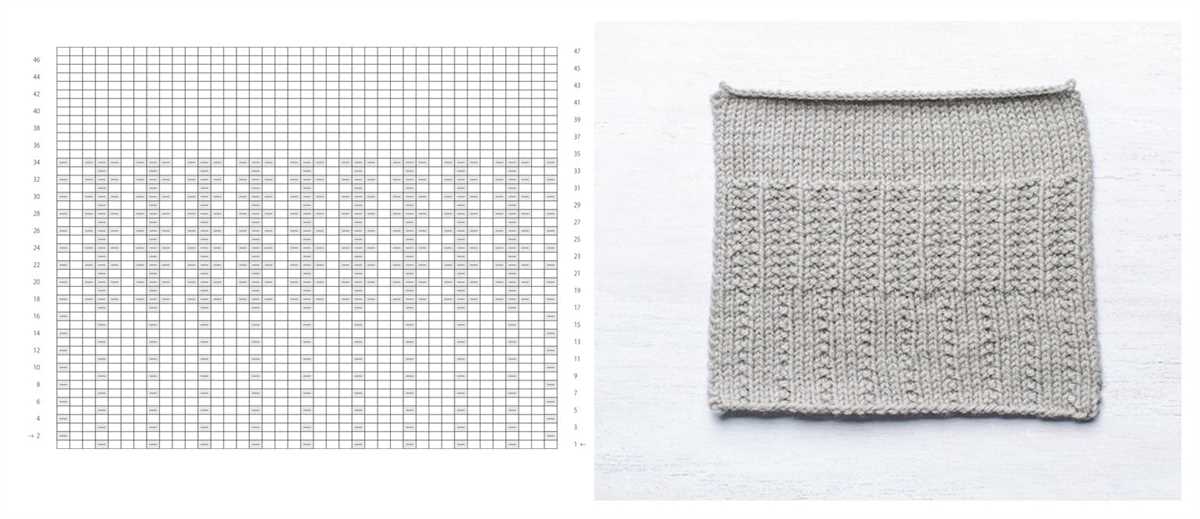
Some patterns may also include a stitch chart or diagram, which visually represents the stitch repeat. This can be helpful in understanding the pattern, especially if you are a visual learner. The chart will show each stitch and the order in which they are worked. You can follow along the chart as you knit, making it easier to keep track of the pattern repeats.
It is important to pay attention to any additional instructions or notes provided in the pattern regarding the stitch repeat. These instructions may include information on how many times the repeat should be worked, or any variations in the repeat for different sizes or sections of the project. Understanding and following these instructions will ensure that you achieve the desired outcome of the pattern.
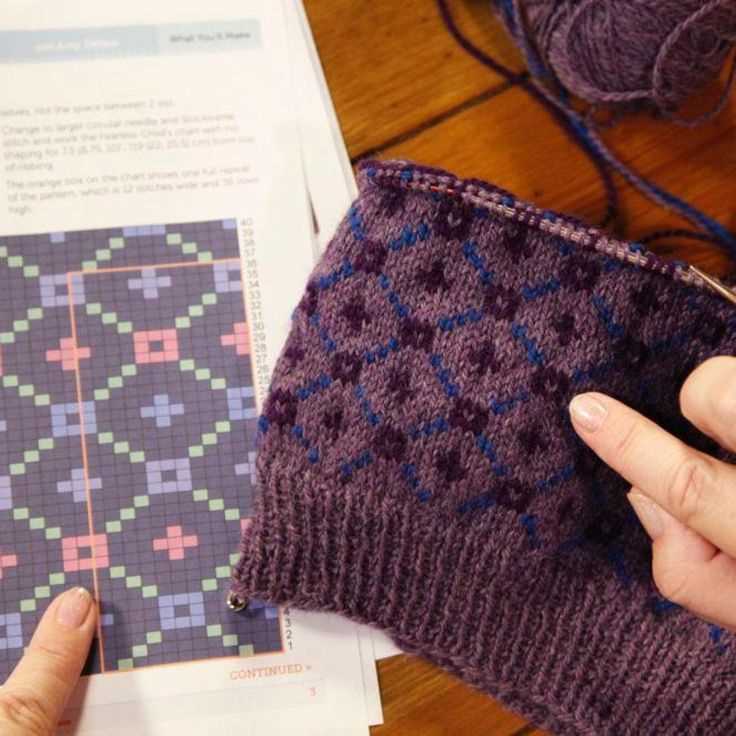
Interpreting the stitch chart
Reading a knitting pattern can be intimidating, especially when it includes a stitch chart. However, with a little practice and understanding of the symbols used, you’ll find that stitch charts are an incredibly helpful tool for visualizing your knitting pattern.
A stitch chart is a graphical representation of a knitting pattern, which shows the stitches and rows that make up the design. Each square on the chart represents one stitch, and the rows are represented by horizontal lines. The symbols used in the chart indicate the specific knitting stitches to be worked.
Understanding the symbols
When interpreting a stitch chart, it’s important to familiarize yourself with the symbols used. Different patterns may use slightly different symbols, but there are some common ones that you’ll often encounter:
- Knit stitch – represented by a filled-in square or a diagonal line going from the bottom left to the top right of the square.
- Purl stitch – represented by a blank square or a diagonal line going from the top left to the bottom right of the square.
- Yarn over – represented by an O or a small circle inside the square.
- Decrease – represented by a diagonal line going from the top left to the bottom right of the square, with a horizontal line intersecting it in the middle.
By familiarizing yourself with these common symbols, you’ll be able to decipher the stitch chart and follow along with the pattern instructions more easily. Some charts may also include additional symbols for specific knitting techniques, such as cables or lace patterns, so it’s always important to check the pattern key for any unfamiliar symbols.
Following the written instructions
When it comes to reading a knitting pattern, it is important to understand how to follow the written instructions. Knitting patterns are typically written in a combination of abbreviations and plain language instructions. It may seem overwhelming at first, but with a little practice, it becomes easier to understand and follow along.
1. Familiarize yourself with the abbreviations: Knitting patterns often use abbreviations to save space and make the instructions more concise. It is important to familiarize yourself with common knitting abbreviations, such as K for knit, P for purl, and YO for yarn over. Keep a knitting abbreviation chart handy to reference as you read the pattern.
2. Read the pattern from beginning to end: Start by reading the pattern from beginning to end to get an overall understanding of the project. Look for any special instructions or techniques that may be mentioned in the pattern. Take note of any pattern repeats or stitch counts that are important for the project.
3. Break down the instructions: Once you have a general understanding of the pattern, break down the instructions into smaller sections. Read each line carefully and ensure you understand what is being asked. Pay attention to any specific measurements or stitch counts that need to be followed.
4. Take notes if necessary: If you find it helpful, take notes as you read the pattern. Write down any specific instructions, stitch counts, or pattern repeats to help you keep track of what you need to do. This can be especially useful if the pattern is more complex or if there are multiple sizes or variations to follow.
5. Practice and ask for help if needed: Reading knitting patterns takes practice, so don’t be discouraged if you don’t understand everything right away. If you are unsure of a certain instruction or technique, don’t hesitate to ask for help. Joining a knitting group or seeking advice from more experienced knitters can be a great way to learn and improve your understanding of knitting patterns.
Recognizing different pattern formats
When you start reading a knitting pattern, it’s important to first understand the different formats that patterns can come in. Each format has its own style and organization, so familiarizing yourself with these formats will make it easier to follow along and execute the pattern correctly.
1. Written instructions: This is the most common format for knitting patterns. Written instructions are typically presented in a paragraph or list format, with each step or row written out in plain language. It’s important to read through the entire pattern before starting to ensure that you understand the sequence of instructions and any special stitches or techniques that may be required.
2. Charted instructions: Some knitting patterns use charts to represent the stitches and rows. These charts are made up of symbols and can be especially useful for complex stitch patterns or colorwork. Reading a charted pattern requires an understanding of the symbols used and the ability to follow along row by row. It’s important to pay attention to the key or legend provided with the chart to ensure you’re interpreting the symbols correctly.
3. Combination format: Many patterns use a combination of written and charted instructions. In this format, the pattern may provide written instructions for certain sections or steps, while utilizing charts for others. Pay close attention to the transitions between written and charted sections to ensure you’re following the correct instructions for each part of the pattern.
4. Abbreviations: Knitting patterns often use abbreviations to reduce the amount of text and make the instructions more concise. It’s important to familiarize yourself with common knitting abbreviations, such as k for knit, p for purl, and yo for yarn over, as these will be used throughout the pattern. Most patterns include a list of abbreviations and their meanings at the beginning or end of the pattern for reference.
By recognizing and understanding the different formats that knitting patterns can come in, you’ll be able to approach each pattern with confidence and successfully complete your knitting projects.
Understanding gauge and swatching
When it comes to knitting, understanding gauge and swatching is crucial for successfully completing a project. Gauge refers to the number of stitches and rows that are made within a specified measurement, typically given as the gauge information in the knitting pattern. It is important to achieve the correct gauge in order to ensure that the finished project will have the correct size and fit.
To determine gauge, it is recommended to create a swatch, which is a small sample of knitting that is worked using the same pattern and materials as the project. The swatch is then measured to determine the number of stitches and rows that are achieved within the specified measurement. This allows the knitter to adjust their tension and needle size if necessary in order to achieve the correct gauge.
Why is gauge important?
Gauge is important because it directly affects the size and fit of the finished project. If the knitter’s gauge does not match the gauge specified in the pattern, the final measurements of the project may differ significantly. For example, if the knitter’s gauge is too tight, the finished project will be smaller than intended, and if the gauge is too loose, the finished project will be larger.
How to swatch correctly?
When swatching, it is important to use the same yarn and needles that will be used for the project. This ensures that the swatch reflects the true tension and drape of the final project. The swatch should be worked in the same stitch pattern and blocked in the same manner as the project. It is also recommended to make the swatch slightly larger than the specified measurement, as this allows for more accurate measuring.
What to do if the gauge is incorrect?
If the gauge achieved in the swatch does not match the specified gauge in the pattern, adjustments can be made by changing the needle size or adjusting tension. Knitting a new swatch with the adjusted variables will help determine if the gauge has been corrected. It may take several attempts to achieve the correct gauge, but it is important to take the time to swatch and make adjustments in order to ensure the success of the final project.
Recognizing pattern repeats
When reading a knitting pattern, one important skill to have is the ability to recognize pattern repeats. Many patterns have a repeating pattern or sequence of stitches that are used throughout the project. By identifying this repeat, you can make your knitting process much easier and more efficient.
To recognize the pattern repeat, start by looking for any instructions that are repeated multiple times throughout the pattern. This could be a specific sequence of stitches, a set of instructions for a particular section, or even a repetitive motif or pattern stitch. Once you have identified these repeated instructions, you can focus on understanding and memorizing them, rather than trying to follow along with each line of the pattern individually.
Noticing the pattern repeat can also help you catch any mistakes
Another benefit of recognizing the pattern repeat is that it can help you catch any mistakes you may have made while knitting. If you notice a mistake in one section of the pattern repeat, you can easily identify where the error occurred and fix it without having to rip out the entire project.
A helpful technique to identify the pattern repeat is to use stitch markers. As you knit, place a stitch marker at the beginning and end of the pattern repeat. This will visually highlight the repeat and make it easier to keep track of your progress. You can also use different colored stitch markers to mark different sections of the pattern, such as the border or the main body.
In conclusion, recognizing pattern repeats in a knitting pattern is crucial for understanding and efficiently completing the project. By identifying the repeated instructions and using stitch markers, you can easily navigate through the pattern, catch any mistakes, and create beautiful knitwear.
Using lifelines for complex patterns
A lifeline is a helpful technique that can save you a lot of time and frustration when working on complex knitting patterns. It involves inserting a thin thread or yarn through a row of stitches to mark a specific point in your work. Lifelines can be particularly useful when tackling intricate lace patterns or any pattern that requires a lot of concentration and attention to detail.
To use a lifeline, you will need a piece of contrasting colored yarn or thread that is longer than your knitting project. The lifeline is inserted at a specific point in your knitting, usually after completing a section or row where you want to mark your progress. You can thread the lifeline through the stitches by using a tapestry needle or by simply threading it through a knitting needle and passing it through the stitches. Make sure the lifeline is snug, but not too tight, so that it doesn’t distort the stitches.
Why should you use lifelines?
- Firstly, lifelines allow you to easily go back and fix any mistakes without having to unravel your entire project. If you make a mistake in a lace pattern, for example, you can simply drop down to the lifeline and pick up the stitches again, rather than having to rip back all your work and start over.
- Secondly, lifelines provide a sense of security and peace of mind. When working on complex patterns that require a lot of concentration, it’s easy to make mistakes. Having a lifeline in place can give you the confidence to push your skills and try more challenging projects, knowing that you have a safety net in case something goes wrong.
- Finally, lifelines can also serve as a visual reference point in your knitting. They can help you keep track of your progress and ensure that you’re following the pattern correctly. By inserting lifelines at regular intervals, you can easily see if you have made any mistakes or if you need to make adjustments to your tension.
Overall, lifelines are a valuable tool for any knitter tackling complex patterns. They can save you time, frustration, and potential mistakes, allowing you to focus on the joy of knitting and creating beautiful projects.
Dealing with different knitting techniques
When reading a knitting pattern, it is important to understand the various techniques that may be used. These techniques can vary depending on the type of stitch being used, the pattern design, and the desired outcome of the project. By familiarizing yourself with these techniques, you can confidently tackle any knitting pattern that comes your way.
1. Basic stitches: The foundation of knitting lies in mastering the basic stitches. These include the knit stitch (where the yarn is pulled through a loop), the purl stitch (where the yarn is pulled back over the needle), and the slip stitch (where a stitch is moved from one needle to the other without being worked). These stitches form the building blocks for many knitting patterns.
2. Advanced stitches: Once you have mastered the basics, you can move on to more advanced stitches. These can include cables, lace, colorwork, and textured stitches. Cables involve crossing stitches over each other to create a twisted effect. Lace patterns typically involve creating holes or eyelets in the fabric. Colorwork techniques allow you to incorporate different colors into your knitting, while textured stitches create patterns and designs on the fabric.
3. Increases and decreases: When following a knitting pattern, you may come across instructions for increasing or decreasing stitches. Increases involve adding stitches to your work, while decreases involve removing stitches. The most common increase is the yarn over (where an extra loop is created on the needle), while common decreases include knit two together (where two stitches are knit together as one) and slip, slip, knit (where two stitches are slipped, then knit together).
4. Finishing techniques: Once you have completed the main body of your knitting project, you will usually need to finish it off. This can involve techniques such as binding off (where the stitches are secured and the work is taken off the needles), seaming (where pieces of the project are sewn together), and blocking (where the finished project is gently stretched and shaped to its final dimensions). These finishing techniques give your project a polished and professional look.
- By understanding and practicing different knitting techniques, you can take on a variety of patterns with confidence.
- Don’t be afraid to try new techniques and challenge yourself. Knitting is a versatile craft with endless possibilities.
Troubleshooting common pattern mistakes
Knitting patterns can sometimes be confusing, and mistakes are bound to happen. But don’t worry, with a little troubleshooting, you can easily fix common pattern mistakes and continue knitting with confidence.
Here are some common pattern mistakes and how to troubleshoot them:
Mistake: Dropped stitch

If you accidentally drop a stitch, don’t panic. Simply use a crochet hook or a spare knitting needle to pick up the dropped stitch and work it back up to the correct row. Take your time and make sure the stitch is properly placed on the needle before continuing.
Mistake: Miscounted stitches
If you realize that you have miscounted your stitches and have too many or too few, you’ll need to carefully unravel the row to the mistake and fix it. To unravel, simply pull the yarn from the last stitch worked and gently unravel row by row until you reach the mistake. Then, work the stitches correctly according to the pattern and continue knitting.
Mistake: Wrong stitch used
If you accidentally use the wrong stitch or forget to perform a specific stitch, you may notice that your pattern doesn’t look right. In this case, you have two options. You can either carefully unravel the row to the mistake, fix it, and continue knitting, or you can leave the mistake as is and treat it as a design element. This decision depends on the severity of the mistake and your personal preference.
Mistake: Incorrect gauge
If your finished piece doesn’t match the measurements specified in the pattern, it’s likely that you have an incorrect gauge. Gauge refers to the number of stitches and rows per inch in your knitting. To troubleshoot this mistake, you can swatch again with a different needle size or adjust your tension while knitting. Remember to always check your gauge before starting a project to ensure a proper fit.
Remember, knitting is a learning process, and mistakes are a normal part of the journey. The key is to stay calm and patient when troubleshooting pattern mistakes. With practice and experience, you’ll become better at detecting and fixing errors. Happy knitting!