
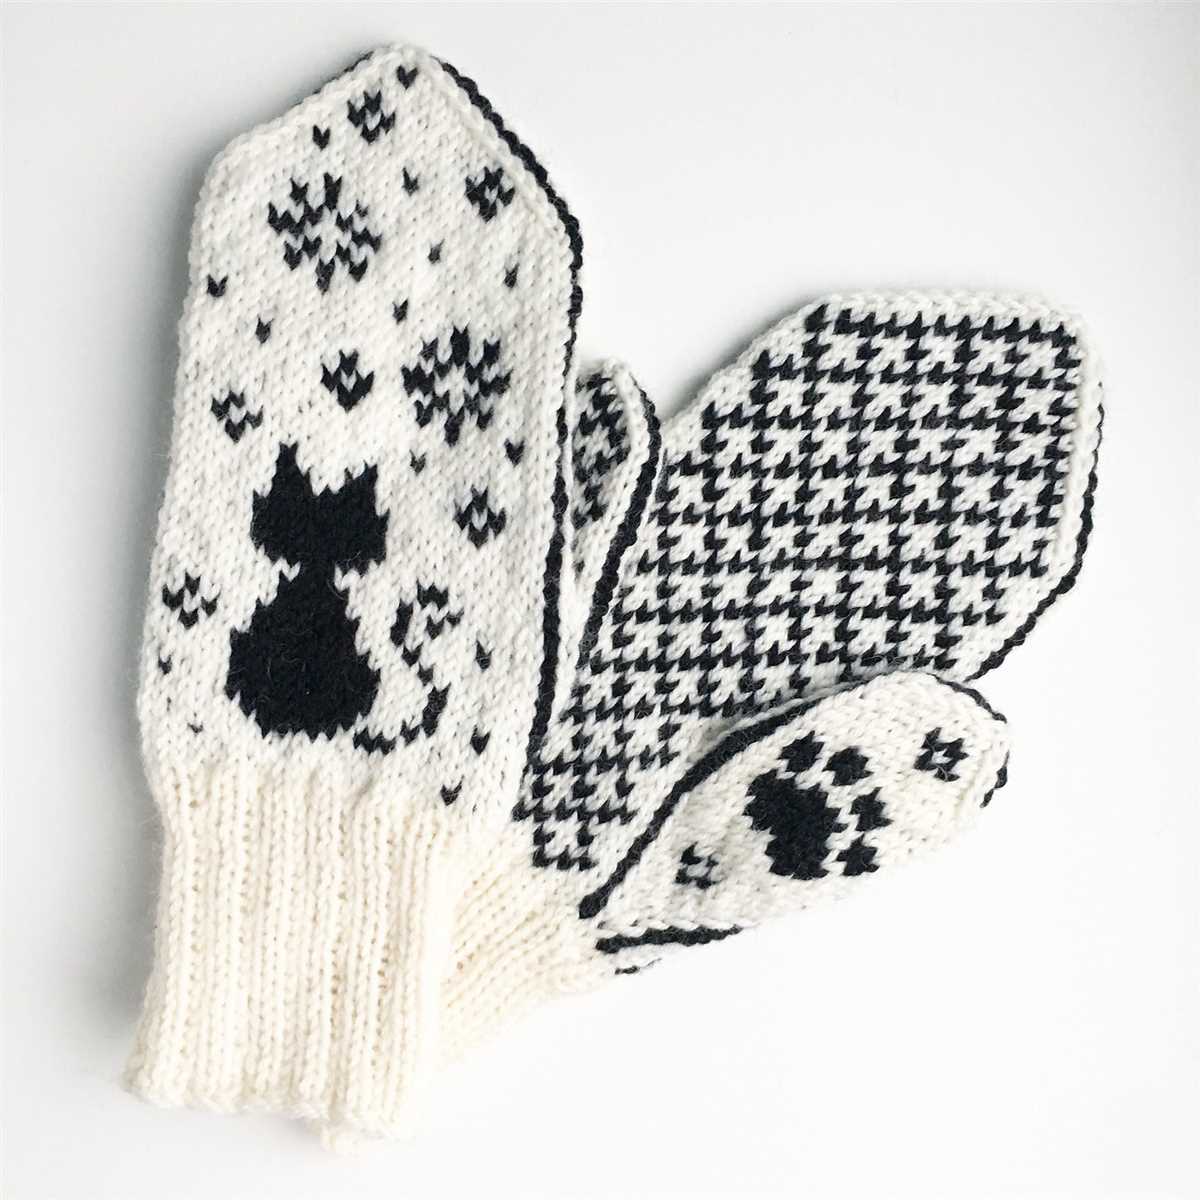
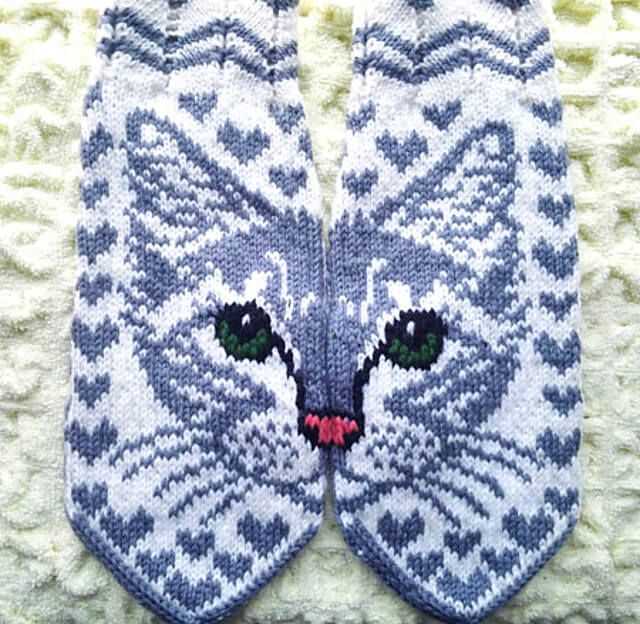
Are you a cat lover who enjoys crafting? If so, then this cat mittens knitting pattern is perfect for you! Hand-knitted mittens are not only cozy and warm, but they also make a fashionable statement. And what better way to show off your love for cats than by knitting adorable mittens in the shape of cats’ paws?
Whether you’re a beginner or an experienced knitter, this pattern is easy to follow and promises hours of fun. With a few skeins of soft, fluffy yarn and some basic knitting supplies, you’ll be able to create the perfect pair of cat mittens for yourself or for a gift.
In this article, we’ll provide you with a step-by-step guide on how to knit these cute cat mittens. From casting on to decreasing, you’ll learn all the techniques needed to complete this pattern. We’ll also include helpful tips and tricks along the way, so even if you’re new to knitting, you’ll feel confident in your abilities.
Cat Mittens Knitting Pattern
If you love cats and enjoy knitting, then this cat mittens knitting pattern is perfect for you! These adorable mittens are not only practical for keeping your hands warm, but they also feature a cute cat design that all cat lovers will adore.
Materials Needed:
- Double-pointed knitting needles, size 6 (4mm)
- Worsted weight yarn in two contrasting colors
- Yarn needle
- Stitch markers
Instructions:
- Using the long-tail cast on method, cast on 40 stitches with your main color.
- Divide the stitches evenly onto three double-pointed needles, with 16 stitches on each needle and 8 stitches on the fourth needle.
- Join in the round, being careful not to twist the stitches. Place a stitch marker to indicate the beginning of the round.
- Knit 2 rounds in a rib stitch pattern (k2, p2).
- Switch to your contrast color and knit 1 round.
- Begin the cat pattern:
| Round | Pattern |
|---|---|
| 1 | *K4 with main color, k2 with contrast color; repeat from * to end of round. |
| 2-4 | K all stitches with main color. |
| 5 | *K2 with contrast color, k4 with main color; repeat from * to end of round. |
| 6-8 | K all stitches with main color. |
| 9 | *K2 with main color, k2 with contrast color, k2 with main color; repeat from * to end of round. |
| 10 | K all stitches with main color. |
| 11 | Knit all stitches with contrast color. |
| 12-14 | K all stitches with main color. |
| 15 | Knit all stitches with contrast color. |
| 16-18 | K all stitches with main color. |
Continue working the cat pattern for the desired length of your mittens. Once you reach the desired length, switch back to your main color and knit 4 rounds. Bind off all stitches and weave in any loose ends. Repeat the pattern to make a matching mitten.
These cat mittens are not only fun to make, but they also make a great gift for any cat lover in your life. Whether you keep them for yourself or give them away, these adorable cat mittens are sure to be a hit!
Why Knitting Cat Mittens is a Popular Craft
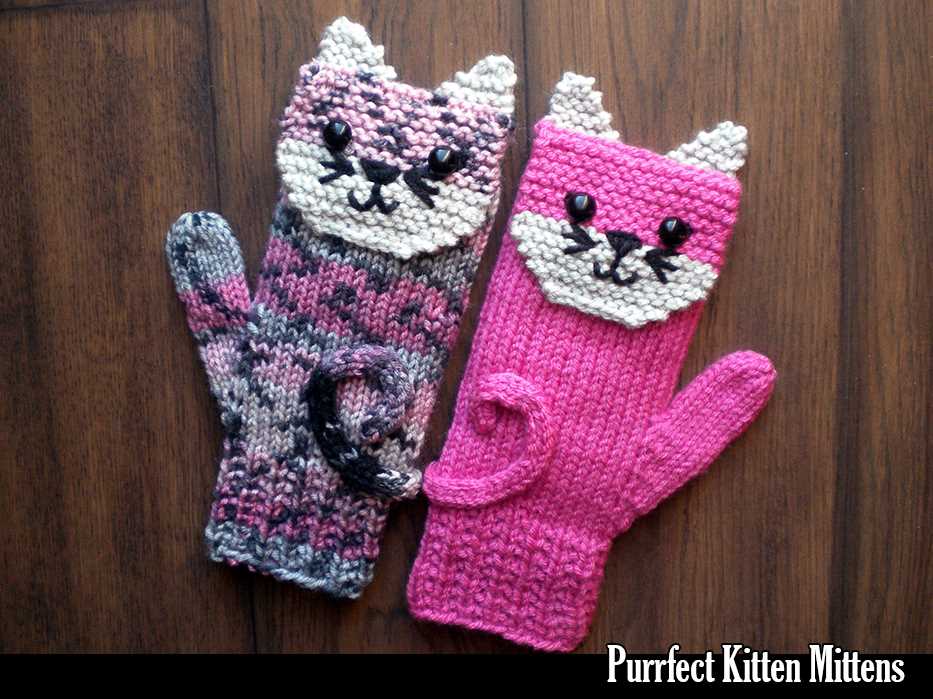
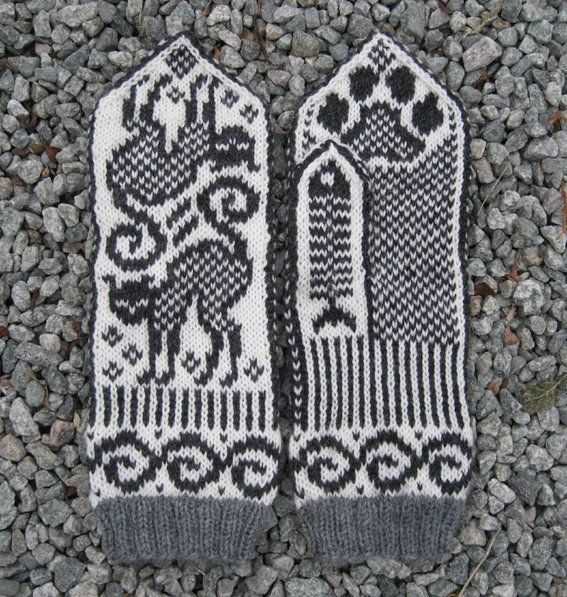
Knitting has always been a popular craft, with people all over the world enjoying the relaxing and creative process of turning wool into beautiful garments. One particular knitting pattern that has gained a lot of popularity in recent years is the cat mittens pattern. This pattern allows knitters to create adorable mittens that resemble cat paws, complete with little paw pads and cute little claws.
There are several reasons why knitting cat mittens has become such a popular craft. First and foremost, it’s a fun and whimsical project that allows knitters to showcase their creativity and sense of humor. The cat mittens pattern offers a unique twist on traditional mittens, making them an eye-catching accessory that is sure to be a conversation starter.
Additionally, knitting cat mittens is a great way to show love for our furry feline friends. Cat lovers all over the world can’t resist the charm of these cat paw-inspired mittens, and knitting them is a way to pay homage to our beloved pets. It’s also a great way to incorporate a bit of cat-themed fashion into our daily lives.
Not only are cat mittens cute and stylish, but they are also functional. The pattern typically includes instructions for creating warm and cozy mittens, making them perfect for cold winter days. This makes the cat mittens pattern a practical choice for knitters who want to combine fashion with functionality.
Knitting cat mittens is also a great project for knitters of all skill levels. Whether you’re a beginner or an experienced knitter, the cat mittens pattern offers a fun and manageable challenge. The pattern typically involves basic knitting stitches and techniques, allowing knitters to practice their skills while creating something cute and unique.
- Overall, knitting cat mittens has become a popular craft because it offers a fun, creative, and whimsical way to show love for cats while also creating functional and stylish accessories.
Choosing the Right Yarn for Your Cat Mittens
When knitting a pair of cat mittens, it is important to choose the right yarn that is not only comfortable for your furry friend but also durable enough to withstand their playful nature. Here are some factors to consider when selecting yarn for your cat mittens:
1. Fiber type
When it comes to yarn for cat mittens, natural fibers such as wool or cotton are usually the best options. Wool provides warmth and is also a great moisture-wicking material, keeping your cat’s paws dry. Cotton, on the other hand, is lightweight and breathable, making it suitable for warmer climates.
2. Weight
The weight of the yarn you choose will depend on the season and your cat’s needs. For colder weather, you may want to opt for a bulky or worsted weight yarn to provide extra warmth. In contrast, a lighter weight yarn, such as fingering or sport weight, may be more appropriate for milder climates or if your cat tends to get overheated easily.
3. Durability
Cats are known for their sharp claws and playful antics, so it’s important to choose a yarn that can withstand their paws’ scratching and biting. Look for yarns that are tightly spun and have a durable composition to prevent snags and unraveling. Yarns with added reinforcement, such as nylon or acrylic blends, can also help increase durability.
4. Color and texture
While not necessarily a functional aspect, the color and texture of the yarn can add some extra flair to your cat mittens. Consider choosing a color that complements your cat’s fur or a texture that adds visual interest to the mittens. However, keep in mind that some cats may be more attracted to certain colors or textures, so choose wisely!
By taking these factors into consideration, you can ensure that the yarn you choose for your cat mittens is not only suitable for your cat’s needs but also enjoyable to work with during the knitting process. Happy knitting!
Essential Tools and Supplies for Knitting Cat Mittens
When it comes to knitting cat mittens, having the right tools and supplies is essential for a successful project. Here are some key items that you will need to get started:
- Knitting Needles: A pair of size 7 or 8 knitting needles is recommended for this project. Choose a pair that feels comfortable to hold and manipulate.
- Yarn: You will need approximately 100-150 yards of worsted weight yarn in the color of your choice. Look for yarns that are soft and durable, as they will need to withstand wear and tear.
- Tapestry Needle: A tapestry needle is used for weaving in loose ends and sewing up seams. It should have a large eye to accommodate the thickness of the yarn.
- Stitch Markers: Stitch markers are used to mark specific stitches or sections of a pattern. They can be helpful in keeping track of increases, decreases, or pattern repeats.
- Scissors: A good pair of fabric scissors is necessary for cutting yarn and trimming loose ends. Make sure they are sharp and easy to handle.
- Row Counter: A row counter can be useful for keeping track of the number of rows worked, especially if the pattern requires multiple repeats or shaping.
- Measuring Tape: A measuring tape is essential for ensuring that the mittens fit properly. Use it to measure your hand circumference and length to determine the appropriate size.
In addition to these basic tools, you may also want to have a stitch holder or scrap yarn for holding stitches, a crochet hook for picking up dropped stitches, and a blocking mat and pins for blocking and shaping the mittens. With these essential tools and supplies, you’ll be well-equipped to start knitting your very own pair of cozy cat mittens.
Understanding the Basic Stitches for Knitting Cat Mittens
When it comes to knitting cat mittens, it’s important to have a solid understanding of the basic stitches. These stitches will form the foundation of your project and determine the overall look and feel of the finished mittens. Whether you’re a beginner or an experienced knitter, mastering these stitches is essential for creating beautiful and functional cat mittens.
One of the most common stitches used in knitting cat mittens is the knit stitch. This stitch is created by inserting the right needle into the front loop of the stitch on the left needle, from left to right, and pulling the yarn through to form a new stitch. The knit stitch creates a smooth, v-shaped pattern and is often used for the main body of the mittens.
The purl stitch is another basic stitch that is commonly used in cat mittens knitting patterns. This stitch is created by inserting the right needle into the front loop of the stitch on the left needle, from right to left, and pulling the yarn through to form a new stitch. The purl stitch creates a bumpy, textured pattern and is often used for creating ribbing or adding variation to the design of the mittens.
Another stitch that is frequently used in cat mittens knitting patterns is the decrease stitch. This stitch is used to create shaping in the mittens, such as the thumb or the top of the mittens. The decrease stitch is created by knitting two stitches together or by slipping stitches and passing the slipped stitch over the knit stitch. This stitch helps to create a snug fit and adds visual interest to the finished mittens.
As you become more comfortable with these basic stitches, you can start to experiment with different knitting techniques and stitch patterns to create unique and personalized cat mittens. Whether you’re knitting for yourself or for a furry friend, having a strong foundation in these basic stitches will help you create mittens that are both cozy and stylish.
Step-by-Step Guide to Knitting Cat Mittens
Are you looking to knit a cozy pair of mittens for your feline friend? Look no further! In this step-by-step guide, we will walk you through the process of knitting cat mittens. These adorable accessories will keep your cat’s paws warm and stylish during the colder months.
Materials Needed:
- Knitting needles (size 6)
- Yarn (choose a soft and durable yarn in your preferred color)
- Tapestry needle
- Scissors
Step 1: Measure and Cast On
Start by measuring your cat’s paw. Take the measurement from the base of the paw to the tip of the longest toe. Once you have the measurement, cast on the desired number of stitches. It’s best to use a stretchy cast-on method to ensure a comfortable fit.
Step 2: Knit the Cuff
Begin knitting the cuff of the mitten using a rib stitch pattern. This will give the mittens extra stretch and help them stay in place. Knit the desired length for the cuff, making sure to leave enough room for the paw to fit comfortably.
Step 3: Shape the Thumb
To create a thumb hole, you will need to shape the thumb section. This can be done by knitting a few stitches together or creating a separate opening for the thumb. Follow a pattern or use your own preferred method to shape the thumb to your cat’s needs.
Step 4: Knit the Body
Continue knitting the body of the mitten, making sure to adjust the stitch count to fit your cat’s paw. You can use a combination of knit and purl stitches or any other stitch pattern you prefer. Knit until the mitten reaches the desired length, leaving enough room for the cat’s claws to comfortably poke through.
Step 5: Shape the Top
To shape the top of the mitten, you will need to decrease stitches gradually. This can be done by knitting two stitches together or using any other decrease method. Decrease until you have a small enough opening to close the top of the mitten.
Step 6: Finishing Touches
Weave in any loose ends using a tapestry needle and trim off any excess yarn. If desired, you can add a small button or a decorative embellishment to the cuff for added flair. Make sure all the seams are secure and check that the mittens fit your cat’s paws comfortably.
And there you have it – a pair of adorable cat mittens! Your furry friend will be warm and stylish, thanks to your knitting skills. Don’t forget to share your creations with fellow cat lovers and enjoy the cozy snuggles with your cat all winter long.
Tips and Tricks for Perfect Fit Cat Mittens
Knitting cat mittens can be a fun and rewarding project, but getting the perfect fit can sometimes be a challenge. Here are some tips and tricks to help you create cat mittens that will fit your feline friend perfectly.
1. Measure your cat’s paws
Before starting your knitting project, it’s important to accurately measure your cat’s paws. This will help ensure that the mittens you make will fit properly. Use a soft measuring tape to measure the length and width of your cat’s paws. Take note of these measurements and refer to them while knitting.
2. Choose the right yarn and needle size
The yarn and needle size you choose can greatly affect the fit of your cat mittens. Opt for a yarn that is soft and stretchy, as it will allow for a better fit. Additionally, choose a needle size that matches the yarn’s recommended gauge. Using the correct needle size will ensure that your stitches are neither too tight nor too loose.
3. Consider adding ribbing
Adding ribbing at the wrists of the cat mittens can help improve the fit and keep them in place. Ribbing creates elasticity, allowing the mittens to stretch and conform to your cat’s paws. Consider using a 1×1 ribbing pattern, alternating knit and purl stitches, for a snug and comfortable fit.
4. Use a pattern specifically designed for cat mittens
While it may be tempting to use a generic mitten pattern and adjust it for your cat, using a pattern specifically designed for cat mittens will give you better results. These patterns take into account the unique shape and size of a cat’s paws, ensuring a perfect fit. Look for patterns that include multiple sizes to accommodate different cat breeds.
5. Try the mittens on your cat as you go
To ensure the best possible fit, try the mittens on your cat as you go. This will allow you to make any necessary adjustments while knitting. If the mittens are too big or too small, you can easily make modifications to achieve the perfect fit.
By following these tips and tricks, you’ll be well on your way to knitting cat mittens that fit your furry friend just right. Remember to be patient and enjoy the process, as the end result will be a pair of cozy and stylish mittens that your cat will love.
Adding Extra Flair to Your Cat Mittens
Knitting cat mittens is a fun and creative way to keep your furry friend warm during the colder months. However, why settle for plain and simple mittens when you can add extra flair to make them truly unique? Here are some ideas to help you add that special touch to your cat mittens:
1. Colorful Patterns:
Add a pop of color to your cat mittens by incorporating vibrant patterns. You can use multiple colors of yarn to create stripes, polka dots, or even intricate Fair Isle motifs. This will not only make your mittens visually appealing but also showcase your knitting skills.
2. Embroidered Designs:
Take your cat mittens to the next level by adding embroidered designs. You can embroider your cat’s name, paw prints, or any other cute motifs onto the back of the mittens. This personalized touch will make your mittens truly one-of-a-kind and a stylish accessory for your furry friend.
3. Button Accents:
Add some extra flair to your cat mittens by attaching decorative buttons. Choose buttons in different shapes, sizes, and colors that complement the overall design of your mittens. This simple addition will instantly elevate the look of your mittens and make them stand out.
4. Faux Fur Trim:
Add a touch of elegance and luxury to your cat mittens by sewing on faux fur trim. This cozy embellishment not only adds warmth but also gives your mittens a sophisticated and fashionable vibe. Opt for neutral-colored fur trim or go bold with vibrant shades to match your cat’s personality.
5. Embellished Cuffs:
Add some extra pizzazz to the cuffs of your cat mittens by embellishing them with beads, sequins, or small pom-poms. This eye-catching detail will make your mittens look festive and whimsical, perfect for those special occasions or holiday festivities.
By adding extra flair to your cat mittens, you can create a truly unique and stylish accessory for your feline friend. Whether it’s with colorful patterns, embroidered designs, button accents, faux fur trim, or embellished cuffs, these small additions will make a big difference in the overall look and feel of your mittens. So get creative, experiment with different techniques, and make your cat mittens truly special!
How to Care for Your Knitted Cat Mittens
Knitted cat mittens are not only adorable, but they also provide warmth and protection for your furry friend’s paws. To ensure that your cat mittens last a long time and stay in good condition, it’s important to follow proper care instructions.
1. Hand Wash Only
Do not machine wash or tumble dry your cat mittens. Knitted items can easily stretch or become misshapen in the washing machine. Instead, fill a sink or basin with lukewarm water and a small amount of gentle detergent. Gently agitate the mittens in the water to remove any dirt or stains. Rinse thoroughly and gently squeeze out excess water. Lay the mittens flat on a towel to dry.
2. Avoid Excessive Stretching
Avoid pulling or stretching your cat mittens. While knitting patterns are designed to stretch and fit snugly, excessive stretching can cause the mittens to lose their shape. When putting the mittens on your cat, gently slide them onto each paw, making sure not to tug or pull too tightly. This will help preserve their shape and ensure a comfortable fit for your furry friend.
3. Store Properly
Store your cat mittens in a cool, dry place. Avoid placing them near direct sunlight or heat sources, as this can cause the yarn to fade or become damaged. You can fold the mittens neatly and store them in a drawer or use a small storage container to keep them safe and protected when not in use. Additionally, it’s a good idea to keep the mittens away from any sharp objects or rough surfaces that could snag or tear the delicate knitting.
4. Handle with Care
Handle your cat mittens with care. While knitted items are generally durable, they can still be delicate. Avoid pulling or tugging on any loose threads, as this can unravel the knitting. When taking the mittens off your cat, gently slide them off rather than yanking or pulling. If you notice any loose threads or snags, it’s best to repair them as soon as possible to prevent further damage.
By following these care tips, you can ensure that your knitted cat mittens remain in excellent condition, providing your furry friend with both warmth and style.
Knitting Cat Mittens for Beginners
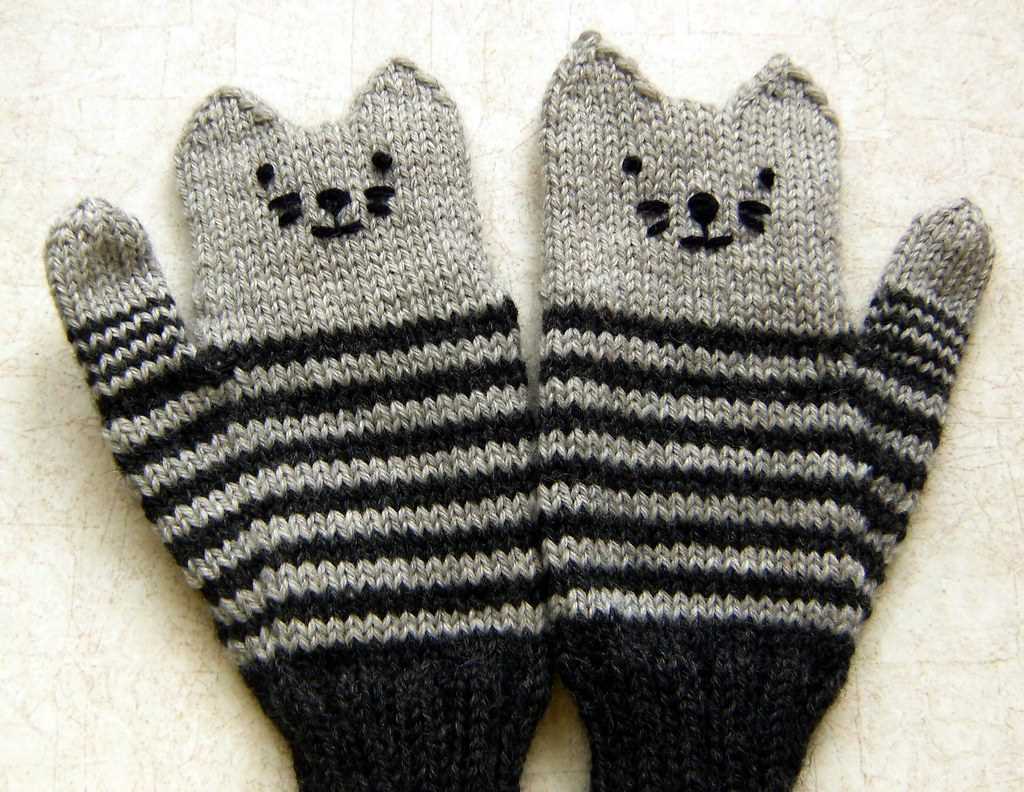
Knitting cat mittens can be a fun and rewarding project for beginners. Whether you’re a cat lover or simply looking for a cute accessory to keep your hands warm, these mittens are a great choice. With a simple knitting pattern and basic techniques, even those new to knitting can easily create a pair of adorable cat-themed mittens.
Gather Materials
Before you start knitting, you’ll need to gather the necessary materials. You’ll need a pair of knitting needles, usually size 8 or 9, and a ball of yarn in your desired color. Additionally, you may want to have a yarn needle for weaving in ends, stitch markers to help keep track of your progress, and a tape measure to ensure the correct sizing.
Follow a Pattern
It’s important to find a knitting pattern specifically designed for cat mittens, as these patterns will include the unique details that make the mittens look like cute little cats. The pattern will provide step-by-step instructions on how to create each section of the mitten, from the cuff to the thumb. Make sure to read the pattern carefully and follow the instructions closely.
Start by casting on the required number of stitches and knitting the cuff of the mitten. Then, you’ll move on to knitting the hand section and shaping the thumb. The pattern may include special stitches, such as increases or decreases, to create the cat ears and face. Take your time and practice these stitches if you’re unfamiliar with them.
Finishing Touches
Once both mittens are complete, you’ll need to weave in any loose ends and sew the mittens together. Follow the instructions provided in the pattern for finishing the mittens, making sure to securely sew any seams to prevent unraveling. You can also add embellishments, such as buttons or embroidery, to give your mittens a personalized touch.
Knitting cat mittens for beginners can be a fun and satisfying project. As you gain more experience and confidence, you can experiment with different colors and patterns to create unique designs. So grab your knitting needles, some yarn, and start crafting your own cozy pair of cat mittens!
Advanced Techniques for Knitting Cat Mittens
In order to create intricate and detailed cat mittens, it is essential to master advanced knitting techniques. These techniques not only enhance the overall look of the mittens but also provide added functionality and durability. Here are some advanced techniques that can take your cat mitten knitting to the next level:
1. Colorwork:
Colorwork involves creating patterns and designs using multiple colors of yarn. This technique can be used to incorporate unique cat-themed motifs on the mittens, such as small paw prints or cat faces. Fair Isle and intarsia are two popular colorwork methods that can be explored to add depth and personality to your cat mittens.
2. Cables:
Cables are a great way to add texture and interest to your cat mittens. By using a cable needle or a cable stitch holder, you can achieve intricate twists and braids in the fabric. Consider incorporating cable patterns resembling cat tails or even whiskers for a playful touch.
3. Lace Knitting:
Although lace knitting is often associated with delicate and feminine designs, it can also be used in cat mitten knitting to create intricate cat-inspired patterns. You can use lace stitches to mimic the shape of cat paws or to create a lace panel showcasing a silhouette of a cat.
4. Provisional Cast-On:
A provisional cast-on is an advanced technique that allows for easy customization and adjustment of the mitten length. By using this technique, you can easily try on the mittens as you go, ensuring a perfect fit. This is especially helpful when knitting cat mittens as different cat breeds may have varying paw sizes.
5. Thumb Gussets:
Thumb gussets are an important feature in cat mittens to provide a comfortable and flexible fit around the thumb. By employing advanced techniques such as increases and decreases, you can create a gusset that allows the mittens to contour to the shape of your cat’s paw, ensuring a snug and secure fit.
By incorporating these advanced knitting techniques into your cat mitten projects, you can create unique and personalized accessories for your feline friends. Whether you choose to experiment with colorwork, cables, lace knitting, or utilize the benefits of provisional cast-on and thumb gussets, these techniques will elevate your knitting skills and result in beautifully crafted cat mittens.
Customizing Cat Mittens for Different Breeds
When it comes to knitting cat mittens, one size does not fit all. Different cat breeds have different paw sizes and shapes, so it’s important to customize the pattern to ensure a perfect fit. With a few simple modifications, you can create mittens that are tailored to your cat’s specific breed.
1. Measure the paw size: The first step in customizing cat mittens is to measure your cat’s paw size. Use a soft measuring tape to measure the width and length of the paw. This will give you the necessary measurements to adjust the pattern.
Paw width:
- For larger breeds like Maine Coon or Norwegian Forest cats, add a few stitches to the width of the mitten pattern to accommodate their wider paws.
- For smaller breeds like Siamese or Abyssinian cats, reduce the number of stitches to make the mitten narrower.
Paw length:
- For breeds with longer paws like the Bengal or Oriental Shorthair, add a few rows to the length of the mitten pattern to ensure that their paws are fully covered.
- For breeds with shorter paws like the Scottish Fold or Munchkin, reduce the number of rows to make the mitten shorter.
2. Adjust the thumb placement: In addition to customizing the size of the mittens, it’s also important to adjust the placement of the thumb opening. Cats with different breeds may have their thumbs positioned differently on their paws. This modification will ensure a comfortable and functional fit.
3. Consider breed-specific characteristics: It’s also important to consider any specific characteristics of your cat’s breed that may require additional customizations. For example, if your cat has extra toes, you may need to modify the pattern to accommodate these unique features.
By customizing cat mittens to the specific breed, you can ensure a comfortable and secure fit for your furry friend. Your cat will appreciate the extra care and attention, and you’ll have the satisfaction of knowing that the mittens are both functional and stylish.
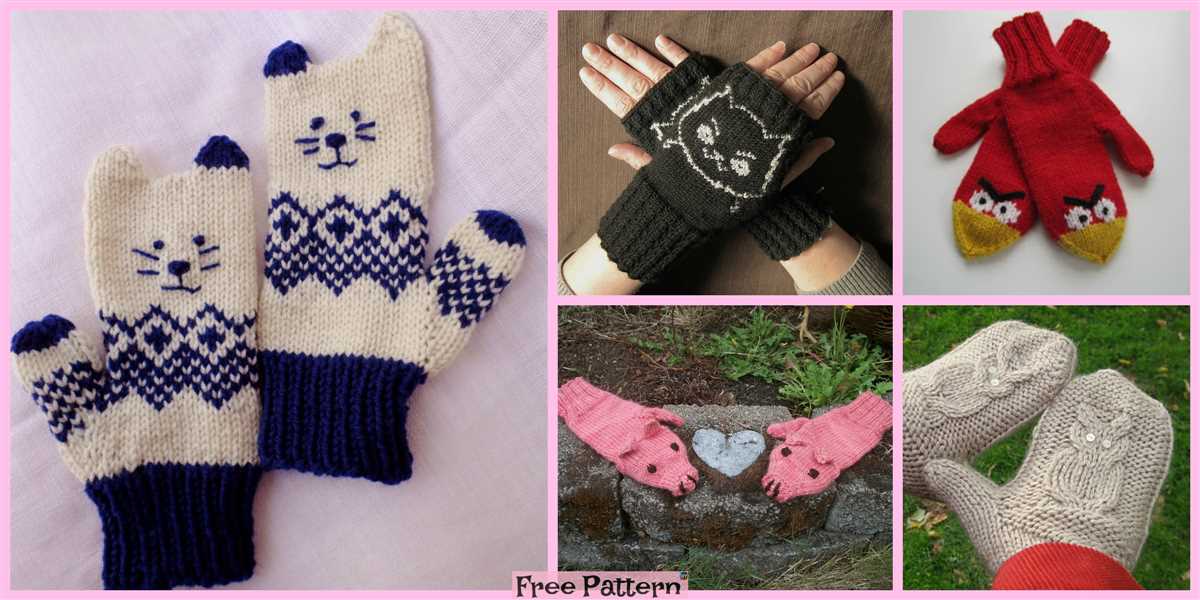
Where to Find Cat Mittens Knitting Patterns
If you’re looking to knit adorable cat mittens for yourself, your children, or as a gift, there are many places to find patterns online. Here are a few popular options:
- Knitting websites: Many knitting websites offer a wide variety of cat mittens knitting patterns. Some popular ones include Ravelry, Knitting Pattern Central, and LoveKnitting. These websites often have patterns for different skill levels and styles, so you can find something that suits your needs.
- Pattern books: There are also many books dedicated to cat mittens knitting patterns. Some popular ones include “Cat Mittens Galore” by Susan Anderson and “Cute Cat Knits” by Emma King. These books not only provide patterns, but they also offer tips and techniques for knitting cat mittens.
- Online marketplaces: Online marketplaces like Etsy and eBay often have independent sellers who offer cat mittens knitting patterns. These patterns may be unique and offer a different style or design from the ones found on knitting websites or in books.
Overall, finding cat mittens knitting patterns is relatively easy with the abundance of resources available online. Whether you’re a beginner or an experienced knitter, you’re sure to find a pattern that you love and can use to create adorable cat mittens for yourself or your loved ones.
Q&A:
What are cat mittens?
Cat mittens are small gloves specially designed for cats to wear. They are typically made of soft and warm materials to keep the cat’s paws cozy during cold weather.
How do I knit cat mittens?
To knit cat mittens, you will need to have basic knitting skills. Start by selecting the appropriate yarn and needles for your desired size. Then, cast on the required number of stitches and knit in the desired pattern until the mitten reaches the desired length. Finally, shape the thumb opening and finish off the mitten. There are many cat mitten knitting patterns available online that you can follow for detailed instructions.
What materials are needed to knit cat mittens?
To knit cat mittens, you will need yarn in your desired color and thickness, knitting needles in the appropriate size for your chosen yarn, a pair of scissors, and a yarn needle for finishing. Optional materials include stitch markers and a tape measure.
Are there different sizes available for cat mittens knitting patterns?
Yes, there are different sizes available for cat mittens knitting patterns. You can find patterns for various cat sizes, from small kittens to larger adult cats. It’s important to choose a pattern that matches your cat’s measurements for the best fit.
Can I customize the design of my cat mittens?
Yes, you can customize the design of your cat mittens according to your preferences. You can choose different colors, add patterns or motifs, or even incorporate personalized details like embroidery or buttons. Just make sure to consider your cat’s comfort and safety when making any modifications.
Where can I find a cat mittens knitting pattern?
You can find cat mittens knitting patterns on various knitting websites, craft stores, or even on online marketplaces like Etsy. There are also many free knitting patterns available on websites and forums dedicated to knitting.
What materials do I need to knit cat mittens?
To knit cat mittens, you will need yarn in the desired color, knitting needles, scissors, and a tapestry needle. The specific type and size of yarn and needles may vary depending on the pattern you choose.