
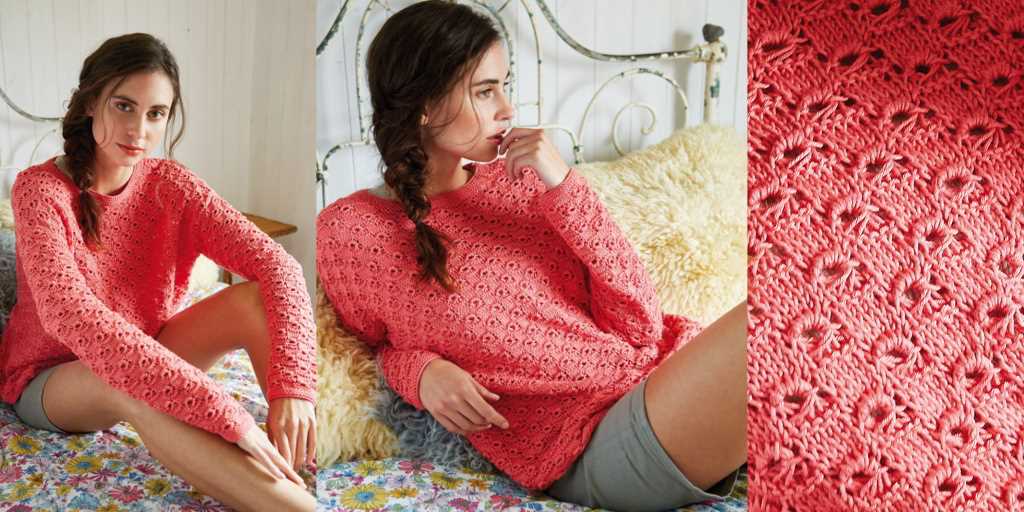
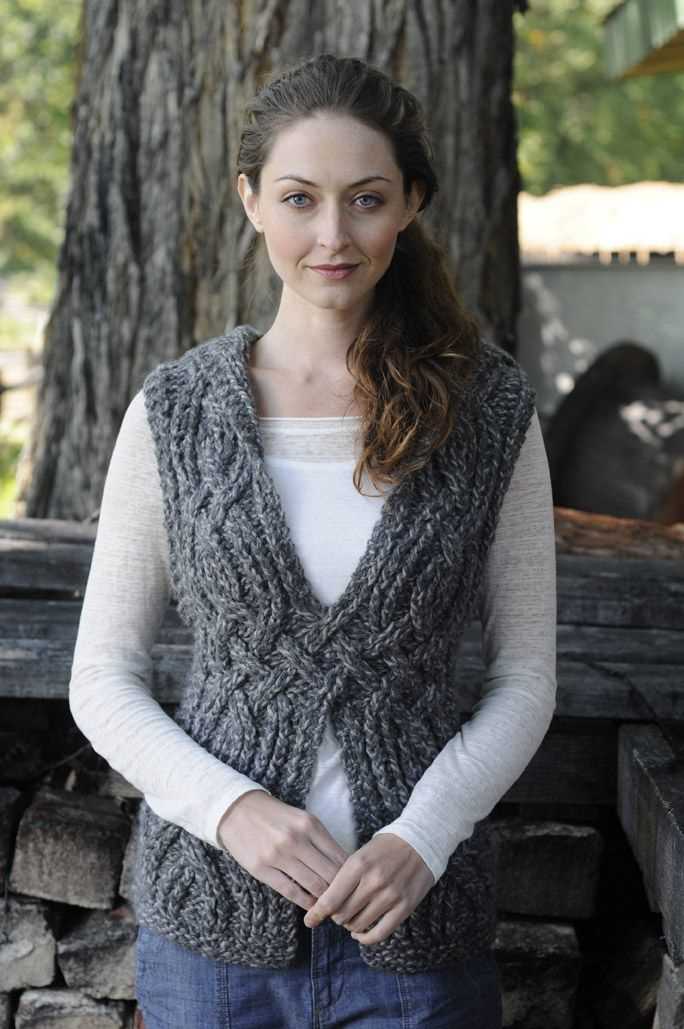
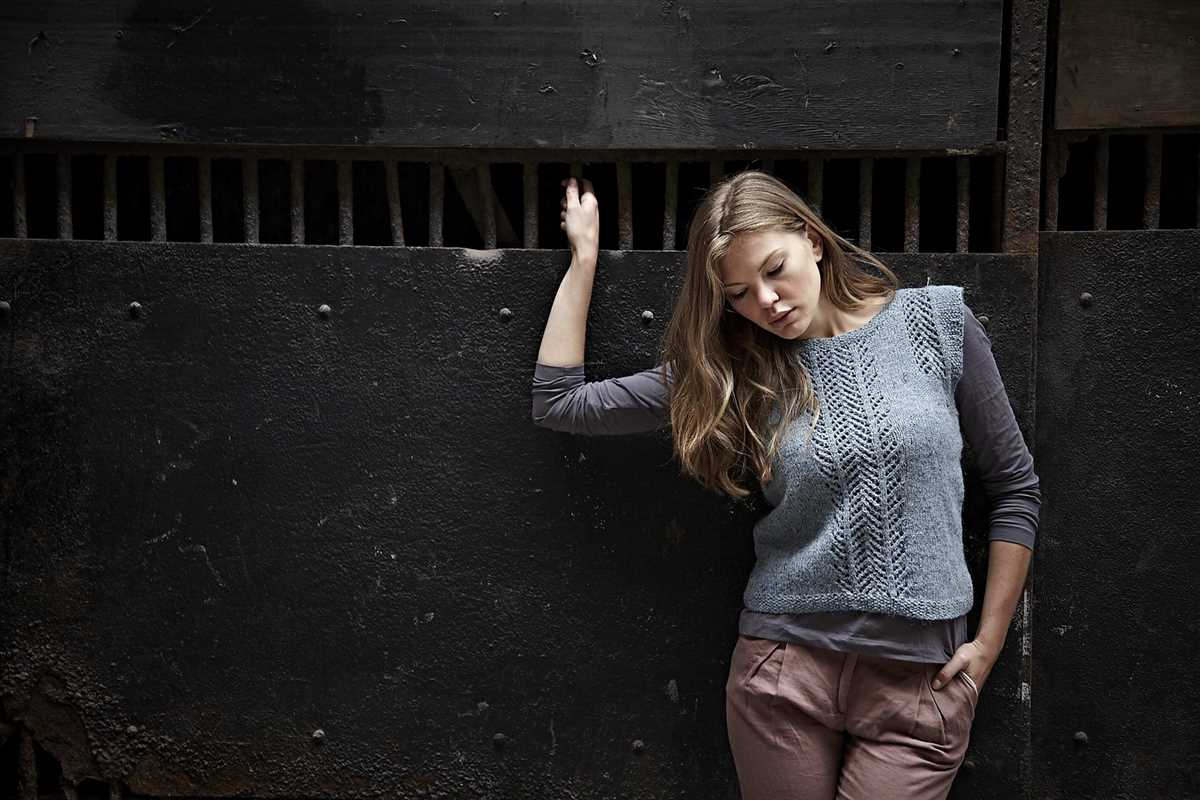
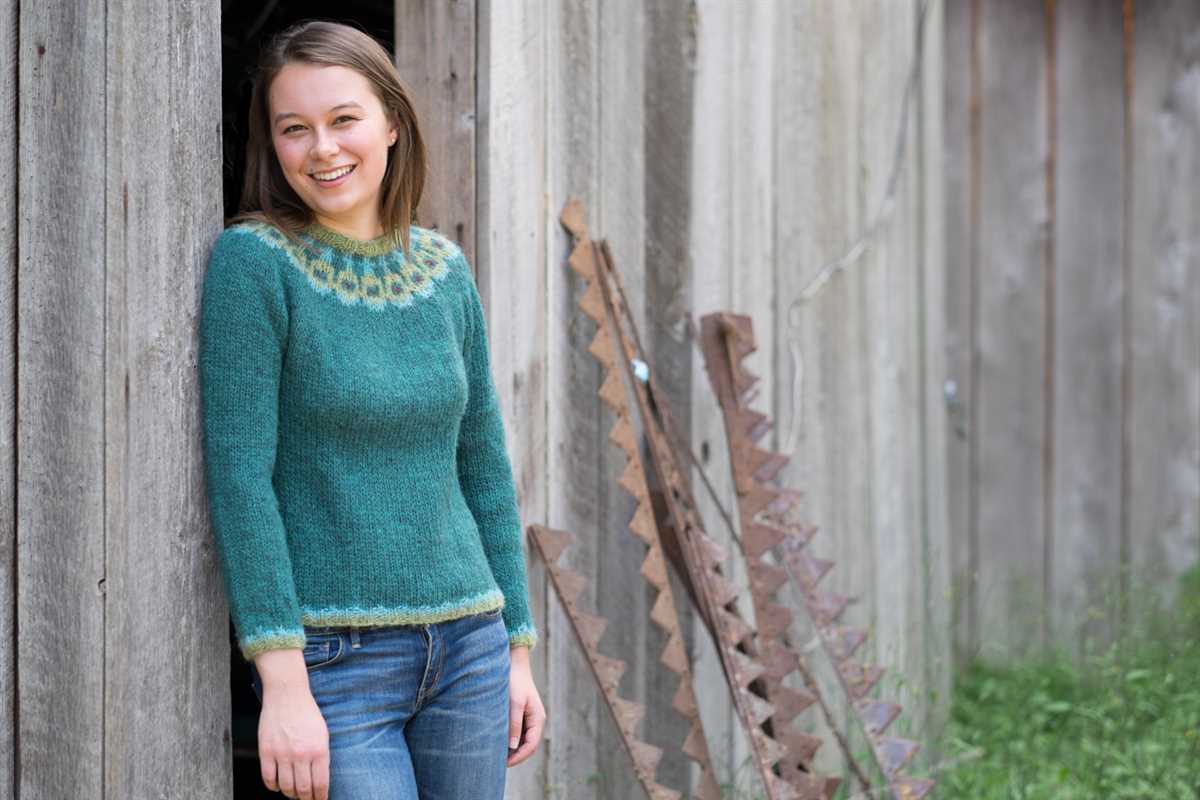
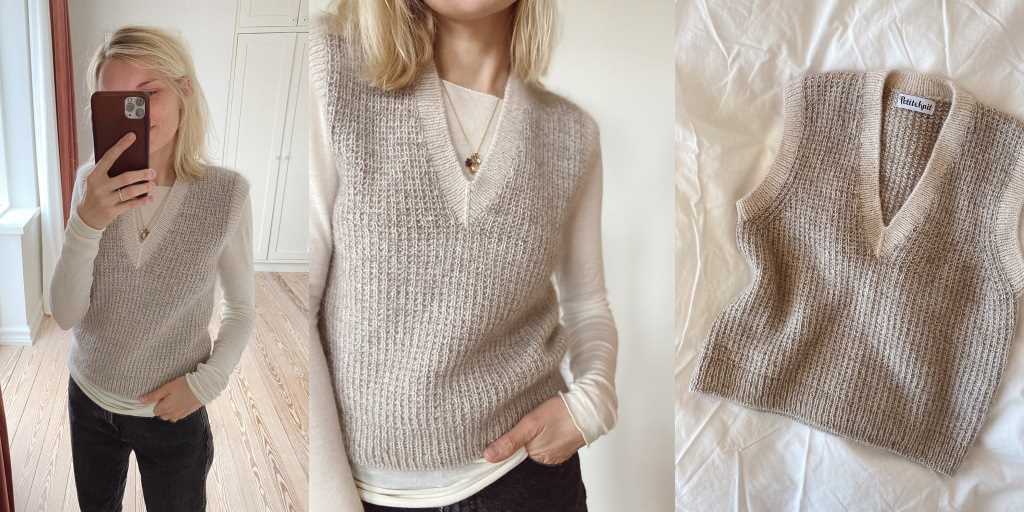
If you’re in the mood for a cozy and stylish project that’s perfect for layering, look no further than the Amy Slipover knitting pattern. This beautiful slipover is a versatile addition to any wardrobe, and is perfect for all seasons. Whether you’re a beginner knitter or an experienced pro, this pattern is sure to be a fun and rewarding project.
The Amy Slipover features a classic slipover design with a modern and flattering twist. The pattern includes instructions for a variety of sizes, ensuring that you’ll be able to create the perfect fit for yourself or a loved one. With its simple yet elegant silhouette, this slipover is a great go-to piece for any occasion.
One of the highlights of this pattern is its versatility. The Amy Slipover can be easily dressed up or down, depending on the occasion. Pair it with jeans and boots for a casual and cozy look, or dress it up with a skirt and heels for a more polished and sophisticated ensemble. The possibilities are endless with this timeless and stylish slipover.
Amy Slipover Knitting Pattern: How to Create a Stylish and Cozy Slipover
Are you looking to add a touch of style and coziness to your wardrobe? Look no further than the Amy Slipover knitting pattern. The slipover, also known as a sleeveless sweater or vest, is a versatile and trendy garment that can be worn over a blouse or shirt for a chic layered look. With the Amy Slipover knitting pattern, you can create your own unique slipover in no time.
The Amy Slipover knitting pattern is suitable for knitters of all skill levels, from beginners to advanced. The pattern provides clear and detailed instructions, making it easy to follow along and create a professional-looking slipover. Whether you’re a seasoned knitter or just starting out, the Amy Slipover knitting pattern is a great project to try.
One of the best things about the Amy Slipover knitting pattern is its versatility. You can choose from a variety of yarn weights and colors to create a slipover that suits your personal style. The pattern also allows for customization, so you can adjust the length and fit of the slipover to ensure a perfect fit. With the Amy Slipover knitting pattern, you have the freedom to create a slipover that is unique to you.
Not only is the Amy Slipover stylish, but it is also incredibly cozy. Knitted with high-quality yarn, the slipover provides warmth and comfort during the colder months. Additionally, the sleeveless design allows for easy layering, making it a practical choice for transitioning between seasons. Whether you wear it over a long-sleeved shirt in the winter or a lightweight blouse in the spring, the Amy Slipover is sure to keep you feeling cozy and fashionable.
So why wait? Get started on your Amy Slipover knitting project today. With its stylish design and cozy feel, it’s the perfect addition to any wardrobe.
Why Choose Amy Slipover Knitting Pattern?
If you are an avid knitter or someone who enjoys creating unique and stylish clothing items, then the Amy Slipover knitting pattern is a perfect choice for you. This pattern offers a variety of benefits that make it an excellent option for knitters of all skill levels.
1. Versatility and Style
The Amy Slipover knitting pattern allows you to create a versatile and fashionable garment that can be worn in various settings. Whether you are going for a casual look or dressing up for a special occasion, this pattern provides a stylish option that can be easily customized to suit your personal style.
2. Customizability
One of the main advantages of the Amy Slipover knitting pattern is its customizability. With this pattern, you have the freedom to choose your preferred yarn, color, and stitch pattern. This allows you to make the slipover truly unique and tailored to your liking.
3. Comfort and Warmth
The Amy Slipover knitting pattern is designed to provide maximum comfort and warmth. The slipover is typically made with soft and cozy yarn, ensuring that you stay warm during colder months. The pattern also allows for easy layering, making it a versatile piece of clothing for different weather conditions.
4. Accessibility for All Skill Levels
Whether you are a beginner or an experienced knitter, the Amy Slipover knitting pattern is accessible to all skill levels. The pattern includes detailed instructions and helpful tips, making it easy to follow along and create a beautiful slipover. If you are new to knitting, this pattern is a great way to expand your skill set and create a stylish garment.
5. Satisfaction of Handmade Creation
By choosing the Amy Slipover knitting pattern, you are able to experience the satisfaction of creating something unique and handmade. Knitting allows you to express your creativity and produce a garment that is truly one-of-a-kind. With the Amy Slipover pattern, you can take pride in wearing or gifting a piece that you have personally crafted with love and care.
In conclusion, the Amy Slipover knitting pattern offers versatility, customizability, comfort, accessibility, and the satisfaction of handmade creation. Whether you are a beginner or an experienced knitter, this pattern is a great choice for creating a stylish and unique garment that you can enjoy for years to come.
Essential Materials for Amy Slipover Knitting
In order to knit the Amy Slipover pattern, it is important to make sure you have all the necessary materials on hand. This will ensure that your knitting project goes smoothly and you can create a beautiful and comfortable slipover. Here are the essential materials you will need:
1. Yarn:
Amount: You will need approximately 500-700 grams of yarn, depending on the size you are knitting and the desired length of the slipover. Make sure to choose a yarn that is suitable for the pattern and one that you enjoy working with.
Type: The pattern recommends using a medium-weight or worsted weight yarn. You can choose a yarn that is made from natural fibers, such as wool or cotton, or opt for a synthetic blend for added durability. Consider the season and climate in which you plan to wear the slipover when selecting the yarn.
2. Knitting Needles:
Size: The pattern suggests using US size 6 (4mm) and US size 7 (4.5mm) knitting needles, or sizes needed to obtain gauge. Make sure you have both sizes on hand to accommodate different parts of the pattern and to achieve the correct tension.
3. Stitch Markers:
Quantity: You will need a set of stitch markers to help keep track of stitches and pattern repeats. It is recommended to have at least 10 stitch markers, but you may need more depending on the size and complexity of the pattern.
4. Tapestry Needle:
Function: A tapestry needle is essential for weaving in loose ends and finishing touches on your slipover. Make sure you have one that is suitable for the yarn thickness you are using.
With these essential materials, you will be well-equipped to start knitting the Amy Slipover pattern. Remember to always check the pattern for any additional materials or tools required and to follow the instructions carefully for best results.
Understanding the Amy Slipover Pattern
The Amy Slipover knitting pattern is a popular choice for knitters looking to create a stylish and cozy garment. The pattern is available in various sizes and can be customized to suit individual preferences. Knitting enthusiasts will find this pattern to be relatively easy to follow, as long as they have some experience with basic knitting techniques.
The pattern begins with instructions for casting on the required number of stitches. It is important to ensure an accurate stitch count in order to achieve the correct fit. The slipover is typically knit in the round, creating a seamless garment. This means that the knitter will need to be comfortable with working in the round and using circular needles or double-pointed needles.
Materials:
- Yarn: The pattern will specify the type and weight of yarn to use. A soft and warm yarn is typically recommended for the slipover.
- Needles: Circular or double-pointed needles of the appropriate size for the yarn.
- Stitch markers: These are helpful for keeping track of the beginning of each round.
- Tapestry needle: This is used for weaving in ends and completing any necessary finishing touches.
The pattern will then provide step-by-step instructions for knitting the slipover, including details on stitch patterns, increases, decreases, and shaping. It is important to carefully read and follow each instruction, as even a small mistake can affect the overall look and fit of the garment.
Once the knitting portion is complete, the pattern will include instructions for finishing the slipover. This may involve seaming any remaining openings or adding ribbing to the neckline, armholes, and hem. The finishing touches can greatly enhance the overall appearance of the garment.
With careful attention to detail and the ability to follow instructions, knitters can successfully create a beautiful Amy Slipover using the provided pattern. The finished garment is sure to be a cozy and stylish addition to any wardrobe, perfect for chilly days and cool evenings.
Getting Started: Casting On Stitches
Before you can start knitting the Amy slipover, you need to cast on stitches. This is the first step in creating your project. Casting on is the process of adding loops onto your knitting needle to create the foundation row.
To cast on stitches for the Amy slipover, you will need your knitting needles and the recommended yarn. The pattern will specify the number of stitches you need to cast on. Make sure to check the gauge mentioned in the pattern to ensure that your slipover will fit properly.
There are different methods you can use to cast on stitches, but the most common method is the long-tail cast on. To do this, start by making a slipknot on your knitting needle. Then, place the slipknot on your non-dominant hand and hold the working yarn in your dominant hand. With your dominant hand, wrap the yarn around your thumb and index finger.
Once you have the slipknot and the yarn wrapped around your fingers, insert the knitting needle between the loop on your thumb and the loop on your index finger. With your dominant hand, grab the yarn and pull it through the loop, creating a new stitch on your needle. Continue this process until you have cast on the desired number of stitches.
Make sure to keep the tension of your stitches consistent as you cast on. This will help ensure that your slipover has an even and neat appearance. Once you have cast on all the stitches, you are ready to begin knitting the first row of your Amy slipover.
Knitting the Body of the Slipover
Once you have completed the necessary gauge swatch and have your measurements ready, it’s time to start knitting the body of the slipover.
Using the size needles recommended in the pattern, cast on the required number of stitches. Make sure to pay attention to any specific instructions on the pattern regarding the cast-on method.
Joining in the round: Once you have cast on the stitches, make sure they are not twisted and join them in the round. This can be done by slipping the first stitch from the left-hand needle onto the right-hand needle, being careful not to twist the stitches. Place a stitch marker to mark the beginning of the round.
Knitting the body: Follow the pattern instructions for knitting the body of the slipover. This may involve knitting in the round or knitting flat and seaming later. Make sure to read the pattern carefully to understand the stitch pattern and any shaping instructions.
- If the pattern calls for any shaping, such as increases or decreases, make sure to follow the instructions closely. Markers can be used to indicate where these shaping stitches should be placed.
- Keep track of your progress by using a row counter or making notes on a piece of paper. This will help ensure that you are knitting the correct number of rows and that your slipover will have the correct length.
Finishing the body: Once you have knit the required number of rows, follow any instructions for finishing the body. This may involve binding off stitches, transferring stitches to waste yarn, or leaving stitches on hold for later seaming.
Remember to always check your gauge as you knit and adjust your needle size if necessary to ensure an accurate fit. Happy knitting!
Creating the Ribbed Hem
When knitting the Amy slipover, one of the key elements is creating a ribbed hem. The ribbed hem adds texture and structure to the bottom of the slipover, giving it a clean and polished finish.
To create the ribbed hem, you will need to start with a ribbing stitch pattern. The most common ribbing stitch pattern is a combination of knit and purl stitches. This creates a stretchy and flexible fabric that will lie flat and snugly against the body.
A typical ribbed hem pattern for the Amy slipover may start with a few rows of knitting in a rib pattern, such as K1, P1. This is repeated for a certain number of rows, depending on the desired length of the hem. The rib pattern continues until you reach the desired length for the hem, and then you can move on to the body of the slipover.
It is important to pay attention to your tension when knitting the ribbed hem. You want the ribbing to be slightly tighter than the body of the slipover to ensure that it hugs the body nicely and doesn’t sag or stretch out over time. You can achieve this by slightly pulling the yarn when working the purl stitches, which will create a tighter stitch.
Once you have created the ribbed hem, you can continue knitting the body of the Amy slipover. The ribbed hem adds a professional and finished touch to the slipover, making it a stylish and versatile garment for any wardrobe.
Knitting the Armholes
When knitting the armholes of the Amy slipover, there are a few important steps to follow to ensure a perfect fit. First, you will need to mark the stitches where the armholes will begin. This can be done by using stitch markers or contrasting yarn. The pattern will usually provide the specific number of stitches to mark for each armhole.
Once you have marked the stitches, you will start shaping the armholes. This is typically done by decreasing a certain number of stitches on each side of the marked stitches. The pattern will provide the specific instructions for how many stitches to decrease and how often to do so. This shaping process helps create the curved opening for the armholes.
As you work on the armhole shaping, it’s important to pay attention to your gauge to ensure that the fit remains consistent with the rest of the slipover. If necessary, you may need to adjust your tension or needle size to achieve the correct gauge. Taking the time to make these adjustments will ensure that the armholes are neither too loose nor too tight.
After completing the armhole shaping, you may need to continue knitting the slipover for a certain number of rows before beginning the neckline shaping or other finishing details. This will be specified in the pattern instructions. Once all shaping and finishing details are complete, you can continue on to the final steps of the Amy slipover knitting pattern.
Shaping the Neckline
The neckline is an important feature of any garment, as it frames the face and adds character to the overall design. When knitting Amy slipover, the neckline can be shaped in various ways to achieve different styles and looks.
One common method for shaping the neckline is to use short rows. Short rows involve partially knitting across a row and then turning the work to knit back in the opposite direction. This creates extra fabric in certain areas, allowing for the neckline to be curved or angled. To create a round neckline, short rows can be used to add extra fabric at the center of the front and gradually decrease the extra fabric towards the shoulders. For a V-neckline, short rows can be used to create a diagonal line from the center front to the shoulder.
Another way to shape the neckline is by using decreases. Decreases are stitches that are knitted together to reduce the number of stitches in a row. By strategically placing decreases at the edges of the neckline, it is possible to create a more fitted and structured look. For example, a symmetrical decrease pattern can be used to create a subtle curve along the neckline, while decreases on only one side can create an asymmetrical and modern look.
Overall, shaping the neckline of the Amy slipover can be achieved through various knitting techniques such as short rows and decreases. The choice of technique will depend on the desired style and look of the finished garment. Whether it’s a round neckline, V-neck, or something more unique, careful attention to shaping will ensure a beautifully finished sweater.
Finishing Touches: Blocking and Sewing the Slipover
After knitting the slipover according to the Amy slipover knitting pattern, it is time to give your garment the finishing touches. Blocking and sewing are essential steps to ensure that your slipover looks polished and fits perfectly.
Blocking: Start by gently washing your slipover in lukewarm water with a mild detergent. After rinsing, gently squeeze out excess water without wringing or twisting the garment. Lay the slipover flat on a clean towel, making sure to reshape it to the desired dimensions. Use blocking pins to secure the edges and help maintain the shape. Allow the slipover to dry completely before proceeding to the next step.
Sewing: Once the slipover is dry, it’s time to sew the seams. Lay the front and back pieces flat, with the right sides facing each other. Use a tapestry needle and matching yarn to sew the side seams and shoulder seams, following the pattern’s instructions. Take your time to ensure that the seams are neat and aligned properly. Finally, sew any remaining details, such as the neckline or armhole edging, following the pattern’s guidelines. Remember to weave in any loose yarn ends to give your slipover a tidy appearance.
By blocking and sewing your slipover carefully, you can enhance its shape and give it a professional finish. These final steps will ensure that your slipover fits well and looks impressive when worn. With the Amy slipover knitting pattern and attention to detail, you’ll have a beautiful and cozy garment ready to wear or gift to someone special.
Styling Tips for Amy Slipover
When it comes to styling the Amy Slipover, there are plenty of options to consider. This versatile knitwear piece can be incorporated into various outfit combinations and can be styled for both casual and more formal occasions. Here are some tips to help you make the most of your Amy Slipover:
1. Layering
Layering is a great way to showcase the Amy Slipover while adding extra warmth and dimension to your outfit. Try wearing it over a crisp white button-down shirt or a lightweight turtleneck for a polished and trendy look. You can also layer it under a blazer or a cardigan for a more sophisticated ensemble.
2. Pair with Jeans or Skirts
Pairing the Amy Slipover with jeans or skirts is a foolproof way to create a stylish and effortless outfit. For a casual daytime look, opt for a pair of skinny jeans or distressed denim and complete the look with ankle boots or sneakers. If you want to dress it up, style the slipover with a midi skirt and heels for a chic and feminine ensemble.
3. Accessorize
Accessories can elevate any outfit, and the Amy Slipover is no exception. Consider adding a statement belt to cinch the waist and create a more defined silhouette. You can also accessorize with chunky knit scarves, statement earrings, or a stylish handbag to complete the look and add your personal touch.
4. Experiment with Colors
The Amy Slipover is available in various colors and shades, so don’t be afraid to experiment and play with different color combinations. Try pairing a neutral-colored slipover with vibrant bottoms or vice versa for a bold and eye-catching outfit. You can also opt for a monochromatic look by wearing the slipover in the same color family as the rest of your outfit.
With these styling tips in mind, you can create versatile and fashionable outfits with your Amy Slipover. Whether you’re going for a casual or dressier look, this knitwear piece is a versatile addition to any wardrobe.
Enjoy Your Handmade Amy Slipover
Now that you have completed knitting your very own Amy Slipover, it’s time to enjoy the fruits of your labor. This stylish and cozy slipover will become a staple in your wardrobe, perfect for layering during the colder months or wearing alone on a mild day. Whether you’re staying at home or going out, the Amy Slipover is versatile enough to suit any occasion.
With its simple yet beautiful design, the Amy Slipover is a great project for knitters of all skill levels. The repetitive pattern allows you to relax and enjoy the process, while the end result is a stunning garment that you can be proud of. The slipover is also a great way to showcase your favorite yarn and color choices, allowing you to personalize the piece and make it truly your own.
The Amy Slipover is not only fashionable but also practical. The slipover is easy to care for and can be machine washed, making it perfect for everyday wear. Additionally, the slipover is designed to fit comfortably, providing you with warmth and freedom of movement. Whether you’re wearing it to a casual gathering or a formal event, the Amy Slipover is sure to keep you comfortable and stylish.
Tips for Styling Your Amy Slipover
- Pair your slipover with high-waisted jeans and ankle boots for a trendy and casual look.
- Layer your slipover over a button-down shirt and pair it with tailored trousers for a more polished and sophisticated outfit.
- Add a belt to cinch in the waist and create a more defined silhouette.
- Experiment with different accessories, such as statement necklaces or scarves, to add a touch of personality to your outfit.
Now that you know how to style your Amy Slipover, it’s time to start wearing it with confidence. Whether you’re heading to the office or meeting friends for brunch, your slipover will be a stylish and comfortable choice. Enjoy the compliments and the satisfaction of wearing a garment that you made with your own two hands.