
Knitting is a popular craft that involves creating fabric by using yarn and knitting needles. Traditionally, knitters would follow a pattern, which is a set of instructions that tells them which stitches to make in order to create a specific design. However, in recent years, technology has made it possible to convert an image into a knitting pattern.
Converting an image to a knitting pattern allows knitters to create unique and personalized projects. Whether you want to knit a portrait of a loved one, recreate a favorite photograph, or turn a work of art into a knitted masterpiece, converting an image into a knitting pattern can help you achieve your vision.
There are various tools and software available that can assist in the conversion process. These tools analyze the image and generate a knitting pattern based on the colors and shapes present in the picture. The resulting pattern can be printed out or saved as a digital file, which can then be used as a guide while knitting.
It’s important to note that converting an image to a knitting pattern does require some manual adjustments. The generated pattern may need to be tweaked to ensure that it is suitable for knitting. Additionally, the complexity of the image may affect the level of detail that can be achieved in the knitted project. However, with patience and experimentation, it’s possible to create stunning knitted pieces using this technique.
How to Convert an Image to a Knitting Pattern
Knitting is a popular craft that allows you to create beautiful and unique items using yarn and needles. While many knitters enjoy following patterns, sometimes you may want to create a design of your own. One way to do this is by converting an image into a knitting pattern.
To convert an image to a knitting pattern, there are several steps you can follow. First, select an image that you’d like to turn into a pattern. It could be a photograph, an illustration, or any other image that you find inspiring. Keep in mind that complex images with many colors may require more advanced knitting skills.
Once you have your image, you will need to determine the size of your knitting project and choose the appropriate yarn and needle size. This will depend on the gauge you prefer and the final dimensions you want for your finished piece. You may need to experiment with different yarn and needle combinations to achieve the desired effect.
Next, you can use computer software or online tools to convert your image to a knitting pattern. These tools will typically allow you to adjust settings such as the number of stitches and rows, the stitch pattern, and the color scheme. You can also choose between different knitting techniques, such as intarsia, fair isle, or duplicate stitch, depending on the complexity of your image.
Once you have generated your knitting pattern, it’s time to start knitting! Follow the instructions in the pattern, knitting each stitch according to the color and composition of the image. Remember to keep track of your progress and make any necessary adjustments as you go along.
Converting an image to a knitting pattern can be a fun and creative way to personalize your knitting projects. Whether you’re making a sweater, a scarf, or a blanket, turning an image into a pattern allows you to add a unique touch to your handmade items.
Choosing the Right Image for Knitting
When converting an image into a knitting pattern, it is crucial to choose the right image that will translate well into a knitted design. Not all images are suitable for this process, so it’s important to consider certain factors before starting the conversion.
Color and Contrast
One of the key things to consider when choosing an image for knitting is the color and contrast. Knitting patterns rely on different colors to create the design, so it’s essential to select an image that has distinct and contrasting colors. This will help the design stand out and be easily recognizable once knitted.
Simplicity and Level of Detail
Knitting patterns work best when they have a certain level of simplicity and clarity. Images with too much detail or intricate patterns might not translate well into a knitted design. It’s important to choose images that have a clear and well-defined subject, with simple shapes and lines. This will make it easier to convert the image into a knitting pattern and ensure that the final design is easily recognizable.
Size and Resolution
The size and resolution of the image can also greatly impact the quality of the knitted design. Images with a higher resolution will result in a more detailed and accurate knitting pattern. It’s best to select images with a high resolution and clear details to ensure that the final knitted design is of the highest quality.
Personal Preference
Ultimately, the choice of image for knitting also comes down to personal preference. Some people might prefer more intricate and detailed patterns, while others might opt for simpler designs. It’s important to choose an image that resonates with you and matches your desired knitting style and skill level.
- Consider color and contrast
- Choose simplicity and clarity
- Opt for high resolution and clear details
- Personal preference matters
Preparing the Image for Conversion
Before converting an image into a knitting pattern, it is important to prepare the image to ensure the best results. Here are a few steps to follow in order to optimize the image for conversion:
- Choose the right image: Start by selecting an image that has clear and distinct lines, shapes, and colors. Simple, high-contrast designs work best for converting to knitting patterns.
- Resize and crop the image: Use image editing software to resize and crop the image to the desired dimensions. This step can help eliminate any unnecessary details or distractions in the image.
- Adjust the brightness and contrast: Enhance the image by adjusting the brightness and contrast levels to make the lines and shapes more prominent and easier to convert into knitting stitches.
- Convert the image to black and white: In order to create a knitting pattern, the image should be converted to black and white. This can be done using the grayscale or threshold function in image editing software.
- Clean up any imperfections: Carefully inspect the image and remove any unwanted spots, noise, or imperfections using the retouching tools available in the image editing software.
By following these steps, you can ensure that the image is optimized for conversion into a knitting pattern. Taking the time to prepare the image properly will result in a clearer and more accurate knitting pattern that can be easily followed by knitters.
Selecting the Suitable Knitting Pattern Software
When it comes to converting an image into a knitting pattern, having the right software can make all the difference. With the right software, you can easily transform any image into a chart or pattern that can be used to create beautiful knitted designs.
There are several factors to consider when selecting knitting pattern software. First and foremost, it is important to choose a software that is user-friendly and intuitive. This will ensure that even those who are new to knitting or pattern design can easily navigate the software and create their desired patterns.
Compatibility is another important factor to consider. The knitting pattern software should be compatible with the operating system of your computer or device. Additionally, it should be able to handle the file types you plan to work with, such as JPEG or PNG files. Some knitting pattern software also offers the option to import images directly from a scanner or digital camera.
Features and tools available in the software are also crucial to consider. Look for features that allow you to easily customize your patterns, such as the ability to adjust the stitch size, color palettes, and stitch symbols. Additionally, look for tools that enable you to easily edit and manipulate the image to make it suitable for knitting, such as cropping, rotating, and adjusting the contrast or brightness.
It can also be helpful to read reviews and seek recommendations from other knitters or pattern designers who have used the software. This can give you insight into the user experience, reliability, and overall quality of the software.
- In conclusion, selecting the right knitting pattern software is essential for converting images into knitting patterns.
- To ensure a smooth and enjoyable design process, choose user-friendly software that is compatible with your system and desired file types.
- Look for software with customizable features and tools that allow you to easily adjust and manipulate the image.
- Reading reviews and seeking recommendations can also help you make an informed decision.
Converting the Image to a Digital Pattern
Converting an image into a digital knitting pattern involves several steps to ensure accurate translation from pixels to stitches. The process typically begins with selecting the desired image and preparing it for conversion.
1. Image selection: The first step is choosing an image that will be interesting and visually appealing when converted into a knitting pattern. This can be a photograph, an illustration, or even a scanned image of a drawing or painting.
2. Image preparation: Before the conversion process can begin, the image should be cleaned up and adjusted as needed. This can involve cropping the image, adjusting the brightness and contrast, and enhancing specific details that will be important in the knitting pattern.
3. Image to pixel conversion: Once the image is prepared, it is converted into a pixel-based representation. Each pixel in the image is assigned a specific color and brightness value, which will later be translated into stitches and rows in the knitting pattern.
4. Color to stitch conversion: After the image is converted into pixels, the next step is to assign a specific stitch to each color in the image. This can be done manually, by referencing a color chart, or with the help of an image processing software that can automatically assign stitches based on color values.
5. Stitch pattern creation: Once the color-to-stitch conversion is complete, a digital pattern is created by mapping each stitch to its corresponding position in the image. This can be done using specialized knitting software or through manual creation using a grid or table.
By following these steps, an image can be successfully converted into a well-defined digital knitting pattern. This pattern can then be used to create a physical knitting project, bringing the image to life in a unique and crafty way.
Customizing the Knitting Pattern
When converting an image into a knitting pattern, it’s important to consider the level of customization you want to achieve. While the basic conversion process will create a pattern based on the colors and shapes in the image, there are several ways to make the pattern more unique and personalized.
Choosing the Colors:
One way to customize the knitting pattern is by choosing specific colors for the yarn. Instead of using the exact colors from the image, you can select a palette that matches your personal taste or the intended recipient’s preferences. This allows you to add your own creative touch to the pattern and make it more visually appealing.
Adjusting the Size:
Another aspect of customization is adjusting the size of the pattern. If you want a larger or smaller finished piece, you can modify the number of stitches and rows in the pattern accordingly. This flexibility enables you to create knitted items that fit perfectly or achieve a specific aesthetic, whether it’s a small coaster or a large blanket.
Adding Details:
To further customize the knitting pattern, you can consider adding extra details. This could include embellishments like cables, lace, or textured stitches to enhance the overall design. You can also experiment with different stitch patterns to create unique effects and make the pattern truly your own.
Creating Variations:
If you want to go even further in customizing the knitting pattern, you can create variations based on the original image. For example, you could choose to focus on a specific section of the image and create multiple patterns that showcase different parts of it. This approach allows for more design exploration and creativity.
- Choose personalized colors.
- Adjust the size of the pattern.
- Add extra details like cables or lace.
- Create variations based on different parts of the image.
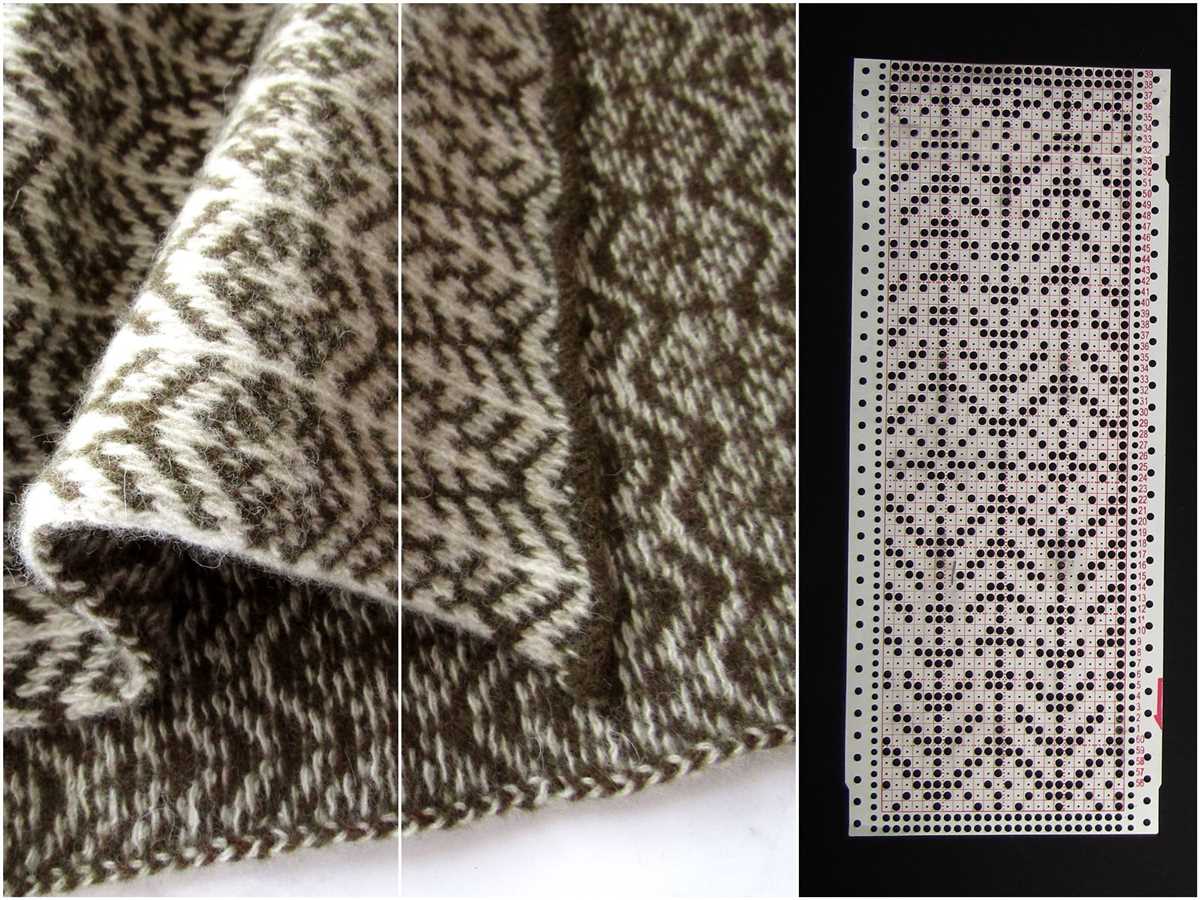
Understanding the Knitting Pattern Chart
Introduction
When it comes to knitting, a pattern chart is an essential tool that helps knitters create intricate designs and patterns. Understanding how to read and interpret these charts is crucial for successful knitting projects. This article will guide you through the basics of understanding a knitting pattern chart.
What is a Knitting Pattern Chart?
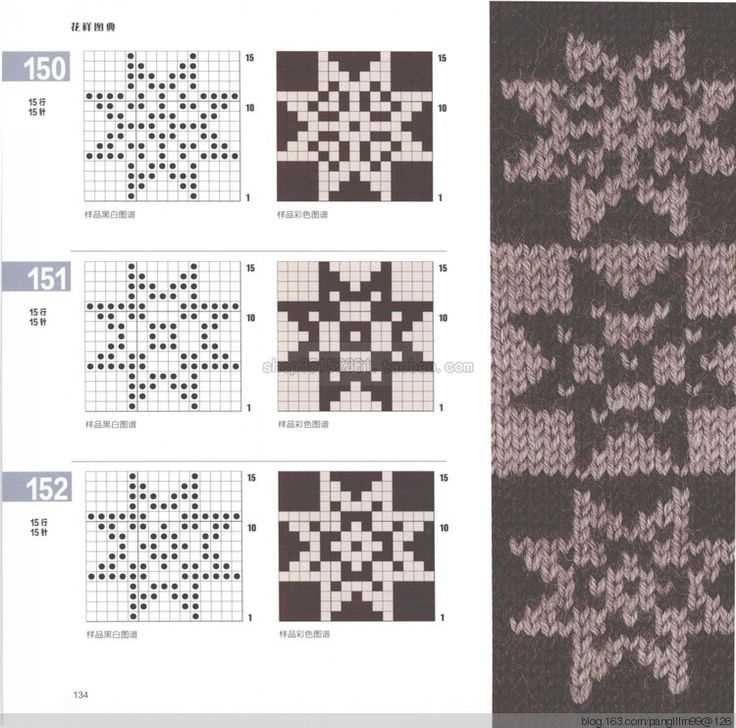
A knitting pattern chart is a visual representation of a knitting pattern, typically using symbols or color-coded squares to indicate different stitches and techniques. It provides a concise and easy-to-follow layout of the pattern, making it easier for knitters to understand and execute. The chart is usually accompanied by written instructions, which complement each other and provide a comprehensive guide for the project.
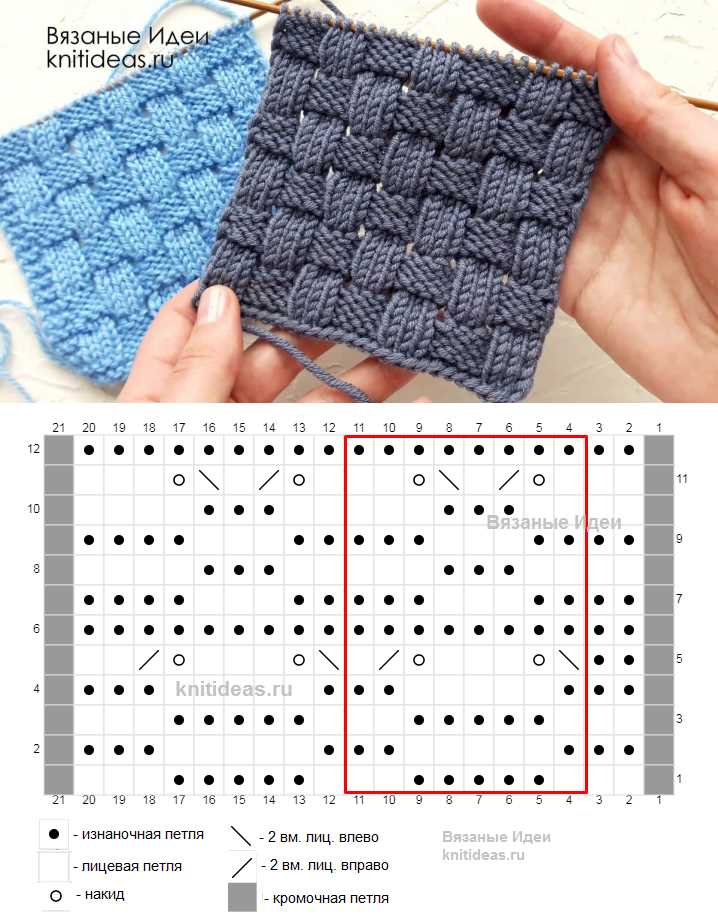
Decoding the Symbols
One of the first things to learn when reading a knitting pattern chart is the symbol key or legend. This key explains what each symbol represents, such as knit stitches, purl stitches, yarn overs, decreases, and various other techniques. Familiarize yourself with the symbols in the key before starting the project to avoid confusion later.
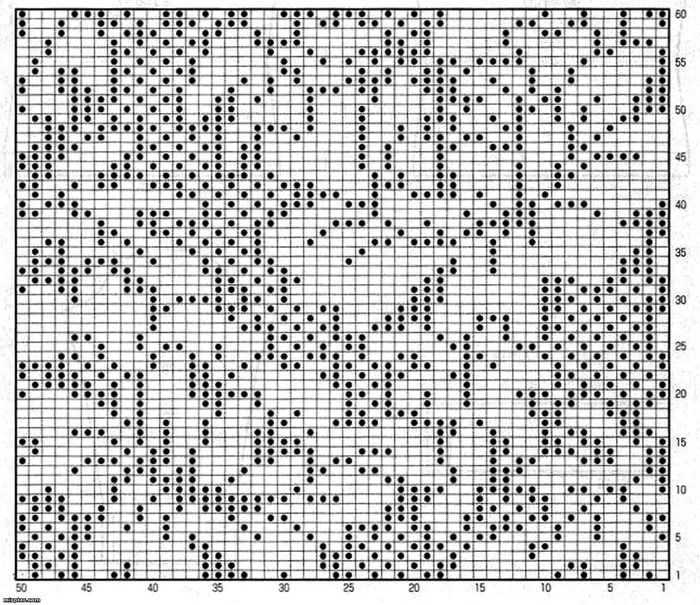
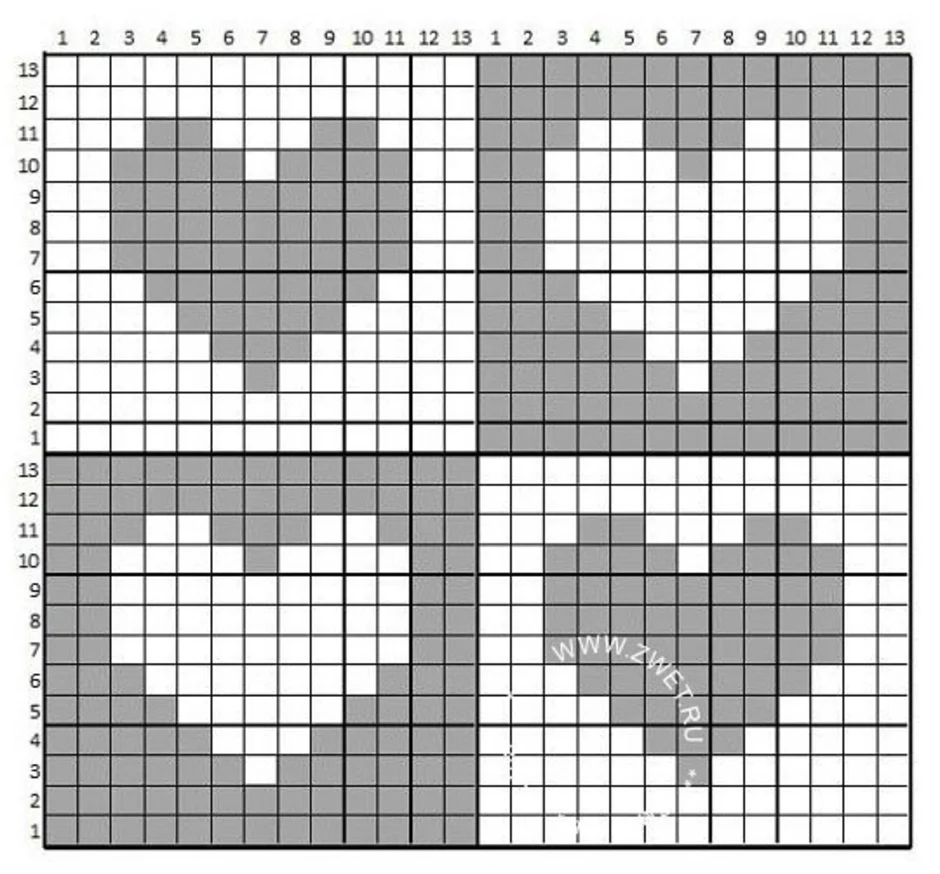
Understanding the Rows and Stitches
A knitting pattern chart is typically divided into rows, represented by horizontal lines, and stitches, represented by vertical columns. Each square on the chart represents one stitch. The numbers on the sides of the chart indicate the row or round number, while the numbers along the top or bottom indicate the stitch count. By following the chart, you can easily see the sequence of stitches and rows required to create the pattern.
Reading the Chart
To read a knitting pattern chart, start from the bottom right corner (or where the pattern indicates) and work your way from right to left for right-side rows and from left to right for wrong-side rows. Each row is typically read from the bottom to the top. Pay close attention to any repeats or color changes indicated on the chart, as they may affect the sequence of stitches. It’s also important to keep track of your progress by using a highlighter or marker to mark off completed rows.
Troubleshooting and Tips

Reading a knitting pattern chart may seem overwhelming at first, but with practice and patience, it will become easier. If you encounter any difficulties or ambiguity in the chart, refer to the accompanying written instructions or consult knitting resources for assistance. It’s also helpful to understand common knitting abbreviations and terminology to better comprehend the chart. Additionally, always check your gauge and make a swatch before starting a project to ensure that your finished piece matches the desired measurements and stitch count.
Interpreting Colors and Symbols in the Pattern
When converting an image to a knitting pattern, it is important to understand how colors and symbols are represented in the pattern. Each color in the image will be represented by a different symbol in the pattern, allowing you to recreate the image using different colored yarns.
The symbols used in knitting patterns may vary, but there are some common ones that you should be familiar with. For example, a square symbol may represent a knit stitch, while a circle symbol may represent a purl stitch. These symbols will be repeated throughout the pattern to indicate which stitches to make.
| Color | Symbol |
|---|---|
| Red | * |
| Blue | # |
| Yellow | @ |
As you work on the pattern, refer to the color key to understand which symbol corresponds to which color. Make sure to keep track of your progress and check the key frequently to ensure accurate color placement.
Additionally, some patterns may also include special symbols to represent specific techniques, such as increases or decreases. These symbols will be explained in the pattern instructions and should be followed accordingly.
- Remember to read the pattern carefully before starting, as it may include important notes or instructions for interpreting the colors and symbols.
- Take your time and practice reading and interpreting knitting patterns to become more comfortable with the process.
- Don’t be afraid to ask for help or seek clarification if you are unsure about any aspects of the pattern.
Determining the Yarn and Needle Size
When converting an image into a knitting pattern, one of the important factors to consider is the yarn and needle size. This decision will greatly impact the final result of your knitted piece, as different yarns and needle sizes will produce different textures, stitch definitions, and overall sizes. Therefore, it is crucial to choose the right yarn and needle size to achieve the desired outcome.
Yarn: The type of yarn you choose will depend on the level of detail you want to achieve in your knitting pattern. Thicker and bulkier yarns such as yarns with a weight category of 4 or 5 will create larger stitches and a more textured look. On the other hand, thinner yarns with a weight category of 1 or 2 will produce finer details and a smoother appearance. Consider the image you are converting and the desired outcome to determine the appropriate yarn weight.
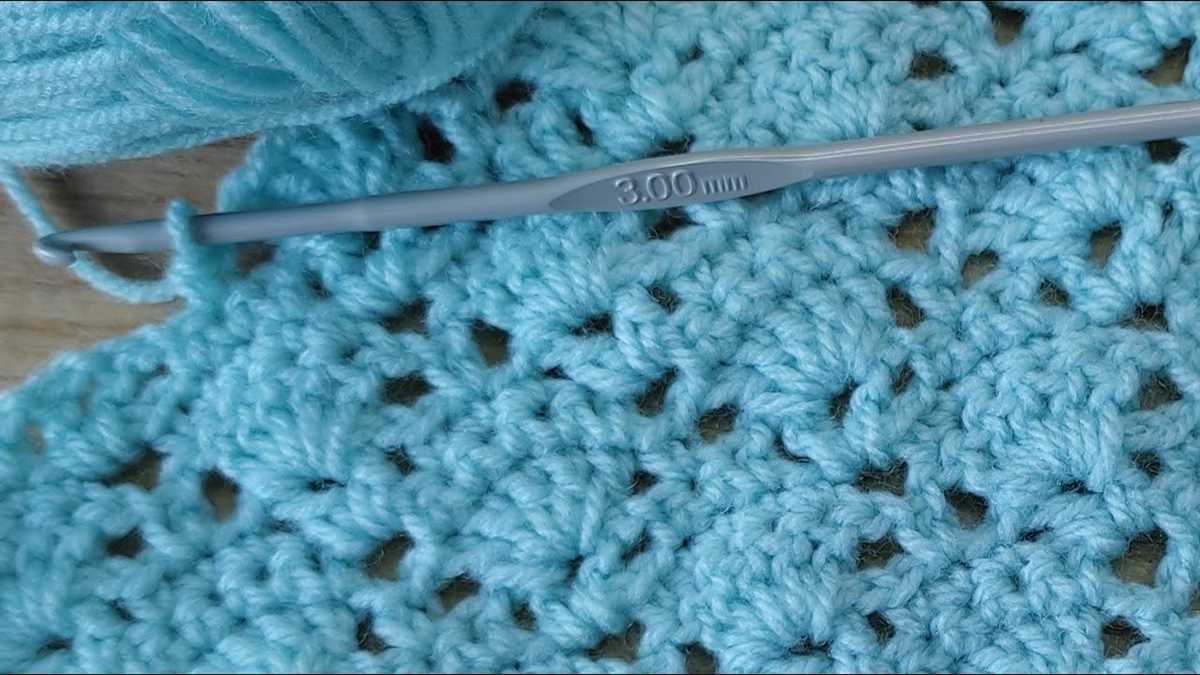
Needle Size: The needle size you select will also play a role in the final look of your knitted image. Smaller needle sizes, such as US 1 or 2, will result in tighter stitches and finer details. Larger needle sizes, like US 10 or 11, will create looser stitches and a more open fabric. Consider the yarn weight and the desired level of detail to choose the appropriate needle size.
In summary, choosing the right yarn and needle size is crucial when converting an image to a knitting pattern. Carefully consider the level of detail and texture you want to achieve and match it with the appropriate yarn weight and needle size. This will ensure that your final knitted piece captures the essence of the image and meets your desired outcome.
Starting the Knitting Project
Before starting your knitting project, it’s important to gather all the necessary materials. This includes knitting needles in the appropriate size, yarn in the desired color, and any additional tools or accessories that may be needed. Make sure to choose a yarn that is suitable for the project and consider the texture and thickness of the yarn as it can affect the final outcome.
Once you have all the materials ready, it’s time to prepare the image that you want to convert into a knitting pattern. First, select the image you want to use and upload it onto your computer. Then, you’ll need to resize and adjust the image to the desired dimensions. This may involve cropping or stretching the image to fit the size of the knitting project you have in mind. It’s important to note that the number of stitches and rows in your pattern will depend on the size of the image and the gauge of your knitting.
- To start converting the image into a knitting pattern, you can use specialized software or online converters. These tools will analyze the image and create a pixelated representation of it, which can then be translated into individual stitches. You’ll need to define the number of colors you want to use and the type of knitting stitch (such as garter stitch or stockinette stitch) you prefer for your project.
- Once you have the knitting pattern generated, it’s time to choose your knitting technique and cast on your stitches. You can choose to work with a single-color technique or incorporate multiple colors using different yarns. Depending on the complexity of the pattern, you may also need to use techniques such as intarsia, fair isle, or duplicate stitch to create the desired image.
Throughout the knitting process, it’s important to keep track of your progress and make any necessary adjustments along the way. Pay attention to the tension of your stitches, gauge, and overall appearance of the pattern. It may also be helpful to use stitch markers or row counters to ensure accuracy and prevent mistakes. Once you’ve completed the knitting project, finish off the edges, weave in any loose ends, and block the finished piece to give it a professional look.
Troubleshooting and Fine-Tuning the Knitting Pattern
While converting an image to a knitting pattern, you may encounter some challenges or need to make adjustments to achieve the desired result. Here are some troubleshooting tips and ways to fine-tune your knitting pattern:
1. Check the Image Quality
Ensure that the image you are using is clear and of high quality. Blurry or low-resolution images may result in a knitting pattern with less defined details.
2. Adjust the Image Contrast
If the knitting pattern lacks contrast and the details are not well defined, you can try adjusting the image contrast. Increasing the contrast can help create a pattern with more distinct color variations.
3. Consider the Knitting Technique
The knitting technique you plan to use for your project may influence how you convert the image to a knitting pattern. Some techniques, such as intarsia or fair isle, are better suited for intricate designs with multiple colors. Ensure that the pattern reflects the requirements of the chosen knitting technique.
4. Test Swatch and Gauge
Before diving into your main project, it’s always a good idea to create a test swatch to check the accuracy of your knitting pattern. Pay attention to the gauge and make adjustments if needed. This will help ensure that your final project matches your intended measurements.
5. Visualize the Final Result
Mentally visualize how your knitting pattern will look once knitted up. Imagine the texture and the colors coming together. This will help you identify any potential issues or areas where adjustments may be necessary.
In conclusion, troubleshooting and fine-tuning a knitting pattern when converting an image is crucial to obtain the desired result. By addressing image quality, contrast, knitting technique, gauge, and visualizing the final result, you can create a knitting pattern that accurately represents your chosen image and results in a beautiful finished project.