
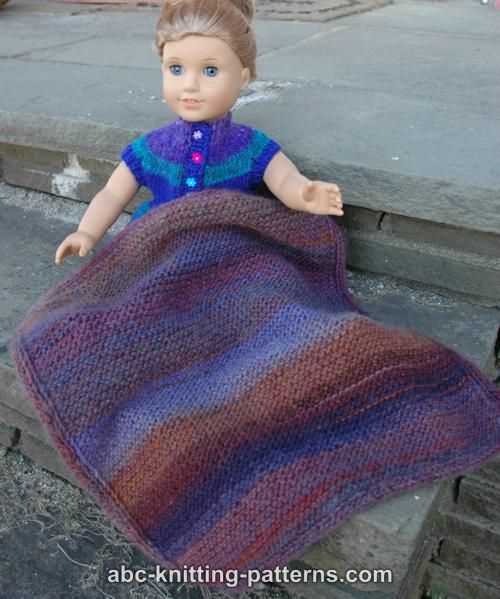
If you have a child who loves their dolls or stuffed animals, then you know how important it is to keep them cozy and warm. One great way to do this is by knitting a blanket for their favorite toy. Not only will it keep their dolls snug, but it’s also a fun and easy project for any beginner knitter.
This easy knit doll blanket pattern is perfect for those just starting out with knitting. The simple design uses only basic stitches, making it a great project to practice and improve your knitting skills. Plus, since it’s a small blanket, it doesn’t require a significant investment of time or materials.
With this pattern, you can create a beautiful and soft blanket that any child will love. Whether it’s for a doll, teddy bear, or stuffed unicorn, this blanket is sure to become a favorite accessory for their favorite toy. So grab your knitting needles and get ready to make something special!”
Easy Knit Doll Blanket Pattern
If you’re looking for a simple and quick project to knit for your child’s doll, this easy knit doll blanket pattern is perfect. Whether you are a beginner or an experienced knitter, this pattern is easy to follow and will result in a cozy and adorable blanket for your child’s favorite toy.
Before starting, gather your materials. You will need:
- Worsted weight yarn in your choice of color
- Size 8 knitting needles
- Tapestry needle
To begin, cast on 60 stitches using the long-tail cast-on method. This will be the width of your blanket. If you want a larger or smaller blanket, simply cast on more or fewer stitches.
Once you have cast on your stitches, begin knitting in garter stitch. This means that you will knit every row. Continue knitting in garter stitch until your blanket measures the desired length.
| Row | Action |
|---|---|
| 1 | Knit all stitches |
| 2 | Knit all stitches |
| … | … |
When your blanket has reached the desired length, bind off all stitches. Cut the yarn, leaving a long tail. Thread the tapestry needle with the tail and weave it through the bound-off stitches to secure.
And there you have it! Your easy knit doll blanket is complete. Your child’s doll will be warm and cozy with this handmade blanket. Feel free to get creative with colors and yarn choices to make each blanket unique. Happy knitting!
Materials
Before you begin knitting the doll blanket, make sure you have all the necessary materials. Here is a list of what you will need:
- Yarn: Choose a soft and lightweight yarn in your desired color. You will need approximately 200-300 yards of yarn.
- Knitting Needles: Select knitting needles that are suitable for your chosen yarn. The recommended size is US size 8 (5mm) needles.
- Tapestry Needle: You will need a tapestry needle with a large eye to weave in the yarn ends.
- Scissors: A pair of sharp scissors will be necessary to cut the yarn.
- Measuring Tape: To ensure accuracy in your knitting, a measuring tape is essential.
It is important to have all these materials ready before you start knitting. This way, you can ensure a smooth and enjoyable knitting experience without any interruptions. Once you have gathered all the materials, you are ready to begin knitting the easy doll blanket pattern!
Yarn
Yarn is a key component in knitting and crochet projects. It is a long, continuous thread made from a variety of natural or synthetic fibers. Yarn comes in different weights, which determine the thickness and heaviness of the final fabric. The weight of yarn is indicated by a number system, with lower numbers indicating thicker yarns and higher numbers indicating thinner yarns.
There are many types of yarn available, each with its own unique characteristics. Some common types include acrylic, wool, cotton, and blends. Acrylic yarn is versatile and affordable, making it a popular choice for beginners. Wool yarn is known for its warmth and elasticity, making it ideal for cozy blankets and sweaters. Cotton yarn is lightweight and breathable, making it suitable for summer garments. Blends combine different fibers to create yarns with enhanced qualities, such as durability or softness.
When choosing yarn for a project, consider the desired drape, texture, and care requirements. The pattern may also specify a recommended yarn type and weight. It is important to check the yarn label for information on needle or hook size recommendations, gauge, and washing instructions.
Yarn can be purchased in skeins or balls, with each containing a specific amount of yarn. The yardage or meterage of yarn varies depending on the weight and brand. It is important to buy enough yarn for a project to avoid running out before completion. If using multiple skeins of the same color, ensure they are from the same dye lot to ensure consistency in color.
Yarn can be a colorful and creative way to bring your knitting or crochet projects to life. Whether you’re making a cozy blanket, a warm scarf, or a cute toy, the right yarn can make all the difference in the final result.
Needles
When it comes to knitting, the choice of needles can make a big difference in the final result of your project. Whether you prefer straight needles, circular needles, or double-pointed needles, each type has its own unique qualities and benefits.
Straight needles are the most traditional type of knitting needles. They are typically made of wood, metal, or plastic and come in various lengths and sizes. Straight needles are ideal for knitting flat pieces, such as scarves or blankets, as they can easily hold a large number of stitches.
Circular needles are a versatile option for knitting both flat and in the round. They consist of two needles connected by a flexible cable. Circular needles are perfect for projects like hats, socks, or sweaters, as the cable allows you to easily knit in a continuous circle.
Double-pointed needles are used for knitting small circumferences, such as sleeves, mittens, or socks. They typically come in sets of four or five and have points at both ends. Double-pointed needles allow you to knit in the round without the need for a circular needle and are great for creating seamless garments.
Regardless of the type of needles you choose, it’s important to select the right size for your project. Needle size can affect the gauge and tension of your knitting, so be sure to check the recommended needle size from the pattern before starting. Remember, practicing with different types of needles can help you find your preferred knitting style and ensure the best results for your projects.
Gauge
Gauge is an important measurement in knitting that determines the size of your finished project. It refers to the number of stitches and rows per inch in a knitted fabric. It is crucial to match the gauge specified in the pattern to ensure that your project turns out the correct size and fits properly.
To achieve the correct gauge, it is important to use the recommended yarn and needle size stated in the pattern. Different yarns and needles can produce different gauges, even if the same stitch pattern is used. Therefore, it is important to check your gauge before starting your project.
Measuring gauge: To measure your gauge, you will need to work a gauge swatch. This is a small square of knitted fabric that allows you to check the number of stitches and rows per inch. The pattern will specify the number of stitches and rows to knit in the swatch.
Adjusting gauge: If your gauge doesn’t match the pattern’s gauge, you may need to change your needle size. If your stitches are too big, you’ll need to use a smaller needle size, and if your stitches are too small, you’ll need a larger needle size. By adjusting your needle size, you can achieve the correct gauge and create a finished project that matches the pattern.
To ensure accuracy, it is recommended to wash and block your gauge swatch before measuring. This allows the knitted fabric to relax and settle into its final size. Make sure to measure your gauge on a flat surface, using a ruler or gauge measuring tool.
Remember, achieving the correct gauge is essential for getting the desired fit and size of your project. Spending a little extra time to measure and adjust your gauge can save you from having to start over or end up with an ill-fitting finished item. So, take the time to swatch and measure your gauge before diving into your knitting project!
Abbreviations
When knitting a doll blanket, it is important to understand the abbreviations used in the pattern. These abbreviations are often used to make the pattern more concise and easier to follow. Here are some common abbreviations you may come across:
- K – Knit: This means to insert the right needle into the front of the stitch on the left needle and draw the working yarn through to create a new stitch.
- P – Purl: This means to insert the right needle into the front of the stitch on the left needle, but instead of knitting, you bring the working yarn over the top and through the stitch to create a new stitch.
- YO – Yarn Over: This means to bring the working yarn over the right needle from back to front, creating an extra stitch.
- K2tog – Knit Two Together: This means to insert the right needle into the next two stitches on the left needle and knit them together as one stitch.
- SSK – Slip, Slip, Knit: This means to slip the next two stitches, one at a time, from the left needle to the right needle, then insert the left needle into the front of the slipped stitches and knit them together.
Understanding these abbreviations will allow you to follow the doll blanket pattern more easily. It is important to refer back to this list whenever you come across an abbreviation you are unfamiliar with. Happy knitting!
Pattern Instructions
Follow these step-by-step instructions to create a beautiful knit doll blanket using this easy pattern:
- Materials: Gather your knitting supplies, including a pair of knitting needles, an appropriate yarn for your project, and a yarn needle.
- Cast On: Start by casting on the desired number of stitches, depending on the size of the blanket you want to make. Use a long-tail cast on or your preferred cast on method.
- Knit Rows: Begin knitting rows using the knit stitch. Continue knitting until the blanket reaches your desired length.
- Change Colors: If you want to add color changes to your blanket, simply switch to a new color yarn at the beginning of a row. You can choose to create stripes, patterns, or a solid color blanket.
- Bind Off: Once the blanket is the desired length, bind off all stitches. Use your preferred bind off method to ensure a neat and secure edge.
- Finishing: Weave in any loose ends using a yarn needle. Block the blanket if desired to give it a professional finish and even shape.
With these pattern instructions, you’ll be able to create a lovely knit doll blanket that is perfect for keeping dolls cozy and warm. Enjoy the process of knitting and creating something special!
Cast On
When beginning a knitting project, the first step is to cast on. This is the process of creating the initial row of stitches on your knitting needle. There are several methods for casting on, but one common technique is the Long Tail Cast On. To do this, you’ll need to estimate the amount of yarn you’ll need for your cast on, as you’ll use two strands of yarn. Make a slipknot using the tail end of the yarn, leaving a long tail.
Hold both the tail end and the strand of yarn attached to the ball in one hand, with the slipknot on your needle. Insert your other needle into the slipknot from left to right, going under the tail end and over the working yarn. Bring the working yarn under your thumb and back over the tip of the needle. Slip the slipknot off the needle and onto the new stitch. Pull the tail end and the working yarn to tighten the stitch. Repeat this process to cast on the desired number of stitches.
Another common cast on method is the Knitted Cast On. This technique creates a stretchy and neat edge. To begin, make a slipknot and place it on your left needle. Insert your right needle into the slipknot from front to back, with the yarn in back of the needle. Wrap the yarn around your right needle and bring it through the slipknot. Slip the new stitch onto your left needle. Pull the yarn to tighten the stitch. Repeat these steps to cast on the desired number of stitches.
Rows 1-10
Begin by casting on 120 stitches with your desired yarn and needle size. This will be the foundation for your doll blanket. If you prefer a smaller or larger blanket, you can adjust the number of stitches accordingly, but keep in mind that it may affect the final size of the blanket.
For the first 10 rows, you will be working in garter stitch, which means knitting every stitch on every row. This creates a flat, textured fabric that is great for blankets. Garter stitch is also very beginner-friendly, making it perfect for those who are new to knitting.
Row 1: Knit all stitches
Row 2: Knit all stitches
Row 3: Knit all stitches
Row 4: Knit all stitches
Row 5: Knit all stitches
Row 6: Knit all stitches
Row 7: Knit all stitches
Row 8: Knit all stitches
Row 9: Knit all stitches
Row 10: Knit all stitches
Continue knitting in garter stitch for the next set of rows until you reach your desired length for the doll blanket. Remember to keep count of your rows and refer to the pattern for any additional instructions or stitch changes.
Rows 11-20
After completing the first 10 rows, you are now ready to move on to rows 11-20 of the easy knit doll blanket pattern. This section will continue to build upon the foundation you have established, adding more depth and texture to the blanket.
The next 10 rows will require you to follow a pattern that incorporates different stitches and techniques to create a visually appealing design. Each row will have specific instructions, so be sure to read them carefully before starting. This will ensure that your work turns out just as you envisioned.
- Row 11: Begin by knitting two stitches, then purl across the row. Repeat this pattern until you reach the end of the row.
- Row 12: Knit across the row.
- Row 13: Purl across the row.
- Row 14: Repeat row 11.
- Row 15: Knit across the row.
- Row 16: Purl across the row.
- Row 17: Repeat row 11.
- Row 18: Knit across the row.
- Row 19: Purl across the row.
- Row 20: Repeat row 11.
Continue following these instructions for rows 11-20 until you have completed row 20. Each row will contribute to the overall design and texture of the blanket, creating a beautiful and cozy accessory for your doll.
Rows 21-30

In rows 21-30 of the easy knit doll blanket pattern, you will continue to create the main body of the blanket using the basic knit stitch. As you progress in these rows, you will start to see the blanket taking shape and growing larger.
It is important to stay mindful of your tension and stitch count as you work through these rows to ensure an even and consistent finished piece. Remember to take breaks and stretch your hands and arms if needed, as knitting for extended periods can cause strain.
Continue following the pattern instructions for each row, being careful to read them thoroughly and check your work before moving on to the next row. This will help to minimize mistakes and ensure that your blanket turns out as desired.
As you near the end of rows 21-30, you may start to notice the texture and pattern of the blanket becoming more evident. The repetition of the knit stitch in these rows creates a neat and orderly appearance that adds to the charm of the finished piece.
If you are enjoying the process of knitting this blanket, take a moment to appreciate how it is coming together and the progress you have made so far. Rows 21-30 mark an important milestone in the project, and each completed row brings you one step closer to the finished doll blanket.
Rows 31-40
The next ten rows in the easy knit doll blanket pattern continue to build on the previous stitches, creating a beautiful and cozy fabric. These rows incorporate a combination of knit and purl stitches to create a textured pattern.
Row 31: Knit across all stitches. This row creates the foundation for the following pattern.
Row 32: Purl across all stitches. This row adds a purl texture to the fabric, creating variation in the pattern.
Row 33: Knit across all stitches. This row continues to build on the knit stitches, maintaining the consistency of the pattern.
Row 34: Purl across all stitches. This row adds another purl texture, creating a visually interesting design.
Row 35: Knit across all stitches. This row adds to the knit stitches, creating a smooth and seamless fabric.
Row 36: Purl across all stitches. This row adds another layer of texture to the fabric, enhancing its visual appeal.
Row 37: Knit across all stitches. This row maintains the consistency of the knit stitches, creating a cohesive pattern.
Row 38: Purl across all stitches. This row adds more depth to the fabric, enhancing the overall look of the blanket.
Row 39: Knit across all stitches. This row builds on the previous knit stitches, creating a consistent and visually pleasing pattern.
Row 40: Purl across all stitches. This row adds another layer of texture, making the blanket even more cozy and inviting.
Bind Off
The bind off method is used to finish the edges of your knitting project and secure the stitches in place so they don’t unravel. It is an essential step in creating a neat and professional-looking finished piece.
To bind off, you will need a tapestry needle or crochet hook that is the same size or slightly larger than your knitting needles. This will make it easier to slide the stitches off the needles.
Here’s how to bind off your stitches:
- Knit the first two stitches.
- Using the left-hand needle, lift the first stitch over the second stitch and let it drop off the needle. You now have one stitch remaining on the right-hand needle.
- Knit the next stitch.
- Repeat steps 2 and 3 until you have one stitch remaining on the right-hand needle.
- Cut the yarn, leaving a tail that is approximately 6 inches long.
- Thread the tail through the last stitch and pull tight to secure.
Summary:
Binding off is the final step in finishing your knitting project. It involves knitting a few stitches, lifting one stitch over the other to create a clean edge, and securing the last stitch with a tail of yarn. The bind off method creates a neat and professional finish and prevents the stitches from unraveling. With this technique, you can confidently complete your easy knit doll blanket and enjoy the cozy warmth it brings.
Q&A:
What is an easy knit doll blanket pattern?
An easy knit doll blanket pattern is a simple knitting pattern that provides instructions for making a cozy blanket specifically designed for dolls. It usually consists of basic knitting stitches and requires minimal skills and experience.
Where can I find an easy knit doll blanket pattern?
An easy knit doll blanket pattern can be found in various places such as knitting websites, online knitting communities, or even in knitting books. You can also try searching for free patterns on knitting pattern websites or platforms.
What materials do I need for an easy knit doll blanket pattern?
The materials needed for an easy knit doll blanket pattern typically include knitting needles appropriate for the chosen yarn weight, yarn in the desired color, and a pair of scissors. Some patterns may also require additional materials such as stitch markers or a tapestry needle for finishing the project.
Is an easy knit doll blanket pattern suitable for beginners?
Yes, an easy knit doll blanket pattern is usually designed with beginners in mind. It typically uses basic knitting stitches and provides clear instructions to guide beginners through the process. It’s a great project for novice knitters to practice their skills and create something cute and functional.
Can I customize an easy knit doll blanket pattern?
Yes, you can definitely customize an easy knit doll blanket pattern! You can choose different colors or yarn types to create a unique look, or you can modify the size of the blanket to fit your doll. Feel free to add your own personal touch and make the pattern your own.
What is an easy knit doll blanket pattern?
An easy knit doll blanket pattern is a simple knitting pattern that guides you step by step to create a small blanket specifically designed for dolls. It usually involves basic knitting stitches and techniques, making it suitable for beginners.