
One of the most popular genres in the world of knitting is witch-themed patterns. With their mysterious and magical designs, these patterns are a perfect way to express your love for all things witchy and supernatural. Whether you’re a beginner or an experienced knitter, there are plenty of free witch knitting patterns available to suit your skill level.
Creating witch-themed knitted items is a great way to add a touch of magic to your wardrobe or home decor. From cozy hats and scarves to witchy socks and sweaters, there are so many possibilities to explore. With the right pattern and some basic knitting skills, you can easily create unique and stylish witch-inspired pieces.
Free witch knitting patterns can be found online, and they offer a wide range of options for all skill levels. Whether you’re looking for a simple and quick project or a more complex design, you’ll find a pattern that suits your needs. These patterns often include step-by-step instructions and helpful tips to guide you through the knitting process.
So, grab your knitting needles, choose a witch knitting pattern that speaks to you, and let your imagination run wild. Whether you’re knitting for yourself or looking for a handmade gift for a fellow witch enthusiast, these free patterns are sure to inspire you. Get ready to create some magical and enchanting knitted pieces!
Free Witch Knitting Patterns
Witch knitting patterns offer a fun and magical way to add a little bit of enchantment to your knitting projects. Whether you’re a beginner knitter or an experienced crafter, these free witch knitting patterns are sure to inspire you to create something spellbinding.
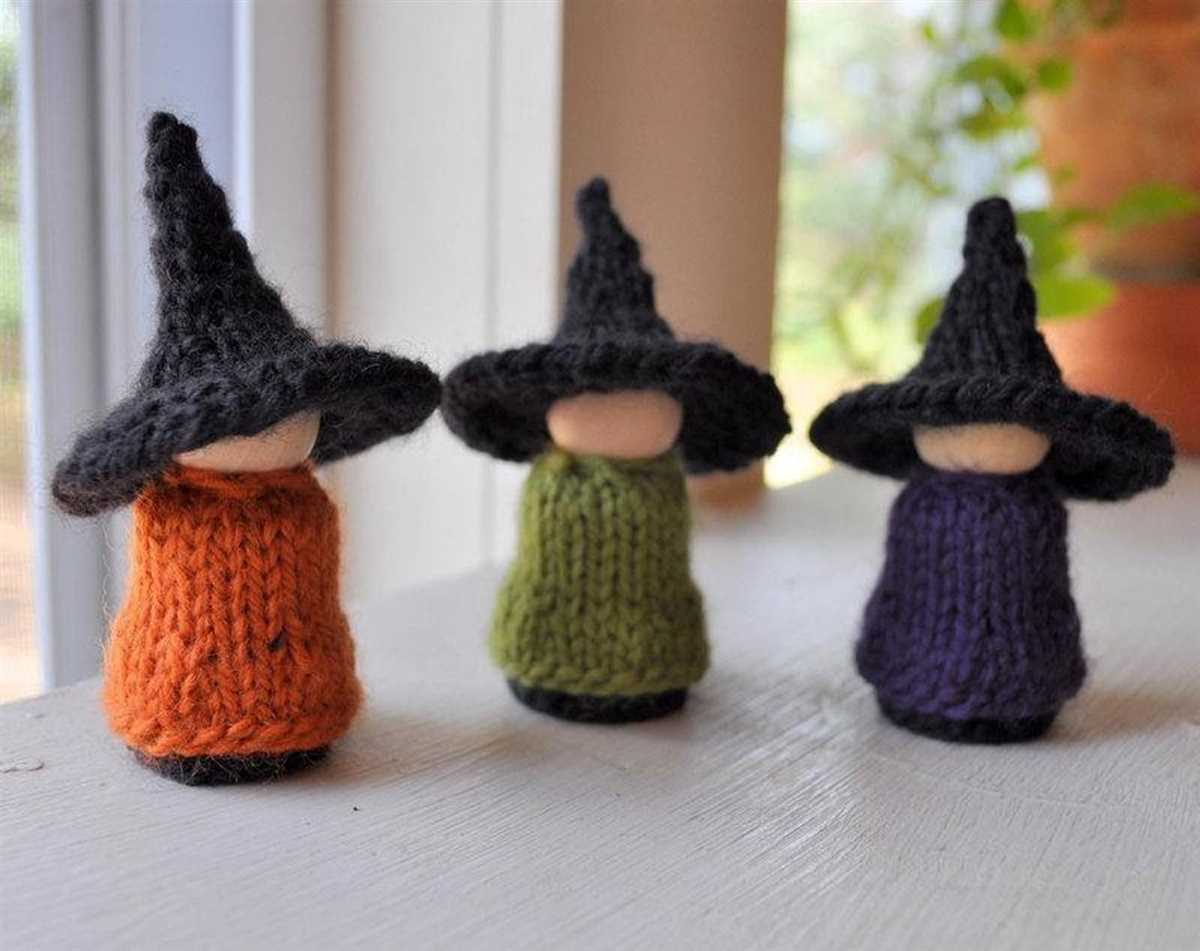
One popular witch knitting pattern is the “Witch Hat Knit Pattern.” This pattern allows you to create a classic pointed witch hat that can be worn as a costume accessory or as a quirky fashion statement. It typically uses a combination of ribbing and stockinette stitch to create the hat’s unique shape. You can customize it by adding a brim or embellishments like ribbons or stars.
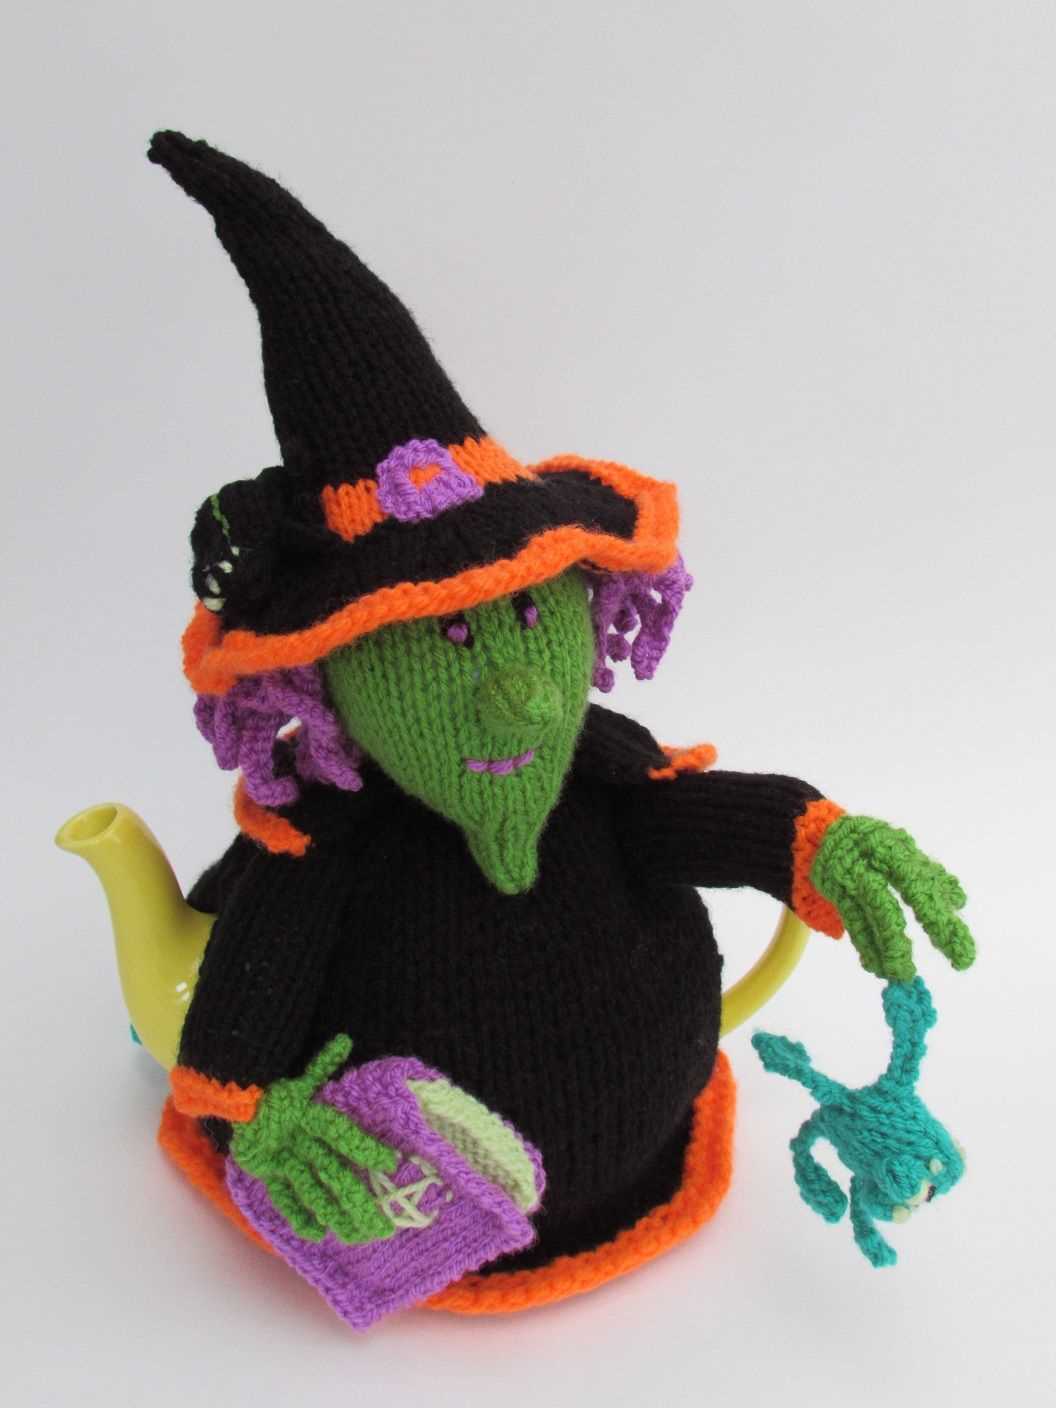
For those who prefer smaller knitting projects, the “Witch Doll Knitting Pattern” is a great choice. This pattern guides you through creating an adorable witch doll that can be used as a decoration or a toy. The pattern usually includes instructions for knitting the doll’s body, clothing, and accessories like a hat and broomstick. You can personalize the doll by choosing different yarn colors and adding details like facial features or a wand.
If you’re feeling adventurous, you can try the “Witch Scarf Knitting Pattern.” This pattern allows you to knit a long scarf featuring witch-themed motifs like cauldrons, broomsticks, or black cats. The scarf pattern typically uses colorwork techniques like stranded knitting or intarsia to create the detailed designs. You can choose your own color palette and experiment with different stitch patterns to make the scarf truly unique.
These free witch knitting patterns offer a fun and creative way to incorporate a touch of magic into your knitting projects. Whether you choose to knit a hat, doll, or scarf, these patterns are sure to cast a spell on your knitting needles and bring out your inner witch.
Beginner-friendly Witch Hat Pattern

Are you a beginner knitter looking for a fun and festive project? Look no further than this beginner-friendly witch hat pattern! With just a few basic knitting techniques, you’ll be able to create a stylish and whimsical hat that’s perfect for Halloween or any witch-themed event.
To get started, you’ll need some basic knitting supplies, including a pair of knitting needles and a skein of black yarn. This pattern uses a medium weight yarn, but feel free to experiment with different weights and colors to make your hat unique. You’ll also need a set of double-pointed needles for the top of the hat.
The pattern starts with the brim of the hat, which is knit in a simple rib stitch. This stitch creates a stretchy and comfortable band that will fit snugly around your head. The brim is worked in rounds, so you’ll need to know how to knit in the round. If you’re new to this technique, don’t worry – there are plenty of tutorials available online that can help you learn.
Once you’ve finished the brim, it’s time to move on to the body of the hat. This part is also knit in rounds, using a combination of knit and purl stitches to create a textured pattern. The pattern provides clear instructions for each round, making it easy for beginners to follow along.
As you work your way up the hat, you’ll gradually decrease stitches to create the iconic pointed shape. This is done using a technique called shaping, which involves decreasing a certain number of stitches at regular intervals. The pattern will guide you through each decrease and help you create the perfect witch hat shape.
Once you’ve completed the body of the hat, it’s time to finish it off with the top. This is where the double-pointed needles come in handy. By transferring your stitches onto the needles and knitting in a specific sequence, you’ll create a neat and even top for your hat. The pattern includes clear instructions for this step, so even if you’ve never used double-pointed needles before, you’ll be able to follow along.
When you’re finished, you’ll have a stylish and bewitching hat that’s sure to turn heads. Whether you’re dressing up for Halloween, attending a witch-themed party, or just looking to add a touch of magic to your wardrobe, this beginner-friendly witch hat pattern is the perfect project for you. Happy knitting!
Spooky Potion Bottle Cozy Pattern
Get into the Halloween spirit with this Spooky Potion Bottle Cozy knit pattern. This cozy is perfect for dressing up your potion bottles and adding a touch of witchy charm to your Halloween decorations. Whether you’re hosting a Halloween party or simply want to add a fun and spooky element to your home, this potion bottle cozy is a must-have.
This pattern features a combination of simple stitches and a touch of lace to create a cozy that fits most standard-sized potion bottles. The cozy is knit in the round, allowing for seamless construction and a snug fit. The pattern includes instructions for customizing the size to fit larger or smaller bottles, making it versatile for all your potion bottle needs.
Materials:
- Worsted weight yarn in black
- Size US 8 (5mm) circular needles
- Stitch markers
- Tapestry needle
- Optional: beads or charms for embellishment
Instructions:
- Cast on 48 stitches using the long-tail cast-on method.
- Place a stitch marker to mark the beginning of the round.
- Join in the round, being careful not to twist your stitches.
- Knit every round until the cozy measures 4 inches from the cast-on edge.
- Switch to lace pattern: (K2, yo, k2tog) across the round.
- Continue the lace pattern for 1 inch.
- Knit every round for an additional 1 inch.
- Bind off all stitches.
- Weave in any loose ends.
- Optional: Add beads or charms to the lace section for extra charm.
Dress up your potion bottles with this spooky cozy and add a touch of witchy elegance to your Halloween decor. Whether displayed on a shelf or used as a centerpiece, these cozy potions will surely be a hit at any Halloween gathering. Get creative and customize the cozy with different yarn colors and embellishments to match your personal style. Have fun knitting and enjoy the enchanting atmosphere this cozy will bring to your Halloween celebrations!
Enchanting Witch Cloak Pattern
Are you looking to add a touch of magic to your wardrobe? Look no further than this enchanting witch cloak pattern! Whether you’re attending a costume party, participating in a cosplay event, or simply want to embrace your mystical side, this cloak is the perfect accessory.
The cloak is designed to be long and flowing, creating an elegant and mysterious silhouette. The pattern incorporates various knitting stitches to add texture and depth to the garment. From intricate cables to delicate lace details, every stitch tells a story and adds to the enchanting allure of the finished piece. The cloak can be customized to fit your personal style, whether you prefer a solid color, a gradient, or even a combination of different yarns.
The construction of the cloak is straightforward, making it suitable for knitters of various skill levels. The pattern includes detailed instructions and diagrams to guide you through every step of the process. Additionally, the cloak is knit using circular needles, ensuring seamless results and reducing the need for excessive seaming.
To complete the look, consider adding some embellishments such as a coordinating hood, whimsical tassels, or even a magical brooch. The possibilities are endless, allowing you to truly make this witch cloak pattern your own. So grab your knitting needles, channel your inner sorceress, and create a garment that will leave others spellbound.
Witch Broomstick Scarf Pattern
If you’re looking for a unique and whimsical knitting project, look no further than the Witch Broomstick Scarf Pattern. This pattern features a charming broomstick design that is perfect for adding a touch of magic to your winter wardrobe.
Materials Needed:
- Worsted weight yarn in black and brown
- Size 8 knitting needles
- Tapestry needle
- Scissors
Instructions:
- Cast on 40 stitches using the black yarn.
- Knit 4 rows in a garter stitch pattern using the black yarn.
- Switch to the brown yarn and knit 2 rows in stockinette stitch.
- Begin the broomstick pattern by knitting 10 stitches in black, then switch to brown and knit 10 stitches.
- Continue alternating between black and brown for a total of 4 rows.
- Switch back to the black yarn and knit 2 more rows in stockinette stitch.
- Repeat steps 4-6 until the scarf reaches your desired length.
- Finish the scarf by knitting 4 rows in garter stitch using the black yarn.
- Bind off and weave in any loose ends.
This Witch Broomstick Scarf is the perfect accessory for any budding witch or wizard. It can be worn as a statement piece or given as a magical gift to someone special. Get creative with your color choices and make it your own. Happy knitting!
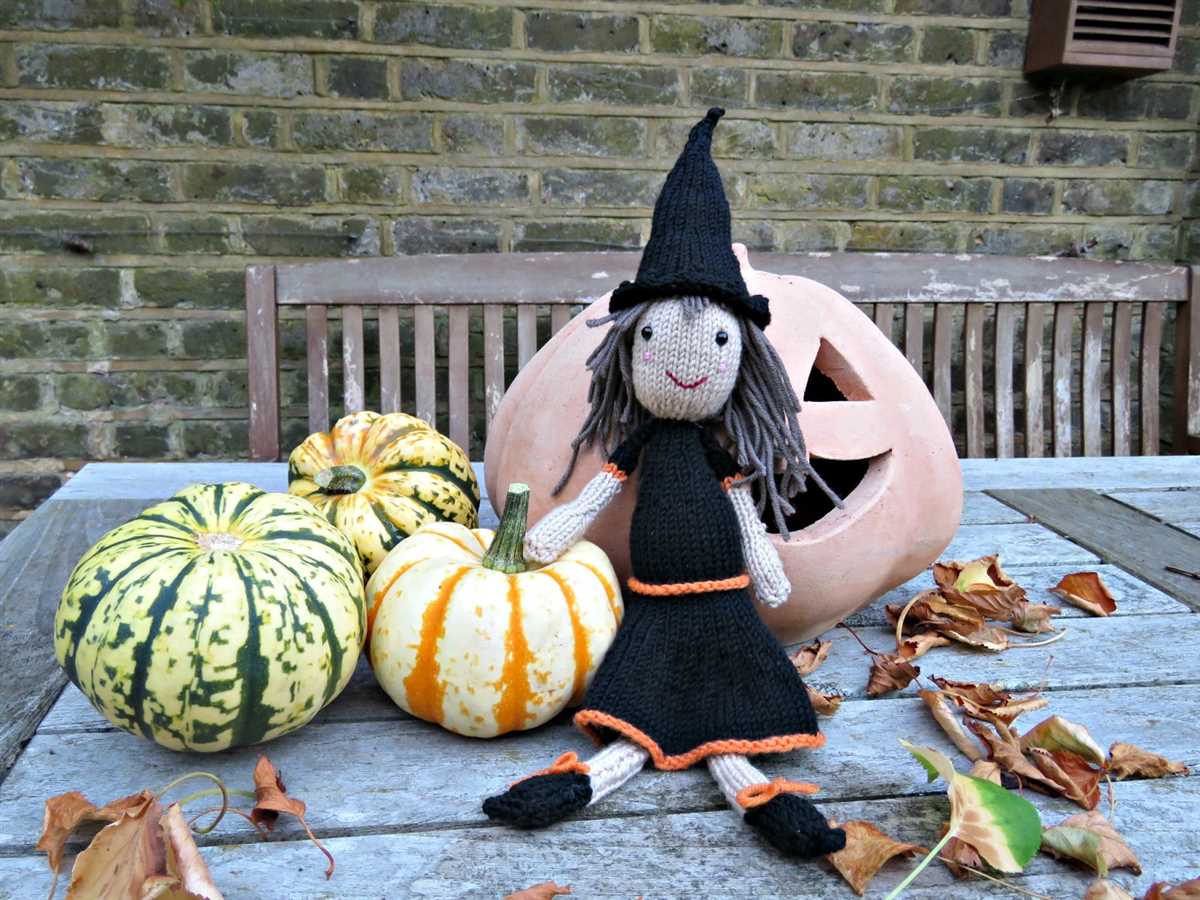
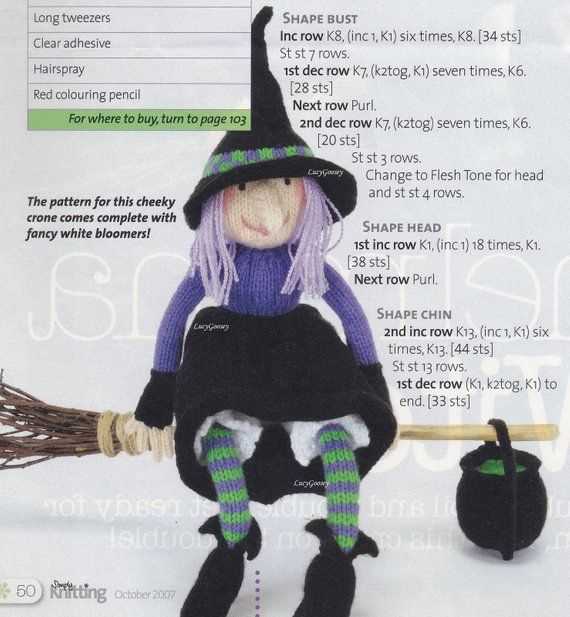
Magical Witch Doll Pattern

If you’re looking to add some magic to your knitting projects, why not try your hand at creating a magical witch doll? This free knitting pattern is perfect for beginners and experienced knitters alike.
To get started, you’ll need a few basic materials including knitting needles, yarn in various colors, stuffing, and a doll-sized broomstick. You can customize the colors and accessories of your doll to make it unique to your style and taste.
Step 1: Cast on
Begin by casting on the number of stitches specified in the pattern. This will create the base of your witch doll’s body. You can use any type of casting on method you prefer, such as the long tail cast on or the knitted cast on.
Step 2: Knit the body
Follow the pattern to knit the body of your witch doll. This may involve knitting in the round or knitting flat and then seaming the pieces together. Be sure to keep track of your stitches and rows to ensure your doll comes out the correct size.
Step 3: Add the details
Once the body of your doll is complete, it’s time to add the details. This may include knitting miniature garments like a witch’s hat, cape, or dress. You can also add facial features using embroidery or buttons. Get creative and make your witch doll truly magical!
Step 4: Stuff and assemble
Once all the pieces of your witch doll are complete, it’s time to stuff and assemble her. Use small amounts of stuffing to fill the body, making sure to shape it as desired. Sew or attach the limbs, head, and accessories to the body using a yarn needle and matching yarn.
Step 5: Finish and enjoy
Give your witch doll a final inspection, making any necessary adjustments or additions. Once you’re satisfied with her appearance, it’s time to sit back, relax, and enjoy the magical presence she brings to your home.
Haunted House Dishcloth Pattern
If you’re looking to add a touch of spooky charm to your kitchen, then the Haunted House Dishcloth Pattern is perfect for you! This pattern captures the eerie atmosphere of a haunted house with its intricate design, making it a fun and unique addition to your home decor. Whether you’re a knitting enthusiast or a beginner, this pattern is suitable for all skill levels.
Materials:
- 4.5mm knitting needles
- Worsted weight cotton yarn in black, orange, and purple
- Tapestry needle
- Scissors
Instructions:
- Cast on 40 stitches with black yarn.
- Row 1: Knit across.
- Row 2: Purl across.
- Row 3: Knit across.
- Row 4: Purl across.
- Row 5: Knit across.

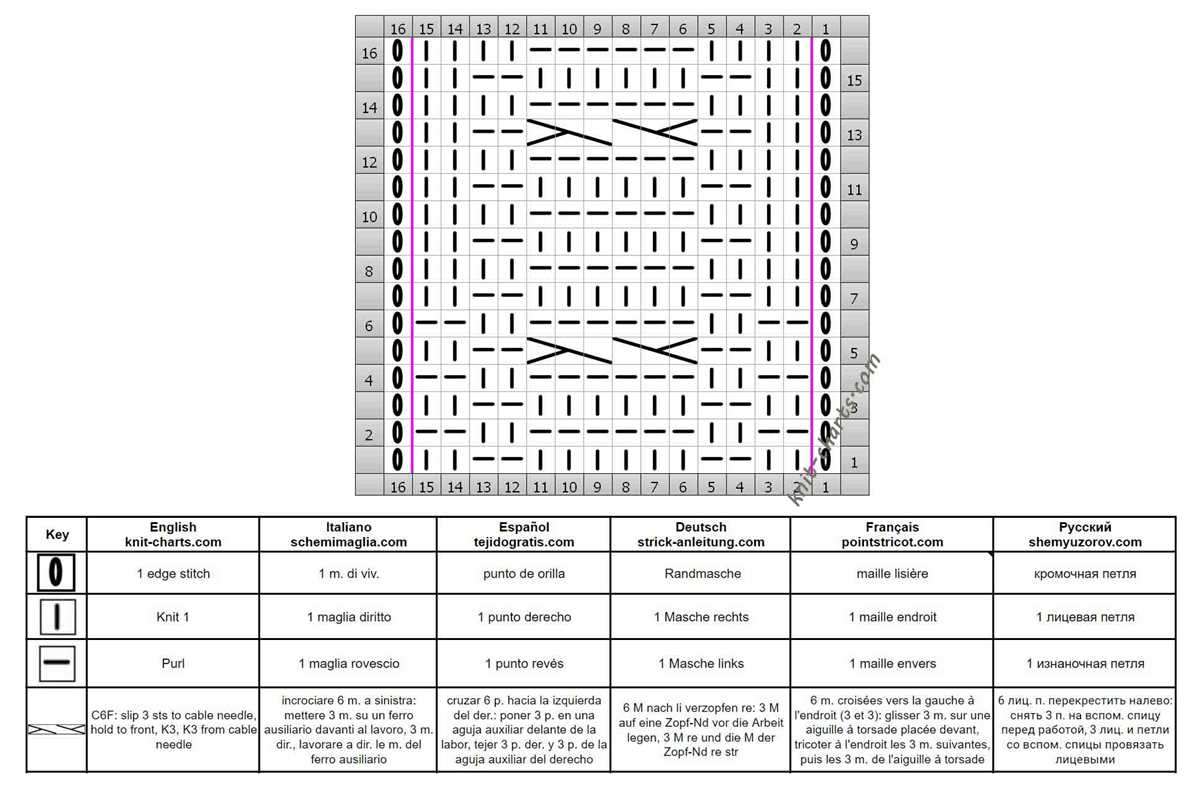
Continue knitting with the black yarn, following the chart provided for the haunted house design. The chart includes various shapes and stitches to create the spooky atmosphere of a haunted house. Use the orange and purple yarn to add pops of color for the windows, doors, and other details.
Once you’ve completed the chart, knit a few more rows with black yarn before binding off. Weave in any loose ends and block the dishcloth to ensure the design is crisp and defined.
This Haunted House Dishcloth Pattern is not only functional but also adds a touch of Halloween spirit to your kitchen. It can be used as a dishcloth, pot holder, or even as a decorative piece. Get creative and have fun with this spooky knitting project!
Witchy Cauldron Mittens Pattern

Are you looking for a fun and festive knitting pattern to make witch-themed mittens? Look no further than the Witchy Cauldron Mittens pattern! These whimsical mittens are perfect for Halloween or any time you want to embrace your witchy side.
This pattern features a cauldron design on the back of the mittens, complete with bubbling potion and a swirl of smoke. The cauldron is created using intarsia knitting, which allows you to work with multiple colors without carrying the yarn across the back. The result is a clean and professional-looking design.
Materials needed:
- Worsted weight yarn in black, green, purple, and white
- Size 8 (5mm) double-pointed needles
- Tapestry needle
Instructions:
- Cast on 40 stitches using the black yarn.
- Divide the stitches evenly onto 4 double-pointed needles.
- Join in the round, being careful not to twist the stitches.
- Knit 1×1 ribbing (k1, p1) for 2 inches.
- Switch to the green yarn and begin the cauldron pattern.
- Follow the chart for the cauldron design, knitting in each color as indicated.
- Once the cauldron design is complete, switch back to the black yarn.
- Continue knitting in black until the mittens measure 7 inches from the cast-on edge.
- Shape the top of the mittens by decreasing 8 stitches evenly across each round.
- When you have 8 stitches remaining, cut the yarn, leaving a long tail.
- Thread the tail through the tapestry needle and slip the needle through the remaining stitches, pulling tight to close the top of the mitten.
- Weave in any loose ends and repeat the entire process to make the second mitten.
With this Witchy Cauldron Mittens pattern, you’ll have a spooky and stylish accessory to show off your love for all things witchy. Keep your hands warm and your witchy vibes strong with these fun and unique mittens!
Wicked Witch Leg Warmers Pattern
Are you looking for a spooky and stylish addition to your witch costume? Look no further than these Wicked Witch Leg Warmers! Made with a combination of black and purple yarn, these leg warmers are the perfect accessory to complete your witchy ensemble.
Materials:
- Size 8 (5mm) knitting needles
- Worsted weight black yarn – 2 skeins
- Worsted weight purple yarn – 1 skein
- Yarn needle
- Scissors
Instructions:
- Using the black yarn, cast on 40 stitches.
- Work in a 2×2 rib stitch (knit 2, purl 2) for 5 inches.
- Switch to the purple yarn and continue in the rib stitch for another 5 inches.
- Switch back to the black yarn and repeat steps 2 and 3 until the leg warmer reaches your desired length. Make sure to end with the black yarn.
- Bind off all stitches in the rib stitch pattern.
- Repeat steps 1-5 to create the second leg warmer.
- Weave in any loose ends using a yarn needle.
Tips:
- Measure your leg before starting to ensure the leg warmers will fit comfortably.
- If you prefer a longer or shorter leg warmer, adjust the length accordingly.
- You can add additional embellishments such as buttons, lace, or bows to customize your leg warmers.
- Feel free to experiment with different yarn colors to match your personal style.
With these Wicked Witch Leg Warmers, you’ll be ready to cast spells and fly on your broomstick in style. Happy knitting!
Bewitching Black Cat Sweater Pattern
The Bewitching Black Cat Sweater Pattern is the perfect knitting project for cat lovers and Halloween enthusiasts alike. This pattern is designed to create a cozy and stylish sweater featuring an adorable black cat motif. Whether you want to show off your love for felines or embrace the spooky spirit of Halloween, this sweater is a must-have addition to your wardrobe.
This pattern calls for intermediate knitting skills and uses basic knitting techniques such as knit, purl, and basic colorwork. The black cat motif is achieved through intarsia knitting, which involves working with multiple colors within a row. The pattern includes detailed instructions and a chart to help you create the cat design with ease.
-
The sweater is knit in the round from the bottom up, starting with a ribbed hem and working up to the arms and neckline. The body of the sweater features a simple stockinette stitch, creating a smooth and cozy fabric.
-
The black cat motif is placed on the front of the sweater, adding a playful and whimsical touch. The cat’s silhouette is created using contrasting yarn colors, making it stand out against the rest of the sweater.
-
The sleeves are also knit in stockinette stitch, with ribbed cuffs for a snug fit. The neckline is finished with ribbing to ensure a comfortable and flattering fit around the neck.
-
The pattern provides instructions for multiple sizes, allowing you to customize the sweater to your preferred fit. You can choose from a range of sizes, from small to extra-large, ensuring a perfect fit for every body type.
With its bewitching black cat design and cozy construction, the Bewitching Black Cat Sweater Pattern is a fun and stylish knitting project that will have you turning heads. Whether you wear it to a Halloween party or as a statement piece during the colder months, this sweater is sure to bring a touch of magic to your wardrobe.
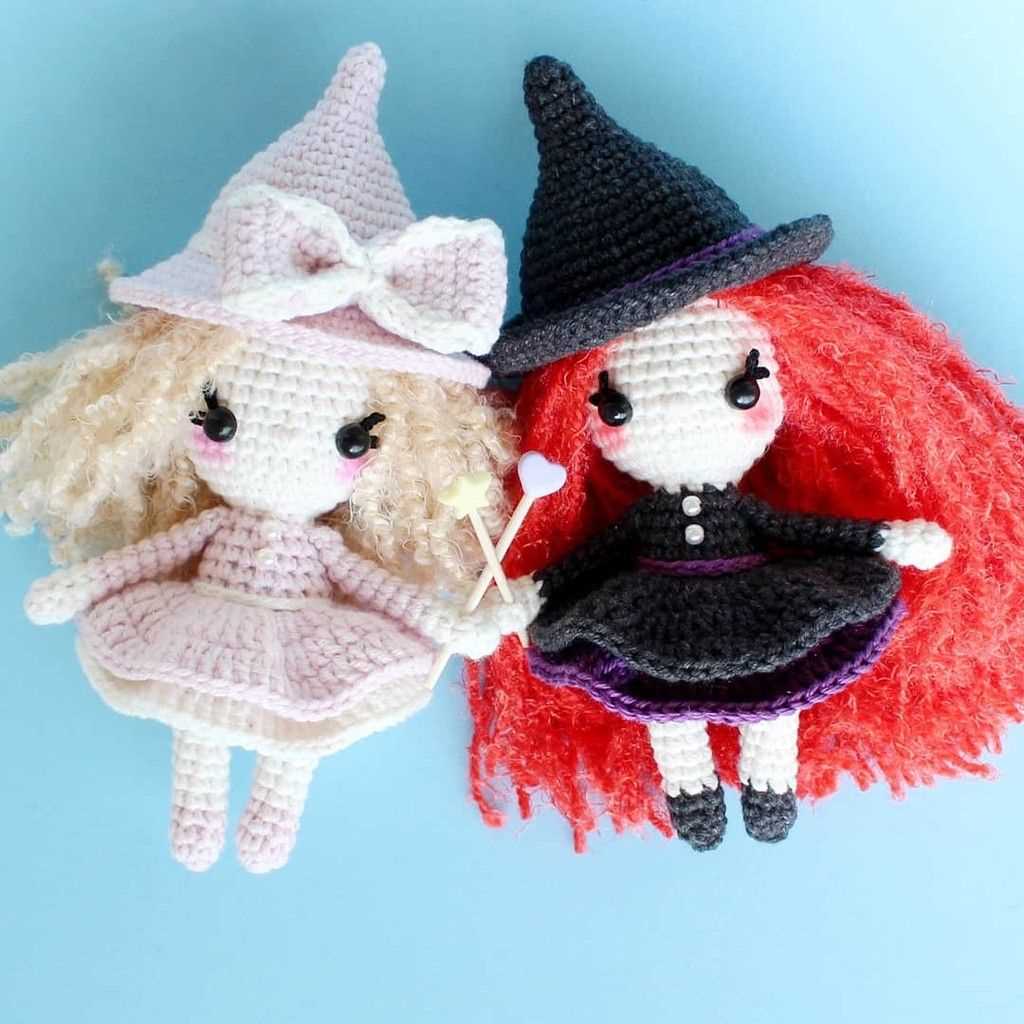
Spellbinding Witch Amigurumi Pattern
Amigurumi, the Japanese art of crocheting or knitting small stuffed toys, has gained popularity in recent years. In this section, we will provide a spellbinding witch amigurumi pattern that you can easily create with your knitting skills. This adorable little witch is perfect for Halloween decorations or as a gift for a witch lover.
Materials needed:
- Worsted weight yarn in black, purple, and green
- Size 4.0 mm knitting needles
- Fiberfill stuffing
- Yarn needle
- Scissors
- Embroidery floss in various colors
Instructions:
- Body:
| Row | Instructions |
|---|---|
| 1 | Cast on 12 stitches in black yarn. |
| 2-10 | Knit each row in black yarn. |
| 11 | Switch to purple yarn and knit each row for 10 rows. |
| 12 | Switch to green yarn and knit each row for 10 rows. |
| 13 | Switch to black yarn and knit each row for 10 rows. |
| 14-20 | Knit each row in black yarn. |
2. Hat:
- Using black yarn, cast on 28 stitches.
- Knit each row for 10 rows.
- Decrease 1 stitch at the beginning and end of each row until 6 stitches remain.
- Knit 2 rows.
- Cast off.
3. Arms (make 2):
- Using black yarn, cast on 6 stitches.
- Knit each row for 8 rows.
- Cast off.
4. Assembly:
- Attach the arms to the sides of the body using the yarn needle.
- Stuff the body with fiberfill until firm.
- Sew the top of the hat to the head of the witch.
- Embroider facial features using embroidery floss.
Voila! Your spellbinding witch amigurumi is complete. You can personalize it by adding accessories such as a broomstick, cauldron, or witch’s hat. Have fun creating your own witchy friend!