
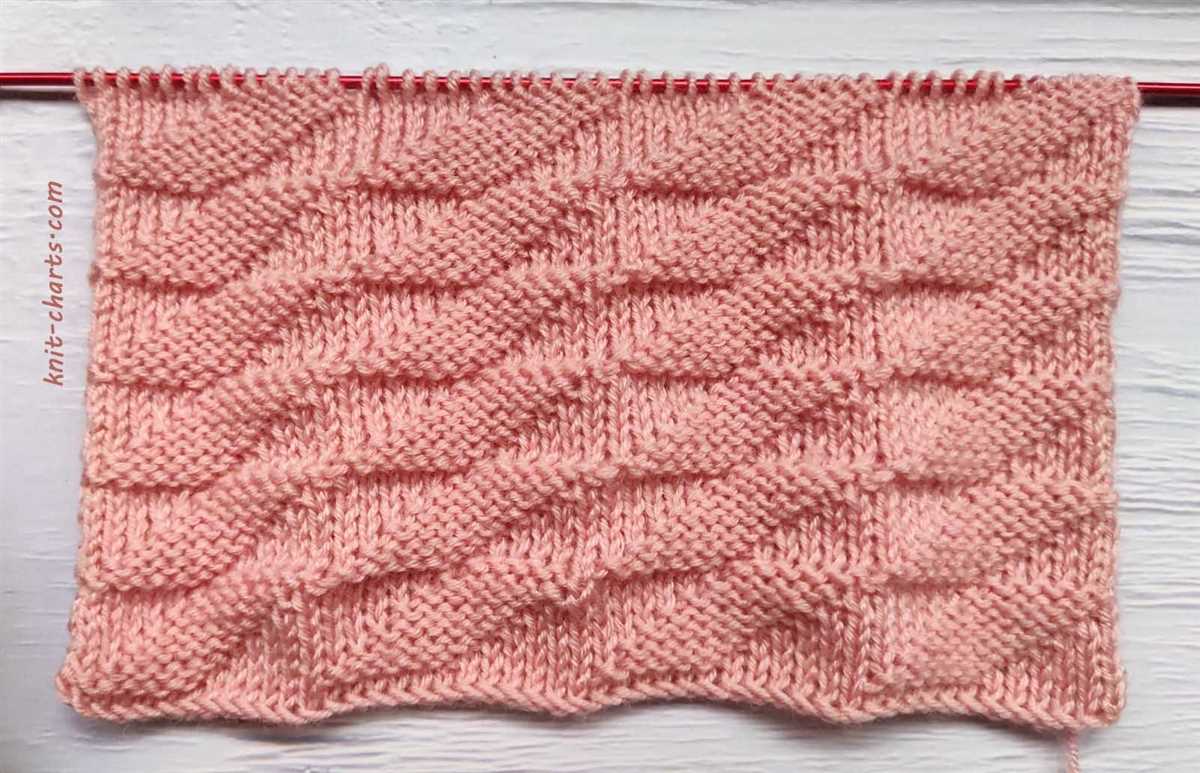
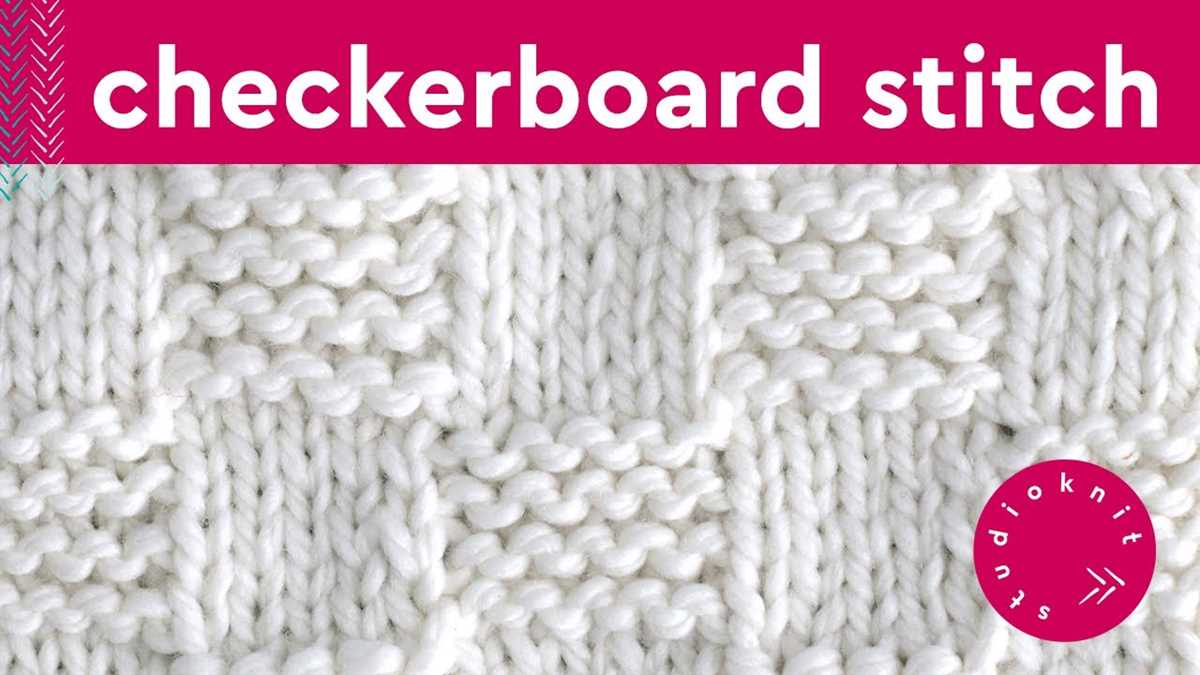
Knitting is a popular hobby that allows you to create beautiful and unique garments and accessories. One of the most popular knitting patterns is the dot stitch. The dot stitch creates a textured pattern with small “dots” or bobbles that stand out from the rest of the fabric. It adds depth and interest to your knitting project, making it perfect for blankets, scarves, or even sweaters.
The dot stitch pattern is created by alternating between knitting stitches and purling stitches to create a bumpy texture. The bobbles are created by knitting several stitches into the same stitch, then turning the work and knitting them again on the back. This creates a raised dot-like texture that adds visual interest to the fabric.
The dot stitch pattern can be used in a variety of ways to add texture and design to your knitting projects. It can be used as a simple border or as an all-over pattern for larger projects. You can also combine it with other stitch patterns to create unique designs. The dot stitch is versatile and can be used with any type of yarn, making it suitable for beginners and experienced knitters alike.
Dot Stitch Knitting Pattern
The dot stitch knitting pattern is a simple and versatile pattern that adds texture and visual interest to your knitting projects. It consists of a series of knit and purl stitches arranged in a grid-like pattern to create a dotted effect.
To knit the dot stitch pattern, you will need basic knitting skills such as casting on, knitting, purling, and binding off. The pattern can be worked on any size needles and with any weight of yarn, making it a great choice for beginners looking to practice their skills or more experienced knitters wanting to add some variation to their projects.
The dot stitch pattern is created by alternating between a knit stitch and a purl stitch in a specific sequence. The pattern can be easily memorized, making it a relaxing and enjoyable knitting project. The resulting fabric has a textured, slightly raised surface that resembles a grid of dots.
There are many ways to incorporate the dot stitch pattern into your knitting projects. You can use it for the entire piece, such as a scarf or blanket, or as a design element, such as a border or panel. The pattern can be worked in a single color or with multiple colors for added visual interest. Experiment with using different color combinations and yarn textures to create unique and beautiful designs.
- To knit the dot stitch pattern:
- Cast on an even number of stitches.
- Row 1: *Knit 1, purl 1; repeat from * to end of row.
- Row 2: *Purl 1, knit 1; repeat from * to end of row.
- Repeat rows 1 and 2 for desired length.
- Bind off in pattern.
The dot stitch pattern is a great way to add texture and visual interest to your knitting projects. Whether you’re a beginner or an experienced knitter, this versatile pattern can be used in a variety of ways to create unique and beautiful designs. So grab your needles and yarn and start knitting the dot stitch pattern today!
What is Dot Stitch?
The Dot Stitch is a knitting pattern that creates a textured, raised dot design on the fabric. It is a simple yet versatile stitch that can be used in various knitting projects, such as scarves, blankets, and sweaters. The dot stitch adds visual interest and dimension to the knitted fabric, making it an appealing choice for both beginner and experienced knitters.
To create the dot stitch, knitters alternate between knitting and purling stitches in a specific pattern. This pattern creates a series of raised dots that stand out from the rest of the fabric. The dot stitch can be done using any type of yarn and needle size, allowing for customization and experimentation with different textures and weights.
How to knit the dot stitch:
- Begin by casting on an even number of stitches.
- Row 1: *Knit 1, purl 1* – repeat this pattern across the row.
- Row 2: *Purl 1, knit 1* – repeat this pattern across the row.
- Repeat rows 1 and 2 until desired length is reached.
- Bind off all stitches.
The dot stitch is a great way to add texture to your knitting projects. It can be used as an all-over pattern or as an accent design. By varying the number of rows between the dot stitches, you can create different effects and densities in your fabric. So grab your needles and yarn, and give the dot stitch a try!
Materials
The dot stitch knitting pattern requires a few basic materials to get started. Here are the items you will need:
- Yarn: Choose your favorite yarn in the color of your choice. The dot stitch pattern works well with various types of yarn, so feel free to experiment with different textures and weights.
- Knitting needles: You will need a pair of knitting needles appropriate for the chosen yarn. Make sure the needles are the correct size to achieve the desired gauge.
- Tapestry needle: This needle will be used for weaving in the loose ends of the yarn and any other finishing touches.
- Scissors: A pair of sharp scissors is essential for cutting the yarn and trimming any excess.
These materials should be readily available at your local craft store or online. Once you have them on hand, you will be ready to start practicing the dot stitch knitting pattern. Remember to choose high-quality materials to ensure the best results for your project.
Getting Started
Before you begin knitting the dot stitch pattern, it’s important to gather all the necessary materials. You will need a pair of knitting needles, preferably in a size that works well with your chosen yarn. The dot stitch pattern requires a medium weight yarn, so make sure to choose a yarn that falls within that category. Additionally, you will need a pair of scissors to cut the yarn at the end of your project.
Once you have your materials ready, it’s time to cast on your stitches. The dot stitch pattern typically requires a multiple of four stitches, so make sure to cast on a number that is divisible by four. You can use any cast on method you prefer, such as the long-tail cast on, the cable cast on, or the knit cast on. Choose the method that you find most comfortable and start casting on your stitches.
Creating the Dot Stitch
The Dot Stitch is a simple yet visually appealing knitting pattern that adds texture and dimension to your projects. It is a combination of knit and purl stitches, creating a playful pattern of dots on the fabric.
To create the Dot Stitch, you will need a basic knowledge of knitting techniques such as knitting and purling. It is recommended to practice the stitch on a small swatch before incorporating it into your larger project.
To start, cast on an even number of stitches. The Dot Stitch pattern is worked over an even number of rows, so keep this in mind when calculating the number of rows you want to include in your project.
The Dot Stitch pattern consists of two rows:
- Row 1: Knit all stitches.
- Row 2: Purl all stitches.
Repeat these two rows for the desired number of rows, and you will start to see the dot pattern take shape. The knit stitches create the dots, while the purl stitches form the background.
The Dot Stitch is versatile and can be used in a variety of knitting projects. It works well for scarves, blankets, and even sweaters. You can also combine it with other stitch patterns to create unique designs.
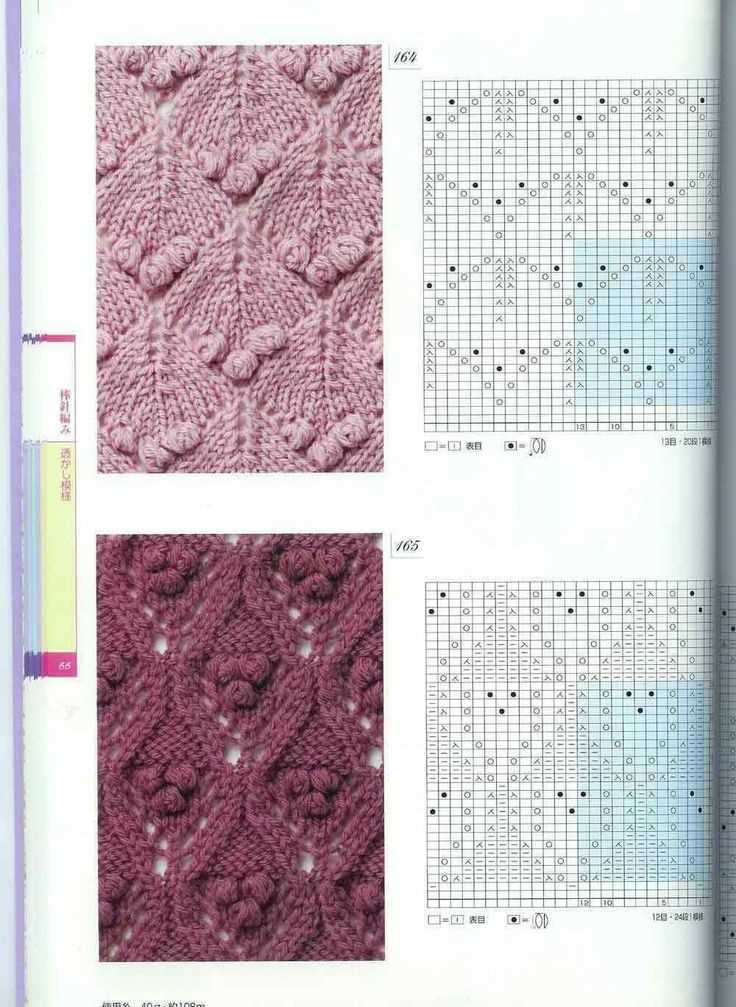
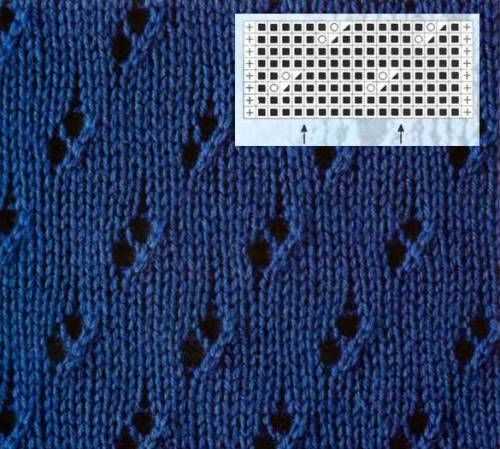
How to Read the Dot Stitch Pattern
When working on a project using the dot stitch knitting pattern, it is important to understand how to read the pattern in order to create the desired design. The dot stitch pattern consists of a series of dots created by knitting and purling stitches in a specific sequence.
Key stitches: The dot stitch pattern typically involves two key stitches: the knit stitch (K) and the purl stitch (P). The knit stitch is created by inserting the needle into the front of the stitch from left to right and pulling the yarn through, while the purl stitch is created by inserting the needle into the front of the stitch from right to left and pulling the yarn through.
In the dot stitch pattern, the dots are created by alternating between the knit and purl stitches. The pattern may specify a set number of knit stitches followed by a set number of purl stitches, or it may provide a more detailed sequence of stitches to create a specific design.
Example:
To illustrate how to read the dot stitch pattern, let’s consider the following example:
- Row 1: K3, P1, K3, P1
- Row 2: P3, K1, P3, K1
In this example, the pattern instructs you to knit 3 stitches, purl 1 stitch, knit 3 stitches, and purl 1 stitch in the first row. In the second row, you will purl 3 stitches, knit 1 stitch, purl 3 stitches, and knit 1 stitch.
By following the specific sequence of knit and purl stitches in the dot stitch pattern, you can create a textured design with a series of dots. It is important to carefully read and interpret the pattern instructions to ensure you are knitting the correct stitches in the correct order.
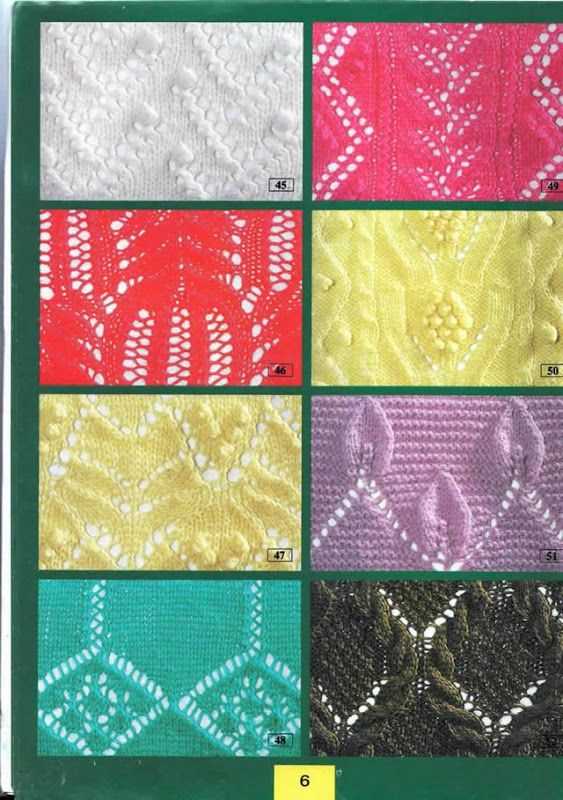
Adding Variations to the Dot Stitch
The dot stitch is a popular knitting pattern that creates a textured surface with raised dots. While the basic dot stitch is beautiful on its own, adding variations can add even more interest and creativity to your knitting projects.
1. Vary the size of the dots: One way to add variation to the dot stitch is to change the size of the dots. You can achieve this by working more or fewer rows between each dot, or by using different needle sizes. Experiment with different combinations to create unique and eye-catching patterns.
2. Mix different colors: Another way to spice up the dot stitch is to use multiple colors. You can alternate between two or more colors for each dot, or create a gradient effect by gradually transitioning from one color to another. This is a great way to personalize your project and make it stand out.
3. Play with stitch placement: Instead of working the dots in a straight line, you can get creative with their placement. Try arranging them in a diagonal pattern, or even in a specific shape or motif. This adds a fun and whimsical touch to your knitting and allows you to customize the dot stitch to suit your preferences.
4. Combine the dot stitch with other stitches: The dot stitch can be combined with other knitting stitches to create even more intriguing textures. For example, you can alternate rows of dot stitch with rows of garter stitch or rib stitch, or incorporate lace stitches for a delicate and feminine look. Don’t be afraid to experiment and mix different stitch patterns to create your own unique designs.
5. Use different yarn weights: Varying the weight of the yarn can also bring new life to the dot stitch. Experiment with different yarn weights, from fine lace yarn to bulky yarn, to achieve different looks and textures. Thicker yarns will create larger, more prominent dots, while finer yarns will create more delicate and subtle dots.
Conclusion: Adding variations to the dot stitch can transform a simple knitting pattern into something truly special. Whether you choose to vary the size of the dots, mix different colors, play with stitch placement, combine with other stitches, or use different yarn weights, you have endless possibilities to explore and create your own unique designs. Let your imagination run wild and have fun with it!
Using the Dot Stitch in Projects
The dot stitch is a popular knitting pattern that adds texture and visual interest to any project. The pattern is created by alternating rows of knit stitches with rows of purl stitches, forming a pattern of raised dots that resembles a polka dot design. This simple yet effective technique can be used in a variety of knitting projects to create beautiful and unique designs.
One way to incorporate the dot stitch into your projects is by using it as a border or edging. For example, you can knit a basic stockinette stitch scarf and add a dot stitch border along the edges to give it a distinctive look. This can be done by simply knitting a few rows of dot stitch at the beginning and end of the scarf, or by knitting a dot stitch border along the entire length of the scarf.
To take the dot stitch to the next level, you can also use it to create all-over patterns in your knitting. This can be achieved by repeating the dot stitch pattern across the entire fabric of your project. For example, you can use the dot stitch to create a polka dot sweater or a dotted blanket. By varying the colors of yarn used for the dot stitches, you can create endless design possibilities.
The dot stitch is also a great technique for adding texture to your knitted accessories, such as hats and mittens. By incorporating the dot stitch into these projects, you can create a tactile surface that not only looks great but also feels great to the touch. This can be especially appealing when using soft and cozy yarns.
Overall, the dot stitch is a versatile knitting pattern that can be used in a wide range of projects. Whether you want to add a touch of texture to your knitting or create a bold all-over design, the dot stitch is a great choice. Give it a try in your next knitting project and see the beautiful results for yourself!
Troubleshooting Tips
One common issue encountered when knitting the dot stitch pattern is accidentally dropping stitches. This can happen when you’re moving the stitches from one needle to another or when you’re switching between knit and purl stitches. To avoid dropping stitches, make sure to keep your tension consistent and pay close attention to each stitch as you work.
If you notice any gaps or holes in your dot stitch knitting, it may be due to unintentionally adding extra stitches. This can happen if you’re not careful when knitting or purling and accidentally yarn over or make additional loops. To fix this, carefully count your stitches after each row and make sure you have the correct number. If you have extra stitches, you can either undo the row and redo it or work two stitches together to eliminate the extras.
Another issue that can arise with dot stitch knitting is tension inconsistency. This can result in unevenly sized dots or a wavy appearance to the fabric. To maintain consistent tension, try not to pull too tightly or too loosely on your yarn as you work. You can also use stitch markers to mark off sections of your work and check periodically to ensure that you’re maintaining the same tension throughout.
If you’re struggling with reading the dot stitch knitting pattern chart, it can be helpful to use a row counter or highlighter to mark off each row as you complete it. This can help you keep track of where you are in the pattern and make it easier to follow along. It’s also a good idea to take breaks and step back from the pattern occasionally to give your eyes a rest and prevent any confusion or mistakes.
Finishing and Blocking
Once you have completed your dot stitch knitting pattern, there are a few finishing touches you can add to make it look polished and professional. Blocking is an essential step in knitting that involves shaping and setting your finished piece. This process can help even out your stitches and improve the drape of the fabric.
To block your dot stitch knitting pattern, follow these steps:
- Prepare your blocking materials: You will need blocking mats or towels, rust-proof pins, spray bottle filled with water, and a tape measure.
- Pin your project: Lay your dot stitch knitting pattern flat on a blocking mat or towel. Gently stretch and shape the fabric to your desired measurements. Use rust-proof pins to secure the edges and corners, making sure the fabric lies flat and even.
- Wet blocking: If your yarn allows, you can wet block your dot stitch knitting pattern by lightly spritzing the fabric with water until it is slightly damp. This will help the stitches relax and set in place. Avoid soaking the fabric or using too much water, as it can permanently stretch or damage the yarn.
- Dry blocking: Leave your dot stitch knitting pattern to dry completely before removing the pins. This can take a few hours or overnight, depending on the yarn and climate. Make sure the fabric is fully dry before moving or wearing the finished piece.
Once your dot stitch knitting pattern is dry and the blocking is complete, you can remove the pins and enjoy your beautifully finished project. The blocking process not only enhances the appearance of your stitches, but it also provides a smooth and professional finish.
Remember to always check the yarn label and follow any specific blocking instructions provided by the manufacturer. Different yarns may require different blocking techniques to ensure the best results.
With these finishing and blocking tips, you can take your dot stitch knitting pattern to the next level and create stunning, professional-looking knitwear.
Q&A:
What is a dot stitch knitting pattern?
A dot stitch knitting pattern is a type of knitting pattern that creates a textured design resembling dots. It is achieved by alternating between knitting and purling stitches in a specific pattern sequence.
How can I create the dot stitch pattern?
To create the dot stitch pattern, you will need to follow a specific pattern sequence. Start by knitting one stitch, then purling one stitch, repeating this sequence across the row. On the next row, you will reverse the sequence, purling one stitch, then knitting one stitch. Repeat these two rows to continue the dot stitch pattern.
What types of projects can I use the dot stitch pattern for?
The dot stitch pattern can be used for various knitting projects, such as scarves, hats, blankets, and even sweaters. It adds a beautiful texture to the fabric and can make your knitted items stand out.
Are there any variations of the dot stitch pattern?
Yes, there are variations of the dot stitch pattern that you can explore. For example, you can try using different colors for the dots to create a more colorful design. Additionally, you can experiment with different yarn weights and needle sizes to change the overall look and feel of the pattern.
Are there any tips for knitting the dot stitch pattern?
When knitting the dot stitch pattern, it’s important to pay attention to your tension. Make sure your stitches are not too loose or too tight, as it can affect the overall appearance of the dots. Additionally, using stitch markers can help you keep track of the pattern sequence, especially if you’re working on a larger project.
What is dot stitch knitting pattern?
Dot stitch knitting pattern is a simple knitting technique that creates a textured fabric with a dotted design. It is achieved by alternating between knit and purl stitches in a specific pattern.
How do you knit the dot stitch pattern?
To knit the dot stitch pattern, you will need to follow a specific sequence of stitches. Start by knitting a row of knit stitches, then purl the next row. Repeat these two rows until you achieve the desired length. The knit stitches will create the raised dots, while the purl stitches will form the background.