
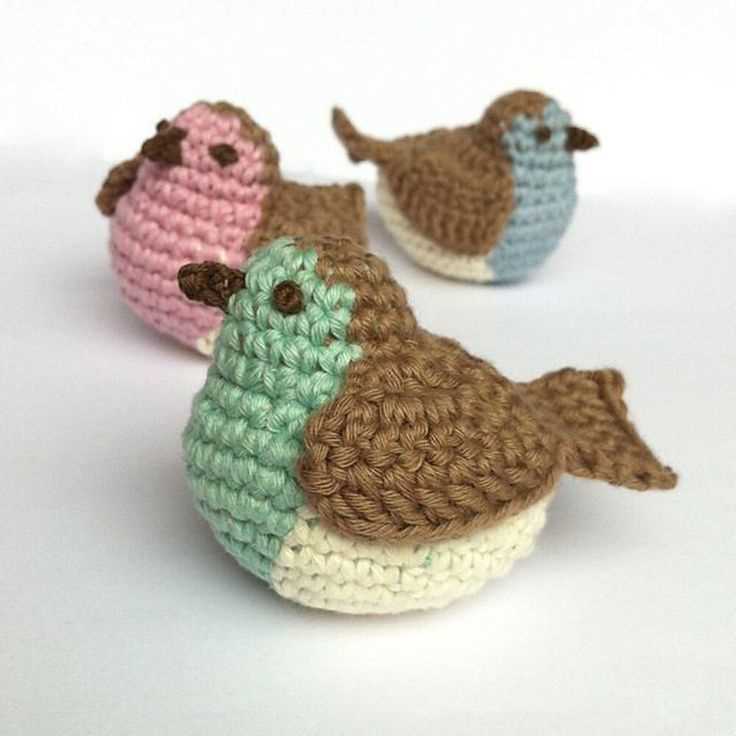
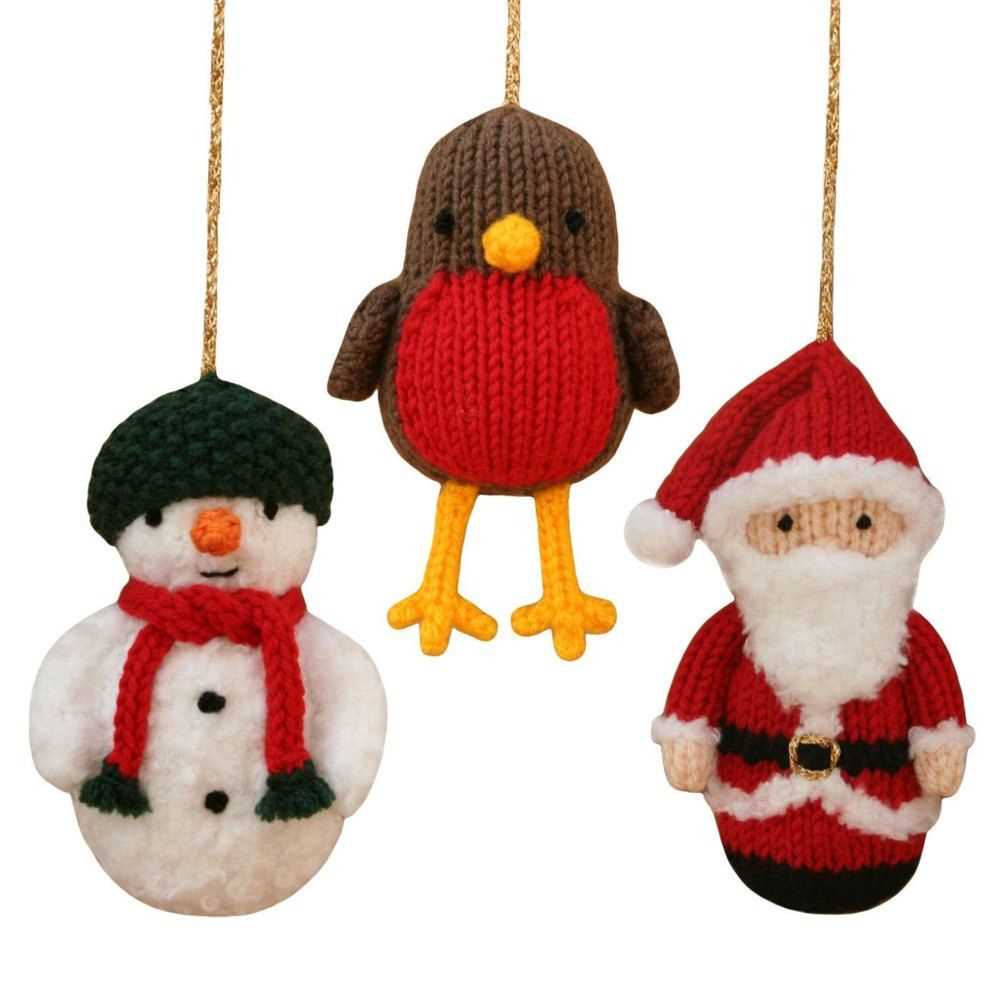
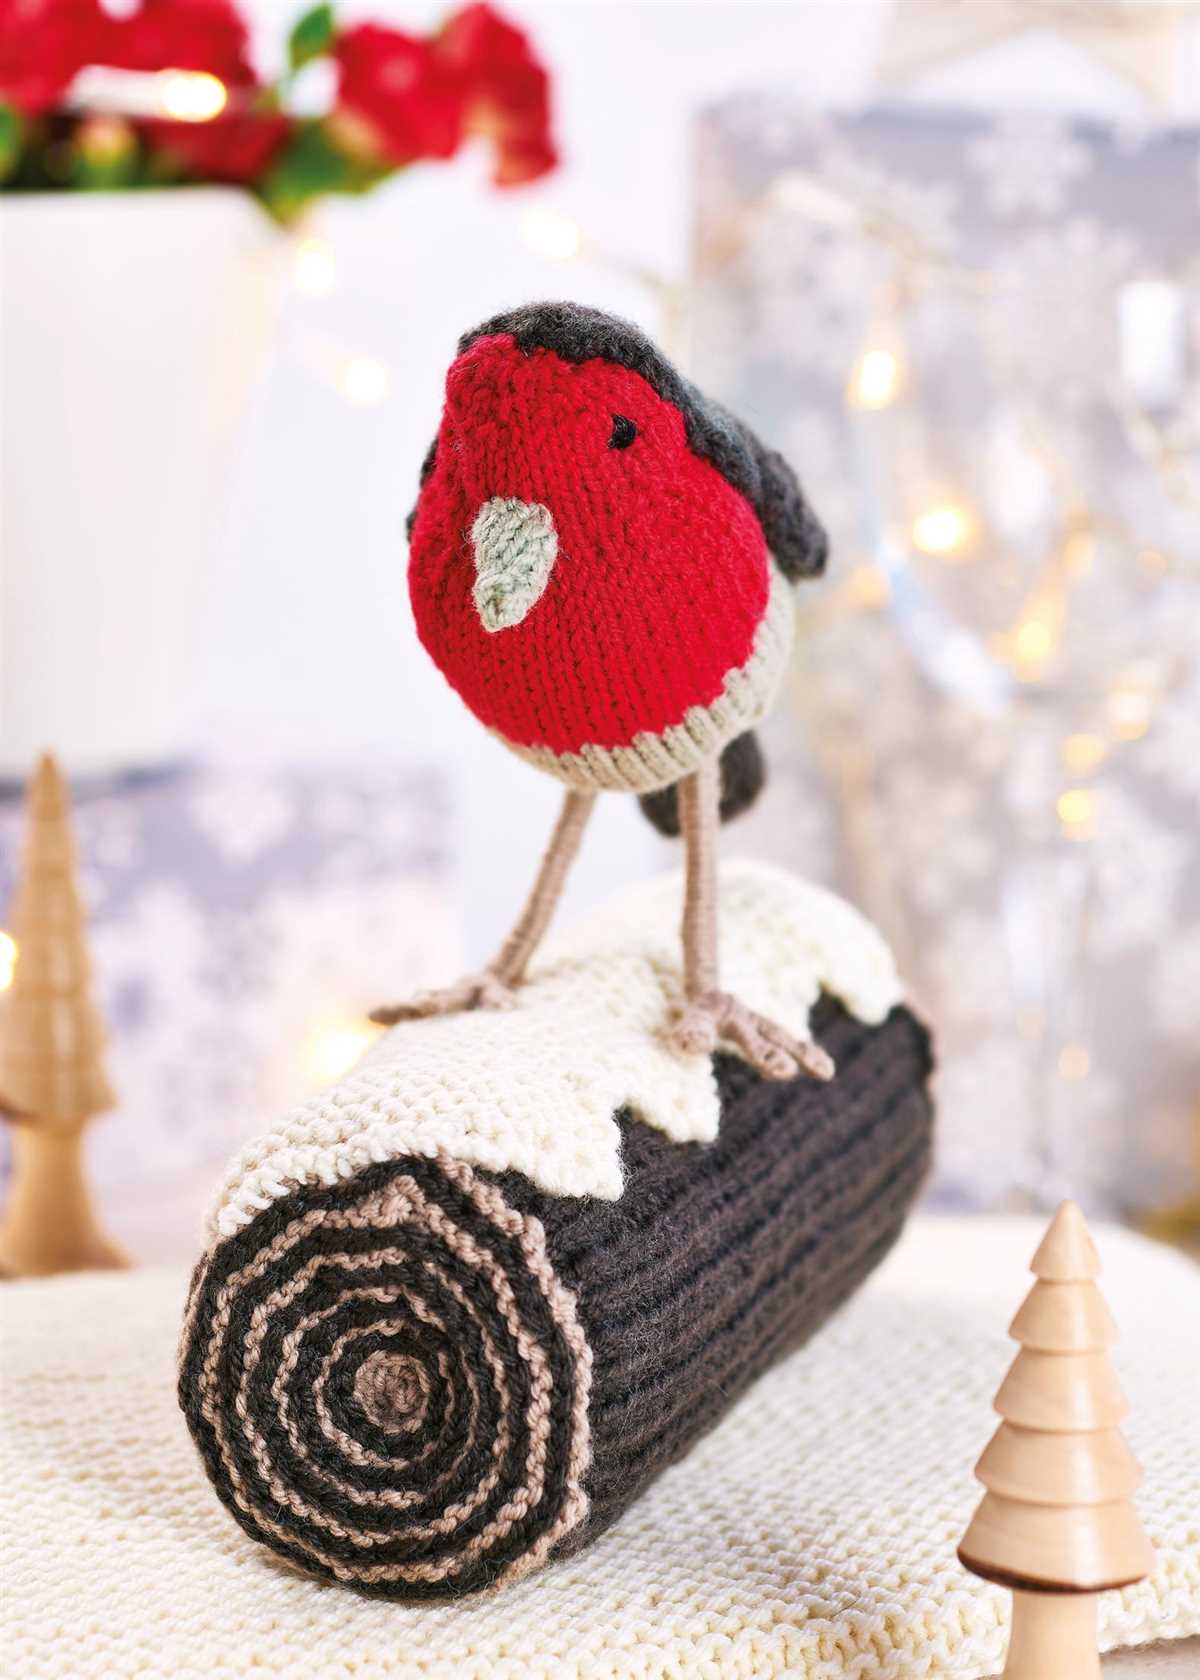
The knitted robin pattern is a delightful project for any knitting enthusiast. Robins are a beloved symbol of winter and Christmas, and this pattern allows you to create your own adorable robin to add a festive touch to your home or to give as a gift. Whether you are an experienced knitter or a beginner, this pattern is suitable for all skill levels and is sure to bring joy to both the maker and the recipient.
Robin patterns are popular among knitters due to their charming design and versatility. The knitted robin pattern typically includes instructions for knitting the body, wings, tail, and legs separately, which are then sewn together. This modular approach allows for customization and creativity. You can choose different colors of yarn to create a realistic robin, or you can use bright and vibrant colors for a whimsical twist. The pattern also often includes a detailed list of materials needed, gauge, and explanations of stitch techniques to ensure that your finished robin looks just right.
Not only is knitting a robin a fun and rewarding project, but it also provides an opportunity to practice and improve your knitting skills. Following a pattern allows you to get comfortable with various stitches, such as knit, purl, increase, and decrease. These small projects are perfect for beginners who want to hone their skills before tackling larger and more complex projects. Additionally, the finished robin can be used as a cute decoration for your home, incorporated into other knitting projects, or given as a heartfelt gift to friends or family.
How to Knit a Robin: A Complete Guide
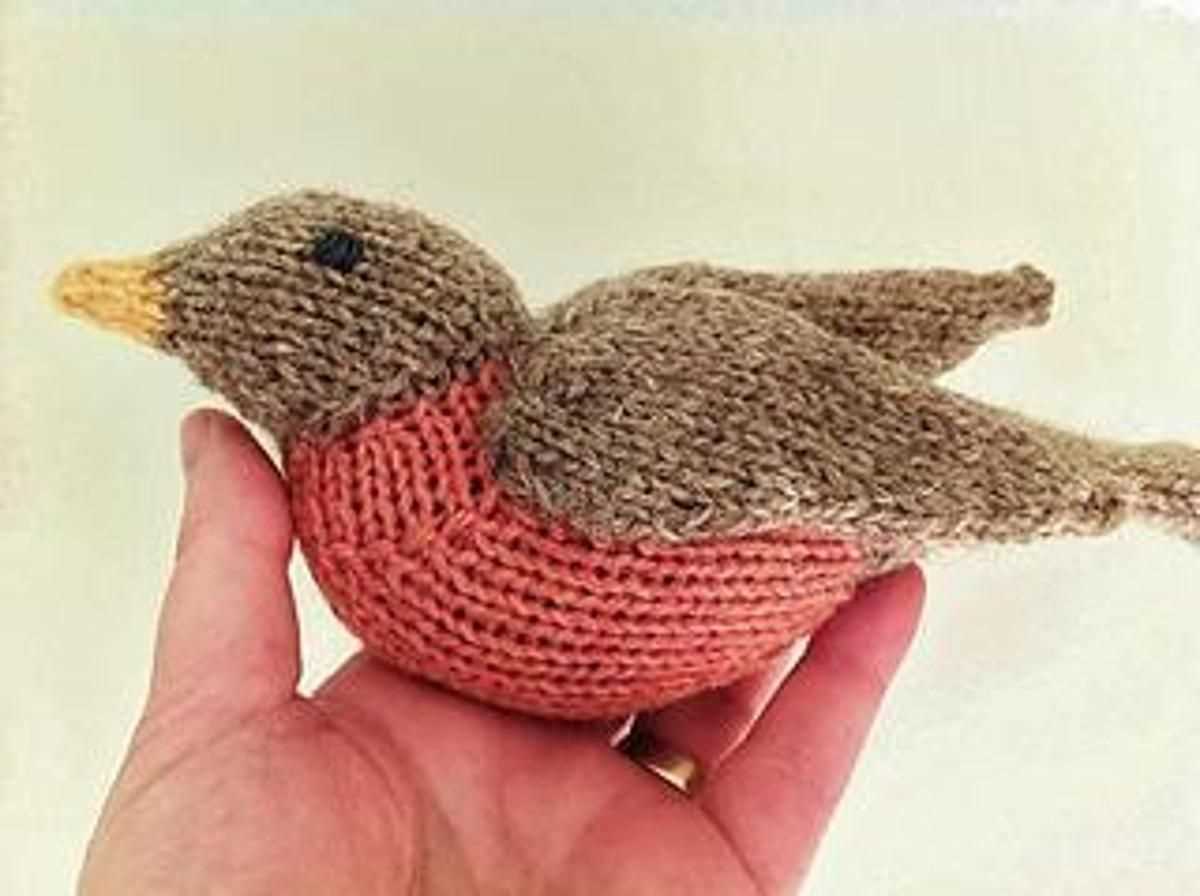
If you’re a knitting enthusiast looking to create a cute and festive Christmas decoration, knitting a robin is the perfect project for you. With its vibrant red breast and charming appearance, a knitted robin can add a touch of whimsy to any holiday setting. In this complete guide, we will take you step by step through the process of knitting a robin, from choosing the right materials to finishing touches.
Materials Needed
- A set of double-pointed knitting needles (size 3.5mm)
- A small amount of red and brown yarn
- Black and white embroidery thread
- Toy stuffing or fiberfill
- Pair of scissors
- Tapestry needle
- Stitch markers
Knitting the Body
Begin by casting on 24 stitches using the brown yarn. Divide the stitches evenly onto three needles, with 8 stitches on each. Join in the round, being careful not to twist the stitches. Knit every round until the body measures approximately 3 inches in length. Then, change to the red yarn and continue knitting until the body measures approximately 5 inches in total. Once you’ve reached the desired length, cut the yarn, leaving a long tail for sewing.
Shaping the Head
To shape the head, you will need to decrease stitches. Start by knitting 2 stitches together at the beginning of each needle, and repeat this decrease every other round until you have 6 stitches left. Cut the yarn, leaving a long tail, and thread it through the remaining stitches. Pull tight to close the opening and secure the yarn.
Adding the Details
Using black embroidery thread, embroider the eyes onto the head. Make a small stitch for each eye, leaving a small space in between. Then, with white embroidery thread, create a V-shaped stitch for the beak. For extra stability, you can also use a small piece of wire to shape and support the beak.
Finishing Touches
Stuff the body with toy stuffing or fiberfill, making sure it is evenly distributed. Sew the bottom of the body closed using the long tail of yarn left from casting on. Attach a loop of yarn to the top of the bird for hanging, and your knitted robin is complete!
Materials Needed
In order to create the knitted robin, you will need the following materials:
1. Yarn:
Color: You will need two different colors of yarn to create the body and beak of the knitted robin. A brown or red yarn can be used for the body, while a yellow or orange yarn can be used for the beak.
Weight: A medium weight yarn is recommended for this project.
2. Knitting Needles:
Size: You will need a pair of knitting needles that are suitable for the chosen yarn weight. Size 4-5 mm (US 6-8) needles are commonly used for medium weight yarn.
3. Stuffing:
Type: To give the knitted robin a plush and three-dimensional shape, you will need some stuffing. Polyester fiberfill or wool stuffing are popular choices for this type of project.
4. Embroidery Thread:
Colors: You will need a small amount of black, white, and brown embroidery thread to create the eyes, beak, and details on the knitted robin.
5. Knitting Accessories:
- Scissors
- Yarn needle
- Stitch markers
- Measuring tape
- Embroidery needle
With these materials, you will have everything you need to start knitting your own adorable robin. Happy knitting!
Getting Started with the Basics
In order to successfully create a knitted robin using a specific pattern, it is important to start with the basics. Knitting requires a basic understanding of knitting stitches, techniques, and tools. By familiarizing yourself with these fundamentals, you will be well-prepared to tackle the knitted robin pattern.
Materials:
- Yarn: Choose a soft, lightweight yarn in the desired colors for your robin. Consider using shades of brown, red, white, and black.
- Knitting Needles: Select knitting needles that are appropriate for the yarn you have chosen. The recommended size will usually be listed on the yarn label.
- Tapestry Needle: This needle will be used for weaving in ends and sewing any necessary seams.
- Scissors: A good pair of scissors is essential for cutting yarn and trimming any excess.
- Stitch Markers: These small rings or clips can be used to mark specific stitches or sections of your knitting.
Knitting Stitches:
When following a knitting pattern, it is important to understand the basic stitches used. The most common stitches you will encounter include:
- Knit Stitch (K): This stitch is created by inserting the right-hand needle into the front of the loop on the left-hand needle, from left to right. Then, wrap the working yarn counterclockwise around the right-hand needle and pull it through the loop, slipping the old stitch off the left-hand needle.
- Purl Stitch (P): This stitch is the reverse of the knit stitch. Insert the right-hand needle into the front of the loop on the left-hand needle, from right to left. Wrap the working yarn counterclockwise around the right-hand needle and pull it through the loop, slipping the old stitch off the left-hand needle.
- Decrease Stitch (K2tog): This stitch is used to decrease the number of stitches in a row. Knit two stitches together as if they were one, inserting the right-hand needle into both loops at the same time from left to right. Wrap the working yarn counterclockwise around the right-hand needle and pull it through the loops, slipping the old stitches off the left-hand needle.
Knitting Techniques:
In addition to the basic stitches, there are certain techniques that may be used in the knitted robin pattern. These techniques include:
- Increasing: This involves adding stitches to your knitting. Common methods include knitting into the front and the back of a stitch, or creating a yarn over.
- Decreasing: The opposite of increasing, decreasing involves reducing the number of stitches in your knitting. This can be achieved through methods like knit two together (K2tog) or slip, slip, knit (SSK).
- Colorwork: If the pattern calls for different colors, you may need to use colorwork techniques such as intarsia or fair isle to create the desired design.
By understanding and practicing these basic stitches and techniques, you will be well-equipped to start knitting your robin using the provided pattern.
Creating the Body
To create the body of the knitted robin, you will need to start by casting on the required number of stitches using the specified yarn and needle size. The pattern may provide instructions on how to start the body, such as whether to begin with the tail or the chest area. It is important to follow these instructions carefully to ensure that the body is knitted correctly.
Once you have cast on the stitches, you can begin knitting the body in the specified stitch pattern. This may involve knitting a certain number of rows in a specific stitch, such as stockinette stitch, to create the smooth texture of the body. Alternatively, the pattern may include instructions for different stitch patterns or textures, such as seed stitch or garter stitch, to add more detail to the body.
As you knit the body, it is important to pay attention to the shaping instructions provided in the pattern. These instructions will guide you on how to increase or decrease stitches to shape the body correctly. For example, you may be instructed to decrease stitches to shape the head or to increase stitches to create the roundness of the body.
You may also need to make adjustments to the body length as indicated in the pattern. This could involve knitting a certain number of rows or repeating a specific pattern section multiple times to achieve the desired body length. It is important to measure your knitting as you go along to ensure that the body is the correct length according to the pattern.
Once you have completed knitting the body of the knitted robin, you can finish off any remaining stitches and weave in the loose ends. It is important to make sure that the body is securely bound off and all loose ends are neatly tucked away to create a professional finish.
Knitting the Wings
If you want to make a knitted robin with realistic and detailed wings, there are a few key techniques and patterns you can use. The first step is to choose the appropriate yarn and knitting needles for the project. Using a lightweight yarn and smaller needles will give you more control over the stitches and allow you to create finer details in the wings.
Once you have your materials ready, you can begin knitting the wings using a combination of basic knitting stitches. Start by casting on the required number of stitches for the width of the wing, then work in stockinette stitch to create a smooth and even texture. Using a different color yarn for the main body of the wing can help to distinguish it from the rest of the robin’s body.
To add more detail to the wings, you can use a combination of techniques such as increases and decreases to shape the wing and create a feather-like appearance. Knitting short rows can also help to create the curved shape of the wing and add depth to the overall design. Consider adding a few rows of garter stitch or ribbing to mimic the texture of feathers.
For a more advanced knitting technique, you can also try incorporating lace patterns into the wings. Lace stitches can create an open and delicate look, perfect for representing the intricate patterns found in bird wings. There are many lace patterns available online or in knitting pattern books that you can experiment with to achieve the desired effect.
Remember to follow the pattern instructions carefully and make any necessary adjustments along the way to ensure the wings turn out the way you envision them. With a bit of patience and practice, you can knit beautifully detailed wings for your knitted robin that will make it truly stand out.
Making the Beak
When making the beak for your knitted robin, you have a few options to choose from. One common method is to use the duplicate stitch technique. This involves embroidering the beak onto the knitted fabric using a contrasting color yarn. To do this, thread your yarn onto a tapestry needle and insert it into the stitch where you want the beak to begin. Then, bring the needle back up through the next stitch, creating a diagonal line. Continue repeating this process until you have filled in the desired shape of the beak.
Another option is to create a separate piece for the beak and sew it onto the body of the robin. To do this, you can knit or crochet a small triangular shape using the desired beak color. Once you have the piece, position it on the front of the robin’s head and use a tapestry needle and matching yarn to sew it in place. Make sure to securely attach the beak to prevent it from coming loose during use.
Using Felt
If you prefer a more 3-dimensional look for your knitted robin’s beak, you can also use felt. Cut a small triangular piece of felt in the desired beak color and shape it to fit the robin’s face. You can then use a strong fabric glue or hand stitching to attach the felt beak to the knitted fabric. This option can give your robin a more realistic appearance, especially if you choose a felt color that closely matches the yarn used for the rest of the body.
- Duplicate stitch
- Sewn-on piece
- Using felt
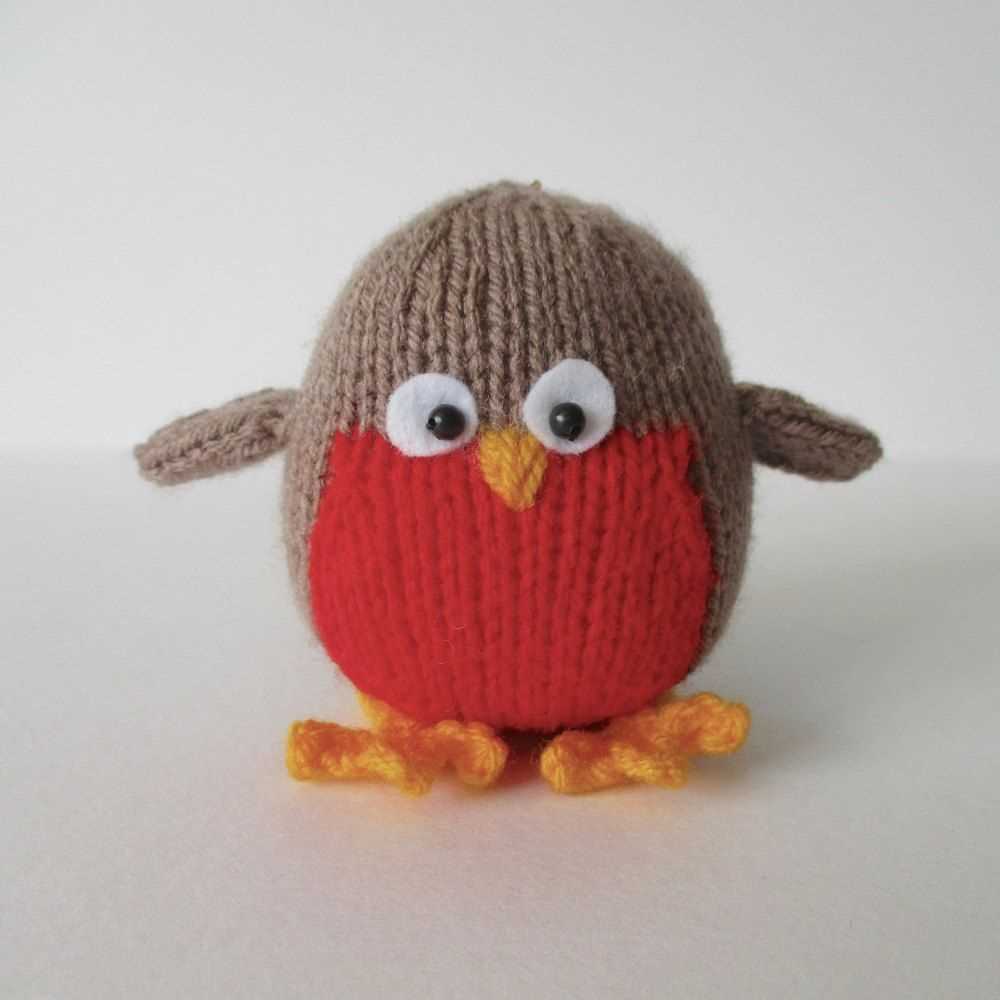
Adding the Eyes
One of the key features of the knitted robin is its eyes. Adding the eyes brings the bird to life and gives it a cute and vibrant look. To create the eyes, you will need two small buttons or beads in the desired color. Make sure the buttons or beads are suitable for stitching onto the knitted surface.
Start by deciding on the placement of the eyes. Usually, they are positioned slightly above the middle of the head, towards the outer edges. Use a tape measure or ruler to ensure that the eyes are symmetrically placed. Then, thread a sewing needle with matching thread and anchor it securely on the inside of the knitted head.
Option 1: To stitch on the buttons, bring the needle up through the back of the knitted surface where the first eye will be positioned. Place a button or bead on the needle and pass the needle back through the knitted surface, making sure to go through the buttonholes or bead holes for a secure attachment. Repeat the process for the second eye, making sure they are the same distance apart and at the same height.
Option 2: If you prefer a more detailed look, you can embroider the eyes instead of using buttons or beads. Use embroidery floss in a contrasting color to create a small round shape for each eye. You can use a simple satin stitch or a French knot to achieve the desired shape. Repeat for the second eye, keeping them symmetrical.
Once the eyes are securely attached or embroidered, tie off the thread on the inside of the knitted head. Trim any excess thread to ensure a neat finish. Now your knitted robin has its eyes and is ready to brighten up any space!
Crafting the Tail
The tail of the knitted robin is a crucial part of the overall design. It adds a touch of whimsy and charm to the finished bird. To craft the tail, you will need some yarn in the desired color. Choose a yarn that matches or complements the color of the robin’s body. Cut a length of yarn, approximately twice the desired length of the tail.
To start, thread the yarn through a large-eyed needle. Insert the needle through the body of the robin, near the base of the tail. Pull the yarn through until there is an equal length on each side of the body. This will create a loop of yarn. Holding both ends of the yarn together, tie a knot to secure it in place.
Next, separate the yarn strands into two equal sections. Twist each section in opposite directions to create a spiral effect. Continue twisting until the entire length of the tail is twisted. This will give the tail a unique and textured appearance. Be careful not to over-twist, as this can cause the yarn to tangle or break.
Once you are satisfied with the twist, bring the two sections of yarn together and tie another knot at the end. This will keep the twisted yarn from unraveling. Trim any excess yarn beyond the knot to achieve the desired length of the tail. It can be helpful to use a ruler or measuring tape to ensure an even cut.
Finally, fluff the tail by gently pulling on the individual strands of twisted yarn. This will give the tail volume and make it look more natural. Adjust the strands as needed to create a balanced and symmetrical tail. Once the tail is complete, it can be attached to the robin’s body using a needle and thread or by sewing it directly onto the body with a tapestry needle. With the tail in place, your knitted robin will be complete and ready to bring a touch of handmade charm to any holiday decor or gift.
Assembling the Parts
Once you have completed all the necessary parts for your knitted robin, it’s time to assemble them together. Follow these steps to bring your bird to life:
1. Attaching the Wings
To attach the wings, place them on either side of the body, making sure they are positioned symmetrically. Use a yarn needle and matching yarn to sew the wings securely in place. Make sure to sew through both the body and the wings to ensure they are firmly attached.
2. Adding the Tail
Next, take the tail piece and position it at the back of the robin’s body. Use the yarn needle and matching yarn to sew the tail securely in place. Make sure to sew through both the body and the tail to ensure it stays in position.
3. Sewing on the Beak
Take the beak piece and position it at the front of the robin’s head. Use the yarn needle and matching yarn to sew the beak securely in place. Start by sewing the base of the beak to the head, then sew around the edges to attach it firmly.
4. Attaching the Eyes
For the eyes, you can either use black buttons or embroider them using black yarn. Position the eyes on either side of the robin’s head and use the yarn needle to sew them securely in place. If using buttons, make sure they are tightly attached.
Once you have followed these steps and all the parts are securely attached, your knitted robin is complete! You can now proudly display your handmade creation or give it as a special gift.
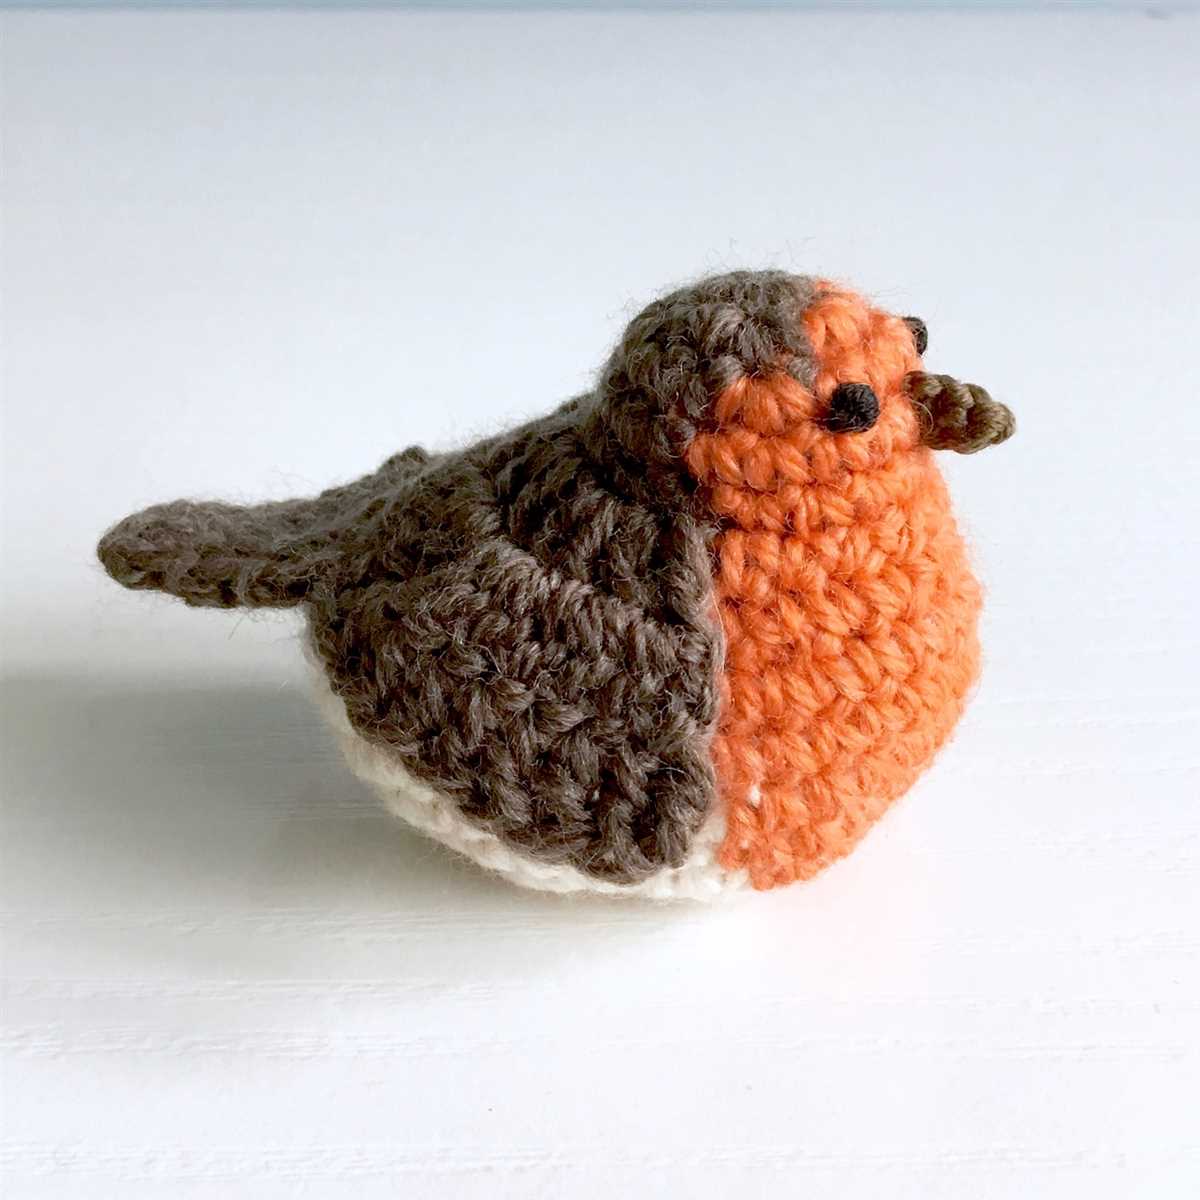
Adding Details
When creating a knitted robin, adding details is what brings the character to life. Small details such as the eyes, beak, and wings can make a big difference in the overall appearance of the bird.
To start, carefully attach the eyes using a contrasting yarn color. Sew them onto the face, making sure they are evenly spaced and centered. This will give the robin a lifelike expression. Next, create the beak by knitting a small triangle shape and sewing it onto the face, just below the eyes. The beak should be slightly curved and pointy, resembling that of a real robin. Finally, attach the wings to the sides of the body. Knit two small rectangles and sew them onto the body, making sure they are symmetrical and positioned correctly.
Eyes: Each eye should be approximately 3 stitches wide and 3 rows tall. Use black yarn to create a small French knot in the center of each eye to give it a pupil.
Beak: Knit a triangle shape that is approximately 4 stitches wide and 6 rows tall. Sew it onto the face just below the eyes, making sure the beak is slightly curved and the pointy end is facing downward.
Wings: Knit two rectangles that are approximately 8 stitches wide and 12 rows tall. Fold them in half and sew the shorter sides together. Attach the wings to the sides of the body, positioning them slightly above the middle of the body and making sure they are symmetrical.
By adding these details, your knitted robin will come to life and be a beautiful addition to any home or holiday decor.
Finishing Touches
Once you have completed knitting your robin, it’s time to add the finishing touches to bring it to life. These final details will give your knitted bird a realistic and charming appearance.
Eyes: Embroider or attach small black beads for the eyes. This will give your robin a lively and whimsical expression.
Beak: Use orange or yellow yarn to knit a small triangular shape for the beak. Attach it securely to the face of the robin, making sure it sits neatly below the eyes.
Wings: Knit two small wings using a different color of yarn, such as brown or gray, to create contrast. Attach the wings to the sides of the robin, slightly below the neck, using a whip stitch.
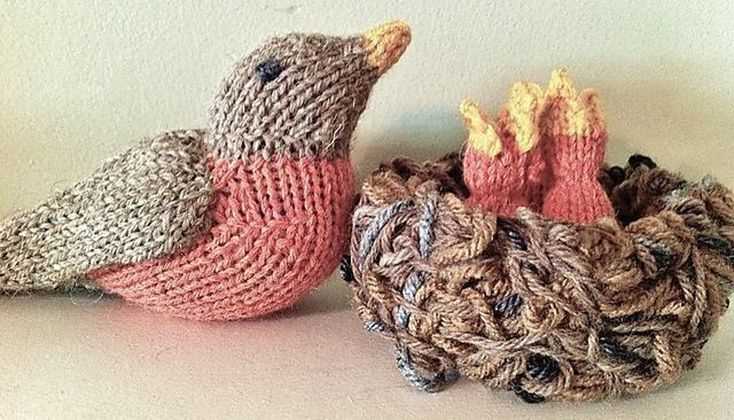
Tail: Give your robin a fluffy tail by attaching small tufts of yarn in a fan shape at the back. This will add texture and make your knitted bird even more adorable.
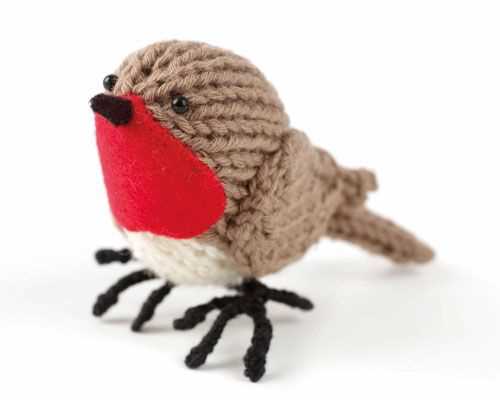
Feet: Use thin wire or pipe cleaners to create the legs and feet. Twist them into a bird-like shape and attach them to the bottom of the body. You can also add small pieces of yarn to create claws for a realistic touch.
Finishing touches can truly transform your knitted robin into a delightful and lifelike creation. Take your time to attach these details carefully, ensuring that they are secure and well-positioned. The small details will make a big difference, giving your knitted robin a character and personality of its own.
Tips and Tricks
When knitting a robin pattern, there are several tips and tricks that can help you create a beautiful and lifelike bird. Here are some key points to keep in mind:
1. Choose the right yarn: The type of yarn you use can greatly affect the final result of your knitted robin. Opt for a yarn that is soft and pliable, with good stitch definition. Natural fibers like wool or cotton are ideal for achieving a realistic texture.
2. Use the correct needle size: The size of your needles will determine the gauge and overall size of your knitted robin. Make sure to use the recommended needle size stated in the pattern, or adjust accordingly to achieve the desired size and tension.
3. Pay attention to detail: To make your robin truly stand out, pay attention to the small details. This includes adding an embroidered eye or using different stitch techniques to create the intricate patterns on the bird’s feathers.
4. Create a lifelike shape: To achieve a realistic shape, consider using wire or pipe cleaners to create a base skeleton for your knitted robin. This will allow you to pose the bird in different positions and make it more dynamic.
5. Practice different knitting techniques: To enhance your overall knitting skills and create a more detailed robin, practice different techniques such as colorwork, lace, or cable knitting. These techniques can add texture and complexity to your bird.
- Choose the right yarn
- Use the correct needle size
- Pay attention to detail
- Create a lifelike shape
- Practice different knitting techniques
Showcasing Your Knitted Robin
Now that you have successfully completed knitting your robin, it’s time to showcase your creation. Whether you made it for yourself or as a gift, displaying your knitted robin can add a charming touch to any room or occasion. Here are a few ways to show off your knitted robin:
1. Display on a Shelf or Mantel
Find a prominent spot in your home to showcase your knitted robin. A shelf or mantel is a perfect place to create a cozy holiday display. Arrange your knitted robin with other festive decor, such as candles, pinecones, or miniature Christmas trees, to create a captivating scene.
2. Attach to a Wreath
A knitted robin can be a delightful addition to a wreath. Use a small piece of wire or thread to attach your robin to the wreath, ensuring it is securely in place. Hang the wreath on your front door or above a fireplace to welcome guests and spread holiday cheer.
3. Gift to a Loved One
If you made the knitted robin as a gift, present it to your loved one in a special way. Place it inside a decorative box or wrap it in colorful tissue paper. Attach a heartfelt note expressing your love and appreciation to add a personal touch.
Remember, the knitted robin pattern is not only a fun project to make but also a cherished item to showcase. Whether you choose to display it in your own home or gift it to someone special, your knitted robin will bring joy and warmth to those who see it.