
Knitting is not only a soothing and creative hobby, but it also allows you to create personalized and practical items. One popular project for beginners is knitting mittens. These cozy accessories are perfect for keeping your hands warm during the cold winter months, and they make great gifts for friends and family.
If you are new to knitting, don’t worry! There are many beginner-friendly mitten patterns available that will guide you through each step of the knitting process. These patterns are designed to be easy to follow and require basic knitting techniques, making them the perfect introduction to mittens knitting.
When choosing a beginner mittens pattern, it’s important to consider the level of difficulty and the size of the finished product. Look for patterns that include detailed instructions, clear diagrams, and helpful tips. Additionally, choose a pattern that matches your skill level and knitting preferences, whether you prefer working with double-pointed needles, circular needles, or straight needles.
Beginner Mittens Knitting Patterns
If you’re new to knitting and looking to take on a new project, beginner mittens knitting patterns are a great place to start. Mittens are a practical and cozy accessory for the cold winter months, and knitting your own pair allows you to customize the colors and style to your liking. Whether you’re knitting for yourself or as a gift for someone else, these beginner patterns are perfect for honing your skills.
One popular beginner mittens knitting pattern is the classic garter stitch mittens. This pattern uses simple knit stitches throughout, making it ideal for those who are just starting out. The garter stitch creates a textured fabric that is both warm and durable. By following the step-by-step instructions and using basic techniques such as casting on, knitting, and binding off, you can create a pair of cozy mittens in no time.
Materials:
- Worsted weight yarn in your desired color(s)
- Size 8 (5mm) knitting needles
- Tapestry needle
- Scissors
Instructions:
- Cast on 30 stitches.
- Work in garter stitch (knit every row) for 3 inches.
- Begin shaping the thumb gusset by increasing stitches. Instructions for this step are provided in the pattern.
- Continue knitting in garter stitch until the mittens reach your desired length.
- Shape the top of the mitten to create a rounded finish. Instructions for this step are provided in the pattern.
- Bind off the stitches.
- Repeat the process to create the second mitten.
- Weave in any loose ends and trim excess yarn.
Once you’ve mastered the garter stitch mittens, you can explore other beginner patterns that introduce more advanced techniques. Some patterns may incorporate ribbing, simple colorwork, or different stitch patterns to add variety and visual interest to your mittens. Whatever pattern you choose, be sure to select a yarn that is soft and warm, like wool or a wool blend, to keep your hands cozy during the chilly winter months.
Knitting your own mittens can be a rewarding and enjoyable project, and with these beginner patterns, you’ll be able to create a cozy accessory in no time. Whether you’re knitting for yourself or as a gift, the handmade touch adds a special charm to these practical winter essentials.
The Best Yarns for Beginner Mittens
Choosing the right yarn is essential when knitting beginner mittens. The yarn you select will determine the comfort, warmth, and durability of the finished mittens. Here are some of the best yarns for beginners:
1. Worsted Weight Yarn
Worsted weight yarn is an excellent choice for beginner mittens due to its versatility and ease of use. This type of yarn is thicker and provides a good balance between warmth and dexterity. It is also widely available in various colors and fiber blends, allowing you to choose a yarn that matches your preferred style and taste.
2. Acrylic Yarn
Acrylic yarn is another great option for beginners. It is affordable, easy to work with, and comes in a wide range of colors. Acrylic yarn is also machine washable, making it ideal for mittens that require regular cleaning. Additionally, it is hypoallergenic, making it suitable for individuals with sensitivities or allergies to certain fibers.
3. Wool Blend Yarn
A wool blend yarn is a popular choice among knitters due to its warmth and durability. It combines the softness of wool with the added strength and stability of synthetic fibers. A blend of wool and acrylic or nylon can make for excellent beginner mittens that are both cozy and long-lasting.
4. Superwash Yarn
If you want mittens that are easy to care for, consider using superwash yarn. Superwash yarn has been specially treated to make it machine washable without shrinking or felting. This makes it an excellent choice for beginners who may be hesitant about handwashing their knitted items.
Ultimately, the best yarn for beginner mittens will depend on your preferences, budget, and the desired qualities of the finished product. Take time to explore different yarn options and experiment to find the perfect yarn for your knitting project.
Choosing the Right Needles for Your Mittens
When it comes to knitting mittens, choosing the right needles is essential for creating a well-fitted and comfortable final product. The needles you select can impact the tension, stitch definition, and overall appearance of your mittens. To ensure success, take the time to choose the right needles for your project.
1. Needle Material
One of the first considerations when selecting knitting needles for mittens is the material they are made of. There are various options available, including metal, wood, and plastic. Metal needles, such as stainless steel or aluminum, are smooth and durable, allowing stitches to glide effortlessly. Wood needles, like bamboo or birch, offer warmth to the hands and provide a natural grip, ensuring stitches stay in place. Plastic needles are lightweight and flexible, making them comfortable for long knitting sessions.
2. Needle Size
The size of the needles you choose depends on the desired gauge and thickness of your mittens. The pattern you are following will usually provide a recommended needle size, which you can use as a starting point. However, it is important to swatch and check your gauge before starting the project. Swatching will help you determine if you need to go up or down a needle size to achieve the correct tension and ensure your mittens fit properly. Remember, different stitch patterns may require different needle sizes, so always swatch to avoid disappointment.
3. Needle Length
Needle length is another factor to consider when knitting mittens. Circular needles with longer cables are often preferred for mittens because they allow you to hold more stitches and prevent them from sliding off. The length of the circular needles should be long enough to accommodate the circumference of your mitten. Alternatively, if you prefer using double-pointed needles, make sure their length is suitable for the size of your mitten. Shorter needles can be used for smaller sizes, while longer needles may be necessary for larger sizes.
By considering the material, size, and length of the needles, you can ensure that your mittens turn out just the way you want them. Experiment with different combinations to find the perfect match for your project, and enjoy the process of creating cozy, handmade mittens.
Basic Knit Stitch for Mittens
When knitting mittens, the basic knit stitch is an essential technique to learn. It is the foundation for creating the fabric of the mittens and gives them a cozy and warm texture. The knit stitch is a versatile stitch that can be used in various knitting patterns, including beginner mittens patterns.
To knit the basic stitch for mittens, you will need knitting needles, yarn, and some basic knitting skills. Start by casting on the desired number of stitches onto your needles. Hold the needles in your preferred hand, with the working yarn attached to the back needle. Insert the front needle into the first stitch on the back needle, from left to right. Wrap the working yarn around the front needle, moving from right to left.
- Next, pull the wrapped yarn through the stitch with the front needle, pulling the stitch off the back needle. This creates a new stitch on the front needle.
- Continue knitting across the row, repeating the steps of inserting the front needle into the next stitch, wrapping the yarn, and pulling it through to create new stitches.
- Once you reach the end of the row, turn the work and repeat the process on the next row.
- Continue knitting rows of the basic knit stitch until the desired length for the mittens is reached.
The basic knit stitch creates a smooth and even fabric that is perfect for mittens. It is a simple stitch that can be easily mastered, making it ideal for beginners. With practice, you can create beautiful and cozy mittens using the basic knit stitch.
How to Purl for Mittens

Mittens are a great beginner knitting project, and learning how to purl is an essential skill for creating the textured patterns often found in mittens. Purling is the reverse of knitting, and it creates a smooth ridge or stitch on the front side of the fabric. Here are the steps to purl for mittens:
Step 1: Hold the Needle and Yarn
To start purling, hold the knitting needle with the stitches in your left hand and the empty needle in your right hand. Make sure that the working yarn is hanging towards the back of your work.
Step 2: Insert the Right Needle
Insert the right needle from right to left through the front of the first stitch on the left needle. The right and left needles should cross each other as you do this.
Step 3: Wrap the Yarn
Take the working yarn and wrap it counterclockwise around the right needle, moving the yarn between the two needles to the front of your work.
Step 4: Pull Through the Stitch
Using the right needle, pull it back and through the stitch on the left needle, bringing the new stitch onto the right needle.
Step 5: Slip the Stitch
Slip the stitch off the left needle, dropping it down onto the right needle. You have now completed one purl stitch.
Continue these steps for the remaining stitches on the left needle until all the stitches have been purled. Purling creates a different texture than knitting, and by combining purl stitches with knit stitches, you can create various patterns and designs for your mittens.
Adding Ribbing to Your Mitten Cuff
If you are looking to add a little extra stretch and snugness to your mitten cuffs, adding ribbing is a great option. Ribbing not only adds a decorative touch to your mittens, but also helps them stay in place and fit comfortably around your wrists.
To add ribbing to your mitten cuff, you can use a variety of stitch patterns such as 1×1 rib, 2×2 rib, or even a seed stitch. The choice of ribbing pattern is up to you and depends on the overall design of your mittens. Keep in mind that different ribbing patterns will result in different looks and levels of stretch.
1. Choose your ribbing pattern: Determine which ribbing pattern you would like to use for your mitten cuff. The most common options are 1×1 rib (alternating knit and purl stitches), 2×2 rib (alternating two knit stitches and two purl stitches), or a seed stitch (alternating knit and purl stitches in a specific pattern).
2. Calculate the number of stitches: Measure the circumference of your wrist and multiply it by the desired number of ribbing stitches per inch. This will give you the total number of stitches you need to cast on for the ribbing section of your mitten cuff.
3. Knit the ribbing section: Using the chosen ribbing pattern, knit the desired number of rows for the ribbing section of your mitten cuff. Make sure to keep track of your stitch count to ensure an even result.
4. Transition to the main mitten body: Once you have completed the ribbing section, you can transition to knitting the main body of the mitten. Follow your chosen mitten pattern and continue knitting until you reach the desired length.
By adding ribbing to your mitten cuff, you can create a more secure and comfortable fit for your mittens. Experiment with different ribbing patterns to achieve the desired look and stretch. Whether you prefer a classic 1×1 rib or a textured seed stitch, ribbing is a versatile and practical addition to your mitten knitting projects.
Creating Thumb Gussets for Your Mittens
When knitting mittens, one of the most important elements to consider is the thumb gusset. The thumb gusset is an extra section of stitches that allows for a comfortable and flexible fit around the thumb. It is essential in creating mittens that are not only stylish but also functional and comfortable to wear.
There are several ways to create thumb gussets for your mittens. One common method is to increase stitches on either side of the thumb, gradually widening the area and providing enough room for the thumb to move. This can be done by knitting two stitches into one or by using a make-one increase technique. These increases are typically worked on every other row or as specified in the pattern.
Another method for creating thumb gussets is to use a thumb gusset stitch pattern. This involves working a specific stitch pattern on the thumb gusset section, such as a cable or lace pattern. This not only adds visual interest to the mittens but also creates additional width and flexibility for the thumb. Thumb gusset stitch patterns can be found in various knitting pattern books and online resources.
It’s important to consider the fit and comfort of the thumb gusset when knitting mittens. The thumb should have enough room to move comfortably without feeling too tight or restrictive. Taking accurate measurements of the thumb and comparing it to the knitting pattern will help ensure a proper fit. Additionally, trying on the mittens as you work on the thumb gusset section can also help assess the fit and make any necessary adjustments.
In conclusion, creating thumb gussets for your mittens is an essential step in making them comfortable and functional. Whether through increase stitches or using a thumb gusset stitch pattern, ensuring a proper fit around the thumb is crucial. Taking measurements, comparing them to the pattern, and trying on the mittens as you work will help achieve the best results. With proper thumb gussets, your mittens will not only keep your hands warm but also be a stylish accessory for the winter season.
Shaping the Top of Your Mitten
When knitting mittens, shaping the top is an important step that gives your mittens their proper fit and shape. It is essential to follow the pattern instructions carefully to ensure that your finished mittens look and feel just right.
Typically, the shaping of the top of a mitten involves decreasing stitches gradually in a specific pattern to form a rounded or pointed top. The exact method and stitch pattern used will depend on the design and style of the mitten pattern you are working on.
1. Decreasing Stitches:
To shape the top of your mitten, you will need to decrease the number of stitches in each round. This is usually done by working knit or purl decreases, such as knit two together (k2tog) or purl two together (p2tog). These decreases help to bring the stitches closer together and create the desired shape.
2. Stitch Pattern:
The exact stitch pattern used for shaping the top of your mitten will depend on the pattern instructions. Some patterns may use simple knit or purl stitches, while others may incorporate more complex stitch patterns, such as cables or lace. It is important to carefully follow the pattern instructions and keep track of your stitches to ensure you are shaping the top correctly.
3. Top Ribbing:
In some mitten patterns, you may be instructed to work a ribbed section at the top of the mitten before shaping the top. This ribbing helps to provide a snug fit and adds an attractive detail to the mitten design. Usually, the ribbing is worked in a combination of knit and purl stitches, such as a 1×1 or 2×2 rib.
4. Final Rounds:
Once you have completed the shaping of the top, you will typically have a small number of stitches remaining. These stitches may be gathered or closed off using a variety of techniques, such as a three-needle bind off or a Kitchener stitch. The pattern instructions should guide you on how to finish the top of the mitten.
By carefully shaping the top of your mittens, you can ensure a comfortable and well-fitting finished product. Take your time, follow the pattern instructions, and enjoy creating a cozy pair of mittens for yourself or as a gift!
Joining the Mitten Seam
One of the most important steps in knitting mittens is joining the mitten seam. This is the process of sewing together the two sides of the mitten to create the final shape. There are different methods for joining the mitten seam, but the most common one is the mattress stitch.
To join the mitten seam using the mattress stitch, start by threading a tapestry needle with a length of yarn that matches the color of your mitten. Insert the needle under the first horizontal bar of one side of the mitten, from front to back. Then, insert the needle under the corresponding bar on the other side of the mitten, also from front to back.
Continue this process, working your way up the mitten and making sure to keep the tension even on both sides. This will ensure that the seam looks seamless and neat.
Once you’ve finished joining the mitten seam, carefully weave in any loose ends and trim the excess yarn. This will give your finished mitten a clean and professional look.
- Use the mattress stitch to join the mitten seam for a seamless look.
- Work your way up the mitten, keeping the tension even on both sides.
- Weave in any loose ends and trim the excess yarn for a clean finish.
Joining the mitten seam is an important step in the knitting process, as it gives your mittens their final shape and structure. By using the mattress stitch and paying attention to tension, you can create a seamless seam that will make your mittens look polished and professional. Once the seam is joined and the loose ends are woven in, you can proudly wear your hand-knit mittens and keep your hands warm during the winter months.
How to Add Decorative Stitching to Your Mittens
One way to elevate the look of your basic knitted mittens is to add decorative stitching. By incorporating different stitch patterns into your project, you can create unique and personalized mittens that stand out from the crowd. Here are some tips on how to add decorative stitching to your mittens:
Choose your stitch pattern
The first step in adding decorative stitching to your mittens is to choose a stitch pattern that you like. There are countless options available, ranging from simple cables to intricate lace designs. Consider the level of difficulty, the look you want to achieve, and the skills you have as a knitter when selecting a stitch pattern.
Some popular stitch patterns for mittens include:
- Cables: Cables create a textured and visually interesting look. They can be simple or complex, depending on the pattern you choose.
- Seed Stitch: This stitch pattern is created by alternating knit and purl stitches. It adds a subtle texture and is easy to work.
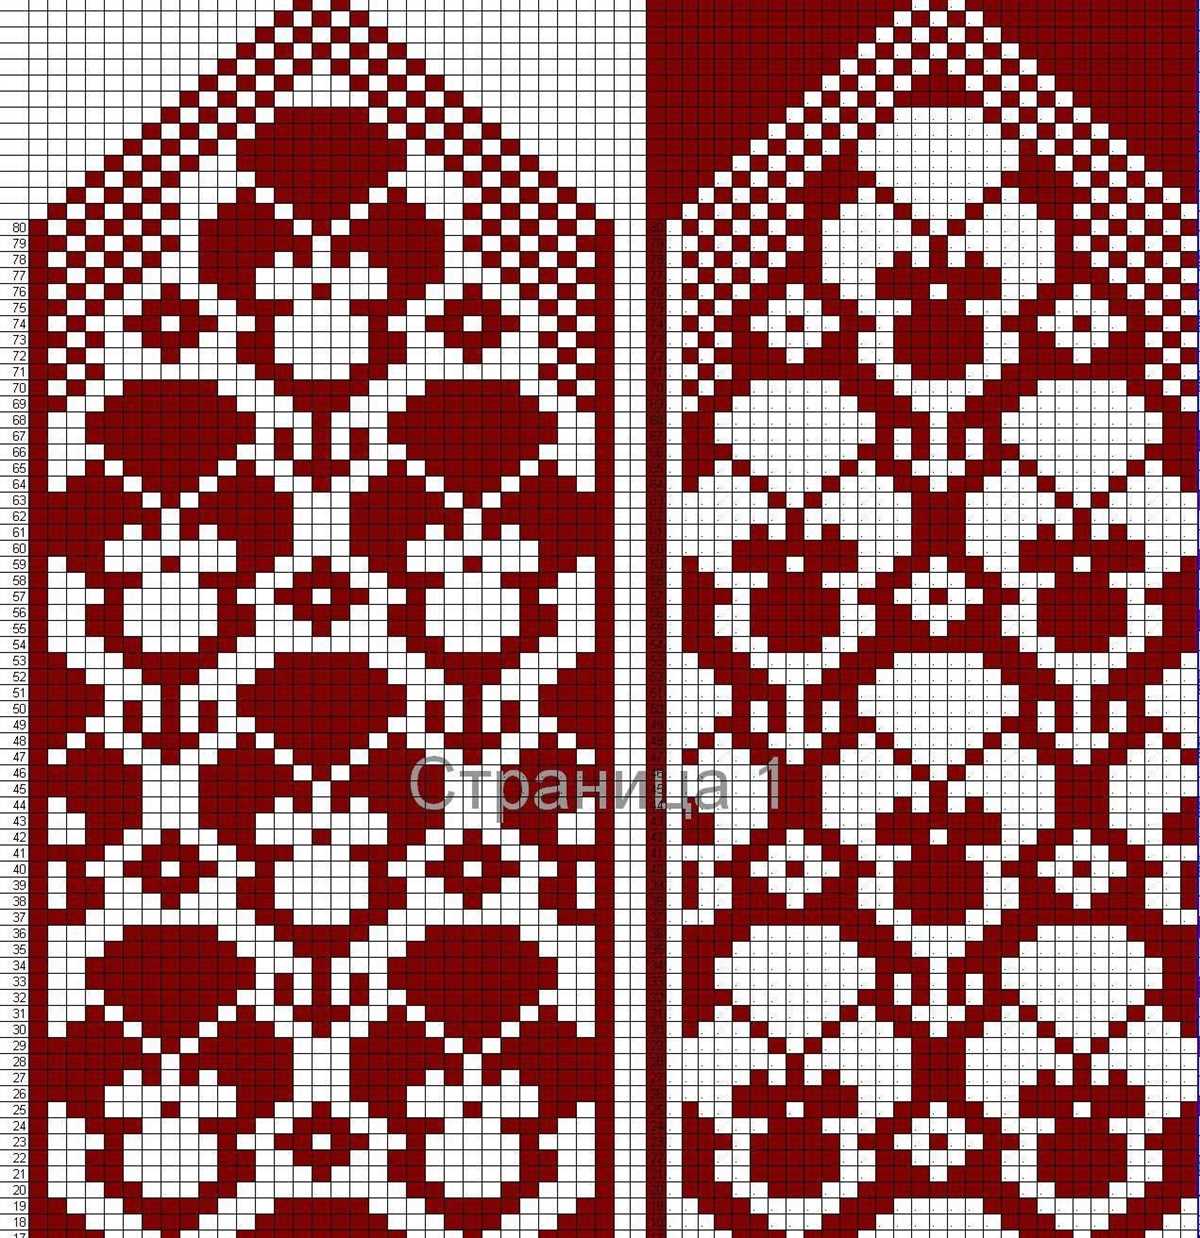
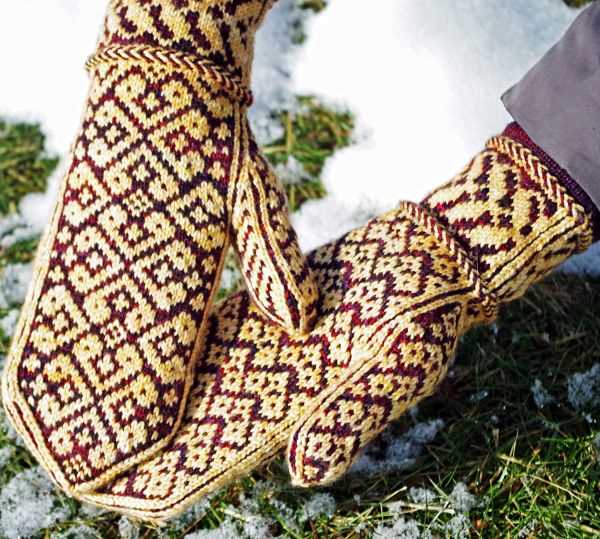
- Fair Isle: Fair Isle is a colorwork technique that involves knitting with two or more colors in a row. It creates intricate designs and patterns.
- Ribbing: Ribbing is a stretchy stitch pattern often used for cuffs and edgings. It adds texture and helps the mittens fit snugly.
Integrate the stitch pattern
Once you have chosen your stitch pattern, you can integrate it into your mitten design. You can incorporate the stitch pattern in different ways, such as working it on the cuff, along the back of the mitten, or across the palm. Be mindful of the sizing and shaping of the mittens as you integrate the stitch pattern, ensuring that it doesn’t interfere with the fit or functionality of the mittens.
Accentuate with contrasting yarn
To make your decorative stitching pop, consider using a contrasting yarn color. This will create a visual contrast and highlight the stitch pattern. For example, if you are knitting a pair of mittens with a cable stitch pattern, using a lighter or darker yarn color for the cables will make them stand out even more.
Remember to experiment and have fun with adding decorative stitching to your mittens. It’s a great way to showcase your creativity and make your knitted accessories truly one-of-a-kind. Happy knitting!
Blocking and Finishing Your Mittens
Once you have finished knitting your mittens, the next step is blocking and finishing them. Blocking is an important process that helps give your mittens their final shape and size. It also helps to even out any uneven stitches and give your knitting a more polished look.
The first step in blocking your mittens is to wet them. Fill a sink or basin with lukewarm water and add a small amount of wool wash or mild detergent. Gently submerge your mittens in the water, making sure they are fully saturated. Allow them to soak for about 15-20 minutes.
After soaking, remove your mittens from the water and gently squeeze out the excess water. Do not wring or twist them, as this can cause the fibers to become misshapen. Lay your mittens flat on a clean towel and roll them up, pressing firmly to remove even more moisture.
Once your mittens are damp, it’s time to shape them. Place one mitten on your hand and gently stretch the fingers and thumb to your desired length. Use pins or blocking wires to hold the shape in place. Repeat this process with the second mitten.
Leave your mittens to dry completely. Depending on the weather and humidity, this can take anywhere from a day to a few days. Once dry, gently remove the pins or blocking wires, and your mittens are ready to wear!
Before wearing, make sure to weave in any loose ends and trim any excess yarn. This will give your mittens a neat finish and prevent any unraveling. If desired, you can also add a decorative edge or embroidery to personalize your mittens.
Finished Beginner Mitten Patterns to Try
If you are a beginner knitter looking to knit your first pair of mittens, there are many beginner-friendly patterns available. These patterns are perfect for practicing basic knitting techniques and creating cozy mittens to keep your hands warm during the colder months. Here are a few finished beginner mitten patterns you can try:
1. Basic Mittens
Description: This pattern is perfect for beginners as it provides a simple and straightforward design. It covers all the basics of mitten knitting, including casting on, knitting in the round, decreasing, and shaping the thumb.
Skills required: Basic knitting skills, knitting in the round
Link to pattern: Basic Mittens Pattern
2. Striped Mittens
Description: This pattern adds a fun twist to the basic mitten design by incorporating colorful stripes. It is a great way to experiment with color combinations and adds a touch of personality to your mittens.
Skills required: Basic knitting skills, knitting in the round, colorwork
Link to pattern: Striped Mittens Pattern
3. Cable-Knit Mittens
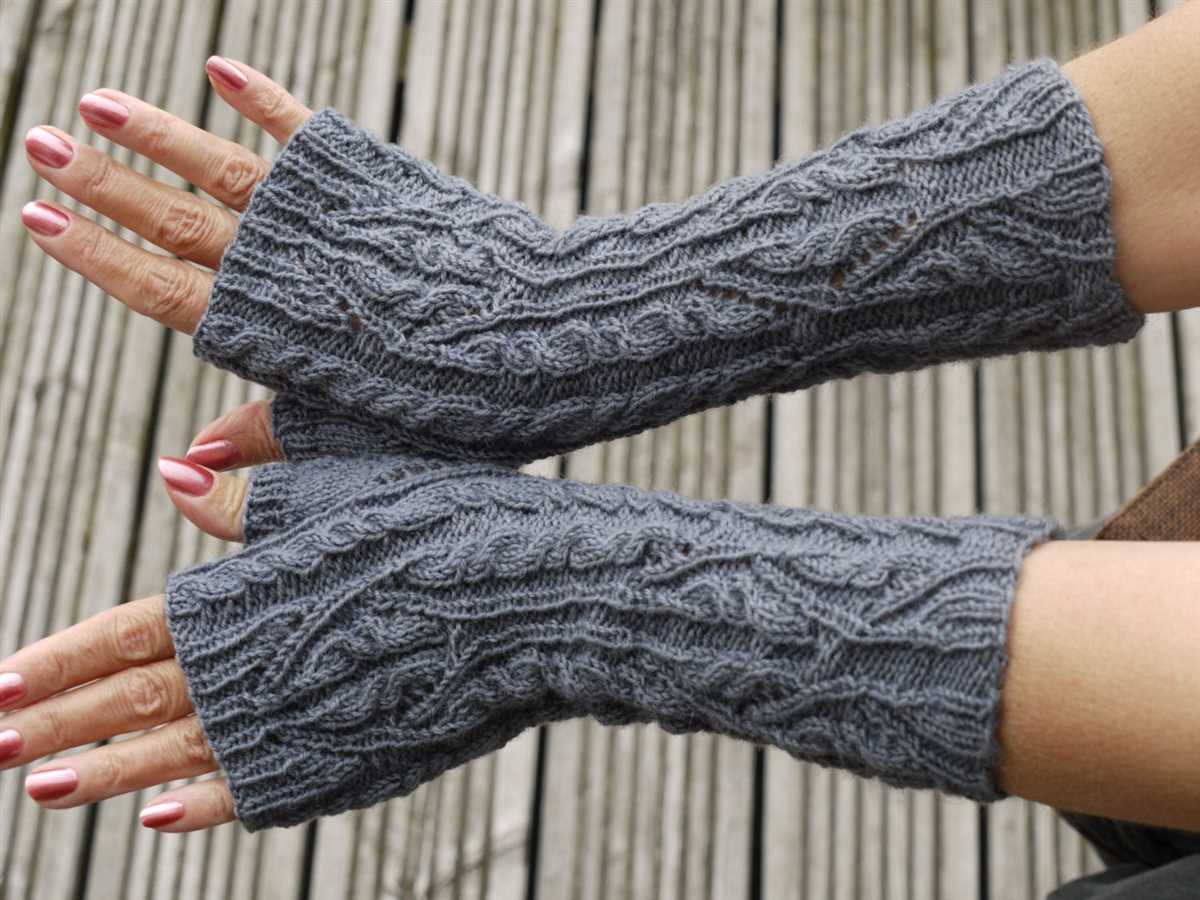
Description: If you want to challenge yourself and try a slightly more advanced beginner pattern, cable-knit mittens are a great option. The pattern includes simple cable stitches that add texture and visual interest to your mittens.
Skills required: Basic knitting skills, knitting in the round, cable knitting
Link to pattern: Cable-Knit Mittens Pattern
These finished beginner mitten patterns offer a range of options for knitters of all skill levels. Whether you prefer a simple and classic design or want to explore colorwork or cable knitting, there is a pattern for you. So grab your needles, choose a pattern, and get started on knitting your own cozy pair of mittens!