
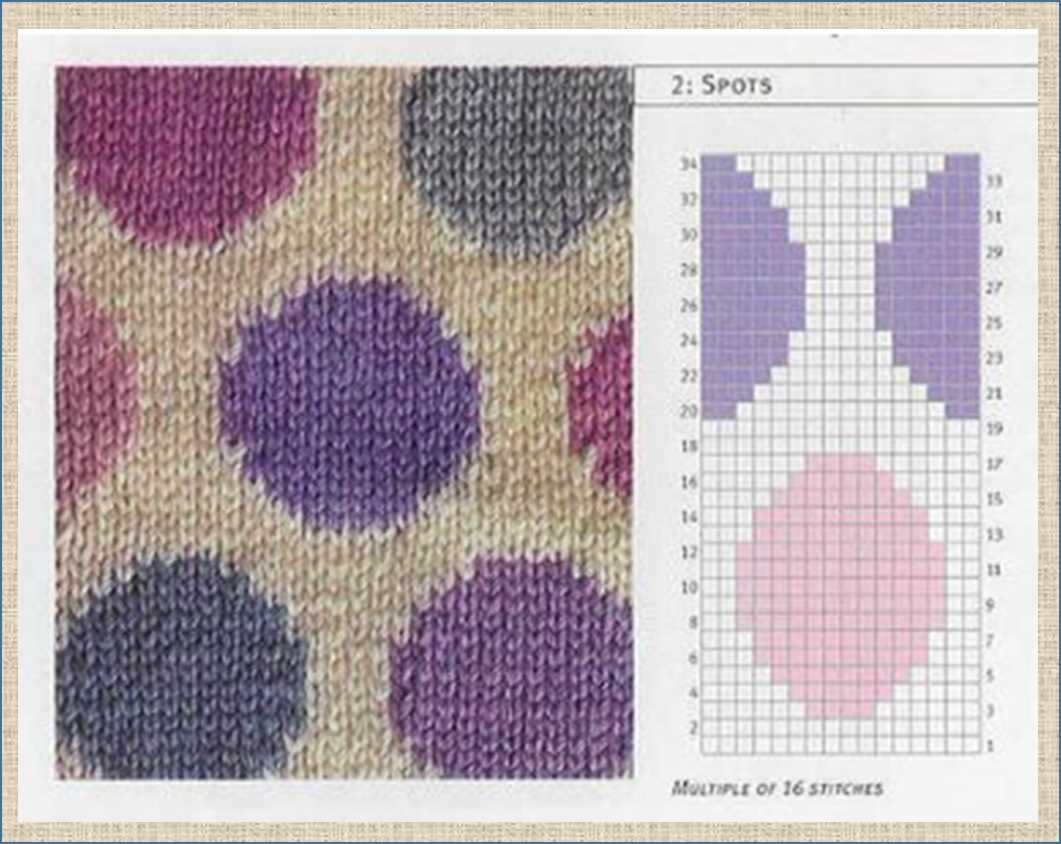
Knitting patterns are a great way to create beautiful and unique garments and accessories. A knitting pattern chart is a graphical representation of the pattern, using symbols and colors to indicate the different stitches and techniques to be used. While reading a knitting pattern chart may seem intimidating at first, with a little practice and understanding of the symbols used, it can become a valuable tool in your knitting arsenal.
When you first look at a knitting pattern chart, it may appear complex and confusing. However, it is important to remember that the chart is simply a visual representation of the knitting pattern, and each symbol corresponds to a specific stitch or action. By studying the key or legend provided with the chart, you can decode the symbols and understand how to create the desired pattern.
One of the key elements to successfully following a knitting pattern chart is to carefully read and understand the instructions provided with the chart. The instructions will usually explain any abbreviations used, as well as any special techniques or variations that may be required. It is important to familiarize yourself with these instructions before you begin, as they will guide you through the knitting process and ensure that your finished project turns out as intended.
Understand the symbols
When reading a knitting chart, it’s important to understand the symbols used. Each symbol represents a different stitch or action that needs to be taken. Familiarize yourself with the most common symbols before starting a project.
Here are some of the most commonly used symbols in knitting charts:
- Blank square: Represents a knit stitch on the right side and a purl stitch on the wrong side.
- Filled-in square: Represents a purl stitch on the right side and a knit stitch on the wrong side.
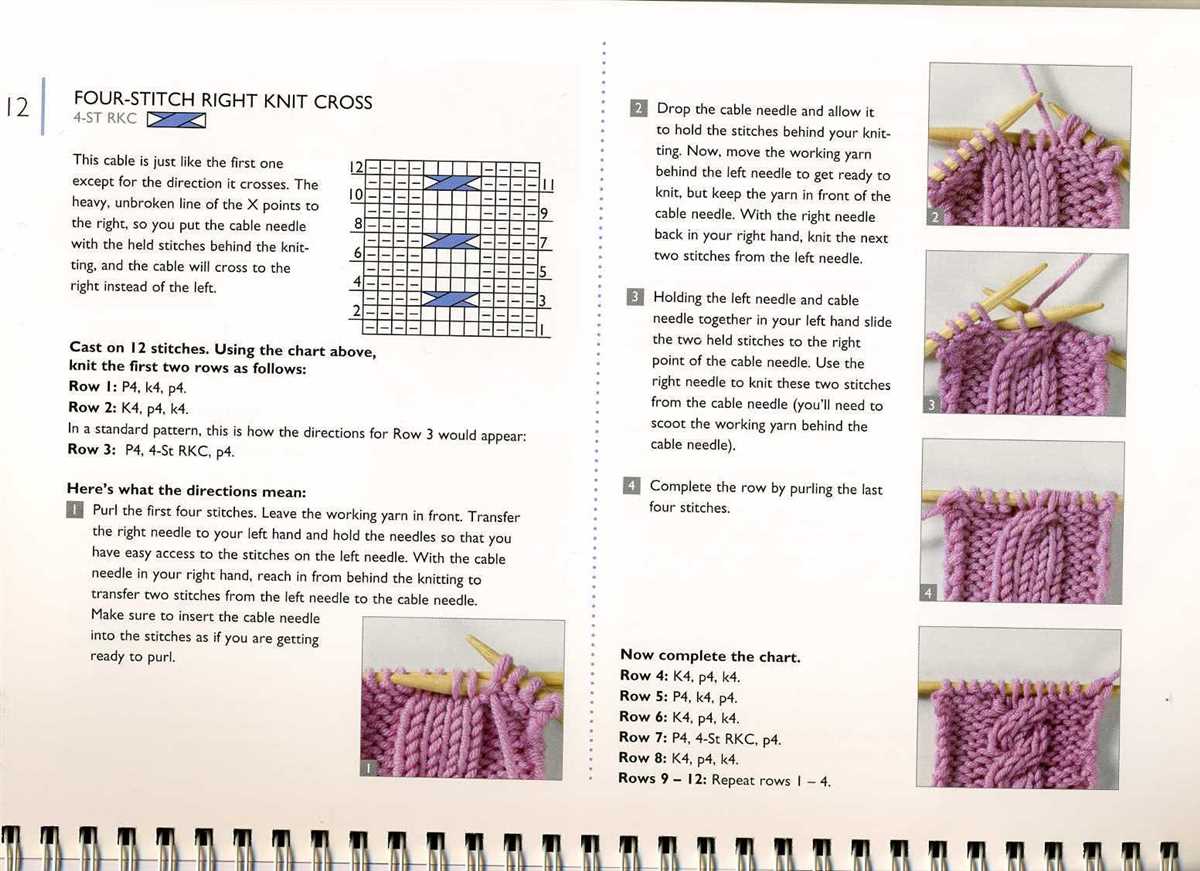
- Arrow: Indicates the direction in which a cable should be made.
- Circle: Represents a yarn over, which increases the number of stitches.
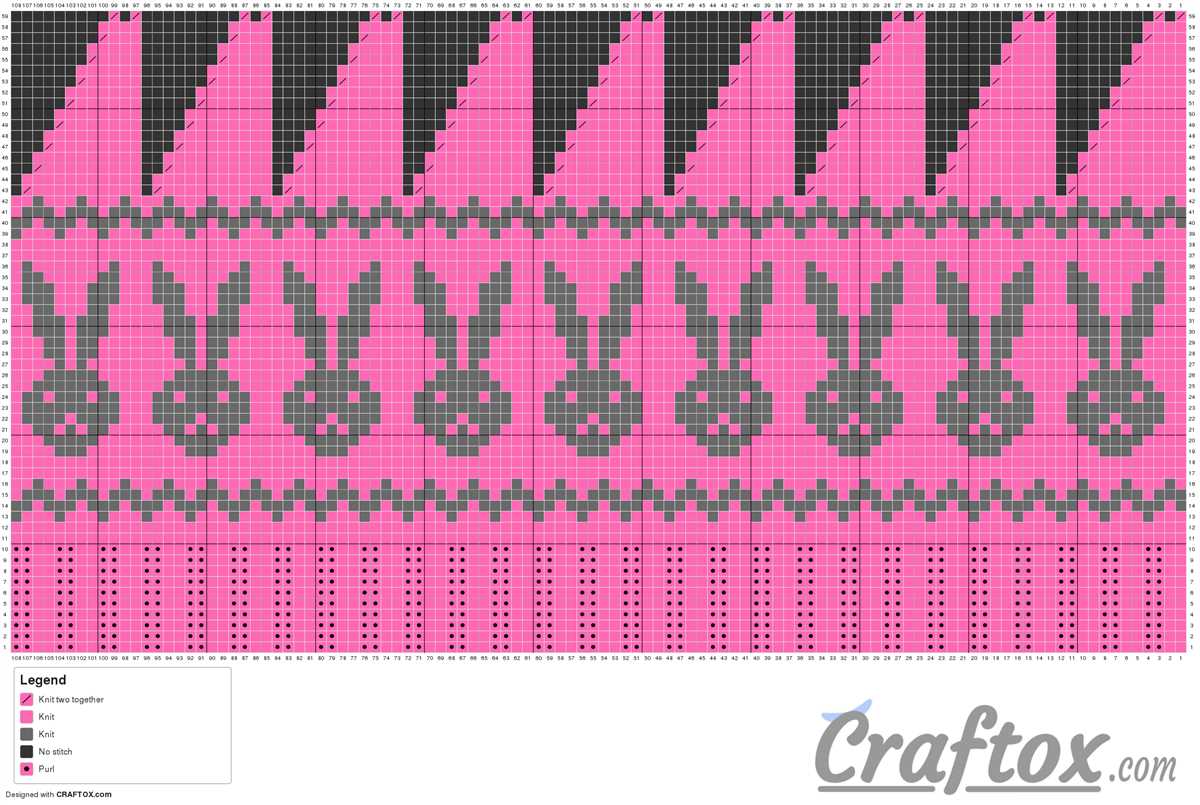
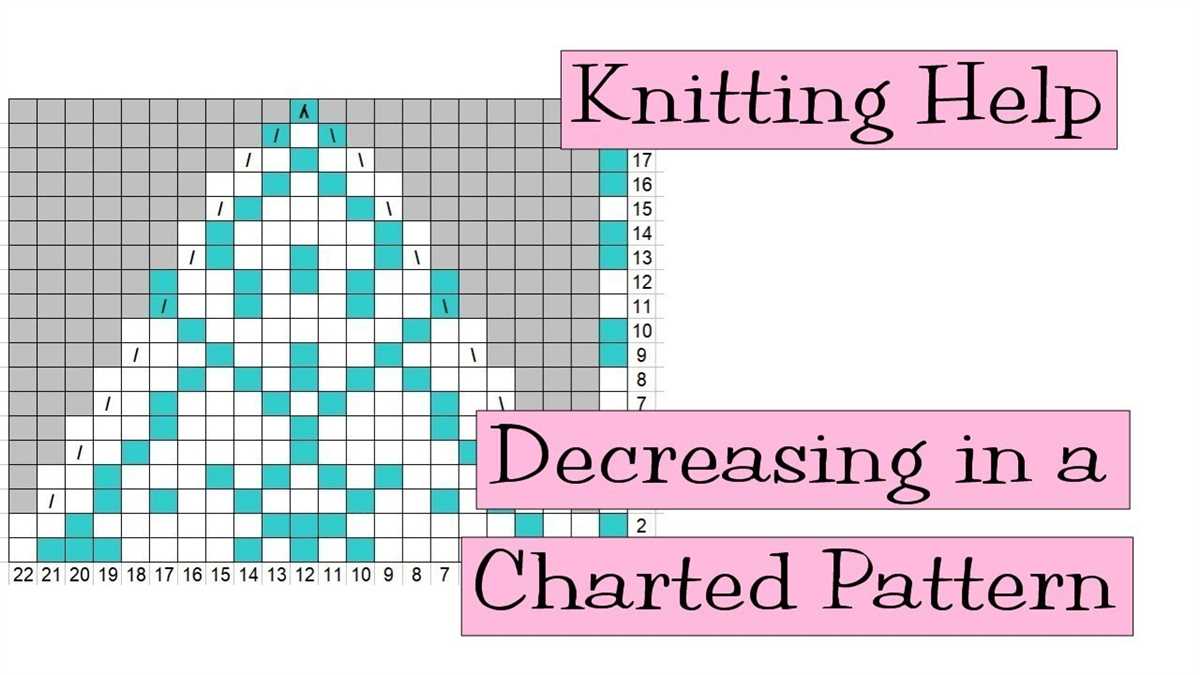
- Slanted line: Indicates a decrease, such as a knit two together (k2tog) or a slip, slip, knit (ssk).
These are just a few examples, and different knitting patterns may use different symbols. Always refer to the legend or key provided with the knitting chart to understand the symbols specific to that pattern.
It can be helpful to keep a cheat sheet of symbols handy until you become more familiar with them. This will help ensure that you are accurately following the chart and creating the correct stitches.
Learn the common symbols
In order to follow a knitting pattern chart, it’s important to familiarize yourself with the common symbols used in these charts. Each symbol represents a specific stitch or technique, and understanding what each symbol means will enable you to accurately recreate the pattern.
Here are some of the most commonly used symbols in knitting pattern charts:
- K: The symbol “K” represents a knit stitch. This is the most basic stitch in knitting, where you insert the right-hand needle into the front of a stitch on the left-hand needle and pull the working yarn through.
- P: The symbol “P” represents a purl stitch. This is another basic stitch in knitting, where you insert the right-hand needle into the back of a stitch on the left-hand needle and pull the working yarn through.
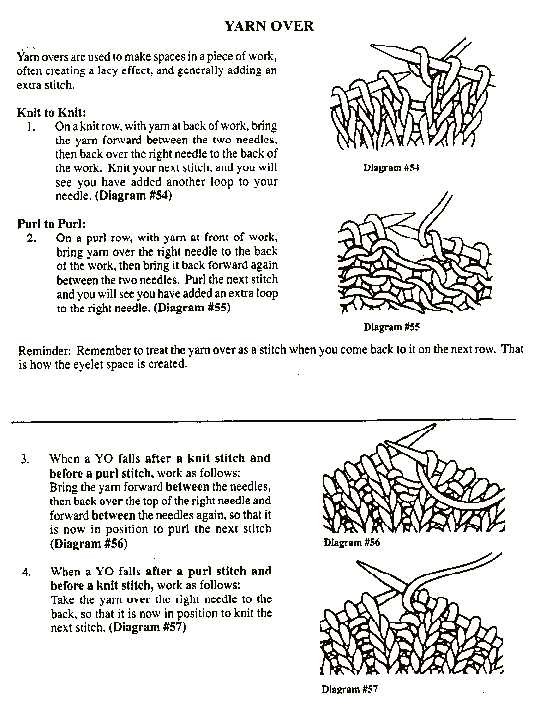
- yo: The symbol “yo” stands for yarn over. This is a technique used to create an extra stitch and create an eyelet in the knitting. To perform a yarn over, simply bring the working yarn over the right-hand needle from front to back.
- ssk: The symbol “ssk” represents a slip slip knit decrease. This is a left-leaning decrease that is commonly used to shape the fabric in knitting. To perform an ssk, slip two stitches knitwise onto the right-hand needle, then insert the left-hand needle into the front of the slipped stitches and knit them together.
- k2tog: The symbol “k2tog” stands for knit 2 together decrease. This is a right-leaning decrease that is also commonly used for shaping in knitting. To perform a k2tog decrease, simply knit two stitches together as if they were one stitch.
By understanding and recognizing these common symbols, you’ll be able to easily follow a knitting pattern chart and create beautiful knitted pieces.
Understanding Knitting Pattern Chart Symbols
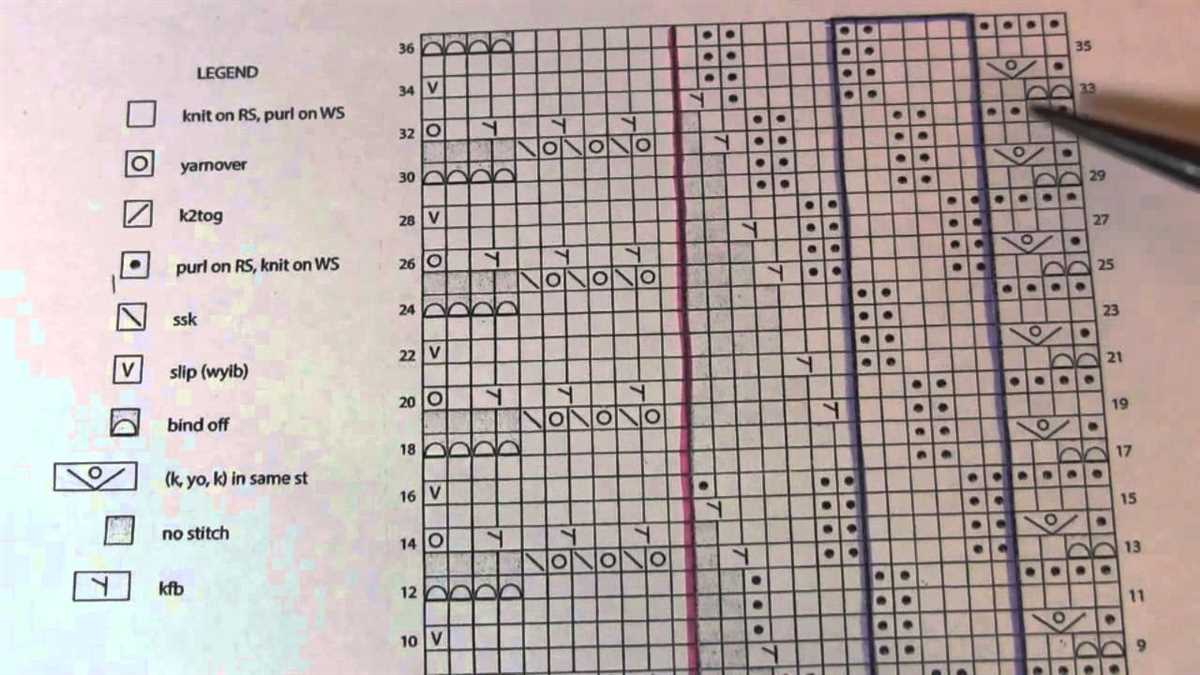
When following a knitting pattern chart, it is important to familiarize yourself with any unique symbols that may be used. Knitting patterns often include a key or legend that explains the meaning of each symbol, so be sure to refer to it before you begin. Some common symbols you may encounter include:
- K – This symbol represents a knit stitch. Insert your needle into the front of the stitch and wrap the yarn around the needle, then pull it through.
- P – This symbol represents a purl stitch. Insert your needle into the front of the stitch from right to left, then wrap the yarn around the needle and pull it through.
- YO – This symbol stands for ‘yarn over’. This is when you bring the yarn from the back to the front of your work, creating an extra stitch on your needle.
- SL – This symbol represents a slip stitch. Instead of knitting or purling the stitch, simply move it from the left needle to the right needle without working it.
- Decrease – There are various symbols that represent different types of decreases, such as knitting two stitches together or slipping a stitch and passing it back over another stitch. These symbols will be explained in the pattern’s key.
By familiarizing yourself with these symbols, you will be able to easily follow along with the knitting pattern chart and complete your project with ease. Take the time to study the key or legend before you begin, and refer back to it as needed to ensure that you are interpreting the symbols correctly. Happy knitting!
Read the key
When you first look at a knitting pattern chart, it can seem overwhelming with all the symbols and colors. However, the key is your guide to understanding what each symbol means and how it relates to the pattern. It is essential to read the key before you start working on the chart to ensure you know what to do.
The key will typically be located at the beginning of the pattern or on a separate page. It will list each symbol used in the chart and provide a description or explanation of what it represents. Some common symbols you may see in a knitting pattern chart include squares, circles, lines, and diagonal lines.
- Squares: Squares often represent knit stitches. Depending on the chart, the squares may be solid or have a different color to indicate a specific detail in the pattern, such as a different stitch texture or color change.
- Circles: Circles are commonly used to represent purl stitches. Like squares, circles may have variations in color or shading to convey additional information about the pattern.
- Lines: Lines in a knitting chart often indicate the direction of the knitting stitches. They can be vertical, horizontal, or diagonal, depending on the pattern. These lines help you understand how the stitches should be worked and how they relate to the rows and columns of the chart.
- Diagonal lines: Diagonal lines are typically used to show a change in stitch pattern or indicate a decrease or increase in the number of stitches.
By referring to the key and understanding the symbols used in the chart, you will be able to follow the pattern accurately and create the desired design. Take your time to study the key before you begin and familiarize yourself with the symbols. Once you have a good grasp of the key, you will find it much easier to read and work with knitting pattern charts.
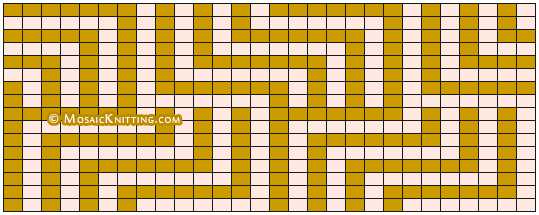
Identify the color codes
When following a knitting pattern chart, it is important to understand and identify the color codes used in the chart. These color codes represent different stitches and help to create the pattern design. By correctly interpreting the color codes, you can ensure that you are knitting the correct stitches and creating the desired pattern.
Typically, knitting pattern charts use a combination of symbols, abbreviations, and colors to represent different stitches. Each color on the chart corresponds to a specific stitch or action, such as knitting, purling, increasing, or decreasing. It is essential to familiarize yourself with the color codes used in the specific pattern you are working on before starting.
Color codes can vary between different knitting pattern charts, but some commonly used color codes include:
- Black: Represents knit stitches.
- White: Represents purl stitches.
- Red: Represents yarn overs or increases.
- Blue: Represents decreases.
- Green: Represents stitch markers or special instructions.
Make sure to refer to the color code key or legend provided with the knitting pattern chart to ensure you are interpreting the colors correctly. Some patterns may use additional colors or symbols to represent other stitches or actions.
Understand the stitch abbreviations
Knitting patterns often use abbreviations to represent different stitches. It’s important to understand these abbreviations in order to correctly follow the pattern chart. Here are some commonly used stitch abbreviations:
- K – knit stitch: Insert the right needle into the front of the stitch on the left needle, wrap the yarn around the right needle, and pull it through the stitch.
- P – purl stitch: Insert the right needle into the front of the stitch on the left needle, wrap the yarn around the right needle in the opposite direction as for the knit stitch, and pull it through the stitch.
- YO – yarn over: Bring the yarn to the front of the work, then wrap it over the right needle from back to front.
- SSK – slip, slip, knit: Slip two stitches from the left needle to the right needle as if to knit, insert the left needle into the front of the slipped stitches on the right needle, wrap the yarn around the left needle, and pull it through the stitches.
- K2tog – knit two stitches together: Insert the right needle into the front of the next two stitches from left to right, wrap the yarn around the right needle, and pull it through both stitches at once.
These are just a few examples of stitch abbreviations you may encounter in a knitting pattern. It’s important to refer to the pattern’s key or glossary for the complete list of abbreviations used. Once you understand the abbreviations, you will be able to read and interpret the knitting pattern chart more easily.
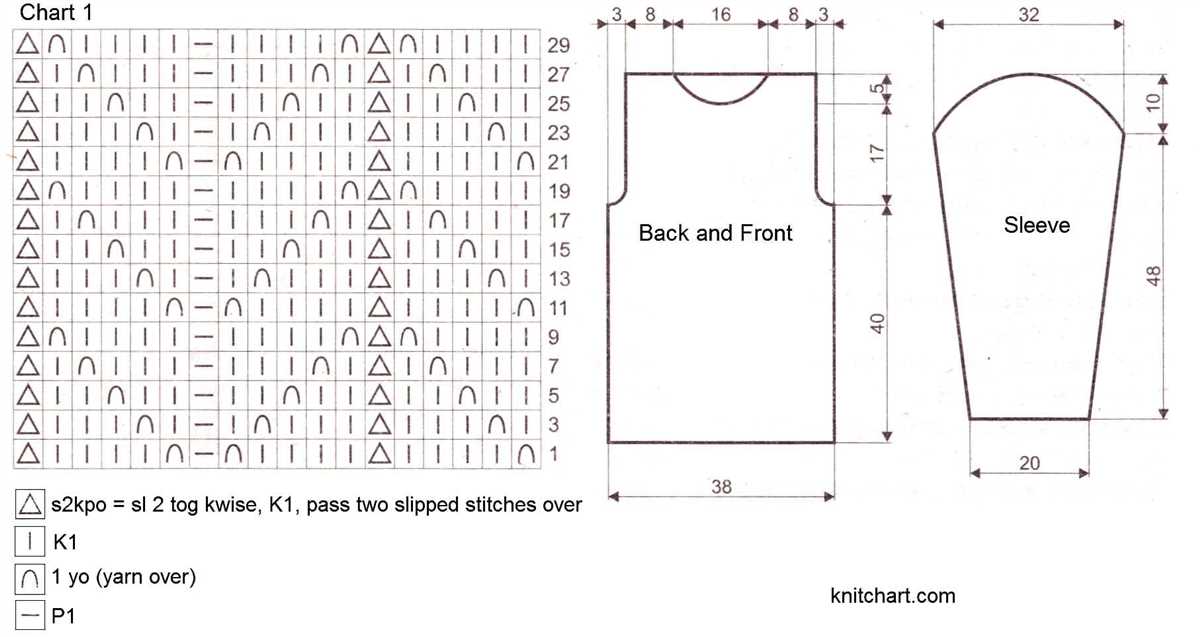
Start at the bottom right corner
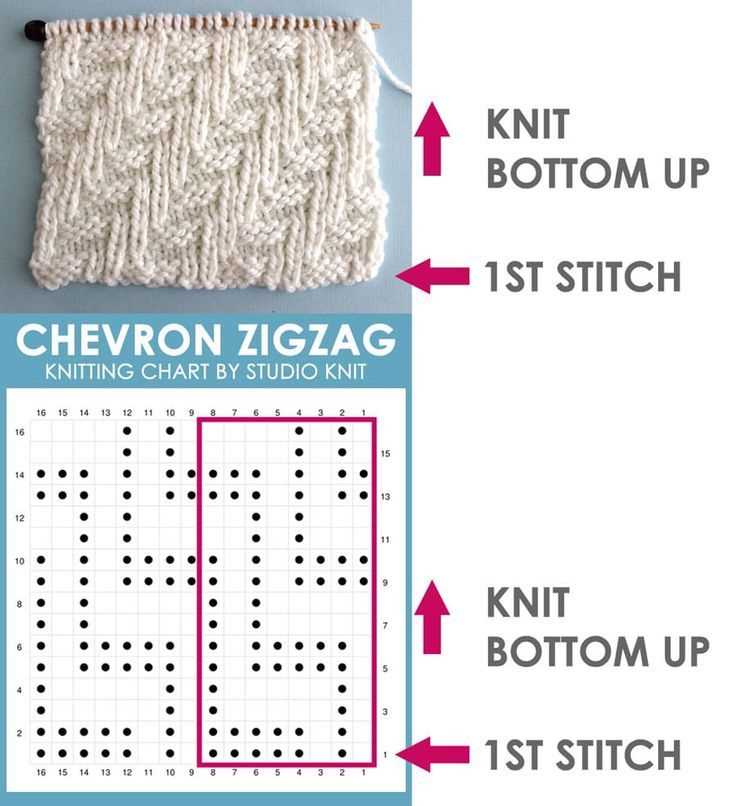
When following a knitting pattern chart, it’s important to start at the bottom right corner. This is where the first stitch of the first row is located. The chart represents each stitch as a symbol or color, and the bottom right corner is the starting point for knitting the pattern.
Before starting, make sure you have a clear understanding of the symbols or colors used in the chart. The key or legend should be provided on the chart or in the pattern instructions. This will help you decipher the chart and know which stitch to make for each symbol or color.
In some cases, the chart may include additional information such as stitch repeats or special instructions. It’s important to read and understand these before starting to ensure the pattern is followed correctly.
As you work your way up the chart, each row will be read from right to left. This means that the rightmost stitch in each row is the first stitch you will knit or purl. The leftmost stitch is the last stitch you will work in that row.
By starting at the bottom right corner and reading each row from right to left, you can effectively follow a knitting pattern chart and create a beautiful finished project.
Begin with the first row
When starting to follow a knitting pattern chart, it’s important to begin with the first row. The first row sets the foundation for the rest of your knitting project and following it correctly will ensure that the pattern will turn out as intended.
The first step is to identify the symbols or stitches used in the chart and familiarize yourself with what each one represents. This information is usually provided in the key or legend section of the pattern. Take the time to read through the key and make sure you understand how to execute each stitch in the chart.
Once you are familiar with the symbols and stitches, locate the first row of the chart and examine it closely. Pay attention to any repeats or pattern sequences that are indicated. This will help you understand the structure of the pattern and make it easier to follow along.
Start knitting the first row according to the chart, following the instructions provided for each stitch. It can be helpful to use a highlighter or pencil to mark off each stitch as you complete it, especially if the chart is complex or has multiple pattern sequences.
Continue working through the chart row by row, making sure to complete each stitch as indicated. Keep track of your progress and refer back to the chart regularly to ensure that you are following the pattern correctly.
Following a knitting pattern chart may take some practice, but with patience and attention to detail, you can successfully create beautiful knitting projects.
Move to the next row

Once you have completed a row of the knitting pattern chart, it is time to move on to the next row. Following a knitting pattern chart can be challenging at first, but with practice, it becomes easier. Here are some steps to help you move to the next row:
1. Read the instructions: Before you start the next row, make sure to read the instructions provided in the pattern. The instructions will tell you what stitches to make and how many times to repeat them.
2. Find your starting point: Look for the number of the next row in the chart and find the corresponding row on your knitting. This will be your starting point for the next row.
3. Follow the chart: Follow the chart from right to left or left to right, depending on the instructions. Read each symbol or stitch and make the corresponding stitch on your knitting. Use a ruler or your finger to help you keep track of where you are in the chart.
4. Repeat if necessary: If the instructions indicate that you need to repeat a particular section of the chart, make sure to do so. Pay attention to the number of times the repeat is specified and make sure you complete the necessary number of repetitions.
5. Mark your progress: As you complete each row, mark your progress on the chart. This will help you keep track of where you are and prevent mistakes or confusion. You can use a highlighter or a knitting marker to mark the completed rows.
6. Continue following the pattern: Keep following the pattern chart row by row until you have completed all the required rows. Remember to take breaks, relax, and enjoy the process.
By following these steps, you will be able to move to the next row in the knitting pattern chart with confidence and accuracy.
Use a row counter
When following a knitting pattern chart, it can be easy to lose track of which row you are on, especially if the chart is complex. To help keep track of your progress, it is a good idea to use a row counter.
A row counter is a useful tool that allows you to keep track of the number of rows you have completed. It typically consists of a small device with a digital or manual counter that you can easily attach to your knitting project. As you complete each row, you can simply click the counter to increment it and keep track of your progress.
Using a row counter is particularly helpful when working on larger knitting projects or patterns with a lot of repeats. It eliminates the need to constantly count rows manually and ensures that you can easily pick up where you left off if you need to take a break from your knitting.
When using a row counter, it is important to remember to start with the correct row number according to the pattern instructions. If you accidentally skip a row or make a mistake, you can easily go back and correct it by adjusting the counter accordingly.
In addition to a row counter, it is also a good idea to keep a pencil and a piece of paper handy. You can use the pencil to mark off each row as you complete it on the paper, which can be especially helpful if you prefer visual cues. This way, you have multiple methods for keeping track of your progress and can choose the one that works best for you.
Keep track of rows completed
When following a knitting pattern chart, it is important to keep track of the rows that you have completed. This will help ensure that you are following the pattern correctly and prevent any mistakes or inconsistencies in your knitting.
One way to keep track of rows is to use a row counter. This can either be a physical counter that you rotate with each row completed, or a digital counter on your phone or tablet. Another option is to use a pen or pencil to mark off each row as you go. Whatever method you choose, make sure that it is easily visible and accessible so that you can quickly and accurately keep track of your progress.
It can also be helpful to highlight or circle important rows or sections of the knitting pattern chart. This can make it easier to find your place and ensure that you are following the correct row for each section of the pattern. Additionally, using a ruler or row marker can help you keep your place on the chart and prevent any confusion or mistakes.
If you are working on a complex or intricate knitting pattern chart, it may be useful to write out each row as you go. This can help you visualize the pattern more clearly and make it easier to see any changes or variations between rows. You can either write out the row on a separate sheet of paper or use a row-by-row tracker that is included with some knitting pattern books or online resources.
By keeping track of the rows you have completed, you can ensure that your knitting pattern chart is accurately followed and that your finished project turns out exactly as you envisioned it. Whether you use a row counter, mark off rows with a pen, or write out each row as you go, finding a method that works for you will make your knitting experience more enjoyable and successful.
Avoid mistakes by double-checking the row number
When following a knitting pattern chart, it is crucial to double-check the row number to avoid making mistakes. Each row in the chart corresponds to a specific step in the knitting process, and if you misread the row number, it can lead to errors in your project. Taking a few extra seconds to verify the row number before starting a new row can save you a lot of time and frustration in the long run.
This is especially important when working on more complex patterns that have multiple stitch patterns or color changes. Each section of the chart may have a different row number, and if you accidentally skip or repeat a row, it can throw off the entire pattern. By carefully examining the row number before knitting each row, you can ensure that you are following the pattern correctly and producing the desired outcome.
One helpful strategy is to use a post-it note or a row counter to keep track of your progress as you work through the chart. Place the post-it note or adjust the row counter to the correct row number before you start knitting each row. This visual reminder will serve as a checkpoint and help prevent any mistakes caused by overlooking or misreading the row number.
Additionally, if you notice any discrepancies between the row numbers on the chart and the written instructions, take the time to clarify with the pattern designer or consult other resources, such as online tutorials or knitting forums. It’s better to be safe than sorry and make sure you fully understand the pattern before proceeding.
In conclusion, double-checking the row number is an essential step in following a knitting pattern chart. By doing so, you can avoid mistakes and ensure that your knitting project turns out as intended. Take the time to verify the row number before each row, use visual aids like post-it notes or row counters, and seek clarification if there are any discrepancies. Happy knitting!
Follow the chart from right to left
When following a knitting pattern chart, it is important to read it from right to left. This is because knitting stitches are worked in the opposite direction than how they are read on the chart. By starting from the right side of the chart, you can easily keep track of where you are and ensure that you are working the correct stitches.
To follow the chart from right to left, start by locating the row number and the stitch symbol at the right edge of the chart. Then, read the corresponding stitch symbol and work the stitch indicated in your knitting. Move to the next stitch symbol to the left and repeat the process until you have completed the row.
It is also helpful to use a stitch marker or highlighter to mark your progress as you move from right to left across the chart. This will make it easier to keep track of where you are and prevent any mistakes or confusion.
In conclusion, following a knitting pattern chart from right to left is essential for accurately working the stitches indicated. By reading the chart in the opposite direction of how it is written, you can ensure that you are correctly following the pattern and creating the desired design. Remember to mark your progress and take your time to prevent any errors. Happy knitting!