
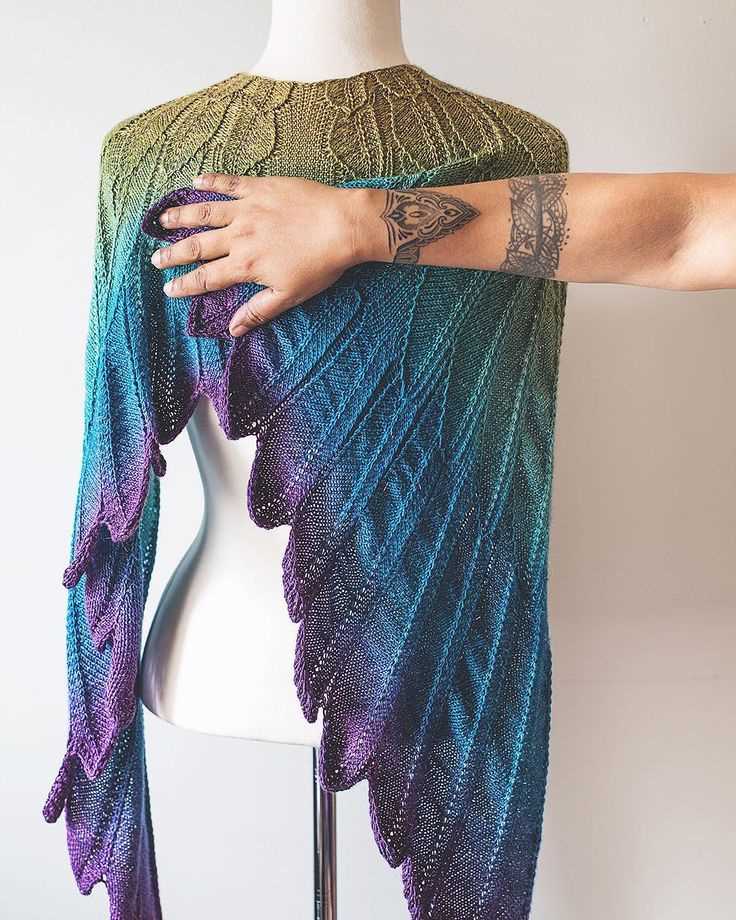
Knitting is a popular hobby that allows crafters to create beautiful and unique items using yarn and knitting needles. One popular knitting pattern that many people enjoy creating is the wings pattern. This pattern involves knitting a piece that resembles wings, which can be used to create various accessories.
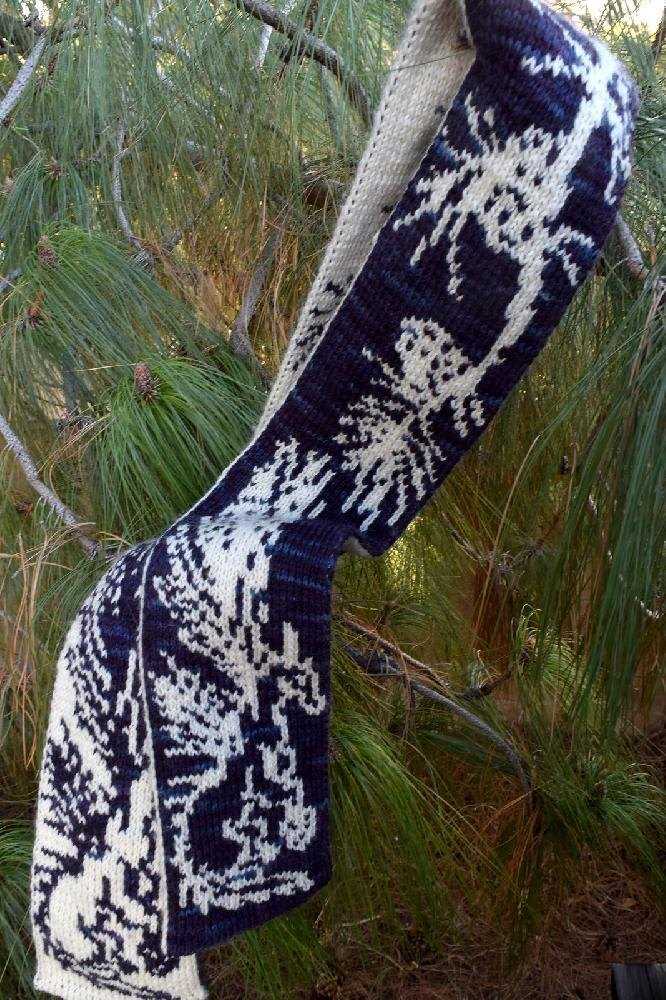
The wings knitting pattern can be used to create a wide range of items such as scarves, shawls, and even decorative wall hangings. The pattern typically involves knitting a series of increases and decreases to create the shape of wings. The final piece can be customized with different colors and stitch patterns to create a truly one-of-a-kind item.
Knitting the wings pattern can be a challenging project for beginners, as it requires some knowledge of basic knitting techniques. However, with practice and patience, knitters of all skill levels can create beautiful and intricate wing-shaped pieces. There are many resources available online that provide step-by-step instructions and video tutorials to help crafters master this pattern.
What is a knitting pattern?
A knitting pattern is a set of instructions that guide you on how to create a specific knitted item. It provides details on the stitches, techniques, and materials required to complete the project. Knitting patterns are commonly used by knitters of all skill levels to create various garments, accessories, and home decor items.
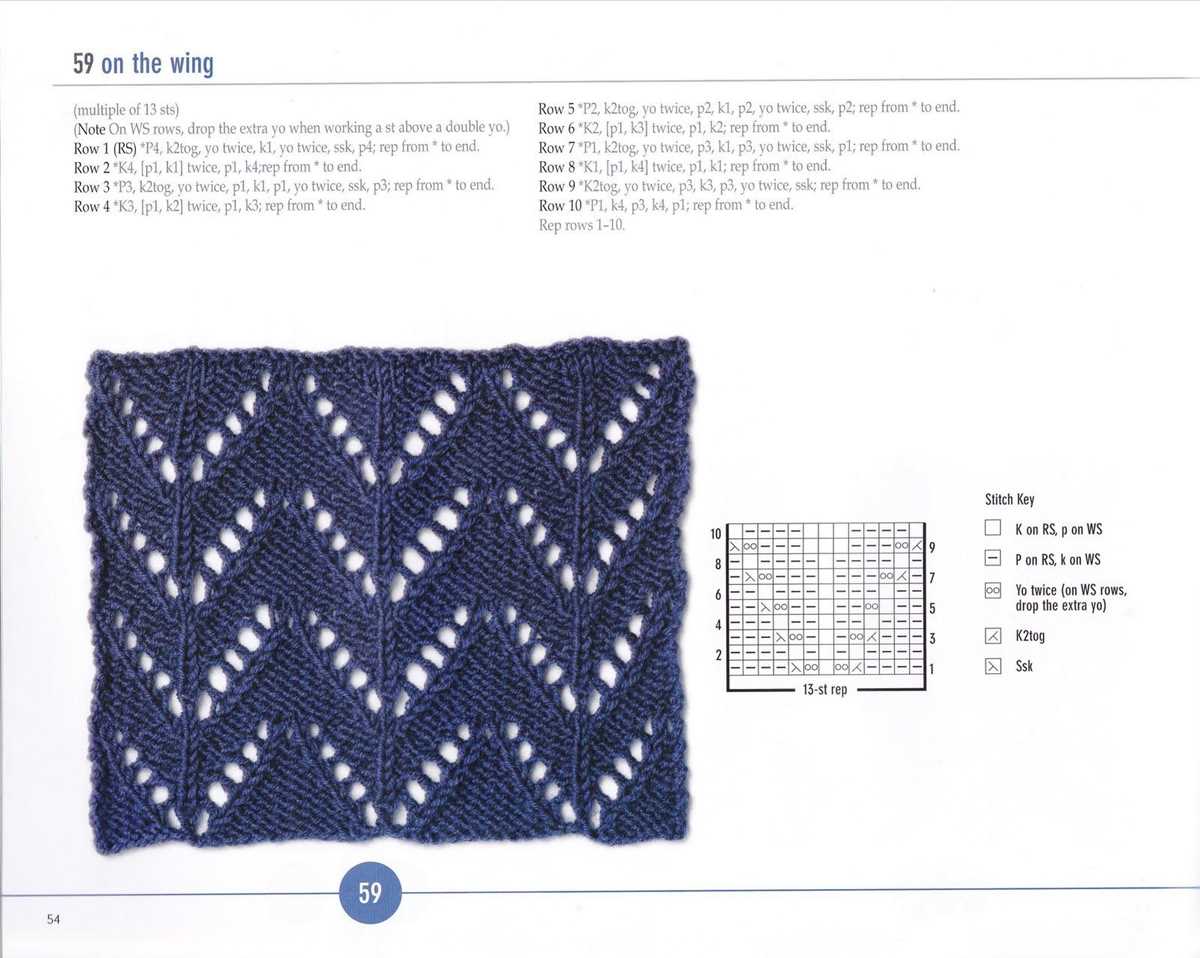
A typical knitting pattern consists of written instructions, charts, and diagrams. The written instructions provide step-by-step guidance on how to perform each stitch or technique, while charts and diagrams visually represent the pattern’s design and stitch placement. The pattern may also include information on gauge, yarn weight and yardage, needle size, and other important details.
Key components of a knitting pattern:
- Instructions: The detailed written instructions that describe each step of the knitting process.
- Charts and diagrams: Visual representations of the pattern’s design and stitch placement.
- Gauge: The number of stitches and rows per inch that should be achieved in order for the finished project to have the correct measurements.
- Yarn weight and yardage: Information on the recommended yarn weight and the amount of yarn required to complete the project.
- Needle size: The size of the knitting needles recommended for the project.
Knitting patterns can vary in complexity, ranging from simple beginner patterns to intricate designs for experienced knitters. They allow knitters to create unique and personalized items, and can be found in books, magazines, online platforms, and even as downloadable PDFs. Many knitting patterns also come with accompanying photographs or illustrations to help visualize the finished project.
Basic materials needed for knitting wings
Knitting wings can be a fun and rewarding project for both experienced and beginner knitters. Before you get started, it’s important to gather all the necessary materials to ensure a successful knitting journey.
The following is a list of the basic materials needed for knitting wings:
- Yarn: Choose a yarn that is suitable for the purpose, such as a soft and lightweight yarn that will give the wings a delicate and airy look. The amount of yarn needed depends on the size of the wings and the pattern you are using.
- Knitting needles: Select a pair of knitting needles that are appropriate for the yarn you have chosen. The size of the needles will also depend on the desired size and tension of the wings.
- Tapestry needle: This needle is essential for weaving in loose ends and stitching the different parts of the wings together.
- Scissors: A good pair of scissors is necessary for cutting the yarn and trimming any excess threads.
- Stitch markers: These small, removable markers are useful for keeping track of specific stitches or sections in the knitting pattern.
- Row counter: A row counter can be helpful for keeping track of the number of rows completed, especially for more complex wing patterns.
- Blocking tools: Depending on the pattern and desired finish, you may need blocking tools such as pins and a blocking mat to shape and stretch the knitted wings into their final form.
By having all these materials ready, you will be well-equipped to start knitting your wings and enjoy the process of bringing your imagination to life!
Step-by-step guide to knitting wings
If you’re looking to knit wings, here is a step-by-step guide to help you create these unique and beautiful accessories. From choosing the right yarn to stitching the final details, we’ll walk you through the process so you can knit your own wings.
Materials needed:
- Yarn: Select a yarn that is suitable for wings. Lightweight and soft yarns such as lace weight or fingering weight yarns work best.
- Knitting needles: Choose the appropriate size needles for your selected yarn.
- Tape measure: Useful for taking measurements and ensuring the wings are the desired size.
- Scissors: To cut the yarn and trim any excess.
- Darning needle: Used for weaving in ends and stitching any necessary seams or details.
Step 1: Casting on and knitting the base
Begin by casting on the desired number of stitches for the base of your wings. This will depend on the size and shape of wings you want to create. Knit the base using your selected yarn and needles in a stitch pattern of your choice. Consider using a simple lace or garter stitch pattern for an airy and textured effect.
Step 2: Increasing and shaping
Once the base is complete, you can start increasing and shaping the wings. This involves adding additional stitches to create the desired shape and size. You can use various increase techniques such as yarn overs or make one (M1) stitches. Follow a wing pattern or create your own shape by increasing on specific rows or in specific stitch locations.
Step 3: Adding texture and details
To give your wings more texture and visual interest, consider adding stitch patterns or details. This can be done by knitting lace panels, eyelet patterns, or incorporating different stitch patterns such as cables or bobbles. These details can be added to specific sections of the wing or throughout the entire piece, depending on your design preferences.
Step 4: Finishing touches
Once the main knitting is complete, you can finish off your wings by binding off the stitches and weaving in any loose ends. Use a darning needle to carefully stitch any necessary seams or details, such as creating a folded edge or attaching separate wing sections. Take your time to ensure all the finishing touches are neat and secure.
With these step-by-step instructions, you’ll be able to knit your own wings and create a unique accessory. Feel free to get creative with different yarns, stitch patterns, and shaping techniques to make each pair of wings truly your own.
Tips for achieving the perfect wing shape
Knitting wings can be a creative and fun project, but getting the perfect wing shape can sometimes be a challenge. Here are some tips to help you achieve the desired result:
1. Start with the right pattern
Choosing the right wing knitting pattern is crucial in achieving the perfect shape. Look for patterns that have clear instructions and diagrams specifically for wings. Consider the size of the wings you want to knit and make sure the pattern matches your desired outcome.
2. Use the right yarn and needles
The type of yarn and needles you use can greatly affect the shape of your wings. Opt for a yarn that has a good drape and is lightweight to help the wings maintain their shape. Utilize needles that are appropriate for the yarn weight to ensure proper tension and stitch definition.
3. Pay attention to shaping techniques
Shaping techniques play a crucial role in achieving the perfect wing shape. Follow the pattern instructions carefully and pay attention to any specific shaping techniques mentioned. This may include increases, decreases, short rows, or other specific stitches that help create the desired wing shape.
4. Block your wings
Blocking is an important step in knitting that helps shape and set your stitches. After completing your wings, wet block or steam block them to help achieve the desired shape. Pin the wings in place and allow them to dry completely before removing the pins.
5. Experiment and adjust
If you’re not satisfied with the shape of your wings, don’t be afraid to experiment and make adjustments. You can try different shaping techniques, change the tension of your stitches, or modify the pattern slightly to achieve the desired outcome. Remember, knitting is a process of trial and error, so don’t be discouraged if it takes a few tries to get it right.
By following these tips and being patient with the process, you’ll be able to achieve the perfect wing shape in your knitting project. Whether you’re knitting angel wings, butterfly wings, or any other type of wings, remember to have fun and enjoy the creative process!
Choosing the right yarn for your wing project
When knitting wings, choosing the right yarn is crucial to ensure a successful and beautiful final product. The yarn you choose will not only affect the appearance of the wings but also their durability and overall quality.
Fiber type: The first consideration when selecting yarn for wings is the fiber type. Depending on the desired outcome, you might opt for natural fibers such as wool or cotton, or synthetic fibers like acrylic or nylon. Natural fibers tend to provide a more authentic and realistic look to the wings, while synthetic fibers offer a wider range of color options and are often more affordable.
Weight and thickness: The weight and thickness of the yarn are also important factors to consider. If you want your wings to have a delicate and airy appearance, choose a lightweight yarn with a thin gauge. Conversely, if you want more structure and substance to your wings, opt for a thicker yarn with a heavier weight.
Texture: The texture of the yarn can also contribute to the overall look of the wings. Smooth and glossy yarns can create a sleek and polished effect, while yarns with more texture, like boucle or eyelash yarn, can add dimension and depth to the wings.
Color: Lastly, consider the color of the yarn. Depending on the wing design and your personal preference, you might choose a solid color, variegated yarn, or even a gradient yarn. Experiment with different color combinations to create unique and eye-catching wings.
By taking these factors into consideration, you can choose the perfect yarn for your wing project, ensuring that your wings are not only beautiful but also durable and of high quality. Happy knitting!
Adding details to your knitted wings
After you have finished knitting the basic shape of your wings, it’s time to add some details to make them stand out even more. You can personalize your wings by adding different textures, colors, or even embellishments.
1. Texture: You can create texture by using different knitting stitches. For example, you can use a seed stitch or a rib stitch to add a raised or bumpy texture to your wings. You can also experiment with different combinations of knit and purl stitches to create interesting patterns and textures.
2. Color:
Adding color to your wings can really make them pop. You can use different colored yarns to create stripes or color blocks. You could also try using variegated yarns, which have different colors in a single strand, to create a unique and colorful effect. If you want to add small details, you can also use embroidery floss to stitch different color accents onto your wings.
3. Embellishments:
In addition to texture and color, you can also add embellishments to your knitted wings. You can sew on beads, sequins, or even feathers to give your wings an extra touch. You can also use fabric or ribbon to create bows or other decorative elements. The possibilities are endless, so let your creativity run wild!
Common mistakes to avoid when knitting wings
Knitting wings can be a fun and rewarding project, but it’s important to avoid common mistakes that can affect the final outcome. By being mindful of these mistakes, you can ensure that your wings turn out beautiful and as intended.
1. Missed or dropped stitches
One of the most common mistakes in knitting is missing or dropping stitches. This can happen when you’re not paying close attention to your work or when you’re not using markers to keep track of your stitches. To prevent this, make sure to use stitch markers and double-check your work frequently to catch any mistakes early on.
2. Uneven tension
Another common mistake is having uneven tension in your knitting. This can lead to wings that are different sizes or shapes. To avoid this, make sure to maintain a consistent tension throughout your project by regularly checking your gauge and adjusting your knitting speed or technique accordingly.
3. Incorrect stitch counts
Having the wrong number of stitches can throw off the pattern and result in wings that don’t look as they should. Before starting your project, carefully read the pattern instructions and ensure that you understand how many stitches should be in each row or round. Double-check your stitch counts as you progress to catch any errors early on.
4. Using the wrong yarn weight or needle size
Using the wrong yarn weight or needle size can have a significant impact on the final appearance and size of your wings. Make sure to use the recommended yarn weight and needle size specified in the pattern to ensure that your wings turn out as intended. If you want to make changes, make sure to adjust the pattern accordingly and consider making a sample swatch before starting your project.
5. Neglecting to block the finished wings
Blocking is an essential step in knitting that can greatly improve the appearance of your finished wings. Neglecting to block your wings can result in them looking uneven or lumpy. Take the time to block your finished wings according to the instructions in the pattern to achieve the best results.
By avoiding these common mistakes and taking the time to properly execute each step of the knitting process, you can ensure that your wings turn out beautifully and become a cherished piece of your knitting collection.
Alternative Wing Knitting Techniques
Knitting wings can be a fun and creative way to add a unique touch to your garments and accessories. While there are traditional wing knitting patterns available, there are also alternative techniques that can be explored to achieve different effects and styles.
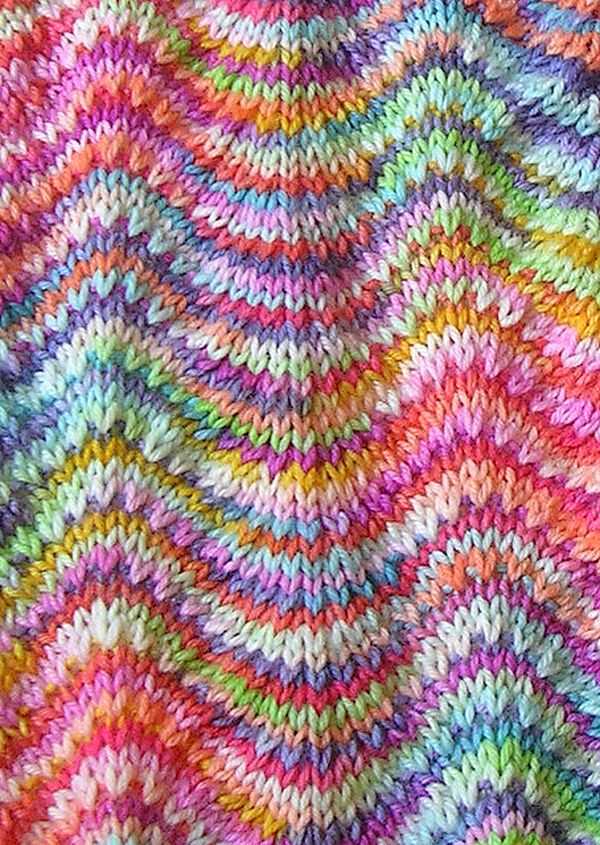
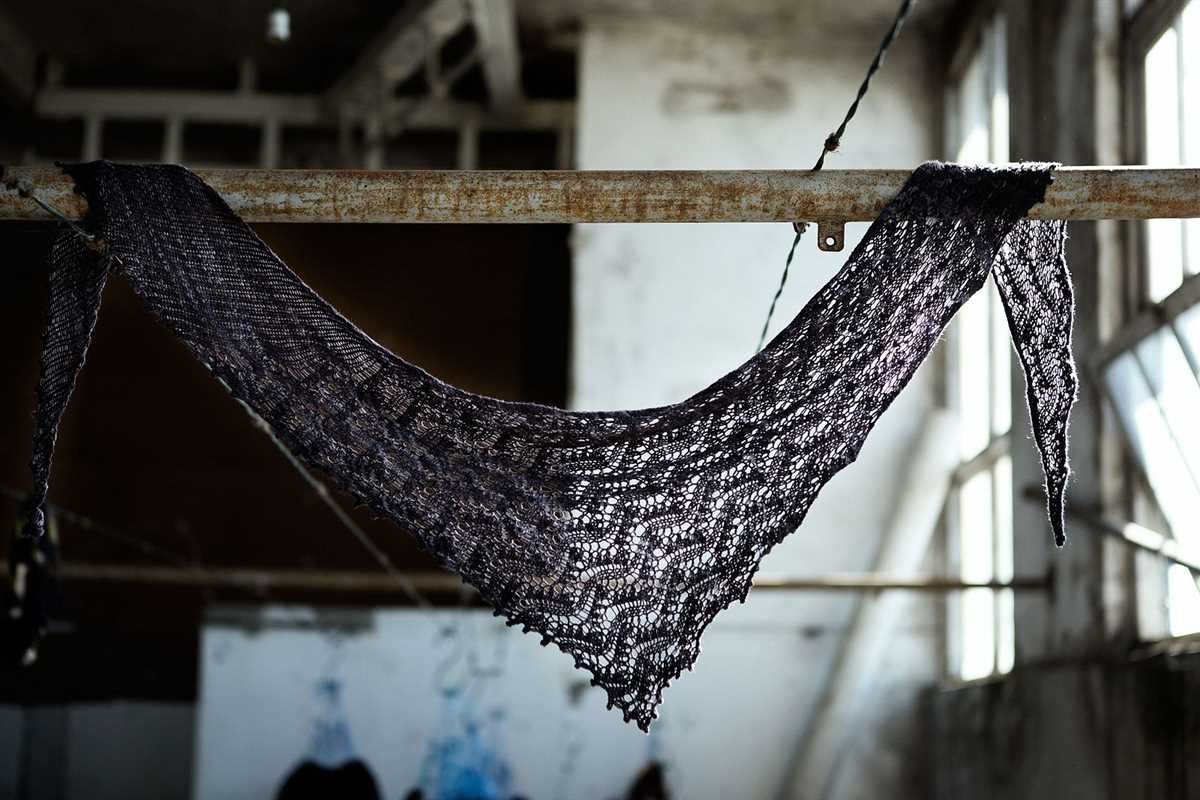
1. Lace Wings: Lace knitting is a popular technique that can be used to create delicate and intricate wing designs. By using lace stitch patterns, such as feather and fan or butterfly stitches, you can create a wispy and ethereal effect for your wings. This technique is great for shawls, scarves, and lightweight garments.
2. Cable Wings: Cable knitting is another technique that can be used to create interesting wing designs. By using cable stitches, you can mimic the texture and shape of bird wings. This technique is great for adding a bold and chunky look to your wings, and it works well for sweaters, cardigans, and accessories.
3. Colorwork Wings: Colorwork knitting involves knitting with multiple colors to create patterns and designs. By using different colored yarns, you can create wing patterns that resemble the feathers of birds. This technique is great for adding a vibrant and eye-catching element to your wings, and it can be used for a variety of garments and accessories.
4. I-cord Wings: I-cord knitting is a technique that involves knitting a small, tubular cord. By using i-cords, you can create small and delicate wings that can be attached to hats, mittens, or even stuffed animals. This technique is great for adding a whimsical and playful touch to your projects.
5. Beaded Wings: Adding beads to your wing designs can create a stunning and glamorous effect. By incorporating beads into your knitting, you can create intricate and sparkling wing designs that catch the light. This technique is great for special occasion garments and accessories.
Exploring alternative wing knitting techniques can open up a world of possibilities for your knitting projects. Whether you choose to experiment with lace, cables, colorwork, i-cords, or beads, these techniques can add a unique and personal touch to your creations. Have fun and let your creativity fly!
Creating different wing sizes and shapes
When it comes to knitting wings, there are countless possibilities for creating different sizes and shapes. Whether you are knitting wings for a stuffed animal, a costume, or an accessory, understanding how to make them unique can add an extra touch of creativity to your projects.
Varying the size: One way to create different wing sizes is by adjusting the number of stitches and rows in your pattern. For smaller wings, you can cast on fewer stitches and work fewer rows, resulting in a compact and petite shape. On the other hand, for larger wings, you can cast on more stitches and work more rows, allowing the shape to spread out and have a greater span.
Changing the shape:
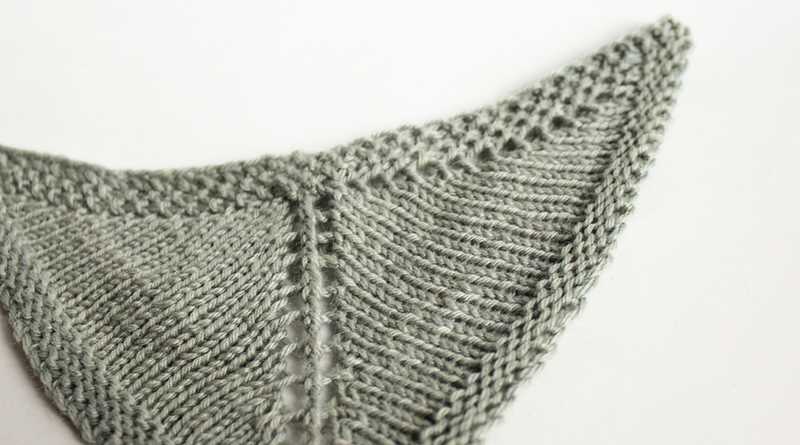
- Pointed wings: To create pointed wings, you can shape the wings by increasing or decreasing stitches gradually towards the outer edges. This will result in a triangular shape with a pointed tip.
- Rounded wings: If you prefer rounded wings, you can shape them by gradually increasing or decreasing stitches evenly on both sides. This will give the wings a curved appearance, resembling the shape of a quarter moon.
Note: Depending on the desired shape, you may need to experiment with your knitting technique, such as using increases (kfb, M1) or decreases (k2tog, ssk) to achieve the desired shape.
Adding texture: Another way to make wings unique is by incorporating different stitch patterns or textures. For example, you can use lace stitches to create delicate and intricate wings, or cable stitches for a more structured and three-dimensional effect. Experimenting with different stitch patterns can give your wings a distinct and personalized touch.
In conclusion, creating different wing sizes and shapes in knitting can be achieved by adjusting the number of stitches and rows, shaping the wings gradually or evenly, and incorporating different stitch patterns or textures. With these techniques, you can bring your knitting projects to life and showcase your individuality and creativity.
Using Knitted Wings in Various Projects
Knitted wings are a versatile and beautiful addition to various projects. Whether you’re creating a costume, an art piece, or accessories, knitted wings can add a magical touch.
1. Costumes:
Knitted wings can transform any costume into something extraordinary. Whether you’re dressing up as a fairy, an angel, or a mythical creature, knitted wings can bring your character to life. You can choose from different wing patterns and colors to match your costume. Knitted wings are not only unique but also comfortable to wear, making them a perfect choice for cosplay events or Halloween.
2. Art Installations:
Create captivating art installations with knitted wings as the centerpiece. The intricate designs and textures of knitted wings can add depth and dimension to your artwork. Whether you’re working on a wall hanging, a sculpture, or a mixed-media piece, knitted wings can serve as a focal point that captures the imagination. Play with different sizes, colors, and shapes to create visually stunning installations that evoke a sense of wonder and magic.
3. Accessories:
Add a touch of whimsy and charm to your wardrobe with knitted wings accessories. From shawls and scarves to headbands and brooches, knitted wings can be incorporated into various accessories. You can choose to knit miniature wings that can be attached to hats or bags, or create larger wings that can be worn as a statement piece. Knitted wings accessories are a perfect way to showcase your love for knitting while adding a unique and playful element to your style.
In conclusion, knitted wings can be used in a variety of projects, from costumes to art installations and accessories. The intricate designs and flexibility of knitted wings make them a versatile choice that can add a touch of magic and whimsy to any project. So, grab your knitting needles and start creating your own pair of knitted wings to bring your imagination to life!
Inspiration for your next wing knitting project
Whether you’re a seasoned knitter or just starting out, creating wings with knitting needles can be a fun and unique project. From delicate lace designs to bold textured patterns, there is no shortage of inspiration when it comes to wing knitting. Here are some ideas to get you started on your next knitting adventure:
Lace Wings
If you’re looking to create a delicate and ethereal look, lace wings are a perfect choice. Choose a fine yarn and a lace knitting pattern that incorporates intricate stitch designs. The result will be a pair of wings that are light, airy, and perfect for a whimsical costume or photo shoot.
Colorful Wings
Why stick to traditional white wings when you can create a vibrant and eye-catching pair? Experiment with different colors and color combinations to create wings that stand out. Whether you opt for bold and bright hues or subtle pastel shades, adding color to your wing knitting project can take it to a whole new level.
Cable Wings
If you love texture and want to create wings with a bold and dramatic look, consider using cable knitting techniques. Cable stitches can add depth and dimension to your wings, creating a stunning visual effect. Experiment with different cable patterns and sizes to find the perfect design for your project.
Don’t be afraid to explore your creativity and think outside the box when it comes to wing knitting. Whether you choose to follow a pattern or design your own, the possibilities are endless. So grab your knitting needles and get ready to soar to new heights with your next wing knitting project!