
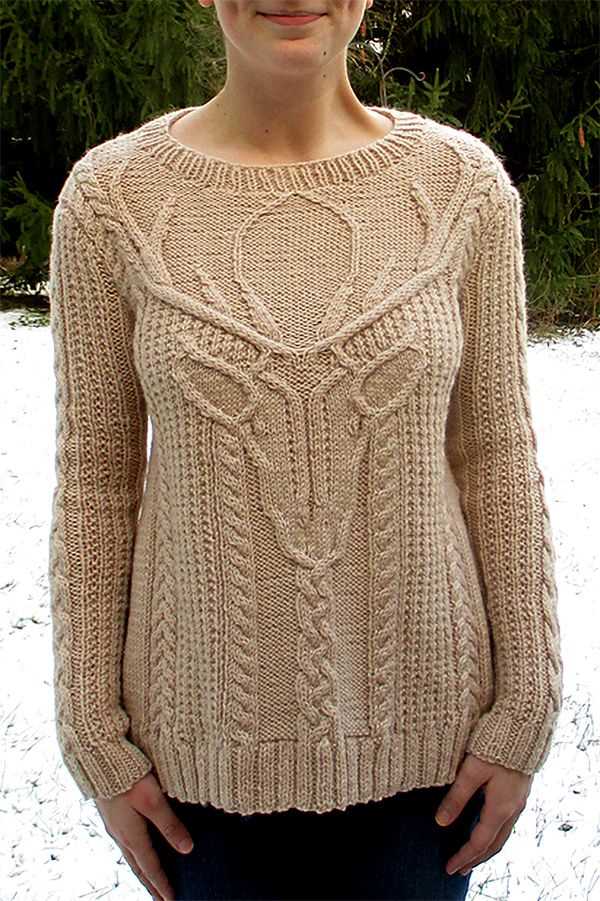
Are you a knitting enthusiast looking for a new project? Look no further! The stag knitting pattern is a unique and stunning design that will challenge and excite you. Whether you’re a beginner or an experienced knitter, this pattern will keep you entertained and satisfied.
The stag knitting pattern is inspired by the majestic beauty and grace of the stag, also known as the deer. With its intricate details and intricate motifs, this pattern captures the essence of this magnificent creature. Knitting this pattern will not only result in a beautiful finished product, but it will also serve as a labor of love and a reminder of the natural world.
Not only is the stag knitting pattern visually appealing, but it also offers a variety of stitches and techniques that will help you improve your knitting skills. From basic stitches like knit and purl to more advanced techniques like cabling and colorwork, this pattern has it all. Plus, the pattern comes with detailed instructions and helpful tips, making it accessible for knitters of all skill levels.
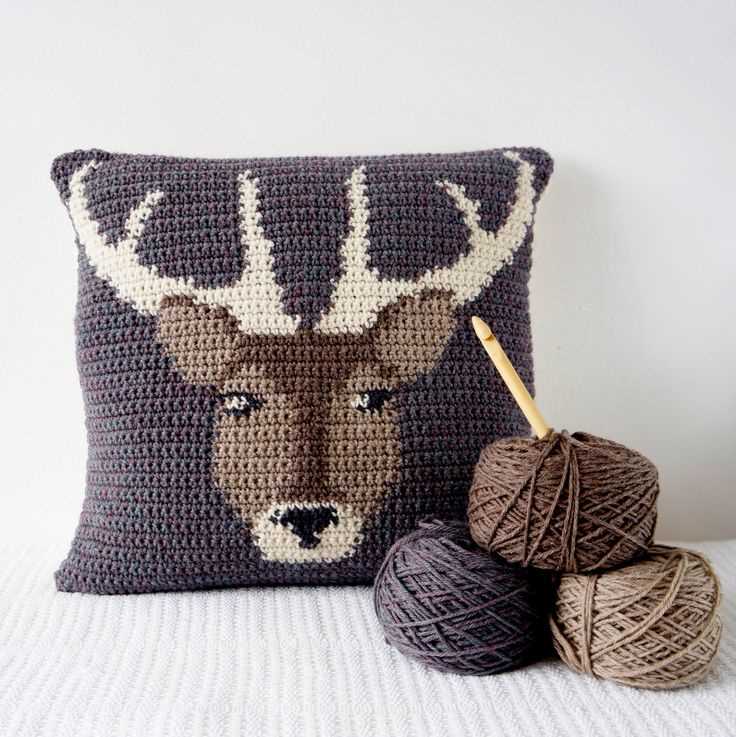
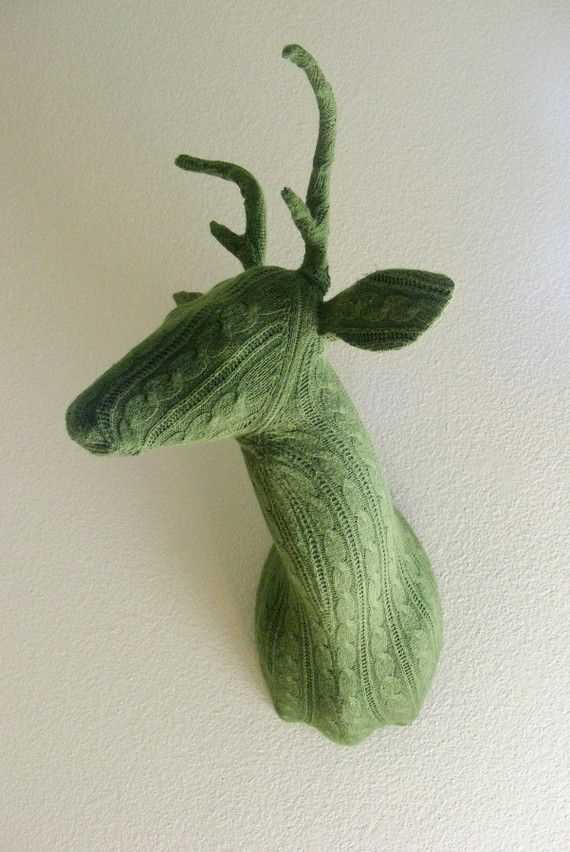
So, why wait? Get your needles and yarn ready and embark on an exciting knitting journey with the stag knitting pattern. Whether you choose to knit a cozy sweater, a warm scarf, or a decorative pillow, the result will be a one-of-a-kind piece that you can be proud of. Let the stag knitting pattern be your next knitting adventure!
Stag Knitting Pattern: A Guide to Creating a Stunning Deer Design
Knitting is a popular hobby that allows you to create beautiful and unique items. If you’re looking to create something truly remarkable, why not try your hand at a stag knitting pattern? Whether you’re an experienced knitter or just starting out, this guide will provide you with all the information you need to create a stunning deer design.
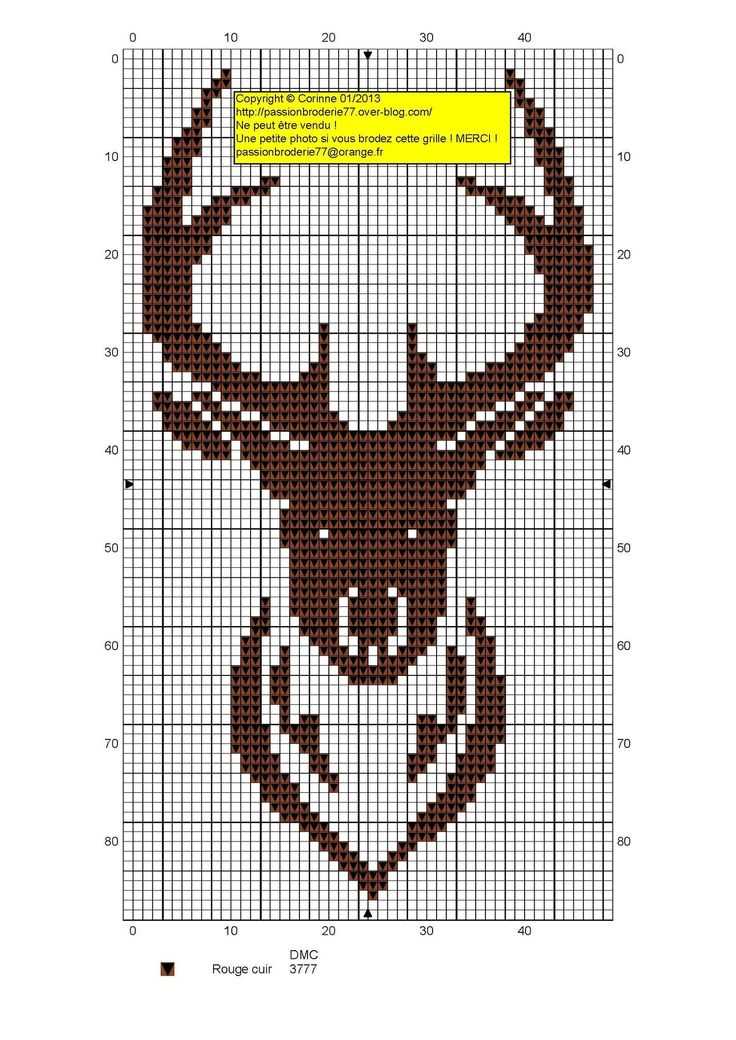
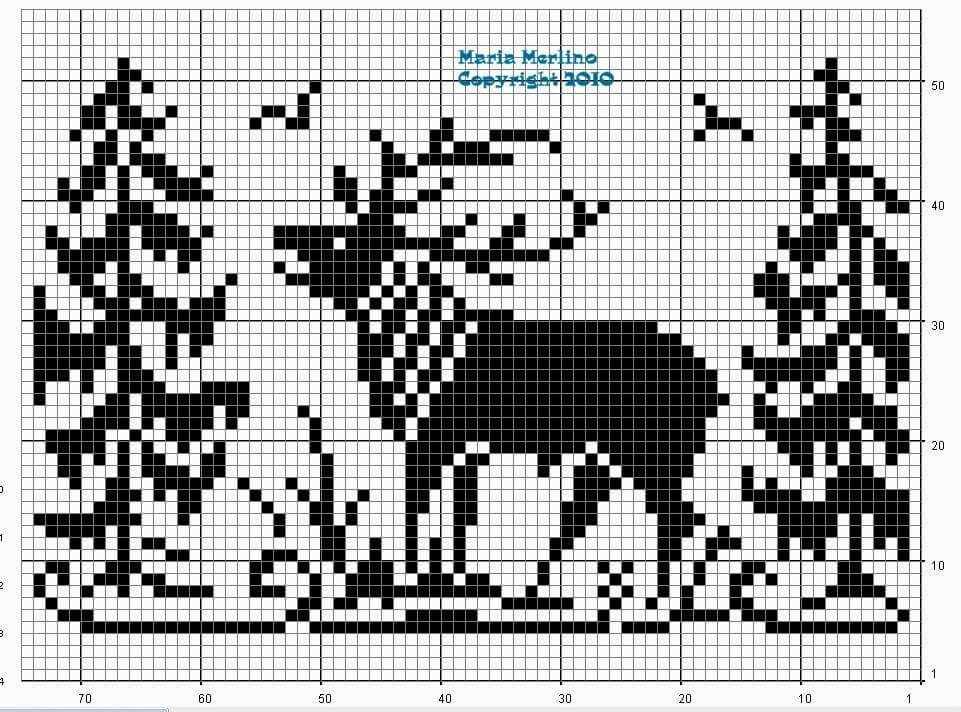
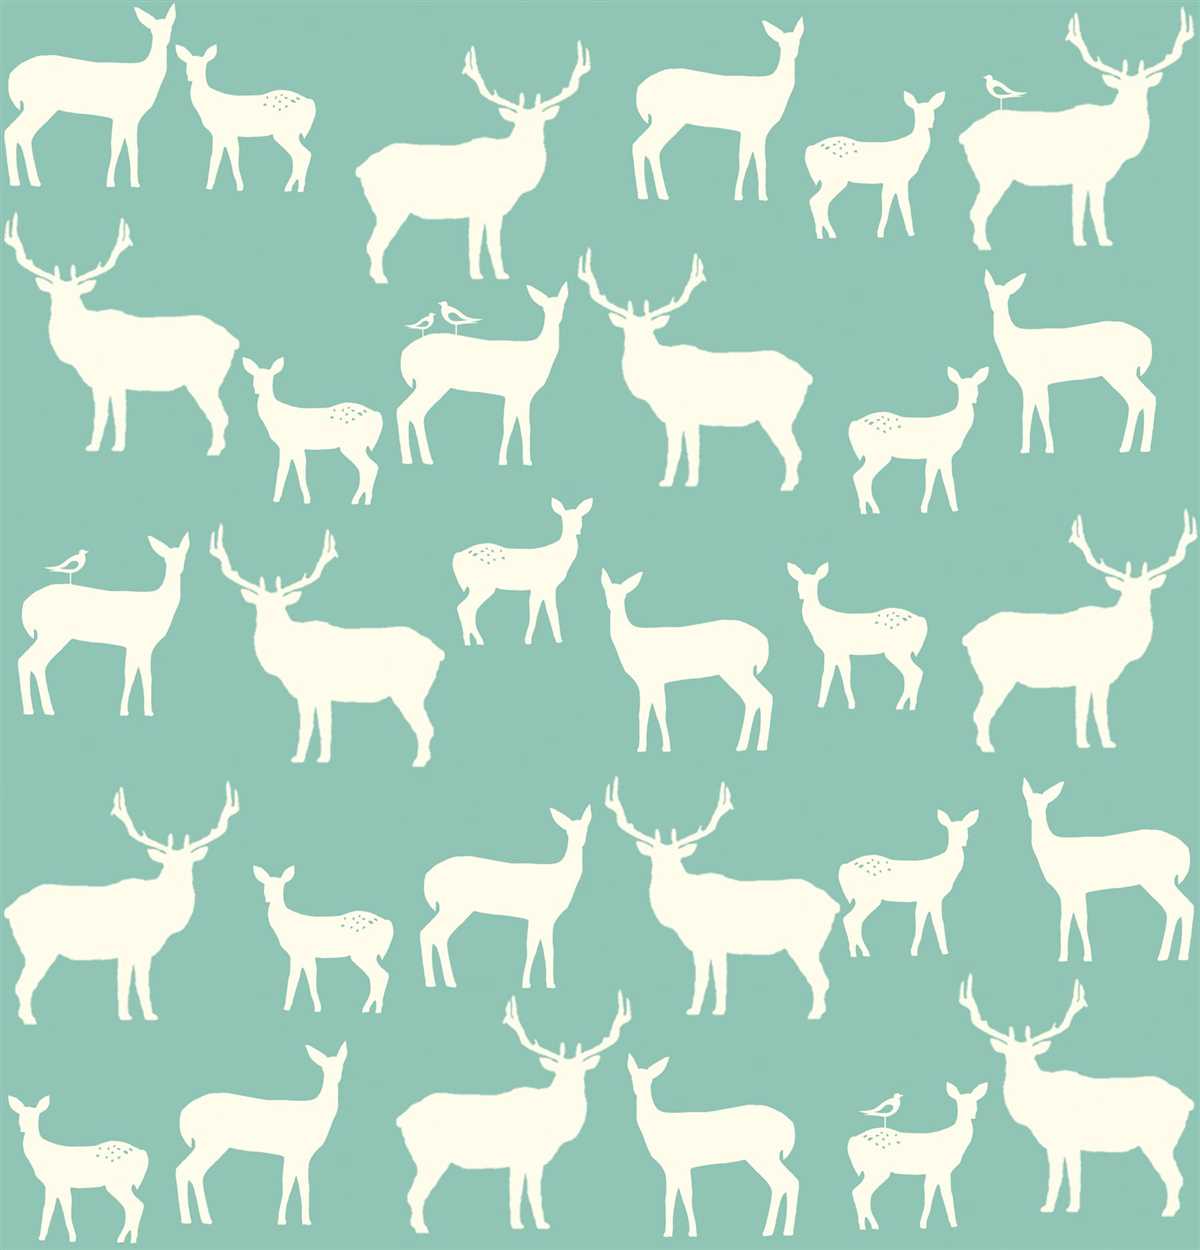
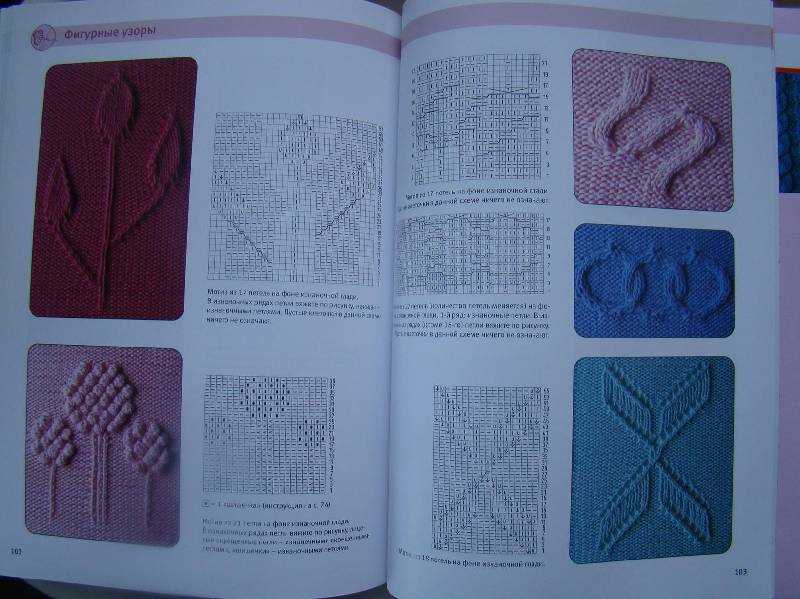
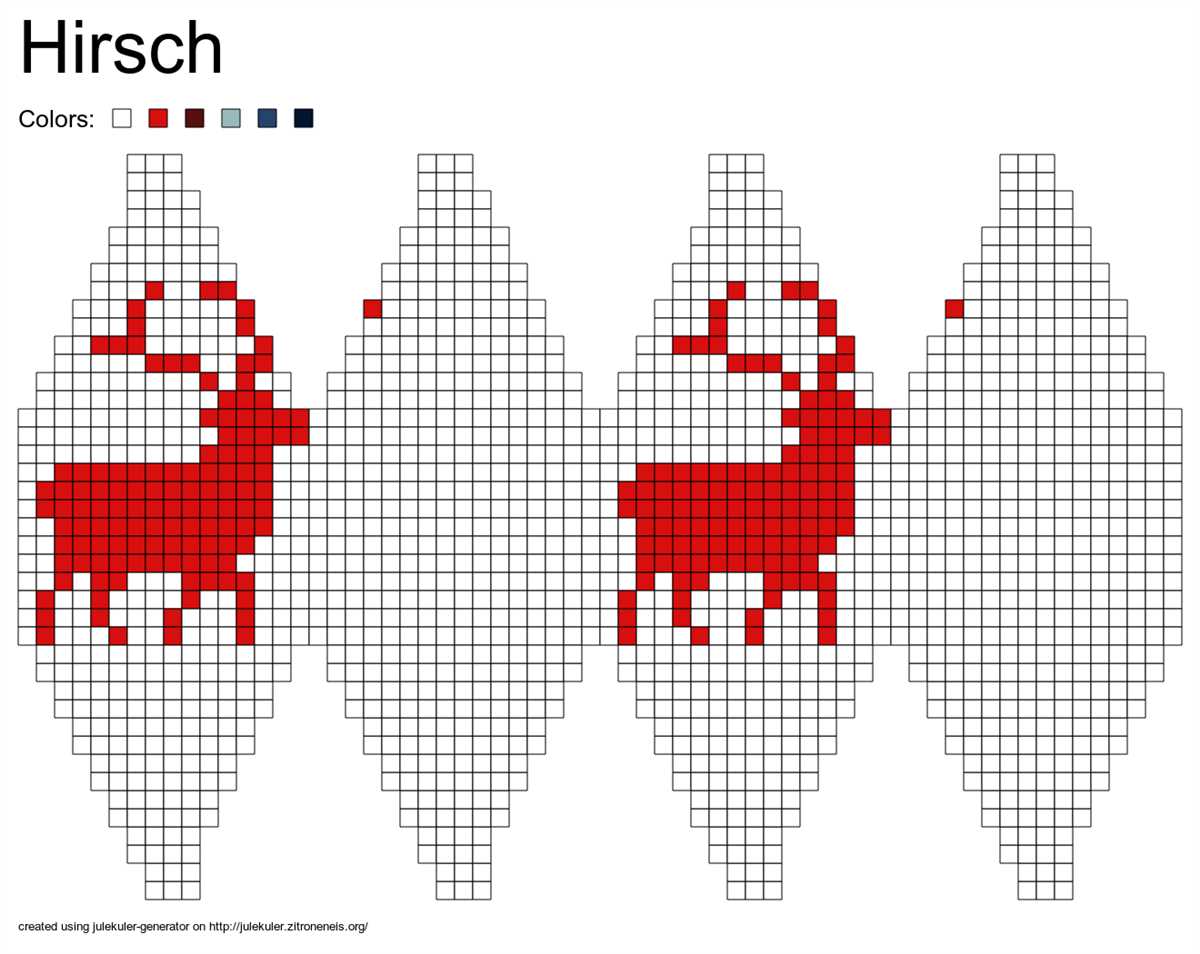
A stag knitting pattern typically includes instructions for creating a knitted deer motif, which can be used in a variety of projects such as sweaters, scarves, or blankets. The pattern usually specifies the type of yarn and needle size to use, as well as any additional materials or techniques required. It may also include charts or diagrams to help you visualize the design and keep track of your stitches.
Choosing the Right Yarn and Needles
When it comes to choosing yarn for your stag knitting pattern, consider the desired texture and appearance of your finished design. A pattern might recommend using a soft and warm wool yarn for a cozy winter sweater, or a lightweight cotton yarn for a breezy summer scarf. The needle size will depend on the thickness of your chosen yarn and the desired tension or gauge. It’s important to follow the pattern’s recommendations to ensure your project turns out as intended.
Following the Pattern and Adding Personal Touches
Once you have gathered all the necessary materials, it’s time to start knitting your stag design. Follow the pattern’s instructions carefully, making sure to count your stitches and rows accurately. If the pattern includes charts or diagrams, refer to them frequently as you progress. As you gain confidence and experience, you can also customize the design by adding your own unique touches, such as different colors or stitch patterns.
Creating a stunning deer design with a stag knitting pattern can be a rewarding and enjoyable project. Whether you choose to create a cozy sweater or a stylish accessory, your finished creation is sure to impress. So grab your needles, choose your yarn, and get ready to embark on a knitting adventure!
Understanding the Stag Knitting Pattern
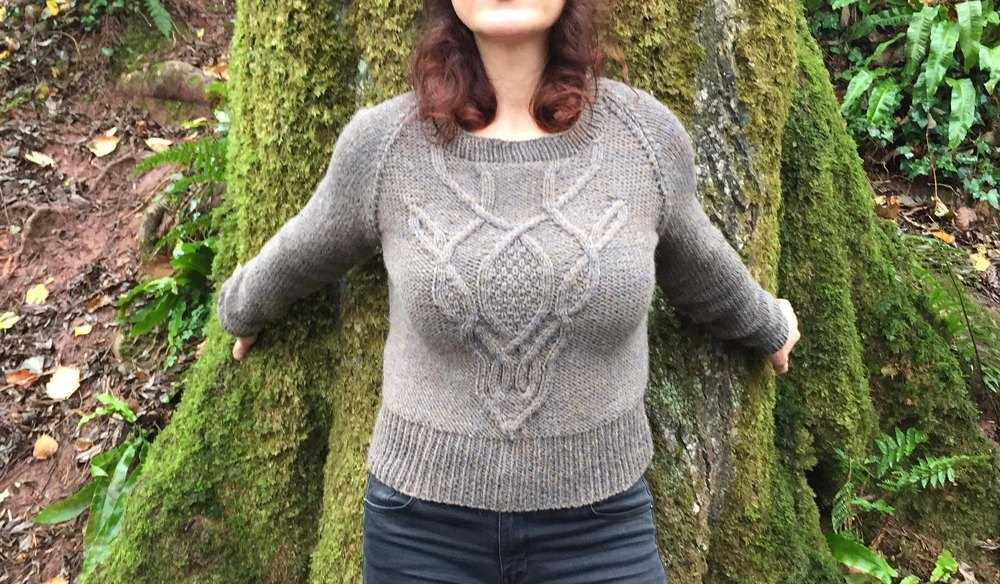
A knitting pattern is a set of instructions that guides you in creating a specific knitted item, such as a sweater, hat, or scarf. The Stag knitting pattern is a popular choice among knitting enthusiasts who want to create a unique and stylish garment with a stag motif. This pattern typically features a repeating design of stags on a background, creating a visually appealing and eye-catching piece.
When it comes to understanding the Stag knitting pattern, it is important to familiarize yourself with the various techniques and stitches involved. This pattern often requires intermediate knitting skills, as it may involve colorwork techniques, such as stranded knitting or intarsia, to create the stag motif. Additionally, it may also involve various stitch patterns, such as cables or lace, to add depth and texture to the overall design.
To successfully follow the Stag knitting pattern, it is crucial to carefully read and comprehend the instructions provided. The pattern will typically include a list of required materials, such as specific yarn types and needle sizes, as well as gauge information to ensure proper sizing and fit. It will also provide step-by-step instructions, often accompanied by charts or written explanations, on how to create the stag motif and complete the garment.
One helpful tip when working on the Stag knitting pattern is to use stitch markers to keep track of the different sections or repeats of the design. This will make it easier to follow the pattern and prevent mistakes. Additionally, taking accurate measurements and swatching before starting the project can help ensure that the finished garment will fit properly.
In conclusion, understanding the Stag knitting pattern requires familiarity with various knitting techniques, careful reading of instructions, and attention to detail. By mastering these skills, you can create a beautiful and unique garment with the striking stag motif.
Choosing the Right Yarn for Your Stag Knitting Project
When it comes to knitting a stag pattern, choosing the right yarn is essential to achieve the desired result. The yarn you select can greatly impact the appearance and texture of your finished project. It’s important to consider factors such as fiber content, weight, and color to ensure that your stag design comes to life.
Fiber Content: One of the first things to consider when choosing yarn for your stag knitting project is the fiber content. The most common yarn options for knitting stag patterns are wool and acrylic blends. Wool offers warmth, durability, and a natural look, making it an ideal choice for capturing the rustic essence of a stag. Acrylic blends, on the other hand, can provide affordability and easy care, making them a good option for those on a budget or looking for low-maintenance garments.
Weight: The weight of the yarn is another crucial factor to consider. The pattern you choose may specify a particular weight, such as DK (double knitting) or worsted weight. It’s important to follow these guidelines to ensure that your stitches are even and the overall shape of the stag is maintained. The weight of the yarn will also affect the drape and warmth of the finished project, so consider your desired outcome when selecting the weight.
Color: The color of the yarn can greatly impact the overall look of your stag design. Traditional stag patterns often feature earthy tones such as browns, greys, and greens to mimic the colors of nature. However, you can also get creative and use bold or contrasting colors to make your stag stand out. Consider the intended use of your knitted item and the recipient’s personal style when selecting the color of your yarn.
In summary, choosing the right yarn for your stag knitting project involves considering the fiber content, weight, and color. Whether you opt for wool or acrylic blends, DK or worsted weight, or earthy tones or bold colors, make sure to select yarn that suits your desired outcome and captures the essence of a majestic stag.
Selecting the Perfect Needles for Knitting a Stag Design
When it comes to knitting a stag design, selecting the right needles is crucial for achieving the desired results. The type and size of needles you choose can greatly affect the texture, tension, and overall appearance of your knitted piece. Here are some factors to consider when selecting needles for your stag knitting project.
Type of Needles: There are various types of knitting needles available, such as straight needles, circular needles, and double-pointed needles. The type of needles you choose depends on your knitting style and preference. Straight needles are commonly used for flat knitting, while circular needles are best for knitting in the round. Double-pointed needles can be used for small, detailed areas of the stag design.
Size of Needles: The size of needles you choose determines the gauge and the overall size of your knitted piece. The recommended needle size for your stag knitting pattern can usually be found in the pattern instructions. However, it’s important to note that everyone’s knitting tension can vary, so it’s a good idea to make a swatch before starting your project to ensure that you achieve the correct gauge. Adjusting the needle size can help you achieve the desired tension and gauge.
Material of Needles: Knitting needles are made from various materials, such as metal, wood, and plastic. The material you choose can affect the overall feel and flexibility of your needles. Metal needles are known for their durability and smoothness, which can be beneficial when working with complex stag designs. Wood and bamboo needles, on the other hand, can provide a warmer and more natural feel, which some knitters prefer. Plastic needles are lightweight and affordable, making them a good option for beginners.
Additional Accessories: In addition to selecting the right needles, you may need to consider other accessories for your stag knitting project. Stitch markers, cable needles, and tapestry needles are just a few examples of accessories that can come in handy during the knitting process. These tools can help you keep track of your stitches, create intricate cable patterns, and weave in loose ends for a polished finish.
Overall, selecting the perfect needles for knitting a stag design is a personal choice that depends on your knitting style, preferences, and the specific requirements of the pattern. Experimenting with different needle types, sizes, and materials can help you find the combination that works best for you and ensures a successful and enjoyable knitting experience.
Essential Stitches for Making a Stag Knitting Pattern
When it comes to creating a stag knitting pattern, there are several essential stitches that you should be familiar with. These stitches will help you bring your design to life and create a stunning and realistic representation of a stag. Whether you are a beginner or an experienced knitter, mastering these stitches will greatly enhance your knitting skills.
1. Stockinette Stitch
The stockinette stitch is one of the most basic stitches in knitting and is commonly used in creating the body of the stag. It is a simple stitch that involves knitting one row and purling the next, resulting in a smooth and flat fabric. This stitch is perfect for achieving a sleek and polished finish for the body of the stag.
2. Cable Stitch
The cable stitch is an intricate stitch that adds texture and depth to your stag knitting pattern. It involves crossing stitches over each other to create a twisted cable effect. This stitch is often used to create the antlers or other intricate details of the stag. Mastering the cable stitch will allow you to add a touch of elegance and complexity to your knitting project.
3. Eyelet Stitch
The eyelet stitch is a decorative stitch that creates small holes or eyelets in your knitting. It is commonly used to add delicate and intricate details to your stag pattern, such as the spots on the coat or the eyes. This stitch is created by making yarn overs and then purling or knitting the next row. The eyelet stitch is a versatile stitch that can be used to create various design elements in your stag knitting pattern.
4. Garter Stitch
The garter stitch is another basic stitch that is commonly used in knitting patterns, including the stag. It is created by knitting every row, resulting in a textured fabric with ridges. The garter stitch is often used for the borders or edgings of the stag pattern, adding a bit of visual interest and structure to the design. It is an easy stitch to master and is perfect for beginners.
By familiarizing yourself with these essential stitches for making a stag knitting pattern, you will be well-equipped to create a realistic and visually stunning piece. These stitches provide the foundation for your design and allow you to add intricate details and texture to your knitting project. So grab your knitting needles and yarn, and start crafting your own unique stag design!
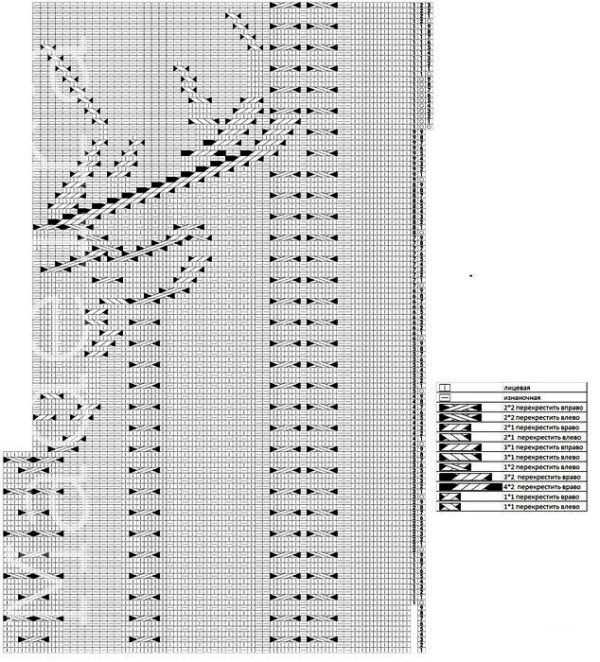
Tips and Tricks for Reading a Stag Knitting Chart
Reading and interpreting a knitting chart can be a bit intimidating, especially for beginners. However, with some practice and understanding of the symbols and techniques used in the chart, it becomes easier to follow and create beautiful stag knitting patterns. Here are some tips and tricks to help you read a stag knitting chart:
1. Understand the symbols:
Before diving into a stag knitting chart, familiarize yourself with the symbols used in the chart. Each symbol represents a specific stitch or action, such as knit, purl, increase, decrease, or yarn over. A legend is usually provided with the chart, which explains the symbols and their corresponding actions. Take some time to study the legend and make sure you understand what each symbol means.
2. Read the chart from right to left:
In most knitting charts, the chart is read from right to left, just like you would read a book. Each row of the chart represents a single row of knitting. Start at the rightmost edge of the chart and work your way towards the left edge, following the symbols and instructions as you go. Keep track of your progress by marking off the completed rows or using a row counter.
3. Pay attention to the row numbers:
Knitting charts usually include row numbers along the sides to help you keep track of your progress. Make sure you are knitting the correct row for each symbol or instruction in the chart. This will help ensure that your stitches are in the right place and that the pattern is coming out correctly.
4. Use stitch markers and highlighters:
Stitch markers can be helpful when working with a large and complex knitting chart. Place stitch markers at key points in the chart to mark important stitch counts, increases, or decreases. This will help you keep track of where you are in the pattern and avoid any mistakes. Additionally, using highlighters or colored pencils to mark the symbols or rows you have completed can make it easier to see your progress and stay organized.
5. Practice with simpler charts:

If you are new to reading knitting charts, it can be helpful to start with simpler charts before tackling more complex stag knitting patterns. Look for patterns and charts with straightforward designs and fewer symbols to practice your chart-reading skills. As you gain confidence and experience, you can gradually move on to more intricate charts and designs.
By understanding the symbols, reading from right to left, keeping track of row numbers, using stitch markers and highlighters, and practicing with simpler charts, you can improve your ability to read and follow a stag knitting chart. With time and practice, you will become more comfortable with charted patterns and be able to create stunning knitted stag designs.
Working on the Body of the Stag: Step-by-Step Instructions
Now that you have finished knitting the legs and antlers of your stag, it is time to move on to the body. This is where the cute little creature starts to take shape! Follow these step-by-step instructions to work on the body of the stag.
Step 1: Begin by joining the yarn at the bottom of one of the legs. Knit the stitches from the leg and continue knitting in the round until you reach the other leg. This will create the base of the body.
Step 2: Once you have completed the first round of knitting the body, it’s time to start shaping it. Work a decrease round by knitting two stitches together throughout the round. This will help create a more tapered shape for the body.
Step 3: Continue knitting in the round without any decreases until the body reaches the desired length. You can use a tape measure to ensure that the body is the right size, or you can compare it to the size of the legs and antlers.
Step 4: To add some texture to the body, you can incorporate a stitch pattern. One option is to knit a few rounds in a different stitch, such as a seed stitch or a rib stitch. This will add visual interest and make your stag look even more adorable.
Step 5: Finish the body by binding off the stitches. Cut the yarn, leaving a long tail for sewing up the remaining seam. This will allow you to easily attach the body to the head and complete your knitted stag.
By following these step-by-step instructions, you will be able to successfully knit the body of the stag. Don’t forget to take your time and enjoy the process, as knitting can be a relaxing and fulfilling hobby.
Creating the Majestic Antlers: Techniques and Patterns
Knitting stag antlers can be a challenging but rewarding project. These majestic antlers can add a touch of nature and elegance to any knitting project, whether it’s a hat, a sweater, or a decorative piece. In this article, we will explore different techniques and patterns to help you create stunning stag antlers.
1. Basic Antler Knitting Technique:
To start knitting a stag antler, you will need a basic understanding of knitting techniques like casting on, knitting, purling, and decreasing stitches. The antler pattern usually involves a combination of knit and purl stitches to create the texture and shape of the antlers. Following a pattern chart or written instructions will guide you through the process.
2. Cable Knitting for Antlers:
Cable knitting is a popular technique used to create intricate patterns and textures, making it perfect for adding detail to stag antlers. By crossing stitches over each other, you can mimic the twisted branches of real antlers. Look for cable patterns specifically designed for antlers or adapt existing cable patterns to suit your project.
3. Colorwork for Realistic Antlers:
Adding colorwork to your stag antlers can enhance their realism and make them stand out. Choose shades of browns and grays to mimic the natural colors of antlers. Fair Isle or stranded knitting techniques are commonly used for colorwork. By carrying multiple strands of yarn at once, you can create intricate patterns and gradients.
4. Embellishments and Finishing Touches:
Once you have knitted the base of your stag antlers, you can add embellishments and finishing touches to make them more lifelike. Techniques like embroidery, beading, or attaching small fabric or felt details can bring extra dimension and character to your antlers. You can also experiment with different blocking and shaping techniques to achieve the desired look.
With these techniques and patterns, you can create beautiful and majestic stag antlers that will be the highlight of your knitting project. Remember to practice and experiment to find the perfect combination of techniques and colors that suit your style and vision. Let your creativity run wild and enjoy the process of bringing nature’s elegance to your knitting projects.
Adding Details and Embellishments to Your Stag Knitting Project
Once you have completed the basic knitting pattern for your stag project, you can take it to the next level by adding details and embellishments. These extra touches will bring your knitted stag to life and make it truly unique. Here are some suggestions for adding that extra special something to your project:
1. Embroidered Details
Consider adding embroidered details to your stag for a more realistic and textured look. You can use embroidery floss in various colors to create details such as eyes, nostrils, and fur texture. Use small stitches to carefully embroider these details onto your knitted piece.
2. Antler Embellishments
Enhance the majestic appearance of your stag by adding antler embellishments. You can create antlers using wire, pipe cleaners, or even knitting some extra pieces. Attach them securely to the head of your stag using stitches or glue. You can also paint or spray them with metallic gold or silver paint for an elegant touch.
3. Mix and Match Yarns
Experiment with different yarn colors and textures to create unique effects on your stag. For example, you can use a variegated yarn for the body to mimic the variation in a stag’s fur. Alternatively, you can add a small pop of color by using a contrasting yarn for the hooves or the inner ears. Mixing and matching yarns will add depth and visual interest to your knitting project.
4. Embellishments on the Coat
If your stag has a coat or scarf, consider adding some embellishments to it. You can sew on small buttons, beads, or charms to create a personalized touch. Alternatively, you can knit or crochet small flowers, leaves, or snowflakes to attach to the coat or scarf. These little details will make your stag project even more charming and unique.
Remember, adding details and embellishments is all about personalizing your stag knitting project and making it your own. Have fun with the process and let your creativity shine!
Joining Pieces: Assembling Your Stag Knitted Design
Once you have finished knitting all the individual pieces for your stag design, the next step is to assemble them together. This process is crucial to ensure that your knitted stag looks seamless and professional. There are several techniques you can use to join the pieces effectively, depending on your personal preference and the specific design.
1. Whipstitch or Mattress Stitch: One common method is to use a whipstitch or mattress stitch to sew the pieces together. This technique involves using a blunt-ended yarn needle to weave the stitches on one piece into the corresponding stitches on another piece. The seam created by this stitch is invisible from the right side of the knitting, giving your stag a neat finish.
2. Crochet Join: If you are proficient in crochet, you can opt for a crochet join method. This technique involves using a crochet hook to slip stitch or single crochet the pieces together. Crochet joining creates a sturdy seam and provides flexibility in adjusting the tension of the join.
3. Three-Needle Bind Off: Another technique for joining pieces is the three-needle bind off. This method requires knitting the pieces together using a third needle. The three-needle bind off creates a strong and secure seam that is easily visible on the right side of the work, adding decorative detail to your stag design.
Regardless of the joining technique you choose, it is essential to follow the pattern instructions carefully and ensure that the pieces align correctly before sewing them together. Take your time and double-check your work as you go to achieve the best results. Once the pieces are securely joined, you can move on to adding any additional embellishments or details to complete your knitted stag design.
Blocking and Finishing Your Stag Knitting Pattern
Once you have completed knitting your stag pattern, it is important to block and finish your project to ensure that it looks its best. Blocking is the process of gently stretching and shaping your knitted fabric to give it a more even appearance and to help it maintain its shape over time.
To begin the blocking process, you will need:
- A clean towel or blocking mat
- Pins
- A spray bottle filled with water
First, lay your knitted stag flat on a clean towel or blocking mat. Gently shape the fabric to the desired measurements, making sure to smooth out any wrinkles or uneven areas. Then, secure the edges of the fabric with pins, being careful not to pull too tightly. This will help the fabric hold its shape while it dries.
Next, mist the fabric with water using the spray bottle. Be careful not to saturate the fabric, as this can cause it to become misshapen or take longer to dry. The water will help the fibers relax and conform to the desired shape.
Leave your project to dry completely before removing the pins
Once your stag knitting pattern is completely dry, carefully remove the pins. The blocking process will have helped the fabric to maintain its shape and give it a more professional finish. Take care not to tug or stretch the fabric as you remove the pins, as this can undo the blocking work you have just completed.
Finally, you can finish off any loose ends or weave in any remaining yarn tails. Use a tapestry needle to weave the yarn into the fabric, being careful to follow the existing stitches and avoid creating lumps or gaps in the finished project.
By following these steps to block and finish your stag knitting pattern, you will be able to create a beautifully shaped and professionally finished piece. Enjoy showcasing your knitted stag and the hard work you put into creating it!
Troubleshooting and Common Mistakes in Stag Knitting
Knitting up a stag pattern can be an exciting challenge, but it’s not uncommon to encounter some hiccups along the way. Here are some common mistakes and troubleshooting tips to help ensure your stag knitting project goes as smoothly as possible.
Mistake: Uneven tension
One common mistake in stag knitting is maintaining even tension throughout the project. Uneven tension can result in a finished product that looks lumpy or distorted. To avoid this, try using the same needles and yarn throughout, and make a conscious effort to keep your tension consistent. If necessary, practice knitting with a tension square first to get a feel for the correct tension required for your pattern.
Mistake: Miscounting stitches
Another common mistake in stag knitting is miscounting stitches. This can lead to asymmetrical or misshapen pieces that don’t fit together properly. To avoid this, consider using stitch markers to help you keep track of your stitch count, especially when working on complex patterns. Additionally, take the time to carefully read and understand the pattern instructions to ensure you’re knitting the correct number of stitches in each section.
Mistake: Incorrect gauge
Gauge is an important factor in knitting, and it’s crucial to match the gauge specified in your stag knitting pattern. If your gauge is off, it can affect the size and fit of your finished project. To ensure you have the correct gauge, take the time to knit a gauge swatch using the recommended needles and yarn. If your gauge doesn’t match, adjust your needle size until you achieve the correct gauge.
Mistake: Not following the pattern instructions
One of the most common mistakes in any knitting project, including stag knitting, is not following the pattern instructions accurately. Skipping a row or misinterpreting a pattern abbreviation can lead to errors in your finished project. Take the time to read the pattern instructions carefully before you start, and refer back to them frequently as you work. If you’re unsure of a specific instruction, consult a knitting reference book or online tutorial for clarification.
By being aware of these common mistakes and following these troubleshooting tips, you’ll be better equipped to tackle any challenges that arise during your stag knitting project. With a little patience and practice, you’ll have a beautiful stag knit piece to show off in no time!
Showcasing Your Finished Stag Knitting Project
After putting in all the time and effort to knit your stag project, it’s time to show it off! Here are some ways to showcase your finished piece and share your knitting skills with others.
1. Social media:
Take beautiful photos of your stag knitting project and share them on social media platforms like Instagram, Facebook, or Twitter. Use relevant hashtags such as #knitting, #knittersofinstagram, or #knitstagram to reach a wider audience of fellow knitters and craft enthusiasts. You can also join knitting communities online and share your finished project there.
2. Gift it:
If you’re proud of your stag knitting project, consider gifting it to a loved one or a friend who will appreciate your handiwork. Hand-knit gifts are always special and show the recipient that you put thought and effort into creating something unique for them.
3. Display it:
Showcase your stag knitting project by displaying it in your home. You can frame the knitted piece or use it as a decorative item. Place it on a shelf, hang it on a wall, or incorporate it into your seasonal decor. Your knitting project can add a touch of warmth and coziness to any room.
4. Enter competitions or contests:
If you’re feeling particularly proud of your stag knitting project, consider entering it into knitting competitions or contests. Look for local craft fairs, knitting festivals, or online contests that accept handmade knitted items. This can be a great way to get recognition for your skills and potentially win prizes or gain exposure for your work.
5. Teach others:
If you’re passionate about knitting and want to share your skills, consider offering to teach others how to make a stag knitting project. You can organize a knitting workshop or class at your local community center, knitting group, or even online. Teaching others not only gives you a chance to showcase your finished project but also helps spread the joy of knitting to others.
Showcasing your finished stag knitting project is a wonderful way to celebrate your accomplishment and inspire others to explore the world of knitting. Whether it’s through social media, gifting, displaying, participating in competitions, or teaching, sharing your knitting project can bring a sense of pride and fulfillment.