
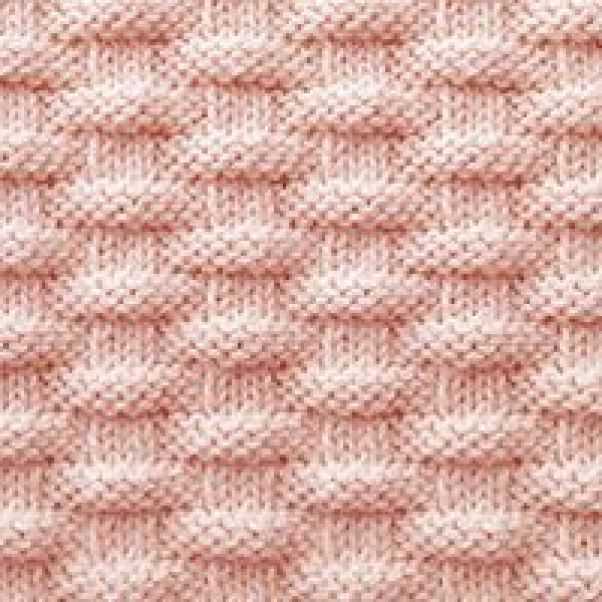
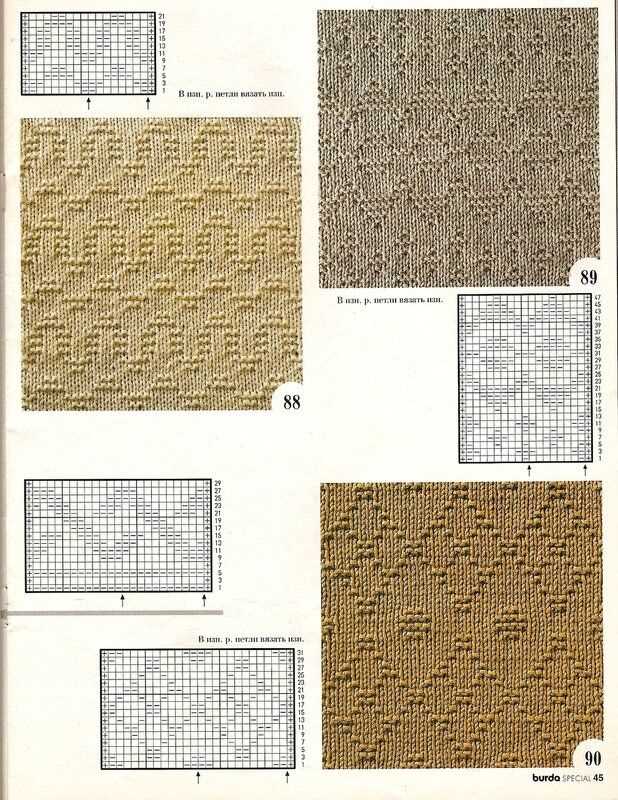
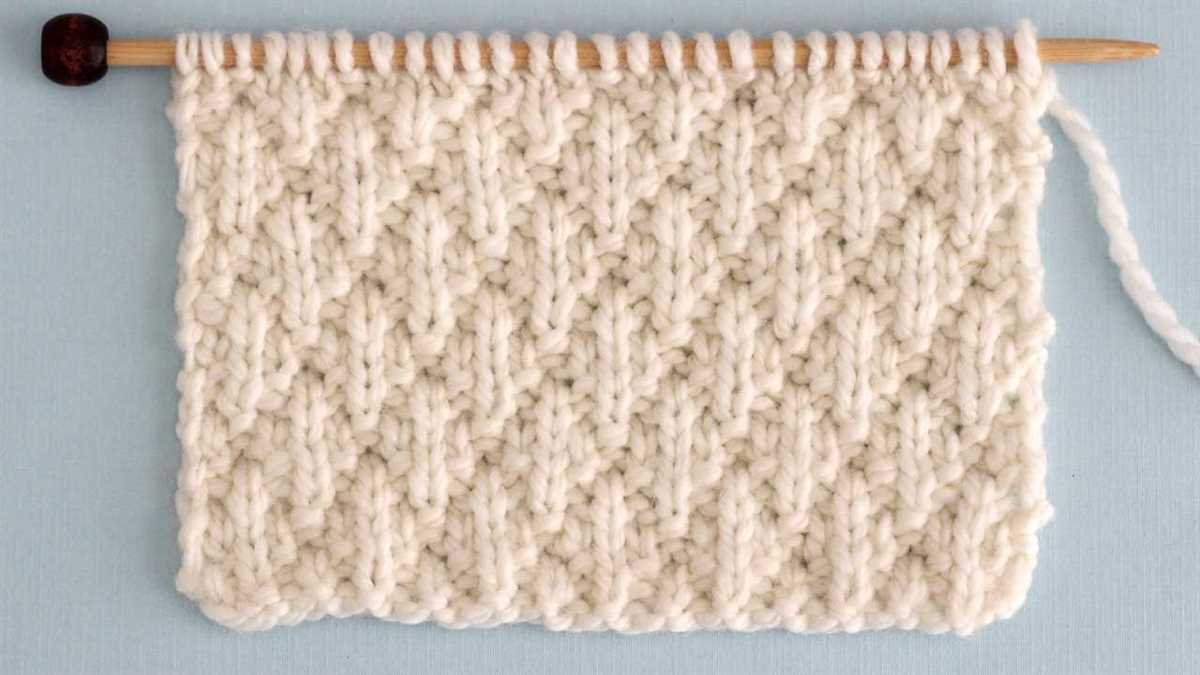
Seersucker stitch knitting pattern is a classic and versatile stitch that creates a textured and puckered fabric. It is characterized by alternating sections of raised, bumpy stitches and smooth, flat stitches, giving it a unique puckered effect. This stitch pattern is easy to knit and is perfect for a variety of projects, including scarves, blankets, and sweaters.
The seersucker stitch pattern is worked by alternating between knitting and purling stitches in specific rows. The raised sections are created by knitting the knit stitches, while the flat sections are created by purling the purl stitches. This alternating pattern creates the puckered texture that is characteristic of seersucker fabric.
Seersucker stitch is a great choice for beginners who want to experiment with different stitch patterns. It is a simple pattern that only requires basic knitting skills, such as knitting and purling. Once you get the hang of the pattern, you can easily create beautiful and unique pieces with a textured and visually interesting look.
What is a Seersucker Stitch Knitting Pattern?

A seersucker stitch knitting pattern is a type of textured stitch pattern used in knitting. It creates a distinctive and unique look that resembles the puckered fabric often used in seersucker textiles. The pattern is achieved by alternating knit and purl stitches in a specific sequence, which creates the characteristic puckered effect.
The seersucker stitch pattern is commonly used in various knitting projects, such as scarves, sweaters, and blankets. It adds visual interest to the fabric and can be combined with different colors and yarn weights to create different effects. The pattern is relatively easy to learn and follow, making it accessible to knitters of different skill levels.
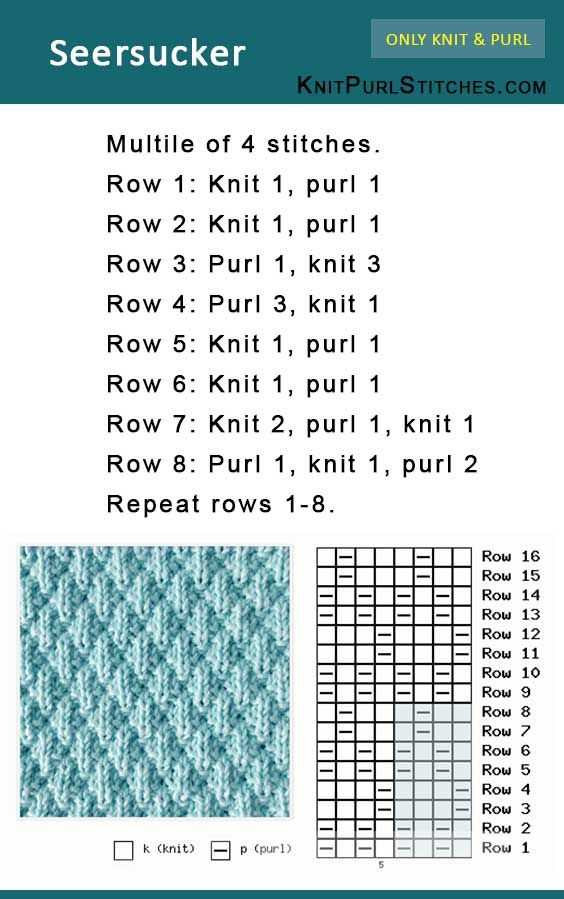
To create the seersucker stitch pattern, follow these steps:
- Cast on an odd number of stitches.
- Row 1: *Knit 1, purl 1; repeat from * to the end of the row.
- Row 2: *Purl 1, knit 1; repeat from * to the end of the row.
- Repeat rows 1 and 2 until desired length is reached.
- Bind off all stitches.
The seersucker stitch pattern is versatile and can be modified to create different variations. For example, you can change the sequence of knit and purl stitches to add more texture or adjust the number of rows to create a taller or shorter puckered effect. Additionally, combining different colors of yarn can enhance the visual impact of the pattern.
Overall, the seersucker stitch knitting pattern is a fun and attractive technique that can add a unique touch to your knitting projects. Whether you’re a beginner or an experienced knitter, trying out this stitch pattern can be a great way to expand your skills and create beautiful and interesting textiles.
Seersucker Stitch Knitting Pattern: Step-by-Step Guide
The seersucker stitch is a unique knitting pattern that creates a textured fabric with alternating rows of raised and flat stitches. It is named after the seersucker fabric commonly used in clothing, which has a similar puckered texture. This stitch pattern is perfect for adding visual interest and dimension to your knitting projects.
To create the seersucker stitch, you will need a knitting needle and yarn of your choice. The stitch pattern involves two simple techniques: knit and purl stitches. Here is a step-by-step guide to knitting the seersucker stitch:
- Cast on an even number of stitches on your knitting needle. This will ensure that the raised and flat stitches alternate properly.
- Row 1: Knit all stitches.
- Row 2: Purl all stitches.
- Row 3: *Knit 1 stitch, purl 1 stitch; repeat from * to the end of the row.
- Row 4: *Purl 1 stitch, knit 1 stitch; repeat from * to the end of the row.
- Repeat rows 1-4 until your knitting reaches the desired length. Make sure to end with a Row 2 (purl) to maintain the alternating pattern.
The seersucker stitch is versatile and can be used in a variety of knitting projects, such as scarves, blankets, and sweaters. It creates a fabric that is breathable and has a great drape, making it perfect for warm weather garments. Experiment with different yarn weights and colors to create unique designs and textures.
Once you have mastered the basic seersucker stitch pattern, you can explore variations and adaptations to add more complexity to your knitting. For example, you can incorporate different stitch patterns or change the number of rows in each section to create different effects.
Tips for Choosing the Right Yarn for Seersucker Stitch
When knitting the seersucker stitch, it is important to choose the right yarn that will give you the desired texture and drape. Here are some tips to consider when selecting yarn for this stitch pattern:
- Weight: The weight of the yarn will affect the overall look and feel of your finished project. For a more structured and defined seersucker stitch, consider using a medium to heavy weight yarn. If you want a lighter and more airy texture, opt for a lightweight yarn.
- Fiber: Different fibers will give the seersucker stitch a different look and feel. Natural fibers like cotton and linen are popular choices as they enhance the stitch’s crisp texture. However, you can also experiment with blends or other synthetic fibers for a different effect.
- Texture: Consider the texture of the yarn and how it will interact with the seersucker stitch. Smooth and tightly spun yarns will create a crisper texture, while yarns with more texture or a halo effect can add dimension to the stitch pattern.
- Color: The color of the yarn is also an important factor to consider. Lighter colors can highlight the stitch pattern and make it stand out more, while darker or variegated colors can create a more subtle or dramatic effect.
- Yardage: Make sure to check the yardage of the yarn to ensure you have enough for your project. Seersucker stitch can use up more yarn than other stitch patterns due to its textured nature.
By taking these factors into consideration, you can choose the perfect yarn for your seersucker stitch project and achieve the desired look and feel.
How to Cast On for Seersucker Stitch Knitting
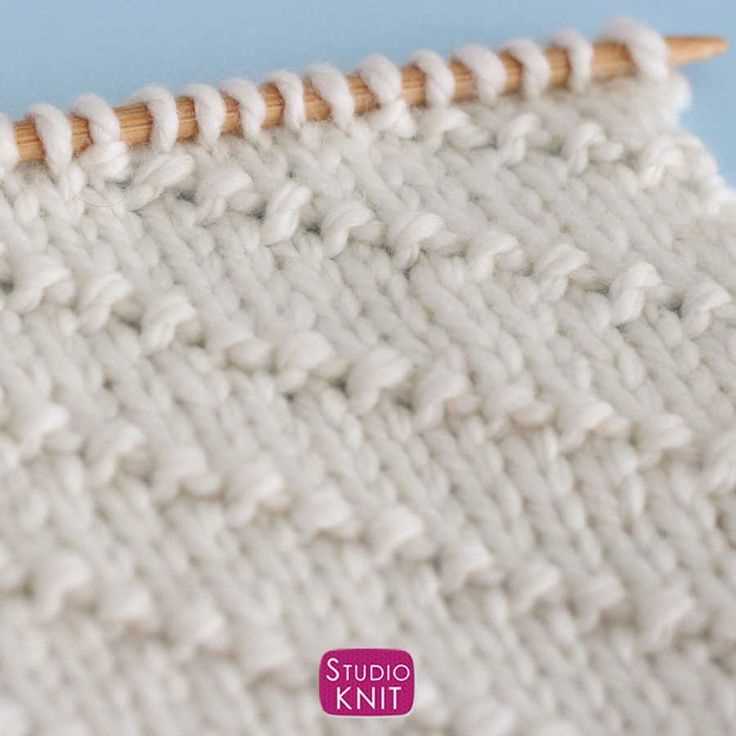
Casting on for seersucker stitch knitting is a simple and straightforward process that sets the foundation for your project. The seersucker stitch pattern creates a textured fabric with alternating raised and flat sections, giving it a unique and eye-catching look. To start, you will need your knitting needles and the yarn of your choice.
Step 1: Begin by making a slipknot on one of your knitting needles. To do this, make a loop with the yarn, inserting the working end through the loop and pulling it tight. Place this loop onto the needle, leaving a short tail.
Step 2: Hold the needle with the slipknot in your right hand and insert the left-hand needle into the slipknot from left to right, going under the right-hand needle.
Step 3: With your right hand, wrap the yarn counterclockwise around the right-hand needle, bringing it from the back to the front.
Step 4: Using the right-hand needle, pull the loop of yarn through the slipknot, creating a new loop on the right-hand needle. This is your first cast-on stitch.
Step 5: Repeat steps 2-4 to cast on the desired number of stitches for your seersucker stitch project. Make sure to keep the tension even and consistent throughout.
Step 6: Once you have cast on all your stitches, you are ready to start knitting the seersucker stitch pattern according to the instructions for your specific project.
Remember to take your time and be patient as you cast on for seersucker stitch knitting. With practice, you’ll be able to create beautiful and intricate designs using this unique stitch pattern.
Seersucker Stitch Knitting: Basic Techniques and Stitches

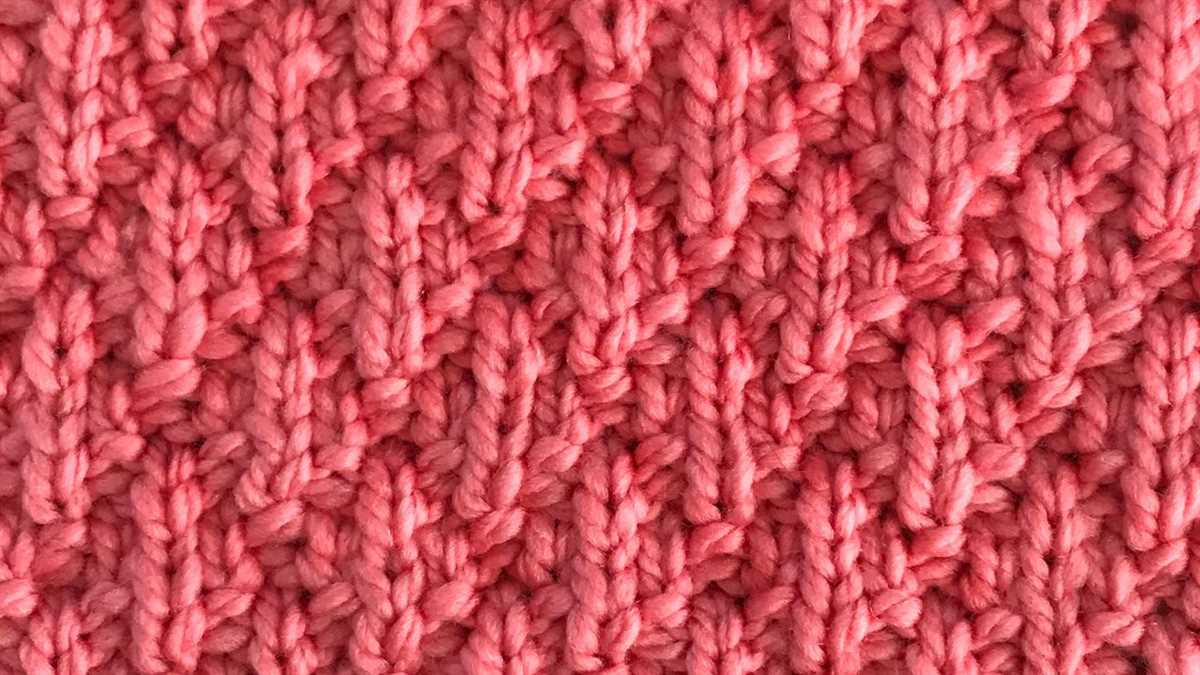
Seersucker stitch knitting is a popular technique that creates a unique texture in your knitted fabric. It is characterized by alternating columns of raised stitches and dropped stitches, giving the fabric a puckered or crinkled appearance. This stitch pattern is perfect for adding visual interest to your knitting projects, whether you’re making a cozy scarf, a stylish sweater, or a textured blanket.
To achieve the seersucker stitch pattern, you’ll need to be familiar with a few basic knitting techniques and stitches. First, you’ll need to know how to knit and purl, as these two stitches are the foundation of the seersucker stitch. The raised stitches are created by knitting into the stitch below the current stitch, while the dropped stitches are created by simply dropping the stitch off the needle without knitting or purling it.
Here’s a step-by-step guide to knitting the seersucker stitch:
- Cast on an even number of stitches.
- Row 1: *Knit 1, drop 1 stitch off the needle.* Repeat from * to * across the row.
- Row 2: *Purl 1, knit 1.* Repeat from * to * across the row.
- Repeat rows 1 and 2 until your desired length is reached.
- Bind off all stitches.
Once you’ve mastered the basic seersucker stitch, you can experiment with different variations and modifications. For example, you can change the number of stitches between the dropped stitches to create a denser or more open texture. You can also incorporate other stitch patterns, such as cables or lace, into your seersucker stitch knitting for even more versatility.
Seersucker stitch knitting is a fun and versatile technique that can elevate your knitting projects to the next level. Give it a try and see how this unique stitch pattern can add a touch of texture and visual interest to your next knitting project!
Seersucker Stitch vs. Other Knitting Patterns: A Comparison
When it comes to knitting patterns, there are countless options to choose from. One popular pattern that stands out from the rest is the seersucker stitch. This unique stitch creates a textured fabric with alternating rows of raised bumps and smooth stripes, reminiscent of the classic seersucker fabric used in clothing. In this article, we will compare the seersucker stitch to other knitting patterns to explore its advantages and versatility.
1. Texture
The seersucker stitch is known for its distinctive texture, which adds visual interest and depth to knitted projects. Unlike other simple stitches like the garter stitch or stockinette stitch, the seersucker stitch creates a raised, bumpy surface that is both tactile and visually appealing. This makes it an excellent choice for scarves, blankets, and other projects where texture is desired.
2. Versatility
Another advantage of the seersucker stitch is its versatility. While it may appear complex, this stitch is actually quite simple to knit, making it accessible to knitters of all skill levels. Additionally, the seersucker stitch can be used with a variety of yarn weights and colors, allowing for endless creative possibilities. Whether you want to knit a cozy sweater or a lightweight summer top, the seersucker stitch can be adapted to suit your needs.
3. Time Efficiency
Compared to more intricate knitting patterns such as cables or lace, the seersucker stitch is relatively quick to knit. This is because it only involves basic knitting techniques, such as knitting and purling, and does not require complex stitch manipulation. As a result, projects worked in the seersucker stitch can be completed in less time, making it a great choice for last-minute gifts or when you want to see quick results.
4. Breathability
Unlike some knitting patterns that create dense and warm fabrics, the seersucker stitch has inherent breathability due to its alternating rows of raised bumps and smooth stripes. This makes it ideal for garments or accessories that need to be lightweight and breathable, such as summer tops or baby blankets. The seersucker stitch allows air to circulate through the fabric, providing comfort and preventing overheating.
In conclusion, the seersucker stitch offers a unique texture, versatility, time efficiency, and breathability compared to other knitting patterns. Whether you’re a beginner or an experienced knitter, incorporating the seersucker stitch into your projects can add visual interest and enhance the overall quality of your knitted items.
Creating Variegated Patterns with Seersucker Stitch
The seersucker stitch is a versatile and unique knitting pattern that can be used to create beautiful variegated patterns in your projects. This stitch is characterized by its alternating sections of purls and knits, which create a textured and bumpy surface. By strategically combining different colors of yarn and experimenting with stitch patterns, you can create interesting and eye-catching designs.
To create variegated patterns using the seersucker stitch, you can start by selecting two or more colors of yarn that complement each other. For example, you could choose a variegated yarn with different shades of blues and greens, and pair it with a solid color yarn in a coordinating hue. This combination of colors will add depth and visual interest to your finished project.
Once you have your yarn colors selected, you can begin experimenting with different stitch patterns to create the variegated effect. For example, you could alternate between knitting two rows with one color and two rows with the other color, or you could try knitting one row with one color and then switch to the other color for the next row. By varying the number of rows and the order of colors, you can create unique and personalized designs.
Another way to create variegated patterns with the seersucker stitch is to incorporate color changes within a single row. For example, you could knit two stitches with one color, then switch to the other color for the next two stitches, and continue this pattern throughout the row. This technique allows you to create intricate and detailed patterns, and adds an extra layer of interest to your knitting.
Overall, the seersucker stitch is a great choice for creating variegated patterns in your knitting projects. Whether you choose to alternate colors between rows or within a single row, this stitch offers endless possibilities for creating beautiful and unique designs. So grab your yarn and knitting needles, and let your creativity soar!
Common Mistakes to Avoid When Knitting Seersucker Stitch
The seersucker stitch is a popular choice for knitting projects as it creates a unique textured fabric. However, there are some common mistakes that beginners and even experienced knitters can make when working with this stitch. By being aware of these mistakes, you can avoid them and achieve better results in your seersucker stitch knitting projects.
1. Uneven Tension:
One of the most common mistakes in seersucker stitch knitting is uneven tension. This can result in an inconsistent fabric with uneven rows or stitches. To avoid this, it is important to maintain a consistent tension throughout your knitting. Pay attention to how tight or loose you are pulling the yarn and adjust accordingly to ensure a smooth and even fabric.
2. Twisted Stitches:
Another mistake that can occur is twisting the stitches when knitting seersucker stitch. This happens when you accidentally insert your needle into the wrong part of the stitch, resulting in a twisted appearance. To avoid this, make sure to insert your needle correctly into the stitch, going under the front loop and into the back loop.
3. Not Counting Stitches:
Counting stitches is crucial when knitting seersucker stitch, as it can be easy to lose track of where you are in the pattern. Mistakes in stitch count can lead to an uneven or misshaped fabric. To avoid this, use stitch markers or pencil marks to keep track of your stitches and regularly double-check your count while working on your project.
4. Ignoring Gauge:
Gauge is an important factor in any knitting project, including seersucker stitch. Ignoring gauge can result in a fabric that is too tight or too loose, affecting the overall fit and appearance. Before starting your project, make sure to check your gauge and adjust your needle size if needed to ensure that you are obtaining the correct number of stitches per inch.
5. Not Blocking the Finished Piece:
Blocking is an essential step in finishing any knitting project, and seersucker stitch is no exception. Not blocking the finished piece can result in a fabric that is not as smooth or even as desired. Take the time to block your seersucker stitch project according to the recommended instructions to give it a polished and professional look.
Avoiding these common mistakes when knitting seersucker stitch can help you achieve better results and create beautiful, textured fabrics. Remember to maintain consistent tension, avoid twisted stitches, count your stitches accurately, pay attention to gauge, and always block your finished piece. With practice and attention to detail, you can master the seersucker stitch and create stunning knitting projects.
Seersucker Stitch Knitting: Ideas and Inspiration
If you’re looking for a unique and textured stitch pattern to incorporate into your knitting projects, seersucker stitch might be just what you’re looking for. Seersucker stitch is a pattern that creates a distinctive puckered effect, reminiscent of the traditional seersucker fabric. The alternating raised and flat sections of the stitch create an interesting texture that adds depth and visual interest to your knitted fabric.
There are countless ways to incorporate seersucker stitch into your knitting projects. One popular option is to use it for creating scarves or wraps. The textured pattern of the seersucker stitch can add an extra touch of elegance and sophistication to these accessories. You can experiment with different yarn weights and colors to achieve different effects, whether you want a delicate and lacy look or a bold and chunky style.
Seersucker Stitch Pattern Ideas:
- Seersucker Baby Blanket: Use the seersucker stitch pattern to create a cozy and textured blanket for a little one. The puckered texture of the stitch adds a tactile element that babies will love.
- Seersucker Sweaters: Knit a seersucker stitch sweater for a unique and fashionable look. The textured pattern can add interest to plain sweaters or highlight certain features, such as the neckline or sleeves.
- Seersucker Dishcloths: Add some texture to your kitchen with seersucker stitch dishcloths. Not only are they functional for cleaning, but they also add a touch of style to your kitchen decor.
- Seersucker Headbands: Create stylish headbands using the seersucker stitch pattern. These headbands can be perfect for adding a pop of color and texture to your hairstyle.
With seersucker stitch knitting, the possibilities are endless. Whether you’re a beginner or an experienced knitter, this stitch pattern can add a unique touch to any project. So grab your yarn and needles, and get knitting!
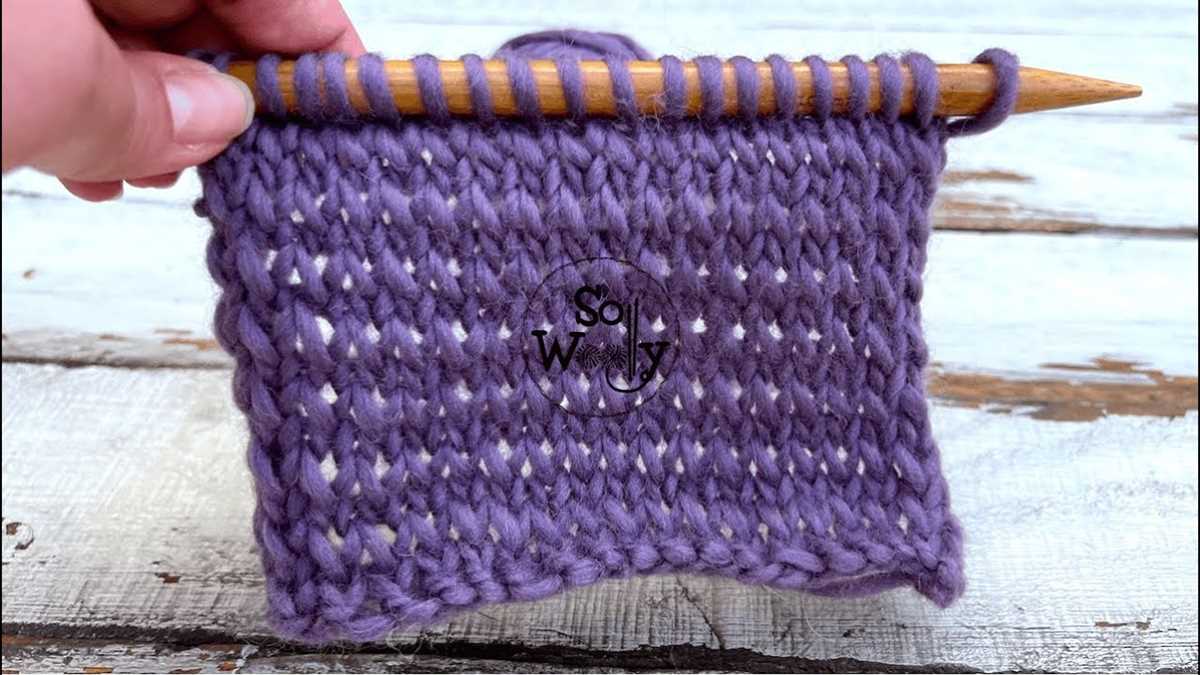
Finishing Off: Binding Off and Blocking Seersucker Stitch Knitting
After completing your seersucker stitch knitting project, it’s time to finish off and give your work a polished look. This involves binding off the stitches and blocking the fabric to ensure it retains its shape. Here are the steps to follow:
1. Binding Off:
To bind off seersucker stitch knitting, you can use a simple bind off or a stretchy bind off, depending on your preference and the desired finish. Both methods are explained below:
- Simple Bind Off: Knit the first two stitches normally. Insert the left-hand needle into the first stitch on the right-hand needle, and lift it over the second stitch and off the needle. Knit one more stitch, then repeat the process of lifting the previous stitch over the one you just knitted. Continue in this manner until you have one stitch left, then cut the yarn and pull it through the remaining stitch.
- Stretchy Bind Off: This method is useful if you want a more flexible edge. Follow the same steps as the simple bind off, but after lifting the stitch over, instead of knitting another stitch, insert the left-hand needle into the next stitch as if to purl, and lift it over the previous stitch and off the needle. Repeat this process until you have one stitch left, then cut the yarn and pull it through the remaining stitch.
2. Blocking:
Blocking seersucker stitch knitting is essential to even out the fabric, open up the pattern, and ensure it retains its shape. Here’s how you can block your project:
- Wet blocking: Fill a basin with lukewarm water and add a mild detergent. Submerge your knitted piece in the water and let it soak for about 15-20 minutes. Gently squeeze out the excess water, avoiding wringing or twisting the fabric. Lay the knitting on a blocking mat or towel, carefully stretching it to the desired shape and measurements. Secure the edges with pins or blocking wires, and let it air dry completely.
- Steam blocking: If wet blocking is not suitable for your yarn or if you’re short on time, you can steam block your seersucker stitch knitting. Hold a steam iron close to the fabric, without touching it, and let the steam gently penetrate the fibers. Use a pressing cloth to protect the knitting. While the fabric is still damp from the steam, reshape it as desired and let it dry completely.
Once your seersucker stitch knitting is properly bound off and blocked, you’ll have a beautifully finished project ready to be worn or displayed. Enjoy the unique texture and visual interest of this stitch pattern!