
Knitting swatch patterns are an essential tool for any knitter. Whether you’re a beginner or an experienced knitter, swatches are an important step in creating beautiful, well-fitting garments. Swatches are small sample pieces of knitting that allow you to test your tension and gauge before you start a larger project.
A swatch is typically knit using the same stitch pattern and yarn that you will be using for your project. By knitting a small section of fabric, you can determine if the number of stitches and rows per inch in your swatch matches the pattern’s gauge. This is especially important when knitting garments such as sweaters or cardigans, where an incorrect gauge can result in a significantly different size.
Not only do swatches help ensure that your finished project will match the pattern’s measurements, they also allow you to practice your knitting techniques and make adjustments if needed. For example, if your swatch is too tight, you may need to switch to a larger needle size to achieve the correct gauge. Conversely, if your swatch is too loose, you may need to use a smaller needle size.
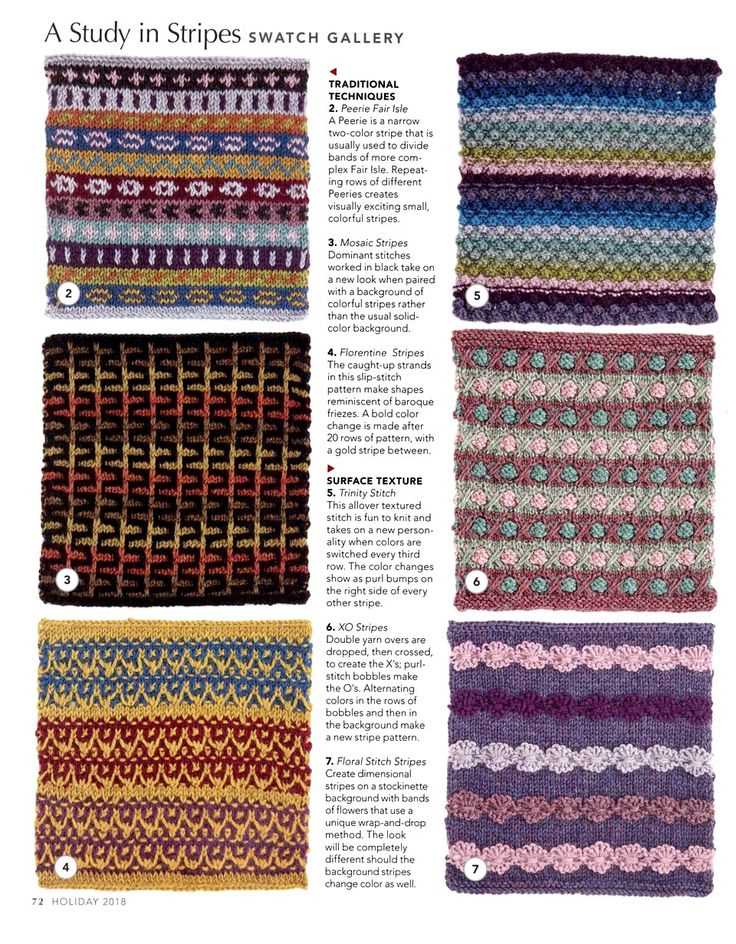
In addition to checking gauge, swatches also give you the opportunity to test different stitch patterns and color combinations. You can experiment with different stitch textures, lace patterns, or colorwork techniques to see how they will look in your final project. Swatches are a great way to unleash your creativity and make sure you’re happy with the design before committing to a larger project.
What Are Knitting Swatch Patterns and Why Are They Important?
Knitting swatch patterns are small samples of knitting that are created before beginning a larger project. They are essentially mini versions of the final project, typically measuring around 4 inches by 4 inches. These swatches are knitted using the same stitch pattern, yarn, and needle size that will be used for the main project.
Swatch patterns are important in knitting because they serve several purposes. First and foremost, they allow knitters to gauge their tension or gauge, which refers to the number of stitches and rows per inch. Since each knitter’s tension is slightly different, creating a swatch helps ensure that the final project will have the desired measurements and fit.
Additionally, swatch patterns allow knitters to practice and familiarize themselves with the stitch pattern before committing to a larger project. This can be especially helpful for more complex stitch patterns or techniques that require concentration and precision. By knitting a swatch, knitters can identify any potential difficulties or areas where they may need to make adjustments.
The information gathered from a swatch pattern can also be used to calculate how much yarn will be needed for the entire project. By measuring the amount of yarn used in the swatch and extrapolating it to the full size of the project, knitters can ensure they have enough yarn to complete their project without running out.
In summary, knitting swatch patterns are a valuable tool in the knitting process. They help knitters achieve the desired tension, practice stitch patterns, identify potential issues, and calculate yarn requirements. By taking the time to create and measure swatches, knitters can set themselves up for success in their larger knitting projects.
The Different Types of Knitting Swatch Patterns
Knitting swatch patterns are an essential tool for knitters to test their gauge and ensure their finished projects turn out the way they want them to. There are several types of swatch patterns that knitters can choose from, depending on their preferences and the project they are working on.
Stockinette Swatch: One of the most common swatch patterns, the stockinette swatch is worked in stockinette stitch, which consists of alternating knit and purl rows. This swatch is perfect for testing gauge and getting a sense of the drape of the finished fabric.
Garter Swatch:
Another popular swatch pattern is the garter swatch, which is worked entirely in garter stitch. Garter stitch is created by knitting every row. This swatch is great for testing gauge and also for practicing different knitting techniques, as garter stitch is versatile and easy to work with.
Ribbing Swatch:
A ribbing swatch is worked in a rib stitch pattern, which is a combination of knit and purl stitches. Ribbing is often used for cuffs, collars, and hems, as it has great stretch and elasticity. Knitting a ribbing swatch helps knitters determine if they are using the right needle size and yarn combination for their project.
Lace Swatch:
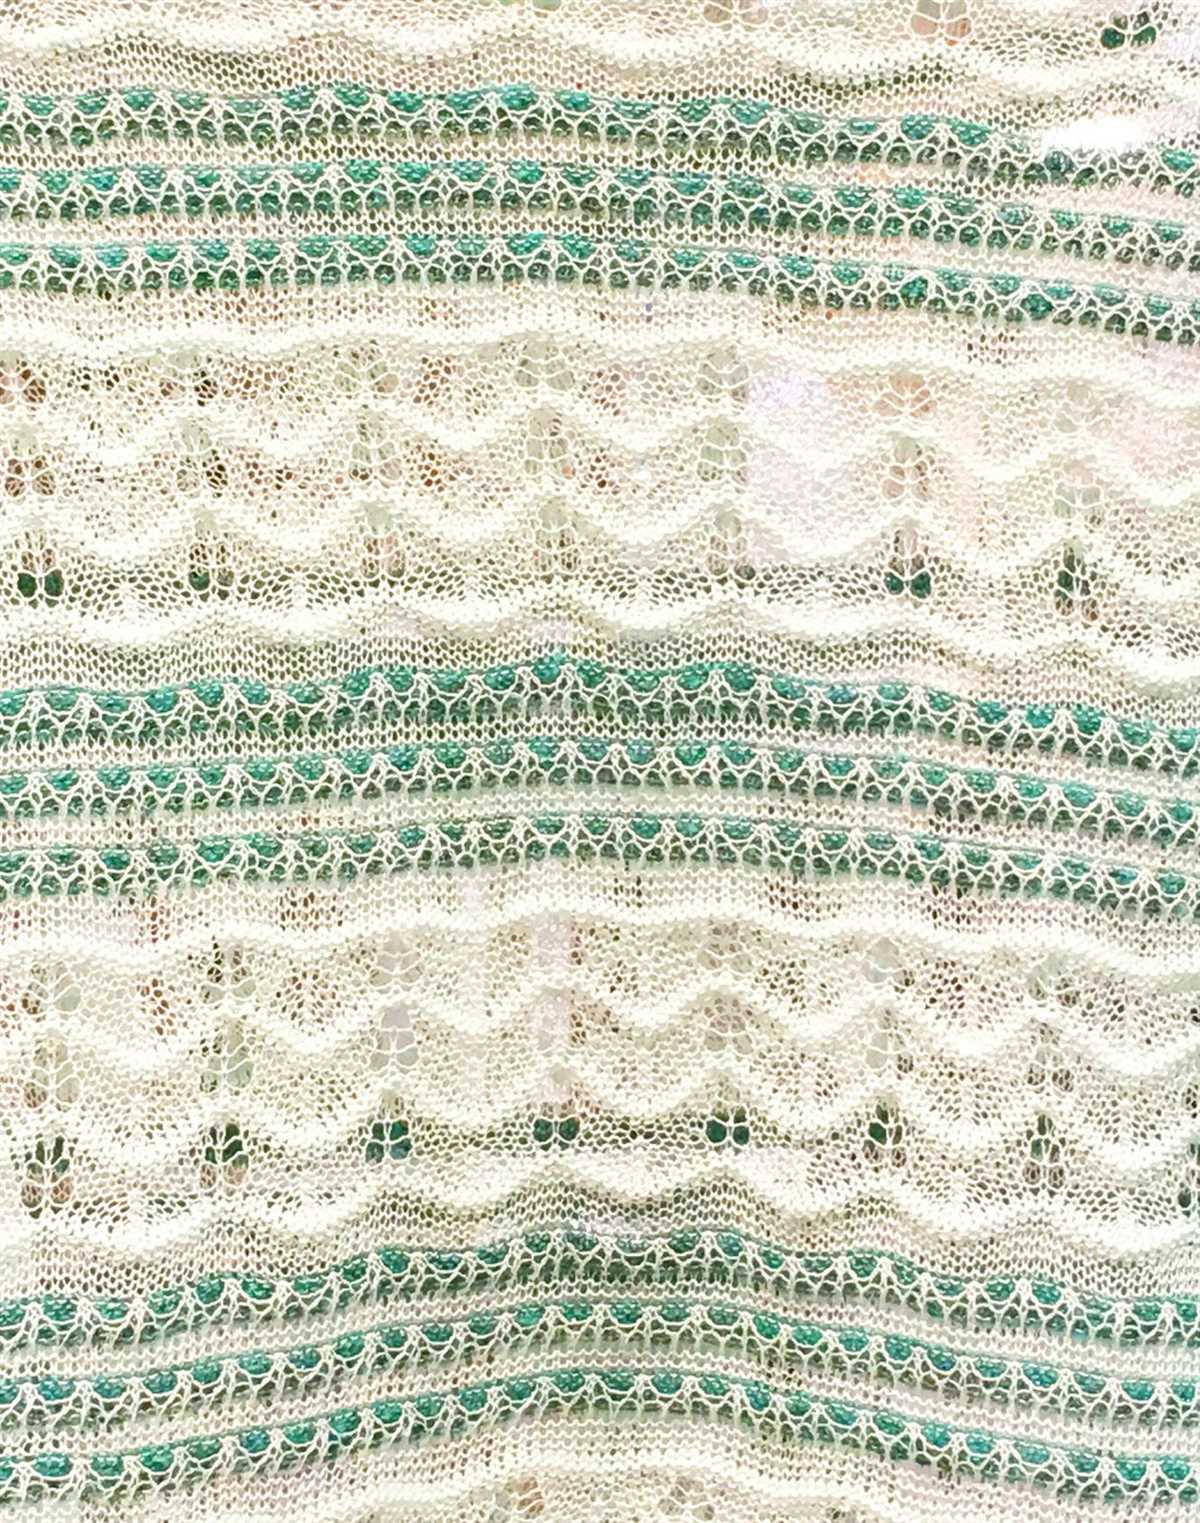
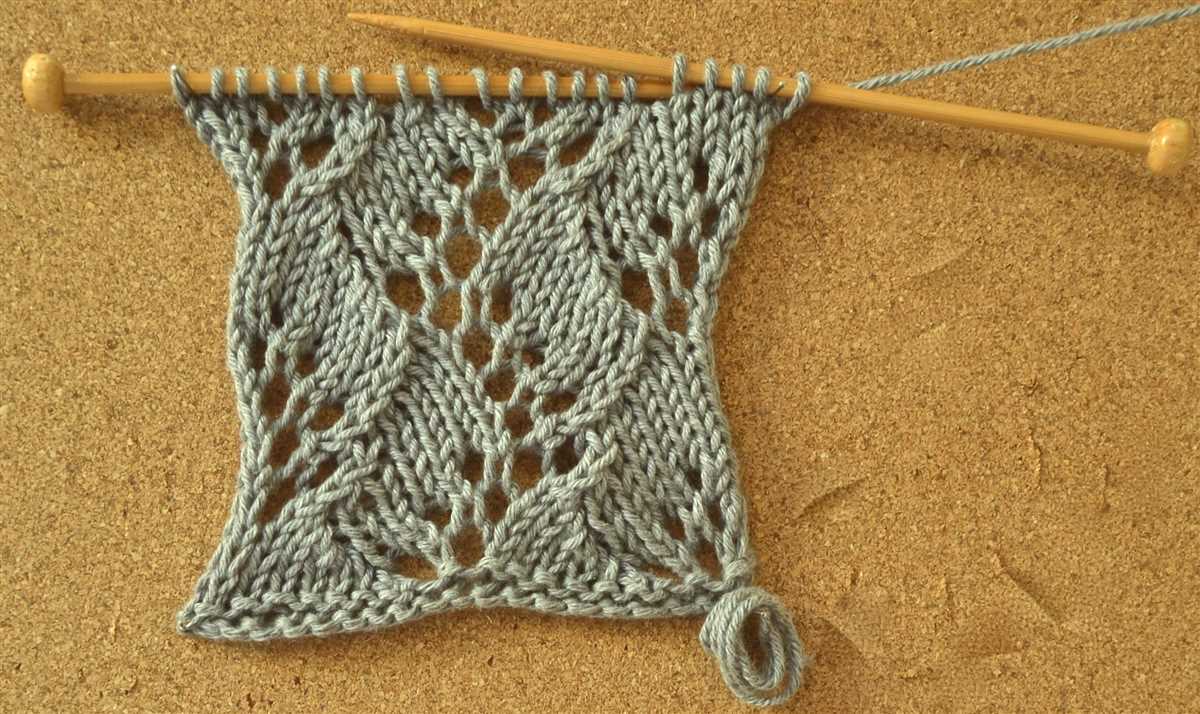
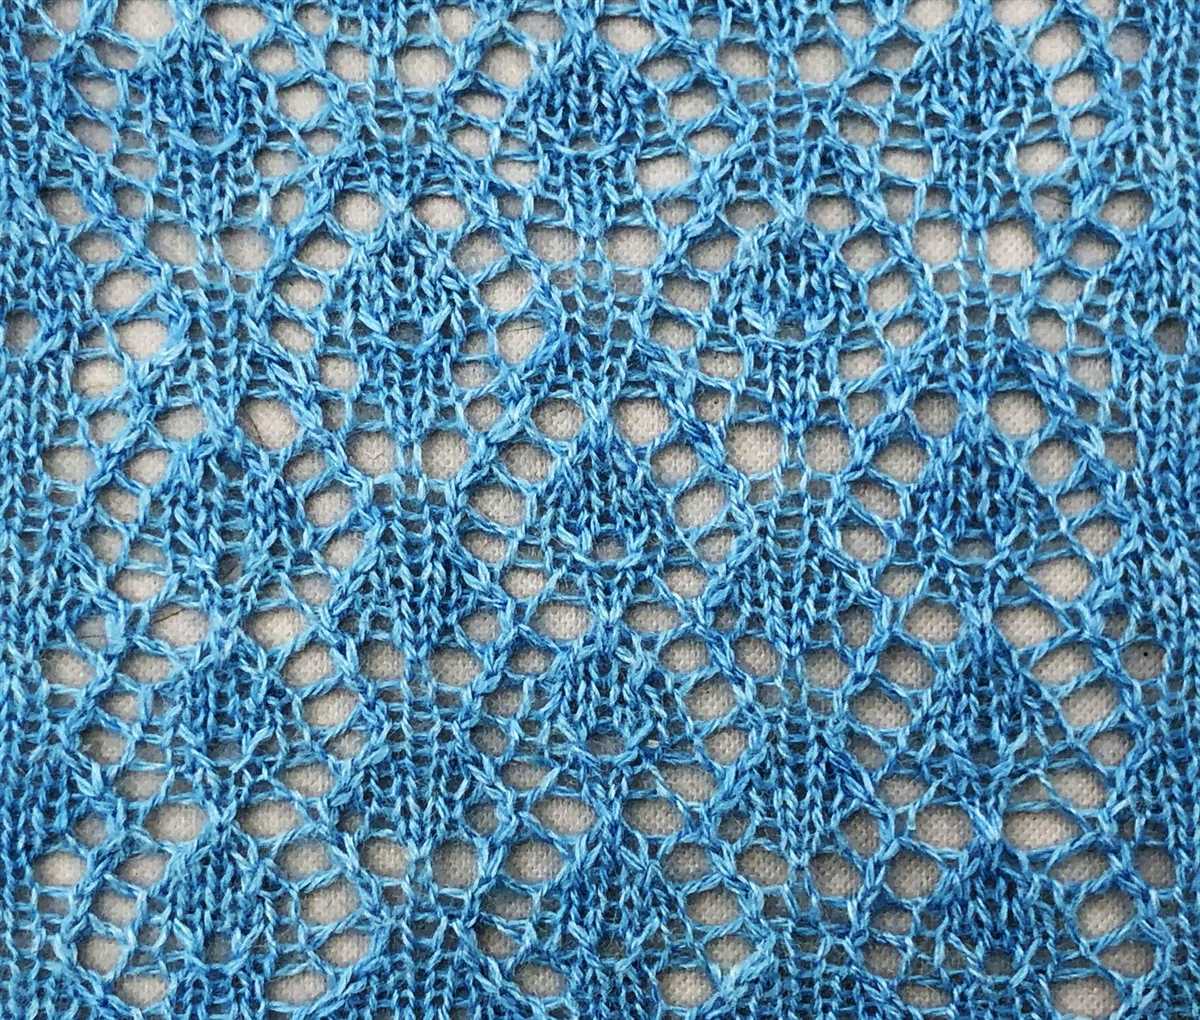
Lace swatches are worked in intricate lace stitch patterns, which often involve yarnovers and decreases to create openwork designs. Lace swatches are perfect for testing gauge and getting a sense of how the lace pattern will look in the finished project. They require attention to detail and are a great way to practice lace knitting techniques.
In addition to these basic swatch patterns, there are also specialty swatches that mimic specific stitch patterns or motifs. These specialty swatches allow knitters to test their skills and experiment with different techniques before committing to a larger project.
Overall, knitting swatch patterns are an important part of the knitting process. They help knitters achieve the desired gauge and ensure the finished project turns out the way they envision. By choosing the right swatch pattern and taking the time to knit a swatch, knitters can set themselves up for success in their knitting projects.
Stockinette Stitch Swatch Pattern
The stockinette stitch is one of the most common and versatile stitch patterns in knitting. It is characterized by alternating rows of knit stitches and purl stitches, creating a smooth, flat fabric with a prominent “V” pattern on one side and a bumpy texture on the other side. This swatch pattern can be used for a variety of projects, from scarves and sweaters to blankets and accessories.
To create a stockinette stitch swatch, you will need a pair of knitting needles and your choice of yarn. Start by casting on an odd number of stitches, such as 21 or 31, to ensure symmetry in the pattern. Begin the first row by knitting all of the stitches. On the next row, purl all of the stitches. Repeat these two rows until your swatch reaches the desired length.
Tips for knitting a stockinette stitch swatch:
- Use a smooth yarn for best results, as textured or fluffy yarns can distort the stitch pattern.
- Make sure to keep your tension even throughout the swatch to maintain consistency in the stitch size.
- Consider blocking your swatch once it is finished to help it lay flat and give you a better representation of the final fabric.
Once your stockinette stitch swatch is complete, you can use it to gauge your stitch and row counts for future projects. This will help ensure that your finished item matches the pattern’s specifications and provides a useful reference for any necessary adjustments. Whether you’re a beginner or an experienced knitter, the stockinette stitch swatch pattern is a classic and essential technique to master.
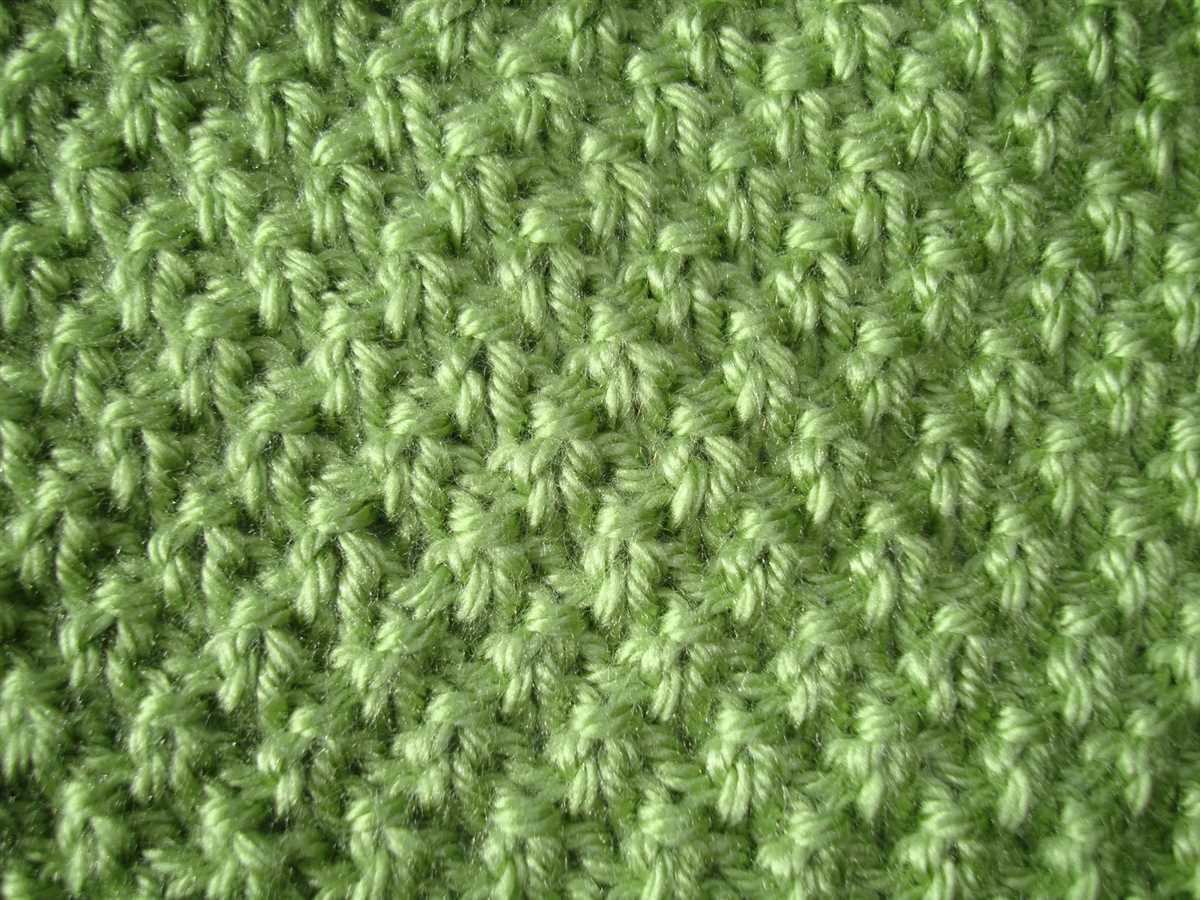
Garter Stitch Swatch Pattern
A garter stitch is one of the simplest and most common stitch patterns in knitting. It creates a fabric with ridges and is achieved by knitting every stitch in every row. The result is a reversible fabric with a lot of stretch and texture. Garter stitch swatches are often used to test gauge or tension and to practice new techniques.
To create a garter stitch swatch, you will need a pair of knitting needles and some yarn. Start by casting on an even number of stitches. For example, you can cast on 20 stitches. Then, knit every stitch in every row until your swatch is the desired size.
Sample Garter Stitch Swatch Pattern:
- Cast on 20 stitches
- Row 1: Knit all stitches
- Row 2: Knit all stitches
- Repeat Rows 1 and 2 until your swatch is the desired size
- Bind off all stitches
After you finish knitting your garter stitch swatch, you can measure its gauge using a ruler or a gauge measuring tool. Gauge refers to the number of stitches and rows per inch in the pattern. By comparing your gauge to the recommended gauge for your project, you can ensure that your finished item will be the correct size.
Additionally, garter stitch swatches can be used to practice different knitting techniques, such as increasing, decreasing, or colorwork. By working on a small swatch before starting your project, you can familiarize yourself with the techniques and make any necessary adjustments before tackling the full project.
Ribbing Swatch Pattern

In knitting, ribbing is a commonly used stitch pattern that creates a stretchy and flexible fabric. It is often used for cuffs, collars, and hems of garments. Ribbing is created by alternating knit and purl stitches in a specific pattern. It can be worked in various combinations, such as 1×1 (alternating one knit stitch and one purl stitch) or 2×2 (alternating two knit stitches and two purl stitches).
To create a ribbing swatch, you will need a pair of knitting needles and a yarn of your choice. Start by casting on the desired number of stitches, depending on the size of your swatch. For a 1×1 rib, cast on an even number of stitches, and for a 2×2 rib, cast on a multiple of 4 stitches.
1×1 Ribbing Swatch Pattern:
- Row 1: *Knit 1, purl 1* repeat to the end of the row.
- Row 2: Repeat Row 1.
- Repeat Rows 1 and 2 until your swatch reaches the desired length.
This simple pattern creates a ribbed fabric with equal columns of knit and purl stitches, giving a textured look. It is a great choice for projects where elasticity is required, such as hats or cuffs.
2×2 Ribbing Swatch Pattern:
- Row 1: *Knit 2, purl 2* repeat to the end of the row.
- Row 2: Repeat Row 1.
- Repeat Rows 1 and 2 until your swatch reaches the desired length.
The 2×2 ribbing pattern creates a more pronounced ribbing effect with larger columns of knit and purl stitches. This pattern is often used for sweaters, scarves, and blankets.
Experiment with different ribbing patterns to add texture and visual interest to your knitting projects. By using different combinations of knit and purl stitches, you can create unique and customized ribbing designs.
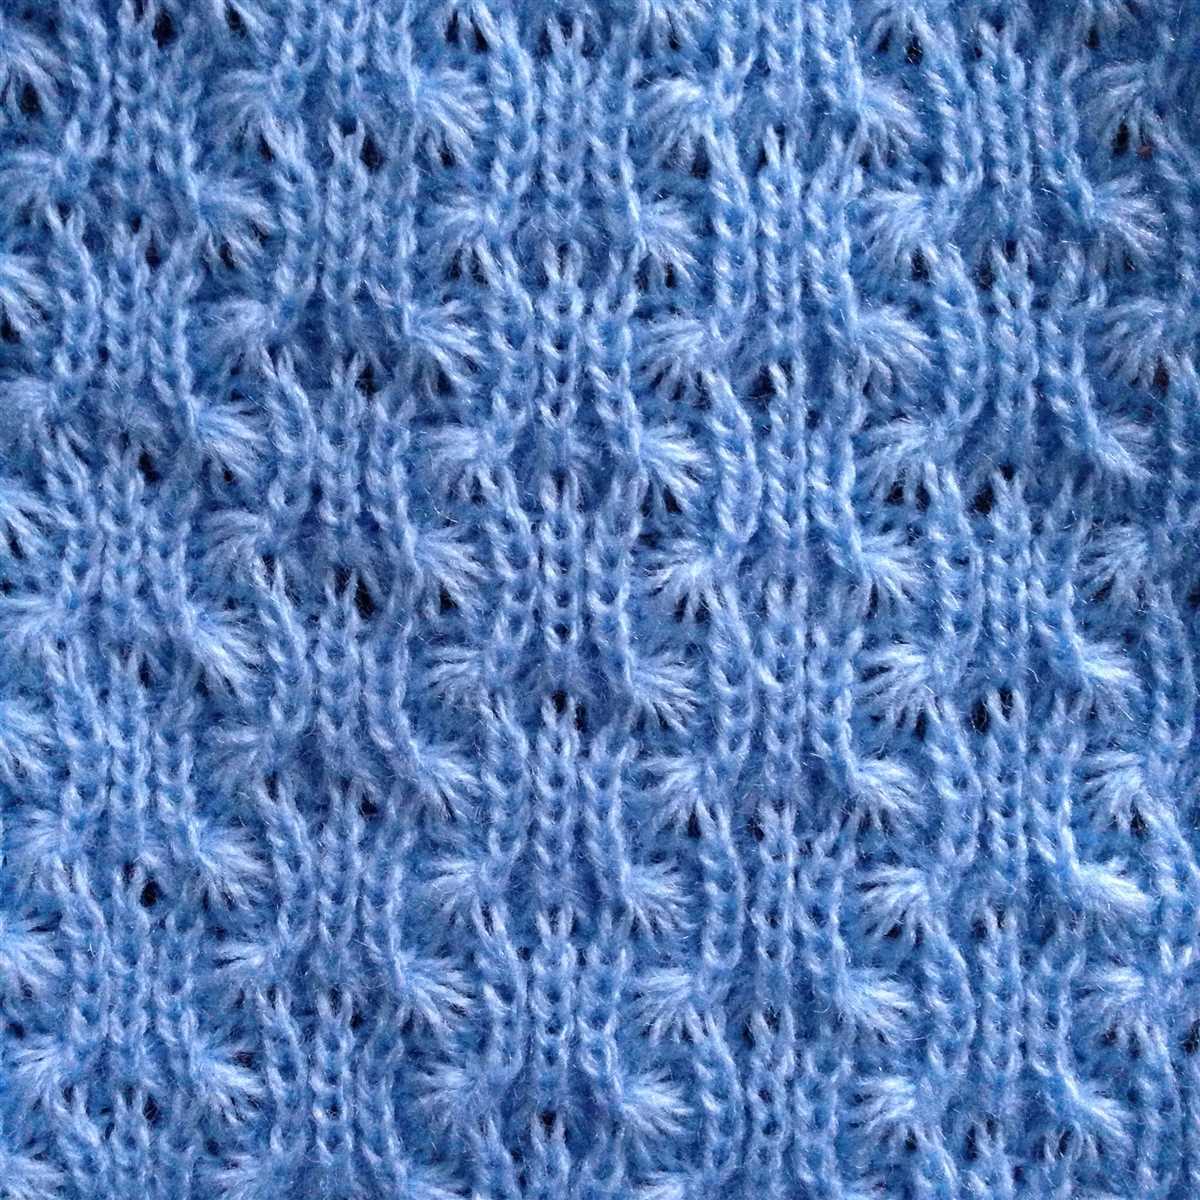
Lace Swatch Pattern
A lace swatch pattern is a beautiful and intricate design that can be knitted to create stunning lace fabric. It is a popular choice for knitters who want to add a touch of elegance to their projects.
When knitting a lace swatch pattern, it is important to choose the right type of yarn and needles. Lace weight yarn is recommended for achieving the delicate and lightweight look of lace. A smaller size needle, such as a US size 3 or 4 (3.25mm or 3.5mm), is typically used to create the intricate lace stitches.
To create a lace swatch pattern, follow these steps:
- Cast on the desired number of stitches for your swatch. It is recommended to cast on a multiple of the lace stitch pattern repeat, plus a few extra stitches for a border.
- Begin knitting the lace pattern according to the instructions. Lace patterns often involve a combination of yarn overs, decreases, and other stitches to create the lace effect.
- Continue knitting the lace pattern for the desired number of rows, following the stitch instructions. Pay close attention to any pattern repeats and make sure to maintain the correct stitch count.
- Once the desired number of rows is reached, bind off the stitches to finish the lace swatch.
After completing the lace swatch pattern, it can be used to create a variety of beautiful projects. Lace swatches are commonly used for shawls, scarves, and lightweight garments. They can also be used to add a lace border to other knitting projects, such as blankets or sweaters.
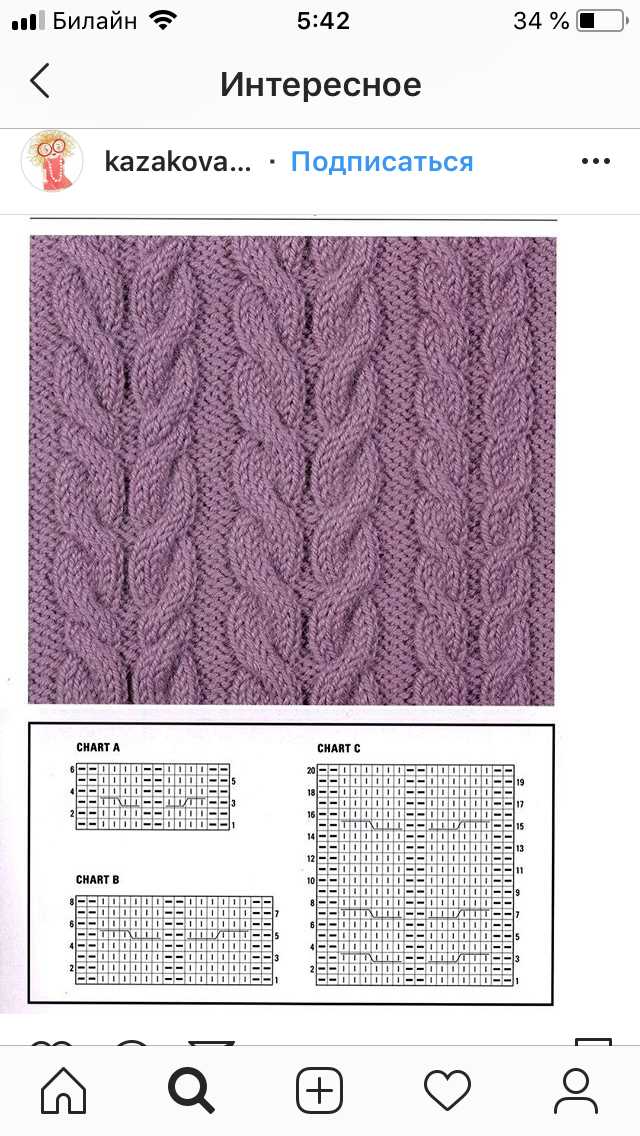
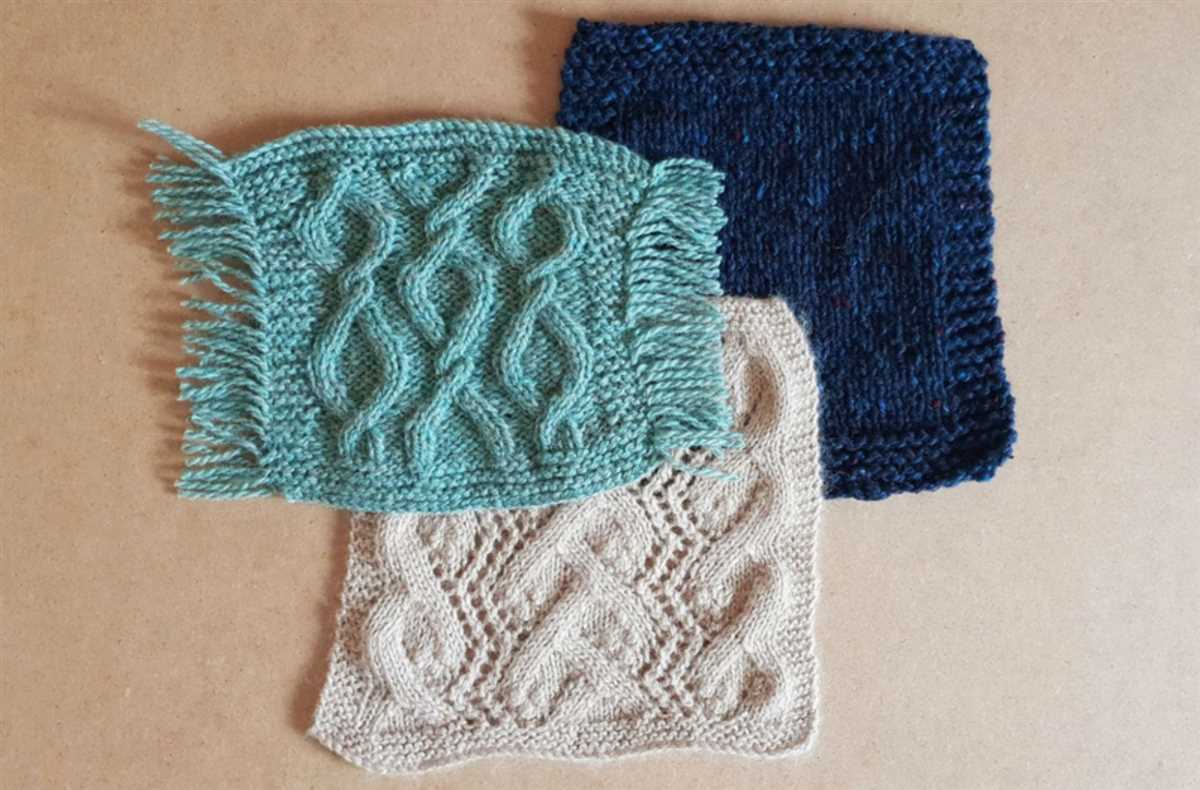
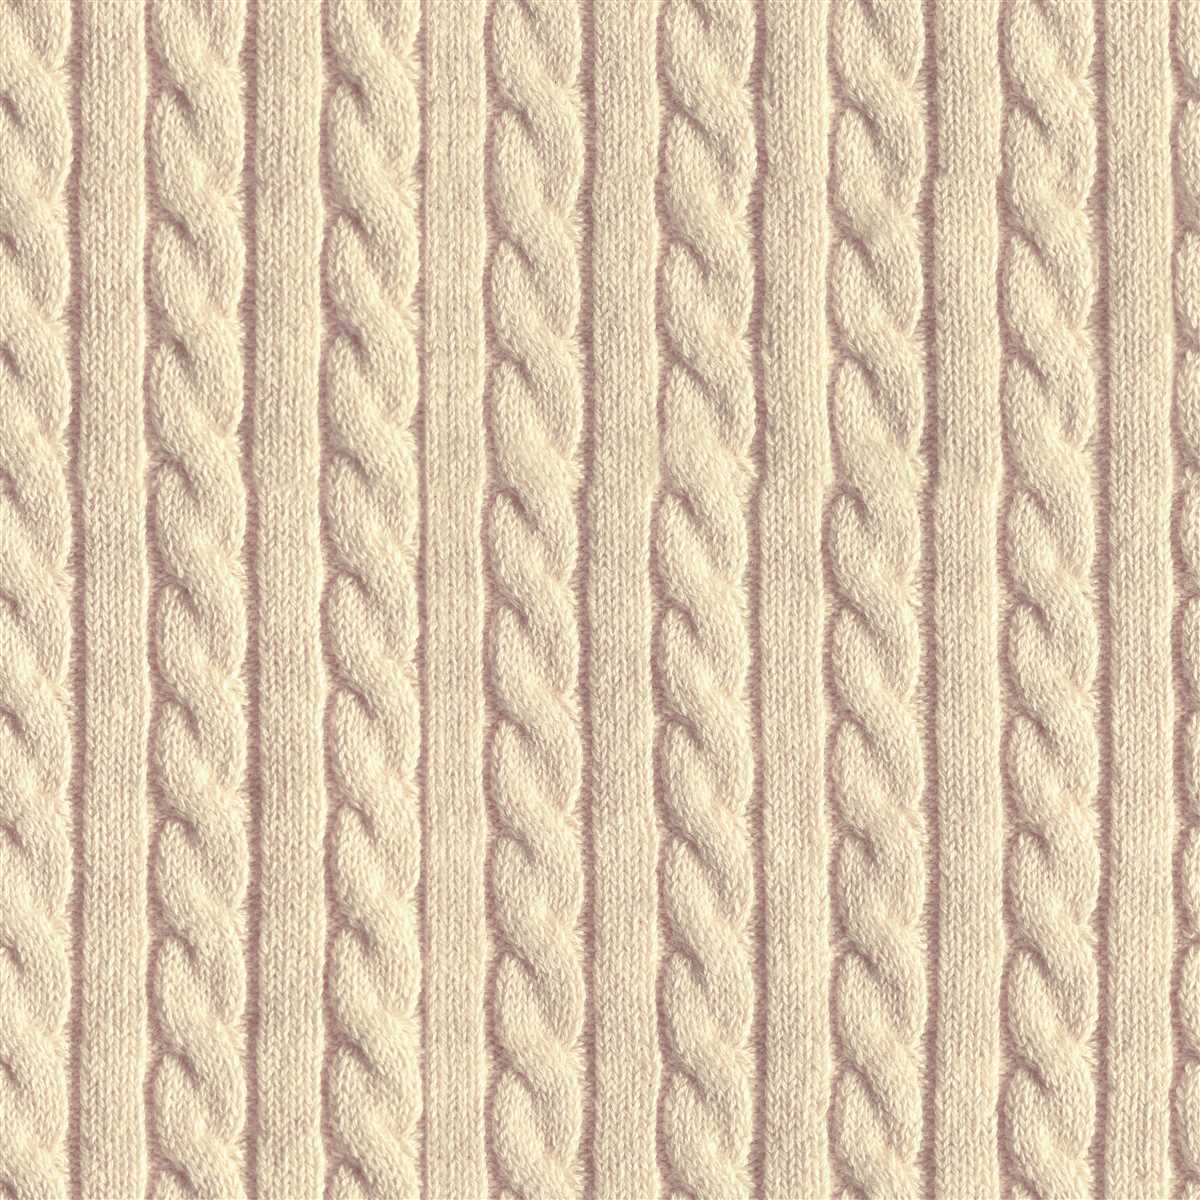
Cable Swatch Pattern
A cable swatch pattern is a popular design element in knitting that creates a textured and visually interesting fabric. It involves crossing stitches over each other to form a cable-like pattern. Cable swatches can be used to create beautiful garments, accessories, and home decor items.
To create a cable swatch pattern, you will need a cable needle and a basic understanding of knitting techniques. Start by casting on an even number of stitches on your knitting needle. The number of stitches will depend on the desired width of your swatch.
Creating the Cable:
1. Knit the first few rows in stockinette stitch to establish a base for your cable swatch.
2. To create a basic cable, choose a set of stitches that you want to cross over each other. Usually, this is done with a panel of stitches in the center of the swatch.
3. Slip the first few stitches onto a cable needle and hold it in front or in back of your work, depending on the direction of the cable you want to create.
4. Knit the next few stitches on your main needle.
5. Then, knit the stitches from the cable needle, crossing them over the stitches on the main needle.
6. Continue knitting the remaining stitches in the row.
7. Repeat the cable pattern every few rows to create a consistent cable motif throughout your swatch.
By experimenting with different cable stitch patterns and variations, you can create unique and intricate designs. Cable swatch patterns can be used to add interest to sweaters, scarves, hats, and other knitting projects. They can also be combined with other stitch patterns, such as ribbing or lace, to create more complex and visually dynamic pieces.
To make the most of your cable swatch pattern, it is important to use the right type of yarn and needles. A yarn with good stitch definition, such as a smooth and plied wool, is recommended to showcase the cable pattern. Additionally, using cable needles with a similar size to your main knitting needles will help create a consistent tension and appearance in your swatch.
How to Choose the Right Yarn and Needle Size for Your Knitting Swatch Pattern
When it comes to knitting swatch patterns, choosing the right yarn and needle size is crucial. The yarn and needle size you choose will determine the overall look and feel of your finished project, as well as the gauge or tension of your knitting.
1. Consider the project: Before you select your yarn and needle size, it’s important to consider the type of project you will be knitting. If you’re making a delicate lace shawl, you’ll want to choose a fine yarn and smaller needles to create intricate details. For a cozy blanket, you might opt for a bulkier yarn and larger needles for a quick and cozy knit.
2. Check the pattern: If you’re following a knitting pattern, be sure to check the recommended yarn and needle size provided. The pattern designer will have chosen these based on the desired outcome of the project. Following the recommended yarn and needle size will help ensure that your swatch matches the gauge specified in the pattern.
3. Consider your tension: Everyone’s tension or knitting style is different, so it’s important to take this into account when choosing your yarn and needle size. If you tend to knit tightly, you may need to use larger needles or a yarn with more drape to achieve the desired gauge. On the other hand, if you tend to knit loosely, using smaller needles or a yarn with more structure may be necessary.
4. Experiment with swatches: Swatching is an essential step in any knitting project. It allows you to test different yarns and needle sizes to see how they affect your fabric. By knitting small swatches using different combinations, you can compare the stitch definition, drape, and overall feel of the fabric to determine which yarn and needle size best suits your project.
5. Seek advice: If you’re unsure about which yarn and needle size to choose, don’t be afraid to seek advice from experienced knitters or your local yarn store. They can offer guidance based on their own experiences and help you make an informed decision.
Choosing the right yarn and needle size for your knitting swatch pattern is an important step in ensuring the success of your project. By considering the type of project, checking the pattern, evaluating your tension, experimenting with swatches, and seeking advice when needed, you’ll be on your way to creating a beautiful knit piece that matches your vision.
How to Knit a Swatch and Measure Gauge
Knitting a swatch and measuring gauge is an essential step in any knitting project. It helps ensure that the finished piece will turn out the correct size and fit. Here’s a step-by-step guide on how to knit a swatch and measure gauge.
Step 1: Choose your yarn and needles
Start by selecting the yarn and needles that you plan to use for your project. Make sure to choose a yarn that matches the recommended weight and fiber content specified in your pattern. Similarly, select the appropriate needle size based on the pattern’s gauge recommendations.
Step 2: Cast on and knit
Using the chosen yarn and needles, cast on a few more stitches than the recommended gauge calls for. For example, if the pattern states that the gauge is 20 stitches per 4 inches, you might want to cast on 30 stitches. Knit a few rows in your desired stitch pattern, making sure to keep the tension consistent throughout.
Step 3: Block the swatch
Block the swatch by wetting it and laying it flat to dry. This step helps relax the stitches and gives a more accurate measurement. Ensure that the swatch is completely dry before proceeding to the next step.
Step 4: Measure the gauge
Using a ruler or gauge tool, measure the number of stitches and rows within a 4-inch square in the center of the swatch. Count the number of stitches horizontally and vertically. Compare these measurements to the recommended gauge in your pattern. If your stitch count is too small, try using larger needles, and if it’s too large, try using smaller needles. Repeat steps 2-4 until you achieve the correct gauge.
Remember, swatching and measuring gauge may seem like an extra step, but it can save you a lot of time and frustration in the long run. By taking the time to ensure that your stitches and measurements align with the pattern’s recommendations, you’ll be on your way to creating a perfectly fitting and well-proportioned knitted garment or accessory.
Troubleshooting Common Issues When Knitting Swatch Patterns
When working on knitting swatch patterns, it’s not uncommon to encounter certain issues that may affect the final outcome of your project. Understanding how to troubleshoot these common problems can help you achieve the desired results. Here are some tips to address common issues:
1. Uneven tension:
One common issue when knitting swatch patterns is uneven tension, resulting in stitches that are tighter or looser than desired. To fix this, pay attention to the tension in your yarn while knitting. You may need to adjust the way you hold the yarn or the needles to achieve consistent tension throughout your work. Experiment with different techniques and find what works best for you.
2. Gauge variations:
Gauge refers to the number of stitches and rows per inch in your knitting. If your swatch pattern does not match the specified gauge, it can affect the fit and size of your final project. To troubleshoot this issue, try using different needle sizes until you achieve the correct gauge. Additionally, make sure you are using the same yarn weight and following the pattern instructions accurately.
3. Dropped stitches:
Dropped stitches can be frustrating, especially when working on intricate swatch patterns. To fix this issue, carefully examine your work to identify any dropped stitches. Use a crochet hook or a knitting needle to pick up the dropped stitch and place it back on the needle in the correct order. Alternatively, you can undo a few rows to fix the dropped stitch and then continue knitting.
4. Twisted stitches:
Twisted stitches can occur when knitting swatch patterns with cables or other textured stitches. This happens when a stitch is twisted incorrectly, resulting in an uneven appearance. To fix this issue, identify the twisted stitch and carefully unravel it back to the mistake. Then, re-knit it correctly by inserting the needle into the stitch from the front or back, as directed by the pattern.
5. Yarn overs and accidental increases:

Yarn overs are intentional increases in knitting to create decorative holes or lacework. However, accidental increases can happen when you unintentionally create extra stitches. To troubleshoot this issue, count your stitches regularly while knitting. If you notice an increase in the stitch count, review your pattern and check for any missed yarn overs. If necessary, you can carefully decrease by knitting two stitches together to correct the stitch count.
Remember, practice makes perfect when it comes to knitting swatch patterns. Don’t be discouraged by common issues – embrace them as learning opportunities and use the troubleshooting tips above to improve your knitting skills.
Creative Ways to Use Knitting Swatch Patterns

Knitting swatch patterns are not just meant to be used as test pieces or samples to check gauge and tension. They can be fun and versatile tools that can be used in a variety of creative ways.
1. Decorative Accessories: Swatch patterns can be transformed into decorative accessories such as coasters, placemats, or even wall hangings. By stitching multiple swatches together, you can create unique and colorful designs that can add a touch of handmade charm to your home.
2. Patchwork Projects: If you have a collection of swatch patterns in different colors and textures, you can use them to create a patchwork blanket, scarf, or even a handbag. This allows you to showcase your knitting skills and create a one-of-a-kind piece that is not only practical but also visually stunning.
3. Gift Wrapping Embellishments: Instead of using traditional gift wrapping materials, consider using knitted swatch patterns to add a personal touch to your presents. You can wrap small gifts with knitted swatch patterns and tie them with colorful yarn or ribbon. This unique and handmade wrapping idea will make your gifts stand out and show your loved ones how much you care.
4. Clothing Accents: Swatch patterns can also be used as accents on clothing items such as hats, mittens, or sweaters. You can stitch small or large swatch patterns onto these items to add a pop of color or texture. This not only adds visual interest to your wardrobe but also gives you an opportunity to showcase your knitting skills.
5. Inspiration for Larger Projects: Swatch patterns can serve as inspiration for larger knitting projects. If you come across a swatch pattern that you particularly love, you can use it as a starting point for designing a larger garment or accessory. This allows you to experiment and create your own unique designs based on the swatch pattern’s color palette or stitch pattern.
6. Learning and Practicing New Techniques: Knitting swatch patterns can be used as a tool for learning and practicing new knitting techniques. Whether you want to try out a new stitch pattern or practice a specific knitting technique, swatch patterns provide a small and manageable canvas for experimentation. This helps you gain confidence and expand your knitting repertoire.
Overall, knitting swatch patterns offer more than just a way to test gauge and tension. They can be transformed into decorative accessories, used for patchwork projects, as embellishments for gift wrapping, accents on clothing, inspiration for larger projects, or as a tool for learning and practicing new techniques. Get creative and explore the endless possibilities with knitting swatch patterns!
Final Thoughts on Knitting Swatch Patterns
Knitting swatch patterns are an essential tool for any knitter. Although they may seem like an extra step in the knitting process, they provide valuable information that can lead to more successful knitting projects. Taking the time to create a swatch can save you time and frustration in the long run by helping you determine the correct gauge and ensure that your finished project will fit as intended.
Not only do swatches help with determining gauge, but they also allow you to practice new stitches, patterns, and techniques before committing to a larger project. This allows you to gain confidence and perfect your knitting skills. Swatches can also be used as a reference for future projects, especially if you keep them labeled and organized.
When creating a knitting swatch, it is important to follow the pattern instructions closely and use the recommended yarn and needle size. Remember that the gauge stated in the pattern is just a starting point, and it may vary depending on your personal knitting tension. If your swatch does not match the gauge, you can adjust your needle size accordingly to achieve the desired result.
Overall, knitting swatch patterns are a valuable tool that should not be overlooked. They provide vital information and help ensure the success of your knitting projects. So, next time you start a new knitting project, take the time to create a swatch and enjoy the benefits it brings to your knitting journey.