
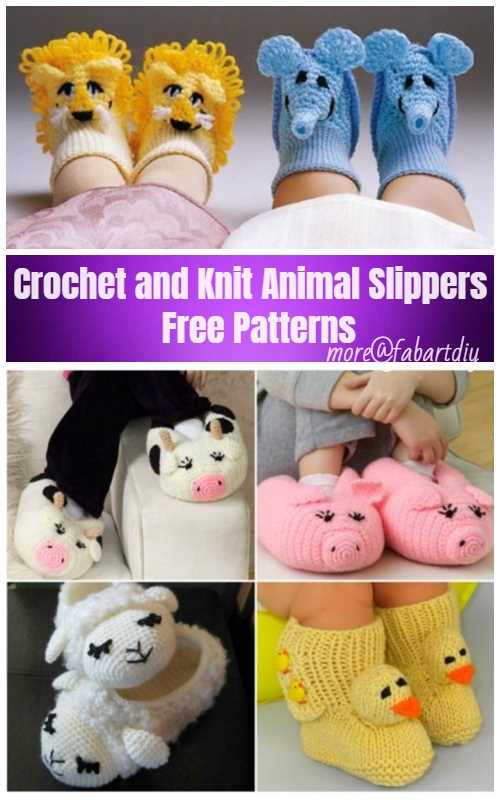
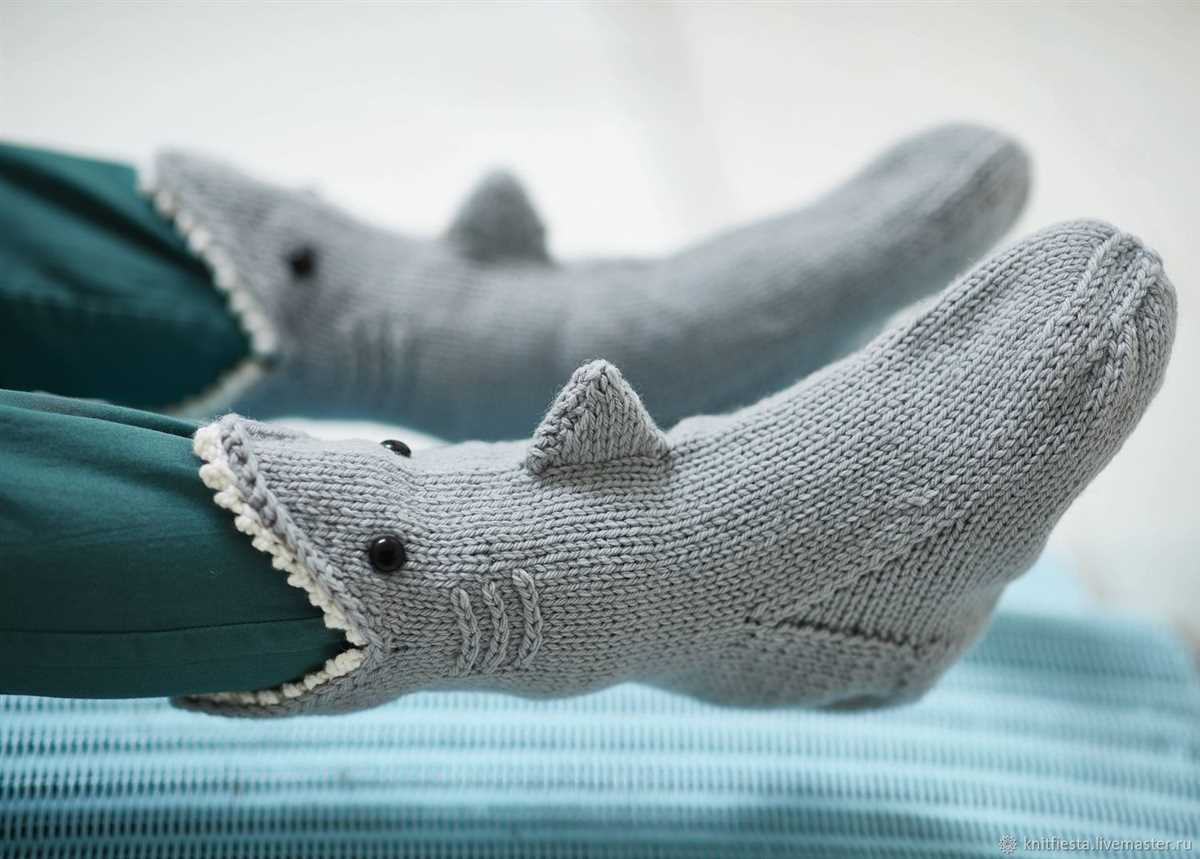
If you’re in search of a fun and cozy project, knitting animal slippers is a perfect choice. Whether you’re a beginner knitter or an experienced one, these adorable slippers will surely bring a smile to your face. With a wide range of animal patterns available, you can create a pair of slippers that resembles your favorite animal or pick a pattern that matches your child’s favorite creature.
Knitted animal slippers are not only cute but also practical. They provide warmth and comfort during the cold winter months, making them a great gift idea for family and friends. These slippers are versatile and can be made for both adults and children. The patterns often include various sizes, allowing you to customize the slippers to fit perfectly.
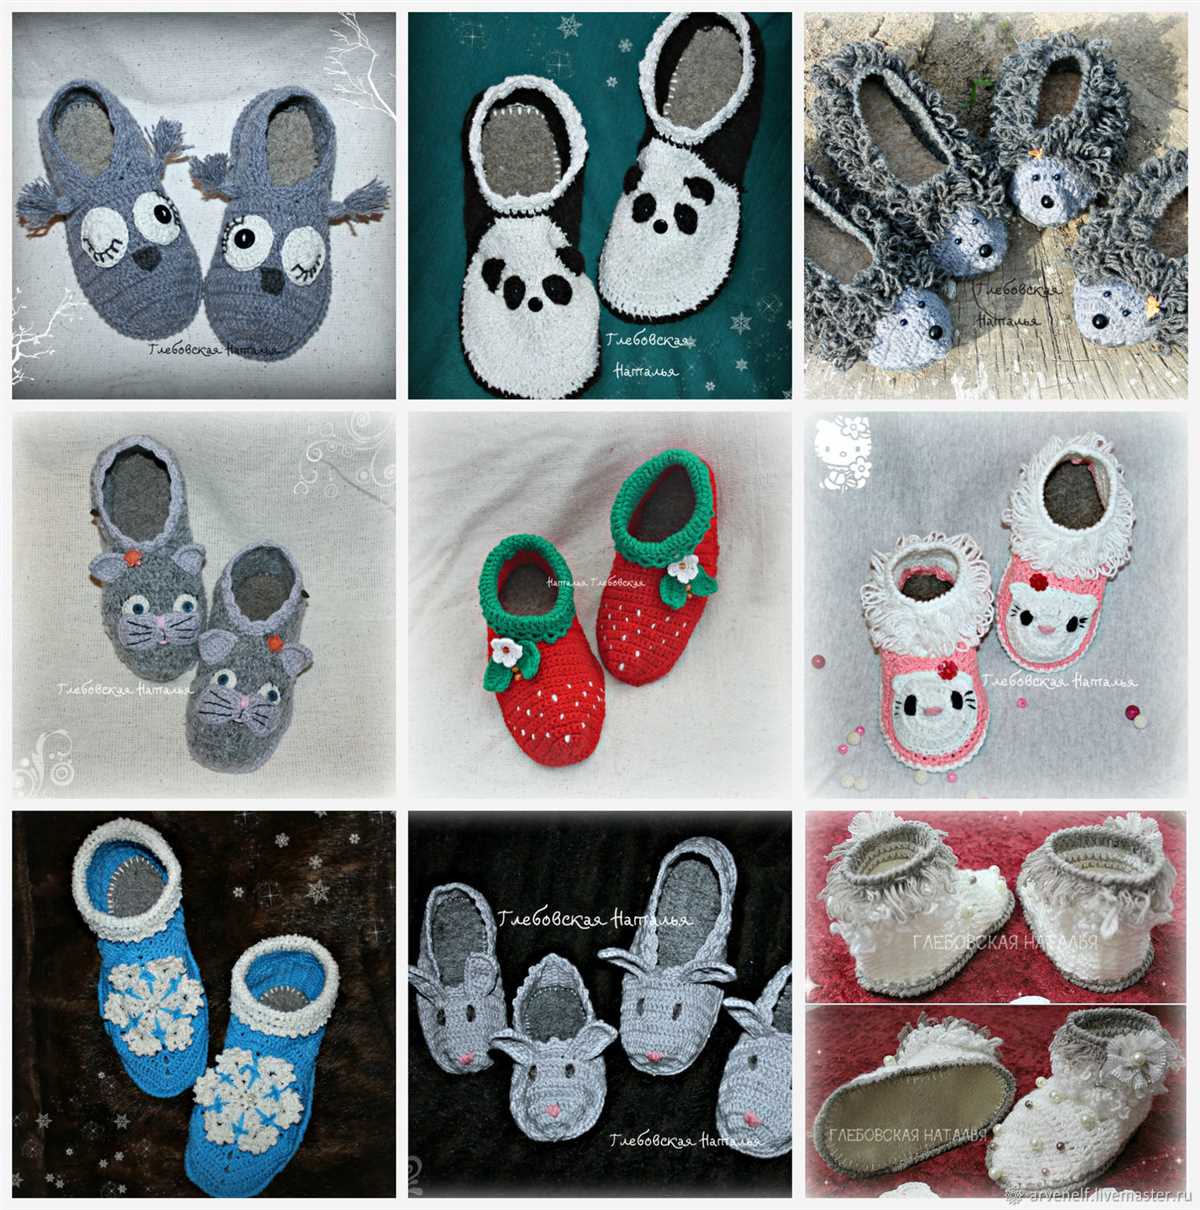
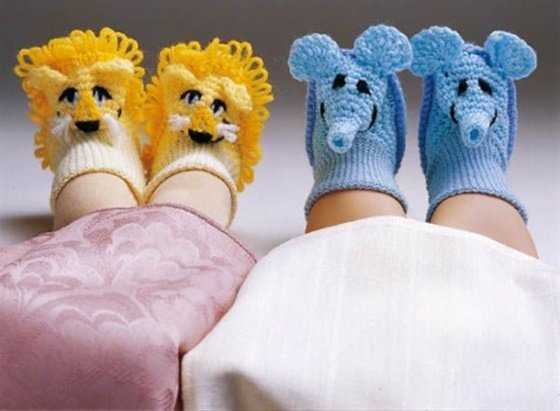
Whether you prefer a classic design or a more whimsical one, there are endless options when it comes to knitted animal slippers patterns. From adorable bunnies and cuddly bears to playful monkeys and fierce lions, you can find a pattern for any animal lover. Put your knitting skills to the test and embark on a project that will bring joy and warmth to your feet!
Knitted Animal Slippers Patterns: Step-by-Step Guide

Knitting your own animal slippers can be a fun and rewarding project for any knitting enthusiast. With a few basic knitting skills and the right patterns, you can create adorable and cozy slippers that resemble your favorite animals. In this step-by-step guide, we will walk you through the process of knitting animal slippers, from choosing the right pattern to finishing touches.
Choosing the Pattern
The first step in knitting animal slippers is to choose a pattern that matches the animal you want to create. There are countless patterns available online or in knitting books, ranging from simple to complex designs. Look for patterns that include detailed instructions, clear diagrams, and helpful tips. Consider your skill level and the time you are willing to invest in the project when selecting a pattern.
Gathering Materials
Once you have chosen a pattern, it’s time to gather all the necessary materials. Most animal slipper patterns will require you to have knitting needles in the appropriate size, as well as yarn in various colors. Depending on the pattern, you may also need additional supplies like stuffing for the animal’s features, buttons for eyes, or embroidery floss for detailing.
After gathering all the materials, take some time to familiarize yourself with the pattern and gather any additional tools you may need, such as stitch markers or a tapestry needle for finishing touches. Having all your materials ready before starting the project will make the knitting process smoother and more enjoyable.
Step-by-Step Knitting Process
Before starting the actual knitting, it’s essential to read through the pattern instructions and make sure you understand them. Pay attention to any specific techniques or stitches used and take the time to practice them if necessary. Once you are confident in your understanding of the pattern, you can begin knitting the slippers by following the step-by-step instructions.
Start by casting on the required number of stitches and work through the pattern row by row. Follow any shaping instructions and incorporate any color changes or stitch patterns as specified in the pattern. Don’t forget to mark any key points or instructions in the pattern to keep track of your progress.
As you progress through the pattern, make sure to check your gauge regularly to ensure that your slippers will fit correctly. Adjust your tension if necessary and take the time to try on the slippers periodically to ensure a proper fit. Once you have completed all the required rows and sections, follow the pattern’s instructions for finishing, which may include seaming, stuffing, or adding any embellishments.
Finishing Touches
After completing the knitting process, it’s time to add the finishing touches to your animal slippers. This may involve sewing on buttons for eyes, embroidering details like noses or mouths, or adding any other special features specified in the pattern. Take your time with these final steps to ensure that your slippers look just right.
Once all the finishing touches are complete, try on your new knitted animal slippers and enjoy the cozy comfort they provide. These unique and handmade slippers will not only keep your feet warm but also make a charming and personalized addition to your wardrobe. Get creative with different animal patterns and experiment with colors and embellishments to make each pair of slippers truly one-of-a-kind.
Choose the Perfect Animal Design for Your Slippers
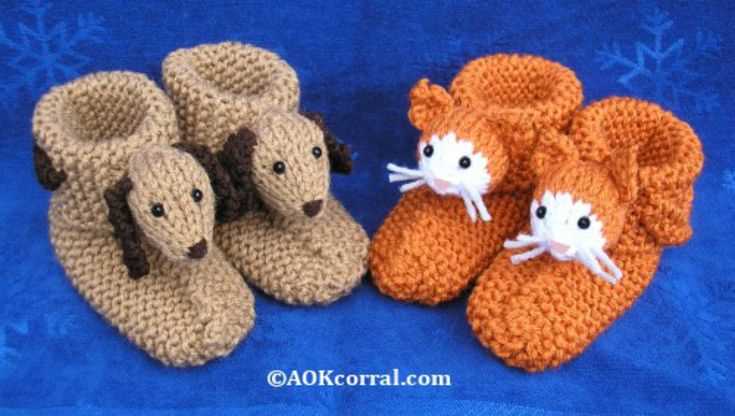
When it comes to knitting animal slippers, the options are endless. From cute and cuddly animals to fierce and wild creatures, there is a design out there for everyone. Whether you are knitting slippers for yourself or as a gift, choosing the perfect animal design can make them even more special.
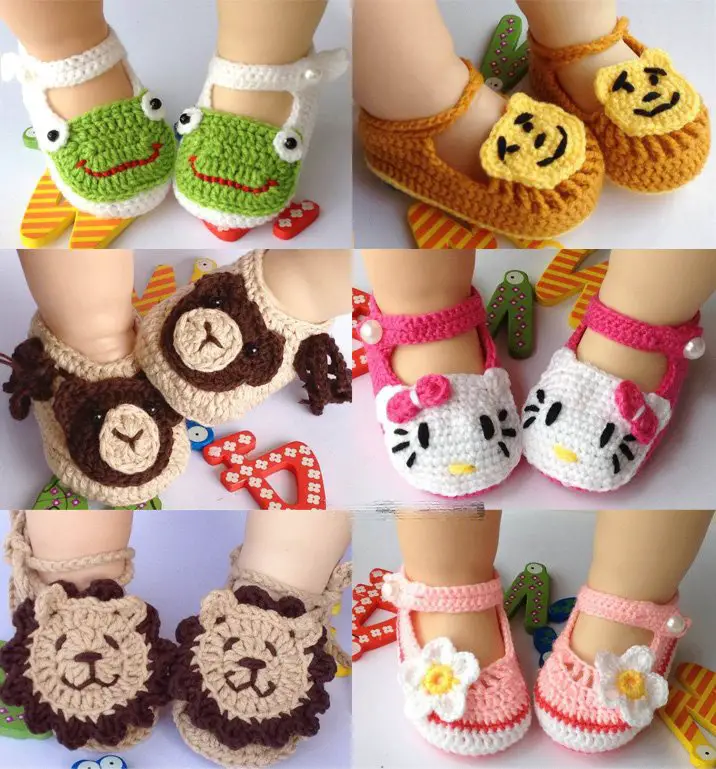
One popular animal design for slippers is the classic teddy bear. These adorable slippers are perfect for both kids and adults, and they can be easily customized with different colors and patterns. The teddy bear design is timeless and will never go out of style. It brings a sense of comfort and nostalgia, making it a perfect choice for cozy nights at home.
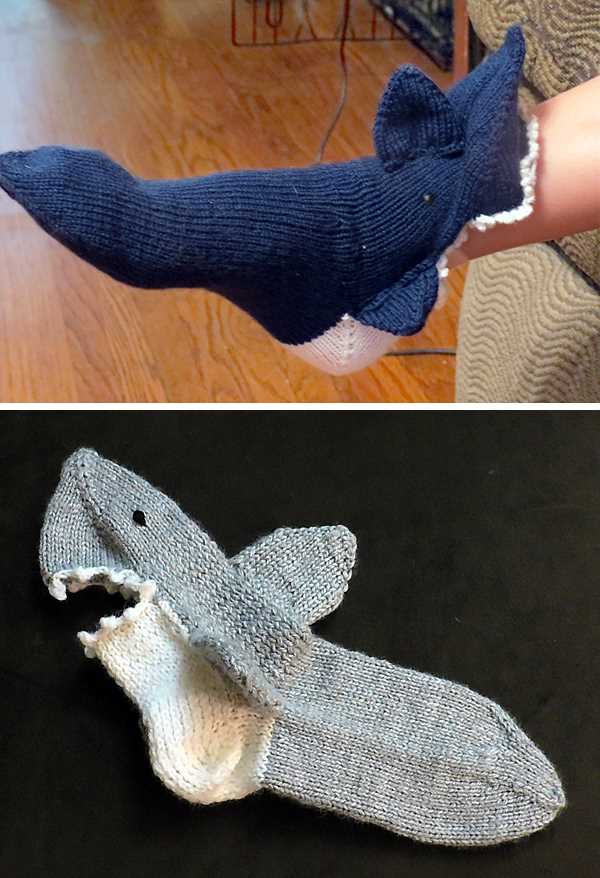
Wild animals
- If you prefer a more adventurous look, consider knitting slippers in the shape of a wild animal.
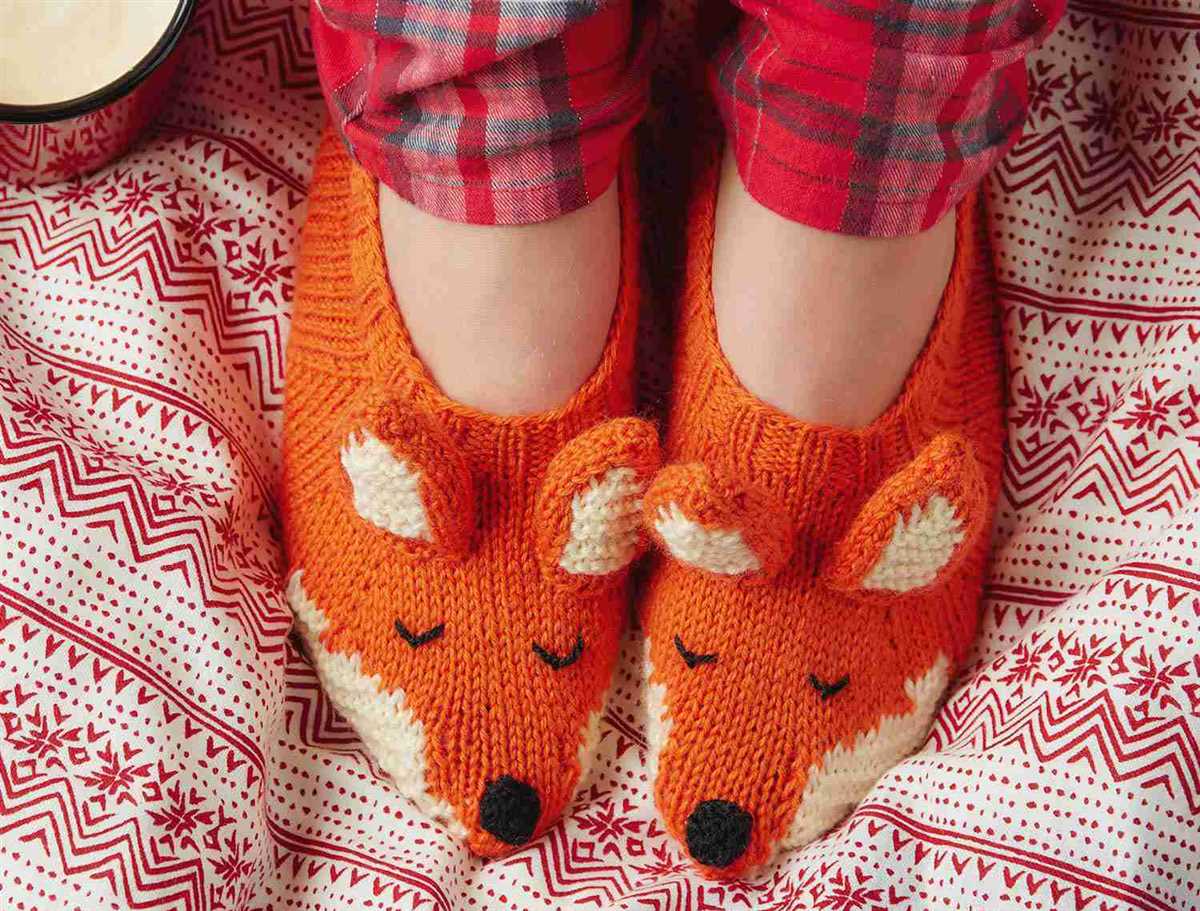
- For those who love the jungle, you can go for a leopard or tiger design. These slippers will add a touch of fierceness to your loungewear.
- If you are a fan of the wilderness, why not try knitting slippers that resemble a bear or wolf? These animals represent strength and resilience.
- For an exotic twist, consider knitting slippers in the shape of a giraffe or zebra. These unique designs will make a statement wherever you go.
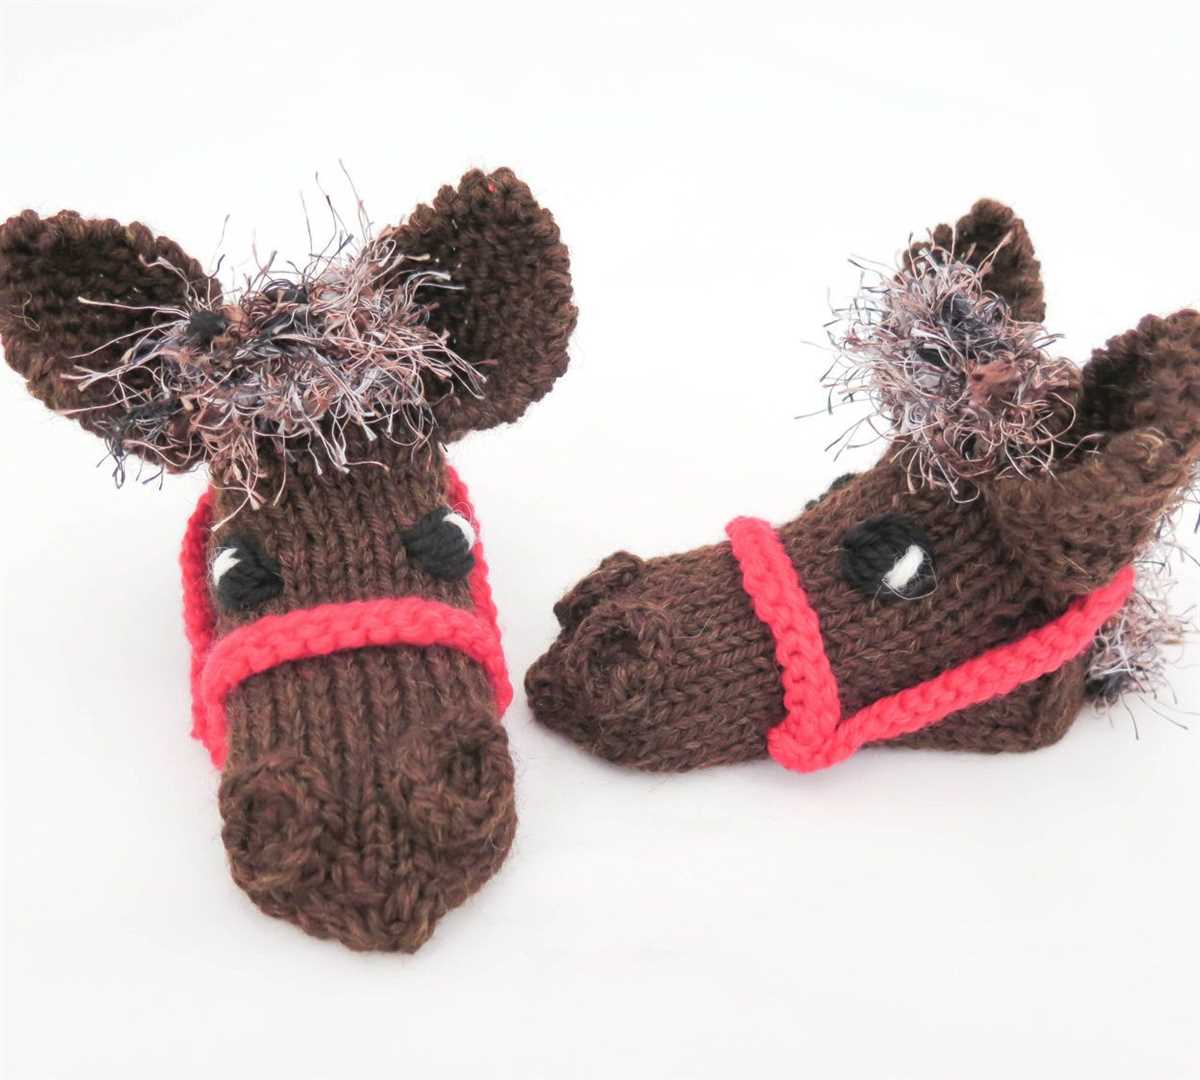
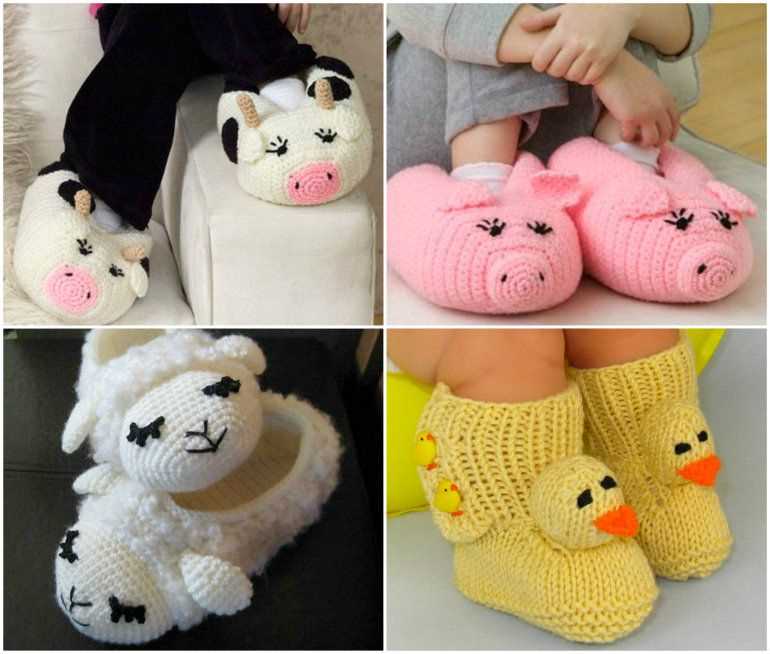
Farm animals
If you prefer a more down-to-earth and rustic look, you can choose a farm animal design for your slippers. These designs are perfect for those who love nature and appreciate the simple beauty of farm animals. You can choose from sheep, cows, pigs, and many other farm animals.
Whichever animal design you choose, these knitted slippers will not only keep your feet warm but also bring a smile to your face. They are a perfect way to show off your personality and love for animals. So grab your knitting needles and start creating the perfect animal design for your slippers today.
Gather the Necessary Knitting Materials
When embarking on a knitting project, it’s essential to gather all the necessary materials before starting. To create knitted animal slippers, you will need the following:
Yarn:
- Choose a yarn that is suitable for slipper projects. Look for yarns that are soft, durable, and warm to ensure comfort and longevity.
- Select yarn colors that match the animal you intend to create. If you’re making cat slippers, opt for yarn in shades of gray or black, whereas if you’re making bunny slippers, pastel colors might be a good choice.
Knitting Needles:
- Select knitting needles that are suitable for your chosen yarn. The recommended needle size is usually indicated on the yarn label.
- Consider using double-pointed needles or circular needles, depending on your preferred knitting technique and the pattern requirements.
Tapestry Needle:
- A tapestry needle with a large eye is essential for weaving in loose ends and sewing pieces of the slipper together.
- Ensure that the tapestry needle is suitable for the yarn weight you are using.
Stitch Markers:
- Stitch markers are useful for keeping track of specific sections or stitch counts in the pattern.
- Choose stitch markers that are easy to slip onto your knitting needles and won’t snag or damage your yarn.
By gathering these knitting materials in advance, you’ll have everything you need to begin working on your animal slippers. Having all the necessary items at hand will make the knitting process more enjoyable and efficient. Make sure to check the pattern you are following for any additional materials required, such as buttons or embroidery thread for embellishments.
Understanding Knitting Patterns and Charts
Knitting patterns and charts are essential tools for any knitter. They provide detailed instructions on how to create specific knitted items, such as animal slippers, and help knitters understand the necessary stitches and techniques involved. Understanding how to read and follow knitting patterns and charts is key to successfully completing a knitting project.
1. Interpreting Abbreviations: Knitting patterns often use abbreviations to represent different stitches and techniques. It is important to familiarize yourself with these abbreviations to easily follow the pattern. For example, “k” usually stands for knit, “p” for purl, and “inc” for increase. The pattern should provide a key or glossary that explains the abbreviations used.
2. Reading a Chart: Knitting charts are visual representations of the pattern, using symbols to indicate different stitches. Each square on the chart represents a specific stitch or color, depending on the pattern. It is important to carefully follow the chart, reading it from right to left for right-handed knitters, and left to right for left-handed knitters. The chart typically includes a legend that explains the symbols used.
Example:
| Symbol | Stitch |
| â¬›ï¸ | Knit stitch |
| â—»ï¸ | Purl stitch |
| âž• | Increase |
3. Following Written Instructions: Some knitting patterns provide written instructions rather than charts. These instructions typically include a combination of abbreviations and more detailed explanations of the stitches and techniques. It is important to carefully read and follow the instructions, ensuring you understand each step before moving on.
4. Checking Gauge: Knitting patterns often include a gauge, which indicates the number of stitches and rows per inch in the specified yarn and needle size. It is important to check your own gauge before starting the project to ensure your finished item will be the correct size. Adjusting needle size or tension may be necessary to achieve the correct gauge.
5. Making Notes: When working on a knitting pattern, it can be helpful to make notes as you go along. This can include marking your progress on the chart or pattern, noting any modifications or adjustments you make, and recording any mistakes or difficulties you encounter. These notes can be valuable references for future projects or if you need to make the same item again.
By understanding knitting patterns and charts, knitters can confidently take on new projects and create beautiful and well-fitting knitted items. Practice and patience are key, and with time, you will become more comfortable and proficient in reading and following knitting patterns.
Start with the Basic Cast-On Techniques
When it comes to knitting animal slippers, one of the most important steps is the cast-on technique. This technique is used to create the first row of stitches on your knitting needles, and it sets the foundation for your entire project. There are several different cast-on techniques to choose from, each with its own unique characteristics and benefits. Whether you’re a beginner or an experienced knitter, it’s crucial to master the basic cast-on techniques before tackling more complex patterns.
The first cast-on technique to learn is the long-tail cast-on. This method is widely used and provides a neat and elastic edge. To start, you’ll need to estimate the length of yarn needed for your cast-on stitches. Make a slipknot at one end of the yarn, leaving a long tail approximately three times the width of your desired cast-on stitches. Holding the needle with the slipknot in your right hand, wrap the tail of the yarn around your thumb and the working yarn around your index finger. Insert the needle under the loop on your thumb, then catch the working yarn with the needle and pull it through the loop. Continue this process until you have cast on the desired number of stitches.
Another widely used cast-on technique is the knit cast-on. This method is quick and easy, making it a great choice for beginners. To begin, make a slipknot and insert the right needle into the slipknot, holding it with your right hand. With the working yarn in back, wrap it around the right needle from left to right and pull it through the slipknot. Place the new loop on the left needle, then insert the right needle into the new loop and repeat the process until you have cast on the desired number of stitches.
By mastering these basic cast-on techniques, you’ll be well on your way to creating beautiful knitted animal slippers. Once you have a solid foundation, you can explore more advanced techniques and patterns to take your knitting skills to the next level.
Mastering the Knit and Purl Stitches
The knit and purl stitches are the most basic and essential stitches in knitting. They form the foundation for many knitting patterns, including the creation of adorable animal slippers. Understanding and mastering these two stitches is key to creating intricate and beautiful knitted pieces.
The knit stitch is the foundation stitch in knitting. It is created by inserting the right-hand needle into the loop on the left-hand needle from left to right, behind the left-hand needle. Then, wrap the yarn around the right-hand needle counterclockwise and pull it through the loop, dropping the original loop off the left-hand needle. This creates a new loop on the right-hand needle. Repeat this process for each stitch, moving from left to right.
The purl stitch, on the other hand, creates a bumpy texture on the right side of the fabric. To purl, insert the right-hand needle from right to left, in front of the left-hand needle. Then, wrap the yarn counterclockwise around the right-hand needle and pull it through the loop, dropping the original loop off the left-hand needle. This creates a new loop on the right-hand needle. Repeat this process for each stitch, moving from left to right.
Mastery of the knit and purl stitches opens up a world of possibilities in knitting. From simple garter stitch scarves to intricate lace patterns, these two stitches can create a variety of textures and patterns. With practice, you can create stunning knitted animal slippers and other unique creations, showcasing your skill and creativity.
Add the Animal Features to Your Slippers
If you’re looking to give your knitted animal slippers a little extra flair, why not add some special features to make them truly unique? Adding animal features to your slippers can be a fun and creative way to bring them to life. Whether you want to make them look like a cute bunny, a playful panda, or a fierce lion, there are endless possibilities for adding animal characteristics to your slippers.
Embroidered Details
One of the easiest ways to add animal features to your slippers is by using embroidery. You can use colorful yarns to create the facial features of your chosen animal, such as eyes, nose, and mouth. This will instantly give your slippers a personalized touch and make them resemble the animal you have in mind.
Appliques
Another option is to add animal-shaped appliques to your slippers. These can be made from felt or knitted separately and then sewn onto the slippers. Appliques can be used to create ears, tails, or even whole animals that sit on top of the slippers. This method allows for more creativity and customization, as you can experiment with different shapes and sizes.
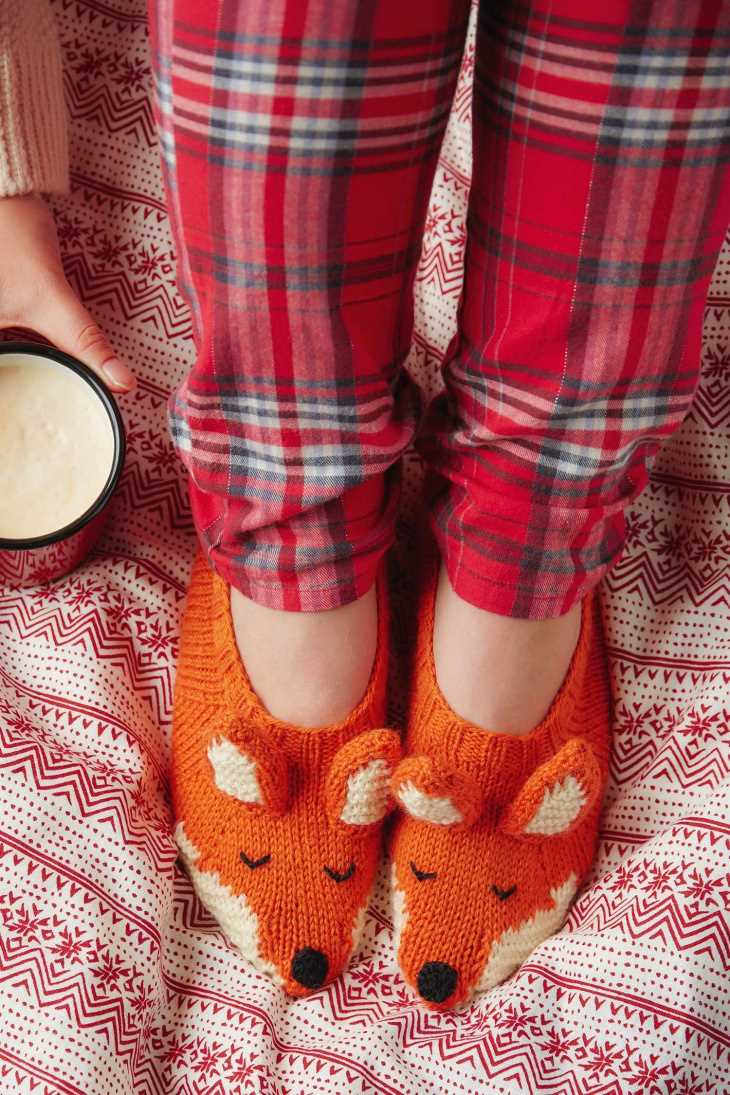
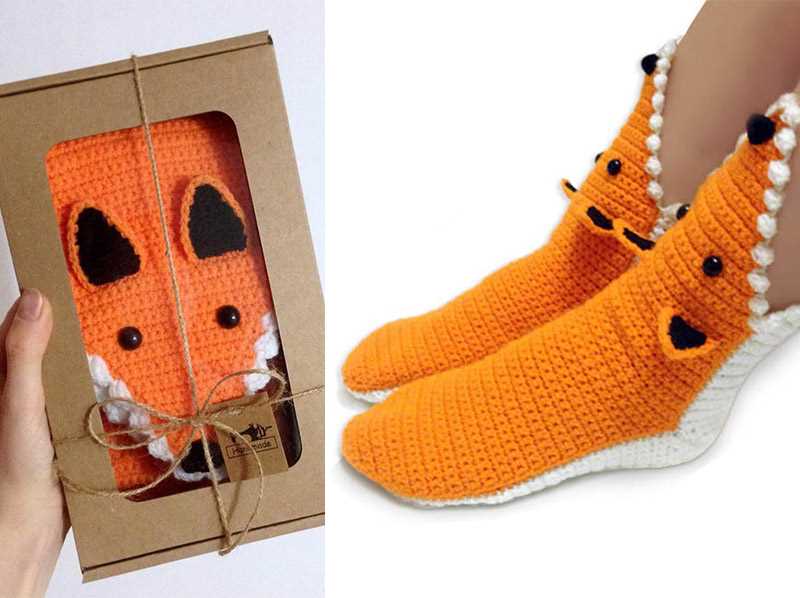
Pom-Poms and Tassels
Pom-poms and tassels can also be used to add a touch of whimsy to your animal slippers. You can create pom-pom tails for bunny or fox slippers, or use tassels to mimic the mane of a lion. These elements can be easily attached to the back or sides of the slippers, adding a playful and eye-catching detail.
Buttons and Beads
If you’re looking for a more detailed option, you can use buttons or beads to create the features of your animal slippers. Buttons can be used for eyes, while beads can be used to add texture to the nose or other facial features. This method requires a bit more time and precision, but the end result can be stunning.
Adding animal features to your knitted slippers is a great way to showcase your creativity and personalize your footwear. Whether you choose to embroider, applique, or use other embellishments, your finished slippers are sure to be one-of-a-kind and a true reflection of your love for animals.
Finishing Off Your Slipper Project
Completing a knitting project can be both exciting and satisfying. When it comes to finishing off your slipper project, there are a few important steps to take to ensure your slippers turn out just right.
Weaving in Ends
One of the first steps in finishing your slipper project is weaving in the loose ends of yarn. This is important for both aesthetic reasons and to prevent unraveling. Using a tapestry needle, carefully thread each loose end through the stitches on the wrong side of the slipper. Make sure to secure the ends tightly and trim any excess yarn.
Blocking
Blocking is a process that helps shape and improve the appearance of your knitted slippers. To block your slippers, begin by gently washing them in lukewarm water with a mild detergent. Rinse the slippers thoroughly and then gently squeeze out the excess water. Lay the slippers flat on a clean towel and shape them to the desired size and form. Allow them to air dry completely before wearing or storing.
Embellishments
If you want to add some extra flair to your knitted animal slippers, consider adding embellishments. You can use embroidery thread or yarn to add details like eyes, noses, or other features to give your slippers a more whimsical and personalized touch. Be creative and have fun with this step, but make sure to secure any embellishments tightly to prevent them from coming loose during wear.
Final Touches
Before your slippers are ready to be worn, take a final look and make any necessary adjustments or touch-ups. Check for any loose stitches or areas that may need reinforcing. You can use a crochet hook or knitting needle to fix any mistakes or tighten loose stitches. Once you are satisfied with the finished product, your knitted animal slippers are ready to be enjoyed!
Tips for Customizing Your Animal Slippers
When it comes to making your own animal slippers, customization is key. Here are a few tips to help you create unique and personalized slippers that reflect your style and personality.
1. Choose your favorite animal
Start by deciding on the animal you want to create. Whether it’s a cute bunny, a playful puppy, or a fierce tiger, choose an animal that holds special meaning to you. This will make the slippers even more special and meaningful.
2. Experiment with different colors
Don’t be afraid to play around with different colors to make your slippers stand out. Consider using bold and vibrant hues that match your favorite animal’s natural colors, or go for a more whimsical look with pastel shades.
3. Add accessories for extra flair
Take your customization to the next level by adding accessories to your animal slippers. You can sew on buttons for eyes, attach pompoms for tails, or even create small hats or bows to give your slippers a unique touch.
4. Use different yarn textures
Another way to personalize your animal slippers is by using different yarn textures. Try using a chunky yarn for a cozy and warm feel, or opt for a soft and fluffy yarn to mimic fur. Mixing textures can add visual interest and make your slippers extra snuggly.
5. Customize the size for a perfect fit
Lastly, don’t forget to customize the size of your slippers to ensure a perfect fit. Take measurements of your feet and adjust the pattern accordingly. This will make wearing your slippers comfortable and prevent them from slipping off.
By following these tips, you can create personalized animal slippers that are one-of-a-kind and truly reflect your own style. So get creative and have fun making your very own customized pair of cozy and adorable slippers!
Caring for and Maintaining Your Knitted Slippers
After spending time and effort creating your beautiful knitted animal slippers, it’s important to learn how to properly care for and maintain them to ensure their longevity. With the right care, your slippers can stay in great condition for years to come.
1. Handwashing: It is recommended to wash your knitted slippers by hand to avoid damaging the delicate fibers. Fill a basin or sink with lukewarm water and add a gentle detergent specifically designed for wool or delicate fabrics. Gently agitate the slippers in the water, then rinse thoroughly. Avoid wringing or twisting the slippers, as this can stretch or distort their shape.
2. Drying: After washing, gently squeeze out any excess water from the slippers. Lay them flat on a clean, absorbent towel or on a mesh drying rack. Reshape the slippers if necessary and allow them to air dry away from direct sunlight or heat sources, as this can cause the wool to shrink or fade.
3. Storage: When you’re not wearing your knitted slippers, it’s important to store them properly to prevent any damage. Place them in a clean, dry storage container or a fabric bag to protect them from dust, dirt, and moths. Avoid storing them in plastic bags, as this can restrict airflow and lead to musty odors.
4. Spot cleaning: If your slippers get stained or soiled in specific areas, spot cleaning is a quick and effective way to remove the dirt. Use a mild soap or wool detergent and a clean, damp cloth to gently blot the affected area. Avoid rubbing or scrubbing the stain, as this can cause further damage to the fibers.
5. Regular maintenance: To keep your knitted slippers looking their best, regularly inspect them for any loose threads or signs of wear. You can easily fix minor damages by carefully sewing them with a matching yarn or thread. By addressing any issues promptly, you can prevent them from becoming more significant problems.
- In conclusion, by following these care and maintenance tips, you can keep your knitted animal slippers looking beautiful and ensure their longevity. Handwashing, proper drying, storage, spot cleaning, and regular maintenance are key to preserving the quality and appearance of your beloved slippers.
Show Off Your Completed Animal Slippers
After hours of knitting and perfecting your technique, it’s time to show off your adorable knitted animal slippers. Whether you’ve made them for yourself or as a thoughtful gift for a loved one, sharing your finished creations can bring a sense of pride and accomplishment.
One way to showcase your animal slippers is through social media platforms. Take a photo of your slippers and share it on Instagram, Facebook, or Pinterest. Use relevant hashtags such as #knittedanimalslippers or #handmade to reach a wider audience of knitting enthusiasts. Don’t forget to tag the original pattern designer if possible, as they would love to see how their design has come to life in your hands.
If you prefer a more personal touch, consider hosting a slumber party or a cozy gathering with friends and family. Encourage your guests to bring their own handmade creations, whether they are animal slippers or other knitted items, and create a show-and-tell atmosphere. It’s a fantastic way to admire each other’s craftsmanship, exchange tips and tricks, and inspire one another for future projects.
Another option is to participate in knitting or crafting forums and communities. Websites like Ravelry or knitting-related Facebook groups allow you to share your completed projects, ask for feedback or advice, and connect with fellow knitters from around the world. You may find new patterns to try, discover new techniques, or even make new friends who share your passion for knitting.
In summary, don’t be shy about showing off your completed animal slippers. By sharing them online, hosting a gathering, or engaging in knitting communities, you can celebrate your hard work and inspire others to pursue their own knitting projects. Enjoy the wonderful world of knitting and the joy it brings to both the maker and the wearer of your adorable knitted animal slippers.