
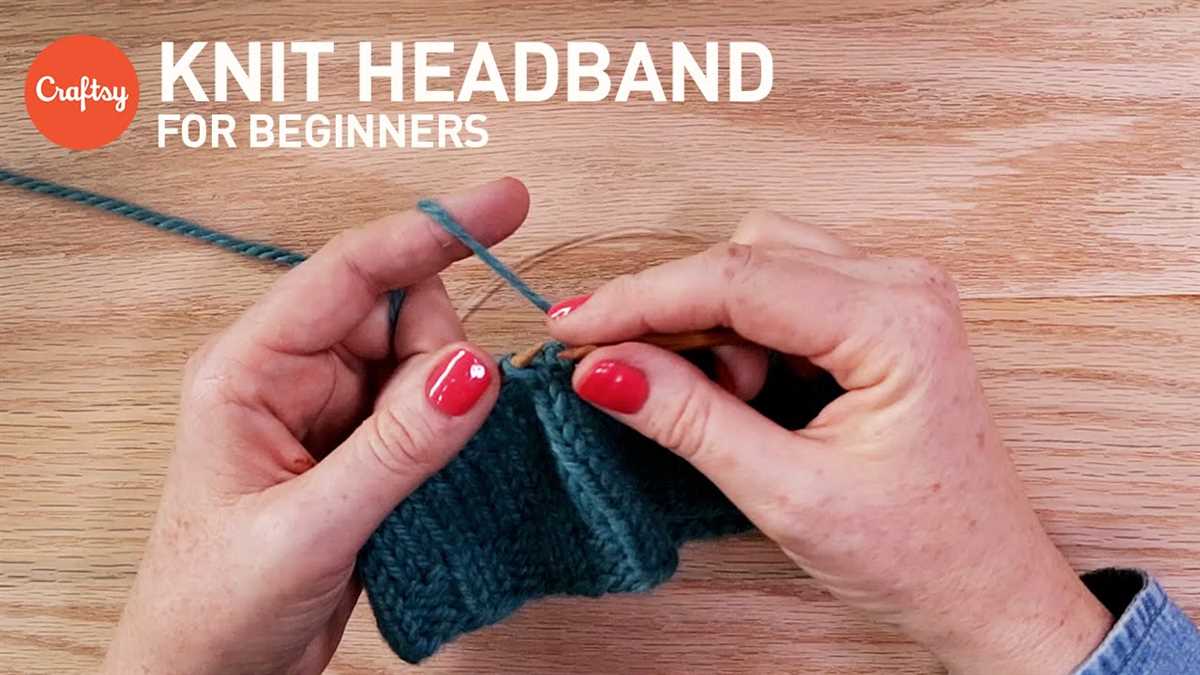
If you are new to knitting and looking for a fun and easy project to start with, headbands are a great choice. They are quick to make and can be a stylish addition to your outfit. In this article, we will share some free headband knitting patterns that are perfect for beginners.
Knitting headbands is a great way to practice basic knitting stitches such as knit and purl. These patterns are simple and easy to follow, making them perfect for beginners. Whether you prefer a wide or narrow headband, a simple design or a more intricate one, there is a pattern here for you.
One of the easiest patterns for beginners is a basic garter stitch headband. This pattern uses only knit stitches, making it a great choice for those who are just starting out. Another simple pattern is a seed stitch headband, which alternates between knit and purl stitches, creating a textured design.
If you are feeling more adventurous, you can try a cable knit headband. This pattern involves crossing stitches over each other to create a braided effect. While it may look complicated, it is actually quite simple once you get the hang of it. There are also patterns that incorporate colorwork or lace for those who want to try something different.
So grab your knitting needles and get started on one of these free headband knitting patterns. With a little bit of practice, you’ll be able to knit up a stylish and cozy headband in no time!
Top Free Headband Knitting Patterns for Beginners
If you’re new to knitting and want to try your hand at making a headband, there are plenty of free patterns available online that are perfect for beginners. Whether you prefer a simple garter stitch or want to try something more intricate, there’s a pattern out there for you. Here are a few top free headband knitting patterns to get you started:
1. Easy Garter Stitch Headband
If you’re new to knitting, the garter stitch is a great place to start. This headband pattern uses just the garter stitch, which means you’ll only need to know how to knit. The pattern is quick and easy to make, and the headband can be customized with different colors or yarn weights for a unique look.
2. Seed Stitch Headband
The seed stitch is another simple stitch pattern that is perfect for beginners. This headband pattern combines the seed stitch with a ribbed edging for added texture and stretch. The pattern includes instructions for adjusting the size of the headband, so you can make it fit just right.
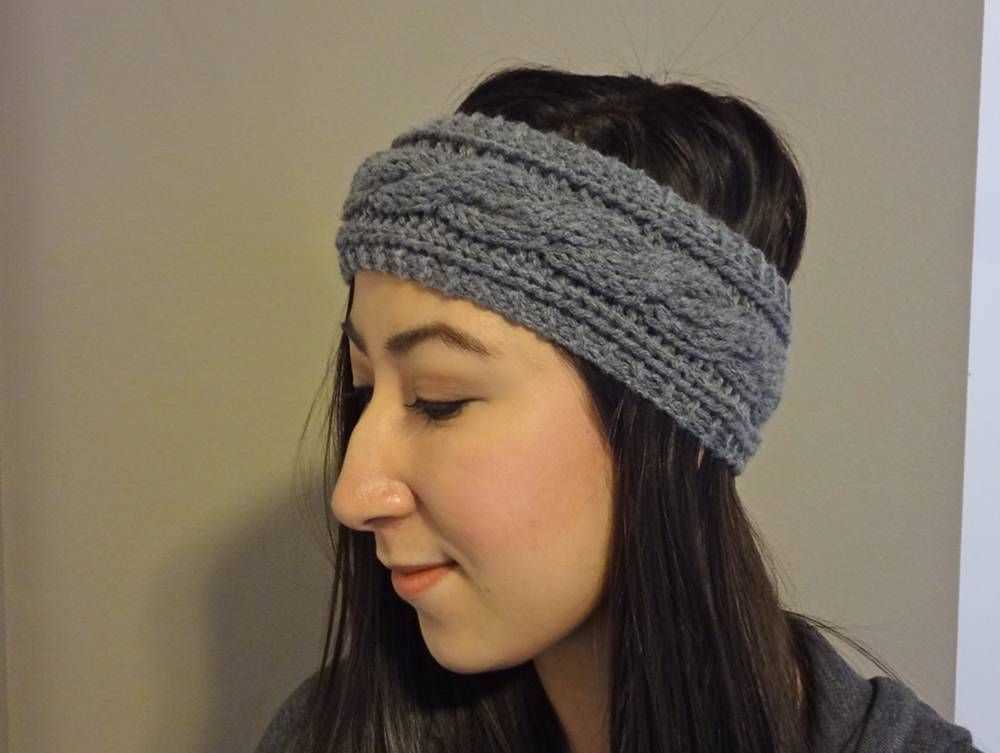
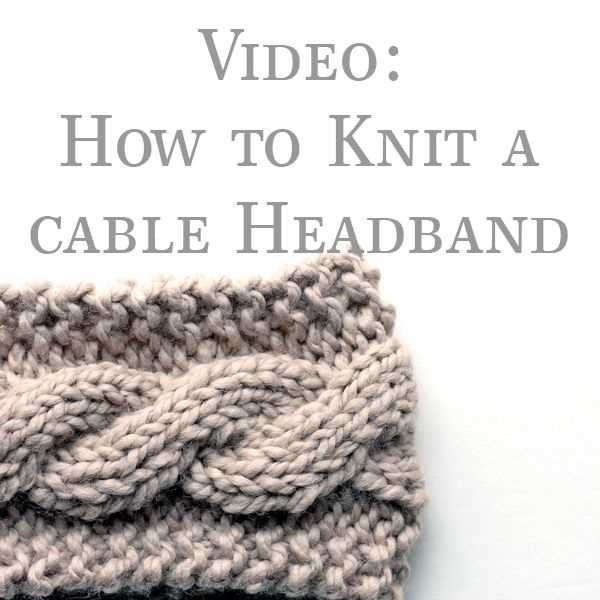
3. Cable Knit Headband
If you’re ready to try something a little more challenging, a cable knit headband is a great option. This pattern uses basic cable stitches to create a stylish and cozy headband. The pattern includes both written instructions and a chart, so you can choose the method that works best for you.
4. Lace Headband

If you’re looking for a delicate and feminine headband, a lace pattern is the way to go. This pattern features a simple lace design that is perfect for beginners. The headband can be made in a variety of yarn weights, so you can create a lightweight accessory for warmer months or a cozy headband for winter.
These are just a few of the many free headband knitting patterns available for beginners. Whether you’re looking for something simple or want to challenge yourself with a more complex stitch pattern, there’s a pattern out there that’s perfect for you. Happy knitting!
Basic Ribbed Headband
A basic ribbed headband is a great project for beginners learning to knit. It’s a simple and quick project that you can complete in just a few hours. The headband is a versatile accessory that can be worn year-round, keeping your ears warm in the winter or holding your hair back in the summer.
To create a basic ribbed headband, you will need a pair of knitting needles and some yarn. Choose a soft, medium-weight yarn in the color of your choice. You can also choose to use a variegated yarn for added interest and texture.
When knitting a ribbed headband, you will be using a combination of knit and purl stitches to create the ribbing effect. The ribbing not only adds stretch and flexibility to the headband, but also gives it a stylish texture.
Start by casting on the desired number of stitches. For a standard adult headband, you can cast on around 80 stitches. Then, work in a ribbed pattern, alternating between knit and purl stitches. For example, you can start with two knit stitches, followed by two purl stitches, and repeat this pattern until the headband reaches the desired length.
Once you have finished the ribbed pattern, simply bind off your stitches and weave in any loose ends. You can also choose to add a decorative touch, such as a bow or a button, to personalize your headband.
A basic ribbed headband is a great project for beginners to practice their knitting skills. It’s a versatile accessory that can be customized to fit any style or outfit. So grab your knitting needles and start creating your own ribbed headbands today!
Simple Seed Stitch Headband
Looking for an easy and quick knitting project? Try making a simple seed stitch headband! This pattern is perfect for beginners who are just starting to learn how to knit. With just two basic stitches, you can create a stylish and cozy accessory for yourself or as a gift.
The seed stitch, also known as the moss stitch, is a simple pattern that alternates knit and purl stitches within the same row. This creates a textured fabric with a bumpy appearance, similar to the seeds on a plant.
Materials:
- Medium-weight yarn in your choice of color
- US size 8 knitting needles
Instructions:
- Cast on 16 stitches.
- Row 1: *Knit 1, purl 1* across the entire row.
- Row 2: *Purl 1, knit 1* across the entire row.
- Repeat rows 1 and 2 until the headband reaches your desired length. Make sure to end with row 1.
- Bind off all stitches.
- Join the ends of the headband together using a needle and thread, or by sewing them together with a slip stitch.
Once you have finished knitting the headband, you can add your own personal touch by attaching a decorative button or embellishment. This simple seed stitch headband is not only a practical accessory for keeping your ears warm in colder weather, but it also makes for a stylish and trendy addition to any outfit.
So grab your knitting needles and some yarn, and give this simple seed stitch headband a try. You’ll be amazed at how quickly and easily you can create a beautiful and functional accessory!
Easy Garter Stitch Headband
If you’re a beginner knitter looking for a simple and stylish project, this easy garter stitch headband is the perfect choice. With just a few basic knitting techniques, you can create a beautiful headband that’s both practical and fashionable.
This headband is knit entirely in garter stitch, which means you only need to know how to knit. Garter stitch is created by knitting every row, so it’s a great stitch for beginners. The headband is worked flat, and then seamed together at the end to create a loop.
Materials:
- Size 8 knitting needles
- Worsted weight yarn
- Tapestry needle
Instructions:
- Cast on 20 stitches.
- Knit every row until the headband measures approximately 18 inches long.
- Bind off all stitches.
- Use the tapestry needle to sew the ends of the headband together, creating a loop.
This headband is a versatile accessory that can be worn in many different ways. You can wear it as a traditional headband to keep your hair back or wear it as a stylish ear warmer during colder months. You can also customize the headband by adding buttons, flowers, or other embellishments to make it your own.
Overall, this easy garter stitch headband is a great project for beginners. It’s simple, quick to knit up, and can be a great gift for yourself or a friend. So grab your knitting needles and some yarn, and get started on your own beautiful headbands!
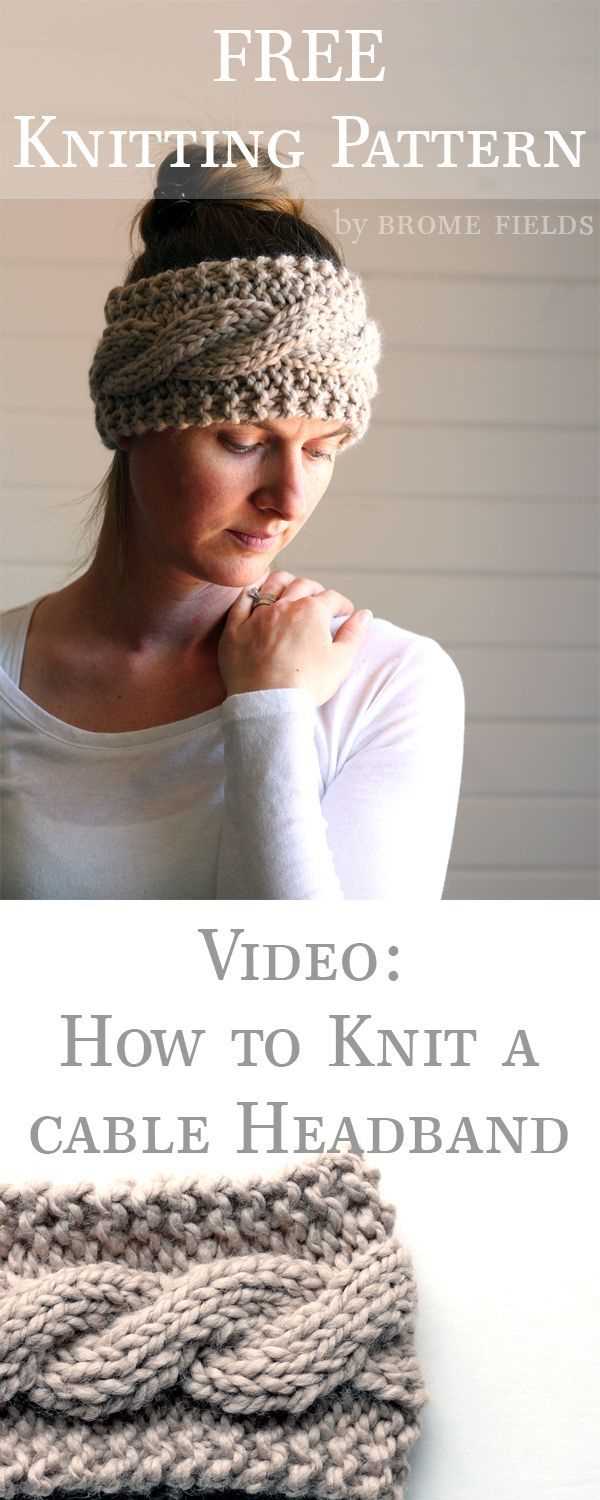
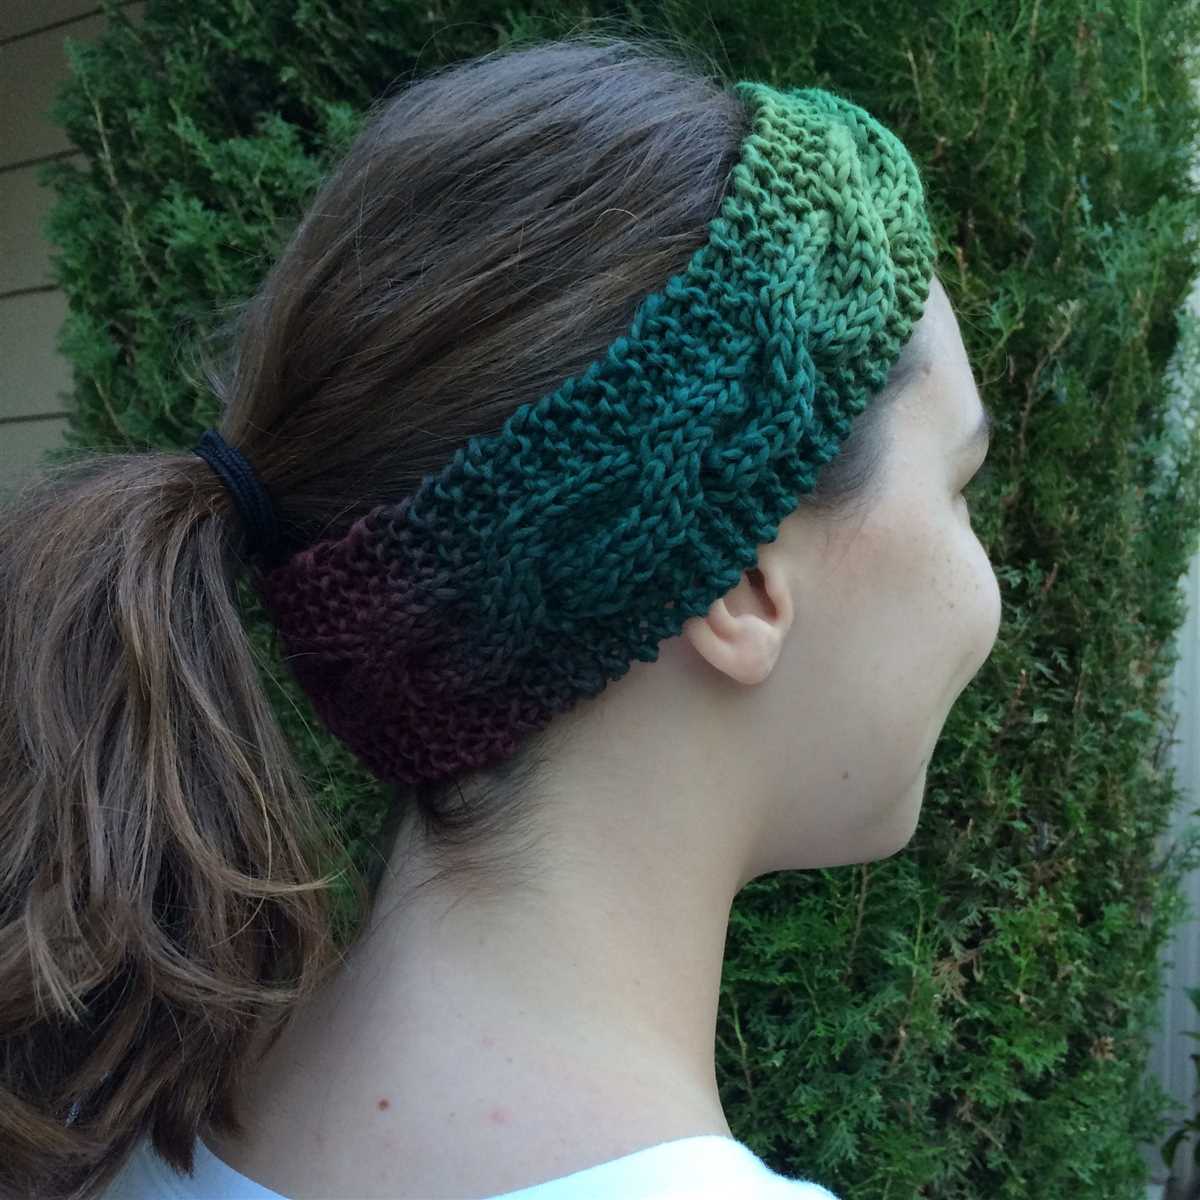
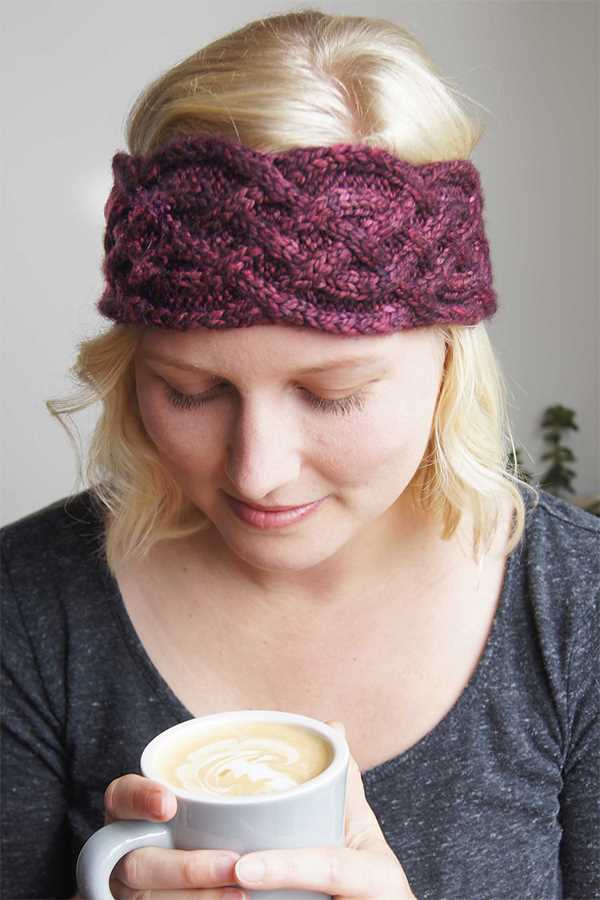
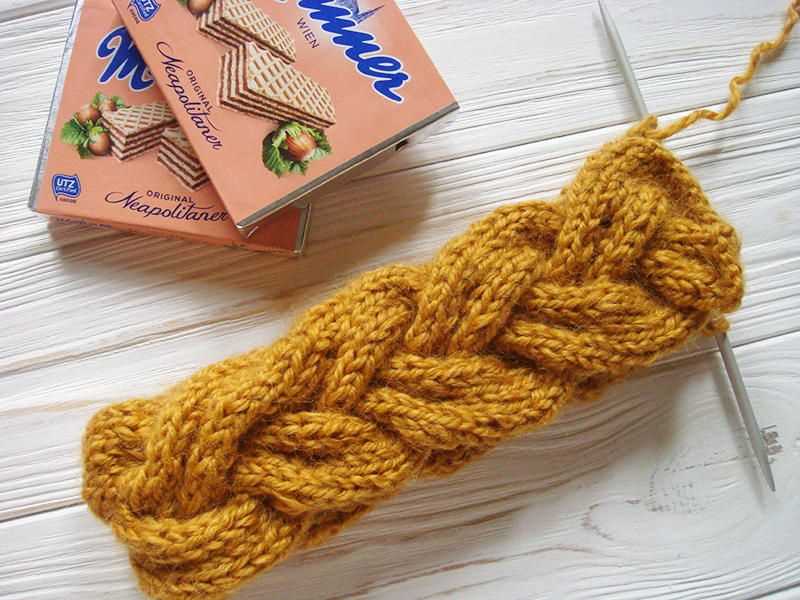
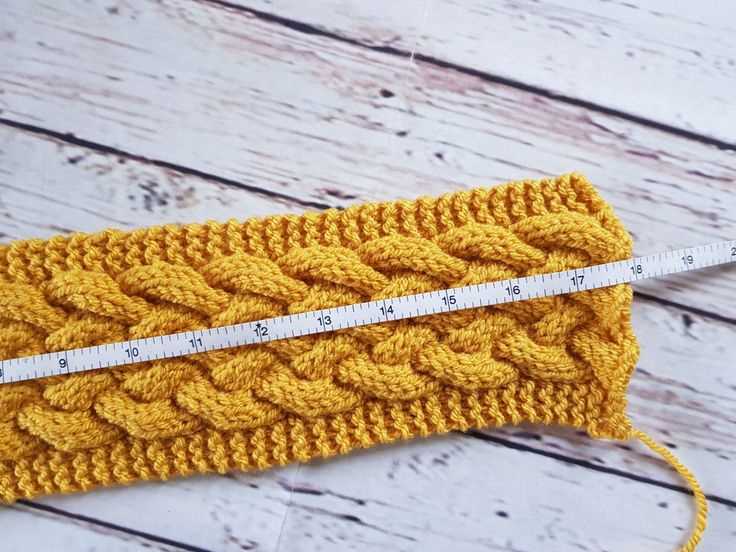
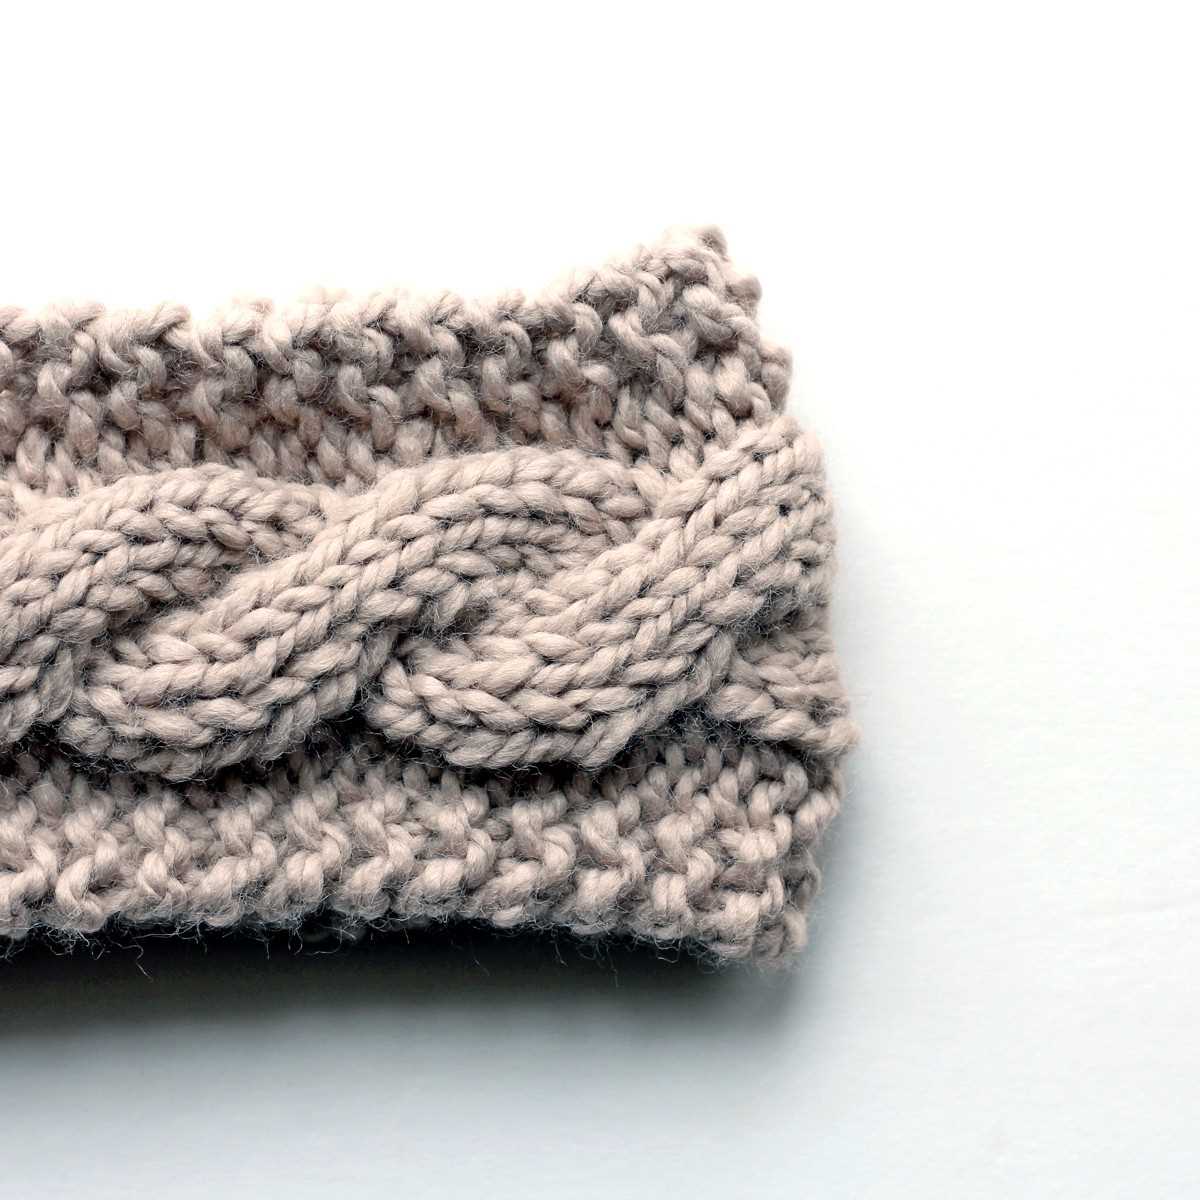
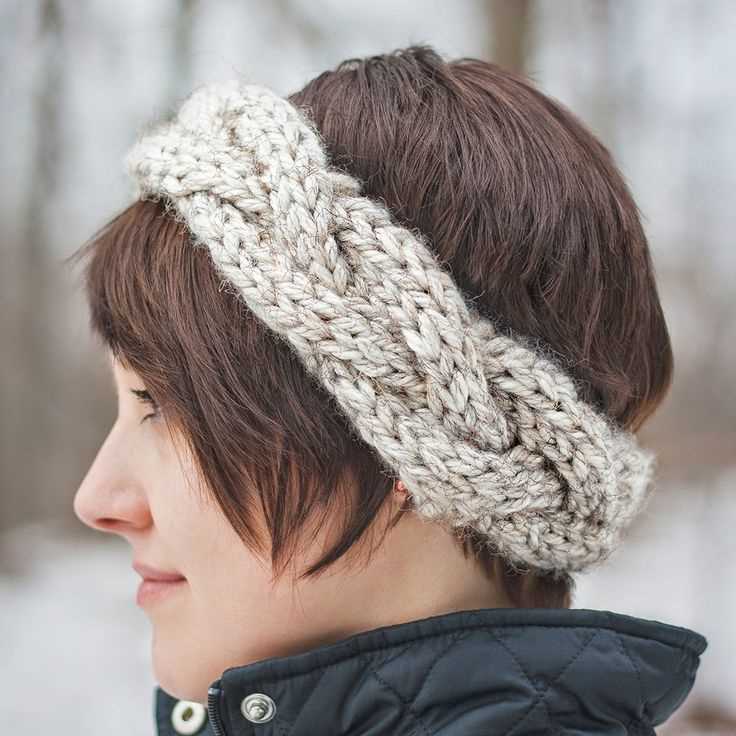
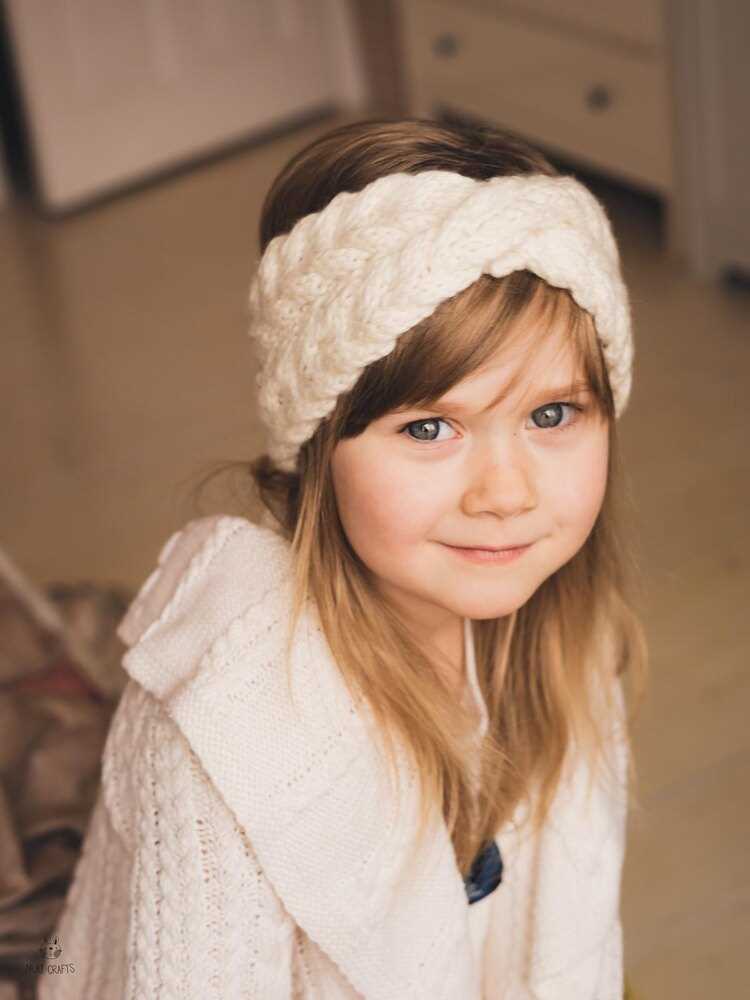
Beginner Cable Knit Headband
Are you a beginner knitter looking for a new project? Why not try your hand at knitting a cable knit headband? Cable knitting is a technique that creates beautiful textured patterns by twisting stitches over each other. It may look complicated, but it’s actually quite simple once you get the hang of it.
To start, you’ll need some basic knitting supplies: a pair of knitting needles, some yarn, and a cable needle. Choose a chunky or worsted weight yarn in a color that you love. The thicker yarn will make the stitches easier to see and give your headband a cozy, warm feel.
Begin by casting on the desired number of stitches. It’s a good idea to make a gauge swatch first to ensure that your headband will fit properly. Follow the pattern instructions to create the cable pattern, which will typically involve knitting and purling stitches and using the cable needle to move stitches around.
Once you’ve completed the cable pattern, continue knitting until the headband reaches your desired length. Then, bind off the stitches and sew the two ends together to form a loop. You can embellish your headband with a decorative button or bow if you like, or leave it plain for a more minimalist look.
The great thing about knitting headbands is that they are quick, portable projects that make great gifts. Once you’ve mastered the cable knit headband, you can easily adapt the pattern to create different widths, lengths, and cable patterns. Don’t be afraid to experiment and make it your own!
Cozy Chunky Knit Headband
A cozy, chunky knit headband is a perfect accessory to keep you warm and stylish during the colder months. Whether you’re a beginner or an experienced knitter, this headband is a fun and quick project to make.
To create your own cozy chunky knit headband, you will need super bulky yarn and size 10 knitting needles. The super bulky yarn will give your headband a thick and luxurious texture. Choose a color that matches your winter wardrobe or go for a bold contrast to make a statement.
Begin by casting on the desired number of stitches. For a standard adult headband, you can start with about 15 stitches. Adjust the number of stitches depending on the size of your head and the desired width of the headband.
Once you have cast on, you can start knitting in your preferred stitch pattern. If you’re a beginner, a simple garter stitch (knitting every row) or a ribbing pattern (alternating knit and purl stitches) will create a beautiful texture. For intermediate knitters, you can experiment with more complex stitch patterns like cables or lace.
Continue knitting until your headband reaches the desired length. This will vary depending on how tight or loose you want the headband to fit. Once you’re satisfied with the length, bind off your stitches and sew the two ends together to create a loop.
To add some extra flair to your cozy chunky knit headband, you can embellish it with buttons, crochet flowers, or a bow. These small details can make your headband unique and personalized.
When you’re finished, try on your new cozy chunky knit headband and enjoy the warmth and style it brings. It’s a versatile accessory that can be worn with your favorite winter coat or as a statement piece with a simple sweater.
So grab your knitting needles and get ready to create a cozy chunky knit headband that will keep you warm and fashionable all winter long!
Quick and Easy Braided Headband
If you’re a beginner knitter looking for a quick and easy project, a braided headband is a great choice. With just a few basic knitting stitches, you can create a stylish and practical accessory that will keep your hair in place and add a touch of flair to your outfit.
To make a braided headband, you will need some basic knitting supplies, including yarn and knitting needles. Choose a soft and comfortable yarn that is suitable for the season and matches your personal style. You can also experiment with different colors to create a unique and eye-catching headband.
- Step 1: Cast on stitches. Begin by casting on an even number of stitches onto your knitting needles. This will determine the width of your headband.
- Step 2: Knit the first row. Knit every stitch across the first row of your headband.
- Step 3: Start the braiding pattern. On the second row, begin the braiding pattern by knitting the first two stitches together, then bringing the yarn to the front and slipping the next stitch purlwise, then bringing the yarn to the back and knitting the next stitch. Repeat this pattern across the row.
- Step 4: Continue the braiding pattern. Repeat the braiding pattern on every row until your headband reaches the desired length. This simple pattern creates a beautiful braided effect.
- Step 5: Bind off stitches. Once your headband is long enough, bind off your stitches to secure the edges. Cut the yarn, leaving a long tail for finishing.
Once you have finished knitting your braided headband, you can seam the ends together using a tapestry needle and the long tail of yarn. This will create a loop that you can easily slip over your head for a comfortable fit. Alternatively, you can add buttons or a Velcro closure for an adjustable option.
This quick and easy braided headband is a great project for beginners, as it allows you to practice basic knitting stitches while creating a useful and stylish accessory. With just a little bit of patience and practice, you’ll have a beautiful headband to wear or give as a thoughtful handmade gift.
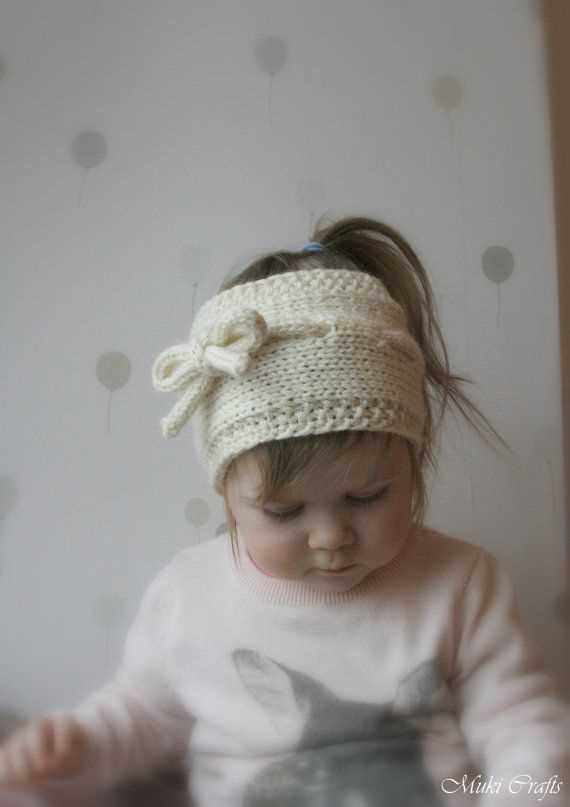
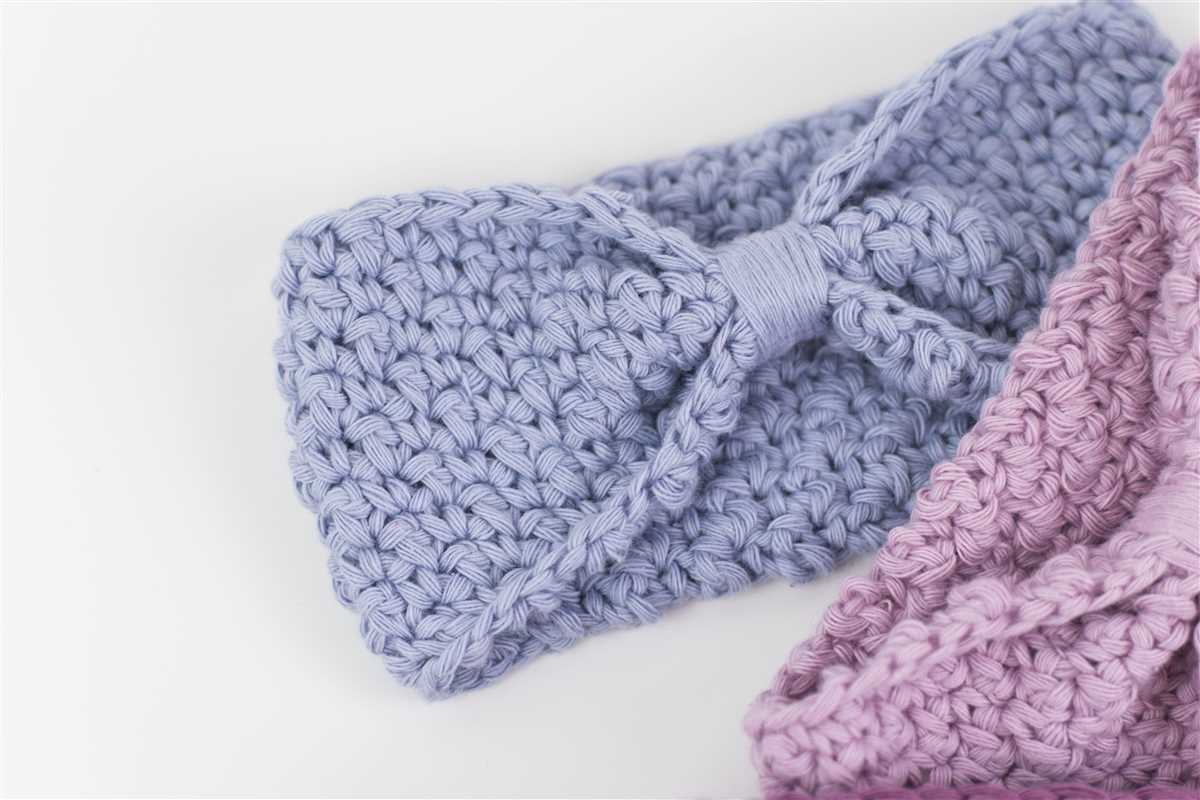
Striped Headband with Bow
If you’re looking for a stylish and beginner-friendly knitting project, why not try making a striped headband with a bow? This cute accessory is perfect for keeping your hair out of your face while adding a fashionable touch to your outfit.
To start, you’ll need a set of knitting needles and two different colors of yarn. Choose colors that complement each other well and will match your personal style. You can also experiment with different yarn weights to achieve the desired width for your headband.
Materials:
- Size 8 knitting needles
- Worsted weight yarn in two colors
- Tapestry needle
- Scissors
Begin by casting on the desired number of stitches, depending on how wide you want your headband to be. You can reference a knitting gauge calculator to determine the right number of stitches for your chosen yarn and needle size.
Next, knit in a striped pattern, alternating between the two colors of yarn. You can choose how thick or thin you want the stripes to be by adjusting the number of rows you knit with each color.
Once you’ve reached the desired length for your headband, bind off your stitches and weave in any loose ends with a tapestry needle. Now it’s time to add the finishing touch – a bow!
Instructions for the bow:
- Using the same yarn as one of your stripes, cast on 12 stitches.
- Knit every row until the strip measures approximately 4 inches in length.
- Bind off the stitches and use the leftover yarn to attach the bow to the headband.
Once the bow is securely attached, you can adjust its shape and size by gently pulling and fluffing the knit fabric. Now you have a beautiful striped headband with a cute bow that you can wear with pride!
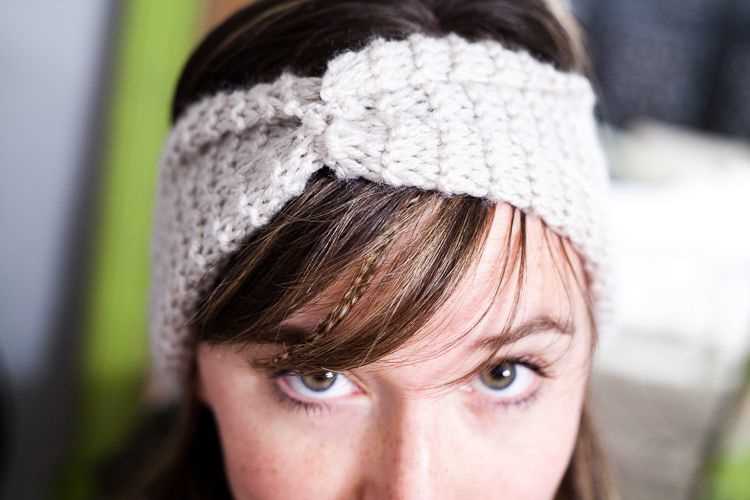
Lace-Edged Headband for Beginners
If you’re a beginner knitter looking to add a touch of elegance to your headband collection, then the Lace-Edged Headband pattern is perfect for you. With its delicate lace edging, this headband is a stylish accessory that will keep you warm and fashionable during the colder months.
The pattern is designed with beginners in mind, so even if you have minimal knitting experience, you can still create a beautiful lace headband. The lace pattern itself is easy to follow and repetitive, making it a great project to practice your knitting skills and build your confidence.
To create this lace-edged headband, you will need some basic knitting supplies, including yarn and knitting needles. You can choose any color of yarn you like to create a headband that matches your personal style. The pattern also includes a detailed list of stitches and techniques used, so you can easily follow along and create a beautiful headband.
If you’re new to knitting or lace knitting, don’t worry! The pattern includes step-by-step instructions and a helpful glossary of knitting terms, making it easy for beginners to understand and follow. Additionally, the pattern provides tips and tricks for creating a neat and professional finish, ensuring that your headband looks stunning from every angle.
Once you’ve finished knitting your lace-edged headband, you’ll have a versatile accessory that can be worn in various ways. Whether you want to keep your hair out of your face while exercising or add a feminine touch to your everyday outfits, this headband will be your go-to accessory. So grab your knitting needles and get started on this beautiful Lace-Edged Headband pattern today!
Colorblock Headband with Buttons
A colorblock headband with buttons is a stylish and practical accessory that can be easily knitted by beginners. This headband pattern allows you to play with different colors and add a touch of personalization with buttons. With just a few basic knitting stitches and some yarn, you can create a beautiful headband that will keep your ears warm and add a pop of color to your outfit.
To make this colorblock headband, you will need two contrasting colors of yarn and a pair of knitting needles. Start by casting on the desired number of stitches, depending on your head size and the width of the headband you want to achieve. Knit in a simple stockinette stitch for the first colorblock section, changing colors when you reach the desired width. Repeat this pattern for as many colorblock sections as you like, ending with the same number of stitches you started with.
To add buttons, simply sew them onto the headband using a needle and thread. You can choose buttons that match the colors of your yarn or go for contrasting colors for a bold and eye-catching look. The buttons not only serve as decorative elements but also add a functional touch, allowing you to create different looks by securing the headband in different ways.
This colorblock headband with buttons is a versatile accessory that can be worn with various hairstyles and outfits. Whether you’re going for a casual or a more dressed-up look, this headband will add a playful and trendy touch to your ensemble. It’s also a great project for practicing your knitting skills and experimenting with different color combinations.
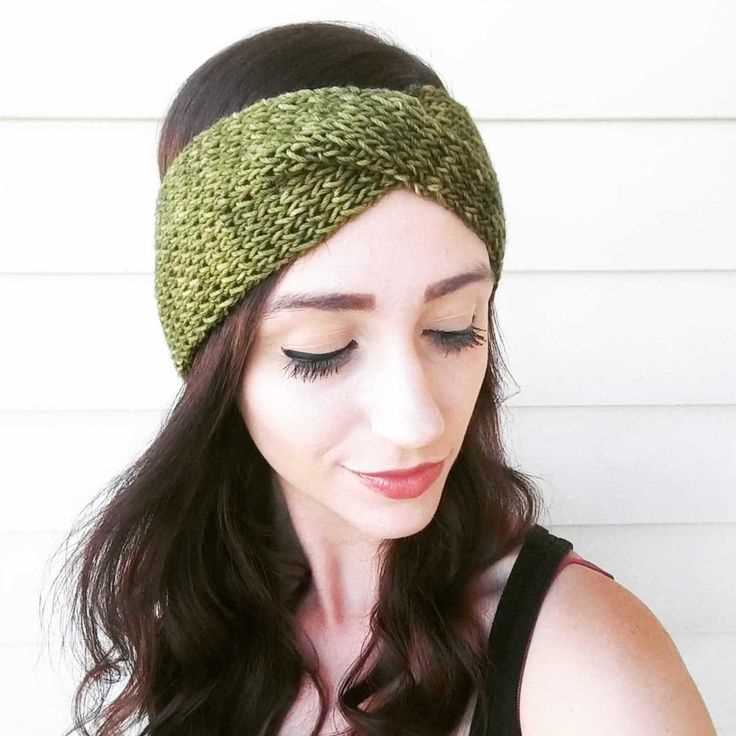
Twisted Turban-Style Headband
A twisted turban-style headband is a trendy and stylish accessory that can add a touch of sophistication to any outfit. Whether you’re a beginner knitter or an experienced one, this headband pattern can be easily mastered.
To create a twisted turban-style headband, you’ll need a few key materials:
- Size 6 or 7 knitting needles
- Medium-weight yarn in your chosen color
- Tapestry needle
- Scissors
Begin by casting on 20 stitches using the long-tail cast-on method. This will serve as the base for your headband. Knit each row in a simple stockinette stitch until the headband reaches your desired length.
Once the desired length is reached, it’s time to twist the headband. Bring the ends of the headband together and twist them two or three times, depending on your preference. This will create a stylish and unique twisted effect.
Next, sew the two ends of the headband together using a tapestry needle and yarn of the same color. Make sure to secure the ends tightly to prevent the headband from unraveling.
Finally, trim any excess yarn and weave in the loose ends to give your headband a polished finish.
The twisted turban-style headband is a versatile accessory that can be worn in various ways. Whether you prefer to wear it on top of your head or over your ears, it’s sure to add a touch of elegance to your look.
Floral Headband with Ribbon Tie
Looking for a cute and stylish headband to add to your accessory collection? This floral headband with ribbon tie is the perfect choice! With its delicate floral design and ribbon tie, it adds a touch of elegance to any outfit.
This headband is ideal for beginners who are just starting out with knitting. The pattern is simple to follow and requires basic knitting techniques. It’s a great project for practicing your knitting skills and creating a beautiful accessory at the same time.
To create this headband, you’ll need a few materials: yarn in your desired color, knitting needles, a needle for sewing, and a ribbon for the tie. Start by casting on the required number of stitches, and then follow the pattern instructions for knitting the headband and creating the floral design.
The floral design is created using a combination of knit and purl stitches, resulting in a textured pattern that resembles flowers. Once you’ve completed the floral design, you can finish off the headband by sewing the ends together and attaching the ribbon tie.
This floral headband makes a great accessory for any occasion. It can be worn with casual outfits for a touch of glamour, or paired with a dress for a more formal look. The ribbon tie adds versatility, allowing you to adjust the fit of the headband to your liking.
Whether you’re knitting this headband for yourself or as a gift for a friend, it’s sure to be a hit. The combination of the floral design and ribbon tie makes it a unique and eye-catching accessory. So grab your knitting needles and get started on this floral headband with ribbon tie pattern today!
Boho-Inspired Headband with Leaf Motif
For those who love bohemian style and want to add a touch of nature to their accessories, this boho-inspired headband with a leaf motif is a perfect choice. The delicate leaf pattern adds an elegant and whimsical touch to any outfit. Whether you’re a beginner or an experienced knitter, this pattern is easy to follow and creates a stunning result.
To create this headband, you’ll need a soft and lightweight yarn in a color of your choice, along with knitting needles in the appropriate size. The leaf motif is created using a combination of knit and purl stitches, making it ideal for beginners who want to try out new techniques.
Pattern Instructions:
- Cast on 20 stitches.
- Knit 4 rows in garter stitch (knit every row).
- Begin leaf motif pattern:
| Row 1: | Purl all stitches. |
| Row 2: | Knit 2, *purl 2, knit 6, purl 2; repeat from * to last 2 stitches, knit 2. |
| Row 3: | Purl all stitches. |
| Row 4: | Knit 2, *purl 2, knit 2, purl 2, knit 2, purl 2; repeat from * to last 2 stitches, knit 2. |
| Row 5: | Purl all stitches. |
| Row 6: | Knit 2, *purl 2, knit 2, purl 2, knit 2, purl 2; repeat from * to last 2 stitches, knit 2. |
| Row 7: | Purl all stitches. |
| Row 8: | Knit 2, *purl 2, knit 6, purl 2; repeat from * to last 2 stitches, knit 2. |
| Row 9: | Purl all stitches. |
| Row 10: | Knit 2, *purl 2, knit 2, purl 2, knit 2, purl 2; repeat from * to last 2 stitches, knit 2. |
Continue repeating rows 1-10 until the headband reaches your desired length. Then, knit 4 more rows in garter stitch and bind off all stitches. Sew the ends together to create a loop and weave in any loose ends.
This boho-inspired headband is a stylish and unique accessory that can be worn year-round. Whether you’re headed to a music festival or simply want to add a bohemian touch to your everyday look, this headband is sure to impress. Have fun knitting and enjoy your new headband!
Q&A:
What are some free headband knitting patterns for beginners?
Some free headband knitting patterns for beginners include the Simple Seed Stitch Headband, the Easy Knit Headband, the Garter Stitch Ear Warmer, the Basic Ribbed Headband, and the Cozy Cable Headband.
What materials do I need to knit a headband?
To knit a headband, you will need yarn (preferably a soft and stretchy yarn such as acrylic or wool blend), knitting needles (appropriate for the yarn weight), a yarn needle for weaving in ends, and optionally, a crochet hook or button for adding a closure.
Are there any headband knitting patterns that use circular needles?
Yes, there are headband knitting patterns that use circular needles. Circular needles are great for knitting in the round and can be used to create seamless headbands. Some examples of headband patterns that use circular needles include the Twist Front Headband and the Braided Cable Headband.
How long does it typically take to knit a headband?
The time it takes to knit a headband can vary depending on the complexity of the pattern, your knitting speed, and the amount of time you dedicate to knitting. However, for beginners, it usually takes a few hours to complete a simple headband.
Are there any headband knitting patterns for children?
Yes, there are headband knitting patterns specifically designed for children. These patterns often feature smaller sizes and fun designs that are suitable for kids. Some examples include the Bunny Ear Headband, the Bow Headband, and the Animal Ear Headband.
What are some free headband knitting patterns for beginners?
Some free headband knitting patterns for beginners include a simple garter stitch headband, a seed stitch headband, a ribbed headband, and a twisted headband. These patterns are great for practicing basic knitting stitches and techniques.