
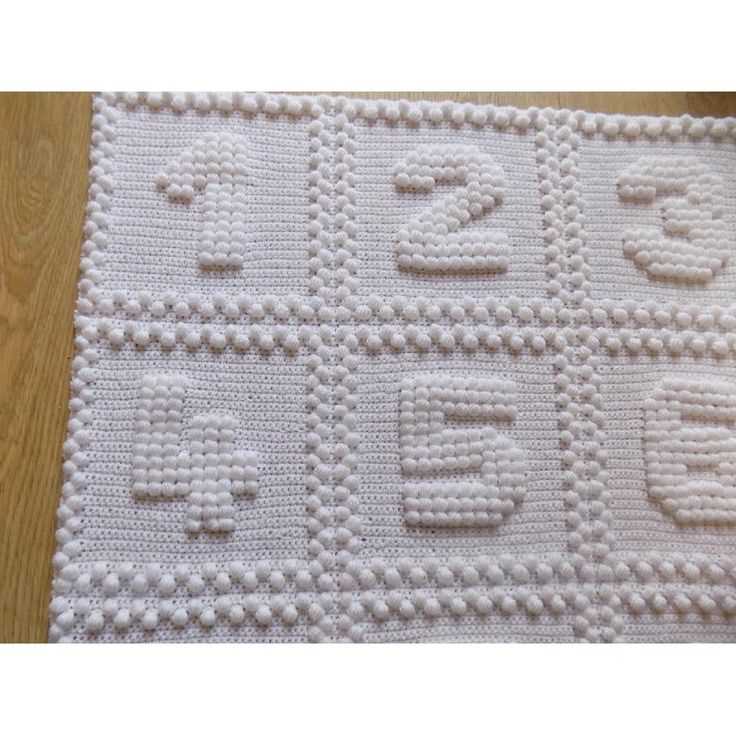
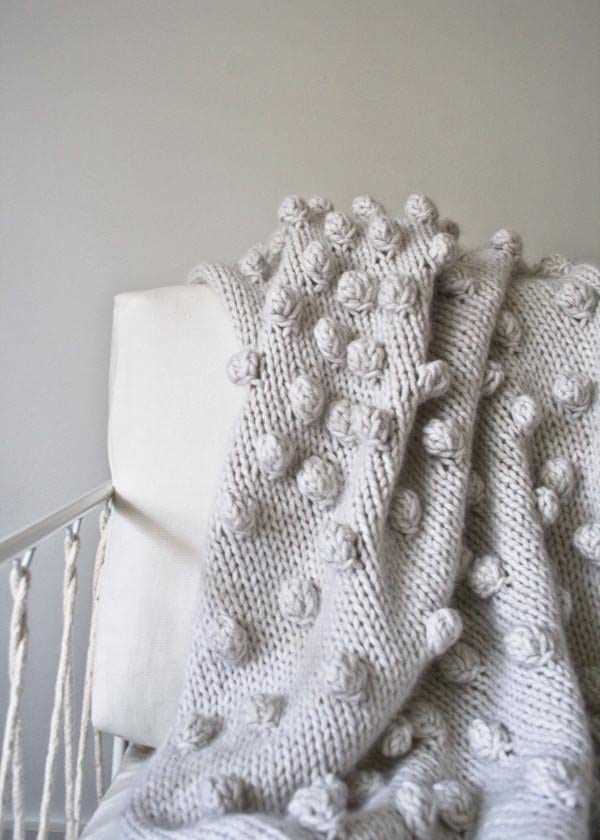
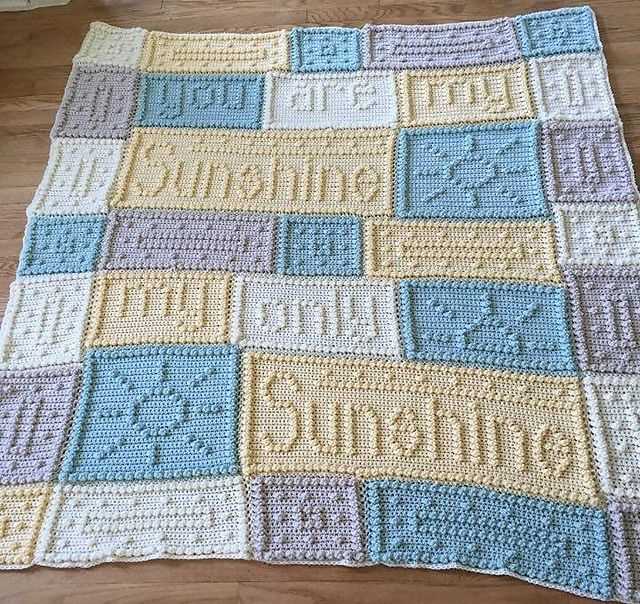
Knitting is a beloved craft that allows you to create beautiful and functional items with just a few simple tools and some yarn. If you’re looking for a new knitting project, why not try your hand at making a bobble blanket? This cozy and textured blanket will keep you warm during those chilly winter nights, and the bobbles add a whimsical touch.
Before you start knitting, you’ll need to gather your materials. You’ll need a set of knitting needles, a crochet hook, and several skeins of your chosen yarn. Make sure to choose a yarn that is soft and cozy, as it will make your blanket extra comfortable. You may also want to choose a yarn in a color that matches your home decor.
The bobble blanket pattern is relatively simple, making it a great project for knitters of all experience levels. You’ll start by casting on a certain number of stitches, depending on how wide you want your blanket to be. Then, you’ll continue knitting in a specific pattern, adding bobbles in certain rows to create the textured effect.
Once you’ve finished knitting your bobble blanket, you’ll need to bind off your stitches and weave in any loose ends. Then, you can add a border to your blanket if you’d like, using either a simple garter stitch or a more intricate lace pattern. Finally, give your blanket a gentle wash and block it to help it keep its shape.
Bobble Blanket Knitting Pattern
Are you looking for a fun and unique project to knit? Look no further than the bobble blanket knitting pattern! This pattern combines the cozy warmth of a blanket with the playful texture of bobbles, resulting in a truly eye-catching and enjoyable knit.
To create this beautiful blanket, you will need a set of knitting needles and a selection of yarn in your favorite colors. The bobble blanket pattern is perfect for using up leftover yarn from other projects, as it allows you to get creative with color combinations.
Begin by casting on the desired number of stitches for your blanket. Then, follow the pattern instructions to create the bobbles. The bobbles add dimension and interest to the blanket, and they are created by knitting multiple stitches into one and then knitting them together on the following row.
As you work your way through the pattern, you will find that the bobble blanket is an addictive knit that is hard to put down. The bobbles create a textured surface that is both visually appealing and fun to touch. The blanket is also reversible, so you can display either side depending on your preference.
Once you have finished knitting the blanket, bind off the stitches and weave in any loose ends. You can block the finished blanket to even out the stitches and make it look its best.
Whether you are knitting this bobble blanket as a gift or for yourself, it is sure to be a cherished and beloved item. With its unique texture and cozy warmth, it is the perfect accessory for snuggling up on a chilly day. Get started on your own bobble blanket knitting adventure today!
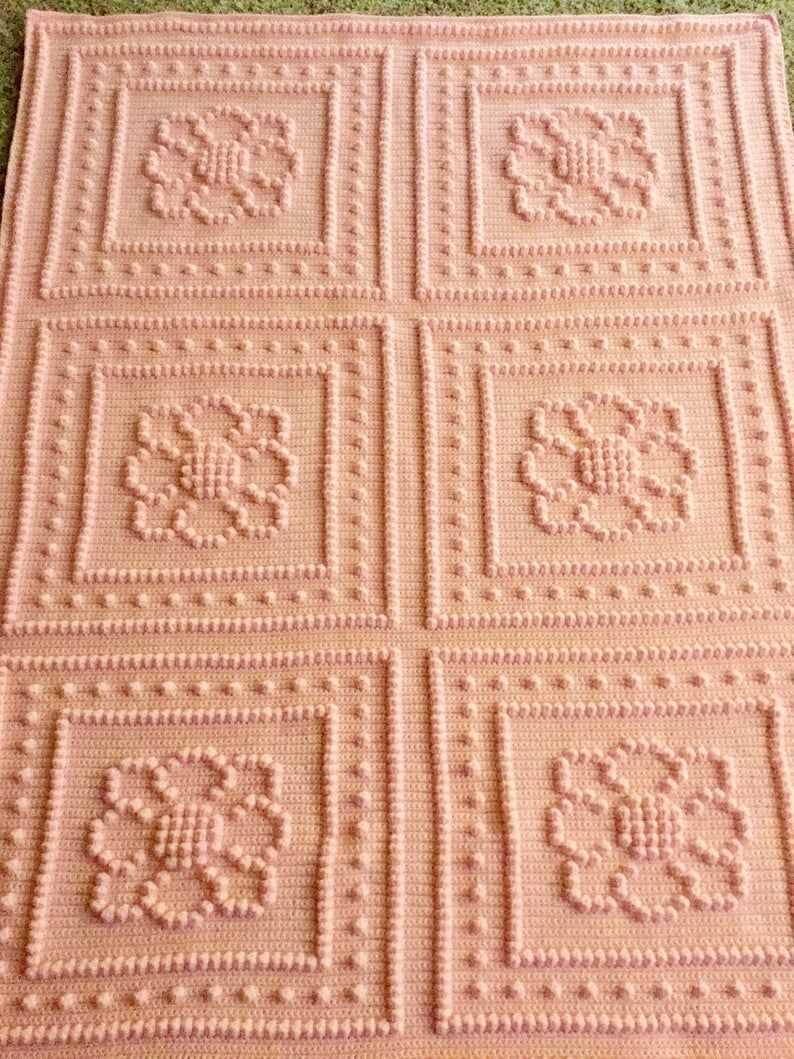
What is a Bobble Blanket?
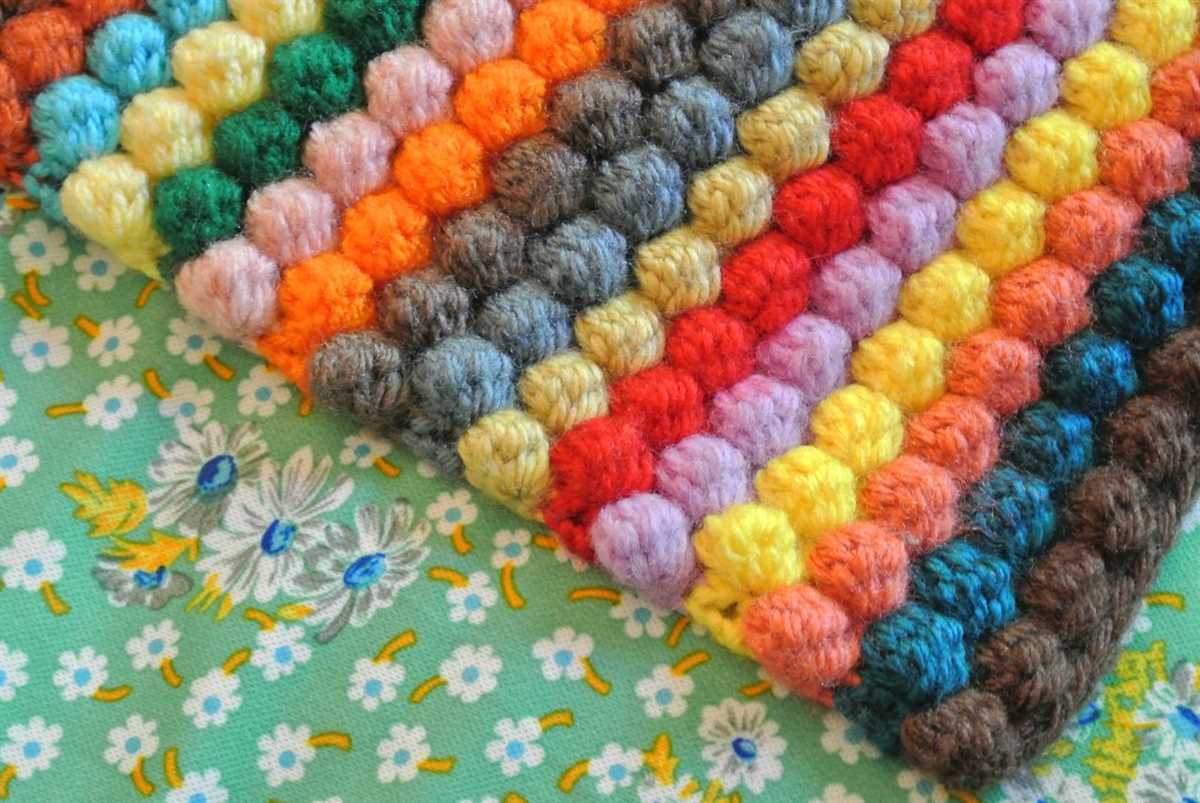
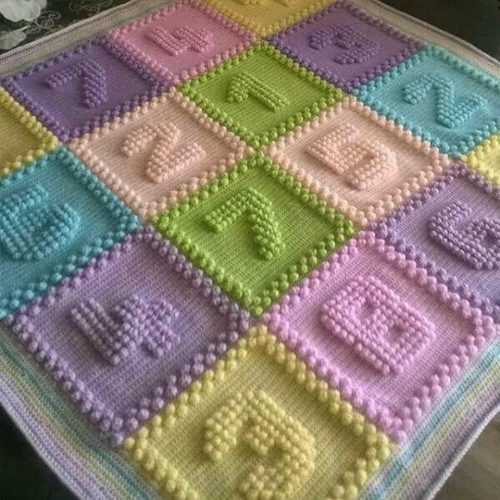
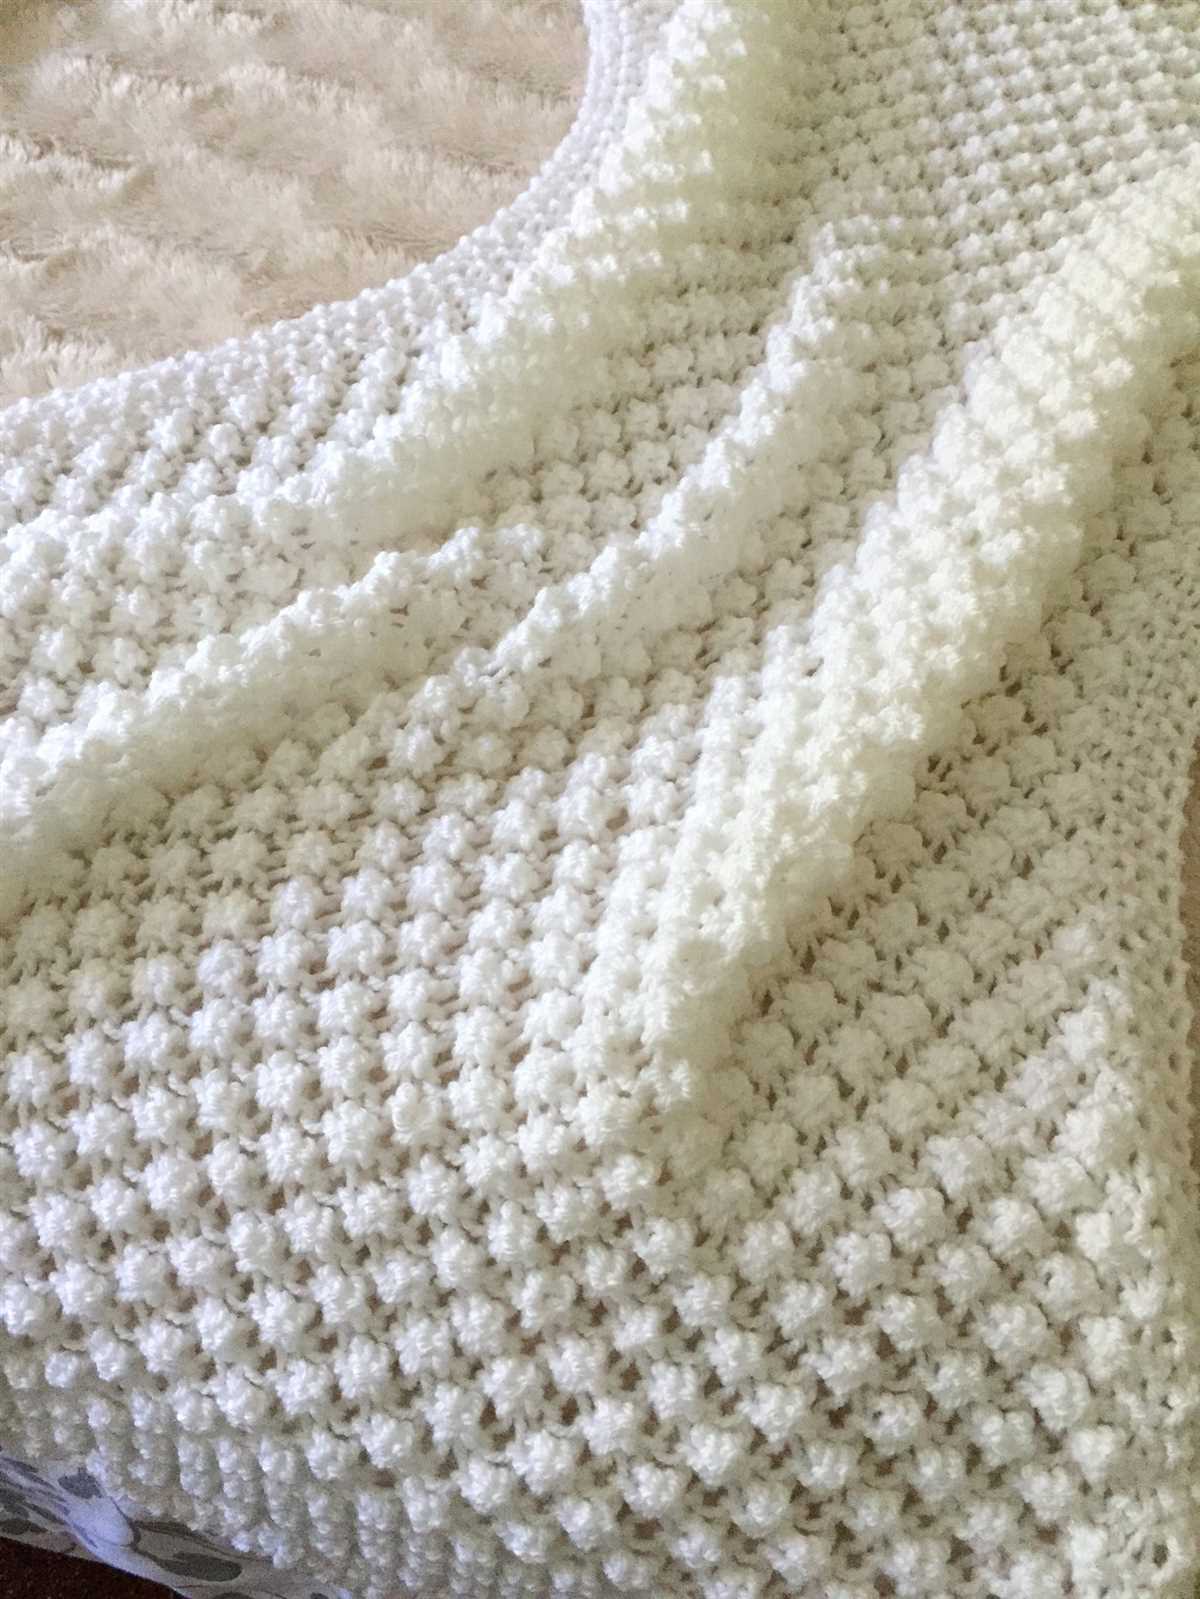
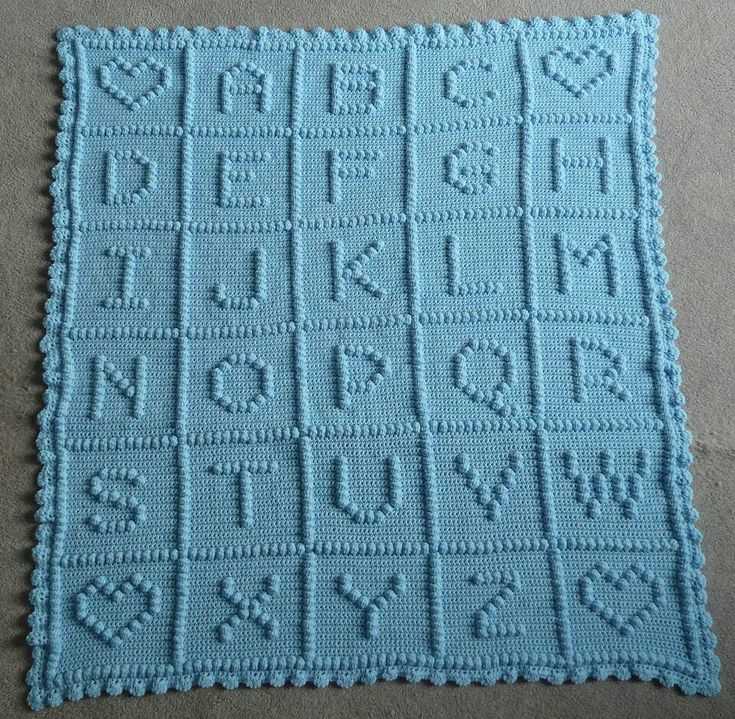
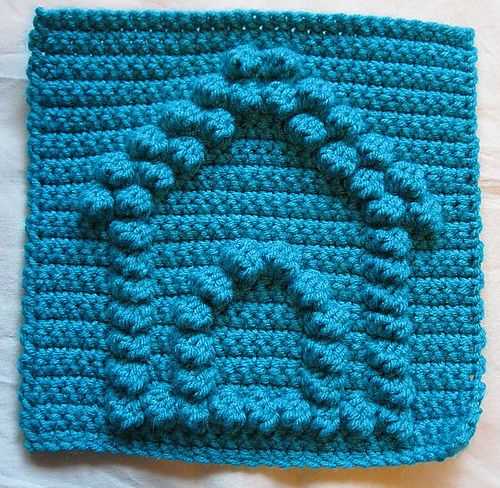
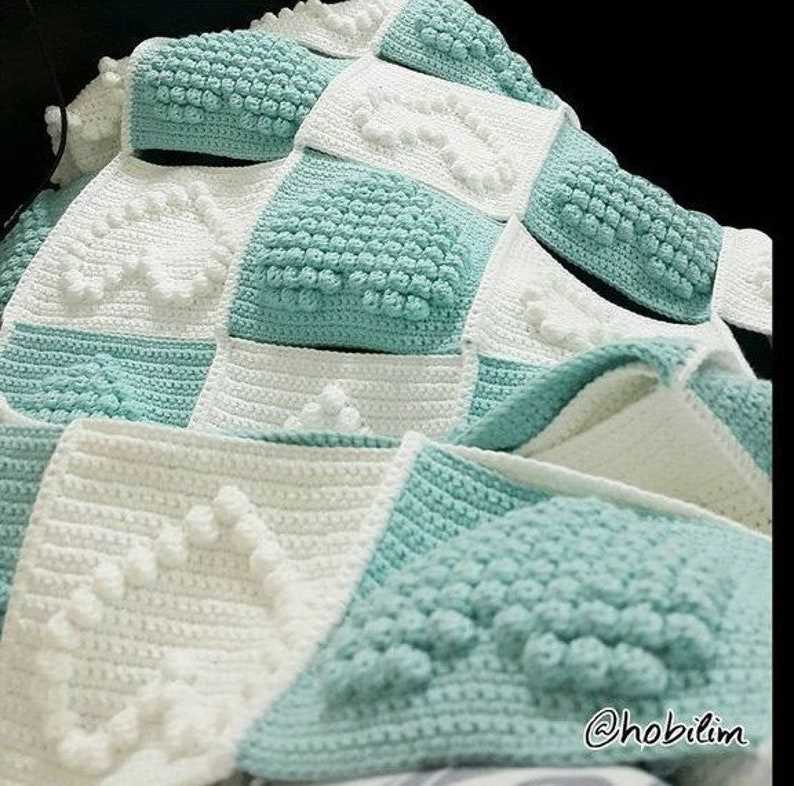
A bobble blanket is a type of knitted blanket that features small, raised bumps, or bobbles, throughout the design. These bobbles add texture and dimension to the blanket, creating a cozy and unique look. The bobbles are created by knitting stitches together in a particular way, resulting in small, round bumps that stand out from the rest of the fabric.
Bobble blankets are popular among knitters and crafters due to their fun and playful appearance. They can be made in a variety of colors and patterns, allowing for endless creativity and customizability. The bobbles also provide additional warmth and insulation, making the blanket perfect for cozying up on a chilly day.
When knitting a bobble blanket, it’s important to follow a specific pattern that outlines the placement and size of the bobbles. This ensures that the bobbles are evenly distributed throughout the blanket and create a harmonious design. Bobble blankets can be made using various knitting techniques, such as the garter stitch or the stockinette stitch, depending on the desired outcome.
In conclusion, a bobble blanket is a knitted blanket that features small, raised bobbles throughout the design. It adds texture, warmth, and a playful touch to any home. Whether you’re an experienced knitter or a beginner, knitting a bobble blanket can be a fun and rewarding project.
Materials You Will Need
Before you begin knitting your bobble blanket, make sure you have all the necessary materials at hand. Here is a list of items you will need:
1. Yarn:
The most important material for your bobble blanket is the yarn. Choose a soft and cozy yarn that is suitable for knitting. The thickness and weight of the yarn will depend on your personal preference and the desired outcome of the blanket. Consider using a chunky or bulky yarn for a thicker and warmer blanket, or go for a lighter weight yarn for a more delicate look.
2. Knitting Needles:
You will also need a pair of knitting needles to work on your bobble blanket. The size of the needles will depend on the thickness of your chosen yarn and the desired tension of your knitting. Check the label on your yarn for the recommended needle size, or use the size recommended in the knitting pattern you are following.
3. Stitch Markers:
Stitch markers can be helpful when knitting a complex pattern or when you need to keep track of specific sections of your blanket. These small rings or clips can be placed on your needles to mark a certain stitch or row, making it easier to follow the pattern and avoid mistakes.
4. Darning Needle:

A darning needle, also known as a yarn needle or tapestry needle, is used for weaving in loose ends and sewing together pieces of your knitted blanket. Choose a needle with a large eye that can accommodate the thickness of your yarn and a pointed tip for easier stitching.
5. Scissors:
A good pair of scissors is essential for any knitting project. Use them to cut the yarn when starting a new ball or when trimming excess yarn from your finished blanket. Make sure your scissors are sharp and have a small size for better control.
6. Bobble Pattern Instructions:
Last but not least, you will need the bobble pattern instructions. These instructions will guide you through the process of creating the bobbles and arranging them in the desired pattern. Make sure to have a printed copy or access to the pattern on your electronic device for easy reference while knitting.
Choosing the Right Yarn

When it comes to knitting a bobble blanket, choosing the right yarn is an important decision. The yarn you choose will determine the look and feel of your finished blanket, as well as its durability and ease of care. Here are some factors to consider when selecting the perfect yarn for your bobble blanket project.
1. Fiber Content
The first thing to consider is the fiber content of the yarn. Different fibers have different properties and will create different results. If you’re looking for a soft and cozy blanket, consider using a yarn made from natural fibers such as merino wool or alpaca. If you prefer a more durable and easy-care option, acrylic or acrylic-blend yarns might be a better choice.
2. Weight and Thickness
The weight and thickness of the yarn will also affect the look and feel of your bobble blanket. Thicker yarns will create a chunkier and more textured blanket, while thinner yarns will result in a lighter and airier finished product. Consider the desired drape and warmth of your blanket when selecting the appropriate weight and thickness of yarn.
3. Color and Pattern
The color and pattern of the yarn will play a significant role in the overall aesthetic of your bobble blanket. Solid-colored yarns will showcase the texture of the bobbles more prominently, while variegated or self-striping yarns can add visual interest and depth to the design. Consider the color scheme and style of your room or the intended recipient’s preferences when choosing the yarn.
4. Budget
Finally, consider your budget when selecting yarn for your bobble blanket. Yarn prices can vary widely, so it’s essential to find a balance between the quality of the yarn and your budget. Keep in mind that more expensive yarns often have better quality and longevity, but there are also affordable options available that can still yield excellent results.
By considering these factors – fiber content, weight and thickness, color and pattern, and budget – you can make an informed decision and select the perfect yarn for your bobble blanket project. Happy knitting!
Bobble Stitch Tutorial
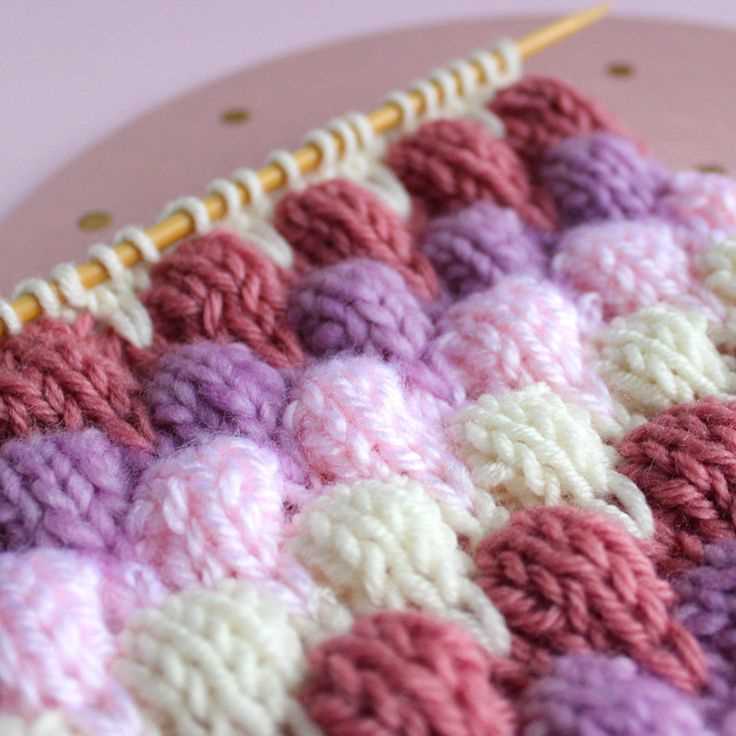
The bobble stitch is a popular and decorative stitch used in knitting patterns, including the bobble blanket pattern. It adds texture and visual interest to the fabric and can be used to create unique designs. The bobble stitch is created by working multiple stitches into a single stitch, then grouping them together to form a bobble. This tutorial will guide you through the steps of creating the bobble stitch.
Step 1: Knit the stitch
To begin, insert your needle into the next stitch as if to knit. Wrap the yarn around the needle and pull it through, just as you would for a regular knit stitch. Do not slip the stitch off the left-hand needle.
Step 2: Knit front, back, front, back
Next, you will create four stitches out of the single stitch. To do this, insert your right-hand needle from left to right into the front of the stitch, wrap the yarn around the needle, and knit into the stitch again. Then, without slipping the stitch off the left-hand needle, insert the right-hand needle from right to left into the back of the stitch, wrap the yarn around the needle, and knit into the stitch once more.
This sequence of knitting into the front and back of the stitch twice will create four new stitches on your right-hand needle, while the original stitch remains on your left-hand needle.
Step 3: Bind off
Once you have created the four new stitches, it’s time to bind off. To do this, slip the left-hand stitch over the right-hand stitch and off the needle. Repeat this process for each of the four new stitches you created, until only one stitch remains on your right-hand needle.
And that’s it! You have successfully created a bobble stitch. Repeat these steps as directed in your knitting pattern to incorporate the bobble stitch into your project. Have fun experimenting with different colors and textures to create a unique and beautiful bobble blanket.
Getting Started: Cast On
Before you begin knitting your bobble blanket, you’ll need to cast on your stitches. This is the first step in any knitting project and involves creating a foundation row of loops on your knitting needles.
To cast on for your bobble blanket, you can use the long tail cast on method. This method provides a neat and stretchy edge that is perfect for blankets. Start by making a slip knot on your knitting needle, leaving a long tail of yarn. Hold the needle with the slip knot in your right hand and the tail of yarn in your left hand.
Step 1: Insert your right needle into the slip knot from left to right, making sure to catch the yarn tail behind the needle.
Step 2: With your right hand, bring the yarn that is attached to the ball over the right needle, forming a loop.
Step 3: Insert your right needle into the loop on the left needle, going from left to right.
Step 4: Use your right hand to pull the yarn through the loop, creating a new loop on the right needle.
Step 5: Slip the new loop onto the left needle, keeping the stitch snug but not too tight.
Step 6: Repeat steps 1-5 until you have cast on the desired number of stitches for your bobble blanket.
- Make sure to count your stitches as you go to ensure accuracy.
- If you make a mistake, you can simply unravel your stitches and start again.
Once you have successfully cast on your stitches, you can begin knitting your bobble blanket following the pattern instructions. Happy knitting!
Knitting the Main Body
Once you have cast on and completed the border of your bobble blanket, it’s time to start working on the main body. This is where the bulk of your knitting will be done, and you’ll see your blanket take shape.
Using your chosen yarn and knitting needles, continue knitting in the desired stitch pattern for the main body of the blanket. This could be a simple garter stitch, stocking stitch, or any other pattern you prefer. Make sure to follow the pattern instructions provided in the bobble blanket knitting pattern you are using.
As you knit the main body, it’s important to keep track of your stitch count to ensure your blanket maintains its shape and size. You can use stitch markers to mark off certain sections or counts, especially if the pattern requires any shaping or stitch changes.
Tip: To keep your knitting even and prevent any unwanted tension changes, make sure to keep your tension consistent throughout the main body. This will help create a cohesive and professional-looking finished blanket.
Continue knitting the main body of your bobble blanket until you reach the desired length. This will depend on the size of blanket you are making and the pattern instructions. Take breaks as needed, but try to keep a consistent knitting rhythm to maintain an even tension throughout your work.
Once you have completed the main body, you can move on to the next steps in the bobble blanket knitting pattern, such as adding a border or blocking the finished blanket. Follow the pattern instructions carefully and enjoy the process of creating your cozy and beautiful bobble blanket!
Adding Bobble Rows
The bobble rows are what give the blanket its unique texture and visual appeal. To add bobble rows to your blanket, follow these steps:
Step 1: Start by knitting a row of your chosen base stitch pattern. This will serve as the foundation for the bobble rows.
Step 2: To create a bobble, knit into the stitch as you normally would, but instead of slipping the stitch off the needle, leave it on. Wrap the yarn around the needle again and knit into the same stitch. Repeat this process several times, depending on the desired size of the bobble. For example, if you want a larger bobble, you might repeat the process 4 or 5 times.
Step 3: Once you have made the desired number of knit stitches in the same stitch, turn your work and purl into each of the knit stitches. This will create a raised, round bobble on the front side of your blanket.
Step 4: Continue knitting your base stitch pattern for the desired number of rows, and then repeat Steps 2 and 3 to add more bobble rows as desired. Remember to alternate between base stitch rows and bobble rows to create the desired texture.
Step 5: Once you have finished adding the bobble rows, you can continue knitting the rest of the blanket using your base stitch pattern.
Tip: When working with bobbles, it’s important to keep your tension consistent to ensure that the bobbles are evenly sized and shaped. Practice on a swatch before starting your blanket to get a feel for the technique.
Creating a Border
Adding a border to your bobble blanket is a great way to finish off your knitting project and give it a polished look. There are several different border options you can choose from, depending on your personal preference and the overall style of your blanket.
Ribbed Border: One option for a border is to create a ribbed edge. This can be done by alternating knit and purl stitches for a certain number of rows. The ribbed border adds texture and interest to the blanket, and can also help prevent the edges from curling.
Garter Stitch Border: Another simple yet effective option is to use garter stitch for the border. This involves knitting every row, creating a textured border that lies flat and adds a clean finish to the blanket. The garter stitch border is a classic choice that works well with a variety of blanket designs.
Lace Border: If you’re looking to add a touch of elegance and femininity to your bobble blanket, consider adding a lace border. There are countless lace stitch patterns to choose from, ranging from delicate and intricate designs to more simple and geometric ones. A lace border can elevate the look of your blanket and make it a truly eye-catching piece.
Seed Stitch Border: For a border with a bit of texture, consider using seed stitch. This involves alternating knit and purl stitches within each row, creating a pattern reminiscent of scattered seeds. The seed stitch border adds visual interest and pairs well with a variety of blanket styles.
Scalloped Border: If you want to create a decorative and whimsical border for your bobble blanket, consider a scalloped edge. This can be achieved by using increases and decreases to create a wave-like pattern along the edge. The scalloped border adds a playful touch and can really make your blanket stand out.
- Experiment with different border options to find the one that best complements your bobble blanket.
- Consider the overall style and theme of your blanket when choosing a border design.
- Don’t be afraid to mix and match different stitches and techniques to create a unique border.
Finishing Touches: Binding Off
As you near the end of your bobble blanket knitting project, you will need to complete the finishing touches by binding off your stitches. Binding off is the process of securing the final row of stitches so that they do not unravel. It is an essential step in any knitting project, as it gives your work a neat and polished look.
To bind off, simply knit the first two stitches as usual. Then, using the left needle, lift the first stitch over the second stitch and off the right needle. Repeat this process for each stitch until you have only one stitch remaining on the right needle. Cut the yarn, leaving a tail of about 6 inches, and pull it through the final stitch to secure it.
When binding off, it’s important to maintain an even tension to ensure that your stitches are not too tight or too loose. If your stitches are too tight, your finished edge will be puckered and may not lay flat. If your stitches are too loose, your edge may be wavy and uneven. Practice binding off with a relaxed grip on the yarn to achieve an even tension.
For added security, you may want to weave in the ends of your yarn once you have finished binding off. To do this, thread the yarn tail onto a yarn needle and weave it in and out of the stitches along the edge of your work. This will help to prevent any loose ends from coming undone and unraveling your hard work.
Once you have completed the binding off and weaving in the ends, take a moment to admire your finished bobble blanket. The binding off process is the final step in completing your project, and it’s a rewarding feeling to see all of your hard work come together in a beautiful and cozy blanket.
Blocking and Care Instructions
Once you have completed knitting the bobble blanket, it is important to block it to achieve the desired shape and texture. Blocking is the process of shaping and stretching the knitted fabric to even out the stitches and make the final product look more polished. Here are the steps to block your bobble blanket:
- Fill a clean sink or basin with lukewarm water and add a mild detergent.
- Gently submerge the blanket in the water and let it soak for about 15 minutes.
- Drain the water and gently press the blanket against the sides of the sink to remove excess moisture. Do not wring or twist the fabric.
- Lay a clean towel on a flat surface and place the blanket on top of it.
- Gently shape the blanket into the desired dimensions, making sure to smooth out any wrinkles or uneven stitches.
- Pin the edges of the blanket to the towel using rust-proof T-pins, starting from the center and working your way outwards.
- Leave the blanket to dry completely, which may take several days depending on the humidity levels in your area.
Once the blanket is dry, you can remove the pins and enjoy your beautifully blocked bobble blanket.
To keep your bobble blanket in good condition, follow these care instructions:
- Hand wash the blanket using a gentle detergent and lukewarm water, and avoid soaking it for prolonged periods.
- Do not wring or twist the fabric when washing.
- After washing, gently squeeze out excess water and reshape the blanket if necessary.
- Allow the blanket to air dry flat, away from direct sunlight.
- Avoid using fabric softeners, bleach, or harsh chemicals that may damage the fibers.
- If needed, you can iron the blanket on a low setting, using a pressing cloth to protect the surface.
- Store the blanket in a cool, dry place when not in use, preferably folded rather than hanging to prevent stretching.
By following these blocking and care instructions, you can ensure that your bobble blanket remains soft, cozy, and beautiful for years to come.