
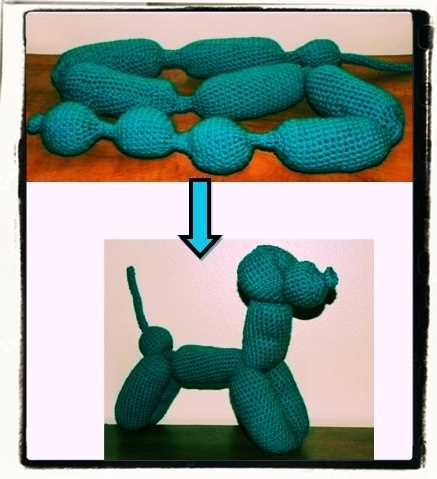
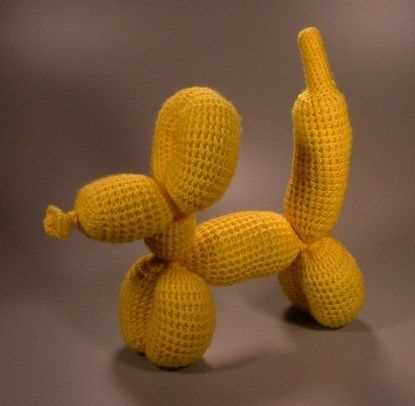
If you’re looking for a fun and unique knitting project, look no further than the balloon dog knitting pattern. This quirky design is sure to bring a smile to everyone’s face, and it’s a great way to challenge yourself and expand your knitting skills.
The balloon dog knitting pattern is not for the faint of heart, but with a little patience and practice, you’ll have your very own adorable and cuddly balloon dog in no time. This pattern is perfect for knitters of all skill levels, from beginners looking for a new challenge to experienced knitters looking for a fun and whimsical project.
To get started, you’ll need a few basic knitting supplies, such as yarn in your choice of colors, knitting needles, and a tapestry needle. You’ll also need to know the basics of knitting, such as casting on, knitting stitches, and binding off.
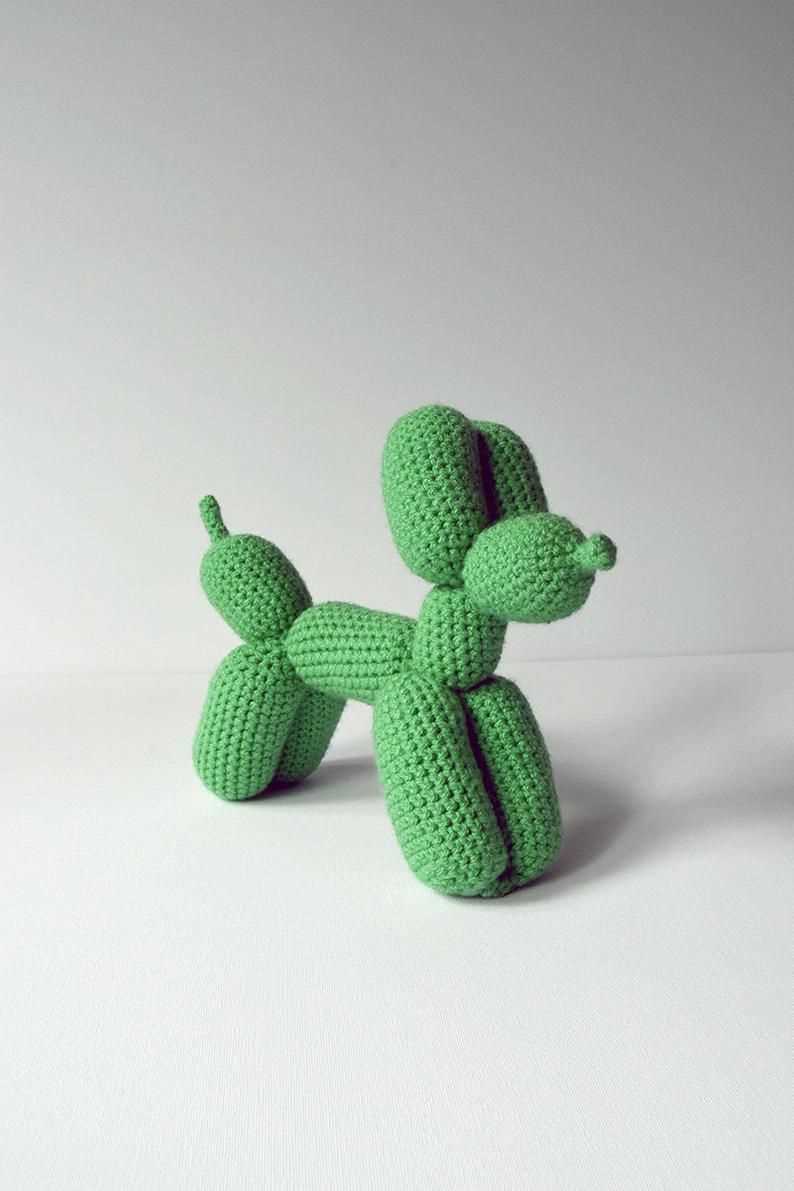
Once you have your supplies ready, it’s time to start knitting! The balloon dog pattern consists of a body, legs, and a head, which are all knit separately and then sewn together. The pattern includes detailed instructions and a stitch-by-stitch guide, so even if you’re a beginner, you’ll be able to follow along and create your own balloon dog masterpiece.
Balloon Dog Knitting Pattern: Create Your Own Adorable Balloon Dog
Do you love balloon dogs? These whimsical and playful creations are not only fun to look at, but they can also be a great addition to your home decor or a delightful gift for someone special. Now, you can create your own adorable balloon dog using a balloon dog knitting pattern!
With the balloon dog knitting pattern, you can bring this classic and iconic toy to life through knitting. This pattern provides step-by-step instructions on how to create your very own balloon dog using yarn and knitting needles. Whether you’re a beginner or an experienced knitter, this pattern is suitable for all skill levels.
Materials:
- Yarn: Choose a color of yarn that matches your desired balloon dog.
- Knitting Needles: Use knitting needles that are appropriate for the thickness of your yarn.
- Stuffing: You’ll need stuffing material to fill your balloon dog and give it its signature plumpness.
- Yarn Needle: A yarn needle will be necessary for sewing up any seams and attaching features.
- Scissors: Keep a pair of scissors handy for cutting yarn and trimming any excess.
Instructions:
- Start by casting on the required number of stitches as indicated in the pattern.
- Follow the pattern instructions row by row to create the body of the balloon dog.
- Once the body is complete, stuff it firmly with the stuffing material to give it its characteristic shape and plumpness.
- Sew up any seams using a yarn needle and the yarn color that matches your dog.
- To create the legs, head, and tail of the balloon dog, follow the pattern instructions for each specific component.
- Attach the legs, head, and tail securely to the body using the yarn needle.
- Finally, give your balloon dog a personalized touch by adding eyes, a nose, and a mouth using embroidery floss or other suitable materials.
- Trim any excess yarn and give your finished balloon dog a final inspection.
Once you’ve completed your balloon dog, you’ll have a unique and charming creation that will surely bring joy and smiles to anyone who sees it. Whether you decide to keep it for yourself as a special decoration or gift it to someone you care about, your handmade balloon dog will be a cherished item for years to come.
Materials Needed for the Balloon Dog Knitting Pattern
Before you start knitting your very own balloon dog, it’s important to gather all the necessary materials. Here is a list of items you will need:
- Yarn: Choose a durable yarn in the color or colors of your choice. It’s recommended to use a medium weight yarn to achieve the desired shape and stability for your balloon dog.
- Knitting Needles: Select knitting needles in the appropriate size for your chosen yarn. The size will depend on your personal knitting tension and the desired gauge for the project.
- Stuffing: You will need stuffing material to fill the balloon dog and give it shape. Polyester fiberfill or cotton stuffing are commonly used for this purpose.
- Yarn Needle: A yarn needle with a large eye is essential for sewing up the various parts of the balloon dog and weaving in loose ends.
- Scissors: A good pair of scissors is necessary for cutting the yarn and trimming any excess threads.
- Markers: Use markers to keep track of your stitches and to mark specific sections or points in the pattern.
- Safety Eyes: If you want to add some extra charm to your balloon dog, consider using safety eyes. These can be found in various sizes and colors to match your design.
Once you have gathered all your materials, you’ll be ready to dive into the balloon dog knitting pattern. Don’t forget to read through the pattern thoroughly before you begin, and always check your gauge to ensure your finished balloon dog turns out just right.
Step-by-Step Instructions for Knitting the Balloon Dog Body
In this tutorial, we will guide you through the process of knitting the body of a balloon dog. Whether you’re a beginner or an experienced knitter, you’ll find these step-by-step instructions easy to follow.
Materials Needed:
- Worsted weight yarn in your chosen color
- Knitting needles in a size appropriate for your yarn
- Tapestry needle
- Stuffing material
- Scissors
Step 1: Cast On
Start by casting on the number of stitches required for your desired dog size. This will depend on the yarn and needles you’re using, as well as your tension. For a small dog, you may need to cast on around 30 stitches, while a larger dog may require 50 stitches or more.
Step 2: Knit the Body
Once you have cast on, begin knitting the body of the dog using the stockinette stitch. This means that you will knit one row and purl one row, repeating this pattern until you reach the desired length. The stockinette stitch will create a smooth surface on one side of the work and a bumpy surface on the other side.
Step 3: Shape the Dog Body
To give the balloon dog its iconic shape, you will need to create increases and decreases at specific points. Begin by knitting a few rows in stockinette stitch without any shaping. Then, follow a pattern or diagram to determine where and how to make the increases and decreases.
Typically, you will need to increase stitches to create the body’s rounded shape and decrease stitches to form the dog’s legs. This can be done through various methods, such as knitting two stitches together (k2tog) to decrease or making one stitch by knitting into the front and back of the same stitch (kfb) to increase.
Step 4: Bind Off
Once you have completed the necessary shaping, it’s time to bind off your stitches. This will secure the edges of your work and create a finished look. There are different bind-off methods you can use, such as the basic bind-off, stretchy bind-off, or picot bind-off. Choose the method that best suits your preference.
Step 5: Stuff and Assemble
After binding off, use a tapestry needle to weave in any loose ends and secure them. Then, fill the knitted body with your preferred stuffing material, making sure to distribute it evenly. Finally, assemble the different parts of the balloon dog, such as the head, legs, and tail, according to the specific pattern instructions.
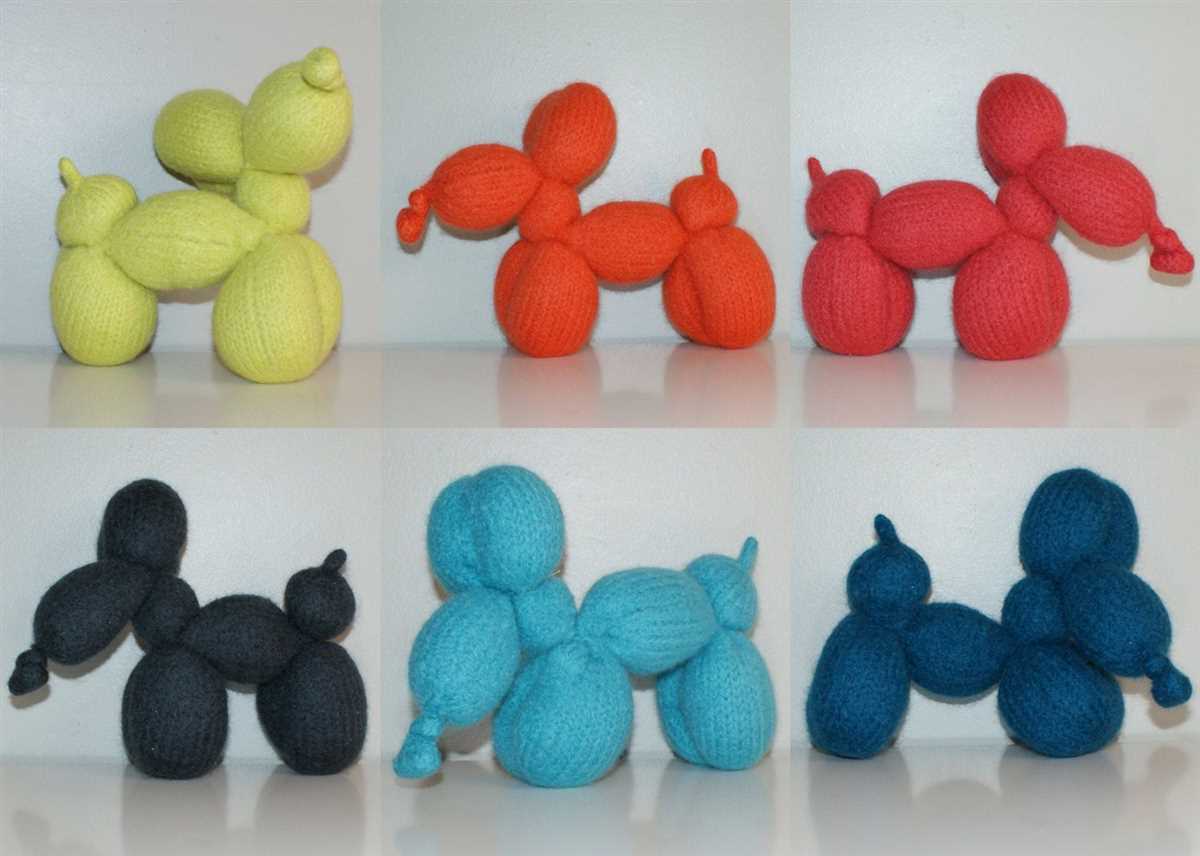
And there you have it! By following these step-by-step instructions, you can knit your very own balloon dog body. Have fun experimenting with different colors and sizes to create a whole collection of adorable balloon dogs!
Adding Details to the Balloon Dog Knitting Pattern
When creating a balloon dog knitting pattern, adding details is what brings the design to life. These small touches can make all the difference in capturing the playful and whimsical nature of a balloon dog.
1. Facial Features: One of the most important details to include in the pattern is the dog’s facial features. This includes the eyes, nose, and mouth. Using contrasting colors of yarn can help make these features pop. By embroidering or sewing on small buttons or beads for the eyes, a more realistic and expressive look can be achieved.
2. Ears and Tail: In order to make the balloon dog look more like a dog and less like a balloon, adding ears and a tail are essential. These can be created by knitting or crocheting small triangles for the ears and a longer, narrow shape for the tail. Sewing or attaching these pieces to the main body of the dog completes the look and adds a touch of cuteness.
3. Collar: A collar is a simple yet effective detail to include in the balloon dog knitting pattern. This can be achieved by using a different color of yarn for a strip around the neck, or by knitting a small band with a button or buckle detail. It adds a finishing touch and gives the dog a more polished and playful appearance.
4. Legs and Feet: The legs and feet are another important detail to consider when designing the pattern. By adding small paws or feet shapes to the bottom of the legs, the dog will have a more realistic stance. This can be achieved by attaching small circular knitted shapes to the legs or by embroidering paw prints onto the surface. It adds depth and dimension to the finished design.
5. Zigzag Pattern: Lastly, incorporating a zigzag or wavy pattern on the body of the balloon dog can mimic the appearance of an inflated balloon. This can be achieved by using a combination of knit and purl stitches in a repetitive pattern. The zigzag effect adds texture and visual interest to the overall design.
- Facial Features
- Ears and Tail
- Collar
- Legs and Feet
- Zigzag Pattern
Knitting the Balloon Dog Tail
When knitting the balloon dog, one of the key components to focus on is the tail. The tail adds character and personality to the balloon dog, making it instantly recognizable. Knitting the perfect tail requires attention to detail and the right techniques.
Materials:
- Yarn in the desired color for the tail (typically a contrasting color to the body)
- Knitting needles appropriate for the yarn
- Yarn needle
Instructions:
- Choose your desired yarn color for the tail. This can be a fun opportunity to get creative and add a pop of color to your balloon dog.
- Cast on the desired number of stitches for the tail. This will depend on the size and length you want for your balloon dog’s tail. A general guideline is to cast on around 15-20 stitches for a smaller tail and increase the number of stitches for a larger, more prominent tail.
- Begin knitting in your preferred stitch pattern. Traditional options include garter stitch, stockinette stitch, or ribbing. Feel free to experiment with different stitch patterns to add texture and visual interest to the tail.
- Continue knitting until the tail reaches the desired length. You can reference the original balloon dog pattern for guidance on tail length, but ultimately it’s up to your personal preference.
- Bind off your stitches to secure the end of the tail. Make sure to leave a long enough tail of yarn to sew the tail to the rest of the balloon dog.
- Use a yarn needle to stitch the tail to the body of the balloon dog. Position the tail towards the back end of the dog, ensuring it’s securely attached.
- Weave in any loose ends of yarn to give your balloon dog a clean and polished look.
Knitting the balloon dog tail is a fun and creative step in the overall process. Experiment with different colors and stitch patterns to customize your balloon dog and make it truly unique.
Creating the Balloon Dog Legs
The legs of a balloon dog are an essential part of its structure and appearance. They provide stability and balance, allowing the dog to stand upright and maintain its shape. Creating the legs requires a careful knitting technique to ensure they are sturdy and proportionate.
To start, choose a suitable yarn color for the legs that matches the body of the balloon dog. This will help create a cohesive look. It is recommended to use a thicker yarn for the legs to give them more stability. You will also need a pair of knitting needles in a size appropriate for your chosen yarn.
Step 1: Cast on the stitches
Begin by casting on the desired number of stitches for each leg. This will depend on the size of your balloon dog and the thickness of your yarn. Make sure to leave a long tail to stitch up the bottom of the leg later.
Step 2: Knit the legs
Using the knitting technique of your choice (such as knit or purl stitches), work the desired length for each leg. Keep in mind that the legs should be proportionate to the body of the balloon dog. Ensure that the tension of your knitting is consistent to maintain an even appearance throughout the legs.
Step 3: Shape the legs
To create the rounded shape of the legs, decrease stitches gradually towards the bottom. This can be done by knitting two stitches together at regular intervals. Experiment with the frequency of decreases to achieve the desired shape. The number of stitches remaining at the bottom of the leg will depend on the size and shape of your balloon dog.
Step 4: Finishing touches
Once you have finished knitting the legs, carefully stitch up the bottom using the long tail you left at the beginning. This will ensure that the legs are closed off and secure. Trim any excess yarn.
Repeat these steps for each leg of the balloon dog. Once all the legs are complete, you can attach them to the body using a sewing needle and yarn. Make sure to position the legs evenly and securely to ensure the stability and balance of the balloon dog.
Making the Balloon Dog Ears
One of the most recognizable features of a balloon dog is its large, floppy ears. These ears give the dog its playful and whimsical appearance. Making the balloon dog ears requires a few basic knitting techniques, but with a little practice, you’ll be able to create adorable ears for your balloon dog.
To start, you’ll need to gather your materials. You’ll need a pair of knitting needles in the appropriate size for your yarn, as well as some yarn in the color of your choice. It’s best to choose a soft and durable yarn that will hold its shape well. You’ll also need a pair of scissors and a tapestry needle for finishing.
Begin by casting on the desired number of stitches for your balloon dog ears. A good starting point is to cast on about 12 stitches, but you can adjust this based on the size of your dog and the thickness of your yarn. Once your stitches are cast on, you can start knitting in your preferred stitch pattern. One simple option is to knit every row (garter stitch), which will create a nice, textured ear.
Continue knitting until the ear reaches your desired length. You can use a tape measure or ruler to help guide you. Once you’re happy with the length, you can bind off your stitches. This can be done by knitting two stitches, passing the first stitch over the second stitch, and repeating until only one stitch remains. Cut your yarn, leaving a tail that is about 6 inches long.
Take your tapestry needle and thread the tail through it. Use the needle to weave the tail through the bound off stitches, pulling it tight to secure the end of your ear. Trim any excess yarn. Repeat these steps to create a second ear for your balloon dog.
Once your ears are complete, you can attach them to your balloon dog. The placement of the ears is up to you, but a popular choice is to place them on either side of the head, towards the top. Use your tapestry needle and some yarn to sew the ears onto the body of your balloon dog. Make sure to secure the ears firmly so they don’t come loose during play.
Finishing Touches for the Balloon Dog Knitting Pattern
Once you have completed knitting your adorable balloon dog, it’s time to add some finishing touches to bring your creation to life. These final details will help make your balloon dog even more playful and realistic. From the shiny eyes and expressive face to the cute collar, here are the essential steps to complete your knitting project.
Add the Eyes
To give your balloon dog that charming and mischievous expression, attach two small black buttons or beads as eyes. Position them evenly on the face, just above the snout. Secure them tightly with thread and make sure they are firmly attached.
Create the Facial Features
To make your balloon dog even more expressive, embroider a small triangle-shaped nose using black yarn. Make sure to position it at the center of the snout. Then, using a contrasting color of yarn, embroider a simple smile between the nose and the eyes. This will add a touch of whimsy to your balloon dog’s face.
Add the Collar
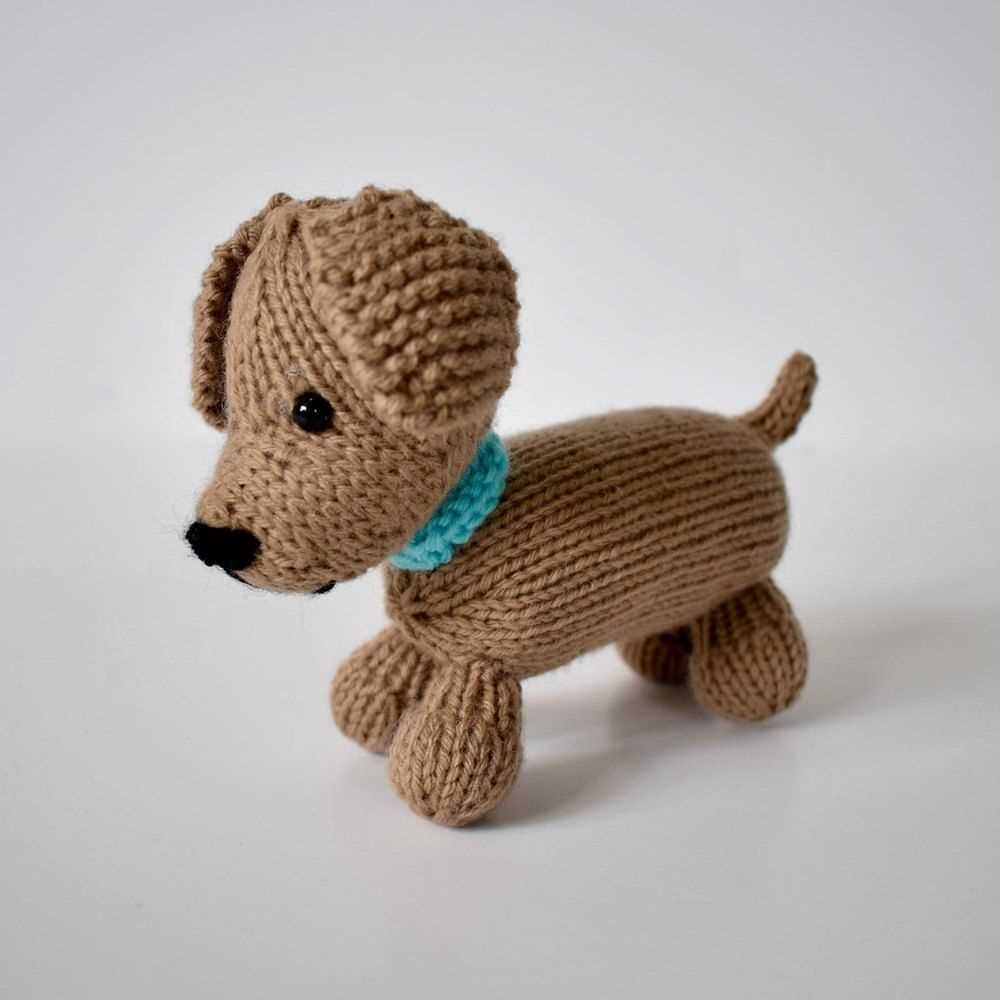
To give your balloon dog that finishing touch, knit a small collar using a different color of yarn. You can choose a bright and vibrant color to make it stand out. Simply cast on a few stitches and knit a strip that fits snugly around your balloon dog’s neck. Attach it securely, making sure it is neither too tight nor too loose.
- Thread two small black buttons or beads for the eyes.
- Embroider a triangle-shaped nose using black yarn.
- Embroider a contrasting colored smile.
- Knit a small collar using a different colored yarn.
By following these steps, you can add the perfect finishing touches to your balloon dog knitting project. The eyes, facial features, and collar will bring your creation to life, making it an adorable and playful addition to your home decor or a delightful gift for a loved one.
Tips and Tricks for Knitting the Balloon Dog
Knitting the balloon dog can be a fun and rewarding project for knitters of all skill levels. Whether you’re a beginner or an experienced knitter, these tips and tricks can help you create a cute and decorative balloon dog.
1. Choose the right yarn:
When knitting the balloon dog, it’s important to choose a yarn that is soft and flexible. Look for a yarn that has a good amount of stretch so that it can be easily manipulated into the desired shape. Acrylic or cotton yarns are often good choices for this project.
2. Use the right needle size:
The size of your knitting needles can make a difference in the final result of the balloon dog. For a tighter and sturdier dog, use smaller needles. For a looser and more flexible dog, use larger needles. Experiment with different needle sizes to achieve the desired texture and shape.
3. Follow the pattern carefully:
Make sure to carefully read and follow the balloon dog knitting pattern. Pay attention to the instructions for shaping the body, legs, and head of the dog. Take your time and double-check the pattern as you go to avoid making any mistakes.
4. Use stitch markers:
Stitch markers can be helpful when knitting the balloon dog, especially when shaping the body and legs. Place stitch markers at the beginning and end of each section to easily keep track of where you are in the pattern. This can prevent any confusion and help ensure that your balloon dog is symmetrical.
5. Stuff the dog properly:
When it comes to stuffing the balloon dog, use a soft and lightweight stuffing material. Avoid overstuffing the dog, as this can cause it to lose its shape and become too rigid. Gently fill each section of the dog with stuffing, making sure to evenly distribute it for a balanced look.
With these tips and tricks in mind, you’re ready to start knitting your own adorable balloon dog. Enjoy the process and have fun creating this unique and playful decoration!
Common Mistakes to Avoid when Knitting the Balloon Dog
Knitting the balloon dog can be a fun and rewarding project, but there are some common mistakes that beginners often make. By being aware of these mistakes, you can avoid them and create a perfect balloon dog.
1. Incorrect Gauge
One of the most important factors in knitting the balloon dog pattern is achieving the correct gauge. Gauge refers to the number of stitches and rows per inch. Failing to match the gauge given in the pattern can result in a balloon dog that is either too big or too small. It is crucial to check your gauge before starting the project and make any necessary adjustments to your needle size or tension to ensure accuracy.
2. Improper Stitch Count
Another common mistake is failing to maintain the correct stitch count throughout the pattern. It is essential to carefully follow the instructions and ensure that you are knitting the correct number of stitches in each row. Adding or skipping stitches can alter the shape and structure of the balloon dog, resulting in an uneven and lopsided finished product. To avoid this mistake, double-check your stitch count at the end of each row and make any necessary corrections.
3. Poor Finishing Techniques
A well-executed balloon dog not only depends on the knitting itself but also on the finishing techniques. Poor finishing techniques can detract from the overall appearance of your balloon dog. It is essential to pay attention to details such as seaming, weaving in ends, and stuffing evenly. Take the time to carefully finish each step of the project, following the instructions provided, to ensure a polished and professional-looking result.
Avoiding these common mistakes can help you create a beautiful and well-made balloon dog. By paying attention to gauge, stitch count, and finishing techniques, you can ensure a successful knitting project and enjoy the satisfaction of a completed balloon dog. Take your time, be patient, and enjoy the process of creating this adorable and fun knitting pattern.
Balloon Dog Knitting Pattern FAQs
If you’re new to knitting or have never tried knitting a balloon dog before, you may have some questions. Here are some frequently asked questions about balloon dog knitting patterns.
1. What materials do I need to knit a balloon dog?
To knit a balloon dog, you will need a few basic materials including:
- Yarn in the colors of your choice
- Knitting needles
- Stuffing or fiberfill
- Tapestry needle
- Scissors
2. Are balloon dog knitting patterns suitable for beginners?
Yes, balloon dog knitting patterns are often beginner-friendly. They typically use basic stitches like knit and purl, which are easy to learn. However, some patterns may include more advanced techniques like increasing and decreasing, so it’s always a good idea to check the difficulty level before starting.
3. Can I customize the size and color of my balloon dog?
Yes, one of the great things about knitting your own balloon dog is that you can customize it to your liking. You can choose the size of the finished dog by using different yarn weights and needle sizes. You can also select your favorite colors to create a unique and personalized balloon dog.
4. How long does it take to knit a balloon dog?
The time it takes to knit a balloon dog will vary depending on your knitting speed and experience level. For beginners, it may take a bit longer to complete compared to more experienced knitters. On average, it could take a few hours to a few days to finish knitting a balloon dog.
5. Can I sell the balloon dogs I knit using a pattern?
Whether or not you can sell the balloon dogs you knit using a pattern depends on the specific pattern and its terms of use. Some patterns may allow you to sell the finished products, while others may have restrictions. It’s important to carefully read and follow the instructions provided with the pattern to ensure you are in compliance with the designer’s terms.
Showcase Your Balloon Dog: Creative Ideas for Display
Now that you have completed knitting your balloon dog, it’s time to showcase your creation. Displaying your balloon dog in creative ways can make it a focal point in your home or a conversation starter at events. Here are some ideas to inspire you:
1. Wearable Display: Attach a pin or brooch backing to your balloon dog and wear it as a unique accessory. Showcase your knitting skills and spark conversations wherever you go.
2. Shadow Box: Frame your balloon dog in a shadow box to create a three-dimensional display. You can add a background, such as a colorful fabric or a cityscape, to enhance its visual appeal.
3. Pet Bed Cover: Repurpose your balloon dog by using it as a cover for your pet’s bed. This playful addition will add a touch of whimsy to your pet’s sleeping space.
4. Centerpiece: Place your balloon dog on a decorative tray or pedestal and use it as a centerpiece for your dining table or coffee table. Surround it with flowers or other small decorative items to create a charming display.
5. Wall Art: Hang your balloon dog on the wall as a piece of art. You can create a gallery wall by displaying multiple balloon dogs of different colors and sizes.
Remember, the possibilities are endless when it comes to showcasing your balloon dog. Get creative and think outside the box to transform your knitting project into a unique and eye-catching display!