
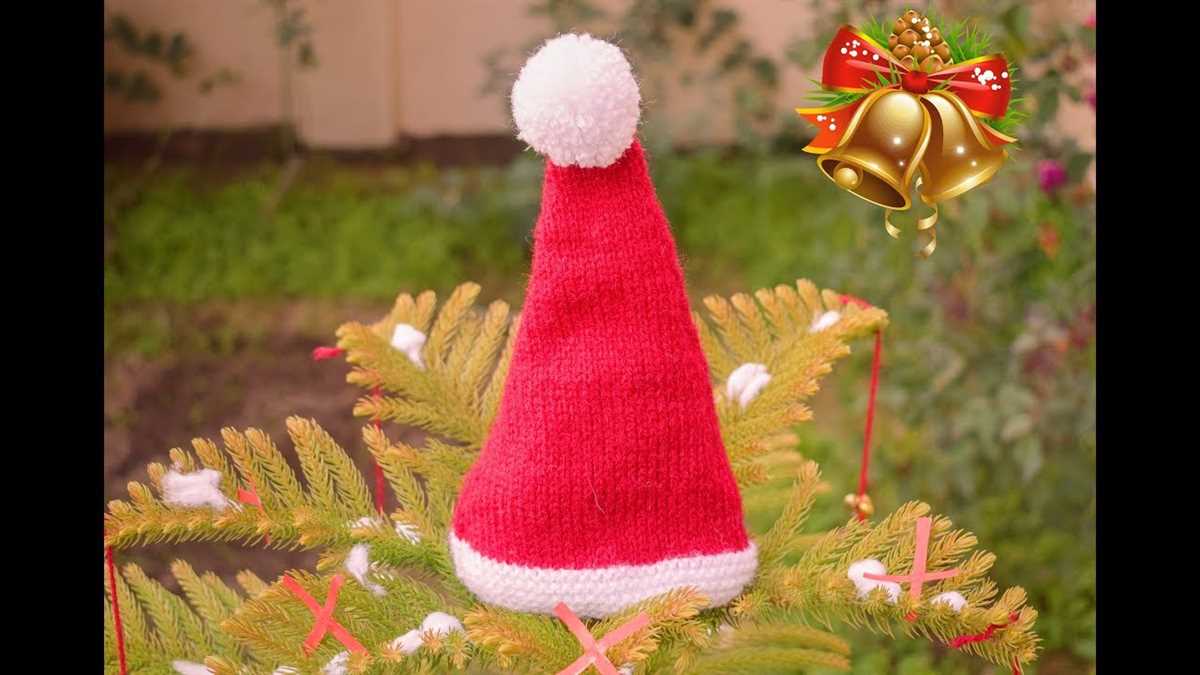
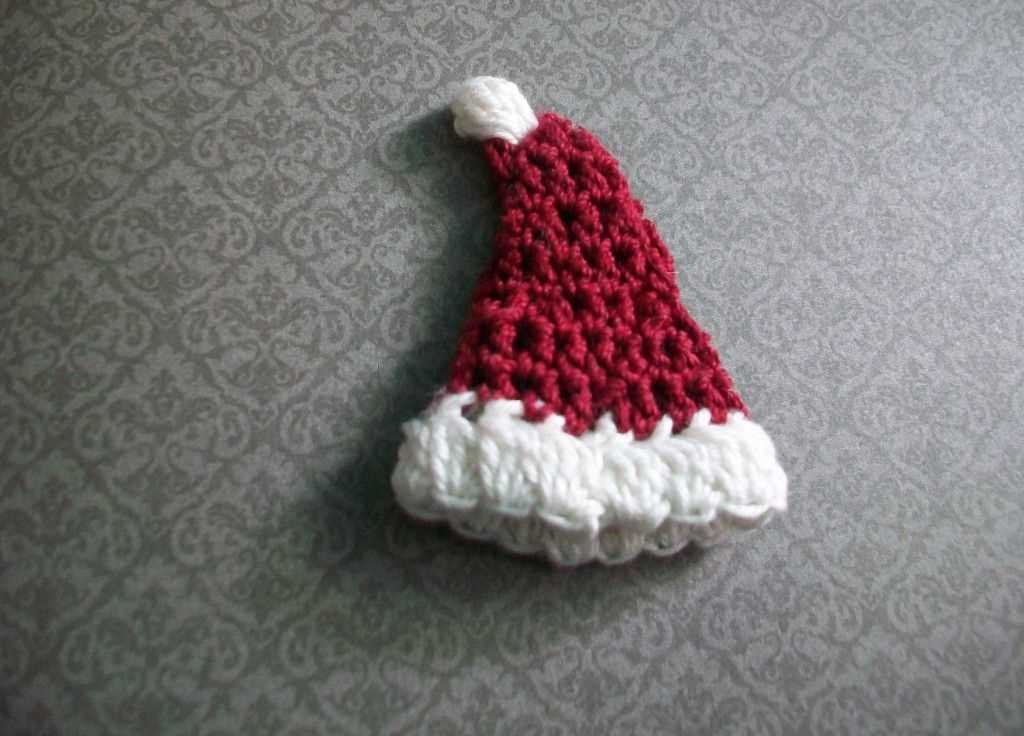
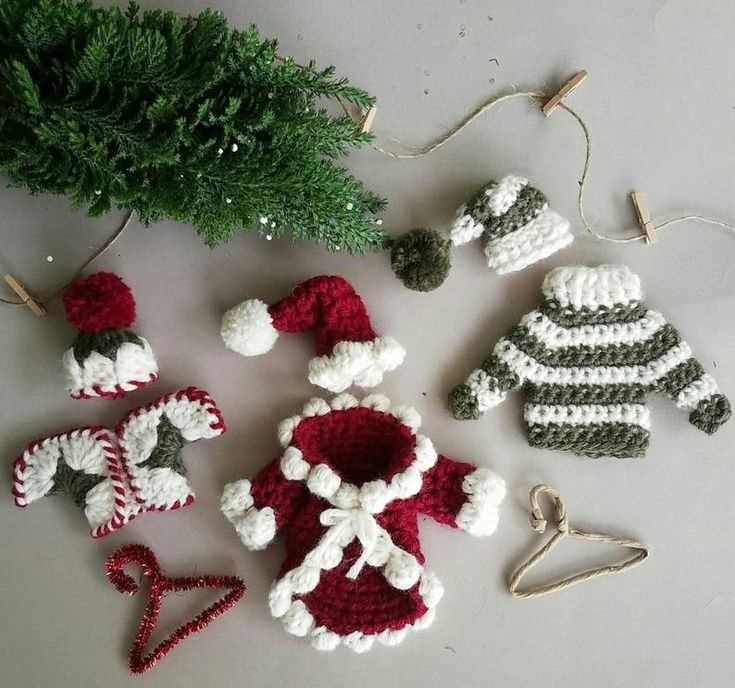
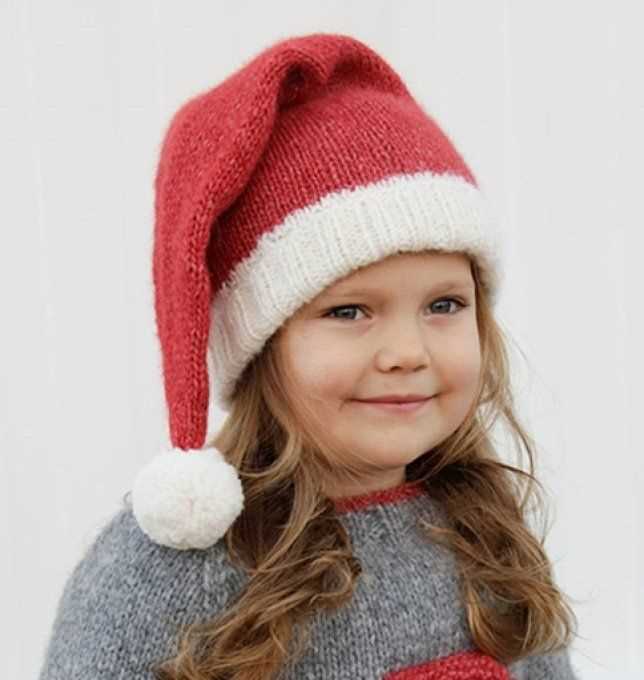
The holiday season is the perfect time to get crafty and create some festive decorations for your home. One popular ornament that many people enjoy making is a knitted Santa hat. Not only is it a fun and easy project to work on, but it also adds a touch of whimsy and charm to your Christmas tree.
Whether you’re an experienced knitter or just starting out, this knitted Santa hat ornament pattern is suitable for all skill levels. With just a few basic supplies and some simple stitches, you can create a cute and cozy hat that will become a cherished part of your holiday decor.
What makes this pattern even more special is the ability to personalize it with different colors and embellishments. You can choose traditional red and white yarn for a classic Santa hat look, or you can get creative and experiment with other festive colors like green and gold. Adding a sparkly pom-pom or some glittery snowflake beads can also add a festive touch to your ornament.
Supplies needed
Before you begin knitting your Santa hat ornament, make sure you have all the necessary supplies. Here is a list of items you will need:
- Yarn: Choose a red yarn for the main part of the hat and a white yarn for the trim.
- Knitting Needles: Use 4mm (US size 6) knitting needles to achieve the desired gauge.
- Tapestry Needle: This will be used to weave in ends and sew the hat together.
- Scissors: You’ll need scissors to cut the yarn and trim any excess.
- Pom-pom Maker: If you want to add a pom-pom to the top of your hat, you’ll need a pom-pom maker. Alternatively, you can use a piece of cardboard to make a pom-pom by hand.
Once you have gathered all the necessary supplies, you’ll be ready to start knitting your Santa hat ornament.
Choosing the right yarn
When it comes to choosing the right yarn for your knitted Santa hat ornament, there are a few factors to consider. Firstly, you’ll want to think about the weight or thickness of the yarn. A thinner yarn, such as sport or fingering weight, will produce a more delicate and lightweight ornament, while a thicker yarn, like bulky or super bulky, will create a more substantial and cozy hat. Think about how you want your ornament to look and feel, and choose a yarn weight accordingly.
The fiber content of the yarn is another important consideration. Acrylic yarns are a popular choice for holiday ornaments as they are affordable, easy to care for, and come in a wide range of colors. However, if you’re looking for a more luxurious ornament, you may opt for natural fibers such as wool or alpaca. These fibers have a soft and warm texture and can add an extra touch of elegance to your Santa hat ornament.
Additionally, consider the color palette of your ornament. Traditional Santa hats are red with a white trim, but you can get creative and choose yarns in different shades of red, green, or even metallics for a festive touch. Look for yarns with vibrant and rich colors that will make your Santa hat ornament stand out.
In conclusion, when choosing the right yarn for your knitted Santa hat ornament, consider the weight, fiber content, and color palette. By taking these factors into account, you can create a beautiful and unique ornament that will add a festive touch to your holiday decorations.
Choosing the right needle size
When knitting a Santa hat ornament, one of the most important factors to consider is the needle size. The needle size determines the gauge of your knitting, which in turn affects the size and overall look of your finished ornament. Choosing the right needle size can make a significant difference in the final outcome of your project.
1. Yarn weight and needle size: The first thing to consider when selecting the needle size is the weight of the yarn you are using. Thicker yarns typically require larger needles, while thinner yarns work best with smaller needles. For a Santa hat ornament, you will likely be using a lightweight yarn, so it is advisable to choose a smaller needle size to achieve a tight knit that will hold its shape.
For example, a size US 2 (2.75 mm) or US 3 (3.25 mm) needle can be a good starting point for a lightweight yarn.
2. Desired gauge and tension: The gauge refers to the number of stitches and rows per inch that you achieve in your knitting. This is important because it will determine the size of your ornament. Consider the desired finished dimensions of your Santa hat ornament and the gauge specified in the pattern, if you are following one. Experiment with different needle sizes to achieve the desired tension and gauge.
For instance, if the pattern calls for a gauge of 20 stitches and 24 rows per 4 inches, you may need to adjust your needle size accordingly until you achieve the correct gauge.
3. Personal preference: Ultimately, the choice of needle size also depends on your personal preference and knitting style. Some knitters prefer a tighter knit and may opt for smaller needles, while others prefer a looser stitch and may choose larger needles. It’s important to consider what kind of look and feel you want for your Santa hat ornament and adjust the needle size accordingly.
- Remember to swatch and measure your gauge before starting the actual ornament to ensure that it will turn out the way you want it to.
- Keep in mind that the needle size is just one factor that influences the final result. The type and texture of the yarn, as well as your tension as you knit, can also affect the outcome.
- Don’t be afraid to experiment with different needle sizes and techniques to achieve the desired look for your knitted Santa hat ornament.
Knitting the brim
When knitting the brim of the Santa hat ornament, you will need to start by casting on the required number of stitches. This will depend on the size of the hat you want to knit. For example, if you want a smaller hat, you might cast on fewer stitches, while a larger hat would require more stitches. It’s important to follow the pattern’s instructions to determine the correct number of stitches.
Once you have cast on the stitches, you can begin working the brim. This section of the hat is typically worked in a rib stitch pattern. A rib stitch involves alternating knit and purl stitches to create a stretchy and textured fabric. In most cases, the pattern will specify the type of rib stitch to use, such as a 1×1 rib or a 2×2 rib. You will need to repeat this rib stitch pattern for the desired length of the brim.
Note: It’s important to maintain an even tension while knitting the brim to ensure that it is not too tight or too loose. If the brim is too tight, it may not fit comfortably around the head of the ornament. If it is too loose, it may not hold its shape properly. Take care to knit each stitch consistently and adjust your tension as needed.
- Cast on the required number of stitches for the desired size of the hat.
- Follow the pattern’s instructions for the rib stitch pattern to create a stretchy and textured brim.
- Maintain an even tension while knitting to ensure the brim fits properly and holds its shape.
Shaping the Body of the Hat
Once you have completed the brim of your knitted Santa hat ornament, it’s time to start shaping the body of the hat. This is where the hat really takes shape and starts to look like a miniature version of the real thing.
To shape the body, you will need to decrease stitches gradually to create the cone-like shape of the hat. This is typically done through a series of decrease rounds, where you will knit two stitches together or work a slip-slip-knit (ssk) decrease. These decrease rounds are usually spaced evenly throughout the body of the hat to maintain the overall shape.
- Start by knitting a few rounds without any decreases to establish the length of the hat’s body.
- Next, begin the decrease rounds by working the specified decrease pattern. This could be knitting two stitches together, working a slip-slip-knit decrease, or any other decrease stitch pattern specified in the pattern you are using.
- Continue to work the decrease rounds at regular intervals, following the pattern’s instructions, until you have reached the desired length and shape of the hat.
It’s important to carefully follow the pattern instructions for shaping the body of the hat to ensure that it turns out correctly. The number of decrease rounds and the spacing between them will depend on the size of your hat and the tension of your knitting. It may be helpful to use stitch markers to keep track of where each decrease round begins and ends.
Shaping the body of the hat is an essential step in creating a realistic and well-fitting Santa hat ornament. Take your time and make sure to keep track of your stitches and decrease rounds to achieve the desired shape.
Adding the pom-pom
Materials needed:
- Yarn in a complementary color
- Pom-pom maker or a piece of cardboard
- Scissors
- Tapestry needle
1. Start by selecting a yarn color that complements the main color of your Santa hat ornament. You can choose a matching color for a cohesive look, or go for a contrasting color for a more playful effect.
2. If you have a pom-pom maker, follow the manufacturer’s instructions to create the pom-pom. If not, you can easily make one using a piece of cardboard. Cut a circle out of the cardboard, then cut another smaller circle in the center. The size of the circles will determine the size of your pom-pom, so adjust accordingly.
3. Wrap the yarn around the cardboard or pom-pom maker. The more times you wrap it, the fuller the pom-pom will be. Keep in mind that the yarn will be doubled up, so account for that when determining how much yarn to use.
4. Once you have wrapped the yarn around the cardboard or pom-pom maker, carefully cut along the outer edge of the circle. Be sure to hold the wrapped yarn firmly in place to prevent it from unraveling.
5. Cut a piece of yarn and slide it between the two layers of cardboard or the pom-pom maker. Tie a tight knot to secure the pom-pom in place.
6. Gently remove the cardboard or pom-pom maker, making sure not to disturb the yarn. Use scissors to trim any uneven edges and shape the pom-pom to your desired size and fluffiness.
7. Finally, thread a tapestry needle with a piece of yarn in the same color as the top of the Santa hat. Insert the needle through the top of the hat and attach the pom-pom by sewing it securely in place. Make sure to weave in the ends of the yarn to ensure a neat finish.
Your knitted Santa hat ornament is now complete with a festive pom-pom! Hang it on your Christmas tree or use it as a playful decoration for your holiday gifts.
Finishing touches
Once you have completed knitting your Santa hat ornament, it’s time to add some finishing touches to make it truly festive and adorable.
First, you can add a fluffy pom pom on the top of the hat. You can use white or red yarn to make the pom pom, or even mix the colors for a fun twist. Attach the pom pom securely to the hat using a yarn needle, making sure it’s centered and secure.
Next, you can add a cute brim to the hat. Using a contrasting color of yarn, knit a few rows of ribbing or garter stitch at the bottom of the hat to create a brim. This will give the hat a more finished look and add some extra texture to the design.
To make your Santa hat ornament even more festive, you can embellish it with some miniature decorations. Attach tiny beads or sequins to the hat to create a sparkling effect. You can also sew on small felt shapes, such as stars or snowflakes, to add a festive touch.
Finally, don’t forget to attach a loop at the top of the hat so you can hang it on your Christmas tree. Using a contrasting color of yarn, make a small chain or braid and attach it securely to the top of the hat. Make sure the loop is strong enough to support the weight of the ornament.
With these finishing touches, your knitted Santa hat ornament will be ready to spread some holiday cheer and bring a touch of festive charm to your Christmas tree.
Variations and customization
Knitting patterns allow for endless variations and customization options, making it easy to create unique and personalized santa hat ornaments. Here are a few ideas to inspire your creativity:
1. Color variations
Play around with different colors to give your santa hat ornaments a fresh and modern look. Instead of the traditional red and white, consider using alternative color combinations such as green and white, blue and silver, or even rainbow colors for a fun and playful twist.
2. Embellishments
Add some extra flair to your santa hat ornaments by incorporating embellishments. Sew on sequins, beads, or small pom-poms to give them a sparkling or textured effect. You can also attach tiny jingle bells to the trim for a festive touch.
3. Pattern stitches
Experiment with different pattern stitches to create unique textures and patterns on your santa hat ornaments. Try using ribbing, cables, or lace stitches to add visual interest and dimension to your knitted ornaments. This is a great opportunity to showcase your knitting skills and create one-of-a-kind designs.
4. Personalization
Make your santa hat ornaments extra special by personalizing them. You can embroider initials or names onto the brim or attach small tags with personalized messages or greetings. This way, you can create memorable keepsakes or gifts that are tailored to the recipient.
Remember, the beauty of knitting is that you have the freedom to customize and adapt patterns to suit your own preferences. Use these ideas as a starting point, and let your imagination run wild to create unique and beautiful santa hat ornaments that will be cherished for years to come.
Other holiday hat patterns
Aside from the knitted Santa hat ornament, there are plenty of other fun and festive holiday hat patterns to try. Whether you’re looking to make hats for yourself, your family, or as gifts, these patterns are sure to bring some holiday cheer.
Here are a few other holiday hat patterns worth checking out:
- Elf Hat: Get in the spirit of Santa’s helpers with a cute and whimsical elf hat pattern. This pattern usually features a pointed design with fun accents like bells or pom-poms.
- Reindeer Hat: Show off your love for all things Rudolph with a reindeer hat pattern. These hats often include antlers and a red nose, perfect for channeling your inner reindeer.
- Snowflake Hat: Embrace the beauty of winter with a snowflake hat pattern. These hats typically have intricate snowflake designs, adding a touch of elegance to your winter wardrobe.
- Gingerbread Hat: Bring some sweetness to your holiday attire with a gingerbread hat pattern. These hats often feature a cute gingerbread man or woman design, complete with icing accents.
- Christmas Tree Hat: Show off your love for all things Christmas with a festive Christmas tree hat pattern. These hats often feature a tree-shaped design with colorful ornaments and a star on top.
With so many fun and creative holiday hat patterns to choose from, you’ll have no problem finding the perfect design to match your style and spread some holiday cheer. Whether you’re knitting for yourself or making gifts for loved ones, these patterns are sure to bring a smile to everyone’s face.