
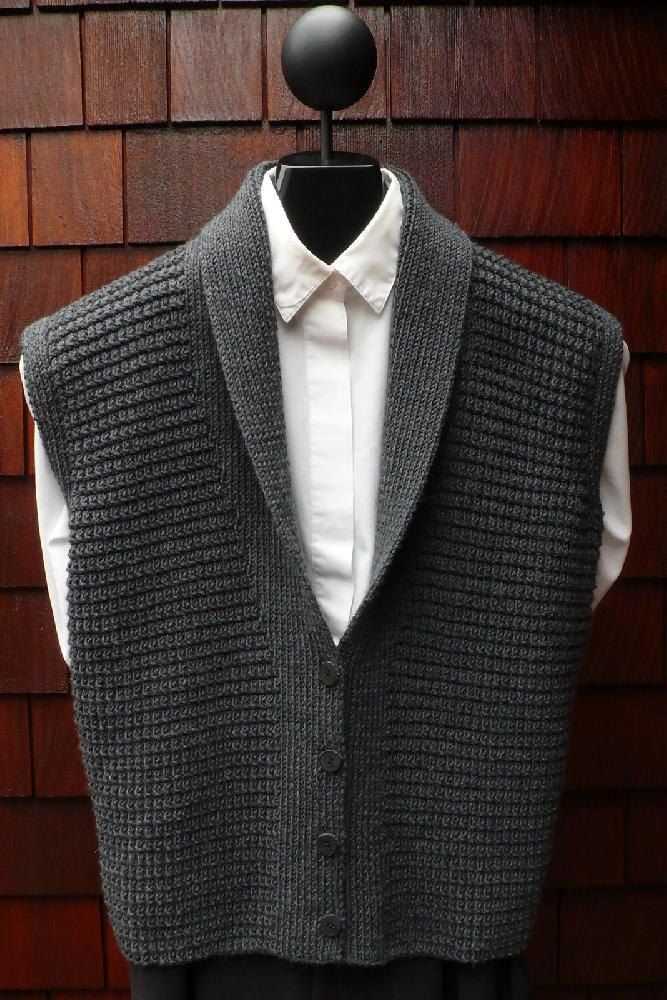
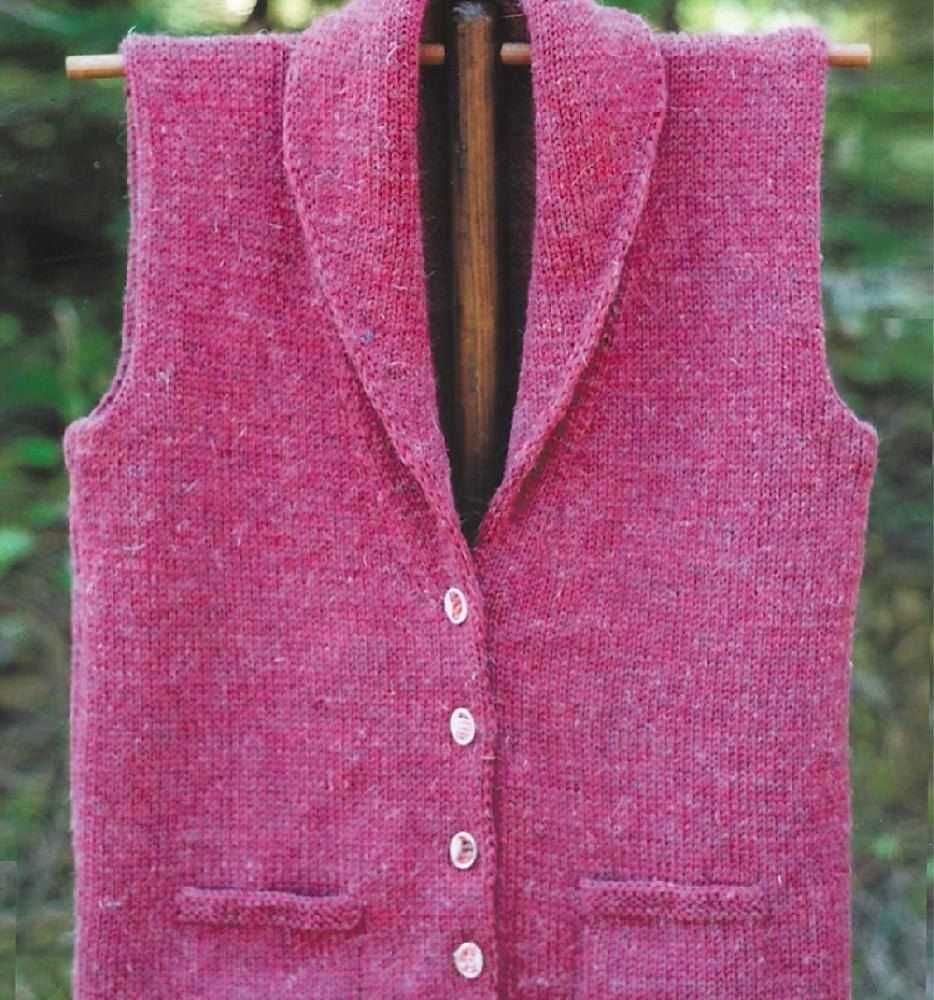
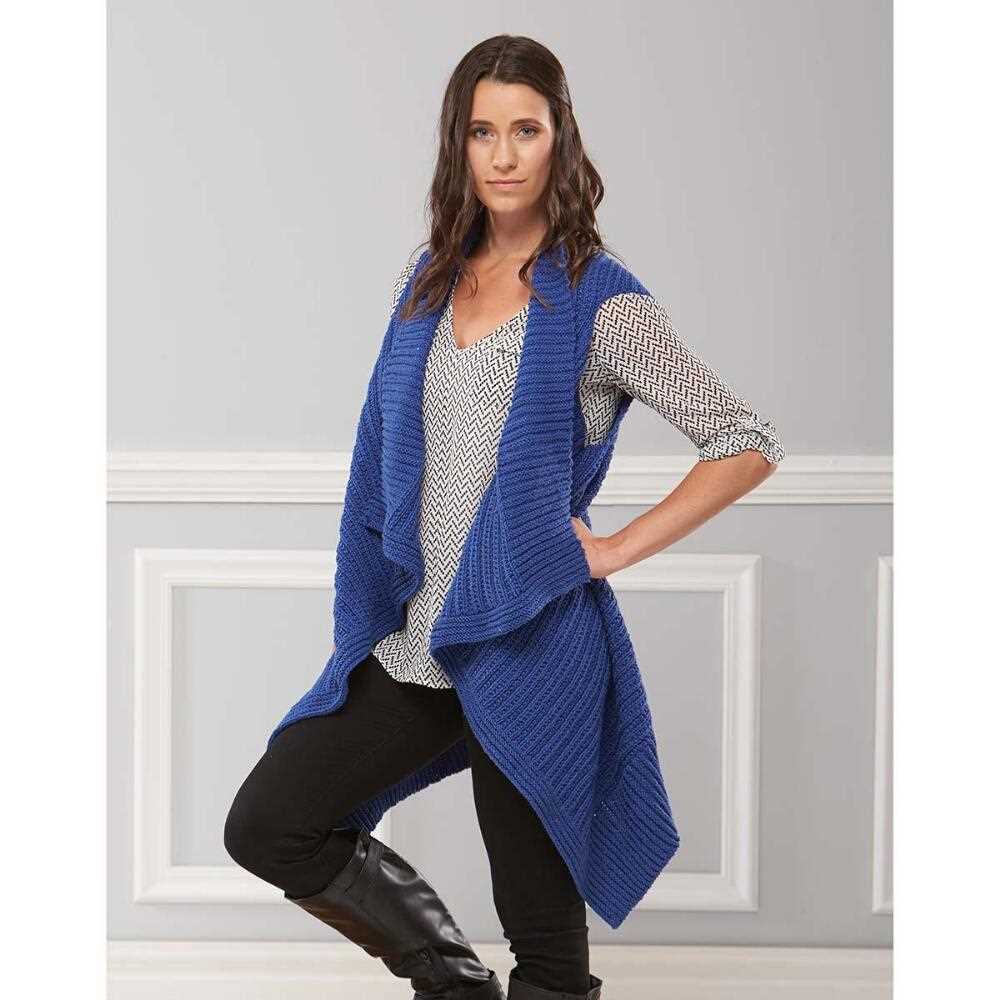
A shawl collar vest is a versatile and stylish addition to any wardrobe. Whether you’re knitting one for yourself or as a gift, this pattern is a great choice for knitters of all levels. The shawl collar adds a touch of elegance and can be worn open or buttoned up for extra warmth.
This knitting pattern features a classic design with a ribbed body and shawl collar. The ribbing adds texture and helps the vest to fit snugly. The pattern includes instructions for a range of sizes, making it easy to customize to your measurements.
To create this shawl collar vest, you’ll need to know basic knitting techniques such as casting on, knitting, purling, and decreasing. The pattern also includes a diagram to help you visualize the construction and placement of the shawl collar.
Whether you’re a beginner looking for a new project or an experienced knitter wanting to add a cozy vest to your collection, this shawl collar vest knitting pattern is sure to become a favorite. So grab your needles, choose your favorite yarn, and get ready to create a timeless wardrobe staple.
What is a Shawl Collar Vest?
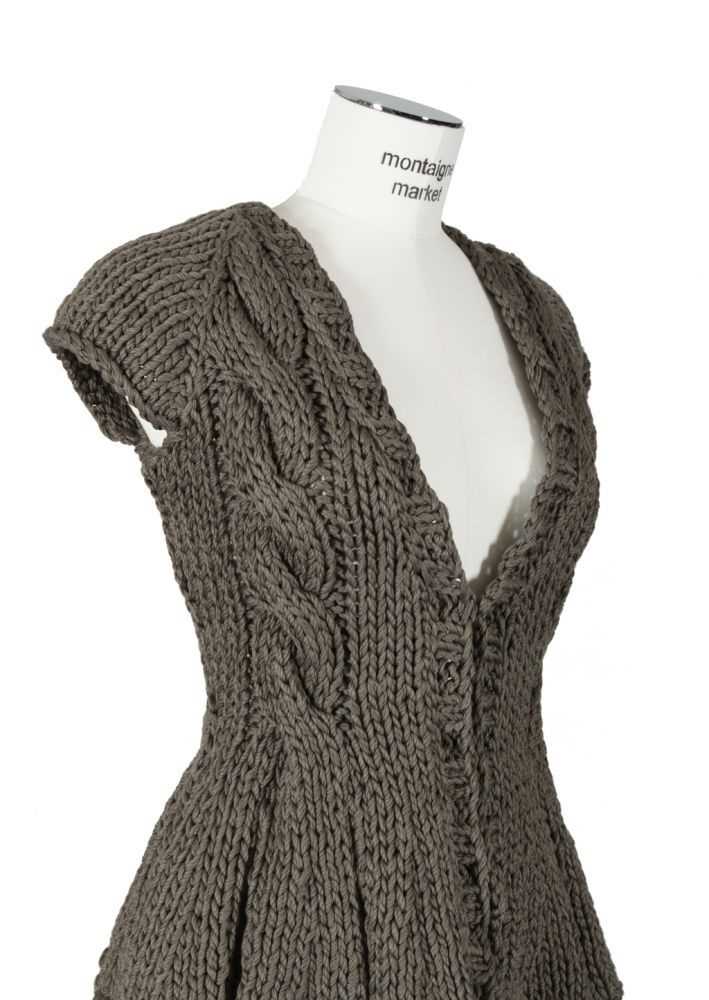
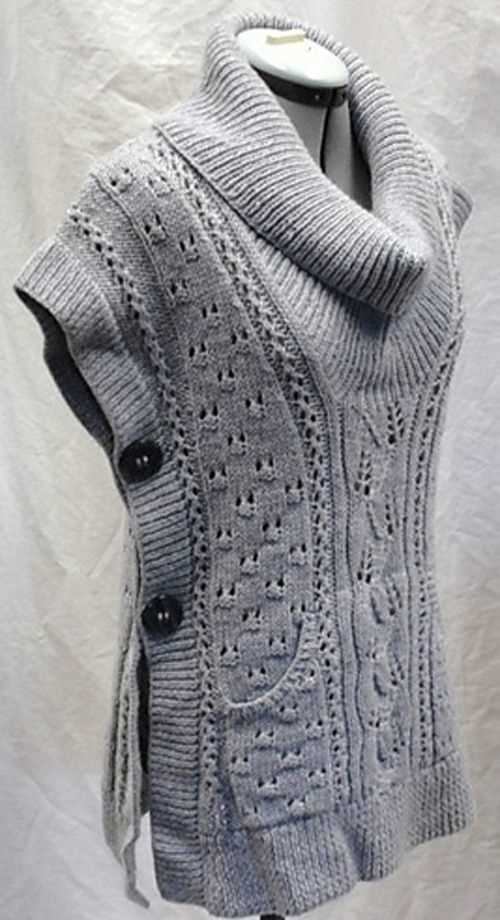
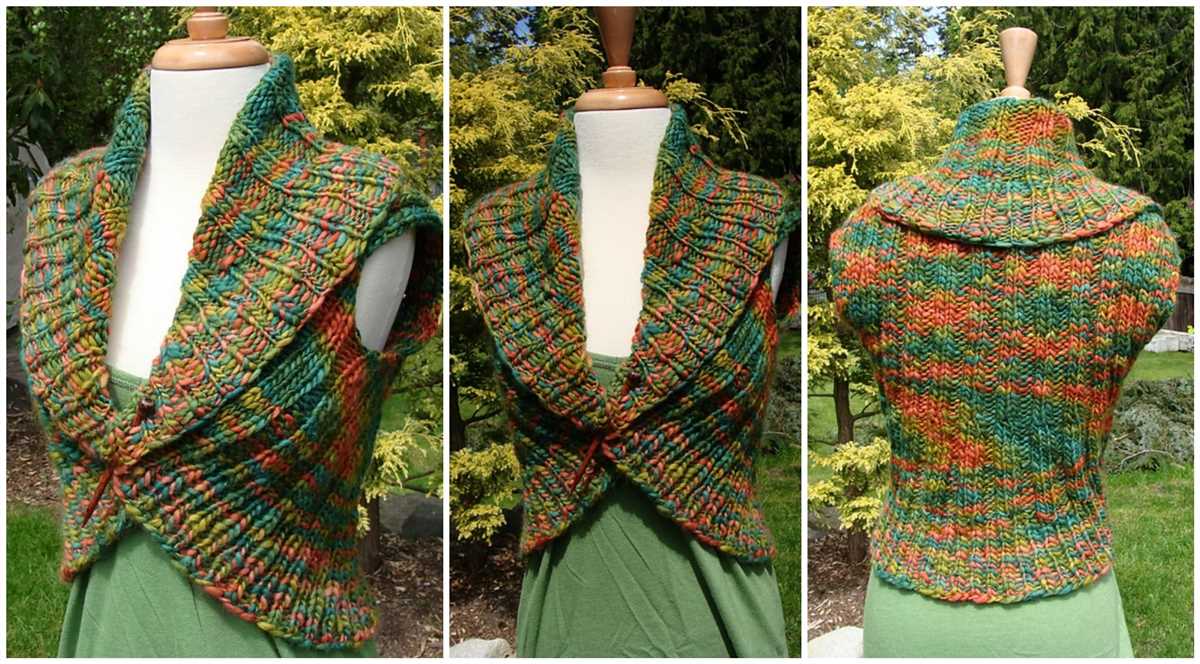
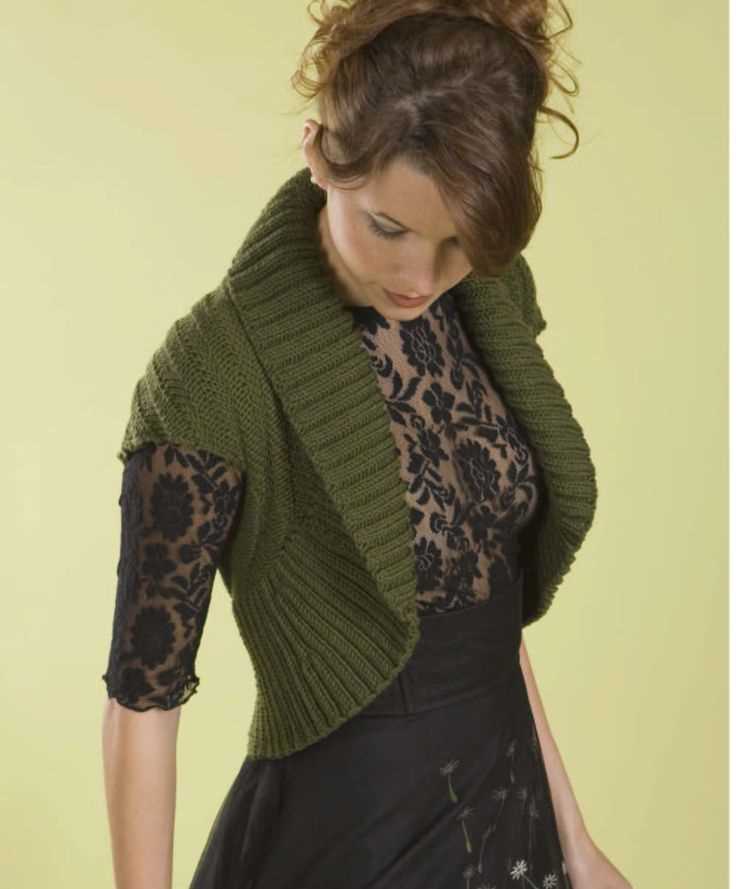
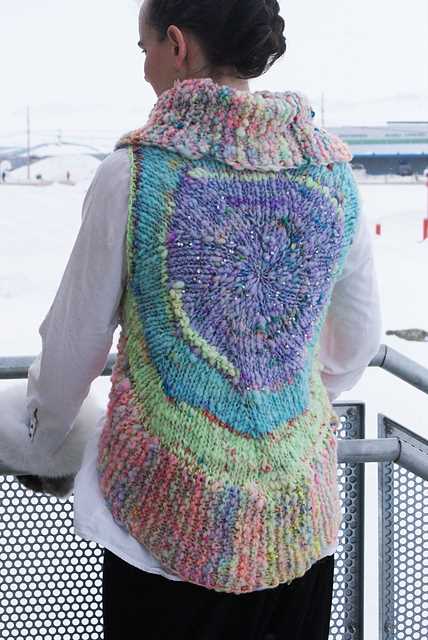
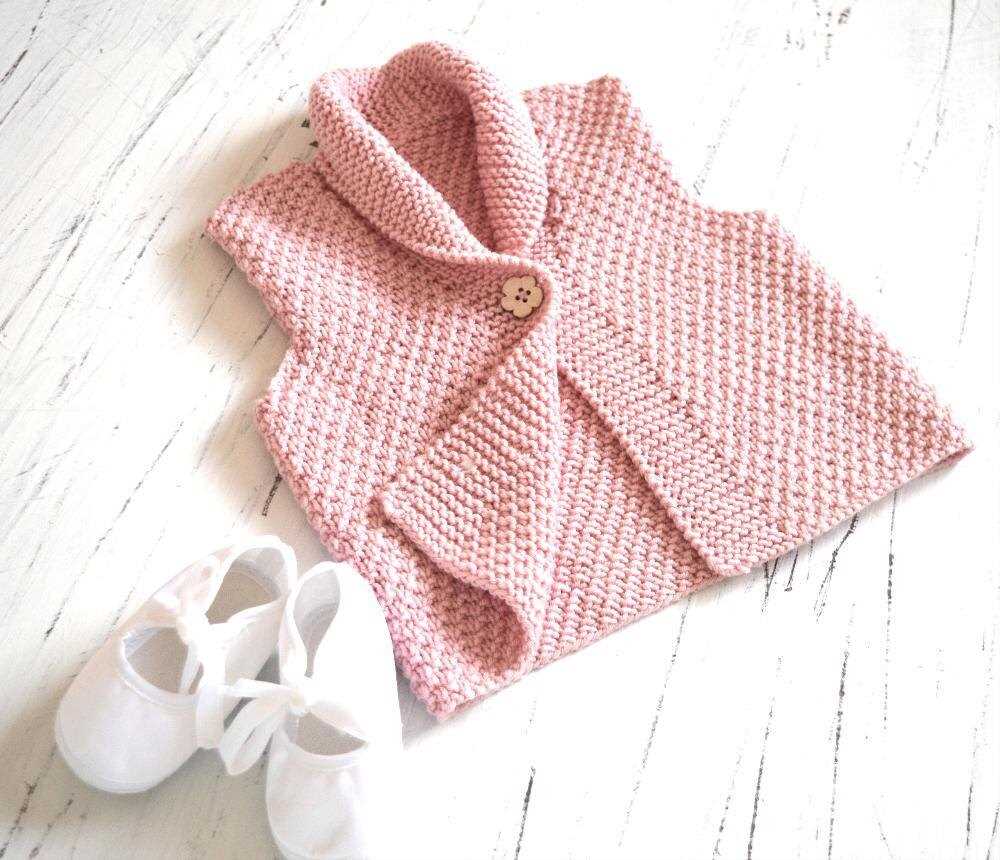
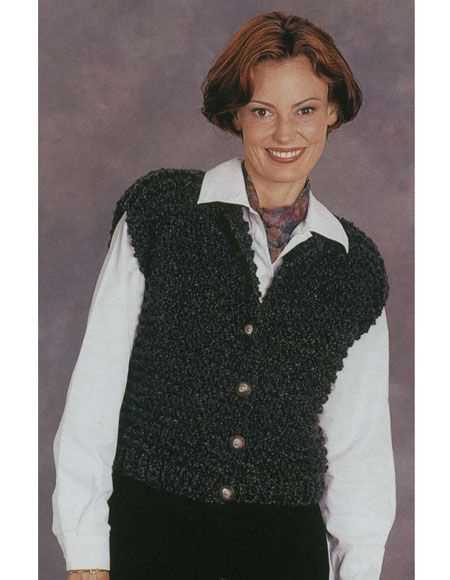
A shawl collar vest is a type of sleeveless garment that features a shawl collar, which is a wider collar that drapes down in a V-shape at the front. It is typically made from knitted fabric and is designed to be worn over a shirt or blouse, adding an extra layer of warmth and style to an outfit. The shawl collar adds a touch of elegance and sophistication to the vest, making it a versatile piece that can be dressed up or down depending on the occasion.
The shawl collar vest knitting pattern allows knitters to create their own shawl collar vests in various sizes and styles. The pattern typically includes instructions for casting on, knitting the body of the vest, shaping the armholes and collar, and finishing the edges. Knitters can choose their preferred yarn and needle size to achieve the desired gauge and drape for their vest.
The shawl collar vest is a timeless wardrobe staple that can be worn in any season. It can be paired with jeans or trousers for a casual look, or with a skirt or dress pants for a more polished appearance. The versatility of the shawl collar vest makes it a popular choice for both men and women, as it can be styled in different ways to suit individual preferences.
Whether you’re a seasoned knitter looking for a new project or a beginner interested in trying out a new pattern, the shawl collar vest knitting pattern offers a rewarding and enjoyable knitting experience. With its classic design and cozy warmth, the shawl collar vest is sure to become a favorite addition to your wardrobe.
Benefits of Knitting a Shawl Collar Vest
Knitting a shawl collar vest can bring a range of benefits, both practical and creative. This versatile garment combines the warmth of a shawl collar with the style of a vest, making it a popular choice for chilly weather. Whether you’re an experienced knitter or just starting out, creating a shawl collar vest can be a rewarding project.
Creative Expression: Knitting allows for creative expression, and knitting a shawl collar vest gives you the opportunity to showcase your personal style and taste. You can select from a variety of yarn colors, textures, and patterns to create a unique and eye-catching garment. This gives you the chance to truly make the vest your own and show off your knitting skills.
Warmth and Comfort: The shawl collar adds an extra layer of warmth and comfort to the vest, making it an excellent choice for colder climates. When the weather gets chilly, you can bundle up and feel cozy with the added protection of the shawl collar. The vest also provides the freedom of movement for your arms, making it a comfortable and practical garment for everyday wear.
Versatility: A shawl collar vest is a versatile piece that can be dressed up or down depending on the occasion. Pair it with a crisp button-down shirt and trousers for a smart and polished look, or wear it over a casual t-shirt and jeans for a more relaxed vibe. The shawl collar adds a touch of elegance and sophistication to any outfit, making it a versatile and stylish addition to your wardrobe.
Knitting Skills: Knitting a shawl collar vest is a great way to improve your knitting skills. This project requires knitting and purling techniques, as well as increases and decreases to shape the vest and collar. You can also try different stitch patterns, such as cables or lace, to add extra texture and visual interest to the vest. By challenging yourself with new techniques and patterns, you can expand your knitting abilities and gain confidence in your skills.
Custom Fit: One of the great advantages of knitting your own shawl collar vest is the ability to create a custom fit. You can adjust the length, width, and overall fit of the vest to suit your body shape and size. This ensures that the vest will be comfortable to wear and flatter your figure. Knitting a garment that fits you perfectly is a satisfying achievement and allows you to enjoy the vest for years to come.
Choosing the Right Yarn for a Shawl Collar Vest
When knitting a shawl collar vest, the choice of yarn is crucial to achieving the desired look and fit. The yarn you select should be suitable for the style and structure of the vest, as well as comfortable to wear.
1. Consider the weight and drape: The weight of the yarn will determine the overall feel and drape of the vest. For a shawl collar vest, it’s generally best to choose a medium to heavy weight yarn that will provide enough structure and warmth. Look for yarns with good drape, as this will enhance the flowing lines of the collar.
2. Look for stitch definition: The stitch definition of the yarn is important for showcasing the intricate patterns and textures of the vest. Choose a yarn that has good stitch definition, meaning that the stitches will be clear and well-defined. This will make the collar and any other details of the vest stand out beautifully.
3. Consider the fiber content: The fiber content of the yarn will impact the comfort and durability of the vest. Natural fibers like wool, alpaca, or cotton are great options as they are breathable and provide warmth without feeling bulky. Consider the season and climate in which you’ll be wearing the vest, and choose a fiber content that suits your needs.
4. Test the yarn: Before committing to a specific yarn, it’s always a good idea to swatch and test it. Knit a small sample to see how it feels in your hands and how it drapes when knitted up. This will give you a better idea of the finished product and whether the yarn is a good fit for your shawl collar vest pattern.
5. Consider your budget: Finally, take into account your budget when selecting yarn for your shawl collar vest. Yarn prices can vary widely, and it’s important to choose a yarn that fits within your budget without compromising on quality. Remember that a well-made, high-quality yarn will result in a more durable and long-lasting vest.
By considering the weight and drape of the yarn, its stitch definition, fiber content, budget, and conducting a swatch test, you can choose the right yarn for your shawl collar vest project. This will ensure that your finished garment is not only visually appealing but also comfortable to wear and fits well. Happy knitting!
Essential Tools for Knitting a Shawl Collar Vest
Knitting a shawl collar vest requires specific tools to ensure the final product turns out well. Here are some essential tools you will need:
1. Yarn: Choose a yarn that is suitable for the shawl collar vest pattern you are using. Consider the weight, fiber content, and color of the yarn to achieve the desired texture and look.
2. Knitting Needles: Select knitting needles that are appropriate for the yarn weight and the gauge required by the pattern. Circular or straight needles can be used, depending on your preference and the pattern instructions.
3. Stitch Markers: Stitch markers are useful for keeping track of stitch patterns, shaping, and any increases or decreases in the pattern. They can be placed on the knitting needles or attached to the knitting itself.
4. Tape Measure: A tape measure is essential for checking your gauge and measuring the length and width of your knitting as you progress. Accurate measurements are crucial for ensuring the right fit of the shawl collar vest.
5. Scissors: A pair of scissors is necessary for cutting yarn and finishing the project. Make sure they are sharp and suitable for cutting through your chosen yarn.
6. Darning Needle: A darning needle, also known as a yarn needle, is used for weaving in loose ends and seaming up any gaps in your knitting. Choose a needle with a large enough eye to accommodate your yarn.
7. Stitch Holders or Scrap Yarn: Stitch holders or scrap yarn are used to hold stitches that you need to keep on hold for shaping or later use. They prevent the stitches from unraveling and provide stability to your work.
8. Row Counters: Row counters are beneficial for keeping track of the number of rows completed, especially if the pattern has multiple pattern repeats or if you need to count rows for shaping or decreasing.
9. Blocking Supplies: Blocking supplies, such as blocking mats, T-pins, or blocking wires, are necessary if you want to achieve a professional finish for your shawl collar vest. Blocking helps to even out stitches and shape the garment.
10. Pattern and Instructions: Lastly, make sure you have a copy of the shawl collar vest knitting pattern and the accompanying instructions. Read through the pattern carefully before starting to ensure you understand all the steps and techniques involved.
With these essential tools at hand, you will be well-prepared to knit a beautiful shawl collar vest. Remember to take your time, follow the instructions, and enjoy the process of creating your own unique garment!
Taking Accurate Body Measurements for a Shawl Collar Vest
Before starting to knit a shawl collar vest, it is crucial to ensure that the measurements taken are accurate. This will help ensure that the finished garment fits well and looks flattering. Here are some key measurements to take:
1. Chest circumference:
Measure around the fullest part of your chest, ensuring that the measuring tape is parallel to the floor. This measurement will determine the size of the vest.
2. Shoulder width:
Measure from the outer edge of one shoulder to the outer edge of the other shoulder. Make sure the tape is straight and level.
3. Back length:
Measure from the base of your neck to the desired length of the vest. This measurement will determine how long the back of the vest should be.
4. Armhole depth:
Measure from the top of your shoulder to the desired depth of the armhole. This measurement will determine how high the armholes should be.
5. Neckline width:
Measure from the base of your neck to the desired width of the shawl collar. This measurement will determine how wide the collar should be.
Once these measurements have been taken, refer to the knitting pattern for the shawl collar vest to determine the appropriate size and adjustments needed. Keep in mind that it is always better to take slightly larger measurements and make adjustments during the knitting process, rather than ending up with a garment that is too tight or uncomfortable.
Understanding the Shawl Collar Vest Knitting Pattern
The shawl collar vest knitting pattern is a popular choice for knitters looking to create a stylish and versatile garment. This pattern incorporates a shawl collar, which adds an extra element of warmth and interest to the vest. It is a great project for intermediate knitters who are looking to expand their skills and create a unique addition to their wardrobe.
Materials: Before starting the pattern, gather the necessary materials. You will need yarn in the desired color and weight, knitting needles in the appropriate size, a set of stitch markers, and a tapestry needle for weaving in ends. It is important to choose a yarn that has good stitch definition and drapes well to ensure a successful final result.
Patterning: The shawl collar vest knitting pattern typically consists of several sections. The body of the vest is usually knitted in a basic stitch pattern, such as stockinette or ribbing, to create a smooth and even fabric. The shawl collar is then worked separately and attached to the body of the vest during the finishing process.
It is important to carefully read and follow the instructions of the knitting pattern. The pattern will outline the specific stitches, gauge, and measurements required to create the vest. It may also include shaping instructions for creating a fitted or relaxed silhouette. Take the time to swatch and check your gauge before starting the project to ensure the correct fit.
Finishing: Once the body of the vest and shawl collar are completed, the final step is to sew the collar onto the neckline of the vest. This is usually done using a tapestry needle and the yarn used for the project. Carefully align the edges of the collar with the neckline, using the stitch markers as a guide, and sew them together using an invisible or decorative stitch.
To complete the vest, weave in any loose ends and block the garment to achieve the desired shape and drape. Blocking involves washing the project, gently reshaping it, and allowing it to dry flat. This helps to set the stitches and improve the overall appearance of the finished garment.
Overall, the shawl collar vest knitting pattern is a rewarding project for knitters looking to create an elegant and functional garment. By following the instructions carefully and paying attention to detail, you can create a beautiful vest that will become a staple in your wardrobe for years to come.
Step-by-Step Instructions for Knitting the Shawl Collar
Knitting a shawl collar for your vest can add a stylish and cozy touch to your garment. With these step-by-step instructions, you’ll be able to create a beautiful shawl collar that will enhance the overall look of your vest.
Materials Needed:
- Worsted weight yarn
- Circular knitting needles (size appropriate for your yarn)
- Stitch markers
- Tapestry needle
- Scissors
Instructions:

- Start by casting on the required number of stitches for your vest’s shawl collar. The exact number of stitches will vary depending on your individual pattern.
- Once you have your stitches cast on, join them in the round using a circular knitting needle.
- Knit in the round for the desired length of your shawl collar. This length will also depend on your specific pattern.
- Next, you’ll want to shape the collar by increasing stitches. This can be done by knitting into the front and back of certain stitches, or by using other increase techniques recommended in your pattern.
- Continue knitting and increasing until you reach the desired width for your shawl collar. Keep in mind that a wider collar will provide a more dramatic and cozy look.
- Once you have achieved the desired width, you can start working on the collar’s edging. This can be a simple garter stitch or a more intricate lace pattern, depending on your preference.
- Follow your pattern’s instructions for knitting the edging, and make sure to pay attention to any stitch counts or pattern repeats.
- After completing the collar’s edging, bind off all stitches and weave in any remaining yarn ends with a tapestry needle.
- Try on your vest and enjoy your new shawl collar! Pair it with a button-up shirt or a plain T-shirt for a stylish and versatile look.
By following these step-by-step instructions, you’ll be able to knit a beautiful shawl collar for your vest. Whether you’re a beginner or an experienced knitter, this project is sure to enhance your knitting skills and create a fashionable accessory for your wardrobe.
How to Knit the Back Panel of a Shawl Collar Vest
In this tutorial, we will guide you through the process of knitting the back panel of a shawl collar vest. The back panel is an essential component of the vest, as it provides structure and support to the garment.
To begin, you will need to gather your materials. You will need a set of knitting needles appropriate for the yarn you are using, as well as the specified amount of yarn for your size. Make sure to check the pattern for the recommended needle size and yarn weight.
Step 1: Start by casting on the required number of stitches for your size. You can use a long-tail cast on or any other cast on method that you prefer. Make sure to keep your tension even as you cast on.
Step 2: Once you have cast on all your stitches, begin working the back panel in your desired stitch pattern. The pattern will specify the stitch pattern to use, whether it’s stockinette stitch, a ribbing pattern, or something else. Follow the pattern instructions carefully to ensure you create the correct stitch pattern.
Step 3: Continue knitting the back panel according to the pattern instructions until it reaches the desired length. This length will be specified in the pattern and will vary depending on your size. Make sure to measure your work regularly to ensure you are on track.
Step 4: Once you have reached the desired length, it’s time to bind off your stitches. You can use a simple bind off or any other bind off method that you prefer. Again, maintain even tension as you bind off to ensure a neat and tidy edge.
Step 5: Once you have bound off all your stitches, weave in any loose ends using a tapestry needle. Make sure to secure the ends tightly to prevent them from unraveling.
Congratulations! You have now successfully knitted the back panel of your shawl collar vest. The back panel provides the foundation for the rest of the vest, and you can now move on to knitting the front panels and collar to complete the garment.
Knitting the Front Panels and Armholes
Once you have completed knitting the back panel of the shawl collar vest, it’s time to move on to the front panels and armholes. You will be working on each front panel separately, starting from the bottom and working your way up to the armhole.
To begin, cast on the required number of stitches for the front panel using the same yarn and needle size as the back panel. Make sure to check the pattern for the specific stitch count.
Continue working in the pattern stitch as instructed, following the shaping and decrease instructions to create the shawl collar shape. You may need to work short rows to shape the collar. Be sure to keep track of your stitches and rows to ensure accuracy.
When you reach the desired height for the armhole, you will begin shaping the armhole by binding off a certain number of stitches at the beginning of the next few rows. Again, refer to the pattern for the specific stitch count and shaping instructions.
Once the armhole shaping is complete, continue knitting the front panel until you reach the desired length for the body of the vest. Remember to keep track of your stitches and rows to ensure both front panels are symmetrical.
Repeat the process for the second front panel, making sure to mirror the shaping and decrease instructions to create a matching pair.
After finishing both front panels and armholes, you can join the front and back panels at the shoulders and proceed to the next steps in the pattern, such as knitting the collar or adding any additional details.
Remember to always refer to the pattern for specific instructions and stitch counts, and don’t be afraid to ask for help or clarification if needed. Happy knitting!
Assembling and Finishing the Shawl Collar Vest
Once you have finished knitting all the pieces for your shawl collar vest, it’s time to assemble and finish the garment. Follow these steps to ensure a professional-looking result.
Step 1: Blocking
Before assembling the vest, it’s important to block all the knitted pieces. This will help even out the stitches and give the garment a polished finish. Follow the blocking instructions provided in the pattern or use your preferred blocking method.
Step 2: Seaming
Start by seaming the sides of the vest using the mattress stitch or your preferred seaming technique. Align the edges of the front and back panels and pin them in place before stitching. Take care to match the stitch pattern and maintain a consistent gauge throughout the seaming process.
Step 3: Attaching the Collar
Next, it’s time to attach the shawl collar to the neckline of the vest. Line up the collar with the neckline, making sure the right sides are facing each other. Use stitch markers or safety pins to keep the collar in place while stitching. Begin sewing at the center back of the neckline and work your way around to the front. Make sure to sew the collar evenly and securely to the vest.
Step 4: Finishing Touches
After the collar is attached, it’s time to finish off any loose ends and give the vest a final touch. Weave in any remaining yarn tails using a yarn needle and trim them close to the fabric to ensure they won’t unravel. Lastly, block the completed vest one final time to set the stitches and give it a professional look.
By following these steps, you can assemble and finish your shawl collar vest with confidence. Enjoy wearing your handmade creation or give it as a thoughtful gift to someone special.
Tips and Tricks for Perfecting Your Shawl Collar Vest
Knitting a shawl collar vest can be a rewarding and enjoyable project. It’s a versatile piece that can be layered over shirts and dresses for a stylish and cozy look. To help ensure your shawl collar vest turns out perfectly, here are some tips and tricks to keep in mind.
Choose the Right Yarn
When selecting yarn for your shawl collar vest, consider the weight and texture. A medium-weight yarn with a slight drape is ideal for achieving a comfortable and flattering fit. Wool or wool-blend yarns are great options as they provide warmth and durability.
Check Your Gauge
Before starting your project, it’s crucial to check your gauge. This will help you ensure that your vest will have the correct measurements and fit. Take the time to knit a swatch using your chosen yarn and needles, and measure it against the recommended gauge in the pattern. Adjust your needle size as needed until you achieve the correct gauge.
Use Stitch Markers
Stitch markers can be extremely helpful when working on a shawl collar vest pattern. They can help you keep track of important sections, such as the shaping for the collar or armholes. Place a stitch marker at the beginning and end of each section to make it easier to follow the pattern instructions.
Take Your Time with the Collar
The shawl collar is the focal point of your vest, so take your time when working on it. Focus on keeping your stitches even and consistent to achieve a professional-looking result. Pay attention to the pattern instructions for shaping the collar and take the time to block the finished collar to ensure it lays flat and nicely on the neck.
Finishing Touches
Once you’ve completed the knitting portion of your shawl collar vest, don’t rush through the finishing touches. Block your vest to even out any uneven stitches and help it maintain its shape. Carefully sew in any loose ends and sew on any buttons or other closures, making sure they are securely attached.
By keeping these tips and tricks in mind, you’re well on your way to creating a beautiful shawl collar vest that you’ll be proud to wear. Enjoy the process and embrace the creativity that knitting offers!
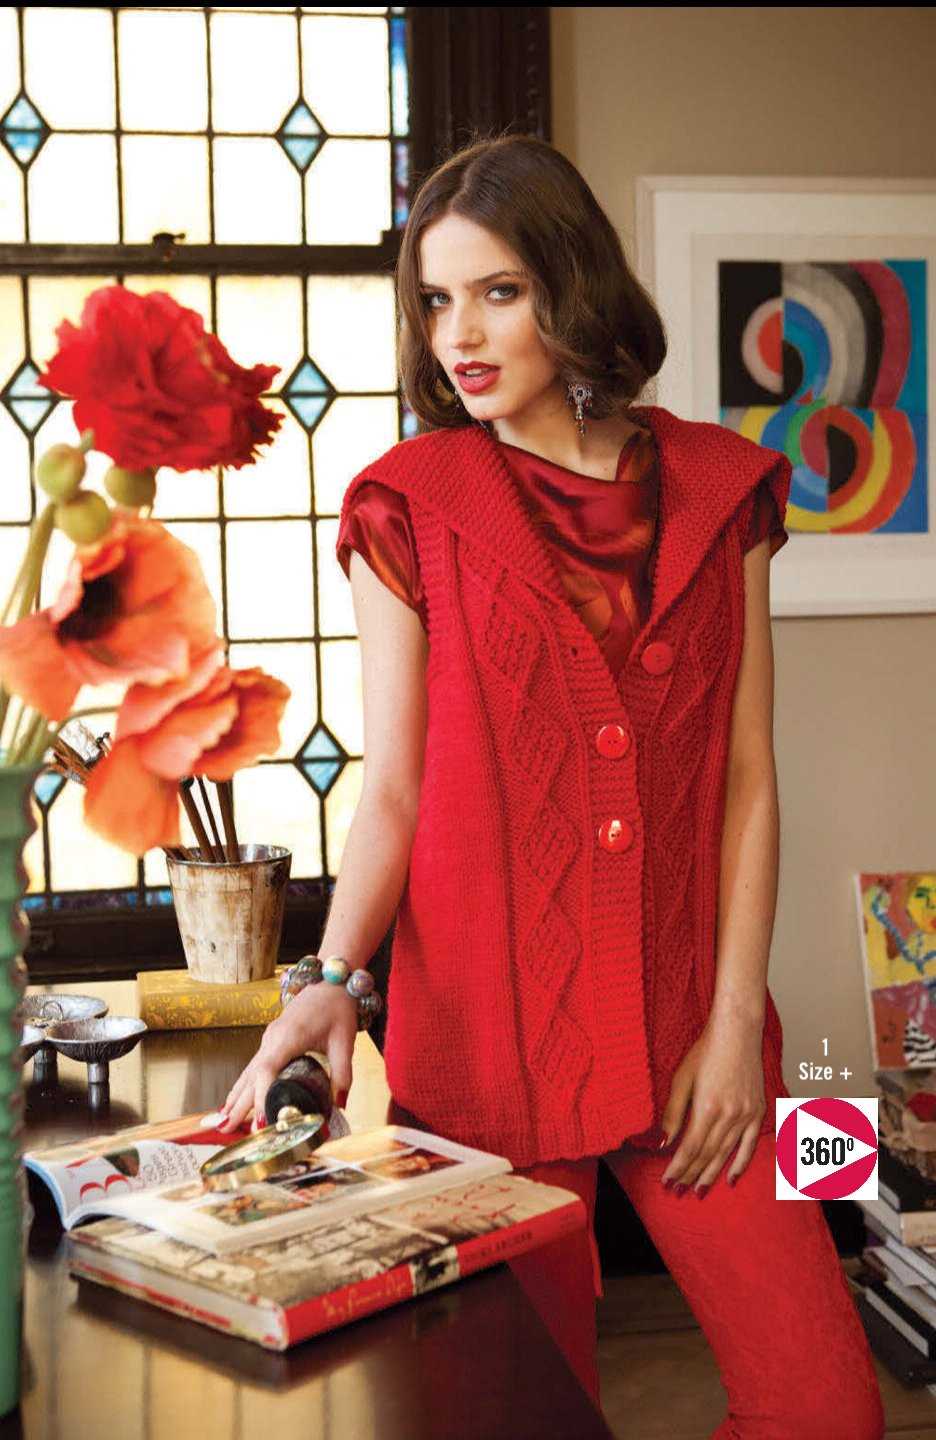
Styling Ideas for Your Shawl Collar Vest

Now that you’ve finished knitting your shawl collar vest, it’s time to start thinking about how to style it. Whether you’re dressing it up for a formal occasion or wearing it casually, the shawl collar vest can be a versatile and fashionable addition to your wardrobe. Here are some styling ideas to help you make the most of your new vest:
1. Layer it over a crisp, button-down shirt
For a polished and professional look, layer your shawl collar vest over a crisp, button-down shirt. Choose a shirt in a contrasting color to make the collar of the vest stand out, or opt for a tone-on-tone look for a more sophisticated vibe. Add a pair of tailored trousers or a pencil skirt to complete the outfit.
2. Pair it with a knit sweater
During colder months, layer your shawl collar vest over a warm and cozy knit sweater. The combination of textures will create a cozy and stylish look. Opt for a sweater in a complementary color or go for a monochromatic ensemble for a more streamlined appearance.
3. Dress it down with jeans
For a more casual everyday look, pair your shawl collar vest with a pair of jeans. Choose a fitted style to balance out the volume of the vest and add a simple top or t-shirt underneath. Finish off the look with ankle boots or sneakers for a comfortable and chic outfit.
4. Style it with a maxi skirt
For a bohemian-inspired look, pair your shawl collar vest with a flowy maxi skirt. Choose a skirt in a floral or paisley print to add a touch of whimsy to the outfit. Complete the look with a pair of sandals or wedges and some delicate jewelry for a feminine and romantic look.
Overall, the shawl collar vest is a versatile and trendy piece that can be styled in various ways. Whether you choose to dress it up or down, it will surely become a staple in your wardrobe. Experiment with different styling options to find your own unique look and enjoy the compliments that come your way!