
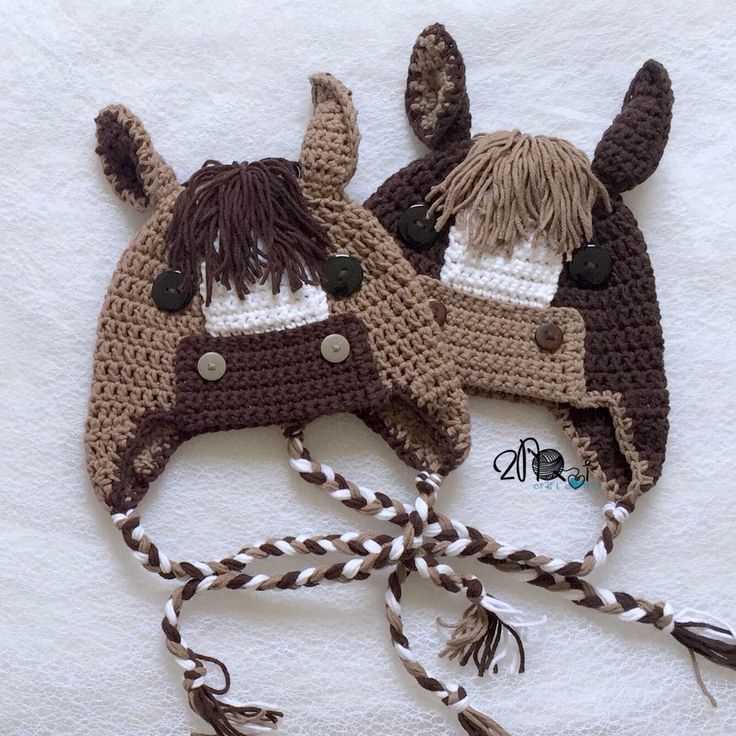
Winter is a season that can often feel dull and dreary, with gray skies and cold temperatures. But who says your wardrobe has to be boring too? With the knit horse hat pattern, you can inject a dose of whimsy and fun into your winter attire.
Imagine walking through a snow-covered park, with the wind nipping at your face, while wearing a warm and cozy horse-themed hat. Not only will it keep your head toasty warm, but it will also turn heads and bring a smile to everyone who sees it.
This knit horse hat pattern is perfect for both beginners and experienced knitters alike. It features a simple design with basic stitches, making it a great project for those who are just starting out. And for more advanced knitters, there are endless possibilities for customization and adding your own personal touch.
Whether you’re knitting this hat for yourself or as a gift for a horse-loving friend, it’s sure to be a hit. So grab your needles, find some cozy yarn, and let your imagination run wild with this playful and charming knit horse hat pattern.
Knit Horse Hat Pattern

If you’re looking for a fun and stylish project to work on, why not try knitting a horse hat? Perfect for horse lovers or as a unique gift, this pattern allows you to create a cozy and adorable hat that resembles a horse’s head.
Materials needed:
- Worsted weight yarn in brown, black, and white
- Size 8 knitting needles
- Tapestry needle
Instructions:
- Start by casting on 80 stitches with the brown yarn.
- Work in a rib stitch pattern (knit 2, purl 2) for about 2 inches.
- Switch to the black yarn and continue knitting in stockinette stitch until the piece measures approximately 6 inches from the cast-on edge.
- Switch back to the brown yarn and knit 6 more rows.
- Decrease the stitches evenly across the row until you have 20 stitches remaining.
- Cut the brown yarn, leaving a long tail. Thread the tail through the tapestry needle and slip the stitches onto the needle.
- Turn the hat inside out and sew the back seam using the mattress stitch.
- With the white yarn, embroider the horse’s eyes and nose onto the front of the hat.
- Weave in any loose ends and your horse hat is complete!
Whether you’re knitting this hat for yourself or as a gift, it’s sure to be a unique and whimsical accessory. So grab your yarn and needles and get started on your very own knit horse hat!
The History of Knit Horse Hats

Knit horse hats have a long and fascinating history. These unique accessories have been used for centuries to provide protection and warmth for horses in cold climates. The tradition of knitting horse hats can be traced back to ancient civilizations, where horse owners would handcraft hats for their beloved animals.
During the medieval period, horses played a crucial role in warfare. Knights and soldiers would often knit hats for their horses to not only keep them warm but also to identify them on the battlefield. These hats were adorned with distinctive colors and patterns, helping allies recognize their own horses among the chaos of war.
In the 19th century, as horse-drawn carriages and agriculture became more prevalent, knit horse hats gained popularity among the general public. Horse owners would knit hats for their working horses, protecting them from the harsh winter conditions while adding a touch of style to their everyday attire.
Today, knit horse hats have become both practical and fashionable accessories for horse enthusiasts. They are created using a variety of knitting techniques and can be customized with different colors, patterns, and embellishments. Whether used for practical reasons or as a fun fashion statement, knit horse hats continue to captivate people’s imaginations and celebrate the long-standing bond between humans and horses.
Choosing the Right Yarn and Needles
When it comes to knitting a horse hat, choosing the right yarn and needles is crucial for achieving the desired result. The type of yarn you use will determine the overall look and feel of the hat, as well as its durability.
Yarn: There are many options available when it comes to selecting yarn for knitting a horse hat. Wool yarn is a popular choice due to its warmth and durability. It also has a natural elasticity, making it easier to work with and ensuring that the hat will retain its shape. Acrylic yarn is another common choice, as it is less expensive and comes in a wide variety of colors. If you prefer a more luxurious feel, you can opt for alpaca or cashmere yarn, although these tend to be more expensive. The weight of the yarn will also affect the final result, with lighter weight yarns creating a finer texture and heavier yarns producing a chunkier look.
Needles: The type and size of needles you choose will depend on the yarn you have selected and the desired gauge of your hat. For most horse hat patterns, circular needles are recommended as they allow for easy knitting in the round. The length of the circular needles will depend on the circumference of the hat you are knitting. Double-pointed needles may also be used for smaller sections, such as the ears or the top of the hat. The size of the needles will determine the tension and overall size of the stitches. Be sure to check the pattern for the recommended needle size, or make a gauge swatch to ensure that your stitches are the correct size.
In conclusion, when knitting a horse hat, it is important to choose the right yarn and needles for the project. Consider factors such as the desired look, feel, and durability of the hat, as well as the recommended needle size and type. By carefully selecting these materials, you can ensure that your horse hat turns out beautifully and meets your expectations.
Getting Started: Casting On
If you’re new to knitting or just starting a new project, the first step is to cast on your stitches. Casting on is the process of creating the foundation row of stitches on your knitting needles, and there are several different methods you can use. In this guide, we will cover the basic long-tail cast on method which is commonly used for many projects.
Step 1: Measuring the Yarn
Before you begin casting on, you’ll need to determine the length of yarn you’ll need. To do this, measure an estimate by wrapping the yarn around your needle, leaving a long tail that is at least three times the width of your project.
Step 2: Making the Slipknot
To start, make a slipknot on your needle by creating a loop with the yarn, leaving a short tail. Insert your needle through the loop and tighten the knot. This slipknot will be your first stitch.
Step 3: Create the Foundation Row
Hold the slipknot in your right hand and hold the long end of the yarn (working yarn) in your left hand. Put the needle with the slipknot in your left hand and the working yarn in your right hand. With your right hand, wrap the working yarn around your thumb and hold it in place. Insert the needle under the yarn on your thumb, then bring your thumb back through the loop to create another loop. Repeat this process until you have cast on the required number of stitches.
Step 4: Tightening the Stitches
Once you’ve cast on all your stitches, you may need to tighten them up. Gently pull on the working yarn to remove any slack from the stitches. Be careful not to pull too tight, as this may make it difficult to work with the stitches later.
Step 5: Start Knitting!
Now that you’ve successfully cast on your stitches, you’re ready to start knitting! Follow your pattern instructions to begin the first row of your project. Remember to keep a steady tension and take your time as you work through each stitch.
Creating the Brim: Ribbing Technique
One of the essential steps in creating a knit horse hat is to incorporate the ribbing technique to create the brim. Ribbing adds elasticity and structure to the hat, ensuring a snug fit around the horse’s head. The ribbing technique involves alternating knit and purl stitches to create a stretchy and textured fabric.
To begin, cast on the desired number of stitches for the brim. It is recommended to use a smaller needle size than the main body of the hat to create a tighter ribbing. A common ribbing pattern is the 1×1 rib, which means you alternately knit one stitch and purl one stitch across each row.
In the first row, knit the first stitch, then purl the next stitch. Continue this pattern until the end of the row. When reaching the last stitch, knit it to maintain a consistent pattern. For the subsequent rows, follow the same pattern of knitting the knits and purling the purls.
To create a neat and professional-looking ribbing, it is important to maintain tension and consistency in your knitting. Ensure that your stitches are not too tight or too loose, as this can affect the stretchiness and appearance of the brim. Take your time and practice to achieve the desired tension.
Continue knitting in the ribbing pattern for the desired length of the brim. Typically, a ribbed brim for a horse hat can be around 1-2 inches in length, depending on your preference. Once you have reached the desired length, you can proceed to the next step of the knitting pattern, whether it’s shaping the crown or adding decorative elements to the hat.
Knitting the Body: Stockinette Stitch
The stockinette stitch is one of the most popular and versatile stitches in knitting. It creates a smooth and even fabric with a distinct right side and wrong side. Knitting a horse hat using the stockinette stitch can give your project a clean and polished look.
To knit the body of the horse hat using the stockinette stitch, start by casting on the desired number of stitches using your chosen yarn and needle size. Make sure to use a stretchy cast-on method to ensure a comfortable fit. Then, work in the round, either using a set of double-pointed needles or a circular needle, depending on your preference.
For each round, simply knit all stitches, without any purling. This creates a smooth, flat fabric on the right side, perfect for showcasing any colorwork or pattern details on the hat. When you reach the end of the round, you can either join the last stitch to the first stitch to form a seamless circle, or use a stitch marker to mark the beginning of each round and work in a spiral.
Continue knitting in the round using the stockinette stitch until the body of the horse hat reaches the desired length. Depending on the size of the hat, this could be anywhere from a few inches to several inches. Keep in mind that the stockinette stitch has a tendency to curl at the edges, so you may want to add a border or use a different stitch for the brim of the hat to prevent this.
The stockinette stitch is a great choice for creating a sleek and professional-looking garment. Whether you’re knitting a horse hat or any other project, mastering this stitch will open up a world of possibilities for your knitting skills.
Creating the Horse’s Face: Intarsia Technique
When knitting a horse hat, one of the most important aspects is creating the horse’s face. This is where the intarsia technique comes into play. Intarsia is a colorwork technique that allows you to knit with multiple colors, creating distinct blocks of color within your design. By using intarsia, you can easily incorporate the different shades of the horse’s face into your knitting project.
To start, you will need to gather the necessary yarn colors for the horse’s face. Typically, you will need a main color for the horse’s head, a contrasting color for the snout, and a darker color for the eyes and mouth. It’s important to choose yarns that are similar in weight and texture to ensure a consistent and professional-looking result.
Begin by knitting the main color for the horse’s head, following the hat pattern instructions. When you reach the area where the face will be, you will switch to the contrasting color for the snout. This is where the intarsia technique comes in. Instead of carrying the contrasting color across the back of the work, you will drop the main color and pick up the contrasting color to knit the snout.
To avoid holes and keep the tension even, it’s important to twist the yarns at each color change. This can be done by lifting the old yarn over the new yarn before knitting the next stitch. By twisting the yarns at each color change, you will create a seamless transition between the different colors of the horse’s face.
Once the snout is complete, you can then switch to the darker color to knit the eyes and mouth. Again, twist the yarns at each color change to ensure a smooth and professional finish. Once the face is complete, you can continue knitting the hat according to the pattern instructions.
By using the intarsia technique to create the horse’s face, you can add a unique and realistic element to your knitted horse hat. Whether you’re making the hat for yourself or as a gift, the intricate details of the horse’s face will surely impress. So grab your yarn and needles, and get ready to create a one-of-a-kind horse hat!
Adding the Horse’s Ears: Shaping Techniques
When knitting a horse hat, one of the key features that brings the design to life is the addition of the horse’s ears. These ears can be a fun and playful element to incorporate, and there are different shaping techniques that can be used to achieve the desired look.
One technique for shaping the horse’s ears is known as the “triangle method.” To create this shape, you will start by casting on a certain number of stitches, usually around 10-15, depending on the size of the hat and the desired ear size. Knit a few rows in garter stitch, then begin shaping the ear by decreasing stitches. This can be done by knitting two stitches together at regular intervals, usually every other row. Continue decreasing until you have only a few stitches remaining, then bind off. This will create a triangular shape that resembles a horse’s ear.
Another technique is the “curved ear method.” This method involves knitting a straight piece for the ear and then shaping it with decreases and increases to create a curved shape. To do this, you will cast on the desired number of stitches and knit several rows in stockinette stitch. Then, begin shaping the ear by decreasing stitches on one side and increasing on the other side. This can be done by knitting two stitches together or making one stitch. Continue shaping until you have achieved the desired curve, then bind off. This method creates a softer, more rounded look for the horse’s ear.
Regardless of the shaping technique you choose, it is important to attach the ears securely to the hat. This can be done by sewing them on using a tapestry needle and matching yarn. Take care to position the ears at the desired angle and secure them firmly, ensuring they won’t easily come loose during wear. Once the ears are attached, your knit horse hat will truly come to life and be a whimsical accessory for any horse lover!
Knitting the Mane: Cabling Techniques
The mane is a standout feature of any horse, and knitting a horse hat with a realistic mane can take your project to the next level. One technique that can be used to achieve a beautifully textured mane is cable knitting. Cable knitting involves crossing stitches over each other to create intricate, woven patterns.
To knit a cable mane for your horse hat, you will need a cable needle. A cable needle is a short, double-pointed needle with a bend in the middle. It is used to hold stitches temporarily while you cross other stitches over them. When working with a cable needle, it is important to pay attention to the direction in which you cross the stitches, as this will affect the overall pattern of the cable.
To create a basic cable pattern for the mane, you will need to work with a multiple of stitches. For example, you may choose to work with 12 stitches. To commence the cable pattern, you will knit a certain number of stitches, let’s say 4, before placing the next 4 stitches onto a cable needle and holding them in the back of your work. Then, you will knit the next 4 stitches from your needle and return to the stitches on the cable needle, knitting them off the cable needle. This will result in the crossing of stitches and the creation of a cable.
Continue repeating this process until you have completed the desired length of the mane. You can experiment with different cable patterns to create a textured effect, such as twists or braids. Once you have finished knitting the mane, you can then sew it onto the horse hat, attaching it securely to create a realistic and stylish accessory.
By incorporating cabling techniques into your knit horse hat pattern, you can add an extra level of detail to your project. The intricate patterns created by crossing stitches can mimic the look of a horse’s mane, resulting in a hat that is both functional and visually appealing. So grab your cable needle and get knitting to create a mane that will make your horse hat truly stand out.
Shaping the Crown: Decreasing and Shaping Techniques
When knitting a horse hat pattern, shaping the crown is an important step to achieve the desired fit and look. This involves decreasing stitches in a certain pattern to create a gradual taper towards the top of the hat.
To begin shaping the crown, the pattern will typically instruct you to start decreasing stitches evenly across the round. This can be done using techniques such as knit two together (k2tog), slip slip knit (ssk), or knit three together (k3tog) depending on the desired effect. These techniques involve reducing the number of stitches in a way that maintains the pattern and shape of the hat.
As you continue to decrease stitches, the crown of the hat will start to take shape. The decreases may be spaced evenly or arranged in a specific pattern, depending on the design of the horse hat. Some patterns may include instructions for introducing shaping techniques such as yarn overs, which can create decorative holes or eyelets in the crown of the hat.
It is important to carefully follow the instructions provided in the pattern for shaping the crown, as this will ensure a proper fit and a visually pleasing end result. Pay attention to the number and frequency of decreases, as well as any additional shaping techniques used. By carefully executing these techniques, you can create a horse hat that is comfortable, stylish, and uniquely your own.
Finishing Touches: Embroidering the Eyes and Nose
Adding the final details to your knitted horse hat can really bring it to life. One of the most important elements to consider is the eyes and nose. These features help create a realistic and recognizable look for your horse hat. Embroidering the eyes and nose requires a steady hand and attention to detail, but with a little practice, you can achieve stunning results.
Embroidering the eyes: Start by selecting the color of yarn or embroidery floss that closely matches the desired eye color. Thread your needle with this color and make a small knot at the end. Begin by positioning the needle in one of the eye socket spaces, and gently bring it back through the fabric a short distance away. Continue stitching back and forth until the eye is filled with color, creating a smooth and round shape. Repeat the same process for the second eye, ensuring both eyes are symmetrical and evenly spaced.
Embroidering the nose: To embroider the nose, choose a color of yarn or embroidery floss that matches the desired nose color. Thread your needle and make a small knot at the end. Start by positioning the needle at the top of the nose area, then insert it back into the fabric slightly below where you started. Pull the needle through, creating a small horizontal stitch. Repeat this step to create a series of horizontal stitches, gradually filling in the space to create the desired shape and size of the nose. Once you have completed the horizontal stitches, repeat the process with vertical stitches to add more depth and texture to the nose. Adjust the length and spacing of your stitches based on your desired effect.
Take your time while embroidering the eyes and nose, as these details can make a big difference in the overall appearance of your knitted horse hat. Ensure that your stitches are secure and even, and don’t be afraid to undo and redo if necessary. Remember, practice makes perfect, so keep experimenting and refining your techniques until you achieve the desired result. With careful embroidery, you can transform your knitted horse hat into a charming and realistic accessory.
Blocking and Sewing the Hat Together

Once you have finished knitting the horse hat, it is important to block it to give it a smooth and even finish. Blocking involves wetting the hat and reshaping it to the desired size and shape. It helps to even out any inconsistencies in the knitting and allows the stitches to settle into place.
First, fill a sink or basin with lukewarm water and add a small amount of gentle detergent. Gently place the hat in the water and let it soak for about 15-20 minutes. Avoid agitating the hat too much to prevent felting or distortion of the stitches. Once the hat has soaked, carefully remove it from the water and gently squeeze out the excess moisture.
To block the hat, you will need a blocking mat or towel and rustproof pins. Lay the hat flat on the mat and gently shape it into the desired size and shape. Ensure that the brim is even and the horse’s face is well-defined. Use the rustproof pins to secure the hat in place, making sure not to stretch the stitches too much.
Allow the hat to air dry completely. This may take 1-2 days depending on the humidity levels in your environment. Once the hat is dry, remove the pins and it will retain its shaped form.
Next, it’s time to sew the hat together. Fold the hat in half, aligning the brim edges, and use a yarn needle and matching yarn to sew the sides of the hat together. Work in a whipstitch or mattress stitch, making sure to sew through both layers of the hat for a secure seam. Take your time to make neat and even stitches.
Finally, weave in any loose ends of yarn and trim them to finish off the hat. Your knit horse hat is now ready to be worn and enjoyed! It is a charming and unique accessory that is sure to make heads turn. Get ready to showcase your knitting skills and bring joy to any horse lover in your life!
Enjoying Your Knit Horse Hat
Now that you’ve completed your knit horse hat, it’s time to start enjoying it! Whether you made it for yourself or as a gift, you’ll love showing off your new accessory. Here are some tips for getting the most out of your hat:
1. Stay Warm: The knit horse hat is not only stylish, but also functional. The yarn used in the pattern is great for insulation, so you can keep your head warm during cold weather.
2. Have Fun: The unique design of the horse hat is sure to bring smiles and spark conversations wherever you go. Embrace the whimsical nature of the hat and have fun with it!
3. Pose for Photos: Take advantage of your knit horse hat to capture some fun and memorable photos. Whether you’re on a horseback ride or just hanging out with friends, the hat will add a playful touch to your pictures.
4. Share the Pattern: If you enjoyed making the knit horse hat, consider sharing the pattern with fellow knitters. You can spread the joy of creating this adorable accessory and contribute to the knitting community.
5. Expand Your Collection: Once you’ve mastered the horse hat pattern, why not try knitting other animal-themed hats? There are endless possibilities for animal-inspired designs that will let you express your creativity and keep your head warm.
With these tips, you can fully enjoy your knit horse hat and make the most of your knitting skills. Happy knitting!
Q&A:
What materials do I need to knit a horse hat?
To knit a horse hat, you will need yarn in various colors, knitting needles, a yarn needle, and scissors.
Is there a specific knitting technique I should use for a horse hat?
For a horse hat, you can use basic knitting techniques such as knit and purl stitches, as well as basic colorwork techniques to create the horse design.
Are there any specific measurements I should follow for a horse hat?
It is recommended to measure the circumference of the head the hat is intended for, as well as the length from the top of the head to the ears. These measurements will help you create a properly fitting horse hat.
Where can I find a horse hat knitting pattern?
You can find horse hat knitting patterns on various websites and online knitting communities. Some popular options include Ravelry, Etsy, and knitting blogs.
Can I customize the colors of the horse hat?
Yes, you can customize the colors of the horse hat by choosing different shades of yarn. You can even get creative and experiment with different color combinations to make your hat unique.
Where can I find a knit horse hat pattern?
You can find a knit horse hat pattern on various knitting websites, such as Ravelry, Etsy, and LoveKnitting. Additionally, you can search for patterns on knitting blogs and forums.
What materials do I need to knit a horse hat?
To knit a horse hat, you will need yarn in the desired color, knitting needles (usually size 8 or 9), a tapestry needle for sewing seams, and stitch markers (optional). Some patterns may also require additional materials, such as safety eyes or crochet hooks for making details.