
Knitting is a craft that uses two or more needles to create loops of yarn, which are then interlocked to form fabric. One of the most versatile and commonly used stitch patterns in knitting is the rib stitch pattern. The rib pattern creates a fabric that is stretchy and elastic, making it ideal for cuffs, collars, and waistbands.
The rib pattern is created by alternating knit stitches and purl stitches in a specific sequence. The most common rib pattern is the 1×1 rib, where one knit stitch is followed by one purl stitch. This creates a vertical ribbed pattern that is evenly spaced across the fabric. Other variations of the rib pattern include the 2×2 rib, 3×3 rib, and so on, where the number of knit stitches and purl stitches in the sequence is increased. These variations create a different look and texture in the fabric.
The rib pattern is not only aesthetically pleasing but also functional. The knit stitches create columns of raised stitches, while the purl stitches create recessed stitches. This texture allows the fabric to stretch in both width and length, making it ideal for garments that need to fit snugly. Additionally, the rib pattern creates a fabric that is reversible, with the same ribbed pattern on both sides. This makes it suitable for projects where both sides of the fabric will be visible.
Overall, the rib pattern is an essential technique in knitting that offers both aesthetic appeal and functional benefits. Whether you’re knitting a sweater, hat, or scarf, incorporating the rib pattern can add texture, stretch, and style to your project.
Definition of Rib Pattern in Knitting
Rib pattern is a commonly used technique in knitting that creates a stretchy, textured fabric. It is often used for cuffs, collars, and borders on garments, as well as for entire pieces like scarves and socks. The basic rib pattern is created by alternating knit and purl stitches in a specific pattern repeat.
In a rib pattern, the knit stitches appear as vertical columns and the purl stitches create horizontal lines. This combination of stitches creates a fabric that is both elastic and visually appealing. The rib pattern is highly versatile and can be adjusted to create different widths and textures by changing the number of knit and purl stitches in each repeat.
To create a rib pattern, one common method is to alternate between knitting two stitches and purling two stitches. This is known as a 2×2 rib pattern. Another variation is the 1×1 rib, where each knit stitch is followed by a purl stitch. There are also more complex rib patterns, such as the 3×1 or 2×3 rib, which involve alternating three or more knit stitches with one or more purl stitches.
Ribbing is particularly useful for creating pieces that need to stretch, such as waistbands or cuffs, as it allows the fabric to expand and contract while retaining its shape. It also gives the fabric a nice drape and can be used to add visual interest to an otherwise plain garment. Overall, rib pattern is a versatile and popular technique in knitting that adds texture and stretch to various projects.
Why rib pattern is popular in knitting
The rib pattern is one of the most popular knitting patterns, and for good reason. It is a versatile and practical technique that creates a stretchy and elastic fabric, making it perfect for a variety of projects. One of the main reasons the rib pattern is so popular in knitting is because it creates a fabric that is extremely versatile and can be used in a wide range of knitting projects, from hats and scarves to sweaters and cardigans.
One of the key features of the rib pattern is its ability to create a fabric that is both stretchy and elastic. This makes it ideal for projects such as hats and socks, where a snug fit is important. The stretchy nature of the rib pattern allows the fabric to expand and contract, ensuring a comfortable fit that will not sag or stretch out over time.
The rib pattern is also highly customizable, allowing knitters to create unique designs and textures. By varying the width and spacing of the ribs, as well as incorporating different stitch patterns, knitters can create endless combinations and designs. This flexibility makes the rib pattern a favorite among knitters who like to experiment and add their own personal touch to their projects.
Another reason why the rib pattern is popular in knitting is its simplicity. The rib pattern is made up of just two basic stitches: the knit stitch and the purl stitch. This makes it an ideal pattern for beginners who are just starting out and want to learn the basics of knitting. The repetitive nature of the rib pattern also makes it a great pattern for those looking for a relaxing and meditative knitting experience.
In conclusion, the rib pattern is popular in knitting for its versatility, stretchiness, customization options, and simplicity. Whether you are a beginner knitter or an experienced one, the rib pattern is a go-to technique for creating beautiful and functional knitted items.
How to Create a Rib Pattern in Knitting
Creating a rib pattern in knitting is a simple and versatile technique that adds texture and elasticity to your project. Ribbing is often used for cuffs, hems, and borders to provide a snug fit and prevent the fabric from rolling. With just a few basic stitches, you can easily create a rib pattern that adds interest and style to your knitting.
To create a rib pattern, you will need to alternate between knit and purl stitches. The most common ribbing pattern is the 1×1 rib, which consists of one knit stitch followed by one purl stitch. This creates a stretchy fabric that is perfect for ribbing. You can also experiment with different rib patterns, such as the 2×2 rib or the seed stitch, to achieve different textures and looks.
To start, cast on an even number of stitches for a basic 1×1 rib pattern. Make sure you have an adequate number of stitches to create a rib that is wide enough for your desired project. Begin with a knit stitch, inserting the right needle into the first stitch from left to right, and wrap the yarn around the right needle. Then, pull the right needle through the first stitch, sliding it off the left needle.
Next, move on to the purl stitch. Insert the right needle into the next stitch from right to left, bringing the yarn in front of the work. Wrap the yarn around the right needle and draw it through the stitch, sliding it off the left needle. Continue alternating between knit and purl stitches until you reach the end of the row.
For subsequent rows, continue to alternate between knit and purl stitches, following the same pattern as the previous row. The knit stitches will appear as purl stitches on the opposite side of the work, creating the ribbed effect. Repeat these rows until you have achieved the desired length for your project.
By mastering the basic rib pattern, you can easily incorporate ribbing into a wide range of knitting projects. Whether you’re working on a cozy sweater, a warm hat, or a pair of comfortable socks, ribbing adds both functionality and style to your finished piece. So grab your needles and start creating beautiful ribbed designs!
Common Variations of Rib Pattern
Rib pattern is a popular knitting technique that creates a textured fabric by alternating knit and purl stitches. This pattern is commonly used for cuffs, hems, and collars of garments as it provides elasticity and helps to keep these areas snug. There are several common variations of rib pattern that can be used to add different textures and visual interest to your knitting projects.
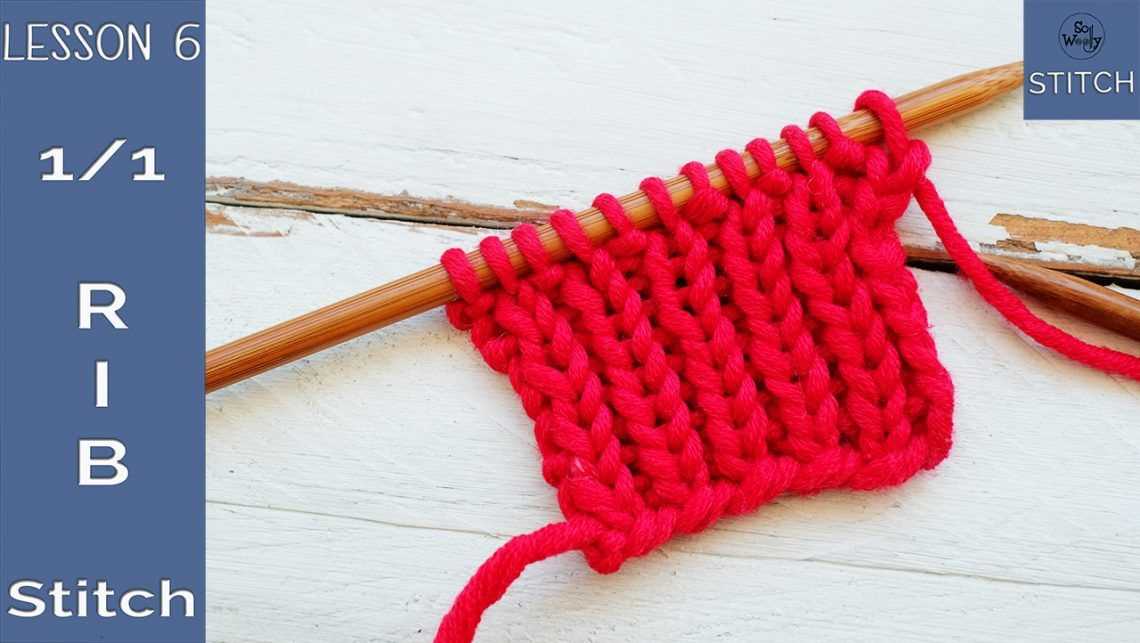
1. 1×1 Rib
1×1 rib is the most basic rib pattern and is created by alternating one knit stitch with one purl stitch. It is often used for cuffs and hems as it provides a neat and stretchy edge. This rib pattern has a clean, vertical appearance and is reversible, making it a versatile choice for various projects.
2. 2×2 Rib
A 2×2 rib pattern is created by alternating two knit stitches with two purl stitches. This pattern creates a tighter, denser fabric compared to the 1×1 rib. It is commonly used for sweaters, scarves, and hats as it provides added warmth and structure to the fabric. The 2×2 rib pattern is also reversible and has a nice, textured look.
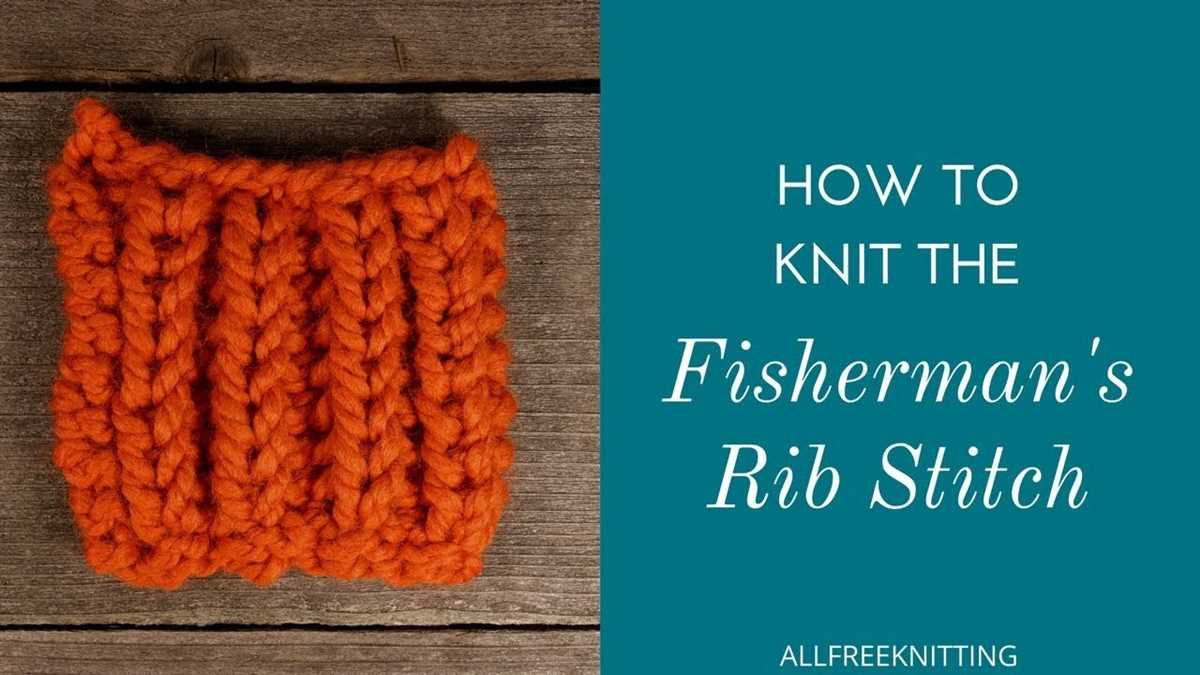
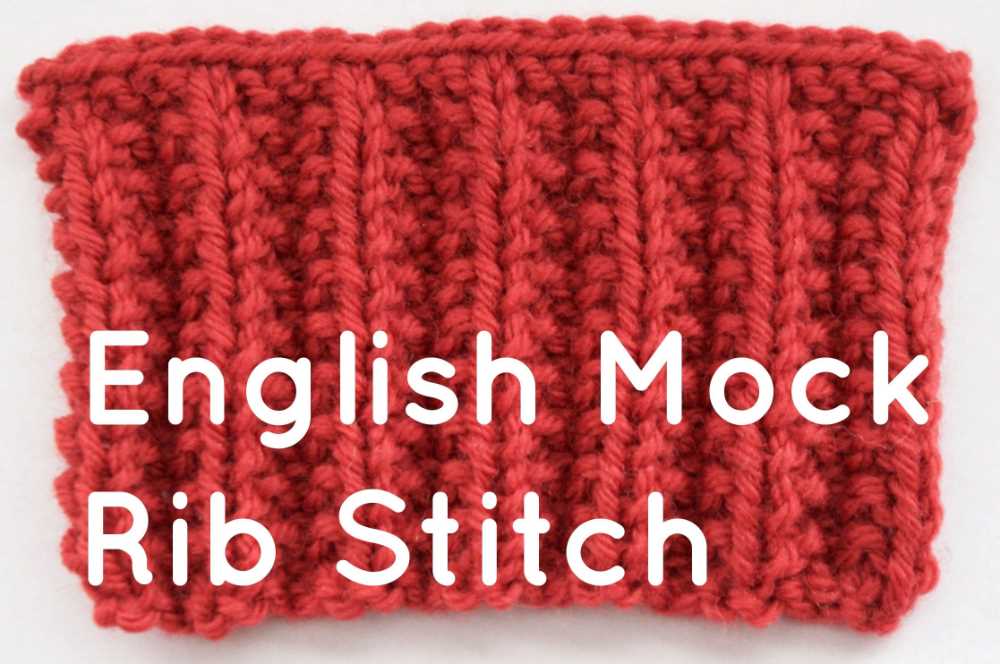
3. Fisherman’s Rib
Fisherman’s rib is a variation of rib pattern that creates a thick, plush fabric. It is achieved by working a combination of knit and purl stitches in a specific sequence. This pattern is commonly used for cozy sweaters and blankets as it provides excellent insulation and a luxurious feel. The resulting fabric has a unique ribbed texture that resembles the scales of a fisherman’s knit.
4. Broken Rib
Broken rib is a rib pattern variation that adds visual interest by interrupting the regular rhythm of the knit and purl stitches. It is achieved by inserting a row or several rows of a different stitch pattern, such as seed stitch or garter stitch, into the rib pattern. This creates a broken look and adds texture to the fabric. Broken rib is often used for scarves, cowls, and other accessories.
5. Half Fisherman’s Rib
Half Fisherman’s Rib is another variation of rib pattern that creates a textured fabric with a unique look. It is achieved by working a specific combination of knit and slipped stitches. This pattern creates a slightly less dense fabric compared to the Fisherman’s rib but still provides warmth and texture. Half Fisherman’s Rib can be used for a variety of projects, including hats, scarves, and sweaters.
These are just a few examples of the common variations of rib pattern in knitting. Experimenting with different rib patterns can add depth and interest to your knitting projects and allow you to create unique and beautiful fabrics.
Tips for knitting rib patterns
Knitting rib patterns is a popular technique among knitters, as it creates a stretchy and textured fabric that is commonly used for cuffs, collars, and hems. Here are some tips to help you master knitting rib patterns:
1. Choose the right yarn: When knitting rib patterns, it’s important to choose a yarn that has good elasticity and stitch definition. Look for yarns that have a blend of natural fibers, such as wool or cotton, that can provide the necessary stretch.
2. Use the right needles: Selecting the right needles for knitting rib patterns is crucial. Use a needle size that matches the recommended gauge for the yarn you are using. This will ensure that your rib pattern has the desired stretch and drape.
3. Practice a consistent tension: Maintaining a consistent tension is essential for achieving an even and professional-looking rib pattern. Pay attention to the way you hold your yarn and try to keep the tension consistent throughout your project.
4. Master the rib stitch: The basic rib stitch pattern consists of alternating knit and purl stitches. Practice knitting rib patterns with a simple 1×1 rib stitch (one knit stitch followed by one purl stitch) until you feel comfortable with the technique.
5. Experiment with different ribbing variations: Once you feel confident with the basic rib stitch, don’t be afraid to experiment with different variations. Try a 2×2 rib (two knit stitches followed by two purl stitches), or even a twisted rib (where you knit into the back of the stitch). These variations can add interesting texture to your projects.
6. Block your finished project: Finally, remember to block your finished ribbed project. Blocking helps even out any inconsistencies in tension and gives your knitting a polished look. Follow the blocking instructions on your yarn label or consult a knitting resource for guidance.
By following these tips and practicing your rib knitting skills, you’ll be able to create beautiful and professional-looking ribbed garments and accessories.
Benefits of using rib pattern in knitting
The rib pattern is a popular choice among knitters for its versatility and practicality. This pattern creates a stretchy fabric with a unique texture, making it ideal for a variety of knitting projects.
1. Elasticity: One of the main benefits of using the rib pattern is its elasticity. The alternating knit and purl stitches create a fabric that has excellent stretch, making it perfect for garments that need to fit snugly, such as hats, socks, and gloves.
2. Structure: The rib pattern adds structure to knitted items. It’s great for creating details like cuffs, waistbands, and collars that need to maintain their shape. The vertical lines created by the rib pattern also give a polished and professional look to the finished project.
3. Thermal insulation: The rib pattern creates a dense fabric with a lot of trapped air pockets. These air pockets provide excellent thermal insulation, keeping the wearer warm and cozy. This makes the rib pattern ideal for winter accessories like scarves and mittens.
4. Hide mistakes: The rib pattern is forgiving when it comes to small mistakes. If you accidentally make a wrong stitch or two, the alternating knit and purl stitches can help disguise these errors. This makes it a great pattern for beginner knitters who are still mastering their skills.
5. Flexibility in design: The rib pattern can be easily modified and combined with other stitch patterns to create unique designs. Whether you want a simple 1×1 rib or a more intricate 2×2 or 3×3 rib, the options are limitless. This allows knitters to add their personal touch to each project.
In conclusion, the rib pattern is a versatile and practical choice in knitting. It offers elasticity, structure, thermal insulation, the ability to hide mistakes, and flexibility in design. Whether you’re knitting a hat, a sweater, or a scarf, the rib pattern is sure to enhance your project with its unique texture and benefits.
How to incorporate rib patterns into different knitting projects
Rib patterns are versatile and can be incorporated into various knitting projects to add texture and stretch to the fabric. Whether you’re working on a scarf, hat, or sweater, ribbing can be a great way to create a polished and professional-looking finish.
When incorporating rib patterns into your knitting projects, it’s important to consider factors such as the yarn weight and needle size. Thicker yarns and larger needles will result in chunkier and more pronounced ribbing, while thinner yarns and smaller needles will create a more delicate and subtle effect. It’s a good idea to swatch your rib pattern before starting your project to determine the desired gauge and adjust your needle size accordingly.
1. Scarves and Cowls: Ribbing is a popular choice for scarves and cowls as it adds elasticity and helps the fabric to lay flat. You can experiment with different rib patterns such as 1×1 (alternating knit and purl stitches), 2×2, or even more complex variations like twisted rib or fisherman’s rib. Incorporating ribbing at the beginning and end of the scarf or cowl can also create a neat border.
2. Hats: Ribbing is commonly used in hat patterns to create a snug and comfortable fit. Knitting a ribbed brim for your hat not only adds stretch but also provides a stylish detail. You can try different rib patterns for the brim, such as 2×2 or 1×1, and then switch to stockinette stitch or another stitch pattern for the body of the hat.
3. Sweaters: Ribbing is often used for the cuffs, hem, and neckline of sweaters to create a clean and polished finish. A classic choice is 1×1 ribbing, but you can also experiment with other patterns like 2×2 or seed stitch rib. When using ribbing for sweaters, it’s important to consider the stretch and drape of the fabric and choose a rib pattern that complements the overall design.
Incorporating rib patterns into different knitting projects allows you to add texture, stretch, and visual interest to your creations. Whether you’re a beginner or an experienced knitter, experimenting with different ribbing techniques can help enhance your knitting skills and expand your design possibilities.
Best yarns for rib patterns
Rib patterns in knitting are an excellent way to add texture and stretch to your projects, whether you’re making a sweater, hat, or scarf. The type of yarn you choose can greatly impact the appearance and feel of your rib pattern. Here are some of the best yarns for rib patterns:
1. Worsted weight yarn:
Worsted weight yarn is a popular choice for rib patterns due to its versatility and availability. It is medium-weight yarn that works well for a wide range of projects. Worsted weight yarn provides a good balance between stitch definition and drape, making it ideal for rib patterns.
2. Wool or wool blend yarn:
Wool or wool blend yarns are known for their elasticity and ability to hold shape, which makes them perfect for rib patterns. These yarns provide excellent stitch definition and have a nice stretch, allowing the rib pattern to stand out and maintain its structure.
3. Cotton yarn:
Cotton yarn is another great option for rib patterns, especially if you’re looking for a lighter and breathable fabric. Cotton yarns are known for their softness and smoothness, making them comfortable to wear. Although cotton doesn’t have as much elasticity as wool, it still works well for rib patterns and creates a neat and defined texture.
4. Bamboo yarn:
Bamboo yarn is a natural fiber yarn that offers a luxurious feel and drape. It has excellent breathability and moisture-wicking properties, making it suitable for various climates. Bamboo yarn has a great stitch definition and works wonderfully for rib patterns, giving them a sleek and elegant look.
- In conclusion, when choosing yarn for rib patterns, consider the weight, elasticity, and drape of the yarn. Worsted weight yarn, wool or wool blend yarns, cotton yarn, and bamboo yarn are all excellent options that will enhance the appearance and texture of your rib patterns.
Examples of Rib Patterns in Knitting
Rib patterns are a popular choice in knitting because they create a stretchy and flexible fabric that is ideal for cuffs, collars, and hems. They also add texture and visual interest to knitted pieces. Here are some examples of rib patterns that you can try:
1. 1×1 Rib Pattern:
The 1×1 rib pattern is one of the most common rib patterns in knitting. It consists of alternating knit and purl stitches across the row. For example, you would knit one stitch, then purl one stitch, and repeat this pattern until the end of the row. This creates a fabric that has a series of vertical ribs.
2. 2×2 Rib Pattern:
The 2×2 rib pattern is another popular choice. It involves working two knit stitches followed by two purl stitches, and repeating this pattern across the row. This creates a fabric with larger ribs compared to the 1×1 rib pattern.
3. Fisherman’s Rib Pattern:
The Fisherman’s rib pattern is a variation of the basic rib pattern. It creates a thick and cozy fabric that is perfect for cold weather garments. To achieve this pattern, you would knit one stitch in the row below, then purl one stitch, and repeat this pattern across the row. The resulting fabric has a more pronounced rib texture.
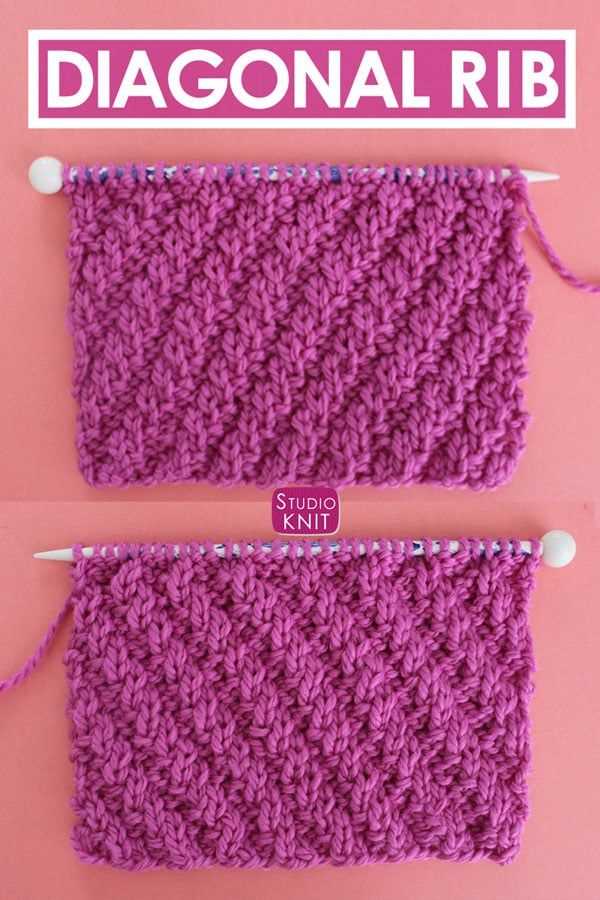
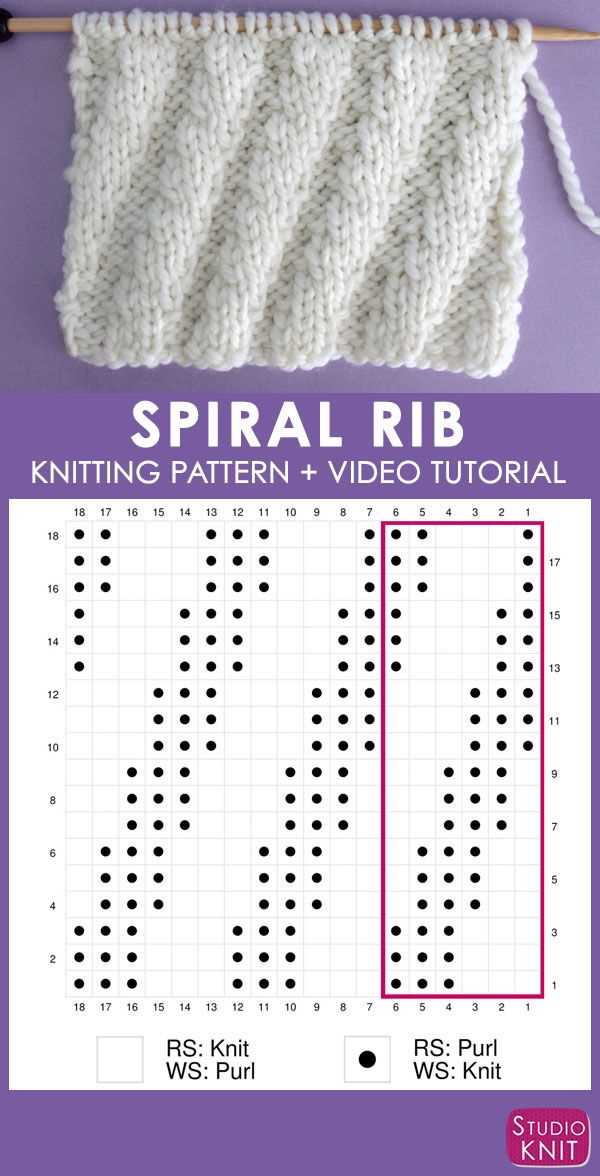
4. Zigzag Rib Pattern:
The zigzag rib pattern adds a touch of whimsy to your knitting. It involves alternating knit and purl stitches, but with an irregular sequence. For example, you might knit two stitches, purl one stitch, knit one stitch, purl two stitches, and repeat this pattern across the row. This creates a fabric with a zigzagging effect.
These are just a few examples of rib patterns that you can experiment with in your knitting projects. Whether you’re a beginner or an experienced knitter, rib patterns offer versatility and endless possibilities for creating unique and beautiful designs.
Frequently Asked Questions about Rib Patterns in Knitting
Here are some frequently asked questions about rib patterns in knitting:
1. What is a rib pattern in knitting?
A rib pattern in knitting is a type of stitch pattern that alternates knit stitches and purl stitches in a specific sequence. This creates vertical columns of raised knit stitches and recessed purl stitches, resulting in a flexible and stretchy fabric that is commonly used for cuffs, hems, and borders.
2. What are the most common rib patterns?
The most common rib patterns in knitting are the 1×1 rib and the 2×2 rib. In a 1×1 rib, you alternate one knit stitch with one purl stitch, while in a 2×2 rib, you alternate two knit stitches with two purl stitches. Other variations, such as the 3×1 rib or the 2×1 rib, are also common and can create different textures and effects.
3. How do I knit a rib pattern?
To knit a rib pattern, you will need to know how to knit and purl stitches. Here are the basic steps:
- Start with the desired number of stitches cast on.
- Row 1: *K1, p1* – repeat this sequence until the end of the row.
- Row 2: *P1, k1* – repeat this sequence until the end of the row.
- Repeat rows 1 and 2 until you reach the desired length.
4. Can I modify the rib pattern?
Yes, you can modify the rib pattern to create different effects. For example, you can change the ratio of knit stitches to purl stitches, or you can introduce additional stitches or cables to the pattern. Experimenting with different variations can help you achieve unique and personalized designs.
5. What yarn and needle size should I use for rib patterns?
The yarn and needle size you should use for rib patterns depend on the desired outcome and the thickness of the yarn. Generally, a medium weight yarn and corresponding needle size are recommended for standard rib patterns. However, you can adjust the yarn weight and needle size to achieve different levels of stretch and drape for your knitting project.
6. Can I use rib patterns for other knitting projects?
While rib patterns are commonly used for cuffs, hems, and borders, they can also be used for the entire project. Rib patterns can create interesting textures and stretch, making them suitable for scarves, hats, sweaters, and other garments. Additionally, rib patterns can be used in combination with other stitch patterns to add visual interest to your knitting projects.
Conclusion

Rib patterns in knitting are versatile stitches that can add elasticity, stretch, and texture to your projects. Whether you’re making cuffs, hems, or entire garments, rib patterns can provide a polished and professional finish. Don’t be afraid to experiment with different rib variations and yarn choices to create unique and personalized designs.
Q&A:
What is a rib pattern in knitting?
A rib pattern in knitting refers to a technique where alternating rows of knit and purl stitches are used to create a raised texture. This pattern is often used for cuffs, hems, and other edges of garments as it creates a stretchy and flexible fabric.
How is a rib pattern created in knitting?
A rib pattern is created by alternating knit and purl stitches on the same row, or by working knit stitches on one row and purl stitches on the next. This creates a pattern of raised ribs that can vary in width and texture depending on the number of stitches and rows used.
What are the benefits of using a rib pattern in knitting?
Using a rib pattern in knitting has several benefits. It creates a fabric with natural elasticity, making it ideal for edges that need to stretch and recover, like cuffs and waistbands. It also adds visual interest to a project and can be used to create different textures, such as raised ribs or columns.
What types of rib patterns are commonly used in knitting?
There are several commonly used rib patterns in knitting. Some examples include 1×1 rib (alternating one knit stitch and one purl stitch), 2×2 rib (alternating two knit stitches and two purl stitches), and 3×1 rib (alternating three knit stitches and one purl stitch). These patterns can be combined or modified to create different effects.
Can a rib pattern be used for more than just edges in knitting?
Absolutely! While rib patterns are commonly used for cuffs, hems, and other edges, they can also be used to create entire garments or sections of garments. For example, a sweater or scarf made entirely in ribbing can have a unique texture and stretchiness. The possibilities are endless when it comes to incorporating rib patterns into your knitting projects.
What is rib knitting pattern?
Rib knitting pattern is a design technique in knitting where alternating columns of knit and purl stitches are used to create a textured fabric. It is named “rib” because the resulting fabric looks similar to the ribs of a ribcage or a ribbed surface.