
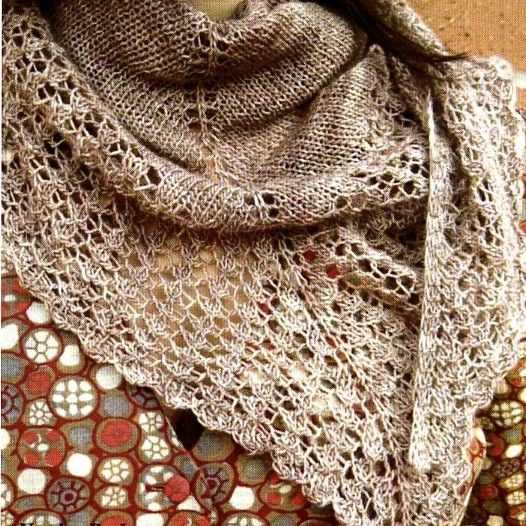
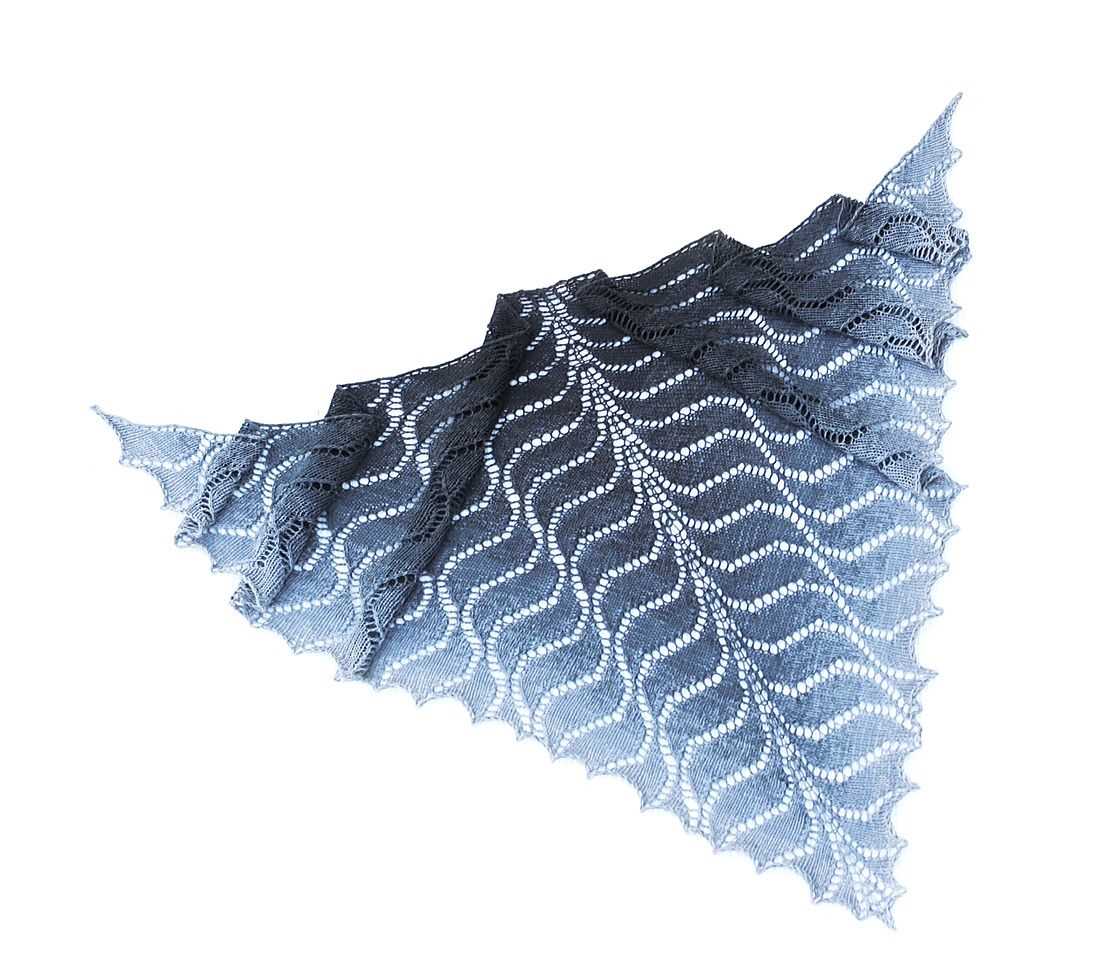
Are you looking for a beautiful and versatile knit shawl pattern? Look no further than the Wave Shawl! This stunning design features a wave-like stitch pattern that creates a sense of movement and elegance. Whether you’re a beginner or an experienced knitter, this pattern is perfect for any skill level.
The Wave Shawl pattern is not only visually stunning, but it’s also incredibly functional. The size and shape of the shawl make it perfect for wrapping around your shoulders or wearing as a scarf. The wave stitch pattern creates a lightweight and airy fabric, making it ideal for all seasons.
This pattern is also customizable, allowing you to create a shawl that is uniquely yours. You can choose from a variety of yarn colors and weights to suit your personal style. With just a few skeins of yarn and a set of knitting needles, you can create a stunning accessory that will be the envy of all your friends.
So why wait? Start knitting your own Wave Shawl today and experience the joy of creating a beautiful and functional accessory. Whether you keep it for yourself or give it as a gift, this shawl is sure to be treasured for years to come.
Wave Shawl Knit Pattern
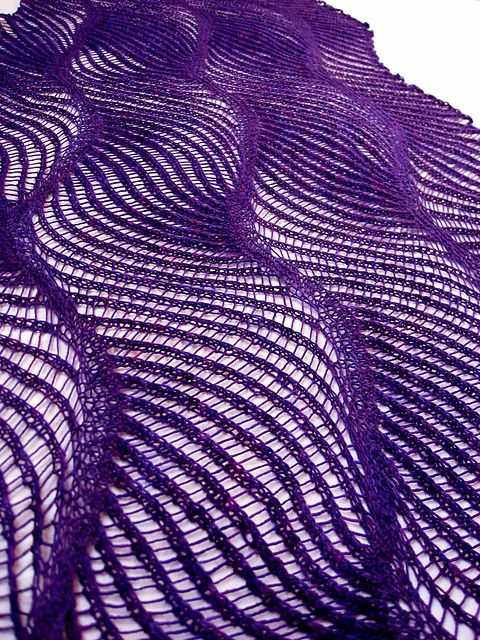
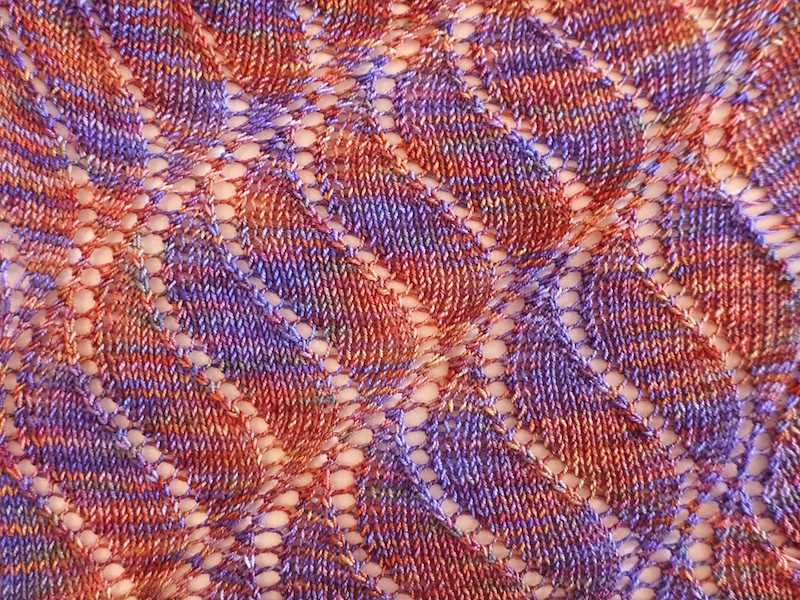
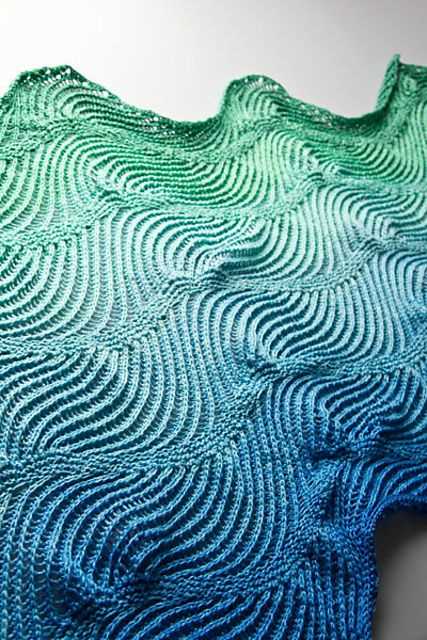
The Wave Shawl Knit Pattern is a beautiful and versatile knitting pattern that creates an elegant and wavy design. This pattern is perfect for knitters looking to create a stylish and lightweight accessory for any season. The wave-like lace stitches create a stunning visual effect that adds depth and interest to the shawl.
To create the Wave Shawl, you will need a circular knitting needle and a light fingering weight yarn. The pattern begins with a garter stitch border and then transitions into the wave stitch pattern. The waves are created using a combination of simple lace stitches, including yarn overs and decreases.
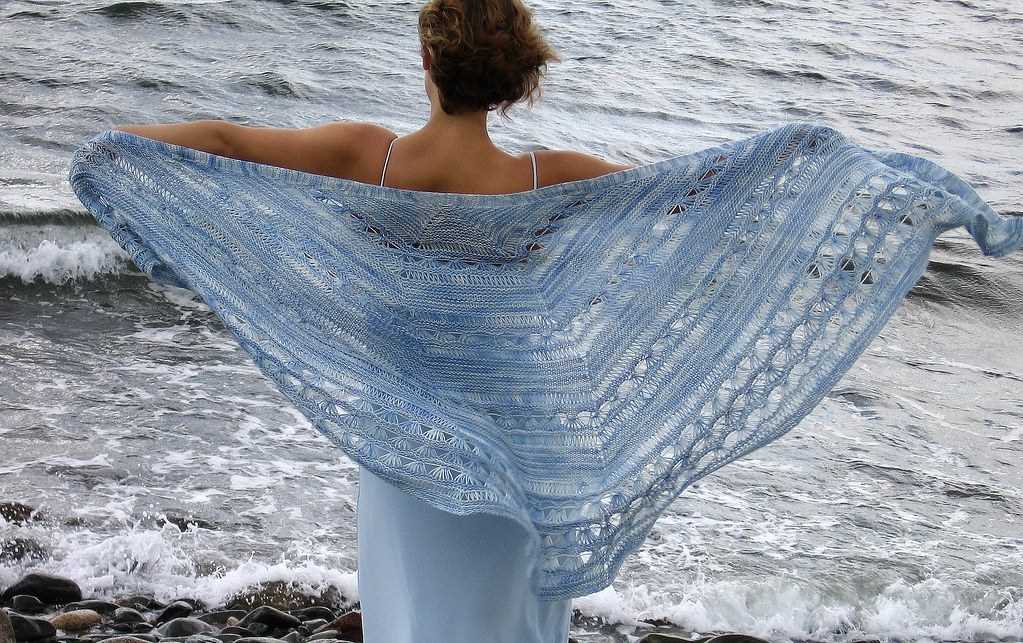
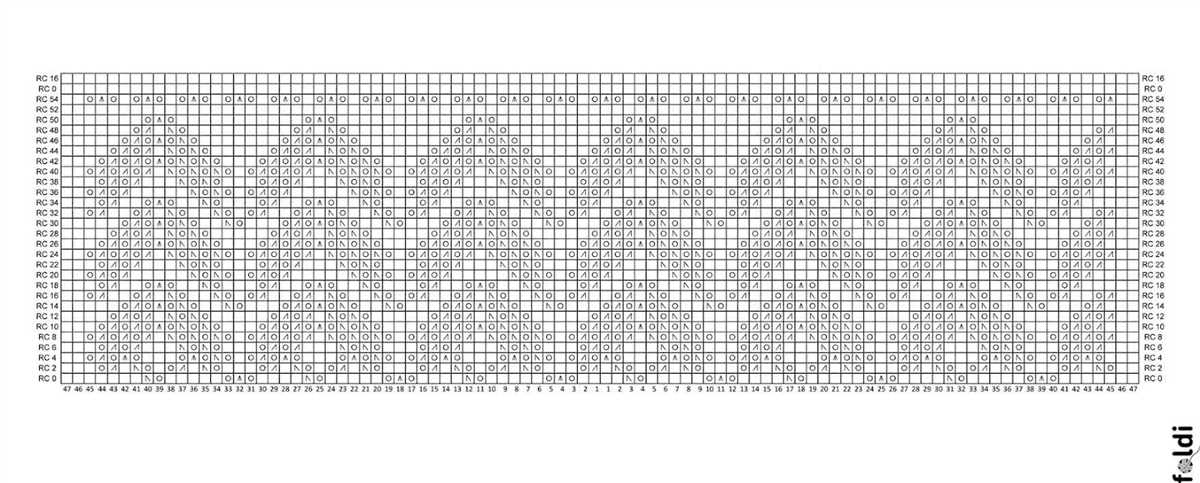
The Wave Shawl knit pattern is suitable for knitters of all skill levels. The pattern includes written instructions as well as charts for visual learners. Experienced knitters will enjoy the challenge of working with lace stitches, while beginners can practice their skills and create a beautiful accessory. The finished shawl can be worn draped over the shoulders or wrapped around the neck as a cozy scarf.
Materials:
- Light fingering weight yarn (approximately 400-600 yards)
- US size 4 (3.5 mm) circular knitting needle
- Stitch markers
- Tapestry needle
Instructions:
- Cast on 3 stitches.
- Row 1: Knit all stitches.
- Row 2: Knit 1, yarn over, knit to end of row.
- Repeat rows 1 and 2 until you reach the desired width for your shawl.
- Begin the wave stitch pattern:
- Continue repeating rows 1-8 of the wave stitch pattern until the shawl reaches your desired length.
- Finish with a garter stitch border: Knit all stitches for a few rows, then bind off.
- Weave in any loose ends and block the shawl to enhance the lace pattern.
| Row | Instructions |
|---|---|
| 1 | Knit all stitches. |
| 2 | Knit 1, yarn over, knit to last stitch, slip 1 knitwise, knit 1, pass slipped stitch over. |
| 3 | Knit all stitches. |
| 4 | Knit 1, slip 1 purlwise, knit 2 together, pass slipped stitch over, knit to end of row. |
| 5 | Knit all stitches. |
| 6 | Repeat row 4. |
| 7 | Repeat row 3. |
| 8 | Repeat row 2. |
The Wave Shawl knit pattern is a fun and rewarding project that allows knitters to showcase their skills and create a stunning accessory. Whether you’re an experienced knitter or just starting out, this pattern is sure to impress and add a touch of elegance to your wardrobe.
What is a Wave Shawl?
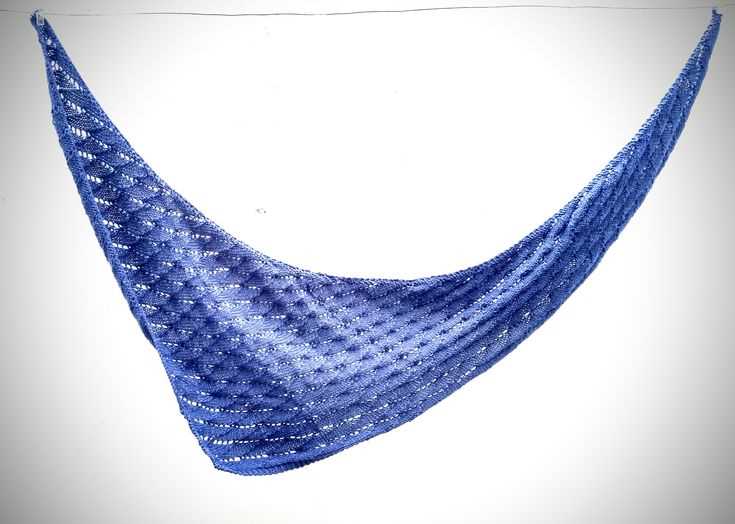
A wave shawl is a type of shawl that features a wave-like pattern in its design. It is a versatile accessory that can be worn in various ways and provides a stylish and elegant addition to any outfit.
The wave pattern in a wave shawl is created through a combination of knit and purl stitches, giving the shawl a beautiful and intricate texture. The pattern typically consists of alternating rows of knit stitches and purl stitches, with increases and decreases strategically placed to create the wave effect.
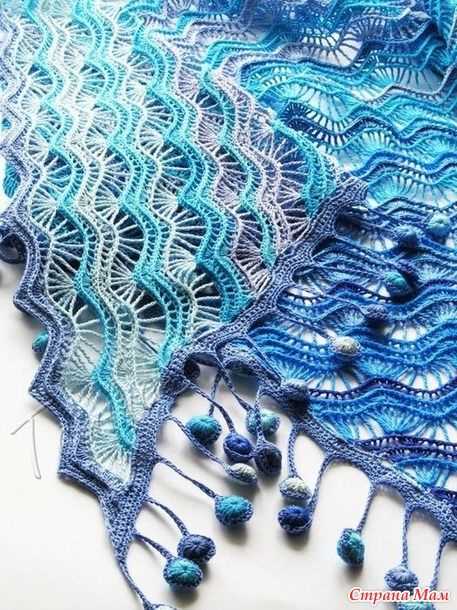
Wave shawls can be knitted using various types of yarn, depending on the desired level of warmth and drape. They can be made with lightweight yarns for a delicate and airy shawl, or with thicker yarns for a more substantial and cozy feel. The choice of yarn can greatly influence the final look and feel of the shawl.
Wave shawls can be worn in a variety of ways, making them a versatile accessory for any season. They can be draped over the shoulders for a classic and elegant look, or wrapped around the neck as a scarf for added warmth. The wave pattern adds a touch of sophistication to any outfit, whether it’s paired with a dress for a formal occasion or with jeans and a sweater for a more casual look.
Knitting a wave shawl can be a rewarding and relaxing project for knitters of all skill levels. The repetitive nature of the wave pattern makes it easy to memorize, allowing for enjoyable and meditative knitting. Whether you’re a beginner knitter looking for a new challenge or an experienced knitter looking for a stylish accessory, a wave shawl is a great choice.
Choosing Yarn and Needles
When it comes to knitting a wave shawl, choosing the right yarn and needles is crucial for achieving the desired result. The yarn you choose will determine the drape, texture, and overall appearance of your shawl.
Yarn: For a wave shawl, it’s best to choose a lightweight yarn that has good drape. Yarns made from natural fibers like cotton, linen, silk, or bamboo are ideal choices. These fibers will give your shawl a soft and flowy look, perfect for showcasing the wave pattern. Additionally, choosing a yarn with a subtle sheen can enhance the elegance of the finished shawl.
Needles: The size of your needles will affect the tension and gauge of your knitting, so it’s important to select the right size for your chosen yarn. Generally, a US size 6 or 7 needle is a good starting point for most lightweight yarns. However, it’s always a good idea to swatch with your chosen yarn and adjust your needle size as needed to achieve the correct gauge.
Furthermore, choosing the right needle type can also make a difference in the outcome of your wave shawl. Circular needles are often preferred for shawl knitting, as they allow you to accommodate a larger number of stitches and provide an even distribution of weight. Additionally, using a needle with a smooth surface, such as bamboo or metal, can help prevent the yarn from snagging and ensure smooth knitting.
Ultimately, the yarn and needle choices you make will depend on your personal preferences and the specific qualities you want in your wave shawl. Experimenting with different combinations can lead to unique and beautiful results, so don’t be afraid to try out different yarns and needles until you find the perfect match for your project.
Casting On
When starting a wave shawl knitting project, the first step is to cast on. This is the process of creating the initial row of stitches on the needle. There are several methods you can use to cast on, but for this pattern, it is recommended to use the long-tail cast on method.
The long-tail cast on is a popular method for its versatility and neat appearance. To cast on, you will need a long tail of yarn, approximately three times the width of the finished shawl. Hold the needle in your right hand and make a slipknot at the end of the yarn, leaving a tail of about 6 inches.
Place the slipknot on the left-hand needle, holding both needles in your left hand. With your right hand, insert the right-hand needle from left to right through the slipknot, catching the yarn tail as you do so. Then, bring the right-hand needle back through the slipknot, creating a loop on the right-hand needle.
Repeat this process, inserting the right-hand needle into each loop on the left-hand needle, catching the yarn tail and bringing it through to create a new loop on the right-hand needle. Continue until you have cast on the desired number of stitches for your wave shawl.
Knitting the Body of the Shawl
After completing the setup rows and establishing the pattern, it’s time to start knitting the body of the shawl. The body is where you’ll be creating the beautiful wavy pattern that gives the shawl its name.
To begin, continue following the stitch pattern as established in the setup rows. This typically involves a series of yarn overs, knit stitches, and purl stitches that create the wave-like design. By repeating these pattern rows, you’ll gradually increase the size of your shawl and create the desired shape.
Remember to count your stitches as you go along to ensure that you’re staying on track and maintaining the correct pattern. It’s easy to accidentally add or skip a stitch, especially when you’re working on a larger project, so double-checking your stitch count can save you from having to undo your work later.
Take your time and enjoy the process of knitting the body of the shawl. This is where the magic happens and you’ll start to see the beautiful waves taking shape. As you work, it can be helpful to use stitch markers to keep track of important points in the pattern, such as the center or certain stitch repeats.
If you’d like to add some variation to your shawl, you can experiment with different types of yarn or color changes. For example, you could incorporate a gradient yarn that transitions from one shade to another, or use a variegated yarn to add pops of color throughout the design. The possibilities are endless!
Continue knitting the body of your shawl until you reach the desired size, keeping in mind that you’ll need enough yarn to complete the next section of the pattern and bind off. Once you’ve finished the body, you’ll be ready to move on to the next step: finishing the edging.
Creating the Wave Pattern
The wave pattern in a shawl is created through a combination of increasing and decreasing stitches. The pattern typically starts with a small number of stitches and gradually increases, creating the wave effect. The number of stitches that are increased or decreased in each row can vary, depending on the desired size and shape of the waves.
To begin creating the wave pattern, you will need a set number of stitches to work with. This can be determined by the desired width of the shawl and the chosen yarn and needle size. Once you have determined the number of stitches, you can begin working the pattern.
One common way to create the wave pattern is through the use of yarn overs and decreases. Yarn overs are created by wrapping the yarn around the needle, increasing the number of stitches. Decreases are made by knitting or purling stitches together, decreasing the number of stitches. By strategically placing yarn overs and decreases in each row, you can create the wavy effect.
When working the wave pattern, it is important to pay attention to the number of stitches in each row. If you do not have the correct number of stitches at the end of a row, the pattern may not turn out correctly. Additionally, it is important to maintain an even tension throughout the entire shawl to ensure the waves are consistent.
There are many variations of the wave pattern that can be created, depending on the specific design and desired outcome. Some patterns may include additional stitches or different types of increases and decreases. It can be helpful to refer to a written pattern or chart to ensure you are following the correct instructions.
Overall, creating the wave pattern in a shawl requires careful attention to detail and a good understanding of knitting techniques. With practice and patience, you can create a beautiful shawl with a stunning wave pattern.
Adding Eyelet Rows
Once you have completed the base section of the wave shawl, you can begin adding eyelet rows to create beautiful lace patterns in your knitting. Eyelet rows are created by making deliberate yarn overs, which create small holes in the fabric. These holes create an open and airy texture, perfect for lightweight and delicate garments like shawls.
To add eyelet rows, you will need to follow a specific pattern of yarn overs and knit stitches. This pattern will determine the placement and spacing of the eyelet holes. For example, you could do a simple pattern of yarn over, knit two stitches, repeat across the row. Or you could create more complex lace patterns using different combinations of yarn overs, knit stitches, and decreases.
Here is a basic eyelet pattern example:
- Row 1: Knit all stitches
- Row 2: Knit 3 stitches, *yarn over, knit 2 stitches, repeat from * to last 3 stitches, knit 3 stitches
- Row 3: Knit all stitches
- Row 4: Knit 3 stitches, *knit 1 stitch, yarn over, knit 2 stitches, repeat from * to last 4 stitches, knit 1 stitch, yarn over, knit 1 stitch, knit 2 stitches
- Repeat rows 1-4 for desired number of eyelet rows
You can experiment with different eyelet patterns to create unique designs in your wave shawl. By varying the placement and frequency of the yarn overs, you can create different visual effects and textures. Have fun exploring different eyelet patterns and adding a touch of elegance to your wave shawl!
Increasing the Lace Stitch Section

The lace stitch section of the Wave shawl knit pattern is a beautiful and intricate part of the design. To increase the lace stitch section, you will need to follow the pattern instructions for increasing the number of stitches in each row.
One way to increase the lace stitch section is by using yarn overs. A yarn over is a simple technique where you wrap the yarn around the needle without knitting or purling a stitch. This creates an extra stitch and an eyelet in the fabric. The pattern may instruct you to do yarn overs at specific points in the row or at regular intervals.
Another way to increase the lace stitch section is by doing double yarn overs. A double yarn over is similar to a regular yarn over, but instead of wrapping the yarn around the needle once, you wrap it around twice. This creates two extra stitches and two eyelets in the fabric. Double yarn overs are often used to create more open and lacy patterns.
When increasing the lace stitch section, it’s important to pay attention to the stitch count and ensure that you are following the pattern correctly. If you are unsure about any of the instructions, it can be helpful to use stitch markers to mark the beginning and end of each lace stitch section. This can help you keep track of the stitches and ensure that you are increasing in the right places.
Overall, increasing the lace stitch section of the Wave shawl knit pattern adds depth and dimension to the fabric. It creates a delicate and intricate design that is sure to impress. By following the pattern instructions and using yarn overs or double yarn overs, you can create a beautiful lace stitch section that adds an elegant touch to your shawl.
Working the Border
In this section, we will discuss how to work the border of the wave shawl knit pattern. The border is an important element of the shawl and adds a finishing touch to the overall design. It defines the edges of the shawl and can be worked in a contrasting color or with the same yarn as the main body of the shawl, depending on your preference.
1. Choosing the Border Pattern: There are various border patterns that you can choose from to complement the wave stitch pattern. You can opt for a simple garter stitch border, which gives a clean and minimalist look, or you can choose a more intricate lace pattern for a delicate and feminine touch. Consider the overall style and aesthetic you want to achieve when selecting the border pattern.
2. Starting the Border: To start the border, you will typically pick up stitches along the edges of the shawl. This is done by inserting the needle into the edge stitches and knitting or purling the stitches onto the needle. The number of stitches you pick up will depend on your gauge and the desired width of the border. Make sure to distribute the stitches evenly along each edge to ensure a smooth and even border.
3. Working the Border Stitch Pattern: Once you have picked up the stitches, you will begin working the border stitch pattern. Follow the instructions provided in the pattern, whether it’s a specific stitch pattern or a combination of stitches. Pay attention to any stitch counts or repeats indicated in the pattern to ensure accuracy and consistency throughout the border.
4. Finishing the Border: After working the designated number of rows or completing the border stitch pattern, you will finish the border by binding off your stitches. This can be done using a standard bind-off method or a stretchier bind-off technique if desired. Take care to bind off loosely to prevent the border from becoming too tight or restrictive.
Overall, working the border of the wave shawl knit pattern allows you to add a decorative element to your shawl and enhance its overall design. Have fun experimenting with different border patterns and colors to create a unique and personalized shawl that suits your style.
Binding Off
Binding off is the final step in completing your wave shawl knit pattern. It involves securing the stitches to prevent them from unraveling and creating a neat edge. There are several methods you can use to bind off, and the one you choose will depend on the desired effect and your personal preference.
One common method of binding off is the standard bind off, also known as the basic bind off or the knit bind off. To use this method, simply knit the first two stitches as usual, then use the left needle to lift the first stitch over the second stitch and off the right needle. Knit the next stitch, then lift the second stitch over the third stitch and off the needle. Repeat this process until all stitches have been bound off. This method creates a firm edge that is appropriate for most projects.
If you want a more decorative or stretchy bind off, you can try the picot bind off. This technique adds a small, decorative loop on the edge of your shawl. To create this bind off, knit two stitches, then bind off one stitch by knitting the second stitch and passing the first stitch over it. With the remaining stitch on the right needle, yarn over, knit two stitches together, and pass the previous stitch over the knit two stitches together. This will create a picot loop. Repeat this process until all stitches have been bound off. The picot bind off adds a delicate touch to your wave shawl knit pattern.
Another method you might consider is the stretchy bind off, perfect for projects that require a bit more give. To achieve a stretchy bind off, use a larger needle size to give your stitches more room. Alternatively, you can use a needle two sizes larger than the one you used for the rest of the shawl. Knit the first stitch, then knit the second stitch. Insert the left needle into the first stitch on the right needle and lift it over the second stitch and off the right needle. Repeat this process until all stitches have been bound off. The resulting edge will have more give and stretch, making it ideal for items like shawls that need to drape nicely.
Blocking the Shawl
Blocking is an essential final step in the process of knitting a wave shawl. It involves shaping and stretching the fabric to achieve the desired size and shape. By blocking the shawl, you can enhance the drape and texture of the fabric, as well as ensure that the lace patterns are fully visible.
To start the blocking process, you will need:
- Blocking mats or towels
- Pins
- Measuring tape
- Spray bottle
- A clean and flat surface
Here are the steps to block your wave shawl:
- Begin by gently soaking your shawl in lukewarm water with a mild detergent. Avoid agitating or wringing the fabric to prevent stretching or damage.
- After soaking, carefully squeeze out excess water. Do not twist or wring the fabric.
- Lay out your blocking mats or towels on a clean and flat surface. Arrange them to accommodate the size and shape of your shawl.
- Place the shawl on top of the blocking mats and gently shape it to the desired dimensions. Use your measuring tape to ensure even and consistent stretching.
- Secure the shawl in place by pinning it to the blocking mats. Start by pinning the edges, then work your way towards the center, making sure to pin the lace motifs to open up the patterns.
- Once the shawl is fully pinned, mist it with water using a spray bottle. This will help the fibers relax and set in the stretched shape.
- Leave the shawl to dry completely. This process can take several hours to a day, depending on the humidity and airflow in your environment.
- Once the shawl is dry, carefully remove the pins and admire your beautifully blocked wave shawl!
Blocking not only gives your shawl its final shape, but it also helps to set the stitches and open up the lace motifs. It is an important step in ensuring that your wave shawl looks its best and showcases the intricate design. So take the time to block your shawl properly and enjoy the stunning results!
Final Thoughts and Variation Ideas
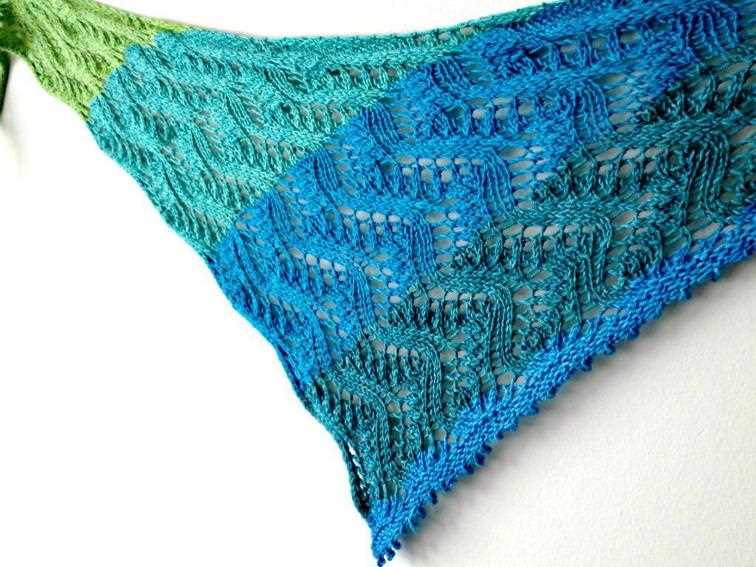
Overall, the wave shawl knit pattern is a beautiful and versatile design that can be customized to suit your preferences. Whether you prefer a more delicate lace pattern or a chunkier, textured look, this pattern allows for endless variations.
One variation idea is to use different types of yarn to create different effects. For example, using a variegated yarn can add an interesting and colorful look to the shawl, while using a self-striping yarn can create a unique pattern without the need for color changes.
Another variation idea is to incorporate different stitch patterns within the wave motif. You can experiment with different lace or cable patterns to add more depth and complexity to your shawl.
If you prefer a larger or smaller shawl, you can easily adjust the number of cast on stitches and the number of repeats in the pattern. This allows you to create a shawl that fits your desired dimensions.
Finally, don’t be afraid to get creative with your finishing touches. Adding fringe, tassels, or beads can enhance the overall look of your shawl and add a personal touch.
Whether you’re knitting this shawl for yourself or as a gift, the wave shawl knit pattern is sure to result in a stunning and cozy accessory that will be cherished for years to come.