
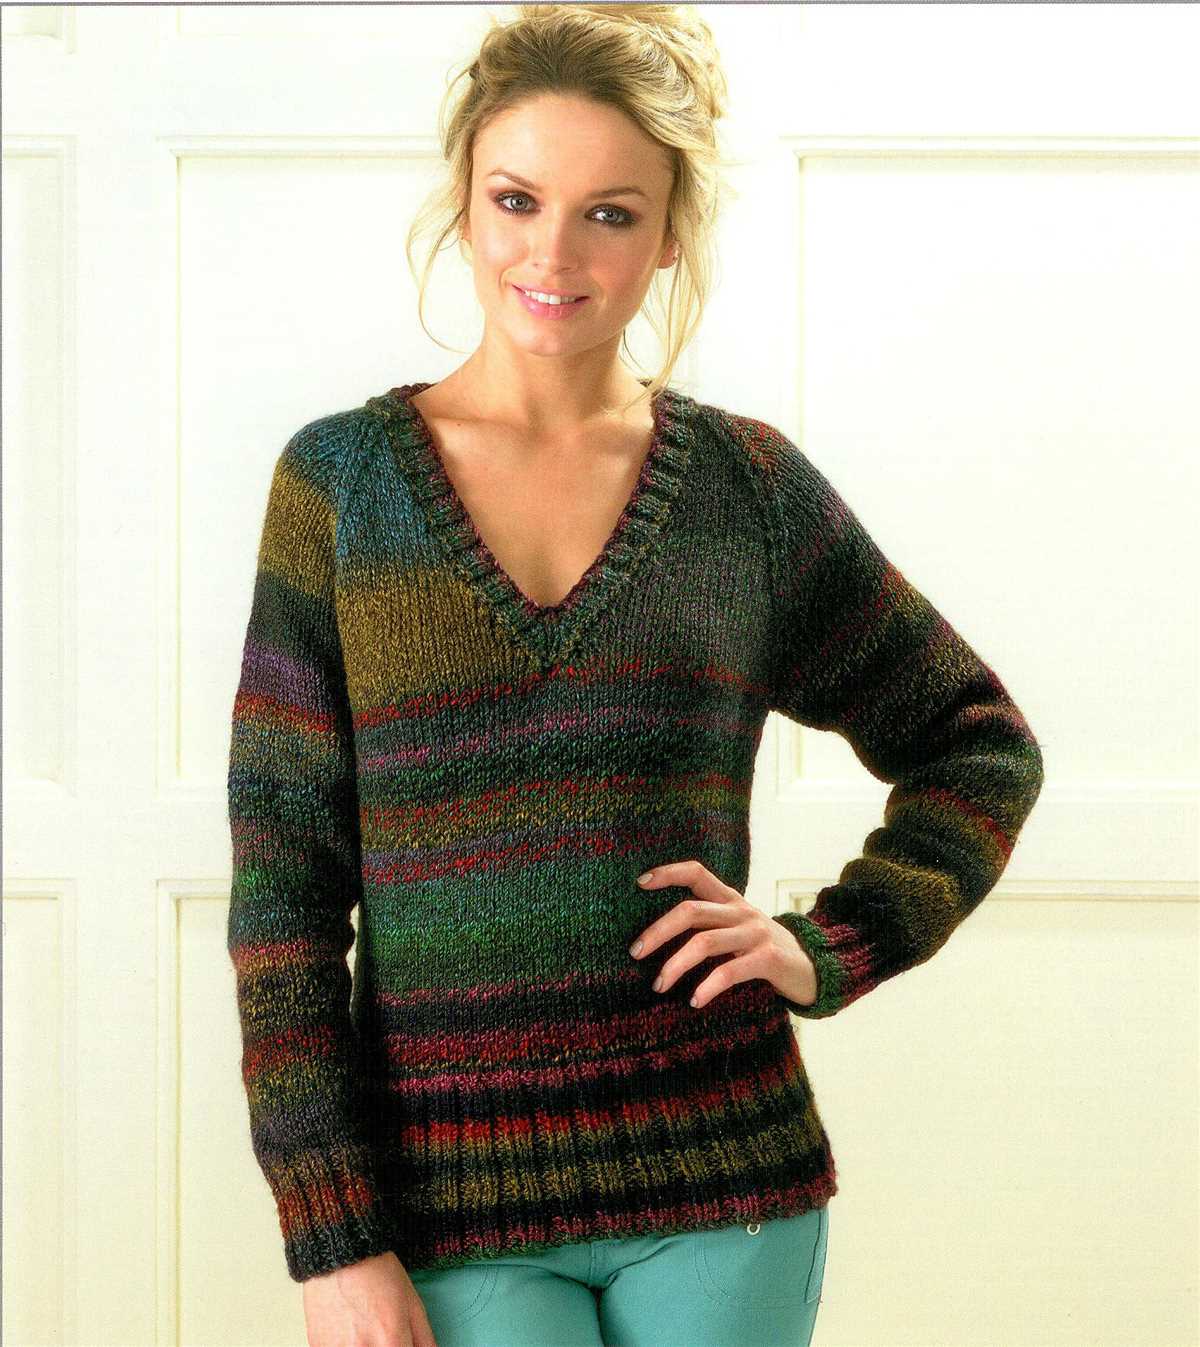
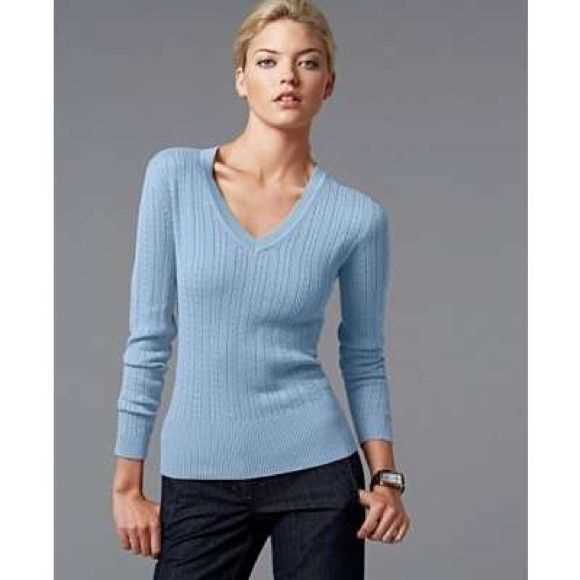
As the winter season approaches, it’s the perfect time to cozy up in a warm and soft jumper. And what better way to stay comfortable and stylish than by knitting your very own V neck jumper? Whether you’re a beginner or an experienced knitter, this free pattern will guide you through the steps to create a beautiful and trendy V neck jumper.
The V neck jumper is a classic style that can be dressed up or dressed down, making it a versatile addition to your wardrobe. Knitting your own jumper allows you to customize the fit, color, and texture to suit your personal style. Plus, it’s a great way to unwind and relax while creating something unique.
With this free knitting pattern, you’ll learn the techniques to create the perfect V neck jumper, from casting on to shaping the neckline. Whether you prefer a loose and oversized fit or a more fitted silhouette, you can easily adjust the pattern to suit your preferences.
So grab your knitting needles and get ready to create a cozy and stylish V neck jumper that will keep you warm all winter long. With this free pattern, you can unleash your creativity and enjoy the satisfaction of wearing a handmade masterpiece. Happy knitting!
How to Knit a V Neck Jumper: A Step-by-Step Guide with Free Patterns
Knitting your own V neck jumper can be a rewarding and enjoyable project. Whether you’re a beginner or an experienced knitter, this step-by-step guide will walk you through the process of creating your very own V neck jumper. With the right pattern and some basic knitting skills, you’ll have a cozy and stylish jumper in no time.
Step 1: Choose the right pattern
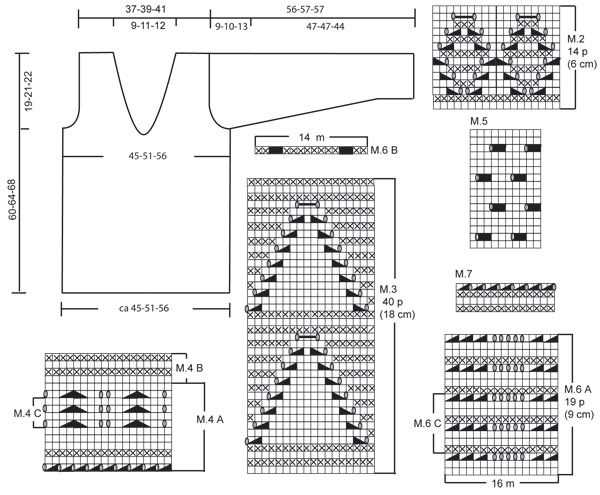
Before you start knitting, it’s important to find a V neck jumper pattern that you like. There are numerous free patterns available online, so take your time to browse and choose the one that suits your style and skill level. Look for a pattern that includes clear instructions and a detailed diagram or chart.
Step 2: Gather your materials
Once you have chosen your pattern, make a list of the materials you will need. Depending on the pattern, you will generally require a specific type and weight of yarn, as well as the corresponding knitting needles. Check the pattern for any additional material requirements, such as buttons or other embellishments.
Step 3: Gauge swatch
Before you dive into knitting the jumper, it’s important to create a gauge swatch. This will help ensure that your finished garment will fit properly. Follow the instructions in your pattern to knit a small swatch using the recommended yarn and needles. Measure the number of stitches and rows per inch and compare it to the gauge specified in the pattern. If your gauge doesn’t match, you may need to adjust your needle size.
Step 4: Cast on and knit the body
With your gauge swatch complete, it’s time to cast on and start knitting the body of the jumper. Follow the instructions in your pattern for casting on the required number of stitches and begin working in the stitch pattern specified. Pay attention to any shaping instructions, such as increases or decreases, to create the desired fit.
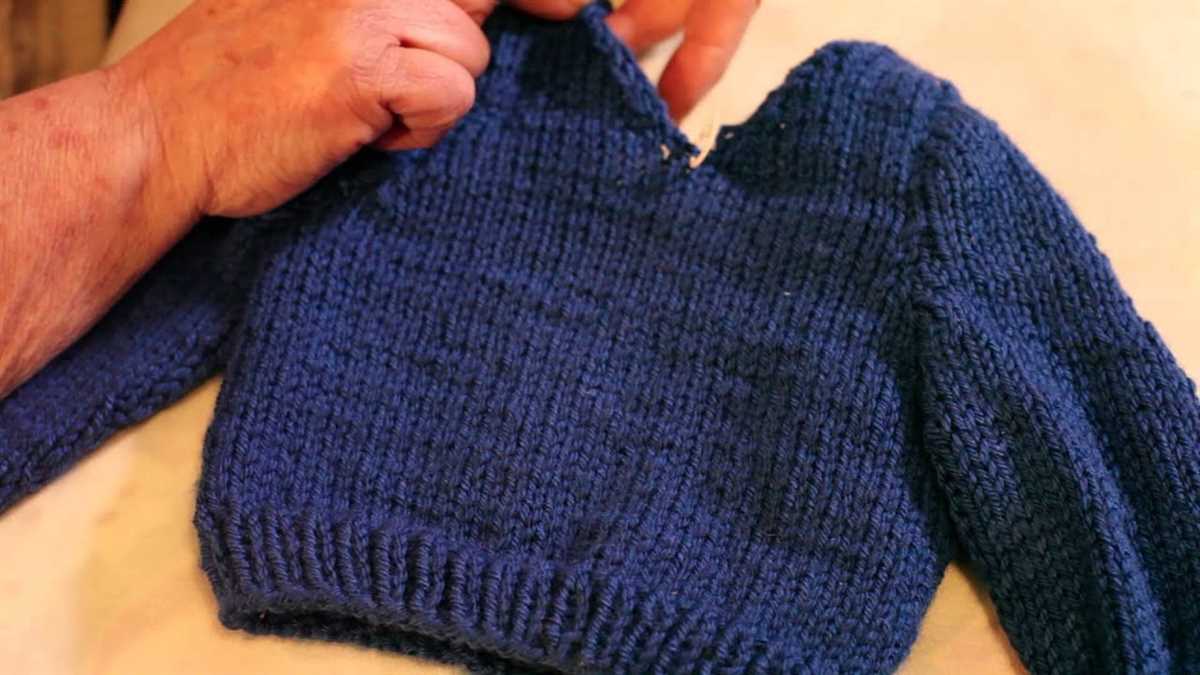
Step 5: Shape the neckline
To create the V neck, you will need to shape the neckline of the jumper. This can be done using simple decreases on either side of the center stitches. Follow the instructions in your pattern for the specific decrease method and continue knitting until you reach the desired depth of the V neck.
Step 6: Finish the jumper
Once the body and neckline are complete, it’s time to finish the jumper. This may involve knitting the sleeves separately and seaming them to the body, adding any desired embellishments, or creating a ribbed hem. Follow the instructions in your pattern to complete these finishing touches.
With these steps and a little time and patience, you can successfully knit your own V neck jumper. Enjoy the process and take pride in wearing a handmade garment that fits perfectly and reflects your personal style.
Choosing the Right Yarn and Needles
When it comes to knitting a v-neck jumper, one of the most important factors to consider is the type of yarn and needles you use. The yarn you choose will not only affect the look and feel of the finished jumper, but also its durability and ease of care.
Yarn: There are many different types of yarn available, each with its own unique qualities. When selecting yarn for your v-neck jumper, consider factors such as fiber content, weight, and texture. For a lightweight and breathable jumper, choose a yarn made from natural fibers such as cotton or bamboo. If you’re looking for warmth, wool or alpaca yarns are great options. Be sure to also check the recommended gauge on the yarn label to ensure it matches the pattern.
Needles: The size and type of needles you use can greatly affect the outcome of your knitting project. For a v-neck jumper, you’ll want to use needles that are appropriate for the yarn you’ve chosen and will give you the desired tension. Most patterns will recommend a specific needle size, but you may need to adjust this based on your personal knitting style. Circular needles are often preferred for larger projects like jumpers, as they allow for easier handling of a large number of stitches. Make sure to also consider the length of the needles, as this will depend on the size of the project and your personal comfort.
By choosing the right yarn and needles for your v-neck jumper, you can ensure that the finished garment not only looks great but also feels comfortable to wear. Take the time to select the perfect materials, and you’ll be rewarded with a beautiful hand-knit jumper that you can be proud of.
Calculating the Gauge
In order to create a V-neck jumper with the correct fit and size, it is essential to calculate the gauge of your knitting project. The gauge refers to the number of stitches and rows per inch in your knitted fabric.
To calculate the gauge, you will need to use the yarn and needle size specified in the knitting pattern. Start by knitting a swatch using the specified yarn and needles. The swatch should be large enough to measure at least 4 inches by 4 inches.
Once you have knitted the swatch, lay it flat and measure the number of stitches and rows within the 4 inch by 4 inch area. Use a ruler or tape measure to count the stitches and rows. Make sure to count only the full stitches and rows, excluding any partial stitches or rows at the edges.
For example, if you have a swatch with 18 stitches and 24 rows within the 4 inch by 4 inch area, your gauge would be 18 stitches and 24 rows per 4 inches.
Compare your measured gauge to the gauge specified in the knitting pattern. If your gauge is different, you may need to adjust your needle size. If your gauge is too small, try using larger needles. If your gauge is too large, try using smaller needles. Make a new swatch using the adjusted needle size and measure the gauge again until it matches the pattern gauge.
Calculating and adjusting your gauge is important to ensure that your V-neck jumper will have the correct size and fit. It may require some trial and error, but it is worth the effort to achieve the desired results in your knitting project.
Understanding the Basic Knitting Stitches
Knitting is a craft that involves creating fabric by interlocking loops of yarn. To successfully knit various patterns and projects, it is essential to understand the basic knitting stitches. These stitches form the foundation of knitting and are the building blocks for more complex designs.
Stockinette Stitch
The stockinette stitch is one of the most commonly used knitting stitches. To create this stitch, you alternate between knitting one row and purling the next row. This creates a smooth, flat fabric with visible “V” patterns on the right side and purl bumps on the wrong side.
Garter Stitch
The garter stitch is another basic knitting stitch that is ideal for beginners. To achieve this stitch pattern, you simply knit every row. This results in a fabric with ridges on both sides, making it reversible. The garter stitch is commonly used for scarves, blankets, and dishcloths.
Seed Stitch
The seed stitch is a simple yet visually appealing stitch pattern that creates a textured fabric. To create the seed stitch, you alternate between one knit stitch and one purl stitch in each row. This creates a fabric with small, raised clusters of stitches, resembling seeds.
Ribbing
Ribbing is a stitch pattern commonly used for cuffs, collars, and waistbands. It creates a stretchy and structured fabric. Typically, ribbing is achieved by alternating knit and purl stitches in a specific pattern, such as knit 2 stitches, purl 2 stitches. This creates vertical columns of knits and purls, giving the fabric elasticity.
Increasing and Decreasing Stitches
In addition to the basic knit and purl stitches, understanding how to increase and decrease stitches is crucial for creating shaping in knitting. Increasing involves adding stitches to the fabric to make it wider, while decreasing involves removing stitches to make it narrower. These techniques are often used in patterns to shape garments, create decorative motifs, or shape the neckline.
By mastering these basic knitting stitches, you can create a wide range of projects, from simple scarves to intricate sweaters. Practice and experimentation will help you become more comfortable with these stitches and open up endless possibilities for your knitting projects.
Casting On and Knitting the Ribbing
When starting a v-neck jumper knitting project, the first step is to cast on the required number of stitches. This will determine the width of the ribbing at the bottom of the jumper. It is important to choose an appropriate casting on method, such as the long-tail cast on or the cable cast on, to ensure a firm and neat edge. The number of stitches to cast on will depend on the desired width of the ribbing and the gauge of the yarn being used.
Once the stitches are cast on, the next step is to knit the ribbing. Ribbing is typically worked in a combination of knit and purl stitches, creating a stretchy and textured fabric. The most common ribbing pattern is the 1×1 rib, which alternates between knitting one stitch and purling one stitch. This pattern is easy to memorize and produces a clean and classic look.
When knitting the ribbing, it is important to maintain an even tension to ensure a consistent appearance throughout the fabric. This can be achieved by holding the yarn and needles with a relaxed grip and working the stitches with a consistent amount of tension. It may also be helpful to use stitch markers to separate sections of the ribbing pattern, especially if working with a large number of stitches.
Overall, casting on and knitting the ribbing is an essential part of creating a v-neck jumper. It sets the foundation for the rest of the garment and provides a polished and professional finish. Taking the time to cast on accurately and knit the ribbing with care will result in a jumper that fits well and looks impressive.
Knitting the Body of the Jumper
Once you have finished knitting the neckline and the shoulders of your v-neck jumper, it’s time to start working on the body. This is where the jumper really starts to take shape.
Using your chosen yarn and needle size, begin knitting the body by picking up stitches along the edges of the neckline. Make sure to evenly distribute the stitches so that the front and back sides of the jumper will be symmetrical. You can use stitch markers to mark the center front and center back stitches.
Join the yarn and work in stockinette stitch for the body of the jumper. Continue knitting in the round or flat, depending on your preferred method. For a sleek and smooth finish, consider using circular needles and knitting in the round. If you prefer to knit the body flat, remember to switch to the appropriate size of straight needles when needed.
Continue knitting in stockinette stitch until the body reaches your desired length. You can use a measuring tape or try the jumper on as you go to ensure the perfect fit. Remember to take into account any shaping you may want to incorporate, such as waist shaping or ribbing at the hem.
Once you have reached the desired length, you can finish off the body of the jumper by binding off all stitches. Make sure to bind off loosely to allow for easy movement and a comfortable fit. Your body is now complete, and you can move on to the next step of knitting the sleeves or any other finishing touches you may want to add.
Shaping the Neckline
When it comes to knitting a V neck jumper, shaping the neckline is an important step that can make a big difference in the final result. The neckline of a jumper should be comfortable and flattering, and achieving the right shape requires careful planning and execution.
To start shaping the neckline, you will first need to determine the width and depth of the V. This will depend on your desired style and the size of the jumper. You can choose to have a narrow V for a more subtle look, or a wider V for a bolder statement. It’s also important to consider how deep you want the V to be, as this will affect how much the neckline slopes.
Once you have decided on the width and depth of the V, you can begin the shaping process. One common method is to work decreases on each side of the V to create the slope. This can be done by working decreases at regular intervals, either on every row or every other row, depending on the pattern. The decreases can be in the form of simple knit or purl stitches, or more complex decreases like knit-two-together (k2tog) or slip-slip-knit (ssk).
Another method for shaping the neckline is to create a gusset. This involves working increases on each side of the V to create a triangular shape. The increases can be made by knitting into the front and back of a stitch, or using other methods like yarn overs. This technique not only shapes the neckline, but also adds a decorative element to the jumper.
Once the shaping is complete, you can continue knitting the rest of the jumper according to the pattern. It’s important to pay attention to the instructions for the neckline, as they may specify how to finish the V and create a neat edge. Following the pattern carefully will ensure that your V neck jumper turns out beautifully and fits well.
Knitting the Sleeves
When it comes to knitting the sleeves for your V neck jumper, there are a few important steps to follow. First, you will need to determine the number of stitches you need for each sleeve. This will depend on the size of your jumper and the gauge of your knitting. You can find this information in the pattern you are using or by measuring your gauge swatch.
Once you have the correct number of stitches, you can start knitting the sleeves. It’s best to use double-pointed needles or a small circular needle for this part of the project. Begin by casting on the required number of stitches and join in the round. You can use the magic loop method or divide the stitches onto multiple needles, depending on your preference.
Next, you will work the ribbing for the cuff of the sleeve. Follow the pattern for the desired number of rows or inches, knitting in the round. After the ribbing, you can switch to the main stitch pattern for the body of the sleeve. This may involve a combination of knit and purl stitches or a specific stitch pattern, depending on your chosen design.
Continue knitting in the round until the sleeve measures the desired length. You can try it on as you go to ensure the fit is correct. Once you’ve reached the desired length, you can start decreasing stitches to shape the sleeve. Follow the pattern instructions for the proper decreases. This will typically involve decreasing a certain number of stitches evenly spaced throughout the round.
Finally, when you have the correct number of stitches left, you can finish the sleeve with ribbing to match the cuff. This will help create a neat and tidy edge. Once the ribbing is complete, bind off the stitches and weave in any loose ends. Repeat these steps for the second sleeve, and your V neck jumper will be complete!
Joining the Sleeves and Body
Once you have completed the sleeves and body of your V-neck jumper, it’s time to join them together. This is an important step in knitting as it creates the overall structure of the sweater. Here’s a step-by-step guide on how to join the sleeves and body seamlessly.
1. Lay your sleeves and body flat on a table, with the right sides facing up. Make sure that the cast-on edges of both sleeves and body are aligned.
2. Using a tapestry needle and a length of yarn, start by sewing the sleeves to the body at the shoulders. Take one sleeve and align it with one side of the body, making sure that the seams are aligned and the stitches are even. Use a whipstitch or mattress stitch to sew the pieces together, working from the cast-on edge towards the top of the sleeve. Repeat this process for the other sleeve and the other side of the body.
3. Once the sleeves are attached to the body at the shoulders, you can proceed to join the sides of the body. Fold the body in half, with the right sides facing each other. Thread a tapestry needle with yarn and sew the side seams using a whipstitch or mattress stitch. Start from the bottom of the sweater and work your way up towards the underarm, making sure to align the stitches and seams as you go.
4. Once you have sewn the side seams, your V-neck jumper is almost complete! Try it on to check the fit and make any necessary adjustments. Then, weave in any loose ends of yarn and block the sweater to give it a polished finish.
By following these steps, you’ll be able to successfully join the sleeves and body of your V-neck jumper, creating a beautiful and cozy sweater that you can enjoy wearing. Happy knitting!
Finishing Touches: Adding Ribbing, Cuffs, and Hem
When knitting a V neck jumper, adding ribbing, cuffs, and a hem is an essential step in finishing the garment. These finishing touches not only add aesthetic appeal but also serve a functional purpose by providing structure and elasticity to the edges of the jumper.
To add ribbing, start by picking up stitches along the neckline. Use a smaller size needle to create a tighter ribbed texture. Knit in a rib stitch pattern, such as K2, P2, for a classic look. Ribbing helps prevent the neckline from stretching out and gives it a polished appearance.
Next, focus on the cuffs of the jumper. You can create a simple ribbed cuff by knitting a few rows in a rib stitch pattern, such as K2, P2. Alternatively, you can experiment with different cuff designs, such as a rolled cuff or a seed stitch cuff, to add variation and interest to your V neck jumper.
Lastly, don’t forget about the hem! Adding a ribbed hem helps weigh down the bottom of the jumper, preventing it from riding up and giving it a polished finish. Again, you can use a rib stitch pattern or incorporate different stitch patterns, such as a cable or lace, to add texture and visual appeal to the hem.
Remember to sew in any loose ends and block your V neck jumper before wearing or gifting it. Blocking will help even out the stitches and enhance the overall appearance of the garment. With these finishing touches, your V neck jumper will be ready to wear and show off your knitting skills!
Conclusion
In conclusion, our free V neck jumper knitting patterns are a great resource for knitters of all skill levels. Whether you’re a beginner looking to try your hand at a new project or an experienced knitter looking for a fun and stylish design, we have something for everyone.
With our easy-to-follow patterns and detailed instructions, you’ll be able to create a beautiful V neck jumper that fits you perfectly. And the best part? They’re all completely free!
So why not give one of our V neck jumper knitting patterns a try? You’ll not only enjoy the process of creating your own unique garment, but you’ll also have a stylish and cozy jumper to wear at the end.
Don’t wait any longer – browse our selection of free V neck jumper knitting patterns and start your next knitting adventure today!