
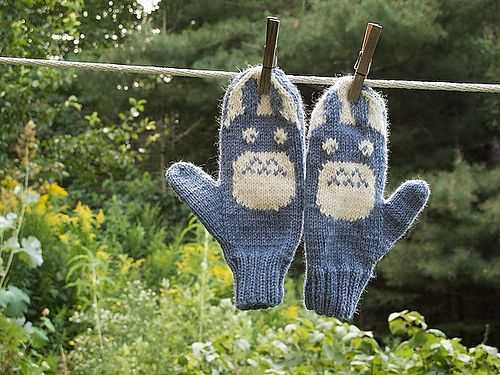
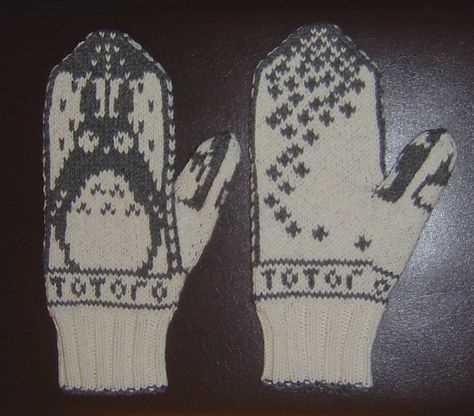
If you’re a fan of the iconic Japanese animation film “My Neighbor Totoro” and love knitting, then this Totoro mittens knitting pattern is perfect for you! These adorable mittens feature the lovable character Totoro, and they will not only keep your hands warm during the cold winter months, but also bring a smile to your face every time you wear them.
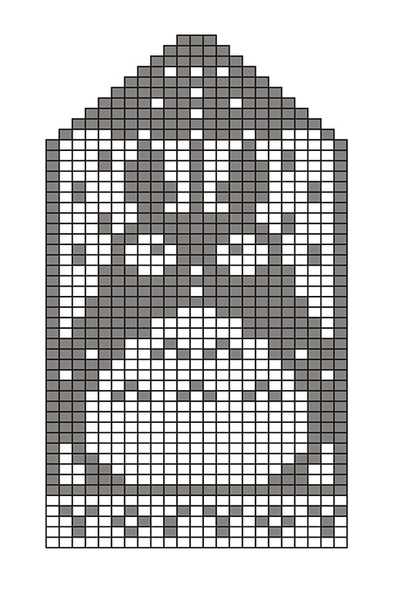
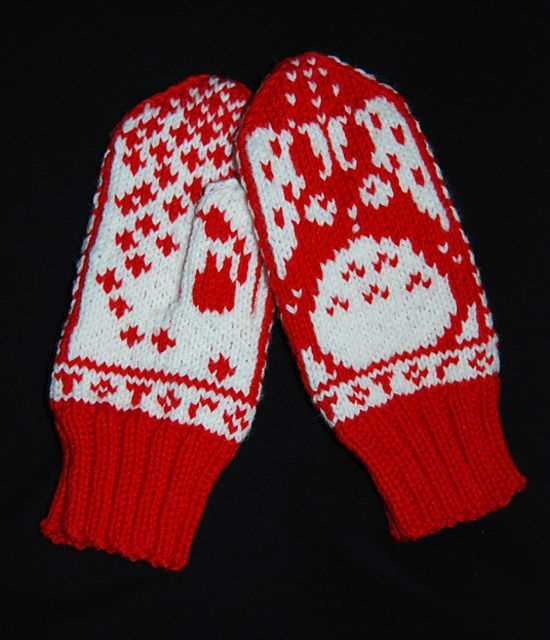
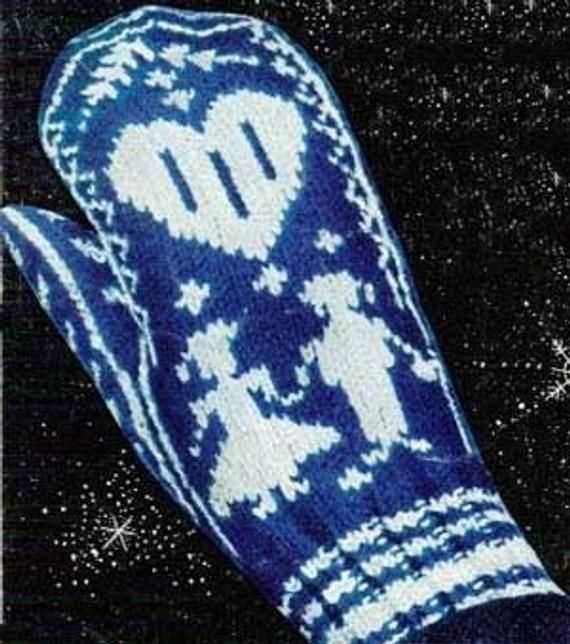
Knitting these Totoro mittens is a fun and enjoyable project for knitters of all skill levels. The pattern includes detailed instructions and a chart to help you create the intricate Totoro design. Plus, you can customize the mittens by choosing your favorite colors for Totoro and his little companion, so you can have a truly unique pair of mittens that match your personal style.
These mittens are not just a fashionable accessory; they are also a great gift idea for any Totoro fan in your life. Imagine the joy on their face when they receive a pair of hand-knit Totoro mittens! They will be the envy of all their friends and will love showing off their Totoro pride wherever they go.
Totoro Mittens Knitting Pattern
If you are a fan of the adorable Totoro character from Studio Ghibli’s animated films, you will love these Totoro mittens! This knitting pattern allows you to create your own cozy mittens featuring Totoro’s cute face and ears.
The Totoro mittens knitting pattern is suitable for intermediate knitters who are familiar with basic knitting techniques such as casting on, knitting, purling, and decreasing. The pattern includes detailed instructions and a chart for creating the Totoro design on the mittens. Additionally, it provides suggestions for yarn and needle size to achieve the desired gauge.
Materials:
- Worsted weight yarn in main color (grey)
- Small amount of yarn in white and black for Totoro’s face and details
- Size US 7 (4.5mm) double-pointed needles
- Cable needle
- Tapestry needle
- Stitch markers
- Scissors
Instructions:
- Cast on the desired number of stitches for the cuff of the mitten using the main color.
- Work in ribbing pattern for the cuff, knitting and purling in the desired ribbing pattern for a stretchy and snug fit.
- Continue knitting in the round, following the provided chart for the Totoro design.
- Shape the thumb gusset by increasing stitches at the side of the mitten.
- Knit the thumb separately and then join it back to the mitten.
- Finish the mitten by decreasing stitches and closing the top.
- Repeat the process for the second mitten.
- Weave in any loose ends and block the mittens to ensure a neat and polished finish.
With this Totoro mittens knitting pattern, you can create a pair of cozy and adorable mittens that are perfect for colder weather. Show off your love for Totoro while keeping your hands warm and stylish!
Why Totoro Mittens are a Popular Knitting Pattern
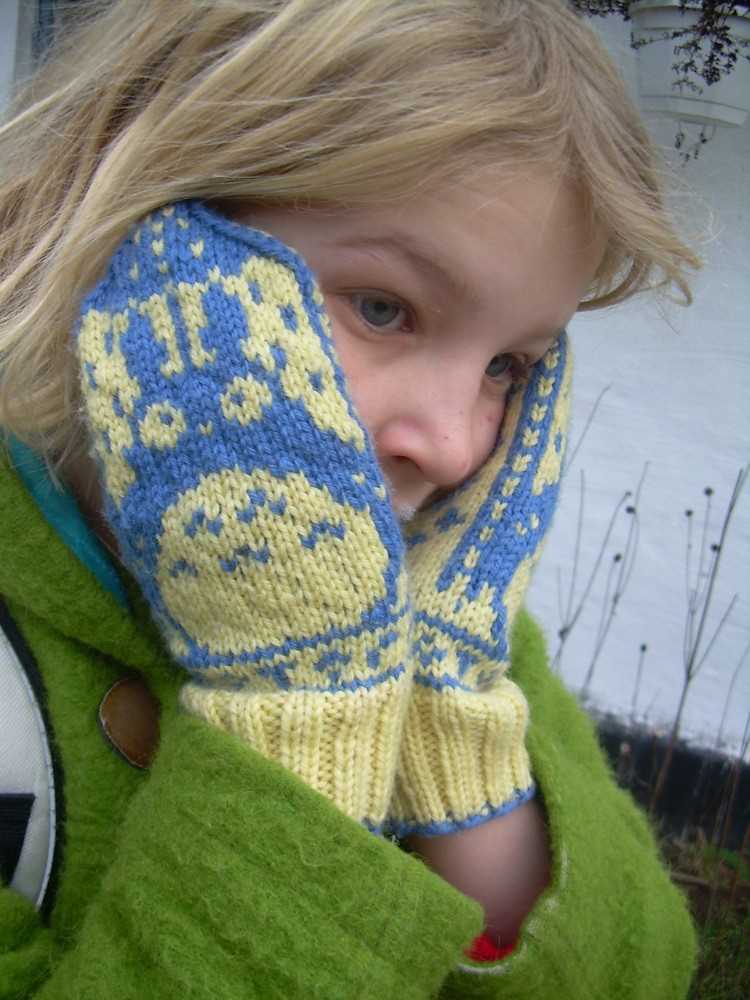
Knitting patterns inspired by the beloved character from the Japanese animated film, “My Neighbor Totoro,” have gained immense popularity among knitting enthusiasts. These adorable Totoro mittens capture the hearts of both children and adults alike, making them a popular choice for knitting projects.
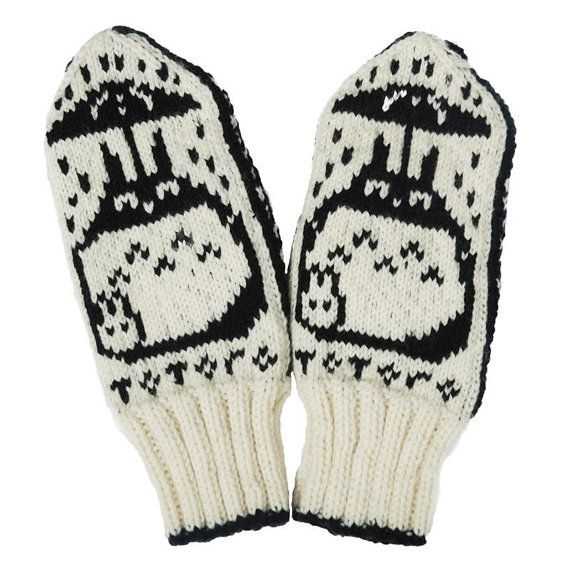
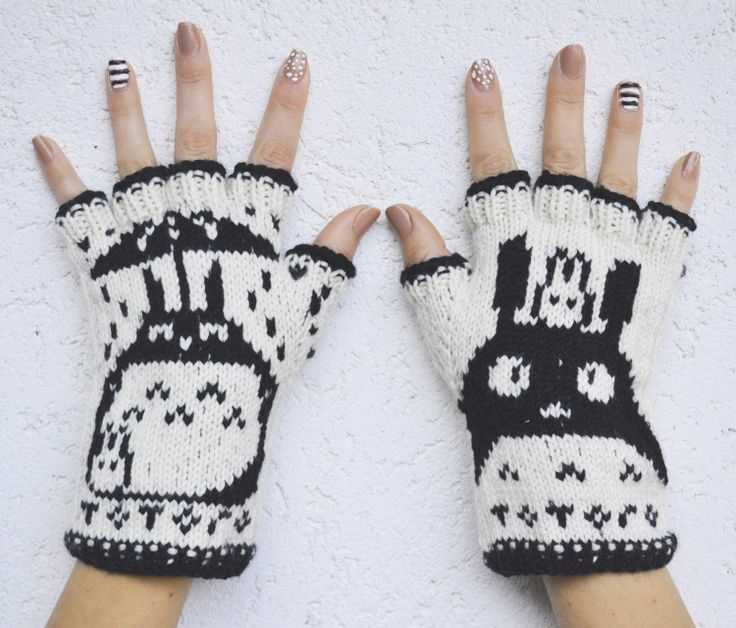
One of the main reasons why Totoro mittens are a hit among knitters is their unique design. The mittens feature Totoro’s iconic face and ears, bringing a touch of anime charm to the wearer. The distinctive look makes them a standout accessory and a great conversation starter.
Moreover, Totoro mittens are not just adorable, but also functional. Knitted with warm and cozy yarn, they provide excellent insulation to keep hands toasty in colder weather. The mittens are designed to be practical and comfortable, ensuring that the wearer can move their fingers freely while still enjoying the cute Totoro design.
For those who enjoy knitting as a form of relaxation and creative expression, Totoro mittens offer an exciting challenge. The patterns often include various knitting techniques, such as colorwork and intricate stitches, allowing knitters to expand their skills and create something truly special.
Another reason why Totoro mittens have gained popularity is the nostalgia factor. “My Neighbor Totoro” holds a special place in the hearts of many as a beloved childhood film. Knitting these mittens brings back fond memories and allows fans to showcase their love for the movie in a unique and practical way.
Whether you are a fan of the “My Neighbor Totoro” film, looking for a fun knitting project, or simply want to add a touch of whimsy to your winter wardrobe, Totoro mittens are an excellent choice. Their popularity lies in their adorable design, functionality, knitting challenge, and nostalgic appeal. Start your Totoro knitting adventure and create your own pair of charming mittens!
Getting Started: Materials and Tools You’ll Need
When it comes to knitting your very own Totoro mittens, it’s important to have all the necessary materials and tools on hand. Here is a list of what you’ll need:
Materials:
- Yarn: Choose a soft and warm yarn in the color of your choice. It’s recommended to use a medium weight yarn for this project.
- Knitting Needles: You’ll need a pair of knitting needles in the appropriate size for your chosen yarn. Check the yarn label for the recommended needle size.
- Stitch Markers: These will help you keep track of your stitches as you work on the mittens. You can use either removable stitch markers or scraps of contrasting yarn.
- Tapestry Needle: This will be used for weaving in the ends of your yarn and sewing any seams.
- Scissors: A pair of sharp scissors will come in handy for cutting your yarn.
Tools:
- Knitting Pattern: Make sure to have a copy of the Totoro mittens knitting pattern. You can either find a free pattern online or purchase one from a knitting pattern book or website.
- Measuring Tape: This will be useful for measuring your hand to ensure a proper fit for the mittens.
- Row Counter: If you have trouble keeping track of your rows, a row counter can be a helpful tool.
Once you have gathered all the necessary materials and tools, you’ll be ready to start knitting your Totoro mittens. It’s always a good idea to read through the pattern and familiarize yourself with the instructions before you begin. Take your time and enjoy the process of creating your own cozy and adorable Totoro mittens!
Understanding the Pattern: Totoro Mittens Design
In order to successfully knit the Totoro mittens, it is essential to understand the pattern design. The Totoro mittens are inspired by the popular character from the Studio Ghibli film “My Neighbor Totoro”. The pattern incorporates various elements of Totoro’s appearance, such as the iconic ears and round shape of the character.
The pattern begins with the cuff of the mitten, which is knitted using a ribbing stitch to ensure a snug fit on the wrist. From there, the pattern gradually increases in stitches to create the hand and thumb sections of the mitten. The main body of the mitten is knitted in a combination of stockinette stitch and colorwork, carefully following the chart provided in the pattern.
To create the Totoro design, the pattern uses different colors of yarn to represent the character’s features. This includes the use of white yarn for the body and belly, gray yarn for the ears and paws, and black yarn for the eyes and mouth. The pattern provides specific instructions for changing colors and carrying the yarn along the back of the work to create a neat and seamless finish.
Additionally, the pattern includes instructions for shaping the thumb and finishing off the mitten with a top closure. This may involve decreasing stitches to create a tapered effect towards the fingertips, and using a gathering technique or a ribbing stitch to close off the top of the mitten.
Overall, understanding the pattern design is key to successfully knitting the Totoro mittens. By carefully following the instructions, incorporating the correct colors, and paying attention to shaping details, knitters can create a pair of adorable and cozy Totoro-inspired mittens.
Choosing the Right Yarn for Your Totoro Mittens
When knitting a pair of cute Totoro mittens, one of the most important decisions you’ll make is choosing the right yarn. The yarn you select will determine the overall look, feel, and warmth of your finished mittens. Here are a few things to consider when choosing the perfect yarn for your Totoro mittens.
Type of Yarn: There are various types of yarn available, each with its own unique characteristics. For the Totoro mittens, it is recommended to use a medium weight yarn, also known as worsted weight or aran weight yarn. This type of yarn is versatile, easy to work with, and provides excellent stitch definition.
Fiber Content:
Animal Fibers: For mittens, it is best to choose a yarn that contains natural animal fibers, as they provide warmth and insulation. Wool is a popular choice, as it is soft, breathable, and has excellent insulating properties. Look for yarns made from merino, alpaca, or a wool blend.
Blend with Synthetic Fibers: If you prefer a yarn that is more durable and easy to care for, consider opting for a blend that includes synthetic fibers such as acrylic or nylon. These fibers can add extra strength and longevity to your mittens, making them suitable for everyday wear.
Color and Texture:
Totoro-Inspired Colors: To achieve the iconic Totoro look, choose yarn in shades of gray for the main body of the mittens. You can also add pops of color for the eyes, nose, and details. Look for subtle variations in shades to add depth and dimension to your Totoro mittens.
Texture: Consider the texture of the yarn as well. A smooth yarn will showcase the stitch patterns and details of your mittens, while a slightly fuzzy or boucle yarn can add an extra touch of coziness.
By carefully selecting the right yarn for your Totoro mittens, you can ensure that your finished project is not only adorable but also practical and comfortable to wear. So take your time to explore different yarn options and choose the one that best suits your preferences and knitting skills. Happy knitting!
Step-by-Step Instructions for Knitting the Cuff
Knitting the cuff is the first step in creating your Totoro mittens. The cuff is the part of the mitten that goes around your wrist and provides a snug fit. To begin, gather your materials which include your knitting needles, yarn, and a tapestry needle. Make sure your needles are the correct size for your yarn as indicated in the pattern.
1. Cast on stitches: Begin by making a slip knot and placing it on your left needle. Insert your right needle into the slip knot, wrapping the yarn around it from back to front. Pull the right needle through the slip knot, creating a new stitch. Repeat this process until you have cast on the required number of stitches as specified in the pattern.
2. Work in rib stitch: The Totoro mittens cuff is worked in a rib stitch pattern, which creates a stretchy and textured fabric. The rib stitch is typically done by alternating knit and purl stitches. Follow the pattern instructions to determine the specific rib stitch pattern for your cuff. Typically, it is a knit 2, purl 2 or a knit 1, purl 1 pattern. Repeat the rib stitch pattern for the required number of rows as indicated in the pattern.
3. Bind off stitches: Once you have completed the desired number of cuff rows, it’s time to bind off the stitches. To do this, knit the first two stitches of the row. Insert the left needle into the first stitch on the right needle and lift it over the second stitch and off the needle. Knit the next stitch and repeat the process of lifting the previous stitch over the current stitch and off the needle. Continue this process until all stitches are bound off.
4. Weave in ends: Finally, use a tapestry needle to weave in the loose ends of yarn from casting on and binding off. Thread the tapestry needle with the yarn tail, and weave it through the stitches on the wrong side of the cuff, making sure to secure the yarn in place. Trim any excess yarn.
By following these step-by-step instructions, you will successfully knit the cuff of your Totoro mittens. Once the cuff is complete, you can move on to knitting the hand and creating the adorable Totoro design.
Creating the Thumb Gusset: A Detailed Guide
When knitting Totoro mittens, one of the important steps is creating the thumb gusset. The thumb gusset is the section of the mitten that creates space for the thumb to fit comfortably. Here is a detailed guide on how to create the thumb gusset.
1. Marking the Thumb Placement
To start, you should first mark the thumb placement on your mitten. Lay the mitten flat and decide where the thumb should be located. It’s typically positioned slightly off-center on the side of the mitten. Once you have determined the placement, mark it with a stitch marker or a contrasting piece of yarn.
2. Increasing Stitches
Next, you will begin increasing stitches to create the thumb gusset. The most common way to do this is by using the “make 1” (M1) increase method. This involves picking up the bar between two stitches and knitting into it to create a new stitch. Repeat this increase every other round or as specified in your pattern until the desired number of thumb gusset stitches is reached.
Note: Make sure to keep track of your increases and visually check that you are maintaining the correct stitch count.
3. Placing Thumb Stitches on Hold

Once you have reached the desired number of thumb gusset stitches, you will need to place them on hold. This involves slipping the thumb stitches onto a stitch holder or a piece of waste yarn. This will temporarily separate them from the rest of the mitten, allowing you to continue knitting the hand portion.
4. Continuing the Hand
After placing the thumb stitches on hold, continue knitting the hand portion of the mitten as instructed in your pattern. This typically involves knitting in the round until you reach the desired length for the mitten.
- Pro tip: Take measurements to ensure proper fit. Try on the mitten as you go to check the length and make any necessary adjustments.
5. Rejoining the Thumb Stitches
Once the hand portion is completed, it’s time to rejoin the thumb stitches. Remove the stitch holder or waste yarn and slip the thumb stitches back onto your needles. Make sure the stitches are in the correct orientation (i.e., not twisted) before continuing.
6. Knitting the Thumb
With the thumb stitches back on your needles, follow the thumb instructions provided in your pattern. This usually involves knitting in the round, decreasing stitches as necessary to shape the thumb. Continue knitting until the thumb reaches the desired length, then bind off the stitches and weave in any loose ends.
By following this detailed guide, you will be able to create the thumb gusset for your Totoro mittens with ease. Remember to take your time and refer to the specific instructions in your knitting pattern for accurate results.
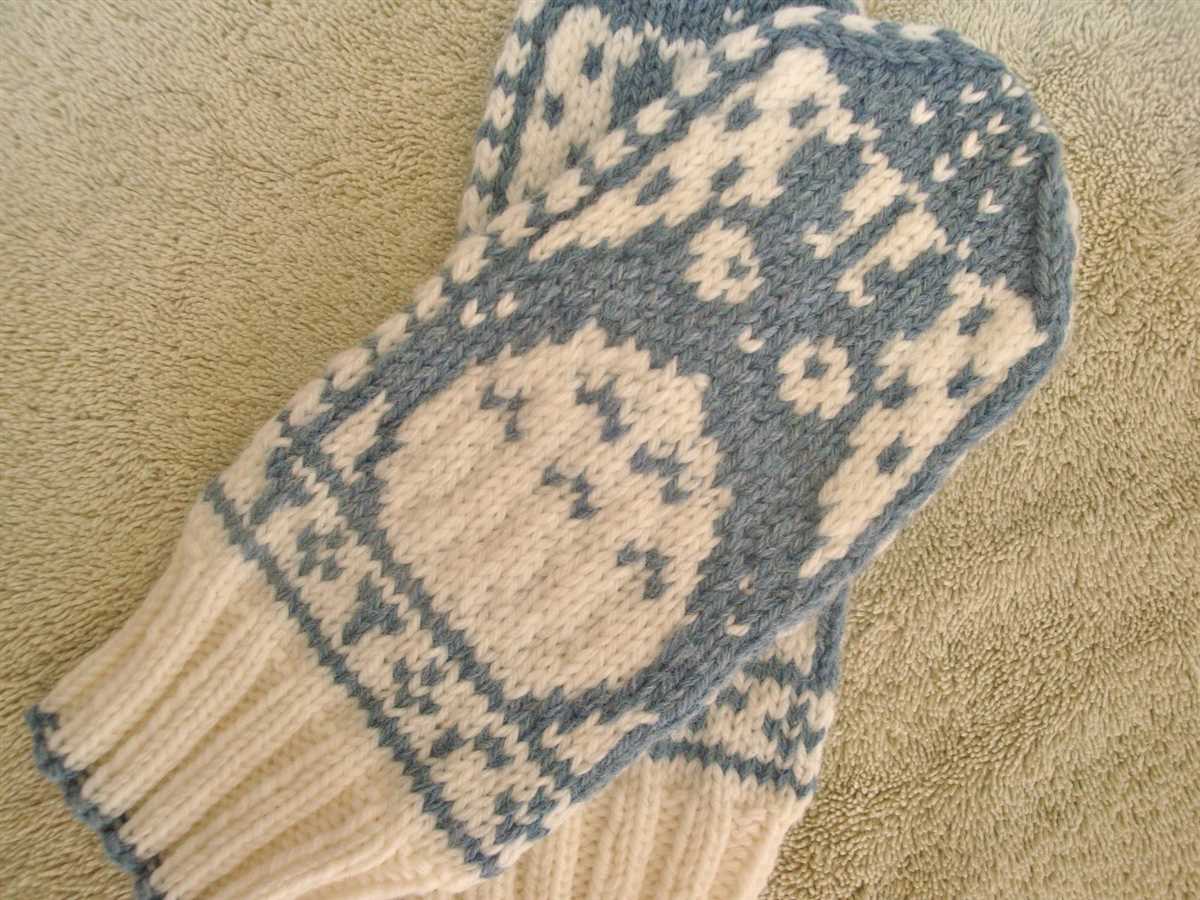
Knitting Totoro’s Face on the Mitten

Knitting Totoro’s face on a mitten is a delightful way to showcase your love for this iconic character from Studio Ghibli’s famous film, My Neighbor Totoro. This pattern allows you to create adorable mittens that feature Totoro’s cute face, making them perfect for both children and fans of all ages.
Creating Totoro’s face on the mitten requires careful attention to detail and following a specific knitting pattern. First, you will need to gather the necessary materials, including the appropriate yarn colors, needles, and a pattern guide. Once you have everything ready, you can begin the exciting process of knitting Totoro’s face onto your mitten.
Start by casting on the required number of stitches for your mitten size and working the ribbing section for the cuff. Then, you can proceed with following the color chart and knitting each section of Totoro’s face using the specified yarn colors. The pattern guide will provide you with row-by-row instructions on how to create the different facial features, including Totoro’s eyes, nose, and mouth.
Knitting Totoro’s face on the mitten requires both basic knitting skills, such as knit and purl stitches, as well as some intermediate techniques, like colorwork and shaping. As you work through the pattern, you will need to switch between different yarn colors and use techniques like stranded knitting or intarsia to achieve the desired look.
Once you have completed the face section of the mitten, continue knitting the remaining rounds according to the pattern. To add an extra touch, you can also choose to knit Totoro’s signature leaf on the top of the mitten, using a separate chart and the appropriate yarn colors. Finally, finish off the mitten by shaping the top and closing it off with a bind-off method.
Knitting Totoro’s face on the mitten is a fantastic way to combine your love for knitting and your favorite animated character. The end result will be a unique and charming accessory that will keep you warm and bring a smile to your face every time you wear it.
Finishing Touches: Tips for Embellishing Your Totoro Mittens
Completing a knitting project is always an exciting moment, but adding some finishing touches can take your Totoro mittens to the next level. Here are some tips to help you embellish your mittens and make them even more adorable.
1. Embroidered details: Totoro is known for its cute facial features, so why not add some embroidery to bring those features to life? Use black embroidery thread to create the round eyes, nose, and mouth of Totoro. You can also use white thread to add some highlights to the eyes for an extra touch of cuteness.
2. Pom-pom tails: Totoro has a fluffy tail, and you can recreate that by adding a pom-pom to the back of each mitten. You can make pom-poms using yarn in a matching or contrasting color. Attach the pom-poms securely to the mittens using a tapestry needle and some extra yarn.
3. Felt appliques: If you want to add some texture to your Totoro mittens, consider using felt appliques. Cut out shapes of Totoro’s ears or belly from felt and sew them onto the mittens using matching thread. This will give your mittens a three-dimensional look and make them even more adorable.
4. Buttons: Buttons can be a fun addition to your Totoro mittens. You can sew small black buttons in the shape of Totoro’s eyes, or you can choose buttons in different sizes and colors to represent Totoro’s diverse friends. Sew the buttons securely to the mittens, making sure they are firmly attached.
5. Ribbons or bows: If you want to add a feminine touch to your Totoro mittens, consider attaching small ribbons or bows to the cuffs. Choose ribbons in colors that complement your mittens and tie them in a bow or simply sew them directly onto the fabric. This will add an extra element of style and charm to your mittens.
With these embellishment tips, you can customize your Totoro mittens and make them truly unique. Whether you choose to embroider, add pom-poms, use felt appliques, sew buttons, or attach ribbons, these finishing touches will make your mittens stand out and bring joy to your winter wardrobe.
Blocking and Finishing: Making Your Totoro Mittens Picture-Perfect
Once you have finished knitting your adorable Totoro mittens, it’s time to give them that final touch to make them picture-perfect. Blocking and finishing are important steps in the knitting process, as they help smooth out any uneven stitches and give your mittens a polished look.
First, you’ll want to block your mittens. Blocking is the process of shaping and stretching your knitting to ensure that it retains its desired shape and size. To block your Totoro mittens, fill a basin or sink with lukewarm water and add a small amount of mild detergent. Gently immerse your mittens in the water, making sure they are fully saturated. Let them soak for about 15 minutes, then carefully remove them and gently squeeze out the excess water.
Next, you’ll need to shape and stretch your mittens to their proper size. Lay them flat on a clean towel and gently pat them into shape, making sure to smooth out any wrinkles or bumps. You can use pins or blocking wires to help hold the shape in place. Allow your mittens to dry completely before moving on to the finishing steps.
Once your mittens are dry, it’s time to add the finishing touches. Trim any excess yarn or loose threads, being careful not to cut into your knitting. If desired, you can embroider eyes and other details onto your Totoro mittens using a contrasting color of yarn. This will give them a more personalized and playful look.
If you’re feeling extra adventurous and want to take your finishing to the next level, you can even add a fleece lining to your mittens for extra warmth and comfort. Simply cut two pieces of fleece fabric to match the shape of your mittens and sew them in place using a whipstitch or blanket stitch.
Now that your Totoro mittens are blocked, shaped, and finished, they are ready to be shown off! Whether you’re creating them as a gift or for yourself, these cute and cozy mittens are sure to bring a smile to anyone’s face.
Tips for Customizing Your Totoro Mittens
While the Totoro mittens knitting pattern is adorable and fun on its own, you might want to add your own personal touch to make them even more special. Here are some tips for customizing your Totoro mittens:
1. Color combinations: Experiment with different color combinations for the main body, eyes, and belly of your Totoro mittens. You can match them to your favorite Totoro character or go for a completely unique look.
2. Embroidery details: After finishing your mittens, you can add extra details with embroidery. Use different colored yarns to stitch the mouth, whiskers, or any other features you want to highlight.
3. Size variations: Adjust the size of your mittens to fit any hand size by using different needle sizes and yarn weights. This way, you can create Totoro mittens for both adults and children.
4. Appliqué accents: If you’re feeling more adventurous, you can add appliqué accents to your Totoro mittens. Consider adding a small leaf or acorn on the belly or a mini Totoro on the cuff for a unique twist.
5. Personalized tags: Add a personalized touch by attaching a small tag with your name or initials to your finished Totoro mittens. This can make them extra special and serve as a reminder of your handmade creation.
Remember, the Totoro mittens pattern is just a starting point. Feel free to get creative and add your own personal flair to make them truly one-of-a-kind!