
If you’re an avid knitter looking for a new project, or even a beginner looking to challenge yourself, a top down pullover knitting pattern is a great option. This style of pattern allows you to knit a sweater from the top down, starting at the neckline and working your way down to the hem. It’s a versatile and customizable technique that allows you to adjust the fit and length of the sweater to your liking.
One of the advantages of using a top down approach is that you can try the sweater on as you go and make any necessary adjustments. This eliminates the need to estimate sizing and ensures a perfect fit. Plus, if you’re unsure about certain elements of the pattern, you can easily modify or add your own touch to make it truly unique.
There are endless possibilities when it comes to top down pullover knitting patterns. Whether you prefer a classic crew neck or a trendy off-the-shoulder design, there’s a pattern out there for you. Some patterns feature intricate lacework or cable stitches, while others are simple and perfect for showcasing your favorite hand-dyed yarn. The choice is yours!
Ready to get started on your top down pullover knitting project? Grab your knitting needles, find a pattern that catches your eye, and dive right in. With a little time and patience, you’ll soon have a beautiful handmade sweater that you can proudly wear and show off to your friends and family.
Top Down Pullover Knitting Pattern
Knitting a top down pullover is a popular technique in knitting circles. This method allows you to start at the neckline and work your way down to the hem. It’s a versatile pattern that can be customized to fit any body shape or size.
This top down pullover knitting pattern can be easily adapted to suit your preferences. You can choose your favorite yarn, stitch pattern, and neckline style. Whether you prefer a classic crew neck or a trendy v-neck, this pattern provides endless opportunities for customization.
Materials:
- Worsted weight yarn (approximately 800-1000 yards)
- US size 8 (5mm) circular knitting needles
- Stitch markers
- Tapestry needle
Instructions:
- Cast on the desired number of stitches for your size.
- Work the ribbing for the neckline, using a 1×1 or 2×2 rib pattern.
- Place stitch markers to mark the beginning of each sleeve and the sides of the body.
- Continue working in the round, increasing as necessary to shape the yoke of the pullover.
- Once the yoke is complete, separate the sleeves from the body and place them on holders.
- Work the body of the pullover, continuing to shape as desired.
- When the desired length is reached, bind off and weave in any loose ends.
- Repeat steps 5-7 for the sleeves.
- Block the finished pullover to give it a polished look.
This top down pullover knitting pattern is a great project for knitters of all skill levels. It offers a fun and creative way to make a personalized garment that will keep you warm and stylish in the colder months. So grab your knitting needles and give this pattern a try!
Choosing the Right Yarn and Needles

When it comes to knitting a top-down pullover, choosing the right yarn and needles is essential to achieve the desired fit and drape. The type and weight of yarn you select will determine the overall look and feel of the finished garment, while the size of your knitting needles will affect the gauge and the overall size of the pullover.
Yarn Choice: The first consideration when selecting yarn is the fiber content. You can choose from a wide range of options including wool, alpaca, cotton, silk, and blends. Each fiber has its own characteristics, so it’s important to consider factors such as warmth, durability, and drape. For a cozy and warm pullover, wool or alpaca yarns are a good choice, while cotton or silk blends can create a lightweight and breathable garment. The weight of the yarn, indicated by its ply or thickness, will also affect the overall look and feel of the pullover. Thicker yarns will create a chunkier, more substantial fabric, while thinner yarns will result in a lighter, more delicate garment.
Needle Size: The size of your knitting needles will determine the gauge of your stitches, which in turn will affect the size of the pullover. The pattern for the top-down pullover will specify the gauge needed to achieve the correct measurements, and you will need to choose a needle size that allows you to match this gauge. If your stitches are too tight and the fabric is stiff, you will need to switch to larger needles. On the other hand, if your stitches are too loose and the fabric is too floppy, you will need to switch to smaller needles. It’s important to check your gauge regularly as you progress to ensure that you’re on track to achieve the correct size.
By carefully considering your yarn choice and needle size, you can ensure that your top-down pullover turns out exactly as you envisioned. Experiment with different yarns and needle sizes to see how they affect the final result. With the right combination, you’ll be able to create a pullover that fits perfectly and is comfortable to wear.
Gauge Swatch
Before starting any knitting project, it is important to make a gauge swatch. A gauge swatch is a small sample of the knitting pattern that is used to determine the number of stitches and rows per inch. This is essential because different knitters have different tension and the pattern may need to be adjusted accordingly.
To make a gauge swatch, you will need the same yarn and needles that you plan to use for your project. Cast on a sufficient number of stitches to create a square that is at least 4 inches by 4 inches. Knit in the pattern specified in the instructions for a certain number of rows.
Measure the gauge swatch: After you have completed the swatch, carefully lay it flat on a surface. Use a ruler or a measuring tape to measure the number of stitches and rows within a 4-inch square. Count how many stitches and rows are within this measurement, and record the results. This will give you your gauge measurements.
Adjustments: If your stitch and row counts do not match the pattern’s gauge, you may need to adjust your needle size. If you have more stitches and rows per inch than specified, your stitches are too tight, and you should try using a larger needle. If you have fewer stitches and rows per inch, your stitches are too loose, and you should try using a smaller needle.
Remember, making a gauge swatch may take some extra time, but it is an important step to ensure that your finished project will be the correct size and fit.
Calculating the Number of Stitches
When knitting a top down pullover, it is essential to calculate the number of stitches accurately to ensure a proper fit. You need to determine the total number of stitches for the yoke, sleeves, and body sections. This calculation depends on the gauge, desired measurements, and stitch patterns used in the design.
To start, you need to determine your gauge by knitting a swatch with the chosen yarn and needles. Measure the number of stitches and rows per inch to get your gauge measurement. This gauge measurement will serve as the basis for all your calculations.
Next, you need to decide on the desired measurements for your pullover, such as the bust circumference, armhole depth, and sleeve length. These measurements can be based on your body measurements or the intended fit of the garment. Once you have these measurements, you can use them to calculate the number of stitches for each section.
The yoke section typically includes the neckline, shoulders, and upper chest area. To calculate the number of stitches for the yoke, you multiply the gauge measurement by the desired circumference of the yoke. For example, if your gauge is 5 stitches per inch and you want a yoke circumference of 40 inches, you would need 200 stitches for the yoke.
For the sleeves, you need to calculate the number of stitches based on both the armhole circumference and the desired sleeve circumference. The armhole circumference is determined by the yoke circumference and shoulder shaping. From there, you can calculate the desired sleeve circumference and multiply it by the gauge measurement to get the number of stitches for each sleeve.
The body section encompasses the area below the yoke. To calculate the number of stitches for the body, you multiply the desired body circumference by the gauge measurement. Additionally, you may need to account for any stitch patterns or shaping used in the body section.
By accurately calculating the number of stitches for each section of the top down pullover, you can ensure that the garment fits properly and looks as intended. Remember to always double-check your calculations and make adjustments as necessary to achieve the desired outcome.
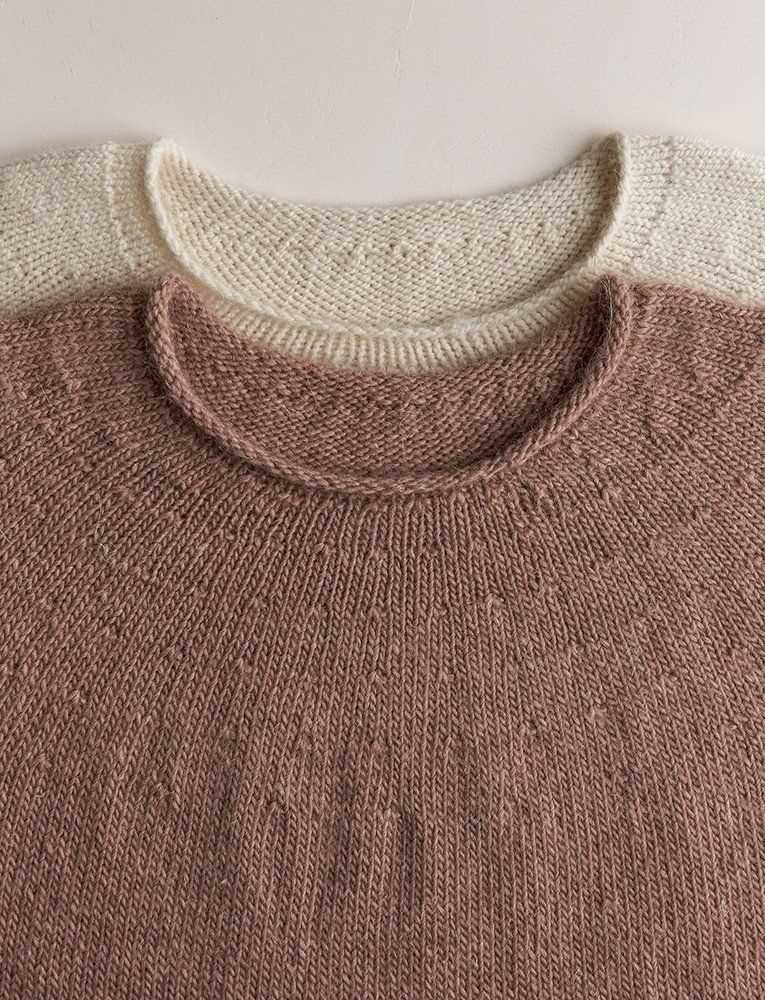
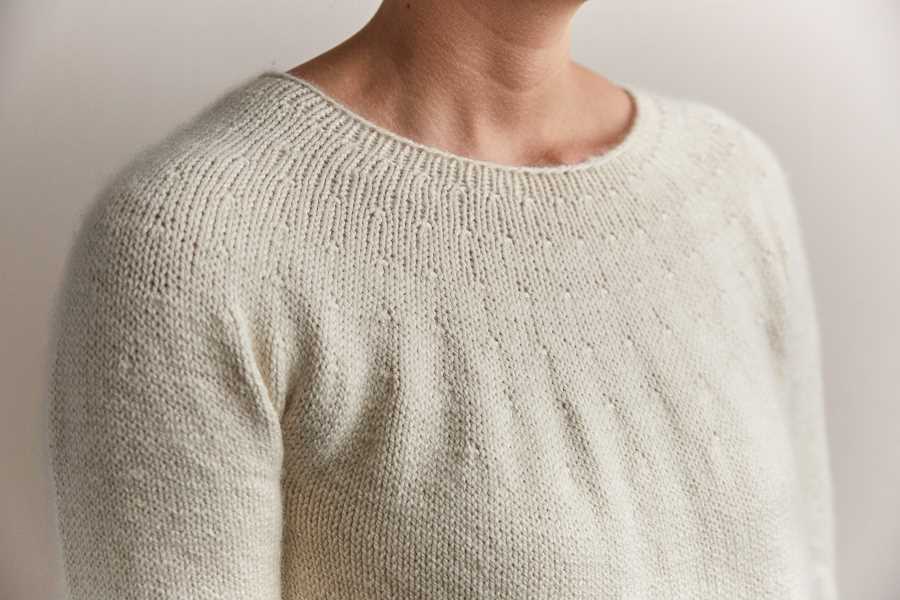
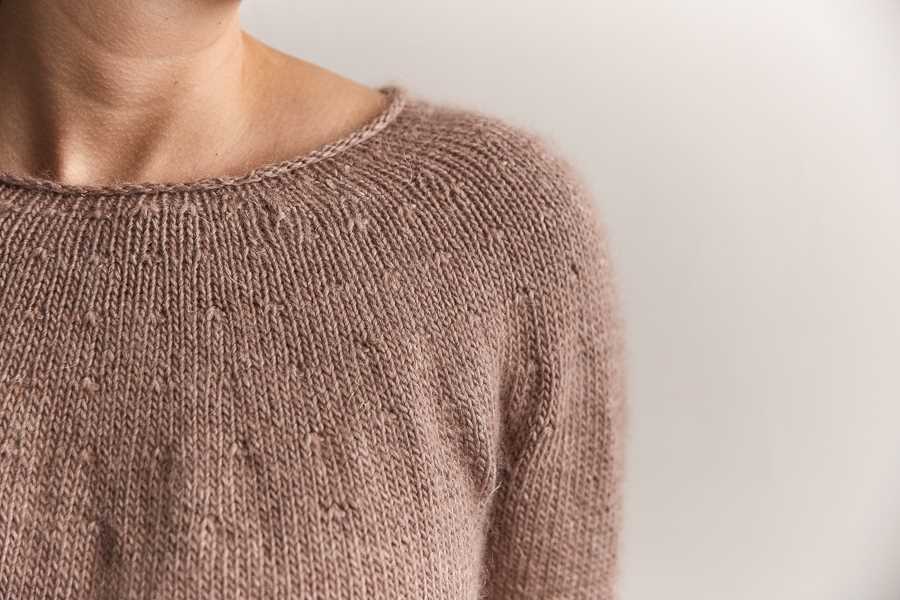
Creating the Neckline

The neckline is an important design element in a top down pullover knitting pattern. It determines the overall look and feel of the garment, as well as its functionality. There are several different options for creating the neckline, each with its own unique style and construction method.
One common technique for creating the neckline is to use short rows. Short rows are partial rows of knitting that are worked back and forth across a small section of stitches. They allow for shaping and contouring the neckline, creating a smooth and comfortable fit. To create the neckline with short rows, you would work a set number of stitches, then turn the work and work back across a smaller number of stitches. This process is repeated until the desired neckline shape is achieved.
Another option for creating the neckline is to use decreases or increases. Decreases are stitches that are worked together to decrease the total number of stitches, while increases are stitches that are added to increase the total number of stitches. By strategically placing these decreases or increases along the neckline edge, you can create a variety of different shapes and styles. For example, a v-neck neckline can be created by gradually decreasing stitches along the edge, while a boat neck neckline can be created by gradually increasing stitches.
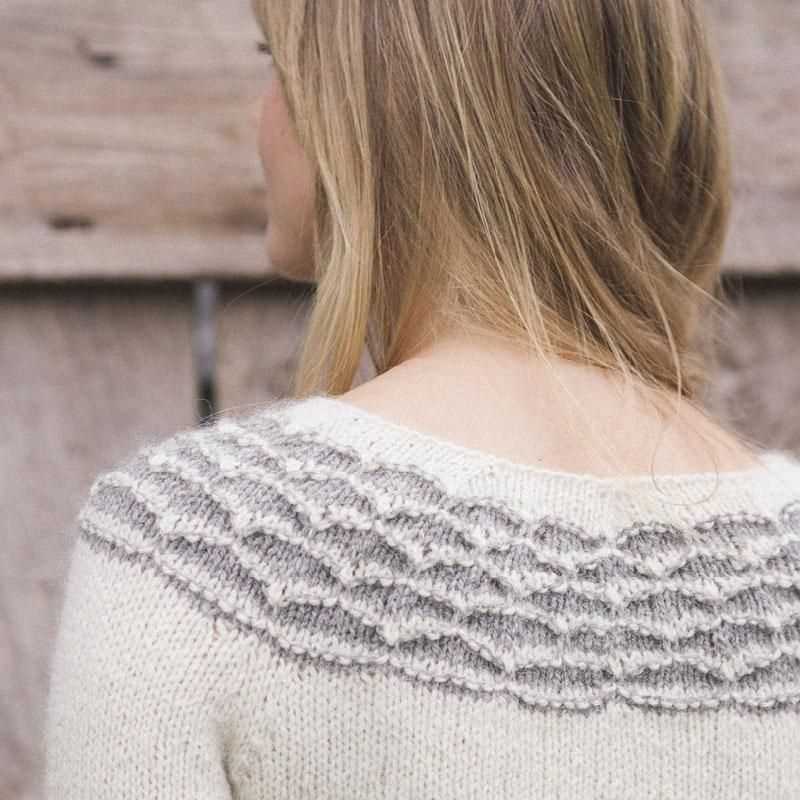
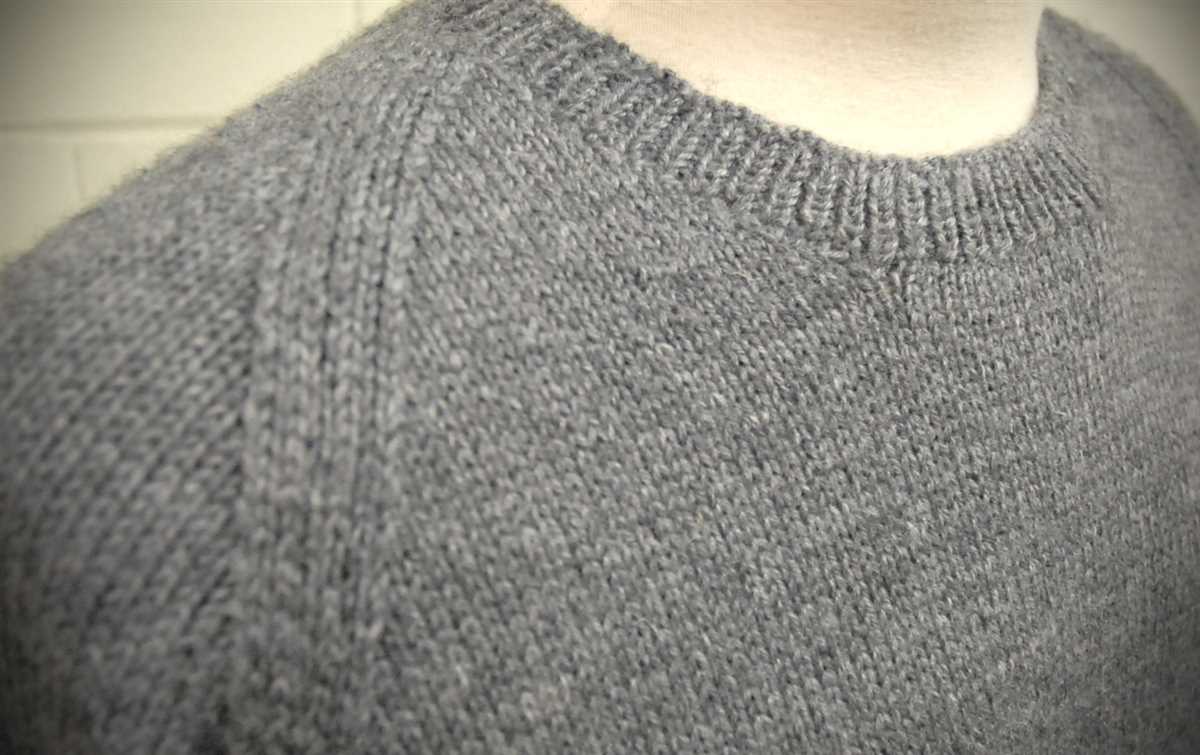
Knitting the Yoke
Once you have completed the body of your top down pullover, it’s time to move on to the yoke. The yoke is the part of the sweater that covers the shoulders and upper chest. It is where you will be working any shaping for the neck and shoulders, as well as any stitch patterns or colorwork.
To begin knitting the yoke, you will start by dividing your stitches onto different needles or stitch holders to create the neck opening. This is typically done by knitting a certain number of stitches, slipping a certain number of stitches onto a holder, and then knitting the remaining stitches. The exact placement of the neck opening will depend on the specific pattern you are following.
Once you have divided your stitches for the neck opening, you will continue working in the round, creating the yoke of the garment. This is where you can get creative and add any stitch patterns or colorwork that you desire. You may choose to continue with a simple stockinette stitch, or you can incorporate cables, lace, or stranded colorwork to make your sweater more unique.
As you work the yoke, you will also need to shape the shoulders to create a comfortable fit. This is typically done through a series of bind off and decrease rows. The exact shaping instructions will vary depending on the pattern, but the goal is to gradually decrease the number of stitches on each shoulder until the desired width is reached.
Once you have completed the yoke and shaped the shoulders, you will then move on to knitting the sleeves and finishing any remaining details, such as ribbing or a collar. The yoke is an important part of the top down pullover, as it determines the fit and overall look of the sweater. With careful attention to detail and some creative stitchwork, you can create a beautiful and personalized garment that you will love to wear.
Adding Shaping to the Body
The key to creating a well-fitting top down pullover is adding shaping to the body. This is done by increasing or decreasing stitches in specific areas to create curves and contours that follow the natural shape of the body.
One common area to add shaping is at the waist. To create a more fitted silhouette, you can decrease stitches around the waistline. This can be done using techniques such as paired decreases, where two stitches are knit or purl together, or by working a series of decreases over a few rows. This will result in a narrower waist and a more tapered look.
Another area where shaping can be added is at the bust. To accommodate for the curves of the bust, you can increase stitches in this area. This can be done by working yarn overs or by working a series of increases over a few rows. This will create more room in the chest area and ensure a better fit.
Additionally, you may want to add shaping at the hips to create a more hourglass figure. This can be done by increasing stitches at the hips, similar to how you would increase at the bust. This will create a slight flare at the hips, adding more definition to the overall silhouette.
When adding shaping to the body, it’s important to keep in mind the overall design and style of the pullover. Consider the desired fit and silhouette, and choose the appropriate techniques and placement of shaping to achieve the desired result. By adding shaping to the body, you can customize the fit of your top down pullover and ensure a flattering and comfortable garment.
Knitting the Sleeves
Once you have completed the body of your top-down pullover, it’s time to move on to the sleeves. The sleeves are knit separately and then attached to the body. This allows for easy customization of sleeve length and fit.
Step 1: First, determine the desired length of your sleeves. Measure from the top of your shoulder to where you want the sleeve to end. This will be your desired sleeve length.
Step 2: Using your desired sleeve length, refer to the pattern to determine the number of stitches you need to cast on for the sleeves. The pattern will typically provide instructions for casting on a certain number of stitches for each size. Use these instructions as a guideline, but feel free to adjust the number of stitches to achieve your desired fit.
Step 3: With the appropriate number of stitches cast on, begin knitting the sleeves in the specified stitch pattern. Depending on the pattern, this might involve working in stockinette stitch, ribbing, or a textured pattern. Follow the pattern instructions closely to ensure accurate results.
Step 4: As you knit the sleeves, it’s important to periodically try them on to check the fit. This will help you ensure that the sleeves are the desired length and width. Adjust the number of stitches or rows as needed to achieve the desired fit.
Step 5: Once you have completed the sleeves, it’s time to attach them to the body of your pullover. Following the pattern instructions, use a method such as mattress stitch or a three-needle bind off to join the sleeves to the body.
Step 6: After attaching the sleeves, make any necessary adjustments to the fit. This might involve adding or removing stitches at the underarm or adjusting the length of the sleeve. Try on the pullover and make any modifications needed to achieve the desired fit.
Step 7: Finally, once you are satisfied with the fit of the sleeves, weave in any loose ends and block the pullover according to the pattern instructions. Blocking will help the stitches to even out and the pullover to take its final shape.
By following these steps, you can successfully knit the sleeves of your top-down pullover and achieve a customized fit that suits your style and preferences.
Joining the Sleeves and Body
Now that you have completed knitting the sleeves and body separately, it’s time to join them together to create the pullover. This is an exciting moment as you start to see your project come together!
To join the sleeves and body, you will need to follow the specific instructions provided in the top down pullover knitting pattern you are using. These instructions may vary depending on the design and construction of the pullover.
1. Set up: Lay the sleeves and body flat on a table or other flat surface, with the right sides facing up. Make sure that the sleeves are aligned with the body, matching the armhole openings.
2. Connect the parts: Using a yarn needle, start by threading a length of the yarn used for knitting the pullover through the first stitch of the right sleeve and the corresponding stitch on the body. Pull the yarn through, making sure it is secure. Repeat this process for the remaining stitches on the right sleeve, joining them to the body.
3. Continue joining: Once the right sleeve is fully joined to the body, repeat the process for the left sleeve, starting from the first stitch and working your way to the end. Make sure that the stitches are evenly and securely joined.
4. Check for symmetry: After joining the sleeves to the body, take a moment to check that the pullover is symmetrical. Ensure that the shoulder seams are aligned and that the armholes are even. If adjustments need to be made, carefully undo the joined stitches and make any necessary corrections.
5. Finish the joining: Once you are satisfied with the alignment and symmetry of the pullover, weave in any loose ends of yarn and secure them. Trim off any excess yarn.
Following these steps will help you successfully join the sleeves and body of your top down pullover, bringing your project one step closer to completion. Enjoy the process and the satisfaction of seeing your hard work come to life!
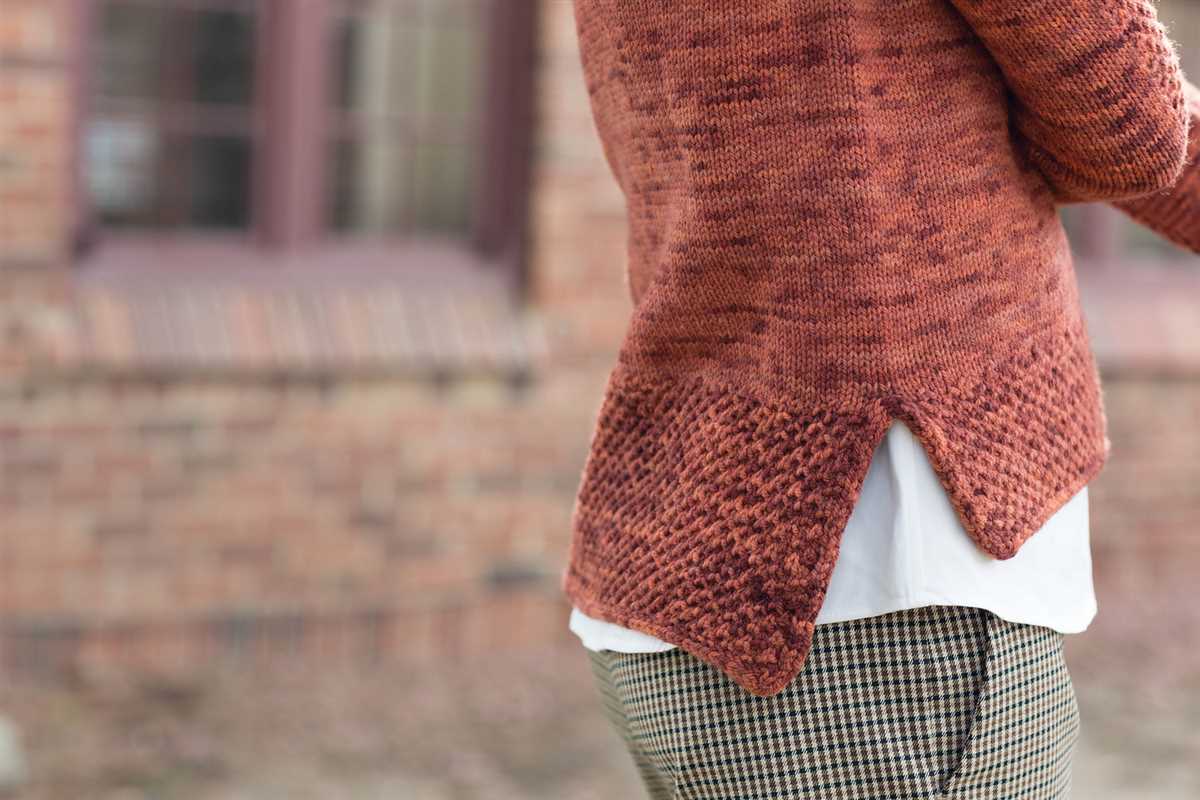
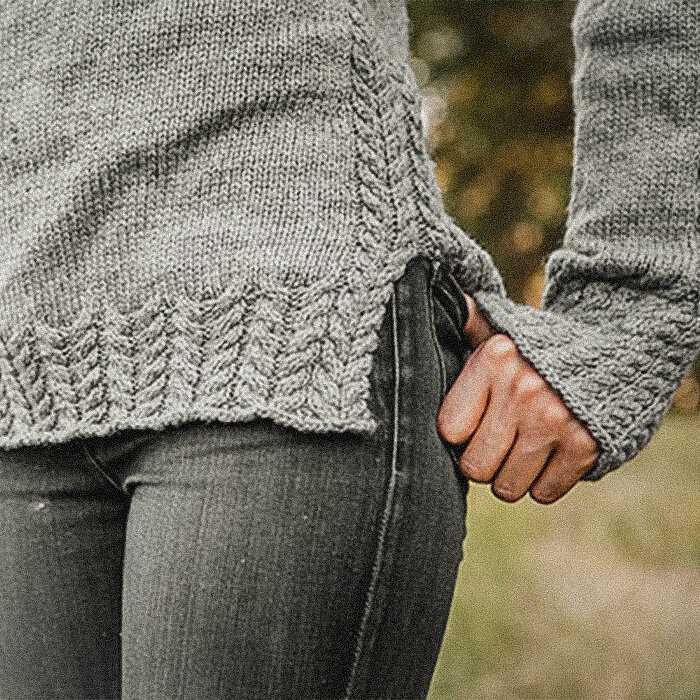
Knitting the Bottom Hem
When knitting a top-down pullover, the bottom hem is usually one of the first sections you will start with. The bottom hem provides structure and stability to the garment, and it also sets the tone for the overall look of the sweater. It’s important to choose the right stitch pattern and yarn for the hem to ensure a professional finish.
The stitch pattern for the bottom hem can vary depending on the design you are working on. Some patterns may call for a simple ribbing or seed stitch, while others may incorporate more elaborate lace or cable patterns. The choice of stitch pattern should complement the overall design of the sweater and provide a smooth transition to the body of the garment.
If using a ribbing stitch pattern for the bottom hem, it’s important to make sure that the ribbing is tight enough to prevent the hem from stretching out over time. This can be achieved by using a smaller needle size for the ribbing section or by working the ribbing with a smaller tension. It’s also important to maintain an even tension throughout the ribbing to ensure a professional finish.
When knitting the bottom hem, it’s important to consider the length of the hem and how it will fit with the rest of the sweater. The hem should be long enough to provide a flattering shape and prevent the sweater from riding up, but it should not be so long that it becomes bulky or uncomfortable to wear.
To achieve the desired length, it’s important to carefully follow the pattern instructions and make any necessary adjustments. This may involve adding or subtracting rows or stitches to achieve the desired length. It’s also a good idea to try on the sweater as you go to ensure that the hem is the right length and fits well with the rest of the garment.
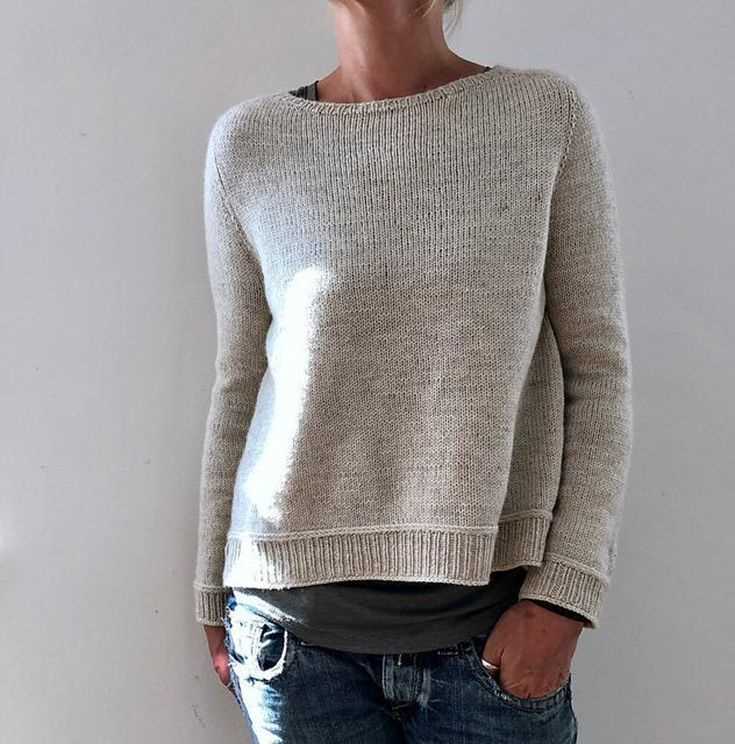
Adding Ribbing to the Cuffs
Adding ribbing to the cuffs of a top-down pullover is a great way to create a polished and professional-looking finish. Ribbing adds elasticity and helps to keep the cuffs in place. In this section, we will discuss how to add ribbing to the cuffs of your top-down pullover.
To add ribbing to the cuffs, you will first need to determine the number of stitches to use. This will depend on the desired width of your ribbing and the gauge of your knitting. A commonly used ribbing pattern is K1, P1, but you can choose any ribbing pattern that you prefer.
Once you have determined the number of stitches, you will knit the ribbing for the desired length. This can be anywhere from 1 inch to several inches, depending on your preference. To knit the ribbing, simply repeat the ribbing pattern (K1, P1 or your chosen pattern) for each row.
After knitting the ribbing to the desired length, you will then need to bind off the stitches. You can use a regular bind off method, or you can choose to use a stretchy bind off method such as the tubular bind off or the sewn bind off. These stretchy bind off methods help to maintain the elasticity of the ribbing and ensure a comfortable fit.
In summary, adding ribbing to the cuffs of a top-down pullover is a simple and effective way to create a polished and professional finish. By determining the number of stitches, knitting the ribbing to the desired length, and using a stretchy bind off method, you can ensure a comfortable and secure fit for your cuffs.
Finishing Touches
Once you have completed knitting your top-down pullover, it’s time to add the finishing touches to make it truly complete. These final steps will bring your garment together and give it a polished and professional look.
Blocking:
Before adding any finishing touches, it is important to block your knitted pullover. Blocking involves soaking the garment in lukewarm water and then gently stretching and shaping it to the desired measurements. This process helps to even out your stitches and allows the fibers to relax, resulting in a more even and professional finish.
Seaming:
If your top-down pullover is knit in pieces (such as separate front and back panels, or sleeves), you will need to seam them together. This can be done using a mattress stitch, which creates an invisible seam that gives your pullover a seamless appearance. Take your time when seaming, making sure to align the edges properly and sew with precision.
Trimming:
Adding trimmings, such as ribbed cuffs or a hem, can give your top-down pullover a polished look. This can be done by picking up stitches along the edges and knitting a ribbed or garter stitch band. Pay attention to the tension and ensure that the trimmings match the overall measurements of your pullover.
Finishing Stitches:
To add a final touch of elegance, consider incorporating decorative finishing stitches. This can include adding a decorative stitch pattern to the cuffs, hem, or neckline, or even knitting a delicate lace panel to incorporate as an accent. These finishing stitches can elevate your top-down pullover and make it truly unique.
Final Touches:
Once you have completed all the necessary finishing touches, it’s time to give your pullover a final look. Check for any loose ends or mistakes, and secure them with a tapestry needle. Take the time to properly press your pullover to remove any wrinkles and give it a crisp and professional appearance.
By paying attention to these finishing touches, you can ensure that your top-down pullover not only fits well but also looks polished and beautiful. Whether you are knitting for yourself or as a gift, these final steps will make your garment truly one-of-a-kind.
Blocking and Seaming
After you have finished knitting your top-down pullover, it is important to block it to give it a polished and finished look. Blocking helps to even out your stitches, relax the fibers, and ensure that your garment is the correct shape and size. To block your pullover, follow these steps:
- Gently soak your pullover in lukewarm water with a few drops of mild detergent for about 15-20 minutes.
- Remove the pullover from the water and gently squeeze out any excess water.
- Lay the pullover flat on a clean towel and shape it to the desired dimensions, making sure the stitches are even and the edges are straight.
- Pin the edges of the pullover with rustproof pins to hold them in place.
- Allow the pullover to air dry completely before unpinning it.
Once your pullover is blocked and dry, it is time to seam it together. Depending on your pattern, you may need to seam the shoulders, sides, and sleeves. Follow these general steps to seam your pullover:
- Place the pullover pieces together, right sides facing each other.
- Using a yarn needle and the same yarn that you used for knitting, begin seaming the pieces together using a mattress stitch or your preferred seaming technique.
- Work your way along the edges, making sure to maintain an even tension and stitch placement.
- When you reach the end of a seam, secure the yarn and weave in any loose ends.
Once you have blocked and seamed your top-down pullover, you can enjoy the final product. The blocking process helps to give your pullover a professional finish, while the seaming ensures that all the pieces come together seamlessly. Take your time with these final steps to ensure that your pullover looks as good as possible.