
Writing a knitting pattern can be both an art and a science. While knitting itself is a beautiful and creative process, translating that process into a coherent and understandable pattern requires a whole different set of skills. Whether you’re an experienced knitter looking to create your own designs or a seasoned pattern writer, “The Knitting Pattern Writing Handbook” is here to guide you through the intricate world of pattern writing.
This comprehensive handbook covers everything you need to know to write clear and user-friendly knitting patterns. From understanding knitting abbreviations and symbols to creating professional-looking charts and schematics, this guide will equip you with the knowledge and skills necessary to turn your knitting projects into well-written patterns that can be enjoyed by knitters of all skill levels.
With step-by-step instructions and insightful tips and techniques, “The Knitting Pattern Writing Handbook” will help you avoid common pitfalls and challenges associated with pattern writing. Whether you’re designing intricate lace shawls or cozy winter sweaters, this handbook will serve as your go-to resource for organizing your thoughts, communicating instructions effectively, and creating patterns that knitters will love.
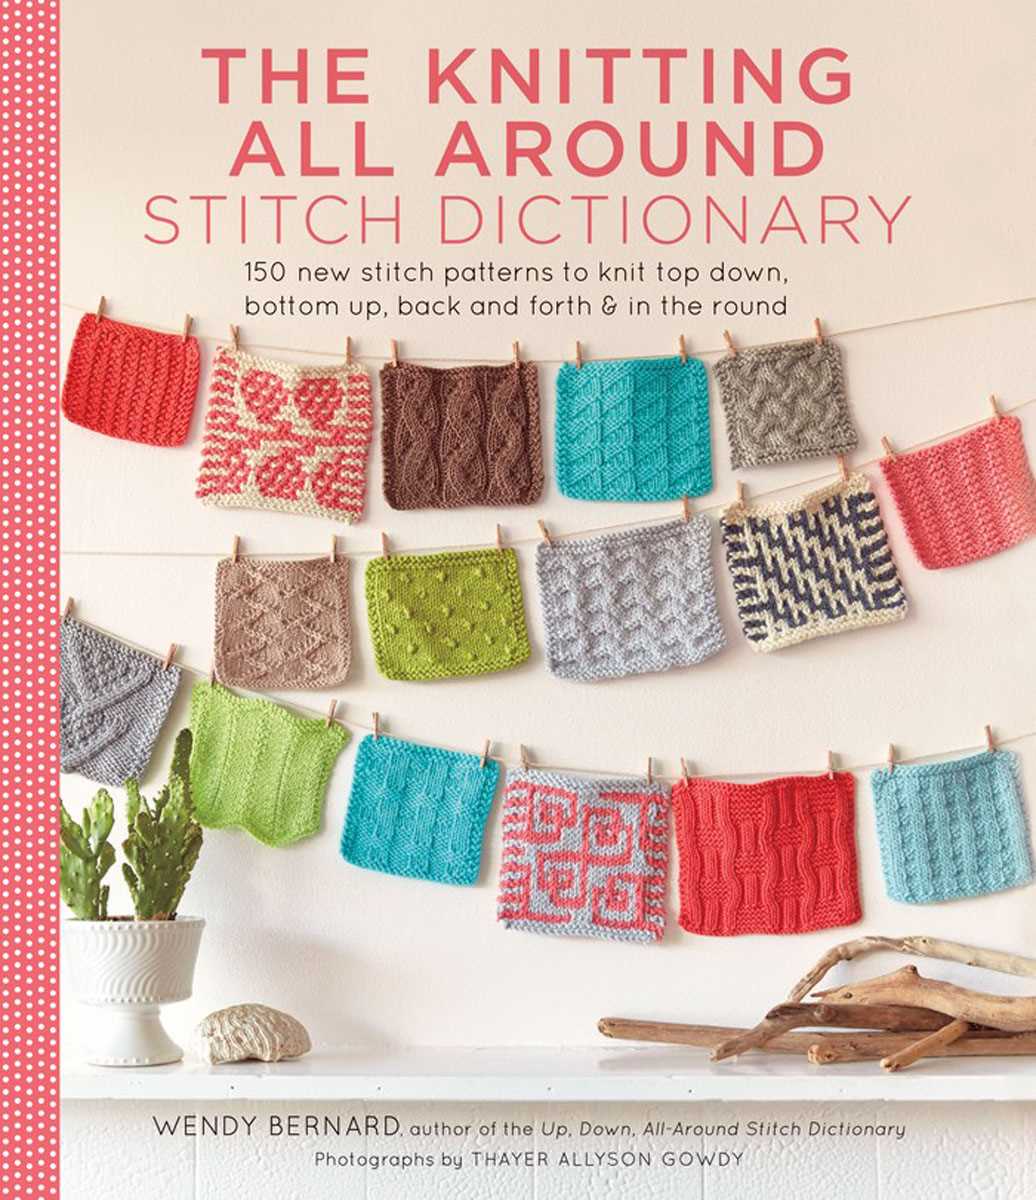
The Knitting Pattern Writing Handbook
Writing a knitting pattern can be a daunting task, especially for beginners. The Knitting Pattern Writing Handbook is here to demystify the process and provide a comprehensive guide to help you write clear and concise knitting patterns that others can easily follow.
Whether you are a seasoned knitter looking to share your patterns with the world, or a budding designer hoping to turn your ideas into tangible projects, this handbook is your go-to resource. It covers everything from choosing the right yarn and needles, to creating stitch patterns, and writing out the instructions in a way that is easy to understand.
Organizing Your Pattern
- Introduction: Begin your pattern with an introduction that provides a brief overview of the project and any special techniques or stitches used.
- Materials: List all the materials needed for the project, including the brand and color of yarn, the size of knitting needles, and any other tools or notions required.
- Gauge: Include the gauge information to ensure that the knitter is using the correct needle size to achieve the desired measurements. This can be presented in both row and stitch counts.
- Instructions: Write out the step-by-step instructions for the project, breaking them down into manageable sections. Use clear and concise language, and include any abbreviations or special stitches used.
- Finishing: Provide instructions for finishing the project, including any seaming, blocking, or embellishments that may be required.
- Notes and Tips: Add any additional notes or tips that may be helpful to the knitter, such as alternative yarn options or pattern variations.
The Knitting Pattern Writing Handbook also includes helpful templates and examples to guide you through the process. With this handbook in hand, you’ll be able to confidently write knitting patterns that inspire and delight knitters of all skill levels.
Understanding Knitting Pattern Language
When you first start following knitting patterns, it can feel like you’re deciphering a secret code. The knitting pattern language can often be confusing, especially for beginners. However, with a bit of practice and understanding, you’ll be able to read and interpret knitting patterns with ease.
Abbreviations and Acronyms: Knitting patterns often use a variety of abbreviations and acronyms to save space and make instructions more concise. It’s important to familiarize yourself with common knitting abbreviations such as k (knit), p (purl), yo (yarn over), and k2tog (knit two stitches together). These abbreviations are usually included in a list at the beginning of the pattern or in a glossary at the end. Refer to this list whenever you encounter an unfamiliar abbreviation.
Instructions and Stitch Patterns: Knitting patterns provide step-by-step instructions for various stitch patterns and techniques. It’s important to read and understand each instruction carefully before proceeding to the next step. Take note of any special stitches or techniques that are required, such as cables or lacework. Understanding the written instructions and being able to visualize them will help you execute the pattern correctly.
Sizing and Measurements: Knitting patterns often include multiple sizes to accommodate different body types and preferences. Pay attention to the sizing information provided in the pattern, such as bust measurements or finished dimensions. Using the correct yarn weight and needle size recommended in the pattern will help you achieve the desired fit and gauge. It’s also helpful to take your own measurements and compare them to the sizing chart provided in the pattern to ensure a proper fit.
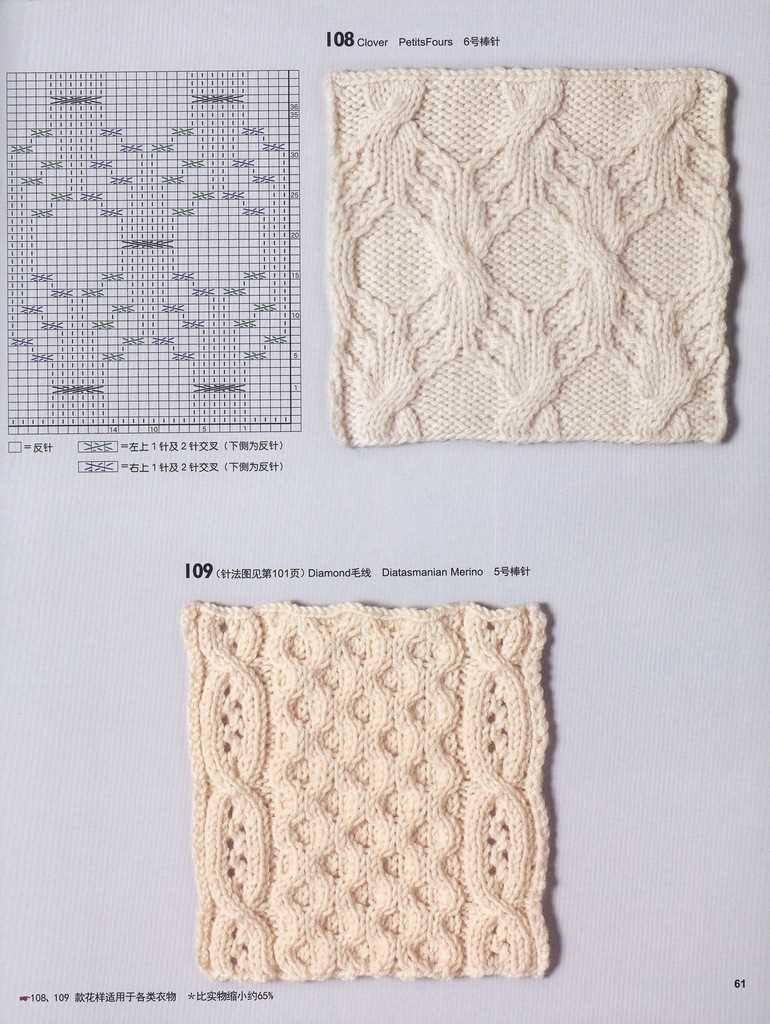
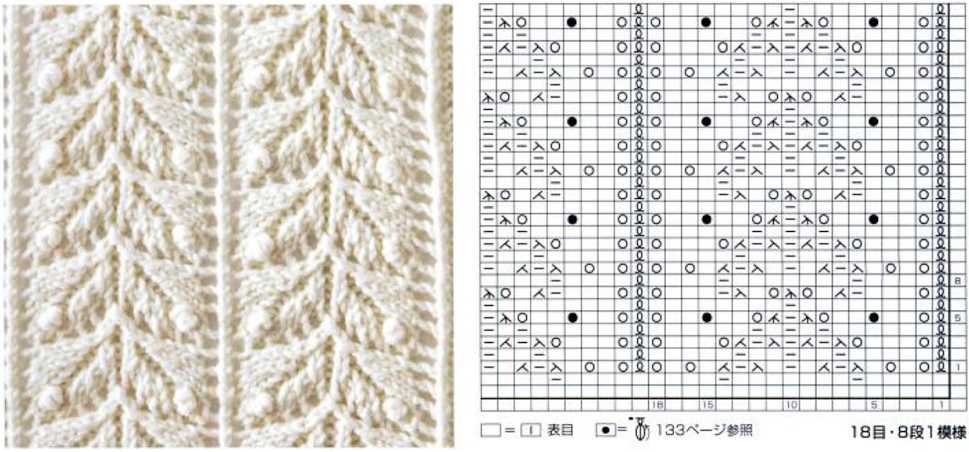
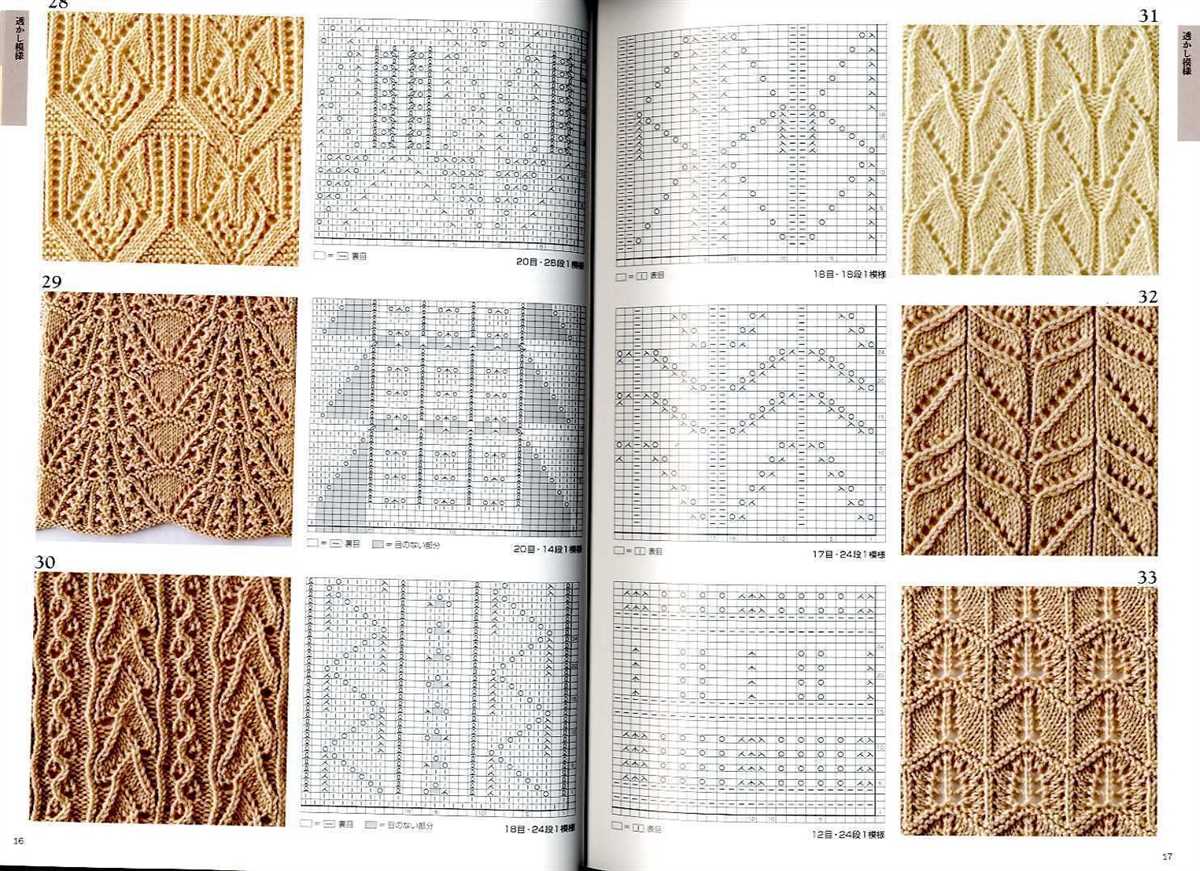
Charts and Diagrams: Some knitting patterns include charts or diagrams to illustrate stitch patterns or colorwork. These visual aids can be very helpful, especially for complex patterns. Take the time to study and understand the symbols and legend used in the chart before you start knitting. Charts are often accompanied by written instructions, so be sure to read and follow both to avoid any confusion.
Note Taking and Tracking: Keeping track of your progress and any modifications you make is essential when following a knitting pattern. Use a row counter or a piece of paper to mark the rows or rounds you have completed. If you make any changes or adjustments to the pattern, make a note of them so you can replicate them later if needed. This will help you stay organized and avoid any mistakes or confusion as you work through the pattern.
By understanding and familiarizing yourself with the language and conventions used in knitting patterns, you’ll be able to confidently tackle any project. With practice, you’ll become more comfortable and adept at following patterns, allowing you to unleash your creativity and explore a wide range of knitting techniques.
Key Components of a Knitting Pattern
When writing a knitting pattern, it is important to include key components that make it clear and easy to follow for knitters of all skill levels. These components provide all the necessary information and instructions for successfully completing the project.
1. Materials

The materials section of a knitting pattern lists all the supplies needed to complete the project. This includes the type and quantity of yarn, as well as the size of the needles required. Additionally, any extra materials such as buttons or embellishments should be specified.
2. Gauge
Gauge is an essential component of a knitting pattern as it ensures that the finished project will have the correct dimensions. It is important to include the gauge information, which is typically stated as the number of stitches and rows per inch, as well as the recommended knitting needle size to achieve this gauge.
3. Sizing
A knitting pattern should provide instructions for multiple sizes, especially for garments such as sweaters or hats. The sizing section should clearly indicate the measurements or bust sizes for each size option, allowing the knitter to choose the appropriate size for their needs.
4. Abbreviations and Special Stitches
Many knitting patterns include abbreviations and special stitches to make the instructions more concise. It is important to include a key or glossary that explains each abbreviation and special stitch used throughout the pattern. This ensures that knitters can easily understand and follow the instructions.
5. Step-by-Step Instructions
The main body of a knitting pattern is comprised of step-by-step instructions for completing the project. These instructions should be clear, detailed, and easy to follow. Each step should include the necessary stitch count or row count, as well as any shaping or pattern repeats.
6. Finishing
The finishing section of a knitting pattern provides instructions for any additional steps required to complete the project, such as sewing seams, adding buttons, or weaving in ends. Including clear and concise finishing instructions ensures that the final product looks polished and professional.
7. Charts and Images

Charts and images can be extremely helpful visual aids for knitters, especially when working on complex stitch patterns or colorwork. Including charts or images that illustrate the pattern instructions can greatly enhance understanding and make the knitting process smoother.
By including these key components in a knitting pattern, designers can ensure that knitters have all the necessary information and instructions to successfully complete their projects. This results in a more enjoyable knitting experience and a finished product that matches the designer’s vision.
How to Read Knitting Instructions
Reading knitting instructions can be intimidating, especially for beginners. However, with some basic knowledge and practice, it becomes easier to understand the patterns and create beautiful knitted items. Here are a few steps to help you read knitting instructions effectively.
1. Familiarize Yourself with the Abbreviations
Knitting patterns often use abbreviations to save space and make the instructions more concise. For example, “k” stands for knit, “p” for purl, and “yo” for yarn over. Take some time to study and memorize these abbreviations so that you can understand the instructions easily.
2. Pay Attention to the Gauge
Gauge refers to the number of stitches and rows per inch in a knitted fabric. It is vital to achieve the correct gauge to ensure that your finished project matches the size specified in the pattern. Always check the gauge provided in the instructions and adjust your knitting needles and tension accordingly.
3. Follow the Stitch Pattern
A knitting pattern usually includes a stitch pattern, which is a repeating sequence of stitches that creates the desired design. Pay close attention to the stitch pattern instructions and follow them carefully. It is essential to count your stitches regularly to ensure that you haven’t made any mistakes.
4. Understand the Repeat Instructions
In many knitting patterns, you will come across repeat instructions. These instructions indicate that a particular set of stitches or rows should be repeated a certain number of times. Make sure to read these instructions carefully and keep track of the repeats to maintain consistency in your work.
5. Take Note of Special Instructions
Some knitting patterns may include special instructions or techniques, such as increasing, decreasing, or using different types of stitches. Make sure to read these instructions thoroughly and practice the techniques if you are not familiar with them. It is essential to understand these additional instructions to complete the pattern correctly.
By following these steps, you will be able to read knitting instructions with confidence and create beautiful knitted items. Remember to take your time, be patient, and don’t hesitate to seek help or clarification if needed. Happy knitting!
Choosing the Right Yarn for Your Pattern
When it comes to knitting, choosing the right yarn for your pattern is crucial. The type of yarn you select can make a significant difference in the final appearance and quality of your project. It is important to consider factors such as the fiber content, weight, and texture of the yarn to ensure that it is suitable for your intended design.
Fiber Content: The first thing to consider when choosing yarn is the fiber content. Yarn can be made from various materials such as wool, cotton, silk, or synthetic fibers. Each type of fiber has its own unique characteristics and properties. For example, wool is known for its warmth and elasticity, while cotton is lightweight and breathable. Consider the specific qualities you desire in your finished project and choose a yarn that aligns with your goals.
Weight: The weight or thickness of the yarn is another important factor to consider. Yarn is typically classified into different weight categories, ranging from lace weight to super bulky. The weight of the yarn will affect the drape, stitch definition, and overall appearance of your project. For intricate lace patterns, you may want to choose a finer, lightweight yarn, whereas a heavier yarn would be more suitable for warm and cozy winter garments.
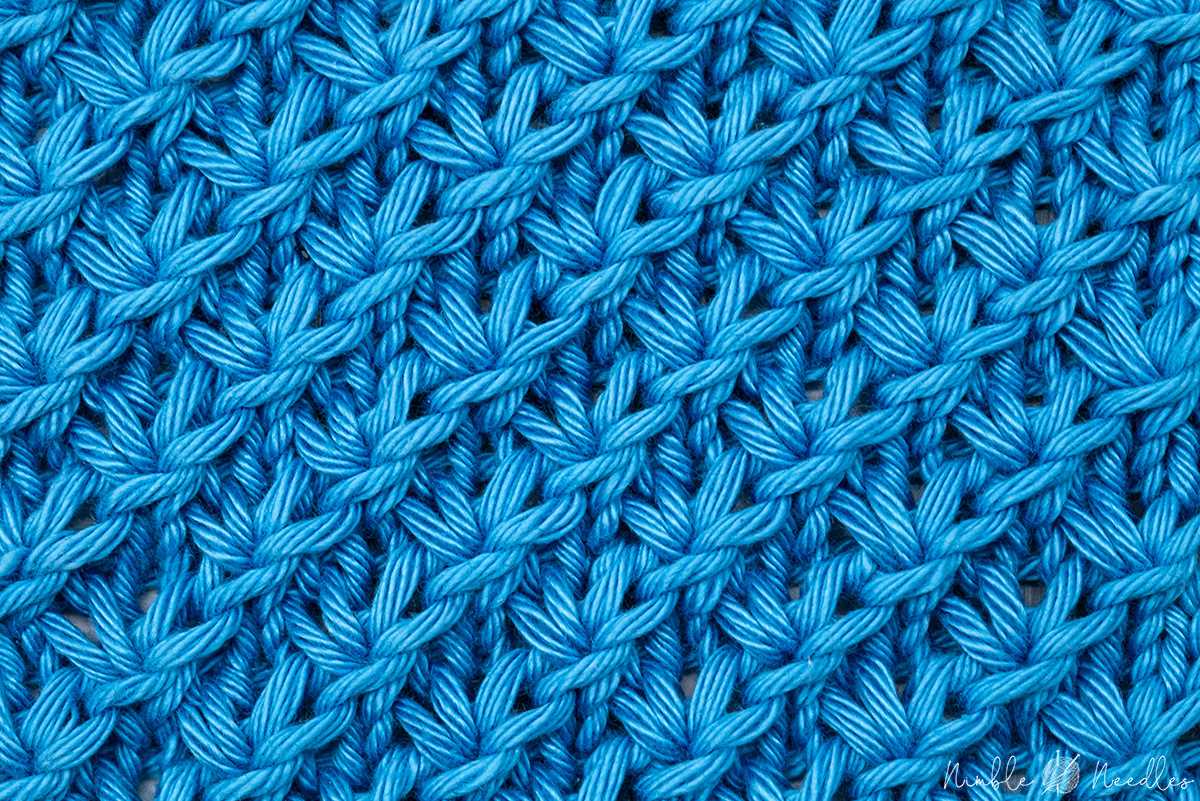
Texture: The texture of the yarn can also greatly impact your knitting project. Yarns can range from smooth and sleek to fluffy and textured. Consider whether you want your stitches to stand out or blend together. A smooth yarn will create defined stitches, while a textured yarn can add visual interest and depth to your design. Take into account the stitch pattern and overall aesthetic you want to achieve when selecting a yarn with the appropriate texture.
By carefully considering the fiber content, weight, and texture of the yarn, you can ensure that it is the right fit for your knitting pattern. Experimenting with different yarns can also lead to exciting and unexpected results, allowing you to unleash your creativity and make each project one-of-a-kind.
Selecting the Right Needles for Your Project

When it comes to knitting, selecting the right needles for your project is crucial. The type and size of needles you use can greatly affect the outcome of your knitting. Here are some factors to consider when choosing your needles:
Material
The first thing to consider is the material of the needles. Knitting needles can be made from various materials, such as metal, wood, or plastic. Each material has its own characteristics that can impact your knitting experience. Metal needles are durable and smooth, allowing stitches to glide easily. Wood needles provide a warm and natural feel, while plastic needles are lightweight and affordable.
Size
The size of the needles is another important factor to consider. The size of your needles will determine the gauge of your knitting, which in turn affects the size and drape of your finished project. Needles are sized according to their thickness, with smaller numbers indicating thinner needles. Make sure to check the pattern or yarn label for the recommended needle size and adjust accordingly.
Type
There are different types of knitting needles to choose from, including straight needles, circular needles, and double-pointed needles. Straight needles are the most traditional and are used for flat knitting. Circular needles are versatile and can be used for both flat and in-the-round knitting. Double-pointed needles are used for small projects or working in tight spaces, such as knitting socks or gloves. Consider the type of project you are working on and choose the appropriate needles.
By considering the material, size, and type of knitting needles, you can ensure that you have the right tools for your project. Experimenting with different needles can also help you find your preferred knitting style and enhance your overall knitting experience.
Understanding Knitting Gauge and Tension
Knitting gauge and tension are crucial elements that every knitter should understand in order to achieve the desired fit and size in their knitted projects. Gauge refers to the number of stitches and rows per inch in a knitted fabric, while tension relates to the tightness or looseness of the stitches.
When starting a knitting project, it is important to follow the gauge suggested in the pattern. This means using the specified yarn and needle size, and knitting a swatch to check if the gauge matches. The swatch should be large enough to accurately measure the number of stitches and rows over a 4×4 inch square.
Measuring gauge is relatively simple: place the swatch on a flat surface and count the number of stitches and rows within the 4×4 inch area. If there are too few stitches and rows, the tension is too loose and a smaller needle size should be used. Conversely, if there are too many stitches and rows, the tension is too tight and a larger needle size is needed.
Understanding knitting gauge and tension is essential to achieving the desired fit and size in a knitted project. Even a small difference in gauge can have a significant impact on the final measurements of a garment. Therefore, it is important to take the time to knit a swatch and adjust needle size if necessary.
It is worth noting that everyone’s tension can vary, so even if you are using the same yarn and needle size as the pattern suggests, you may still need to make adjustments. This is why it is always recommended to knit a swatch and measure gauge before starting a project.
In summary, knitting gauge and tension are essential concepts to understand in order to achieve the desired fit and size in a knitted project. By following the suggested gauge in a pattern, knitting a swatch, and making any necessary adjustments, you can ensure that your finished project will turn out just as intended.
Essential Abbreviations and Terms

When reading knitting patterns, it is important to be familiar with the abbreviations and terms used. These shorthand notations are designed to make patterns concise and easier to read. Here are some essential abbreviations and terms that every knitter should know:
1. K – This stands for “knit”. To knit a stitch, insert the right needle into the front of the stitch on the left needle, wrap the yarn around the right needle, and pull it through the stitch.
2. P – This stands for “purl”. To purl a stitch, insert the right needle into the front of the stitch on the left needle, wrap the yarn around the right needle, and pull it through the stitch.
3. RS – This stands for “right side”. The right side of the knitting is the side that will be facing out when the project is finished.
4. WS – This stands for “wrong side”. The wrong side of the knitting is the side that will be facing in when the project is finished.
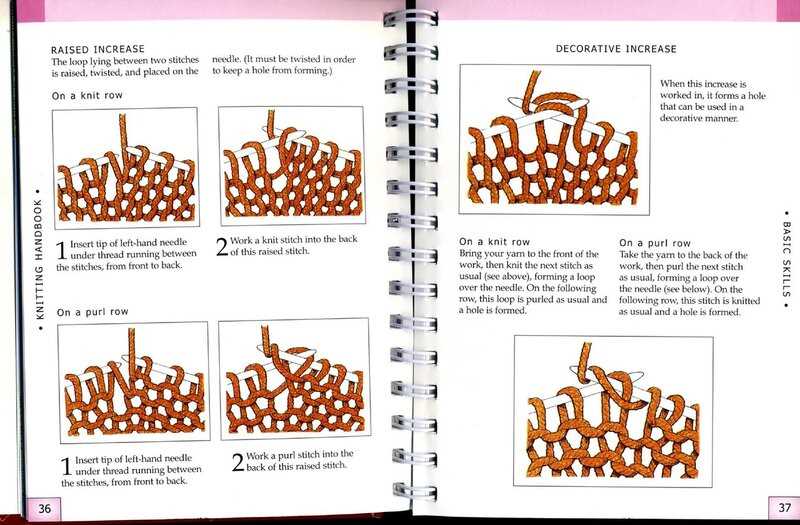
5. Inc – This stands for “increase”. To increase stitches, make a new stitch by picking up the yarn between two existing stitches and knitting or purling into it.
6. Dec – This stands for “decrease”. To decrease stitches, eliminate one or more stitches by knitting or purling two stitches together.
7. Stitch Marker – A small ring or marker that is placed on the needle to mark a specific point in the knitting, such as the beginning of a round or a pattern repeat.
8. Yarn Over – This is a technique used to create an extra stitch by wrapping the yarn around the needle without knitting or purling.
9. BO – This stands for “bind off”. To bind off stitches, work the first two stitches as normal, then pass the first stitch over the second stitch and off the needle. Repeat this process until all stitches have been bound off.
10. Gauge – The number of stitches and rows per inch in a knitted fabric. It is important to match the gauge specified in the pattern to ensure the finished project will be the correct size.
By familiarizing yourself with these abbreviations and terms, you will be able to confidently read and understand knitting patterns, making your knitting projects a breeze.
Writing Clear and Concise Instructions

Writing clear and concise instructions is crucial for any knitting pattern. Knitters rely on these instructions to create their projects, so it’s important to provide them with clear guidance from start to finish. Here are some tips to help you write instructions that are easy to understand:
1. Use Simple Language
When writing knitting instructions, it’s important to use simple and straightforward language. Avoid using jargon or complex terminology that may confuse the reader. Instead, use common knitting terms that are easily understood by knitters of all skill levels.
2. Break it Down
Break down your instructions into simple and manageable steps. This will make it easier for knitters to follow along and complete the project. Use bullet points or numbered lists to clearly outline each step, and consider adding subheadings to organize the instructions into sections.
3. Be Specific and Precise
Include all the necessary details in your instructions to ensure accuracy. Specify the type and weight of yarn, the size of needles, and any other materials or tools that are required. Clearly state the measurements and gauge, and provide clear explanations for any abbreviations or symbols used in the pattern.
4. Use Visual Aids
Visual aids can be incredibly helpful for knitters, especially when it comes to complex techniques or stitch patterns. Consider including photographs, diagrams, or charts to visually demonstrate the steps or stitch patterns. This will further enhance the clarity of your instructions.
By following these tips, you can ensure that your knitting instructions are clear, concise, and easy to follow. This will help knitters of all skill levels successfully complete your patterns and create beautiful projects.
Creating and Organizing Charts and Graphs
Charts and graphs are essential tools for visualizing knitting patterns. They provide a clear and concise representation of the stitches and their placement, making it easier for knitters to follow along and understand the design. When creating charts and graphs for knitting patterns, it is important to use consistent symbols and a clear layout to ensure readability and accuracy.
Organizing Symbols: Before creating a chart or graph, it is important to establish a set of symbols that will represent different stitches and techniques. These symbols should be easy to read and understand, and they should be consistent throughout the pattern. Using a key or legend to explain the symbols will help knitters quickly reference the chart or graph as they work on their project.
Layout and Structure: When organizing charts and graphs, it is important to consider the overall structure and layout of the pattern. Charts and graphs should be placed in a logical order and aligned with the written instructions to ensure clarity and ease of use. Using headings, subheadings, and bullet points can also help to further organize the information and make it more digestible for knitters.
Use of Colors: While not necessary for all patterns, the strategic use of colors can greatly enhance the readability and aesthetics of charts and graphs. Color-coding different stitches or sections can help to differentiate between them and make it easier for knitters to follow along. When using colors, it is important to consider their accessibility for color-blind users and to provide alternative options, such as patterns with different textures or shading.
Testing and Revision: After creating charts and graphs, it is important to thoroughly test them to ensure accuracy and usability. Knitting a sample swatch based on the chart or graph can help identify any errors or inconsistencies that need to be addressed. It is also important to gather feedback from other knitters, as they may have different perspectives and suggestions for improvement. Revision based on testing and feedback is crucial to creating charts and graphs that are reliable, clear, and user-friendly.
Troubleshooting Common Pattern Errors
When writing a knitting pattern, it’s inevitable that you may encounter some errors or issues along the way. However, understanding and being able to troubleshoot these common pattern errors is an essential skill for any knitwear designer. Here are some of the most common errors that can occur in knitting patterns, along with tips on how to fix them.
1. Incorrect stitch count
One of the most frequent errors in knitting patterns is an incorrect stitch count. This can happen when a stitch is accidentally missed or added, causing the pattern to be off balance. To fix this error, carefully count each stitch in the affected section and make adjustments accordingly. You may need to insert or remove a stitch to ensure that the stitch count is correct.
2. Confusing or missing instructions
Another common error is when instructions are confusing or missing altogether. This can lead to confusion and frustration for the knitter. To avoid this issue, it’s important to proofread and test your pattern thoroughly before publishing. If you come across confusing instructions, rewrite them in a clear and concise manner. If you notice any missing instructions, fill in the gaps to ensure that the pattern is complete.
3. Incorrect gauge
Incorrect gauge can cause the finished project to be either too big or too small. It’s essential to include a gauge swatch section in your pattern and provide clear instructions on how to measure gauge accurately. If a knitter finds that their gauge doesn’t match the pattern gauge, they may need to adjust their needle size or tension to achieve the correct gauge. Make sure to communicate this troubleshooting step clearly in your pattern instructions.
4. Inconsistent sizing
Sometimes, patterns may have inconsistent sizing, where the measurements provided for different sizes do not line up correctly. This can cause confusion and incorrect sizing for the knitter. To troubleshoot this error, carefully review the measurements for each size and make sure they are consistent and accurate. If necessary, make adjustments to ensure that the sizing is correct and consistent throughout the pattern.
- Incorrect stitch count
- Confusing or missing instructions
- Incorrect gauge
- Inconsistent sizing
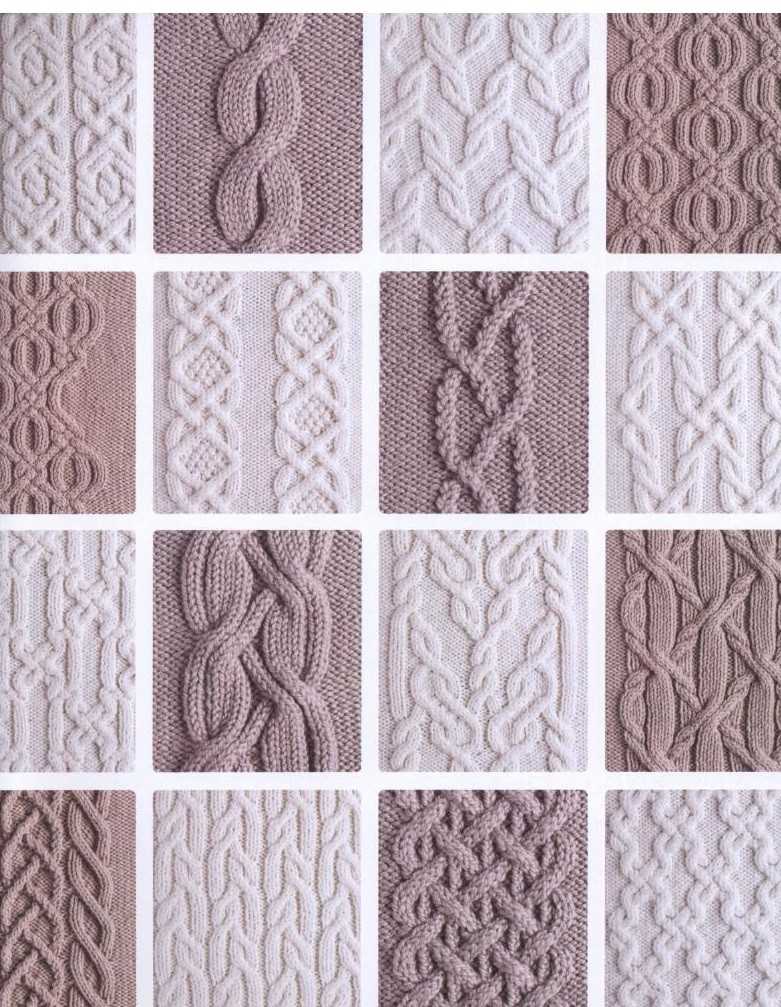
Adding Special Techniques and Stitch Patterns
One of the great things about knitting is the variety of techniques and stitch patterns that can be incorporated into a project. These special techniques and stitch patterns can take a simple project and turn it into something unique and eye-catching. In this section, we will explore some of the ways you can add special techniques and stitch patterns to your knitting projects.
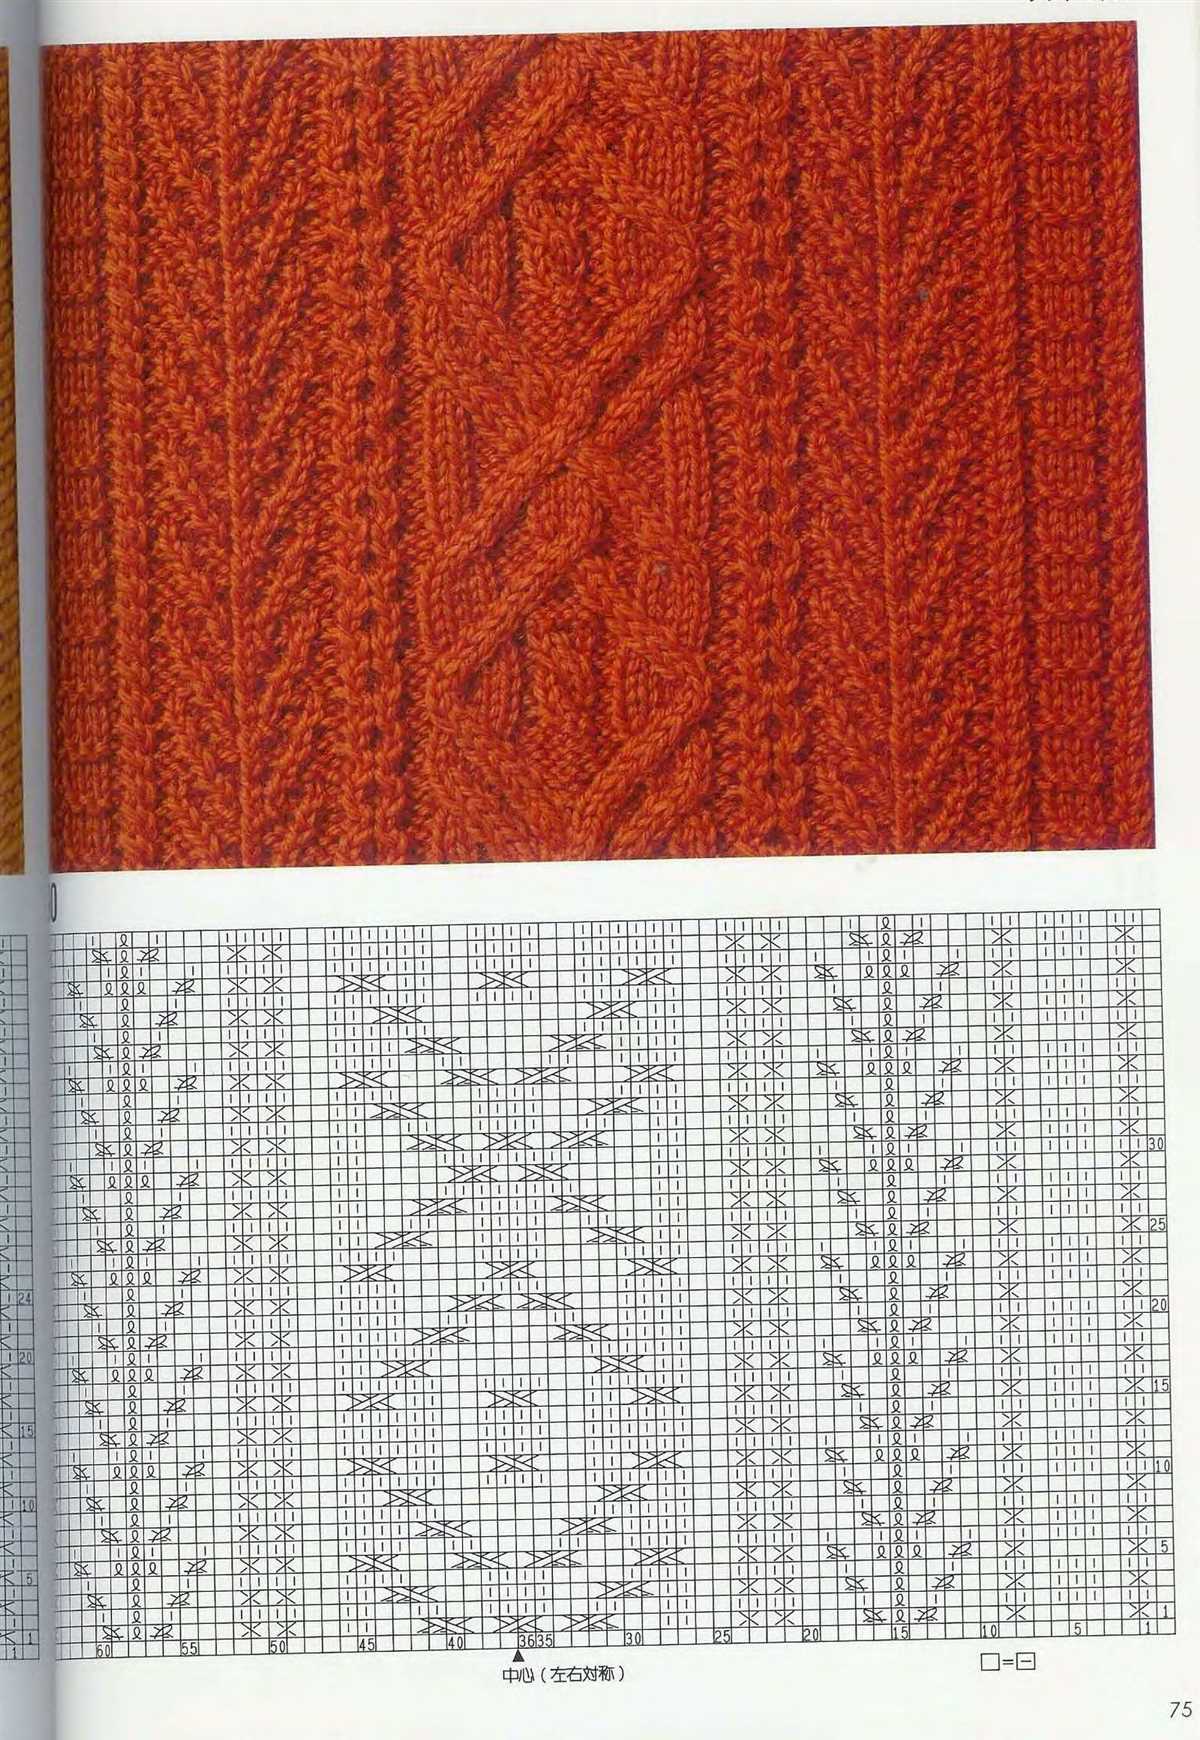
1. Cabling
One popular technique for adding texture to your knitting is cabling. Cables are created by crossing stitches over each other, creating a twisted effect. They can be simple or intricate, depending on the desired look. You can incorporate cables into your knitting by following a specific cable pattern or by creating your own designs.
2. Lace
Lace patterns are another way to add interest and beauty to your knitting. Lace patterns typically involve creating holes and decorative motifs through various combinations of stitches. These delicate designs can be used to create shawls, scarves, or even as a decorative element on a garment.
3. Colorwork
Colorwork involves using multiple colors of yarn in a single knitting project. This can be done through techniques such as stranded knitting or intarsia. Colorwork can create stunning patterns and designs, from simple stripes to intricate fair isle motifs. It adds depth and dimension to your knitting, making it visually appealing.
4. Textured Stitches
Incorporating textured stitches, such as bobbles, cables, or seed stitch, can add visual interest and dimension to your knitting. These stitches create texture and make your project stand out. Experimenting with different textured stitches can give your knitting a unique and personalized touch.
5. Beads and Embellishments
If you want to take your knitting to the next level, consider adding beads or other embellishments to your projects. Beads can be incorporated into lace patterns or used as decorative accents. Embellishments such as buttons, ribbons, or embroidery can add a touch of flair and individuality to your finished piece.
Tips for Editing and Testing Your Pattern
Writing a knitting pattern is a creative and challenging process, but it doesn’t end with putting words on paper. Editing and testing your pattern are crucial steps to ensure that your instructions are clear, accurate, and easy to follow. Here are some tips to help you with the editing and testing process:
Edit your pattern:
1. Read through your pattern multiple times to check for any grammatical or spelling errors. Use a spell checker and grammar checker to help you with this process.
2. Make sure your instructions are clear and concise. Double-check that you have included all the necessary information and have not left out any crucial steps.
3. Use headings, subheadings, and bullet points to break up your instructions and make them easier to read and understand.
4. Check your measurements and gauge to ensure they are accurate. Make any necessary adjustments to your pattern if needed.
Test your pattern:
1. Before publishing your pattern, you should test knit it yourself. Follow your instructions step by step to ensure they produce the desired result.
2. Provide the pattern to a few trusted test knitters and ask for their feedback. They can help identify any confusing or unclear instructions and provide suggestions for improvement.
3. Consider creating different sizes or variations of your pattern and have them tested as well. This will help ensure that your instructions work for different body types and preferences.
4. If possible, include photos or diagrams in your pattern to help knitters visualize the steps. This can be especially useful for more complex or intricate patterns.
Summary:
Editing and testing your knitting pattern are essential steps to ensure its accuracy and usability. By carefully reviewing and refining your instructions, you can provide knitters with a clear and enjoyable knitting experience. Don’t be afraid to seek feedback from others and make any necessary adjustments to improve your pattern. With proper editing and testing, you can create a knitting pattern that others will love to use.