
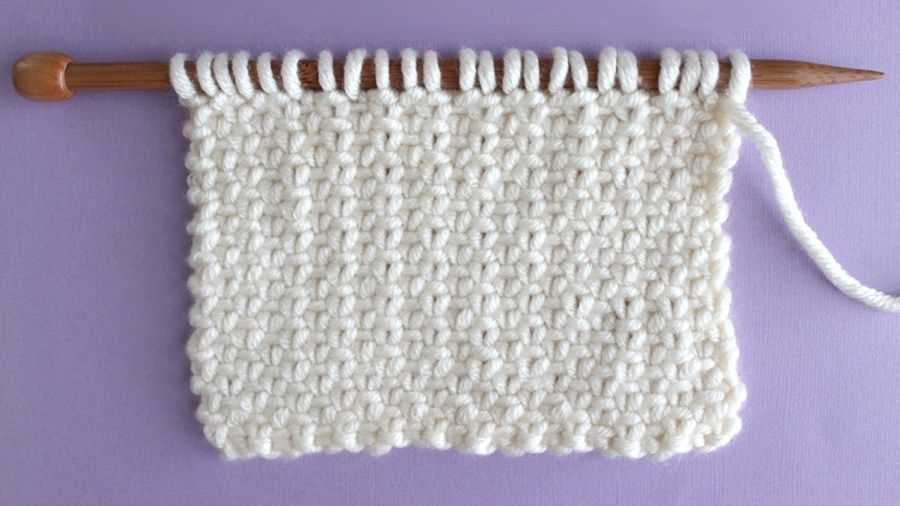
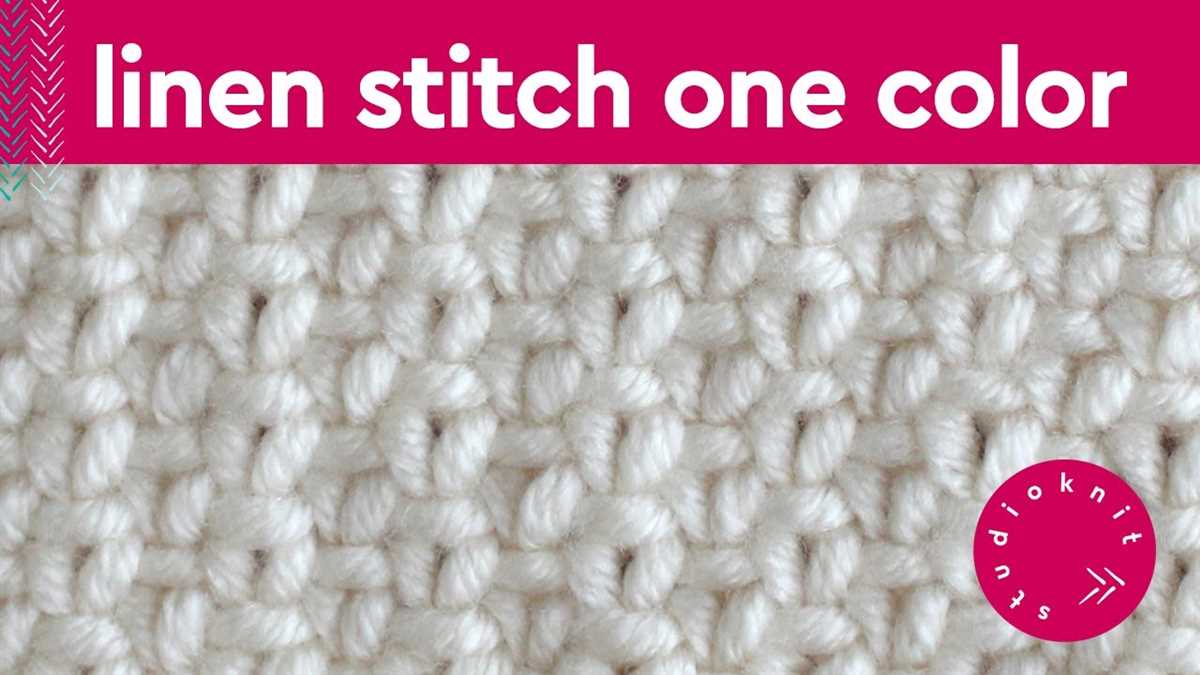
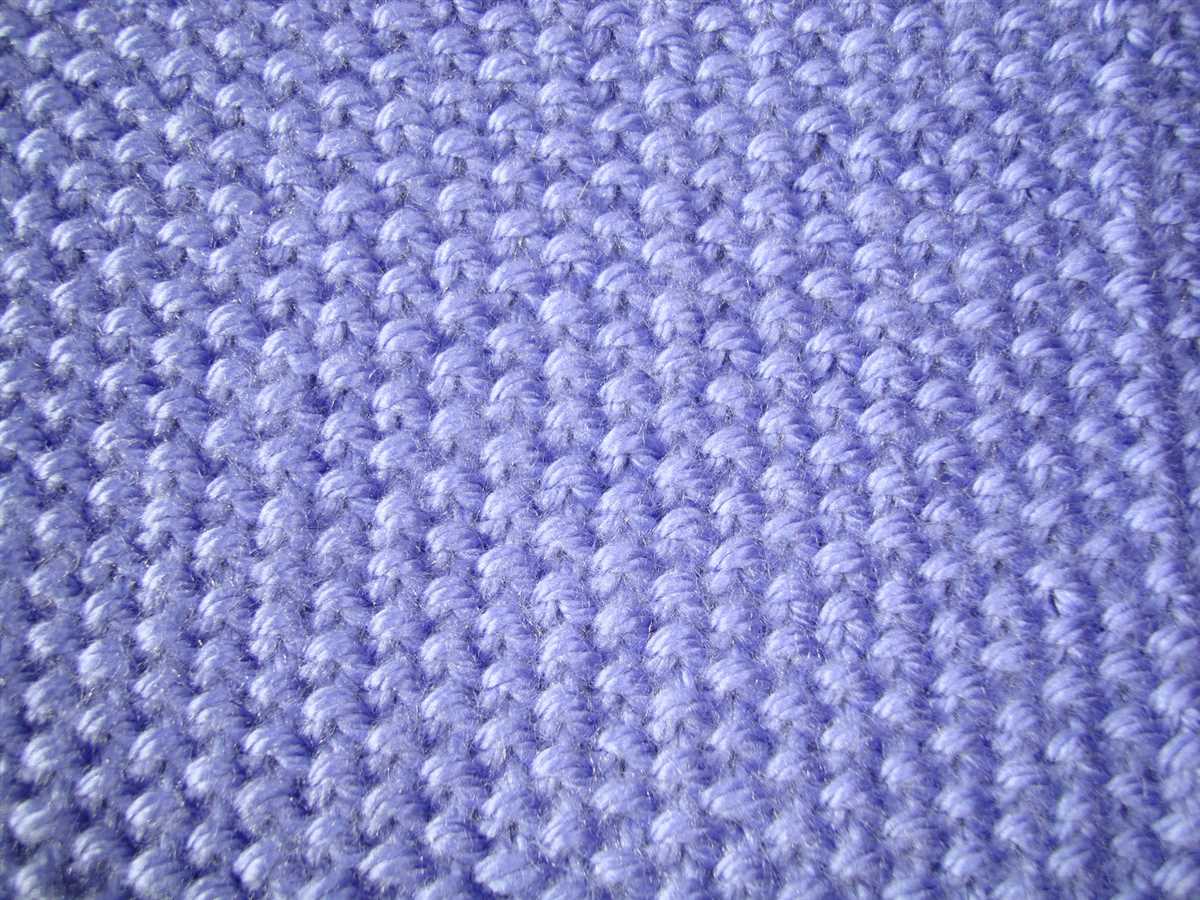
The linen stitch pattern is a popular technique in knitting that creates a beautiful woven look. It consists of alternating rows of knit and slip stitches, creating a tight and dense fabric. This stitch pattern is often used to create scarves, blankets, and other textured items.
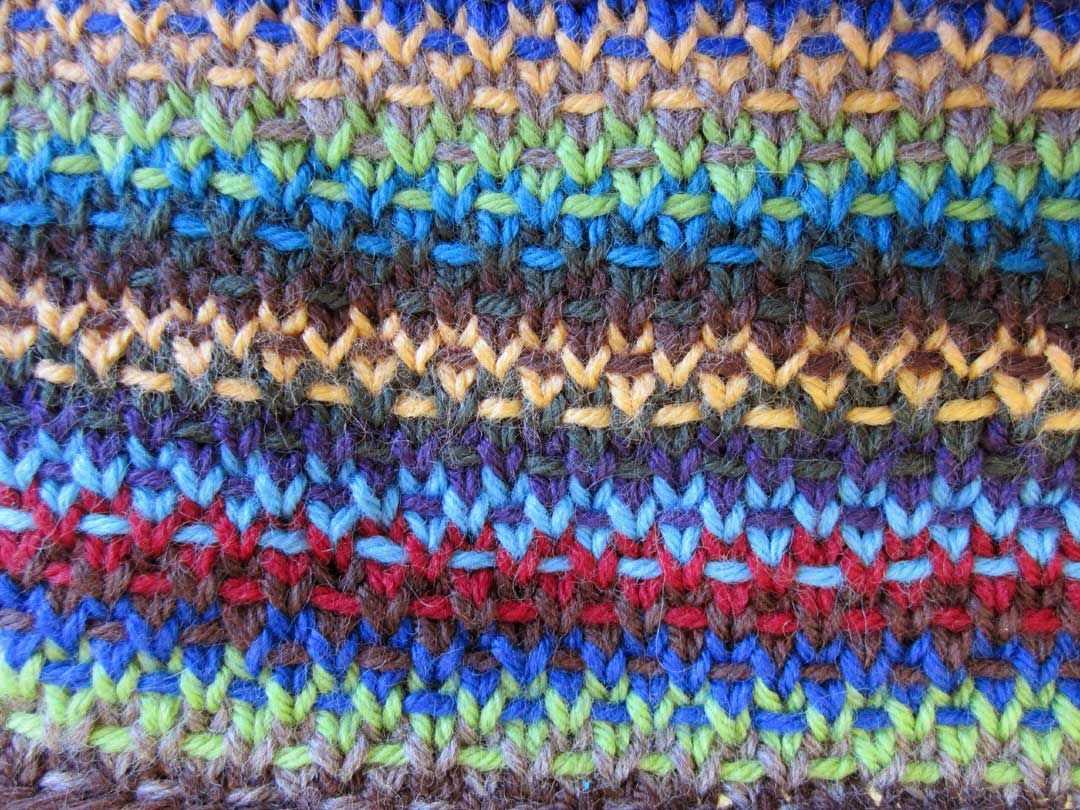
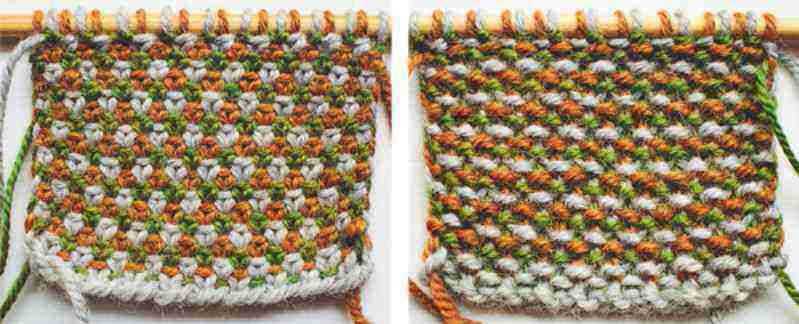
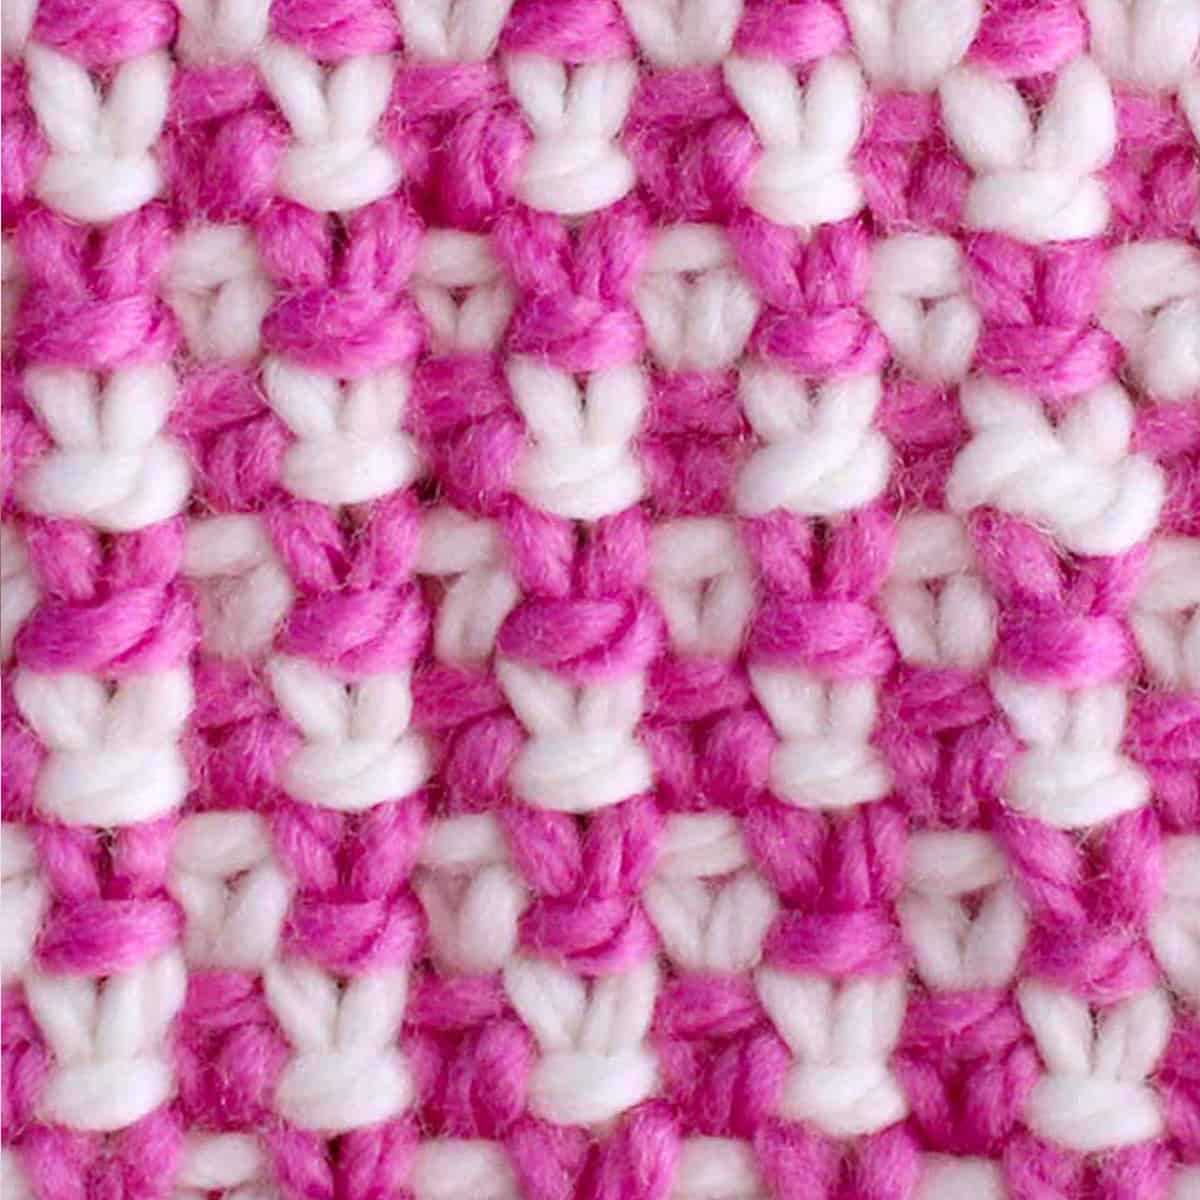
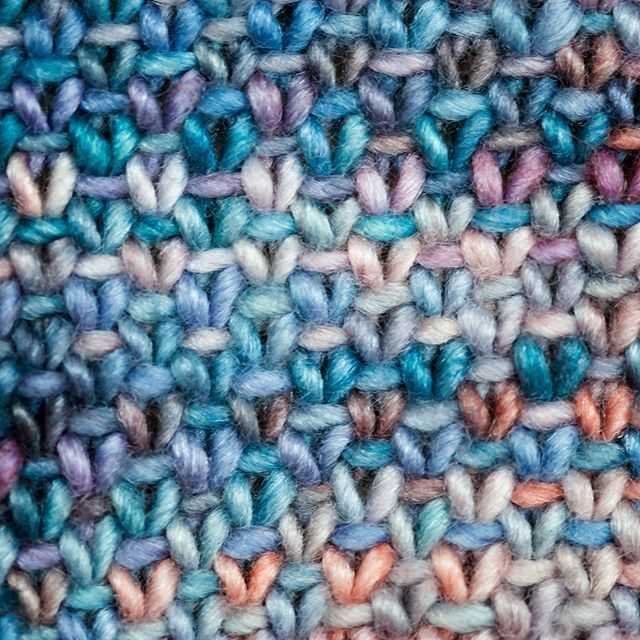
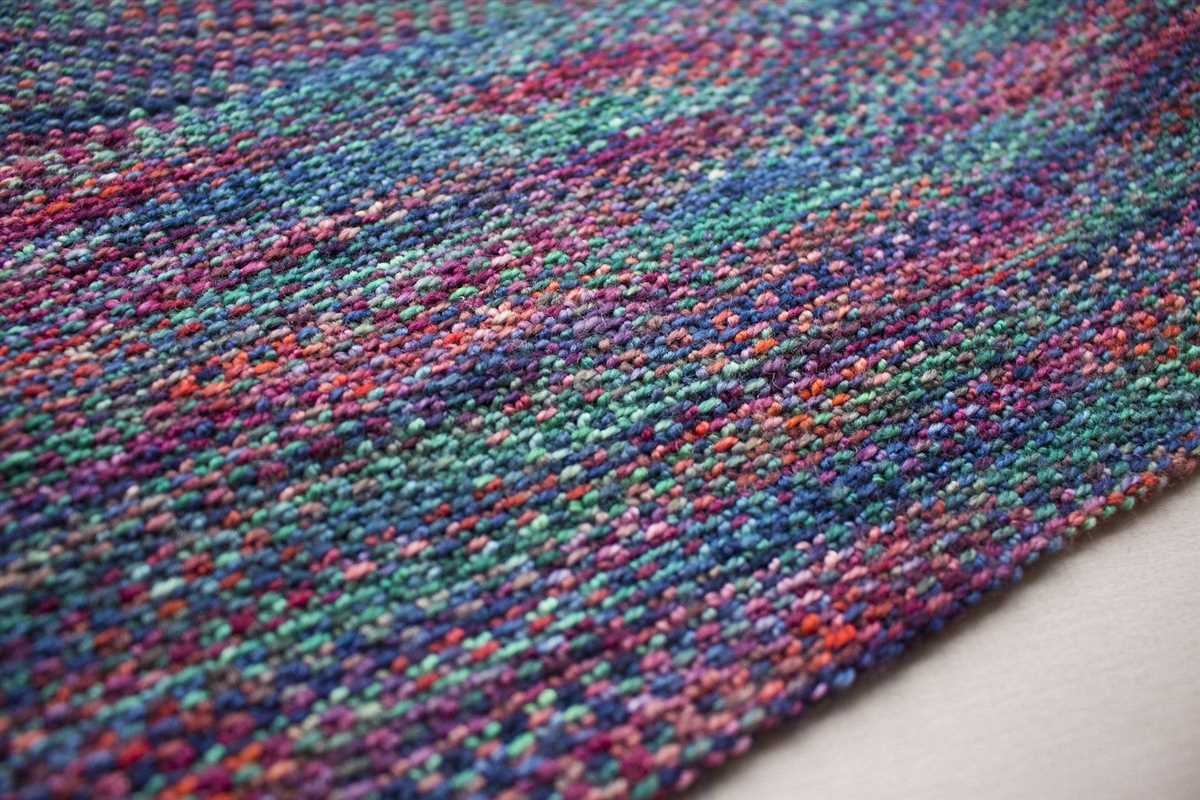
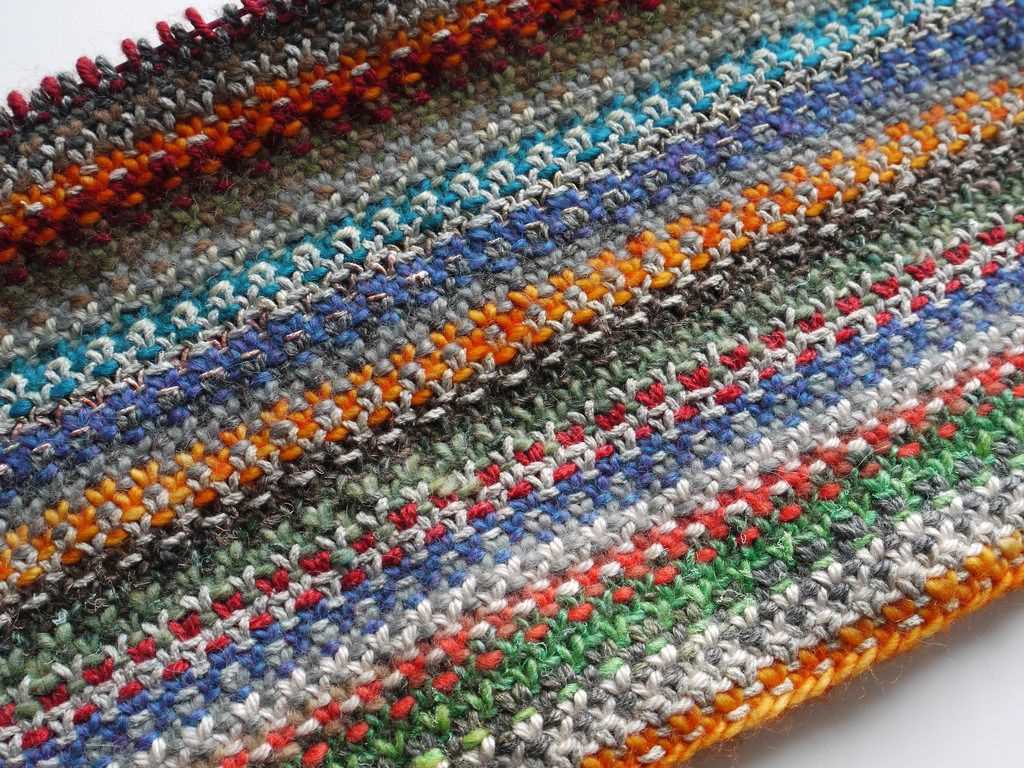
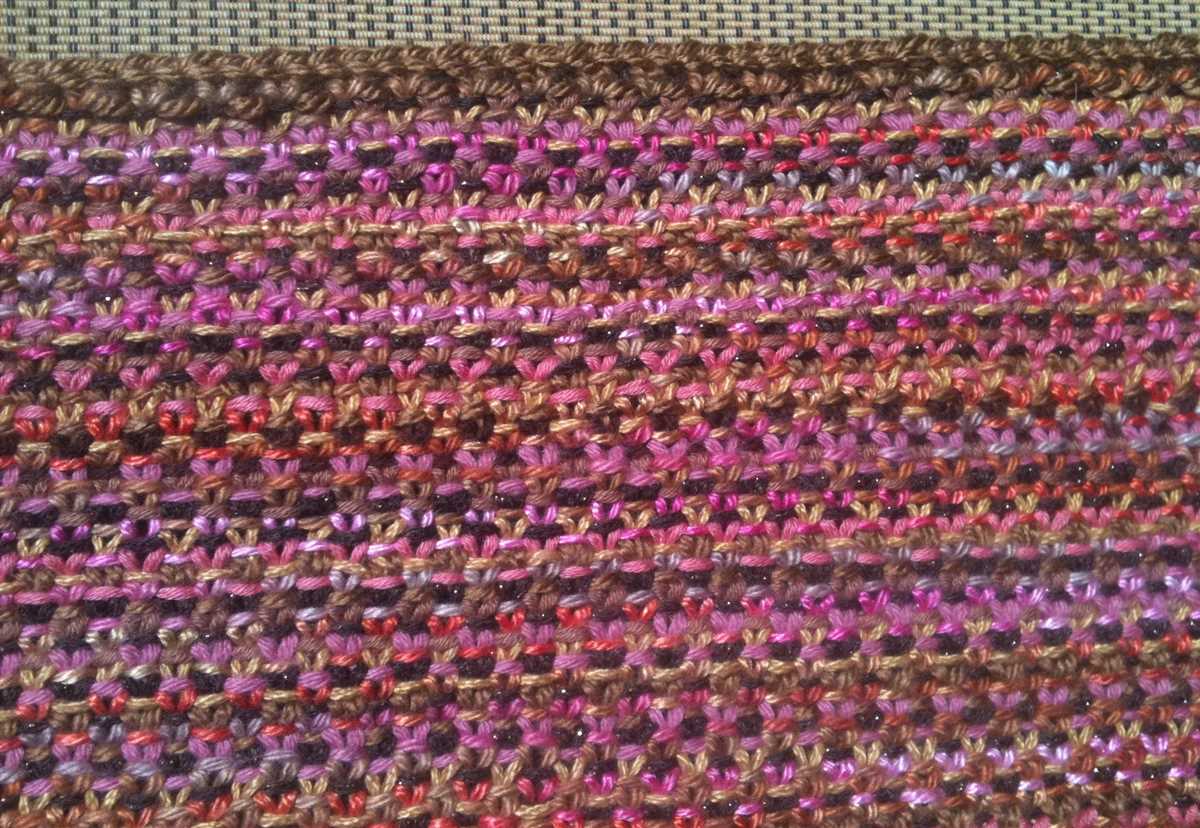
The linen stitch pattern is known for its versatility and ability to showcase different colors and yarns. It is especially effective with variegated or hand-dyed yarns, as it highlights the color changes and creates an interesting visual effect.
One of the benefits of knitting the linen stitch pattern is that it is reversible, meaning that both sides of the fabric look the same. This makes it ideal for items such as scarves or shawls since it doesn’t matter which side is showing. Additionally, the tight and dense fabric created by the linen stitch pattern provides warmth and durability.
In this article, we will explore how to knit the linen stitch pattern, including step-by-step instructions and tips for success. Whether you are a beginner or an experienced knitter, mastering this versatile stitch pattern will expand your knitting repertoire and allow you to create stunning and unique projects.
What is the linen stitch pattern in knitting?
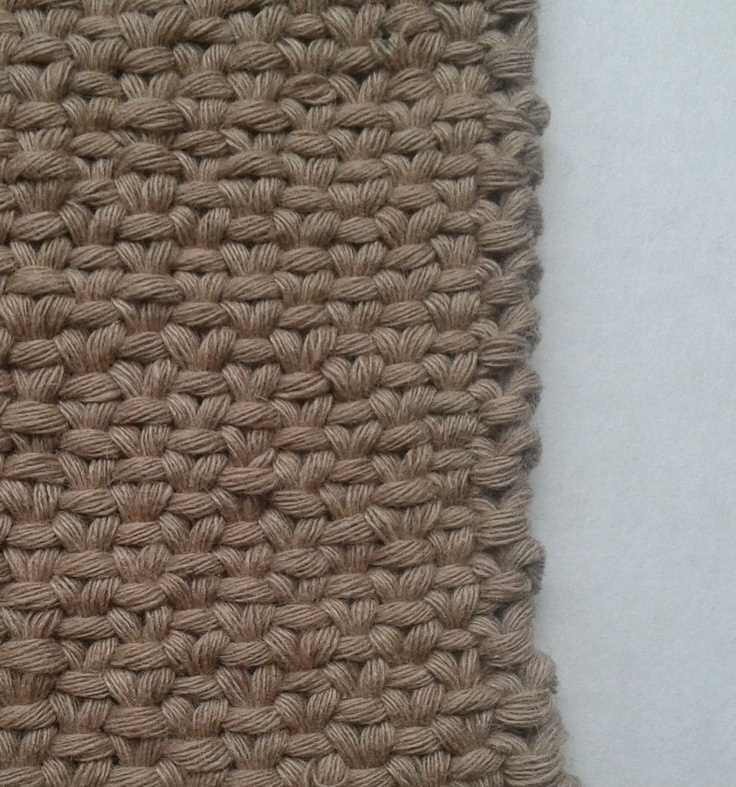
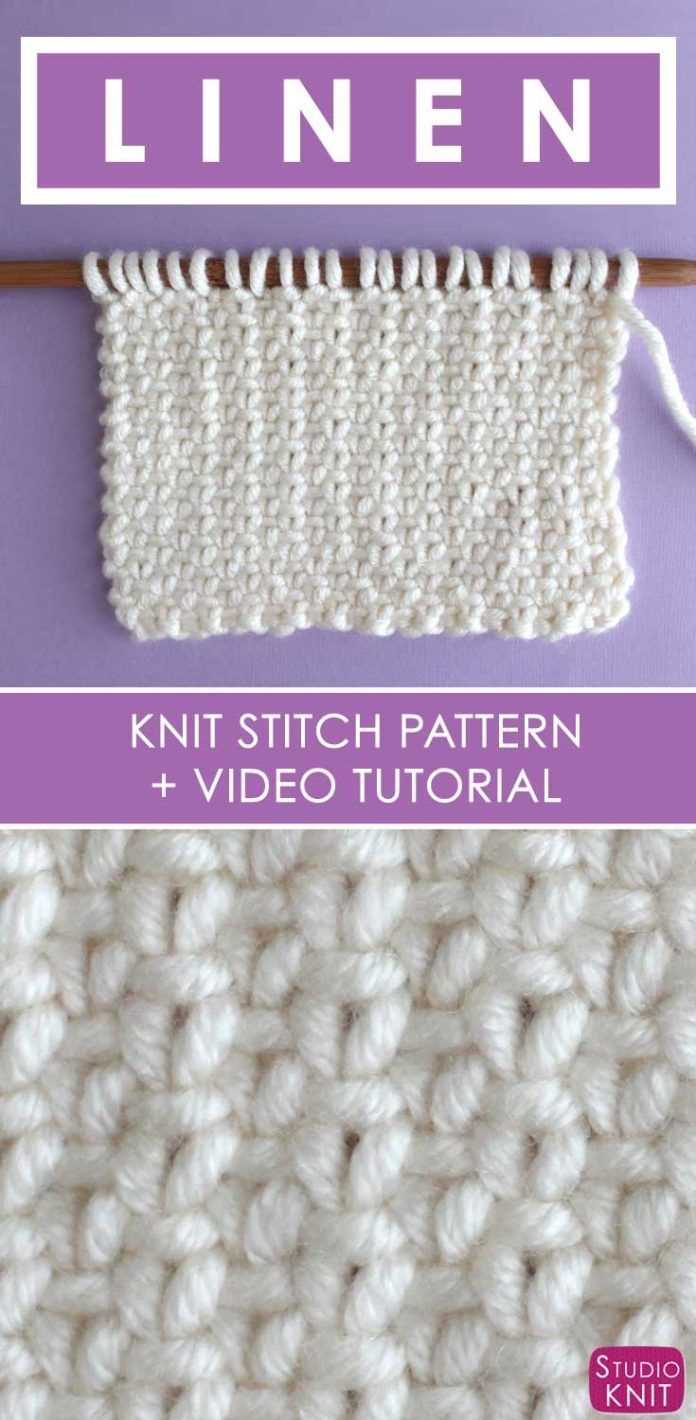
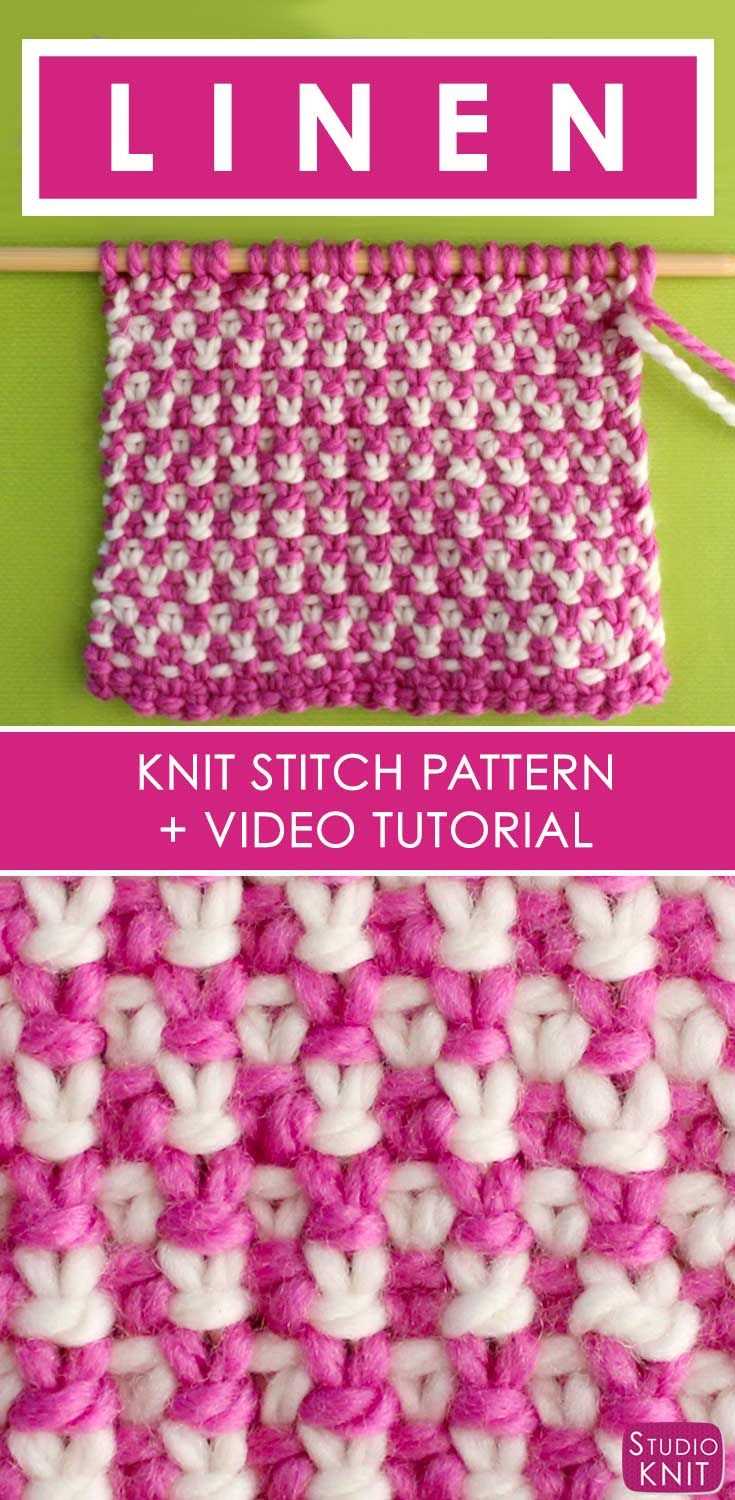
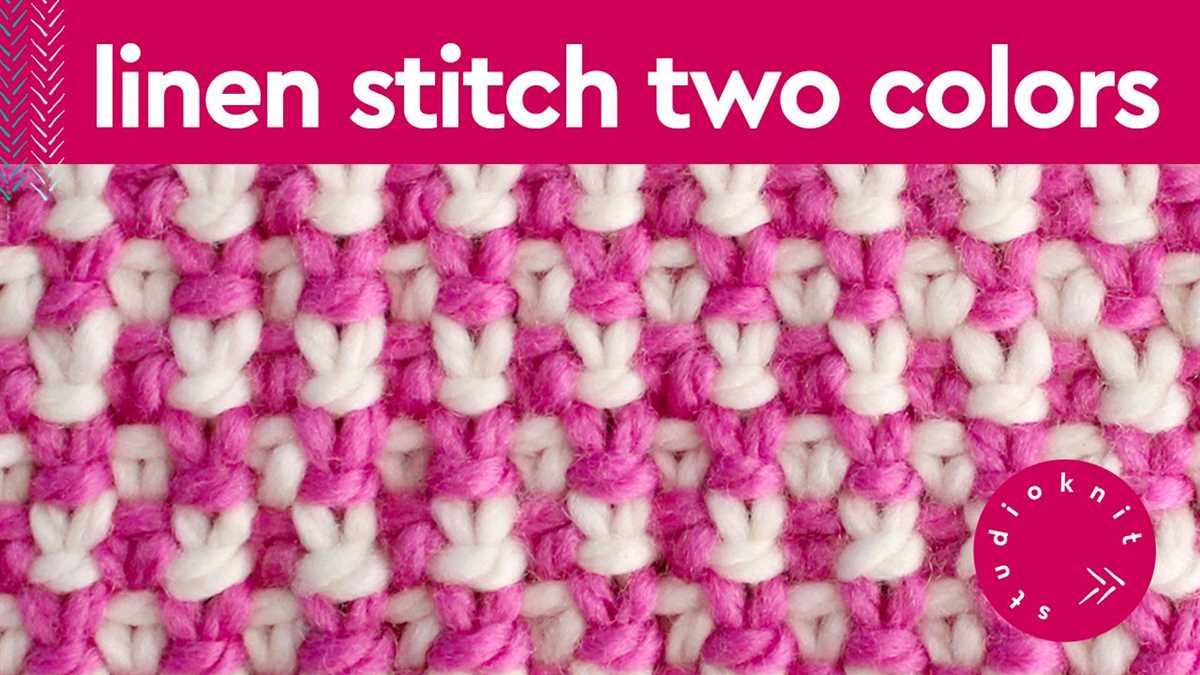
The linen stitch pattern is a popular knitting stitch that results in a textured, woven-like fabric. It is also known as the fabric stitch or fabric woven stitch. This pattern creates a dense and sturdy fabric with a subtle, yet pleasing, texture.
The linen stitch pattern is achieved by alternating between knit and slip stitches across each row. This creates a tight, woven appearance that resembles linen fabric. The unique construction of the linen stitch pattern also makes it suitable for creating reversible fabrics, as both sides of the work look nearly identical.
To create the linen stitch pattern, you will need to cast on an even number of stitches. This stitch pattern is worked over an even number of rows. You start by knitting the first stitch and then slipping the next stitch purlwise with the yarn in front. This alternating knit-slip pattern is continued across the row, with the last stitch always being knit.
Once you reach the next row, you again start by knitting the first stitch and slipping the next stitch purlwise. This creates a staggered effect, as the slipped stitches from the previous row are now being knitted. You continue this pattern across each row until the desired length is achieved.
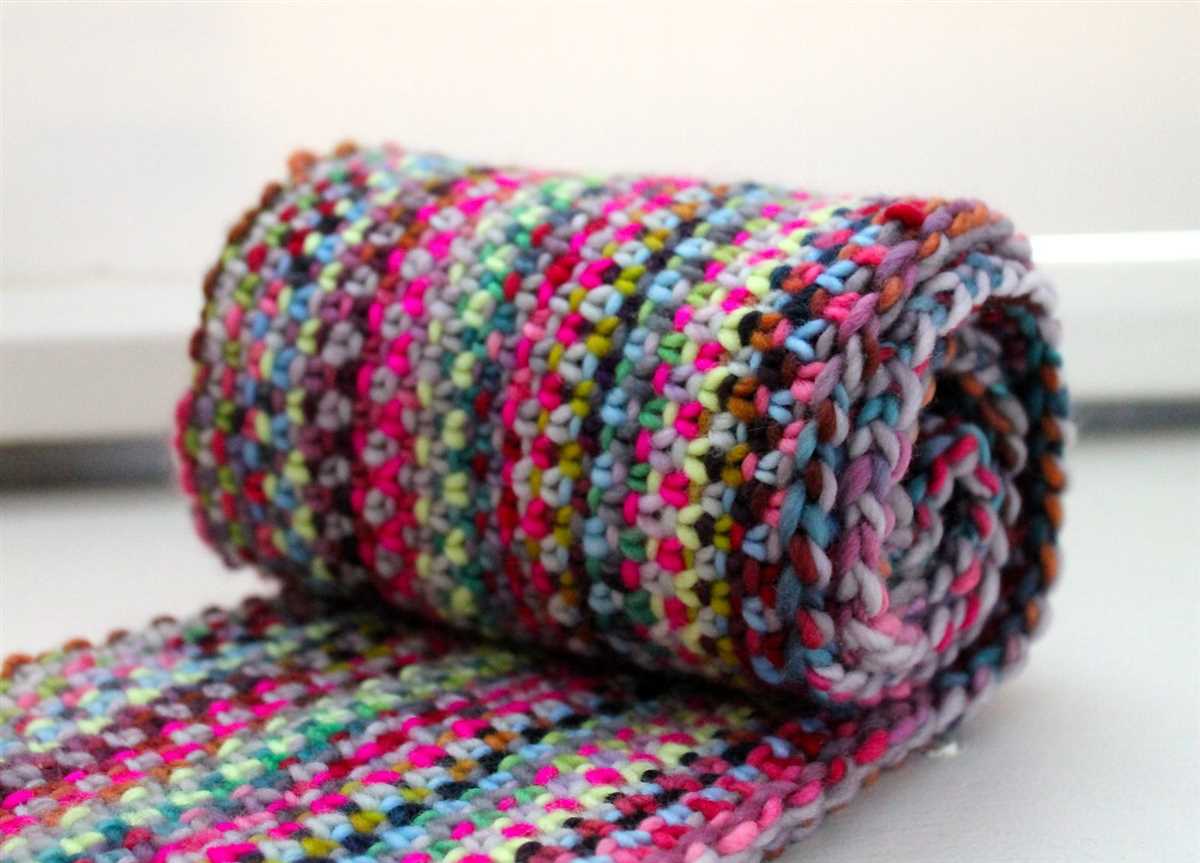
The linen stitch pattern is versatile and can be used to create a variety of knitting projects, such as scarves, blankets, and even garments. It is especially popular for showcasing variegated or self-striping yarns, as the tight stitch pattern can help prevent pooling or color pooling. This stitch pattern also works well with both solid and textured yarns, allowing for endless possibilities and creativity in knitting.
- The linen stitch pattern creates a textured and woven-like fabric.
- It is achieved by alternating between knit and slip stitches.
- The pattern can be worked over an even number of stitches.
- It is versatile and can be used for various knitting projects.
- Works well with variegated and textured yarns.
Benefits of using the linen stitch pattern
The linen stitch pattern offers a number of benefits that make it an attractive option for knitters. One of the main advantages of using this pattern is its versatility. The linen stitch can be used to create a wide range of projects, from scarves and shawls to blankets and garments. Whether you’re a beginner or an experienced knitter, this pattern can be adapted to suit your skill level and desired outcome.
Another benefit of the linen stitch pattern is its unique texture. The alternating pattern of knits and slips creates a fabric that is dense and sturdy, making it ideal for projects that require durability. Additionally, the linen stitch pattern has a beautiful drape and a subtle diagonal pattern, adding visual interest to your knitted items.
- Efficiency: The linen stitch pattern is also known for its efficiency. Unlike other patterns that require a lot of concentration and counting, the linen stitch is relatively easy to memorize and requires minimal attention once you get the hang of it. This makes it a great pattern for those who want to knit on the go or while watching TV.
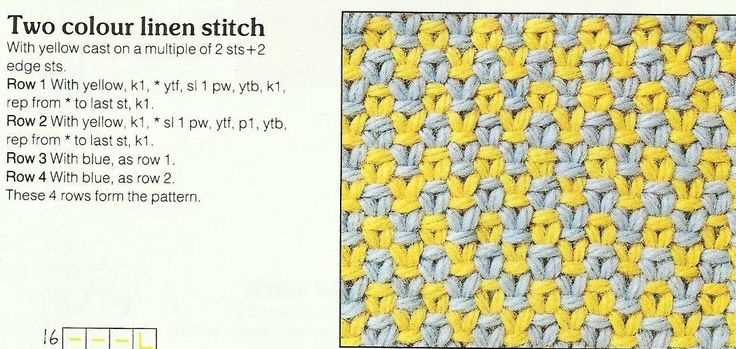
- Colorwork: Another advantage of the linen stitch pattern is its suitability for colorwork. The tight fabric created by this pattern is perfect for showcasing multiple colors, creating beautiful and intricate designs. Whether you choose to use two contrasting colors or a whole range of shades, the linen stitch will highlight the colors and create a stunning finished product.
- Reversible: One more benefit of the linen stitch pattern is that it is reversible. Both sides of the fabric look almost identical, making it ideal for scarves, blankets, and other items that will be seen from both sides. This means you don’t have to worry about which side is facing out, and it adds to the overall versatility of the stitch.
In conclusion, the linen stitch pattern is a versatile and attractive option for knitters. Its unique texture, efficiency, suitability for colorwork, and reversibility make it a popular choice for a wide range of projects. Whether you’re a beginner or an experienced knitter, incorporating the linen stitch into your projects will result in beautiful, durable, and visually interesting knitted items.
How to knit the linen stitch pattern
The linen stitch pattern is a simple but beautiful stitch that creates a dense and textured fabric. It is called linen stitch because the resulting pattern resembles the woven texture of linen fabric. This stitch pattern is great for a variety of knitting projects, such as scarves, blankets, and even garments.
To knit the linen stitch pattern, you will need a pair of knitting needles and your choice of yarn. The linen stitch is worked over an even number of stitches, so cast on the desired number of stitches for your project.
Step 1: Row 1
Start by knitting the first stitch. Then, slip the next stitch with the yarn in front (wyif). Repeat these two stitches – knit one, slip one wyif – until the end of the row.
Step 2: Row 2
For the second row, begin by purling the first stitch. Then, slip the next stitch with the yarn in back (wyib). Repeat these two stitches – purl one, slip one wyib – until the end of the row.
Step 3: Repeat rows 1 and 2
Continue alternating rows 1 and 2 until your project measures the desired length. Remember to always start row 1 with a knit stitch and row 2 with a purl stitch. The linen stitch pattern creates a reversible fabric, so both sides will look great.
Step 4: Bind off
When you’re ready to finish your project, bind off using your preferred method. Weave in any loose ends, and your linen stitch pattern project is complete!
The linen stitch pattern is a versatile and rewarding stitch to knit. It creates a visually appealing fabric with a unique texture. Give it a try for your next knitting project!
Gathering your materials
Before starting your knitting project using the linen stitch pattern, you will need to gather a few essential materials. Having everything prepared and ready to go will ensure a smooth and enjoyable knitting experience.
Knitting Needles: You will need a pair of knitting needles suitable for your chosen yarn weight. Depending on the thickness of the yarn you are using, it is recommended to use knitting needles in the range of US size 6 to 8 (4.0mm to 5.0mm).
Yarn: Choose a yarn that is compatible with the linen stitch pattern. A smooth, non-fuzzy yarn works best to showcase the stitch definition. Worsted weight or DK weight yarns are commonly used for this stitch pattern.
Tapestry Needle: A tapestry needle, also known as a yarn needle, is essential for weaving in loose ends and finishing your project. Make sure to have one on hand before you begin.
Scissors: A pair of sharp scissors will come in handy for cutting the yarn when needed. Keep a small pair of scissors nearby to easily trim any excess yarn.
Stitch Markers (Optional): If you are working on a larger project or want to keep track of specific sections, stitch markers can be helpful. They can be used to mark the beginning of the round or specific stitch pattern repeats.
Pattern or Instructions: Lastly, have your knitting pattern or instructions readily available. Whether you are following a printed pattern or an online tutorial, having clear instructions will guide you through each step of the linen stitch pattern.
Creating a foundation row
When starting a knitting project with a linen stitch pattern, it is essential to create a strong and stable foundation row. The foundation row sets the tone for the rest of the pattern and ensures that your stitches will be even and consistent throughout the project.
To create a foundation row, you will need to cast on an even number of stitches. This can be done using your preferred cast-on method, such as the long-tail cast-on or the knitted cast-on. Make sure to cast on tightly enough so that the stitches are not too loose or too tight.
Once you have cast on your stitches, you are ready to begin the first row of the linen stitch pattern. The foundation row is created by alternating between a knit stitch and a slip stitch. The knit stitches will be worked as usual, inserting the right needle into the front of the stitch and pulling the yarn through. The slip stitches, on the other hand, will be slipped purlwise, meaning that you will insert the right needle into the stitch as if to purl, but instead of knitting it, you simply move it to the right needle without working it.
Example:
- Row 1: *Knit 1, slip 1 purlwise*; repeat from * to end of row.
By following this alternating knit and slip pattern, you will create a beautifully textured linen stitch fabric. Remember to keep your tension consistent as you work through the foundation row to ensure an even appearance and gauge. Once you have completed the foundation row, you can continue with the main body of the linen stitch pattern, repeating the same alternating knit and slip stitches for each row.
Starting the pattern repeat
The knitting linen stitch pattern is known for its simplicity and beautiful texture. To start the pattern repeat, you will need to cast on an odd number of stitches. This is essential for creating the alternating knit and slip stitch pattern that gives linen stitch its unique appearance.
Once you have cast on the desired number of stitches, the first row of the pattern repeat begins with a knit stitch. Simply insert your right-hand needle into the first stitch on the left-hand needle and wrap the yarn around the needle, pulling it through to create a new stitch. Repeat this knit stitch across the row, knitting each stitch until you reach the end.
For the second row, things get a bit more interesting. Instead of knitting all the stitches, you will be slipping some stitches. To slip a stitch, insert your right-hand needle into the next stitch on the left-hand needle as if you were going to knit it, but instead of wrapping the yarn around the needle, simply transfer the stitch from the left needle to the right needle.
The key to creating the linen stitch pattern is to alternate between knitting and slipping stitches. On the odd rows, you will knit all stitches, and on the even rows, you will slip every other stitch. This creates a tight, woven look that resembles linen fabric.
Finishing the pattern
Once you have completed the knitting linen stitch pattern, it is time to finish off your project. There are a few steps you can take to ensure that your finished piece looks polished and professional.
First, you will want to bind off your stitches. To do this, simply knit the first two stitches as usual, then use your left-hand needle to lift the first stitch over the second stitch and off the right-hand needle. Continue this process for each stitch until you have one stitch left on the right-hand needle. Cut the yarn, leaving a tail that is long enough to weave in later, and pull it through the last stitch to secure it.
You may also choose to block your finished piece. Blocking is the process of shaping and smoothing the knitted fabric to give it a more finished look. To block your project, soak it in lukewarm water for about 15 minutes, then gently squeeze out the excess water and lay it flat on a drying rack or towel. Use pins or blocking wires to gently stretch and shape the fabric to the desired dimensions. Allow the project to dry completely before removing the pins or wires.
Finally, weave in any loose ends to ensure that your project is secure and tidy. Use a tapestry needle to thread the loose ends through the stitches on the wrong side of the fabric. Be sure to weave the ends in and out of several stitches to prevent them from coming loose over time. Once all the loose ends are woven in, trim any excess yarn.
By following these steps, you can complete the knitting linen stitch pattern with a professional finish. Whether you are making a scarf, a blanket, or any other project, taking the time to bind off, block, and weave in ends will ensure that your finished piece looks beautiful and lasts for years to come.
Adding Variations to the Linen Stitch Pattern
The linen stitch pattern is a simple yet elegant knitting technique that creates a beautiful woven texture. While the basic pattern is stunning on its own, adding variations to the linen stitch can bring even more visual interest and creativity to your knitting projects.
Color Variations: One of the easiest ways to add variation to the linen stitch pattern is by using different colors of yarn. You can create a striped effect by alternating between two or more colors in each row, or you can work with variegated yarn that already has multiple colors in it. Experiment with different color combinations to create different moods and looks in your projects.
Texture Variations: Another way to add variation to the linen stitch is by changing the texture of the yarn you use. You can achieve this by using different types of yarn, such as silk for a smooth and luxurious feel or mohair for a soft and fuzzy texture. Additionally, you can incorporate different stitch patterns within the linen stitch, such as ribbing or lace panels, to create even more texture and dimension.
Pattern Variations: You can also play around with the linen stitch pattern itself to create different effects. For example, you can increase or decrease the number of stitches between slip stitches to change the width of the linen stitch rows. You can also experiment with different stitch counts and repeats to create patterns within the linen stitch, such as diagonal lines or chevron motifs.
Combining Variations: The best part about adding variations to the linen stitch pattern is that you can combine them together to create truly unique and personalized knitting projects. For example, you can use a variegated yarn with a different texture for each color, or you can combine different stitch patterns within the linen stitch to create a complex and visually striking design. The possibilities are endless, so don’t be afraid to experiment and have fun with your knitting!
Projects using the linen stitch pattern
The linen stitch pattern is a classic that can be used in a variety of knitting projects. It is characterized by its tight weave and textured appearance, making it perfect for creating beautiful and durable items. Here are some projects that you can try using the linen stitch pattern:
1. Scarves and shawls:
Scarves and shawls are popular choices for using the linen stitch pattern. The tight weave of the stitch creates a warm and cozy fabric that is perfect for keeping you warm during colder seasons. You can experiment with different yarn weights and colors to create unique and stylish accessories.
2. Blankets and throws:
The linen stitch pattern can also be used to create soft and luxurious blankets and throws. The tight weave of the stitch provides warmth and durability, making it perfect for snuggling up on the couch or adding an extra layer of comfort to your bed. You can choose to create a monochromatic blanket or play with different colors and create interesting patterns.
3. Bags and pouches:
The linen stitch pattern can be used to create sturdy and functional bags and pouches. The tight weave of the stitch makes it perfect for carrying heavier items, such as books or groceries. You can experiment with different sizes and shapes to create the perfect bag or pouch for your needs.
4. Coasters and placemats:
The linen stitch pattern can also be used to create practical and stylish coasters and placemats. The tight weave of the stitch provides a solid base that can withstand heat and liquids, making it perfect for protecting your surfaces. You can play with different colors and sizes to create a unique set for your home.
These are just a few examples of the many projects that you can try using the linen stitch pattern. Whether you are a beginner or an experienced knitter, the linen stitch pattern offers endless possibilities for creating beautiful and functional items.
Tips and Tricks for Knitting with the Linen Stitch Pattern
Knitting with the linen stitch pattern can result in a beautiful, textured fabric that is perfect for a wide range of projects. However, this stitch pattern can be a bit challenging for beginners or those unfamiliar with it. To help you out, here are some tips and tricks to make your knitting experience with the linen stitch pattern more enjoyable and successful.
1. Use a smaller needle size
When knitting the linen stitch pattern, it is recommended to use a smaller needle size than what is typically used for the yarn weight. This will help to create a tighter, more defined fabric. Experiment with different needle sizes to achieve the desired effect.
2. Carry the yarn properly
One of the challenges of the linen stitch pattern is carrying the yarn up the side of the work when changing colors. To prevent loose yarn floats, it is important to twist the yarns together at the beginning of each row. This will ensure a neat and tidy fabric with minimal yarn ends to weave in.
3. Practice tension control
The linen stitch pattern requires consistent tension control to achieve an even fabric. Pay attention to your tension while knitting and make any necessary adjustments. If your fabric appears too tight or too loose, try loosening or tightening your grip on the yarn. Practice will help you find the right tension for this particular stitch pattern.
4. Choose the right yarn
Not all yarns are suitable for the linen stitch pattern. Consider using a yarn with good stitch definition, such as a smooth, plied yarn. Avoid very fluffy or textured yarns, as they can obscure the structure of the stitches and make it difficult to achieve the desired texture.
5. Block your finished project
Blocking is essential when working with the linen stitch pattern, as it helps to even out the stitches and enhance the texture. After completing your project, wet block or steam block it to relax the fabric and bring out the full beauty of the stitch pattern.
By following these tips and tricks, you will be able to knit with the linen stitch pattern with confidence and create stunning projects with this versatile stitch pattern. Happy knitting!
Common Mistakes to Avoid When Knitting the Linen Stitch Pattern
While knitting the linen stitch pattern can create a beautiful and textured fabric, there are a few common mistakes that knitters should avoid. By being aware of these potential pitfalls, you can ensure a successful and enjoyable knitting experience.
Here are some mistakes to watch out for when knitting the linen stitch pattern and how to avoid them:
- Tight tension: One of the most common mistakes when knitting the linen stitch pattern is knitting with a tight tension. This can result in a stiff and unyielding fabric, making it difficult to achieve the desired drape and texture. To avoid this mistake, try to keep your tension relaxed and even, allowing the stitches to flow easily.
- Miscounting stitches: Linen stitch can be a bit tricky when it comes to counting stitches, as the pattern is not as straightforward as knitting in stockinette or garter stitch. It’s important to pay close attention and keep track of the number of stitches in each row to maintain the correct pattern. Using stitch markers or placing a tally mark on a piece of paper can help you stay organized and avoid miscounting stitches.
- Using the wrong yarn: The linen stitch pattern looks best when knit with a yarn that has good stitch definition and drape. Choosing a yarn that is too fuzzy or bulky can obscure the texture of the stitch and result in a less polished finished product. Opt for a yarn with a smooth texture and a fiber content that will drape nicely.
- Skipping the slip stitch: The linen stitch pattern involves slipping every other stitch. It’s important not to accidentally skip this step, as it will result in an incorrect stitch pattern and may throw off the entire fabric. Pay close attention to the pattern instructions and make sure to slip the designated stitches on each row.
- Not swatching: Swatching is an important step in any knitting project, and the linen stitch pattern is no exception. It’s crucial to knit a swatch with the chosen yarn and needle size to ensure that you achieve the correct gauge. This will help you avoid disappointment and allow you to adjust your needle size or tension if needed.
By being mindful of these common mistakes and taking the necessary precautions, you can successfully knit the linen stitch pattern and create a beautiful and textured fabric.