
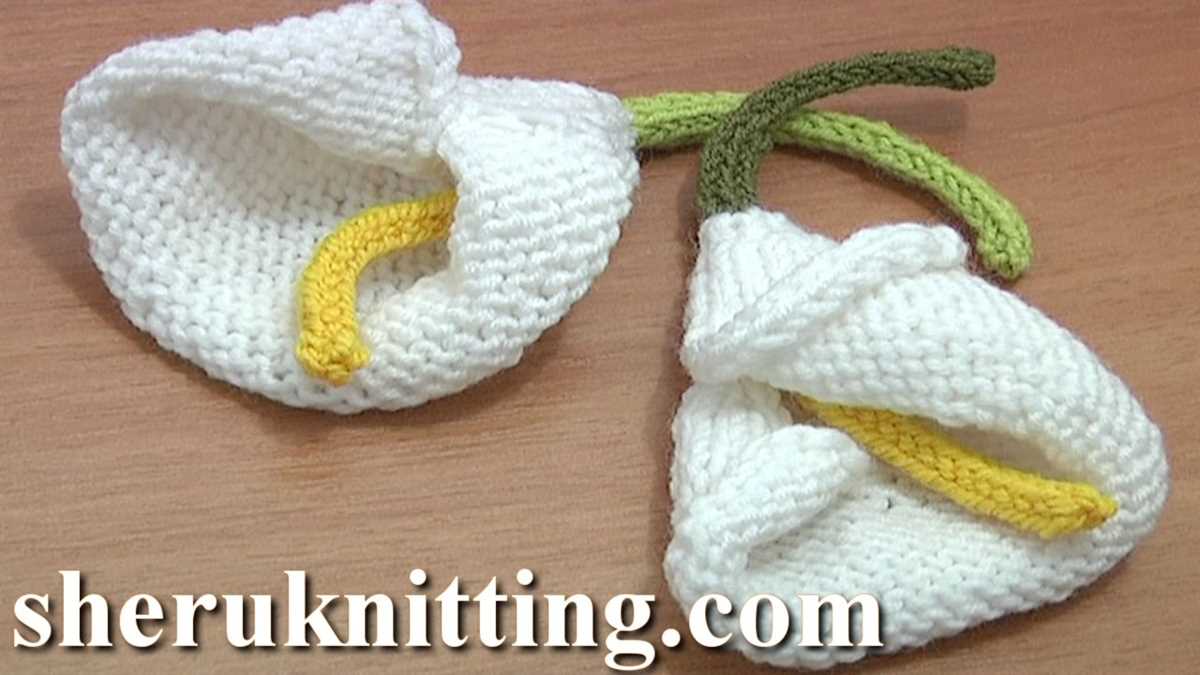
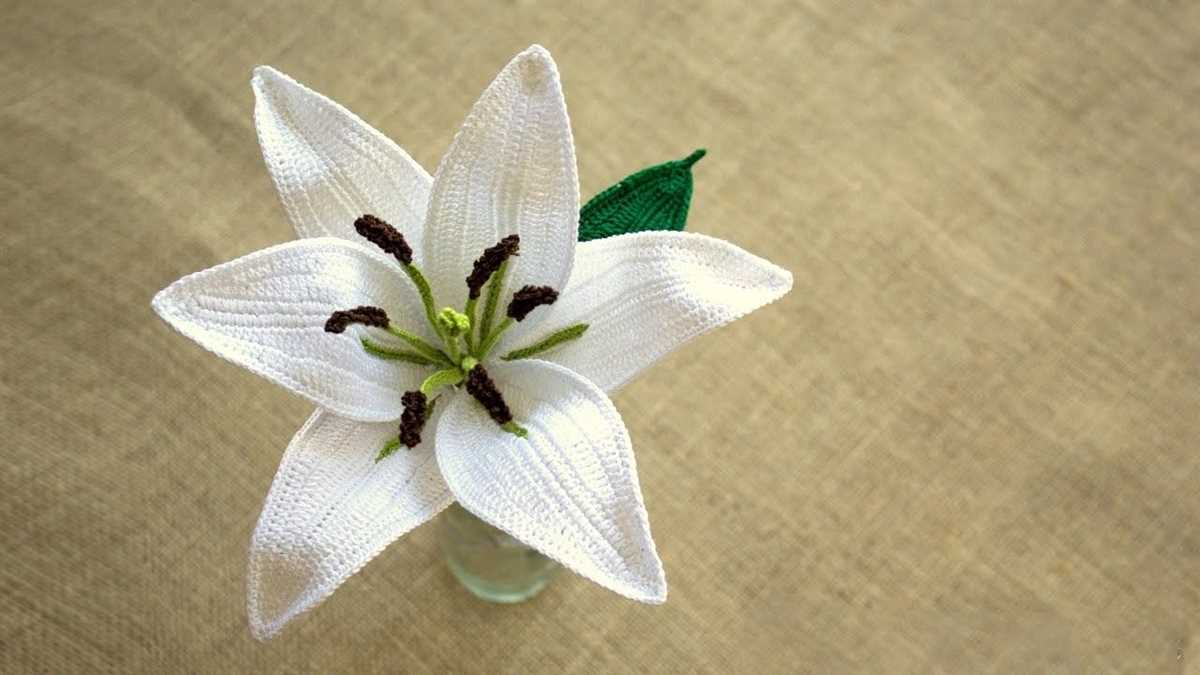
Knitted flowers are a popular choice for crafters looking to add a touch of beauty and elegance to their projects. One of the most beloved flower patterns is the knitted lily. This delicate and intricate pattern captures the essence of a real lily, making it the perfect addition to any knitting project. Whether you’re making a decorative pillow, a scarf, or even a sweater, the knitted lily will add a touch of sophistication and charm.
The knitted lily pattern requires intermediate knitting skills, as it involves various techniques such as lace knitting and increasing/decreasing stitches. However, with practice and patience, anyone can master this stunning flower pattern. The end result will be a gorgeous lily with flowing petals and a detailed center, creating a visually captivating piece.
There are countless variations of the knitted lily pattern, allowing you to customize your flower to your own preferences. You can experiment with different yarn colors, sizes, and even mix and match various knitting stitches to create a unique lily that suits your style. The possibilities are endless, making the knitted lily pattern a versatile choice for both beginner and experienced knitters.
Knitted Lily Pattern
The knitted lily pattern is a beautiful and intricate design that can be used to create stunning pieces of knitwear. This pattern is perfect for those who have intermediate to advanced knitting skills, as it involves complex stitches and techniques.
To create the knitted lily pattern, you will need to have a basic understanding of knitting terminology and techniques, such as casting on, knitting, purling, and decreasing stitches. You will also need to be comfortable working with multiple colors of yarn and changing colors within a row.
Materials:
- Worsted weight yarn in two contrasting colors
- Knitting needles in a size appropriate for your chosen yarn
- Tapestry needle for weaving in ends
Instructions:
- Begin by casting on the desired number of stitches in your main color.
- Work several rows in garter stitch (knit every row) to create a border.
- Begin the lily pattern by following the chart or written instructions. This pattern typically involves a combination of knit, purl, and slip stitches to create the lily petals.
- Continue working the pattern in your main color until you have completed the desired number of lilies.
- Switch to your contrasting color and begin working the background stitches. This typically involves alternating between knit and purl stitches to create a textured background.
- Continue working the background stitches until your piece is the desired length.
- Finish your work by binding off all stitches and weaving in any loose ends.
The knitted lily pattern is a versatile design that can be used to create a wide range of projects, such as scarves, shawls, and even blankets. With its intricate details and beautiful texture, this pattern is sure to impress anyone who sees your finished piece.
Materials Required for Knitted Lily Pattern
Knitting a lily pattern requires a few essential materials to get started. These materials will ensure that you have everything you need to create a beautiful knitted lily.
To begin, you will need a set of knitting needles. The size of the needles will depend on the desired finished size of your lily. Usually, a medium-sized set of knitting needles, around US size 7 or 8, is suitable for this project. However, you can adjust the size according to your preference.
- Yarn: Choose a yarn that is soft, lightweight, and easy to work with. Worsted weight yarn in a variety of colors is a popular choice for knitting lilies. You can select one color for the petals and another for the stem.
- Tapestry Needle: A tapestry needle with a large eye is essential for weaving in loose ends and finishing touches.
- Scissors: A pair of sharp scissors is necessary for cutting the yarn and trimming any excess.
- Stitch markers: Stitch markers are helpful for keeping track of stitches and marking specific sections of your knitting.
- Stuffing: If you plan to create a stuffed knitted lily, you will need some stuffing material. Polyester fiberfill is a common option for this purpose.
Once you have gathered all the necessary materials, you will be ready to start knitting your lily pattern. Make sure you have a comfortable and well-lit area to work in, and take your time to ensure neat and even stitches.
Basic Knitting Techniques for Knitted Lily Pattern

Knitting is a popular craft that allows you to create beautiful and intricate designs. One such design is the knitted lily pattern, which can be used to create decorative flowers for various purposes. To successfully knit the lily pattern, it is important to familiarize yourself with some basic knitting techniques.
1. Casting on
The first step in knitting the lily pattern is casting on. This is the process of creating the initial stitches on the knitting needles. There are several methods for casting on, but the long-tail cast-on method is commonly used for this pattern. It involves creating a slipknot and then looping the yarn around the needle in a specific way to create new stitches.
2. Knit and purl stitches
The knitted lily pattern incorporates both knit and purl stitches. Knit stitches are created by inserting the right needle into the front of the stitch on the left needle, wrapping the yarn around the right needle, and pulling it through the stitch. Purl stitches, on the other hand, are created by inserting the right needle into the front of the stitch on the left needle, but wrapping the yarn counter-clockwise around the right needle before pulling it through the stitch. These two basic stitches are essential for creating the textured petals of the knitted lily.
3. Decreasing and increasing
To shape the petals of the knitted lily, it is necessary to know how to decrease and increase stitches. Decreasing stitches is done by knitting two stitches together or purling two stitches together, which results in a decrease in the number of stitches on the needle. Increasing stitches, on the other hand, can be done by knitting or purling into the same stitch twice, or by creating a yarn over. These techniques allow you to create the desired shape and size for the petals of the knitted lily pattern.
4. Finishing techniques
Once you have completed knitting the lily pattern, it is important to know how to properly finish your project. This involves binding off, which is the process of securing the last row of stitches and preventing them from unraveling. There are various methods for binding off, but the basic process involves knitting or purling two stitches, and then passing the first stitch over the second stitch and off the needle. This is repeated until only one stitch remains, which is then cut and woven into the back of the work to secure it.
By familiarizing yourself with these basic knitting techniques, you will be well-equipped to tackle the knitted lily pattern and create beautiful and realistic knitted flowers. With time and practice, you can master these techniques and create stunning pieces of knitted art.
Casting On Stitches for Knitted Lily Pattern
The knitted lily pattern is a beautiful design that can be used to create various knitted items such as scarves, shawls, or even blankets. To begin working on this pattern, you will need to cast on a certain number of stitches. The specific number of stitches will depend on the size of the item you are creating and the desired width of the lily pattern.
To start casting on stitches for the knitted lily pattern, you will need a pair of knitting needles and your chosen yarn. It is important to choose a yarn that is suitable for the project, ensuring that it is the right weight and thickness for your desired outcome. Once you have your materials ready, you can begin the casting on process.
1. Determine the number of stitches: Before casting on, decide how many stitches you want to have in each lily repeat. This will depend on the complexity of the pattern and the desired width of your finished item. It is recommended to start with a small number of stitches for a practice swatch to familiarize yourself with the pattern.
2. Make a slipknot: To start casting on, make a slipknot by forming a loop with the yarn and pulling the end through the loop. Tighten the loop, leaving a small tail of yarn.
3. Insert the needle: Insert one of the knitting needles into the slipknot loop and hold it in your right hand.
4. Create the first stitch: With your left hand, take the tail end of the yarn (not the working yarn) and wrap it around your left thumb, then insert the needle under the yarn loop on your thumb and bring it up through the loop.
5. Continue casting on: Repeat step 4 to create additional stitches. Each time you bring the needle up through the loop, slip the new stitch onto the left-hand needle. Keep casting on stitches until you have reached the desired number for your lily pattern.
By following these steps, you can successfully cast on stitches for the knitted lily pattern. Once you have cast on all the required stitches, you can begin knitting the rest of the pattern to create a beautiful lily design.
Knitting the Lily Petals
When knitting lily petals, it is important to choose the right yarn and needles to achieve the desired texture and shape. A lightweight yarn, such as fingering or sport weight, works well for creating delicate and realistic petals. To emphasize the texture and definition of the petals, using a needle one or two sizes smaller than what is recommended for the yarn can be beneficial. This will result in a tighter gauge and more defined stitches, which will enhance the overall appearance of the petals.
The lily petals can be knit using a variety of stitch patterns, depending on the desired look. A simple garter stitch or stockinette stitch can create smooth and even petals, while lace or cable patterns can add intricate and decorative details. Starting with a smaller number of stitches and gradually increasing can help achieve the tapered shape of a lily petal. Knitting each petal individually and then sewing them together can also allow for more precise shaping and customization.
Stitch pattern:
- Cast on the desired number of stitches. For example, 10 stitches.
- Row 1: Knit all stitches.
- Row 2: Purl all stitches.
- Repeat Rows 1 and 2 until the desired length is achieved.
- Bind off all stitches.
Shaping the petal:
- Start with a small number of stitches, such as 3 or 5.
- Increase one stitch at each end of the row by knitting front and back (kfb) or making a yarn over (yo).
- Continue increasing every 2nd or 4th row until reaching the widest part of the petal.
- Decrease one stitch at each end of the row by knitting two stitches together (k2tog) or slipping a stitch knitwise, knitting the next stitch, and passing the slipped stitch over (skp).
- Continue decreasing every 2nd or 4th row until only a few stitches remain.
- Bind off the remaining stitches.
By following these guidelines and experimenting with different stitch patterns and shaping techniques, knitters can create beautiful and realistic lily petals to incorporate into various knitting projects, such as floral decorations, accessories, or even garments.
Shaping the Lily Center
The center of a knitted lily is an important part of the pattern, as it creates the shape and brings the flower to life. To shape the center, we begin by casting on a certain number of stitches using the long-tail cast-on method. This will determine the size of the center and will allow us to create the desired number of petals later on.
Once the stitches are cast on, we can start working the rows that will shape the center of the lily. Typically, this involves a combination of knit and purl stitches to create texture and depth. By working increases and decreases strategically, we can shape the center to have a rounded, convex shape.
- Increasing stitches: To create the round shape, we often need to increase stitches in the center. This can be done by knitting into the front and back of a stitch, or by using other increasing techniques such as yarn overs.
- Decreasing stitches: To create a more defined center and give the petals room to bloom, we need to decrease stitches towards the outer edges. This can be done using techniques like knit two together or slip slip knit.
By combining these techniques and working the rows according to the pattern instructions, we can shape the center of the knitted lily to resemble the natural curves and contours of a real flower. The shaping process is often repeated over several rows until the desired shape is achieved.
Once the center is shaped, it serves as the foundation for the rest of the lily pattern. From here, we can move on to knitting the petals, adding details, and finishing off the flower. The shaping of the center is essential in creating a realistic and visually appealing knitted lily.
Joining the Petals and Center
When knitting a lily flower, joining the petals and center is an important step in creating a realistic and cohesive final result. This is where the individual components come together to form the complete flower.
To join the petals and center, start by placing the petals around the center, making sure they are evenly spaced and facing outward. Use a tapestry needle and yarn to sew the petals onto the center, securing them in place. Make small stitches, going through both the petal and the center, to create a strong and stable bond.
Stitching Technique
- Begin by threading the tapestry needle with a length of yarn that matches the color of the petals.
- Insert the needle through the base of a petal from the back to the front, leaving a small tail of yarn at the back.
- Insert the needle through the center of the flower, going through both layers of the petal and the center.
- Bring the needle back up through the center and the petal, close to the point where you started.
- Repeat this stitching technique for each petal, working your way around the center of the flower.
- Once all the petals are sewn onto the center, make a few extra stitches to secure the yarn and create a neat finish.
By carefully joining the petals and center, you will create a beautiful knitted lily flower that can be used as a decorative element in various projects, such as hats, scarves, or even as a standalone piece. This step is crucial to ensure that the petals stay in place and give the flower its recognizable shape.
Adding Stem and Leaves to the Knitted Lily
Once you have completed knitting the petals of your lily, you can add a stem and leaves to make it look more realistic. Adding these details will bring your knitted lily to life and make it more visually appealing.
To create the stem, you will need a separate set of knitting needles and green yarn. Start by casting on the desired number of stitches for your desired stem length. You can use straight knitting needles or a circular needle depending on your preference. Knit in the stockinette stitch until the stem reaches your desired length. You can also add some texture to the stem by knitting in a ribbed or twisted stitch pattern.
Once you have completed the stem, it’s time to add the leaves. To make the leaves, you will need green yarn and double-pointed knitting needles. Start by casting on a small number of stitches for the leaf base. Then, you will work short rows to shape the leaf. Knit a few rows in garter stitch, then decrease on one side to create a diagonal shape. Continue knitting in this manner, decreasing on one side until you reach the tip of the leaf. You can also add some texture to the leaf by utilizing different stitch patterns such as lace or cable.
Once you have completed knitting the stem and leaves, it’s time to attach them to your knitted lily. Use a tapestry needle and matching yarn to sew the stem to the base of the lily. Make sure to secure it tightly to ensure it doesn’t come loose. For the leaves, position them along the stem and sew them in place. You can arrange the leaves in a natural-looking pattern by varying their placement and angles.
Adding a stem and leaves to your knitted lily will give it a more realistic appearance and make it stand out as a beautiful handmade piece. Don’t be afraid to experiment with different stitch patterns and leaf shapes to create a unique and personalized design.
Finishing Touches for the Knitted Lily Pattern
Once you have completed knitting the lily pattern, it’s time to add the finishing touches to make it truly special. There are a few steps you can take to enhance the overall look and quality of your knitted lily.
Blocking:
One of the most important steps in finishing your knitted lily is blocking. Blocking helps to even out the stitches and give your lily a more professional finish. To block your knitted lily, you can use blocking mats or towels and some rust-proof pins. Gently stretch the lily into shape and pin it down with the pins. Leave it to dry completely before removing the pins. This will give your lily a smooth and polished appearance.
Embroidery:

To add some extra flair to your knitted lily, you can consider embroidery. Use a contrasting colored yarn or embroidery thread to create intricate designs or add details to the petals of your lily. You can embroider stitches like French knots, lazy daisies, or satin stitches to create a stunning visual effect. Embroidery adds texture and depth to the flower, making it more visually appealing.
Finishing off:
When you have completed blocking and embroidery, it’s important to finish off your lily properly. This means weaving in any loose ends of yarn and securing them to prevent unravelling. You can use a tapestry needle to weave the ends back into the knitted fabric, making sure they are secure and hidden. Additionally, you may want to attach a stem to your knitted lily to give it a more realistic look. This can be done using wire or floral tape to create a sturdy stem.
By following these finishing touches, you can elevate your knitted lily from a simple project to a stunning piece of artwork. Take your time and pay attention to detail to create a final product that you can be proud of.
Variation Ideas for Knitted Lily Pattern
Once you have mastered the basic knitted lily pattern, there are endless possibilities for variations and customizations. Here are some ideas to inspire your creativity:
1. Multi-colored lilies
Add more life to your knitted lilies by using multiple colors. You can create beautiful gradient effects by changing colors gradually or make each petal a different color for a more vibrant look.
2. Embellishments
Give your lilies an extra touch of elegance by adding embellishments. You can attach small beads or sequins to the center of each flower or embroider delicate stitches on the petals for a more intricate design.
3. Different yarn weights
Experiment with different yarn weights to create lilies of various sizes. Thicker yarns will result in larger flowers, while thinner yarns will produce more delicate and dainty blooms.
4. Alternative stitch patterns
Try incorporating different stitch patterns into your lily design. You can use lace patterns for a more intricate and delicate look or experiment with cables to add texture and depth to the petals.
5. Make a bouquet
Instead of knitting single lilies, why not knit a whole bouquet? Create multiple lilies and attach them to stems or arrange them in a vase for a beautiful and long-lasting floral arrangement.
Summary
The knitted lily pattern is a versatile design that can be customized in countless ways. Whether you choose to play with colors, add embellishments, experiment with different yarn weights, incorporate alternative stitch patterns, or create a bouquet, the possibilities for creativity are endless. Have fun exploring different variations and make each knitted lily uniquely your own!