
Knitted bikinis have become a popular trend among fashion enthusiasts in recent years. Not only are they stylish and unique, but they also allow you to showcase your knitting skills in a whole new way. If you’re looking to try out a new knitting project and increase your summer wardrobe, a knitted bikini may be just what you need.
Creating your own knitted bikini is a fun and rewarding experience. You have the freedom to choose your own colors, patterns, and style, making it truly personalized. Whether you prefer a simple and classic design or something more intricate and eye-catching, there is a knitted bikini pattern out there for everyone.
Knitted bikinis are also practical and versatile. They are comfortable to wear and dry quickly, making them perfect for a day at the beach or lounging by the pool. They also provide more coverage than traditional swimsuits, making them a great option for those who prefer a bit more modesty.
In this article, we will explore various knitted bikini patterns, from basic beginner designs to more advanced patterns. We will also share tips and tricks for knitting with different types of yarn and adjusting the pattern to fit your body shape. So, grab your knitting needles and get ready to dive into the world of knitted bikinis!
Knitted Bikini Pattern: A Step-by-Step Guide to Creating Your Own Stylish Swimwear
Summer is here, and it’s time to hit the beach or the pool! If you’re looking to stand out in a crowd and express your creativity, why not try making your very own knitted bikini? With this step-by-step guide, you’ll learn how to create a stylish and unique swimwear that fits you perfectly.
First, gather all the materials you’ll need for this project. You’ll need a set of knitting needles, preferably in a size suitable for the yarn you choose. Speaking of yarn, opt for a soft and stretchy yarn that is suitable for swimwear. Avoid using wool as it tends to absorb water and may lose its shape. Instead, consider using a cotton blend or a synthetic yarn that dries quickly and retains its elasticity.
Step 1: Take Measurements and Create a Swatch
Before you begin knitting, it’s important to take accurate measurements to ensure the best fit. Measure your bust, underbust, waist, and hips to determine the size you’ll need to knit. Next, create a swatch using the chosen yarn and needles. This will help you gauge the number of stitches and rows needed to achieve the desired size and gauge for your bikini.
Step 2: Cast On and Knit the Top
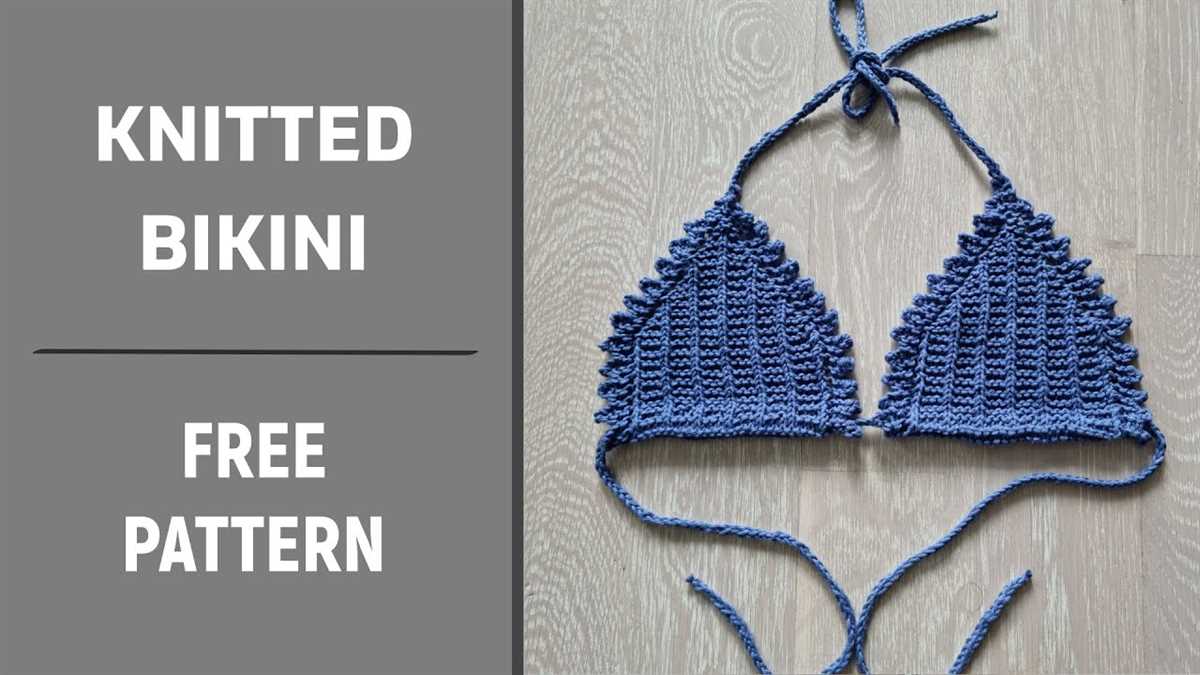
Once you have your measurements and swatch, it’s time to cast on and start knitting the top of your bikini. Follow the pattern instructions for your chosen design, whether it’s a triangle bikini top or a bandeau style. Pay attention to shaping and any increases or decreases that may be required to achieve the desired fit. Don’t forget to try it on as you go to ensure a perfect fit!
Step 3: Knit the Bottom
After completing the top, it’s time to move on to knitting the bottom part of your bikini. Whether you prefer a classic bikini brief or a more cheeky style, follow the pattern instructions to shape and create the desired fit. Make sure to try it on and make any necessary adjustments as you go.
Step 4: Finishing Touches
Once the top and bottom parts of your bikini are complete, it’s time for the finishing touches. This may include adding straps, closures, or any other details you desire. Remember to weave in any loose ends and block your bikini to ensure it maintains its shape after washing.
Now that you have your very own knitted bikini, you’re ready to hit the water in style. Enjoy the compliments and the satisfaction of wearing something truly unique that you’ve created with your own hands!
Choosing the Right Yarn and Needles for Your Knitted Bikini Project
When embarking on a knitted bikini project, one of the most important considerations is choosing the right yarn and needles. The choices you make in this regard can have a big impact on the final look and feel of your bikini, as well as its durability and comfort. By taking the time to carefully select your materials, you can ensure that your finished bikini is both beautiful and functional.
Yarn Choice: When choosing yarn for your knitted bikini, it is important to look for a material that is both soft and durable. Cotton yarn is a popular choice for bikinis, as it is breathable and comfortable against the skin. Look for a yarn that has a smooth texture and good stitch definition, as this will help to create a polished and professional-looking finished product. Additionally, consider the color of the yarn and how it will look against your skin tone. Opt for a shade that complements your complexion and makes you feel confident.
Needle Selection: The type of needles you use can also make a difference in the outcome of your knitted bikini. Circular needles are often recommended for bikini projects, as they allow you to easily work in the round. Additionally, using a smaller needle size than what is typically recommended for your chosen yarn can create a tighter and more secure fabric. This can be especially important for a bikini, as you want the finished garment to stay in place and maintain its shape, even when wet.
Considerations for Swimwear: When knitting a bikini, it is important to consider the special requirements of swimwear. Look for a yarn that is labeled as suitable for swimwear, as these often have properties such as increased elasticity and resistance to fading and stretching. Additionally, think about the construction of your bikini and choose needles that will help you achieve the desired level of support and coverage. For example, using smaller needles for the straps and edging can create a firmer and more secure fit.
In conclusion, choosing the right yarn and needles for your knitted bikini project is essential for achieving a beautiful and functional finished garment. Make sure to select a soft and durable yarn that compliments your complexion, and consider using circular needles for easy working in the round. Don’t forget to factor in the requirements of swimwear and choose materials that offer increased elasticity and resistance to fading and stretching. By taking these considerations into account, you can create a stunning and long-lasting knitted bikini that you will love to wear.
Understanding the Basic Stitches and Techniques Needed for Knitting a Bikini
Knitting a bikini might seem like a daunting task, but with a basic understanding of the stitches and techniques involved, it can be a fun and rewarding project. Whether you’re a beginner or an experienced knitter, mastering these fundamental skills will pave the way for creating a beautiful and comfortable knitted bikini.
Knit and purl stitches: The foundation of knitting, these two stitches are used to create various patterns and textures. The knit stitch is formed by inserting the needle into the loop from the left to the right, pulling the yarn through, and sliding the stitch off the needle. The purl stitch is the opposite, with the needle inserted from right to left and the yarn brought through from the back to the front.
Increasing and decreasing: To shape the bikini, you’ll need to master the art of increasing and decreasing stitches. Increasing is done by adding an extra stitch, often referred to as a yarn over, which creates a small hole in the fabric. Decreasing, on the other hand, involves knitting two stitches together or slipping stitches to achieve the desired shape.
Casting on and binding off: These techniques are used at the beginning and end of your knitting project. Casting on creates the initial row of stitches, while binding off closes the final row and secures the fabric. There are various methods for casting on and binding off, such as the long-tail cast on and the standard bind off, so choose the ones that work best for your project.
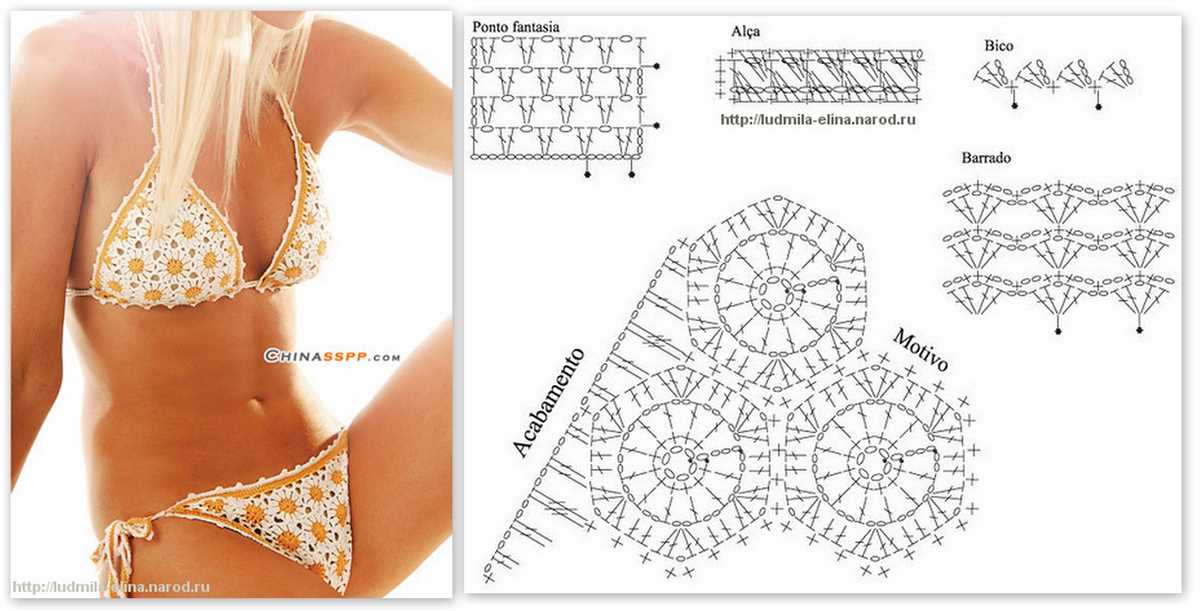
Following a pattern: While you can certainly improvise and create your own bikini design, following a pattern can provide guidelines and inspiration. Knitted bikini patterns are available in books, magazines, and online resources, and they often include step-by-step instructions along with stitch charts or diagrams. Make sure to read and understand the pattern before starting, and feel free to customize it to suit your preferences.
Choosing the right yarn and needle size: To ensure that your knitted bikini turns out well, it’s important to select the appropriate yarn and needle size. Consider using a cotton or bamboo blend yarn that is soft, breathable, and suitable for swimwear. Additionally, choose a needle size that gives you the correct gauge or tension as specified in the pattern to achieve the desired fit and drape.
Blocking and finishing: Once you’ve finished knitting your bikini, it’s time to give it a professional touch. Blocking involves gently washing and shaping the finished piece to help it relax and take on its intended shape. This step can greatly improve the overall appearance and fit of your bikini. After blocking, finish off any loose ends and add any necessary closures or straps to complete the garment.
Getting Started: Casting on and Creating the Foundation for Your Bikini Top
Before you can start knitting your bikini top, it’s important to cast on and create the foundation for your project. This is the first step in the knitting process and will determine the size and shape of your bikini top. Here’s a step-by-step guide to help you get started.
Casting On
To begin, you’ll need to cast on stitches onto your knitting needles. The number of stitches you cast on will depend on the size of your bikini top and the gauge of your yarn. Make sure to check the pattern or gauge swatch for the recommended number of stitches. You can use a basic cast on method, such as the long-tail cast on, or any other method you prefer.
Hold one knitting needle in your right hand and the other in your left hand. Leave a long tail of yarn (about 6-8 inches) and make a slipknot. Slide the slipknot onto the needle in your right hand and tighten it. Now, using your left hand, hold the needle underneath the slipknot and wrap the yarn around the needle from back to front. Insert the needle into the loop on your right hand needle and slip the new loop onto your right-hand needle. Repeat this process until you have the required number of stitches for your pattern.
Creating the Foundation
Once you have cast on the desired number of stitches, it’s time to create the foundation for your bikini top. This is where you will establish the shape and size of the cups. You can use a combination of knit and purl stitches or any other stitch pattern that you prefer.
Follow the pattern instructions for shaping the cups, which will involve increasing or decreasing stitches to create the desired shape. You may also need to knit certain sections in ribbing or other stitch patterns to create texture or structure. Make sure to keep track of your stitch count and row count as you work to ensure that your bikini top turns out the right size.
Continue working in the specified stitch pattern until the foundation for your bikini top is complete. This may involve working a set number of rows or reaching a certain measurement. Once you have finished creating the foundation, you can move on to the next steps in the pattern, such as adding straps or detailing.
Knitting the Cups: Shaping and Increasing for a Perfect Fit
When knitting a bikini, one of the most important aspects to consider is achieving a perfect fit for the cups. This involves shaping and increasing the stitches in order to create the desired shape and size. By carefully following a pattern and making the necessary adjustments, you can create a customized bikini top that fits you perfectly.
To start knitting the cups, you will typically begin with a certain number of stitches. It’s important to keep track of your stitches and markers, as these will help guide you in the shaping process. You’ll often start by knitting in the round and creating a base for the cups.
Shaping the Cups:

Shaping the cups involves increasing and decreasing stitches to create the desired shape and contour. This is usually done by using various knitting techniques such as yarn overs, knit two together (k2tog), and slip slip knit (ssk). These techniques create the necessary increases or decreases to achieve the desired cup shape.
When shaping the cups, it’s important to refer to the pattern instructions and follow the recommended stitch count and measurements. This will help ensure that your cups turn out the right size and shape. Additionally, trying on the bikini top as you go can help you make any necessary adjustments for the perfect fit.
Increasing for a Perfect Fit:
Increasing stitches in the cups is crucial for achieving the perfect fit. This is typically done by adding increases at regular intervals, which helps expand the cups and accommodate the bust. You can increase stitches by using techniques like yarn overs or knitting into the front and back (kfb) of a stitch.
When increasing stitches, it’s important to consider the size of the increase and how it will affect the overall shape of the cups. You may need to make multiple increases on each side of the cups to ensure a balanced and symmetrical shape. Testing and trying on the bikini top as you go can help you make any necessary adjustments to achieve the perfect fit for your unique body shape.
Creating the Straps: Customizing Length and Design
When knitting a bikini, the straps play a crucial role in providing support and ensuring a comfortable fit. As each person’s body is unique, it is important to customize the length and design of the straps to meet individual preferences and measurements. By doing so, you can create a bikini that not only looks great but also feels great to wear.
Adjusting the length: To begin, measure the distance from the top of the bikini cups to the desired point on your back where the straps should be attached. This will serve as the base measurement for the strap length. Keep in mind that shorter straps typically provide more support, while longer straps can offer a more relaxed fit. Once you have determined the desired length, you can then begin knitting the straps to match this measurement.
Choosing the design: The design of the straps can also be customized to suit your personal style and preferences. You may opt for simple, straight straps for a classic look, or experiment with more intricate patterns such as cables or lace for added visual interest. Additionally, the width of the straps can be adjusted to suit your comfort level. Narrow straps offer a delicate and feminine look, while wider straps provide more coverage and stability.
When knitting the straps, it is important to ensure that they are both strong and flexible. Using a durable and stretchy yarn, such as cotton or a blend of natural fibers, can help achieve this balance. Adding a touch of elasticity to the straps through the use of ribbing or a stretch stitch pattern can also enhance their flexibility.
Overall, by customizing the length and design of the straps, you can create a knitted bikini that is tailored to your unique body shape and style preferences. Whether you prefer shorter, more supportive straps or longer, relaxed ones, the possibilities are endless. Experiment with different patterns and yarns to find the perfect combination that will make you feel confident and comfortable in your handmade bikini.
Adding a Pretty Pattern or Texture to Your Bikini Bottom
When it comes to choosing a bikini, the bottom is just as important as the top. While solid colors can be classic and timeless, adding a pretty pattern or texture to your bikini bottom can take your swimwear to the next level. Whether you prefer florals, stripes, geometric designs, or something more unique, there are endless options to choose from.
One popular option for adding a pattern or texture to your bikini bottom is through knitted techniques. Knitting allows for intricate designs and can create a textured look that adds visual interest to your swimwear. From simple lace patterns to more complex cable stitches, knitted bikini bottoms offer a unique and stylish option for those who want to stand out on the beach.
If you’re looking for a feminine and delicate touch, consider a bikini bottom with a floral pattern. Floral designs can be achieved through knitting techniques such as lace or colorwork. Choose soft pastel shades for a subtle and romantic look, or go bold with vibrant colors for a more eye-catching effect.
If you prefer a more modern and sleek look, opt for a bikini bottom with a geometric pattern. Geometric designs can be created through colorwork or by using textured stitches like ribbing or chevron. Choose contrasting colors to make a bold statement, or stick to monochromatic shades for a chic and sophisticated look.
If you want to add a bohemian touch to your swimwear, consider a bikini bottom with a chevron or chevron-inspired pattern. Chevron patterns are created by alternating v-shaped stitches, and they can give your bikini bottom a fun and free-spirited vibe. Choose earthy tones or bold, tribal-inspired colors to embrace the boho trend.
For a playful and youthful look, consider a bikini bottom with stripes. Striped patterns can be achieved through colorwork or by using different stitch techniques. Choose bright and vibrant colors for a fun and energetic look, or go with classic black and white for a timeless appeal.
Whatever pattern or texture you choose for your bikini bottom, make sure it complements your body shape and personal style. Consider the placement of the pattern, the size of the design, and the overall visual impact it will have. With the right pattern or texture, your bikini bottom can become a statement piece that showcases your unique personality and sense of style.
Knitting the Waistband: Ensuring a Comfortable and Secure Fit
When knitting a bikini, one of the most important elements to consider is the waistband. The waistband not only provides a secure fit but also contributes to the overall comfort of the garment. To ensure a perfect fit, it is essential to carefully choose the appropriate yarn, gauge, and stitch pattern for the waistband.
Choosing the right yarn: To create a waistband that is comfortable and secure, it is recommended to select a yarn that has some stretch to it. This will allow the bikini to hug the body without feeling too tight or restrictive. Look for yarns that contain a blend of natural fibers and elastic materials, such as cotton with a touch of spandex or nylon.
Determining the gauge: Gauge is crucial when creating a waistband that fits properly. It is best to follow the pattern’s recommended gauge, as this ensures that the waistband will be the right size. Using a different gauge may result in a waistband that is either too loose or too tight. To check gauge, knit a test swatch and measure it against the pattern’s instructions.
Creating the waistband stitch pattern:
Ribbing: Ribbing is a popular stitch pattern for waistbands as it provides elasticity and helps the garment maintain its shape. Common ribbing patterns include the classic 1×1 rib (alternating knit and purl stitches) or the 2×2 rib (alternating two knit stitches with two purl stitches). These ribbing patterns create a stretchy and flexible waistband that is comfortable to wear.
Elastic thread: For additional support and security, some knitters like to incorporate elastic thread into the waistband. This can be done by holding the elastic thread together with the main yarn while knitting. The elastic thread adds extra stretch and ensures that the waistband stays in place, even during movement.
Adjustment options: If you want to customize the fit of the waistband, consider incorporating adjustable elements. For example, you can add a drawstring or a set of buttons and buttonholes to allow for easy tightening or loosening of the waistband. These options give the wearer more control over the fit and can be helpful for those who prefer a more personalized experience.
In conclusion, the waistband of a knitted bikini plays a vital role in both comfort and fit. By choosing the right yarn, determining the correct gauge, and selecting a suitable stitch pattern, you can create a waistband that is not only secure but also ensures a comfortable and enjoyable wearing experience.
Incorporating Decorative Details: Ribbons, Buttons, and More
When it comes to knitting a bikini, incorporating decorative details can add a touch of uniqueness and style to your creation. Ribbons, buttons, and other embellishments can be used to elevate the overall design and make it stand out.
One way to incorporate decorative details is by adding ribbons. You can use ribbons of different colors and widths to create interesting patterns and designs. For example, you can weave ribbons through the knitted fabric to create a lattice-like effect or add a pop of color by attaching ribbons along the edges of the bikini top or bottom. The choice of ribbon material, such as satin or grosgrain, can also contribute to the overall aesthetic of the bikini.
Buttons can also be used as decorative accents on a knitted bikini. Whether they are functional or purely decorative, buttons can add a charming touch to your design. You can choose buttons of various shapes, sizes, and colors to personalize your bikini. For instance, you can sew buttons in a row down the center of the bikini top or use them as fastenings for the straps or closures. Consider using buttons made from natural materials, like wood or shell, for a more rustic or beachy vibe.
In addition to ribbons and buttons, other embellishments can be incorporated into a knitted bikini. Think outside the box and explore options like beads, shells, or sequins. These small details can be added strategically to areas of the bikini, such as the edges, straps, or as accents in patterns. However, keep in mind that these embellishments should be carefully sewn on to ensure they withstand wear and tear during use.
When incorporating decorative details into your knitted bikini, consider your personal style and the overall theme you want to achieve. Experiment with different materials and placement to create a unique and eye-catching design that reflects your creativity and fashion sensibilities. Whether you choose ribbons, buttons, or other embellishments, these decorative details are sure to make your knitted bikini truly one-of-a-kind.
Joining the Bikini Pieces Together: Seaming Techniques for a Professional Finish
When it comes to knitting a bikini, one of the most important steps is joining the pieces together to create a finished garment. The way you seam your bikini can make a big difference in the final look and fit. Here are some seaming techniques to help you achieve a professional finish.
1. Mattress Stitch
The mattress stitch is a popular seaming technique that creates an invisible seam. To use this technique, you’ll need to have the right sides of the pieces facing up and align the edges to be seamed. Insert the needle under the first horizontal bar on one piece, then under the corresponding bar on the other piece. Continue to sew in this manner, making sure to keep the tension even. This stitch creates a neat and flat seam that seamlessly joins the pieces together.
2. Slip Stitch Seaming
Another technique that can give your bikini a professional finish is slip stitch seaming. This method creates a decorative edge while joining the pieces. To use slip stitch seaming, you’ll need to have the wrong sides of the pieces facing each other. Insert the needle through both layers, then bring it back up and insert it into the next stitch on the opposite piece. Repeat this process, working your way across the seam. Slip stitch seaming creates a textured seam that adds an extra touch of style to your bikini.
Remember to use a yarn that matches your bikini for seaming, as this will help the seam blend in seamlessly. It’s also important to take your time and be patient while seaming, as this step can greatly affect the overall look and fit of your bikini. With these seaming techniques, you’ll be able to join the pieces of your knitted bikini together with a professional finish.
Adding Lining and Padding for Comfort and Modesty
When it comes to knitted bikinis, comfort and modesty are important considerations. Adding a lining and padding to your knitted bikini can help achieve both of these factors. Whether you’re planning to wear your bikini for a day at the beach or lounging by the pool, having an extra layer of fabric can provide added comfort and coverage.
Lining: One option for adding a lining to your knitted bikini is to sew a separate fabric lining to the inside of the bikini. This lining can be made from a variety of materials, such as swimsuit lining fabric or lightweight stretchy fabric. The lining can be sewn directly onto the knitted bikini, ensuring a secure fit and preventing any see-through issues. This extra layer of fabric can provide a smoother and more comfortable feel against the skin, eliminating any itchiness or irritation that may be caused by the knitted stitches.
Padding: If you prefer a bit more modesty or enhanced shape, adding padding to your knitted bikini can be a great option. There are various options for adding padding, such as removable foam cups or silicone inserts. These can be inserted into the lining of the bikini top to provide extra coverage and shaping. Padding can also help to prevent any awkward moments or unwanted exposure while swimming or participating in water activities.
If you’re unsure about how to add a lining or padding to your knitted bikini, there are plenty of tutorials and patterns available online that can guide you through the process. Adding these extra layers can take your knitted bikini to the next level, ensuring both comfort and modesty while still showcasing your handmade creation.
Finishing Touches: Blocking and Styling Your Knitted Bikini
After completing your knitted bikini, it’s time to give it a finishing touch to ensure it looks its best when you wear it. This involves blocking and styling the bikini to ensure it fits well and has a polished appearance.
Blocking: Blocking is an essential step in the knitting process that helps to shape and size your garment. For a knitted bikini, blocking is especially important as it ensures that the bikini maintains its shape and fits well. To block your bikini, start by soaking it in lukewarm water with a mild detergent. Gently squeeze out the excess water and lay it flat on a blocking mat or towel. Use pins to adjust the shape and size of the bikini, making sure it matches the desired measurements. Allow it to dry completely before removing the pins. Blocking will not only help to shape the bikini but also even out the stitches and enhance its drape.
Styling: Once your knitted bikini is blocked and dry, you can add some final touches to enhance its overall look. Consider adding straps or ties to create a customized fit. You can also add decorative elements such as beads or crocheted flowers to give your bikini a unique and personalized touch. Experiment with different styling options to find the look that suits your personal style and preferences. Remember to consider the functionality of the bikini while styling it, ensuring that any additions or embellishments do not compromise its wearability or comfort.
When blocking and styling your knitted bikini, it’s important to keep in mind that different yarns and stitch patterns may require different blocking techniques. Always refer to the specific instructions provided with the pattern or consult an experienced knitter for guidance. With the right finishing touches, your knitted bikini will look beautiful and be ready for a day at the beach or by the pool.
Care and Maintenance: Tips for Keeping Your Knitted Bikini in Great Condition
After spending time and effort creating your beautiful knitted bikini, it’s important to take proper care of it to ensure its longevity. Here are some tips for keeping your knitted bikini in great condition:
- Hand wash: Due to the delicate nature of knitted garments, it’s best to hand wash your bikini using cold water and a gentle detergent. Avoid using bleach or harsh chemicals as they can damage the fibers.
- Avoid wringing: Instead of wringing out the excess water from your bikini, gently press it against a towel to remove the moisture.
- Reshape and dry flat: After washing, reshape your bikini to its original form. Lay it flat on a clean towel or drying rack to dry. Avoid hanging it, as this can cause stretching and distortion.
- Store properly: When not in use, store your knitted bikini in a drawer or box with acid-free tissue paper to protect it from moisture, dust, and insects.
- Avoid excessive sun exposure: Prolonged exposure to sunlight can fade the colors of your bikini and weaken the fibers. If you’re wearing your bikini in the sun, try to limit the exposure and use a sunscreen to protect it.
- Handle with care: To prevent snags and tears, be gentle when putting on or taking off your knitted bikini. Avoid contact with sharp objects or rough surfaces.
- Address stains immediately: If you spill something on your bikini, quickly blot the stain with a clean cloth or paper towel. Avoid rubbing, as this can spread the stain. Use a mild stain remover if necessary and wash the affected area gently.
By following these care and maintenance tips, you can keep your knitted bikini looking beautiful and in great condition for many summers to come. Enjoy wearing your handmade creation with confidence and style!